Recent Discussions

Word Similarity Checker fails in desktop and web: “Something went wrong”
Hello, I am having an issue with Microsoft Word Similarity Checker. The Similarity Checker consistently fails with the message: “Something went wrong. Try again.” This happens in both: - Microsoft Word desktop - Word for the web / Microsoft 365 web version Product/account details: - Microsoft 365 subscription is active - Word shows activated under File > Account - Connected experiences are enabled - Word desktop version: Microsoft 365 Apps, Version 2606, Build 20131.20112 Click-to-Run Current Channel Troubleshooting already completed: 1. Confirmed Word is activated under File > Account. 2. Confirmed connected experiences are enabled: - Experiences that analyze your content: ON - Experiences that download online content: ON - All connected experiences: ON 3. Ran Office Update Now. 4. Restarted Windows. 5. Ran Quick Repair. 6. Ran Online Repair. 7. Tested in a brand-new blank Word document. 8. Tested on mobile hotspot instead of normal network. 9. Confirmed ProtonVPN was turned off. 10. Cleared Office Wef cache contents at: %LOCALAPPDATA%\Microsoft\Office\16.0\Wef\ 11. Checked Microsoft Edge WebView2 Runtime. The installer says it is already installed for the system. 12. Signed out of Word/Microsoft 365, restarted Windows, and signed back in. 13. Tested again in Word desktop. 14. Tested again in Word for the web. 15. The same “Something went wrong. Try again” Similarity Checker error still occurs. I also previously saw a script error when clicking Update License in Word: URL shown included: https://oc.officeapps.live.com/odc/v2.1/hrd Error: 'Hrd' is undefined Because the issue occurs in both desktop Word and Word for the web after these troubleshooting steps, this seems like a Microsoft 365/Word Similarity Checker service-side or account-side issue rather than a local installation problem. Can someone from Microsoft confirm whether there is a known issue with Similarity Checker right now, or whether this needs to be escalated as an account/service-side problem?5Views0likes1Comment
"Allow edit range" permission on Azure AD joined device
Hello. Many of our users use "Allow edit range" permission in excel. On domain joined devcies, users can search Windows AD to select the user to assign permission. However, on Azure AD joined devcies only local system is listed and thus permission cannot be assigned to a user. Has anyone faced this issue ad have found a resolution for this? How to use "Allow edit range" permission and select a user from Azure AD?2.1KViews1like7Comments
Are Microsoft partners using the Business Process Catalog? Looking for real-world adoption insights
Hi community, I'm curious to hear from Microsoft partners about your experience with the Business Process Catalog (BPC)- Microsoft's structured library of end-to-end business processes for D365 implementations. Specifically, I'd love to understand: Are you actively using the BPC in your D365 engagements? If yes, how and where does it fit into your delivery methodology? If not, what's holding adoption back — awareness, tooling, client readiness, or something else? We're seeing increasing attention on BPC as a foundation for structured implementation approaches, and I'm interested in how partners are (or aren't) integrating it into their practice. Would love to hear honest takes from the field. -Ellie34Views0likes2Commentsgenerate list
Good day! I have a file that has list of all names on one sheet. is there a way to generate on a different sheet list of names based on the first letter of the names? like in sheet1 would be all the names, sheet2 would be names starting in A-D, sheet3 names starting in E-J... TIA!25Views0likes3Comments
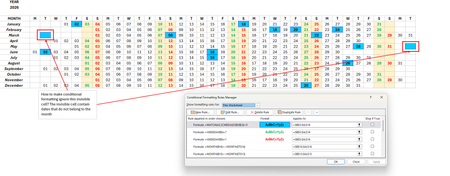
how to ignore conditional formatting for a cell that is not empty but invisible (cell format ;;;)
hi, i need help with a conditional formatting of cells that are not empty but invisible (cell format to ;;; (invisible)). I have a calendar where the dates are invisible (outside of the month) but the cell formatting applies to it (cuz it is that date, i.e., public holiday). i have attached the screenshots and i hope someone can help me out. thank you so much. regards, angel45Views0likes2Comments
Outlook Classic - Crashes When Drafting with Copilot in RDS environment
Hi all, I'm interested to see whether anyone else is experiencing this issue, particularly in an RDS environment. We have a number of users who have paid-for Microsoft 365 Copilot licences, including the integration within Office applications such as Outlook, Word and Excel. In Outlook Classic running on our Windows Server 2019 RDS environment, Copilot no longer works correctly. When a user presses Alt + I to Draft with Copilot, or clicks the Copilot pencil icon within the body of an email, and then enters a prompt, Copilot displays "Writing your email" and the blue progress bar starts moving from left to right. At that point it freezes, Outlook crashes, and closes. In some cases Outlook will automatically reopen after the crash. The Copilot integration appears to work fine in Excel and Word. Is anyone else running Outlook Classic in a Windows Server 2019 RDS environment with Microsoft 365 Copilot licences? I would be interested to know if you have experienced the same issue. I've tried repairing and reinstalling Office apps, and always ensure they are fully up to date. Thanks.250Views1like4CommentsAzure AD SSPR Password write back issue
Hi all, A company I work for have issues with the reset password function with AD Connect. In the SSPR audit logs in Azure AD, we face on 'Reset password (self-service)' the status reason 'OnPremisesAdminActionRequired', with a follow up event log within the AD connect server: event ID: 33004 with error "hr=80230626, message=The password could not be updated because the management agent credentials were denied access" I face this issue before and this was causing because the AD DS connector account did not have the right permissions. In this case this is not. What I have done so far: - Updated AD Connect from 2.0.89.0 to 2.0.91.0 - enforced TLS 1.2: https://docs.microsoft.com/en-us/azure/active-directory/hybrid/reference-connect-tls-enforcement - Checked AD DS connecter account 'MSOL_xxxxxxxx' permissions: https://docs.microsoft.com/en-us/azure/active-directory/authentication/troubleshoot-sspr-writeback#verify-that-azure-ad-connect-has-the-required-permissions - the user do not have the options 'password never expires' or 'user cannot change password' configured - Let AD connect talk to another DC dc02 instead of dc01 - Checked connection to SSPR service from DC's : Test-NetConnection -ComputerName ssprdedicatedsbprodscu.servicebus.windows.net -Port 443 - The action 'Change password (self-service)' are successful (via my account portal) , only action 'Reset password (self-service)' face this issue (via passwordreset.microsoftonline.com) -- both use the same OnPremisesAgent ->> AADConnect Have anyone a idea what else I can try more? Regards, RicardoSolved26KViews0likes13Comments
Stock Data Type - SPCX
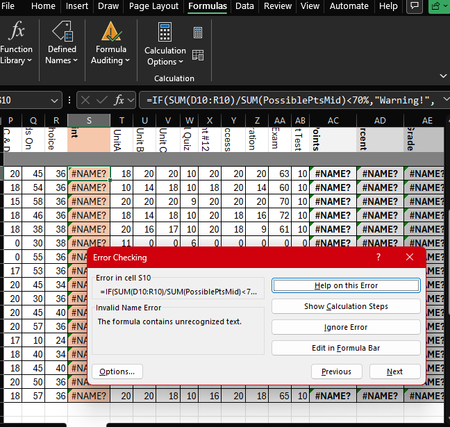
I have spreadsheet that pulls Stock data and it has been working fine. Bought some SPCX shares and added SPCX to the Stock cell. Selecting Stock Data Type does NOT find SPCX in the list of shares. This is on the deaktop app. I tried this wth Excel Online and SPCX is found and works fine? I have also made sure the Desktop apps are all up to date. Any potential fixes out there?Solved37Views0likes2CommentsOptimizing Microsoft 365 Licenses Using Behavior Data (E3/E1/F3)
Hi everyone, We are currently working on a Microsoft 365 license optimization initiative and would appreciate insights from the community and Microsoft experts. Our approach focuses on two main areas: (1) Revoking licenses for inactive users, and (2) Reviewing active users to ensure their assigned license (E3, E1, or F3) aligns with actual usage and collaboration needs. From a data perspective, we are leveraging Microsoft 365 usage signals such as Teams activity, Outlook email interactions, meetings, and SharePoint/OneDrive collaboration. While usage reports provide raw metrics, we are looking for guidance on how these signals should be interpreted and combined in a meaningful and fair way. Specifically, we would like to understand: (1) Which usage metrics best represent user collaboration behavior? (2) Are there any recommended thresholds or patterns that help distinguish light, standard, and heavy collaboration users to map E3, E1, or F3? Any best practices, references, or real-world experiences would be greatly appreciated. I'm sorry if this is the wrong forums to ask for. Thanks in advance for sharing your insights.322Views0likes2CommentsGoogle Workspace sender stuck at SCL=5 to all Microsoft-hosted recipients
Sending email from a new domain via Google Workspace. All mail to Microsoft-hosted recipients (both Outlook.com consumer accounts and Microsoft 365 Exchange Online tenants) is being routed to junk. Authentication passes perfectly on every message. This appears to be a domain reputation cold-start issue and I am looking for guidance on how to resolve it without waiting 2-4 weeks. Affected recipients are all Microsoft-hosted recipients tested (Outlook.com consumer + Microsoft 365 Exchange Online tenants). Please help me!!! Confirmed via X-MS-Exchange-Organization-SCL: 5 and delivery header dest:J;OFR:SpamFilterAuthJ;RF:JunkEmail on all test emails including ones with normal subject lines and body text. Content makes zero difference to the score. What has already been done: SPF hardened from ~all to -all DMARC upgraded from p=none to p=quarantine IP confirmed not listed on Microsoft's delist portal (sender.office.com) Domain confirmed not listed on Spamhaus DBL or SURBL Domain registered with Google Postmaster Tools JMRP enrollment attempted — not available to Google Workspace senders as SNDS requires IP ownership Outlook.com Postmaster support request submitted9Views0likes1Comment
User agent : ODMTADemand-Transform_Zip
Hello guys, I’m investigating a SharePoint/OneDrive alert and noticed the following user agent: """ODMTADemand-Transform_Zip""" I found information about OneDriveMpc-Transform_Zip/1.0 being related to ZIP downloads from SharePoint/OneDrive, but I can’t find anything specific about ODMTADemand-Transform_Zip. Does anyone know what this user agent is used for? Is it a legitimate Microsoft backend process, and is it related to ZIP generation/download operations in SharePoint or OneDrive?20Views0likes1CommentAdd-in Excel Labs
Da tempo sto utilizzando l'add-in Excel Labs, soprattutto nelle sua funzionalità base di "Advanced formula environment" particolarmente utile nella compilazione di formule LAMBDA che stanno avendo un così grande sviluppo in questi ultimi tempi. La facilità nella redazione e nel debug inline delle formule, i commenti e la gestione delle stesse in "Gestione Nomi" ne ha fatto per me e penso per molti uno strumento eccellente che ovviamente non può essere paragonato all'edito base di Excel. Rivolgo perciò un invito a considerare possibile la sua implementazione direttamente in Excel come strumento alternativo all'editor di base . Ritengo che tutti potranno giovarne.23Views0likes1Comment
Searching in a Microsoft List
How could a user restrict their search to a particular value in a particular field? Let's say I need to search for the value 'Williams' in the 'Company' field. I could enter "Williams" into the search bar, but the hits would include all items that contain the word "Williams" in any field. I want to restrict the search. How can one do that?739Views0likes3CommentsOneNote breaks if I move it onto an external display
Hi guys I use OneNote extensively for work as my virtual notepad. At most of my working locations, I use my laptop - Dell Latitude 7440 - connected to either a Dell Docking station + 2 monitors, or a pair of samsung monitors which have an inbuilt hub, connect via USB-C and are daisychained together. I've never had any issues with OneNote in the past, but recently have found that if I try and move my OneNote window onto either external monitor, it seems to break OneNote - the whole window becomes just the index list which is normally a column on the left (where it shows all your notebooks and pages) and it won't actually display any of the content from the notebooks/pages. If I try minimizing that column, it has a complete breakdown as if its unable to properly load the actual page content. The only way to fix this is to drag the window back to my laptop screen and then close it and reopen. Has anyone else experienced this? It's really frustrating and affecting my productivity as I often need it side-by-side with other screens.2KViews3likes6Comments- 5Views0likes0Comments
Best practices for Power Automate with service account
We had a colleague leave who had their work email address and account connected to MANY Power Automate flows, SharePoint, OneDrive, Forms, Excel, etc. We are looking to create a recommendation / best practices for a single account that will be used by the I.T. department for use in Power Automate, etc. We will have colleagues in the I.T. department have access to SharePoint sites (maybe a security issue? do we EACH get our OWN accounts then?) and Power Automate We'd have to have it setup as an email enabled account so we'd have to pay instead of a service account. Other thoughts?203KViews5likes40CommentsPlanning to Migrate OST Files to Microsoft 365 - Need Some Guidance Before I Start
Hey folks, I have a task coming up where I need to migrate OST files into Office 365 mailboxes. A few of the OST files I'm dealing with are orphaned or corrupted which is making me a bit nervous about the whole process. A couple of things I'm unsure about: How to handle OST files that are no longer linked to an active profile Whether corrupted OST files can still be migrated to Office 365 without major data loss Best way to verify data integrity after migration Haven't started yet and want to make sure I'm going in the right direction before I begin. Has anyone migrated corrupted or orphaned OST files to Office 365? What approach worked best for you?30Views1like2CommentsFreezing multiple rows
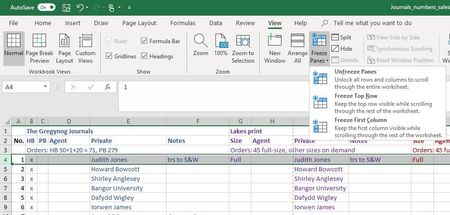
I just need to freeze the top 3 rows in a spreadsheet. Easy: select the 4th row, click 'Freeze Panes' and choose the 'Freeze rows' option. Except that the option isn't there - the only option offered is to freeze the top row. I am using Office 365, so my Excel is a current version. And I am working in Normal View. So I don't understand why I cannot freeze multiple rows any more!Solved565KViews4likes24CommentsIf formula
Dear Sirs …. Kindly need your help with below table to distinguish between + or - numbers in the result cell to take + value cell keep in mind the following If formula used in result cell ( if there is a better way , I am open ) :- =IF(SUM(O18:P18)>=0,SUM(O18:P18),IF(SUM(O18:P18)<=0,"0.000",(IF(SUM(O18:P18)<=0,O18+P18)))) looking forward to your help , thanks in advance Cell O18 Cell P18 Result cell 10.000 -214.730 0.000Solved7KViews0likes34Comments



Events
Recent Blogs
- 6 MIN READExplore what's new for Agent 365 in June 2026.Jul 08, 2026256Views0likes0Comments
- Unlock financial intelligence from Xero directly in Copilot.Jul 08, 2026237Views1like1Comment