How to add a custom property to a form comes up all the time. We’ve done some videos of this previously but here is a written walkthrough. In this example we’ll actually do a couple of tricky things:
1) We will extend the Problem class to add a Support Group property and bind that to the same enum/list hierarchy as that used by the Incident form.
2 We will add a List Picker control to the form and bind it to this new property we create.
Why are we doing this? Well, for some reason we put Support Group as an option on the Incident form but not on the Problem form. Some people have asked for that to be on the Problem form as well.
This is the discrepancy that I am talking about..
Incident form:

Problem form (no support group field):

OK – here we go step by step:
First, get the new version of the authoring tool which is currently Beta 2:
Service Manager 2010 Authoring Tool Beta 2 Released
1) Create a new MP (Fie –> New File –> Give your MP a name)
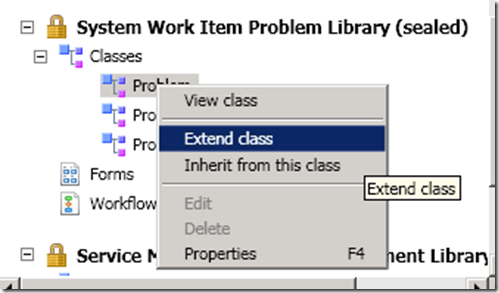
2) In the class browser search for ‘Problem’. If the class browser is not visible you can make it show up using View –>
3) Right click on it and choose View

4) When it comes up in the MP explorer, right click on the problem class and choose Extend class
5) In the class editor click New Property…

a. Provide a name for it like SupportGroup (no spaces or funky characters in internal names)

b. Click OK when it asks you which MP to store your customizations in
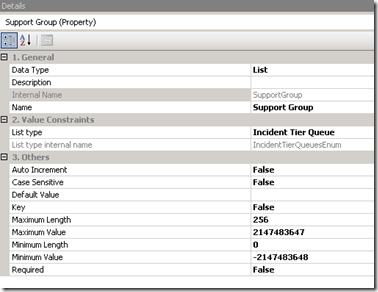
6) In the Details pane, change the display name to something like ‘Support Group’
7) Change the data type to List
8) Click the … button in the List Type property
9) Select the Incident Tier Queue list (that’s the Support Group list – somehow the names don’t sync up anymore)
Should look like this when you are done:
10) Save your MP.
11) Now go to the form browser and search for the Problem form. If the Form Browser is not showing you can make it show up by going to View –> Form Browser.
12) Right click on the form and choose ‘View’
13) Click the customize button

a. Click OK when it asks you which MP to store your customizations in
14) Drag a label and a List Picker control onto the form from the toolbox and position it where you want it. You can move the other controls around if need be.

15) In the Details pane:
Change the Content attribute of the label control to say something like ‘Support Group:’
Change the BindingPath attribute of the List Picker control to Problem / Support Group (or whatever you named it)
16) Save the MP
17) Import the MP
18) Close and reopen the console.
Now when you are editing problem records your form will look like this:
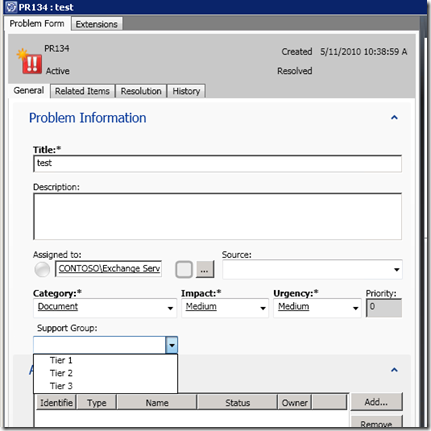
If you edit the Support Group list in the Library/Lists view it will change the values for both the Problem and the Incident forms.
Nice!
The Management Pack I generated to do this is attached.