[Today's post comes to us courtesy of Shawn Sullivan]
Networking has changed significantly in requirements, setup, and configuration on SBS 2008. This blog post introduces one of the major networking wizards and gives some insight on how setup handles networking.
The job of the CTIW is to detect a third party firewall device or ISA server and an existing DHCP server, while trying to gather information about the current network settings so it can properly configure the server to communicate with the Internet. This is only a small part of what the CEICW did in SBS 2003. Public domain name, certificate, and Exchange configuration are done using other wizards.
To first understand how the CTIW works, you must first be aware of the networking requirements of SBS 2008 and understand what steps are occurring during setup to configure the network connection of the server. Whether or not you need to run the CTIW depends directly on a successful networking configuration performed by setup.
SBS 2008 has been designed primarily to move existing peer to peer networks to an integrated server solution. In the typical peer to peer network, a hardware device is acting as the DHCP server and firewall for the local area network (LAN). SBS 2008 setup has been designed to automatically detect the presence of DHCP and the default gateway on the LAN, and then use this information to configure the server’s network settings. The goal is to connect the server to the Internet with as little user intervention as possible. If the automatic configuration of the network fails during setup, then it will be clearly marked in the Getting Started tasks in the Administrator Console. If it is successful, then the CTIW does not need to be run.
SBS 2008 must be installed with a single network interface card connected to the LAN, which is protected by either a 3 rd party firewall or an ISA server. The Premium SKU includes a second copy of Windows Server 2008 Standard to install on another machine. If you wish, you can install a second NIC and ISA on this machine and place it on the edge of your network.
**The SBSAnswerFile.xml is used to enter either Migration Mode or Advanced Mode during setup. In either case, you are manually entering the network settings of the server and automatic detection is skipped. **
Network detection during setup
During a clean install of SBS 2008 (no answer file), the following steps are occurring to determine current network settings:
- SBS setup will attempt to detect an existing DHCP service. If DHCP is properly configured, we will also find the router.
- If DHCP is detected, and we are not in a migration mode, SBS uses the DHCP network to obtain updates and skips the rest of the network configuration. We will use the DHCP assigned IP address as our static IP to get through DCPROMO. Afterwards, the CTIW will ask that you disable the existing DHCP service and enable it on SBS.
- If it doesn’t detect DHCP, it will attempt to detect the router primarily on 192.168.x.1 or 192.168.x.254. It will not automatically detect routers in 172.x.x.x or 10.x.x.x networks.
- If we do not detect a router, we will use a temporary static IP for the DCPROMO process. The CTIW will need to be run after setup completes
- If we detect a router and an internet connection, setup will complete the internet connection process and you will not have to run the CTIW.
Network Interface Cards
In the case of setup detecting multiple network interface cards (NICs), one of the following will occur:
- If 1 private and 1 public NIC is detected, the public NIC is disabled and the private is configured.
- If no private NICs are detected and one or more public NICs are, setup is blocked.
- If multiple private NICs are detected and no public NICs, then setup chooses the first NIC detected and disables the rest.
- If no NIC is detected, setup is blocked until a network card is installed and plugged in. If you need to add drivers for your network card, you can add them when Windows prompts you for drivers for your disk.
How the router is discovered
If not discovered through DHCP, the server does the following both during setup and during the CTIW:
- Sends an ICMP Router Discovery Message on multicast address 224.0.0.2. Routers on the LAN that support RFC 1256 will respond with a Router Advertisement.
- It uses the Simple Service Discovery Protocol Discovery Service (SSDP) to find routers that do not support RFC 1256.
- It will send ARP requests to 192.168.*.1 and 192.168.*.254, checking 255 subnets for the router.
If a router is found, then the following is done:
- It will attempt to ping the router for a response.
- It will try to resolve 3 requests for WWW.MICROSOFT.COM from 3 randomly chosen root hint DNS servers through the detected router. During setup, the list of root hints is hard coded, but after install the list is dynamically chosen from the server’s DNS. Note: it doesn’t actually connect to WWW.MICROSOFT.COM , just looks for a successful response from the root hint DNS server
- If it cannot resolve WWW.MICROSOFT.COM , then the user will be prompted to manually configure the router and test the internet connection.
When dealing with an ipv6 router with DHCP disabled, SBS relies on stateless auto-configuration to be enabled on the router. In this case, a router discovery broadcast will return a response from the router including the site prefix and gateway address of the network. IPv6 routers must support stateless auto-configuration to properly work in the SBS 2008 environment. IPv4 must still be enabled, as some SBS features, specifically Exchange, requires IPv4.
CTIW Flow
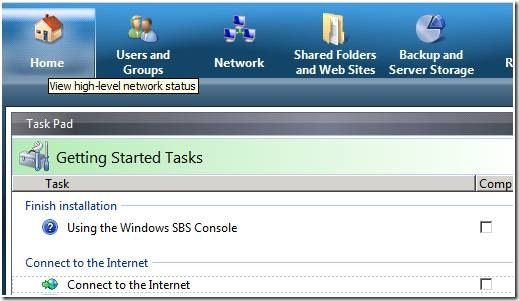
You can launch the CTIW from two places in the Windows SBS Console; either under the Getting Started Tasks, or under Network > Connectivity:

After the welcome screen, the number of network cards is detected and the wizard will attempt to automatically detect the router once more (if we have not detected a DHCP service). It does this in case the user has changed routers since setup or since the last time the wizard was run. The wizard will detect the presence of the router and an Internet connection in the same fashion that setup uses, described above.

If the router is detected, if we receive a reply from the root hints server, and there is no existing DHCP server on the network, then the wizard will complete without incident.
If DHCP is detected on the network
If the wizard detects a DHCP presence, the following occurs:
- It uses the current DHCP subnet settings to configure the DHCP scope on the server. It configures the new scope to hand out Class-C addresses on the same network as the router, from .1 to .254 with .1 through .10 excluded.
- It asks the user to manually disable it, and then check the network once again. If you cannot disable DHCP at the moment, it will ask you to postpone it and the DHCP service will remain disabled on SBS. You will be constantly reminded of this.
If no router or Internet connection detected
If no router is found, then you are prompted to enter the IP address of both the router and server. At this point auto discovery is stopped.
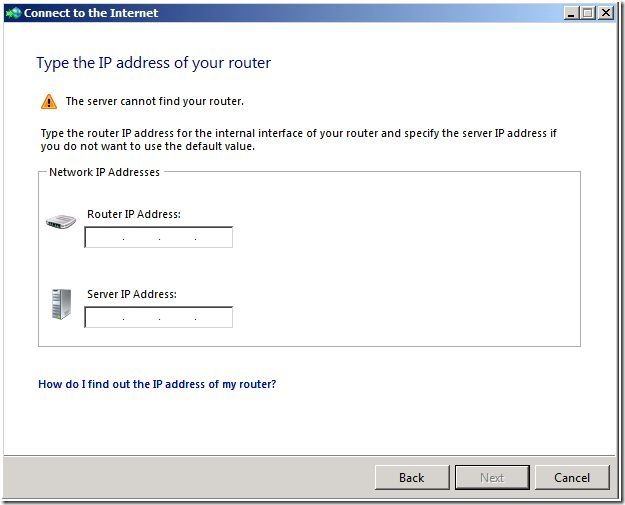
The wizard will assign a subnet mask of 255.255.255.0 to the server and configure DNS to use root hints. It will also test to see if the router responds to the IP address entered and attempt to resolve WWW.MICROSOFT.COM through root hints.

If the wizard fails to receive a reply from the router, it will notify us and allow us to continue without detecting a router. If the DNS query fails, we are prompted to login to the router to manually configure it for Internet access, and then test the connection.
We can skip the test only after attempting it at least once. This will allow us to complete the wizard without detecting the router or an Internet connection.