Radhika Gupta | Software Development Engineer | Microsoft

The Hyper-V over SMB feature in System Center 2012 Virtual Machine Manager (VMM) builds on this feature by providing increased management support and adding full support for NAS storage management. Users can now do the entire lifecycle of a network share from creation to modifying permissions to deletion through VMM. These network shares can either reside on a Windows Server 2012 ( now SMB 3.0 ) file server or on NAS devices that implement the SMB 2.2 or higher protocol. Currently VMM supports NAS devices (NetApp or/and EMC) that support the SMI-S compliant storage provider.
The first part of these blog series covers all about learning the implementation details of various operations. In this second part we are going to cover troubleshooting. We are going to go over each operation and see what could go wrong in each of these operations (i.e. What’s Wrong and Why, or WWW).
Basics
Below, you will find the steps to manage SMB shares in VMM:
Add Storage device
The first step is to add the storage device or the Windows file server into VMM’s management. This can be done using the Fabric workspace –> Storage\Provider node –> Right-click and select the “Add Storage device” option. Select “Windows based file server as managed storage device”. The Add-SCStorageProvider cmdlet can also be used to add the storage device from the PowerShell command line.
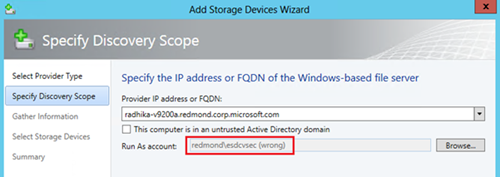
1. WWW: Use the RunAs account that has administrator access on the file server. VMM will use this specified RunAs account to execute any future file share administrative operations like creating, modify permissions and deleting shares. Users might choose a RunAs account that does not have admin rights (in the local administrator’s group) on the file server machine, or the RunAs account entered in VMM might have the wrong password.

2. WWW: As part of adding the storage provider/file server operation, VMM will discover all the currently present shares on the storage device and add them to VMM’s management. Any shares added later on the storage device (out of band from VMM) will also be periodically discovered and added to VMM management. These shares are not automatically added as managed shares and should be marked for management to be used by VMM. This can be done using the Share properties page.

3. WWW: Users can also add storage devices in non-trusted domain machines. It is important to check the “This computer is in an untrusted Active Directory domain” checkbox if we are adding such a machine as file server. It’s possible that the user might choose a non-trusted domain machine but forget to check this box. If the machine is reachable then at this stage we would add the machine successfully but one would see errors later when performing other operations on the shares. More information is covered in later steps.
4. WWW: User can also add storage devices in non-trusted domain machines. The machine name might not be resolvable by DNS.
5. WWW: We communicate to the file server using WinRM and remote management might be disabled on the file server. This is a setting in Server Manager. Note that this is applicable to each call we make to the file server.

If this is the case, you may get the following error:
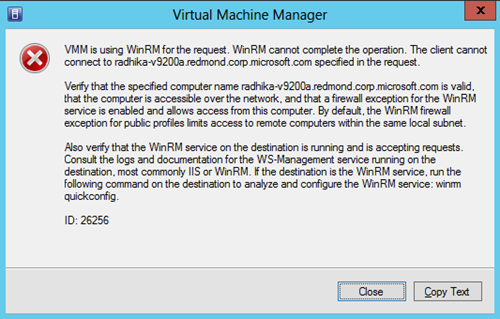
VMM is using WinRM for the request. WinRM cannot complete the operation. The client cannot connect to <serverName.domain.com> specified in the request.
6. WWW: Another reason for the error above is that the WinRM call is attempting to communicate with an incorrect port (e.g. port 80 instead of port 5985). Port and protocol both should be 5985 and http respectively for the default file server configuration. The following registry key stores the WinRM port for VMM:
HKEY_LOCAL_MACHINE\SOFTWARE\Microsoft\Microsoft System Center Virtual Machine Manager Server\Settings, WSManTcpPort
7. WWW: The user might try to add a provider with lower then SMB 2.2 support. We would get an ‘SMB 2.2 protocol not supported’ error in this case.
Create the share
You can optionally create file shares directly on the provider using the Fabric workspace –>Storage\Provider node –> Select the provider from the right view or data grid –> Select the ribbon action to Create File Share. If the user specifies a local path that is not present on the file server, VMM will automatically add the path for you.
The New-SCStorageFileShare cmdlet can also be used to create the share from PowerShell command line.
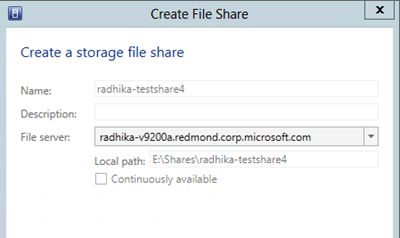
8. WWW: While creating the share, the user could enter a incorrect local path (i.e. incorrect drive). We would create the folder if one is not present.
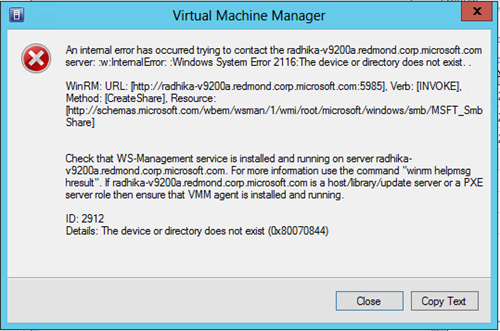
An internal error has occurred trying to contact the <serverName.domain.com> server: :w:InternalError: :Windows System Error 2116:The Device or directory does not exist.
Register the share to a host or cluster
Once a share is added or discovered, you need to register it with any hosts or clusters where you want to create the VMs that can utilize the file server remote storage. This is done using the Fabric workspace –> Select the host or cluster –> Right-click “Properties” –> “Storage” page (for host) or “File Share Storage” page (for clusters) -> Select “Add File Share” option.
The Register-SCStorageFileShare cmdlet can also be used to register the share from PowerShell command line.
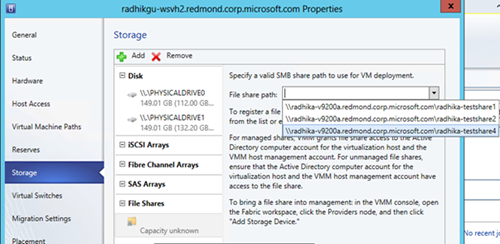
9. WWW: Why doesn’t my share does not show up in the list? If the share was discovered later or not marked as managed, then it would not show-up in the list here. VMM only shows managed shares here.
10. WWW: As part of this operation, VMM will modify the share with the necessary permissions so that the Hyper-V host can access the storage. It modifies both share and NTFS permissions. We might get specific errors stating what permissions were not modified and user can manually go and modify the permissions. One error could occur if the file server RunAs account does not have appropriate permissions.
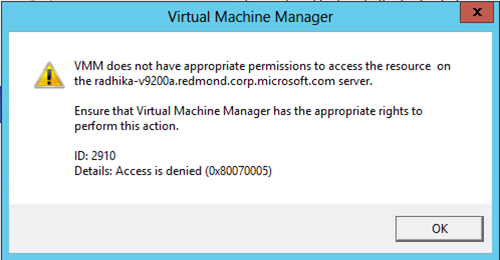
VMM does not have appropriate permissions to access the resource on the <serverName.domain.com> server.
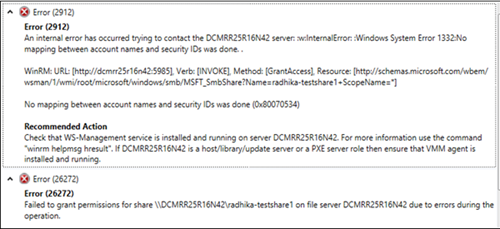
11. WWW: While adding the storage device/provider, if the checkbox for “untrusted active directory domain” is not checked for a machine in an untrusted active directory domain then we would not be able to modify the permissions. Registering the share will fail with a warning and the task will have errors related to the failure. An example of one of these errors is below:
|
|
|
Error (2912) An internal error has occurred trying to contact the DCMRR25R16N42 server: :w:InternalError: :Windows System Error 1332:No mapping between account names and security IDs was done. . WinRM: URL: [http://dcmrr25r16n42:5985], Verb: [INVOKE], Method: [GrantAccess], Resource: [http://schemas.microsoft.com/wbem/wsman/1/wmi/root/microsoft/windows/smb/MSFT_SmbShare?Name=radhika-testshare1+ScopeName=*] No mapping between account names and security IDs was done (0x80070534) Recommended Action Check that WS-Management service is installed and running on server DCMRR25R16N42. For more information use the command "winrm helpmsg hresult". If DCMRR25R16N42 is a host/library/update server or a PXE server role then ensure that VMM agent is installed and running. Error (26272) Failed to grant permissions for share \\DCMRR25R16N42\radhika-testshare1 on file server DCMRR25R16N42 due to errors during the operation. Recommended Action Manually grant permissions on \\DCMRR25R16N42\radhika-testshare1. |
Unregistering the share from the host or cluster
Before removing the host or cluster, it is recommend to unregister the share from the host or cluster. This will clean up all of the unnecessary permissions to the Hyper-V host on the share. This can be done using the Fabric workspace –> Select the host or cluster –> Right-click “Properties” –> “Storage” page –> Select the “Remove File Share” option.
The Unregister-SCStorageFileShare cmdlet can also be used to unregister a share from the PowerShell command line. Based on optional user input –RemovePermissionsOnShare , one can select to not modify the permissions on the share. This option is only available when using PowerShell command line. The default for this option is $false (i.e. to always leave the permissions on the share). So if you are seeing that your permissions are left on the share, then it’s probably because the share was not removed with the –RemovePermissionsOnShare parameter.
Remove the share
You can also remove the share completely from the file server using VMM. This can be done using Fabric workspace –> Storage/Provider node –> Select the provider from the right data grid –> Select the share –> Select the ribbon action “Remove”. Please note that this would permanently remove the share from the file system. This will not delete the files on the share. The Remove-SCStorageFileShare cmdlet can be used to remove the share from PowerShell command line.
VMM Server Setup & Host Agent installation
VMM uses CredSSP and enables CredSSP on the host agent WinRM calls. Since WinRM only allows delegation of “Fresh credentials”, this requires the VMM server to explicitly pass valid credentials when creating a WinRM session. Note that we cannot use the VMM service account since WinRM does not support using “Default credentials”. We use the RunAs account assigned while adding the host or cluster for this purpose. All of the following WinRM calls to the host will use this RunAs account to manage the host, hence it’s essential to add the host and/or cluster with a RunAs account instead of just providing direct credentials (i.e. username and password), allowing VMM to use these saved credentials for delegation.
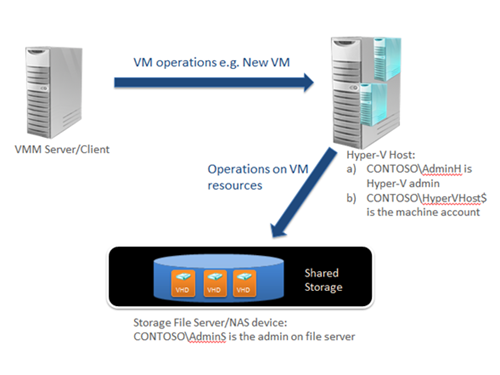
Figure 2: Credential Delegation
To enable CredSSP, VMM automatically does the following for you:
1. VMM Server Setup: VMM server setup configures the machine’s group policy settings to allow WinRM to use the CredSSP authentication provider.
- Enable WinRM client GPO: Computer Configuration\Administrative template\Windows Components\Windows Remote Management (WinRM)\WinRM Client
[Allow CredSSP authentication] = true
OR
Command Line: winrm set winrm/config/client/auth '@{CredSSP="true"}'
WWW: If the VMM server side WinRM client configuration CredSSP setting is set to false by a domain GPO then you would see the following error:
|
|
|
Error (20554) The Windows Remote Management (WinRM) client on VMM server cannot process the request to the target computer radhikgu-wsvh2.redmond.corp.microsoft.com. CredSSP authentication is currently disabled on the client configuration. WinRM: URL: [http://radhikgu-wsvh2.redmond.corp.microsoft.com:5985], Verb: [INVOKE], Method: [GetVersion], Resource: [http://schemas.microsoft.com/wbem/wsman/1/wmi/root/scvmm/AgentManagement] Unknown error (0x803381a2) Recommended Action Change the client configuration on VMM server by running: winrm set winrm/config/client/auth @{CredSSP="true"} from elevated command line and try the request again. Also, Group Policy must be edited to allow credential delegation to the target computer. Use gpedit.msc and look at the following policy: Computer Configuration -> Administrative Templates -> System -> Credentials Delegation -> Allow Delegating Fresh Credentials. Verify that it is enabled and configured with an SPN appropriate for the target computer. For example, for a target computer name "myserver.domain.com", the SPN can be one of the following: WSMAN/myserver.domain.com OR WSMAN/*.domain.com OR WSMAN/* |
Enable credential delegation GPO: Computer Configuration\Administrative Templates\System\Credentials Delegation
[AllowFreshCredentials ] = "WSMAN/* "
WWW: If the above setting is somehow removed by a GPO, then you would see the following error:
|
|
|
Error (20553) The Windows Remote Management (WinRM) client on the VMM server cannot process the request. A computer policy does not allow the delegation of the user credentials to the target computer radhikgu-wsvh2.redmond.corp.microsoft.com. WinRM: URL: [http://radhikgu-wsvh2.redmond.corp.microsoft.com:5985], Verb: [INVOKE], Method: [GetVersion], Resource: [http://schemas.microsoft.com/wbem/wsman/1/wmi/root/scvmm/AgentManagement] Unknown error (0x803381a3) Recommended Action Use gpedit.msc and look at the following policy: Computer Configuration -> Administrative Templates -> System -> Credentials Delegation -> Allow Delegating Fresh Credentials. Verify that it is enabled and configured with an SPN appropriate for the target computer. For example, for a target computer name myserver.domain.com, the SPN can be one of the following: WSMAN/myserver.domain.com OR WSMAN/*.domain.com OR WSMAN/* |
2. Host agent Setup:
Enable WinRM service GPO: Computer Configuration\Administrative template\Windows Components\Windows Remote Management (WinRM)\WinRM Service.
[Allow CredSSP authentication] = true
OR
Command Line: winrm set winrm/config/service/auth '@{CredSSP="true"}'
WWW: If the host side WinRM service configuration CredSSP setting is set to false by a domain GPO after agent installation already happened then you would see the following error:
|
|
|
Error (20552) VMM does not have appropriate permissions to access the resource on the radhikgu-wsvh2.redmond.corp.microsoft.com server. Recommended Action Ensure that Virtual Machine Manager has the appropriate rights to perform this action. Also, verify that CredSSP authentication is currently enabled on the service configuration of the target computer radhikgu-wsvh2.redmond.corp.microsoft.com. To enable the CredSSP on the service configuration of the target computer, run the following command from an elevated command line: winrm set winrm/config/service/auth @{CredSSP="true"} |
I hope that you will found this post helpful. If you know of any other error scenarios and would like them to be add to this list, please feel free to submit feedback at the bottom of this post and/or ask questions on the VMM forums . Also, make sure to visit the VMM 2012 TechNet Library !
Thanks,
Radhika Gupta | Software Development Engineer | Microsoft
Get the latest System Center news on Facebook and Twitter :


System Center All Up:
http://blogs.technet.com/b/systemcenter/
System Center – Configuration Manager Support Team blog:
http://blogs.technet.com/configurationmgr/
System Center – Data Protection Manager Team blog:
http://blogs.technet.com/dpm/
System Center – Orchestrator Support Team blog:
http://blogs.technet.com/b/orchestrator/
System Center – Operations Manager Team blog:
http://blogs.technet.com/momteam/
System Center – Service Manager Team blog:
http://blogs.technet.com/b/servicemanager
System Center – Virtual Machine Manager Team blog:
http://blogs.technet.com/scvmm
Windows Intune:
http://blogs.technet.com/b/windowsintune/
WSUS Support Team blog:
http://blogs.technet.com/sus/
The AD RMS blog:
http://blogs.technet.com/b/rmssupp/
App-V Team blog:
http://blogs.technet.com/appv/
MED-V Team blog:
http://blogs.technet.com/medv/
Server App-V Team blog:
http://blogs.technet.com/b/serverappv
The Forefront Endpoint Protection blog :
http://blogs.technet.com/b/clientsecurity/
The Forefront Identity Manager blog :
http://blogs.msdn.com/b/ms-identity-support/
The Forefront TMG blog:
http://blogs.technet.com/b/isablog/
The Forefront UAG blog:
http://blogs.technet.com/b/edgeaccessblog/
