- Home
- System Center
- System Center Blog
- Creating Workspaces (aka “wunderbars”) in System Center Service Manager
- Subscribe to RSS Feed
- Mark as New
- Mark as Read
- Bookmark
- Subscribe
- Printer Friendly Page
- Report Inappropriate Content
I get this question at least once a month… How do I create my own workspace? Usually this kind of question comes from partners that want to add some functionality to Service Manager and really want to elevate the presence of that solution by creating a dedicated workspace for it.
Around here we call these buttons in the lower left of the console “wunderbars”, but the official name for them is “workspaces”. Don’t ask me where the name “wunderbar” came from. If you are going to TechEd EMEA in Berlin in a couple of weeks you can practice your German by calling them “vunderbars”. :) Since wunderbar is more fun to say that workspace we’ll stick with wunderbar for this blog post.
OK, let’s get down to it. It’s really pretty easy. The only thing you really have to understand is that the entire console navigation pane is broken down into a hierarchy of folders and views. The wunderbars are just special folders! Imagine that there is an invisible root folder. Each folder that is a child of that folder is treated by the console framework as a wunderbar.
NOTES: The wunderbar icon sizes are 16x16 (collapsed) and 24x24 (expanded). The 16x16 (in tree) and 64x64 (view pane header) for views/folders.
7. Next, we define the display strings in the Language Pack section. Please see Localizing Management Pack Content for more information on localizing management pack content.
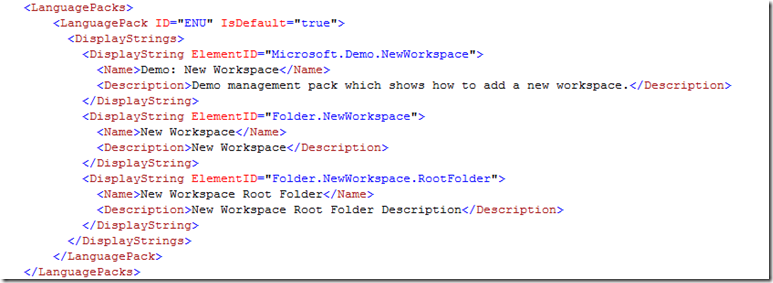
8. Lastly, we define the Image Resources. The FileName points to a file name which is in the same folder as your management pack XML file.

9. Now that you have created the management pack XML file and the images, you need to create a management pack bundle. Read Introducing Management Pack Bundles for more information. I normally copy the New-MPBundle.ps1 script into the same folder as my XML file and image resources and then run it like this:
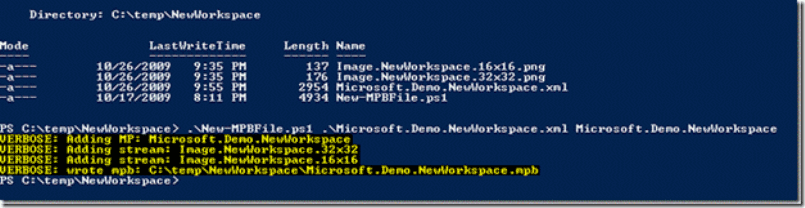
10. Next I need to import the .mpb file using either the PowerShell cmdlet Import-SCSMManagementPack or the Import Management Pack wizard in the console.

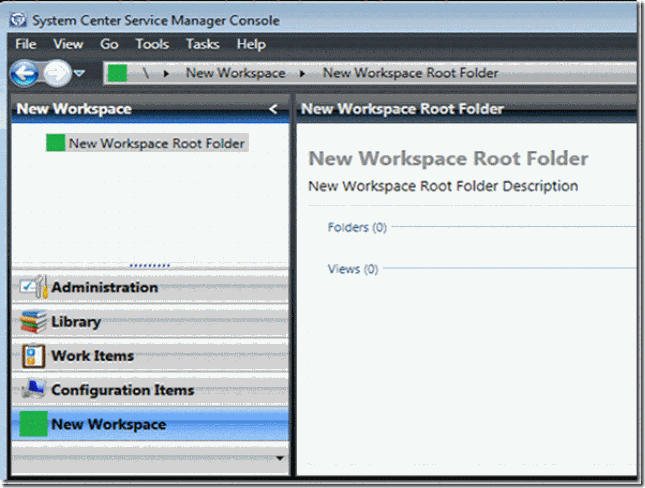
11. After I’ve done that, I can restart the console and then see my new workspace in the console!
So – here is what you need to do…
1. Create a 16x16 pixel .png file with the icon you want to show when the wunderbar is “collapsed”. For this example I just created a really plain green box icon.
2. Create a 24x24 pixel .png file with the icon you want to show when the wunderbar is full size.
3. Create a new management pack .xml file and reference the System.Library and Microsoft.EnterpriseManagement.ServiceManager.UI.Console management packs.
<ManagementPack SchemaVersion="1.1">
<Manifest>
<Identity>
<ID>Microsoft.Demo.NewWorkspace</ID>
<Version>1.0.0.0</Version>
</Identity>
<Name>Microsoft Demo For New Workspace</Name>
<References>
<Reference Alias="System">
<ID>System.Library</ID>
<Version>7.0.5229.0</Version>
<PublicKeyToken>31bf3856ad364e35</PublicKeyToken>
</Reference>
<Reference Alias="Console">
<ID>Microsoft.EnterpriseManagement.ServiceManager.UI.Console</ID>
<Version>7.0.5229.0</Version>
<PublicKeyToken>31bf3856ad364e35</PublicKeyToken>
</Reference>
</References>
</Manifest>
4. Next, you need to add a couple of Category elements to categorize the Image Resources (which come at the end of the MP) into 16x16 icons and 24x24 icons.
<Categories>
<Category
ID="Category.NewWorkspaceImage24x24" Target="Image.NewWorkspace.24x24" Value="System!System.Internal.ManagementPack.Images.u24x24Icon" />
<Category
ID="Category.NewWorkspaceImage16x16" Target="Image.NewWorkspace.16x16" Value="System!System.Internal.ManagementPack.Images.u16x16Icon" />
</Categories>
This simply tells the console framework what size each icon is so that the appropriate size icon can be used in the appropriate context. Make sure your icons are essentially identical except for their size.
5. Next we will declare the folders themselves.
….Sorry, I need to switch to using images here because there is some bug on the blog site here that won’t let me upload more than a certain amount of text…. You can get this management pack from the attachments to this post if you want to copy the text.

The first folder that is declared is the “wunderbar”. It’s parent is the magic root folder of the whole console. The other folder is a child of the wunderbar and represents the root node of the navigation tree within the new workspace.
6. Next, we’ll add image references for the folders. Two for the wunderbar – 16x16 and 24x24 and just one for the root folder in new workspace – 16x16 only. These ImageReferences create the relationship between the Folders created above and the Image resources created at the end.

You must be a registered user to add a comment. If you've already registered, sign in. Otherwise, register and sign in.