- Home
- Security, Compliance, and Identity
- Core Infrastructure and Security Blog
- Mailbag: How Do You Set Network Adapter Settings with PowerShell in Windows 8/Windows Server 2012?
- Subscribe to RSS Feed
- Mark as New
- Mark as Read
- Bookmark
- Subscribe
- Printer Friendly Page
- Report Inappropriate Content
First published on TechNet on Mar 29, 2013
Here’s an interesting question that came to us from one of our readers.
Question:
I am setting up multiple Windows Server 2012 and Windows 8 virtual machines. How do you set the IP address of a network adapter using PowerShell?
This is a great question. It makes sense to be able to automate parts of the virtual machine configuration process, especially when creating multiple virtual machines for a virtual lab environment. While these commands can be pasted into a PowerShell prompt from the Clipboard functions of a Virtual Machine Connection, these could be slipped into the OS install with other tools as well for a more automated experience. The PowerShell commands referenced below may be used with Windows Server 2012 and Windows 8. These commands don’t just work within virtual machines.
They work with installations to physical hardware as well.
To configure network adapters in Windows Server 2012 or Windows 8 using PowerShell, you first need to know the names of the network adapters as you would see them in the list of network connections if you were to look. The default name for a network connection in Windows Server 2012 or Windows 8 is Ethernet . . If you’ve installed Windows Server 2012 or Windows 8 with just a single network adapter, then the only name you need to be concerned with is Ethernet . If there are other network adapters detected by this operating system, those will be sequentially numbered starting with Ethernet 2 , and so on. For this example, let’s assume a configuration of two adapters with the following intended IP address configuration:
|
“Ethernet” IP Address |
192.168.0.14 |
|
Subnet Mask |
255.255.255.0 |
|
Default Gateway |
192.168.0.1 |
|
DNS |
192.168.0.10 |
|
“Ethernet 2” IP Address |
10.0.0.1 |
|
Subnet Mask |
255.0.0.0 |
|
Default Gateway |
undefined |
|
DNS |
undefined |
The following commands may be used to configure the network adapters based on the configuration above:
$netadapter = Get-NetAdapter -Name Ethernet
$netadapter | Set-NetIPInterface -Dhcp Disabled
$netadapter | New-NetIPAddress -IPAddress 192.168.0.14 -PrefixLength 24 –DefaultGateway 192.168.0.1
Set-DnsClientServerAddress -InterfaceAlias " Ethernet " -ServerAddresses " 192.168.0.10 "
$netadapter = Get-NetAdapter -Name “ Ethernet 2”
$netadapter | Set-NetIPInterface -Dhcp Disabled
$netadapter | New-NetIPAddress -IPAddress 10.0.0.1 -PrefixLength 8
Using IPConfig /all, you can see the results of these commands:
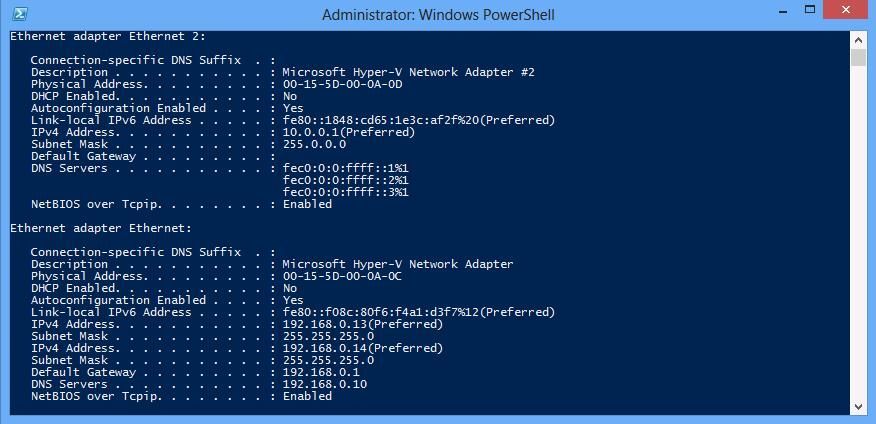
If you wanted later to change Ethernet 2 back to DHCP addressing, it is as easy as omitting the New-NetIPAddress calls and changing the –DHCP parameter of Set-NetIPInterface to Enabled.
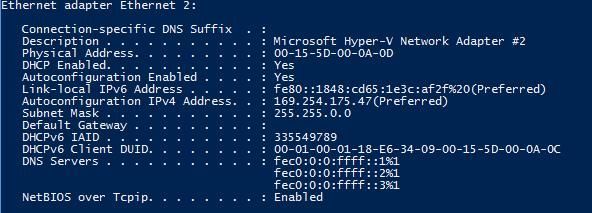
$netadapter = Get-NetAdapter -Name “ Ethernet 2”
$netadapter | Set-NetIPInterface -Dhcp Enabled
For more details about the New-NetIPAddress PowerShell cmdlet for Windows 8 and Windows Server 2012, as well as links to other related cmdlets you may find valuable, please consult the following reference :
http://technet.microsoft.com/en-us/library/hh826150.aspx
Also, when configuring virtual machines, the Metrics setting can be important. For more information about the importance of Metrics setting on the network adapters, check out Roger’s post below:
Until next time!
Martin
You must be a registered user to add a comment. If you've already registered, sign in. Otherwise, register and sign in.