sharepoint list
61 TopicsImporting and Exporting a List Template (.stp file) in SharePoint
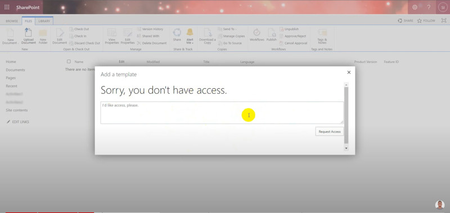
Developers often need to import the same data for reuse across SharePoint sites. They want an effective way to import and manage this data across sites and want to preserve environment settings, rather than having to start from scratch each time. As a developer, if you’re using the modern experience in SharePoint, the option to upload a SharePoint list template (.stp) file isn’t obvious in your settings. Also, if you try to upload it, you might get a message that says, “Sorry, you don’t have access.”6KViews0likes0CommentsHow to Populate SharePoint List with Files from SharePoint Document Library using Power Automate
Microsoft SharePoint Online is a platform for document management, information sharing, internal collaboration and more that is a part of the Microsoft 365 family of apps. In this blog post, I will show you how to create a document library and list in SharePoint for an Employee Record and how to populate the data from an Excel sheet in SharePoint Document Library using a Power Automate Flow. This process eliminates the process of entering the data from the Excel sheet manually into the SharePoint list. It enables us to easily automate all the data in the Excel sheet into our SharePoint list. Use Case: Track Employee Data Record Here we will work on a scenario to help better understand the process. The HJK company has started making changes to the way they work and one of those things is moving their employee's data from an Excel sheet where it is stored to a SharePoint list. This can be done manually but they will prefer a process where the moving of the data can be achieved easily. In the Excel sheet these are the data types of the columns in the table. Column Data Type EEID Text Job Title Text Department Text Business Unit Text Gender Text Ethnicity Text Age Number Hire Date Date Annual Salary Currency Country Text City Text Exit Date Date Disclaimer: This is not an actual company but a scenario created to show you how the populating process works with SharePoint and Power Automate. The Excel sheet used in this blog post is a free sample data gotten online. Note: Make sure the Data in your Excel sheet is in a table format. I will walk you through the process Create the SharePoint Document Library. Upload the Excel file to the SharePoint Document Library Create the SharePoint List for the employee's data. Create the Instant cloud flow to populate the SharePoint list Create a SharePoint Document Library In this step, we will be working on creating the document library where the Excel sheet that contains the Company's employee information will be uploaded. Login into Microsoft 365. At the left hand side, click on the App Launcher. 2. From the App launcher we will be clicking on SharePoint. From this process we can easily access SharePoint Online. From the list of application shown, click on SharePoint. 3. I already created my SharePoint site so lets go ahead and create our SharePoint Document Library. Click on +New. 4. After clicking on Document library from the drop-down, this gives us an opportunity to create a New SharePoint document library. So on the right hand side, on Name, give the document library a name (a name that you can easily identify and understand). Here I will be using Employee_Record. Next, click on Create. Upload the Excel Sheet to the Document Library In this step, we would be uploading the excel sheet to the SharePoint Document Library. With this process it will make it easier for us to populate the SharePoint list with the data in the Excel sheet easily using power Automate. Follow these steps: 1. At the top of the screen close to the name of the document library click on Upload. After clicking on Upload, we have a drop-down of names to select from which is Files, Folder and Template. Here we will be click on Files. 2. Next, click on the file you need uploaded. Here I will be clicking on the Excel file named Excel Record Sample Data. Next click on Open. From the second screenshot below you can see our excel sheet Employee record sample data has been uploaded to our document library. Create the SharePoint List In this step, we will work on creating the SharePoint list which will be the new place were will be keeping track of the employee's record data in the company. 1. Let's go ahead and create the Employee SharePoint list. At this step we have already created the SharePoint document library, in order to leave the SharePoint document library click on the name of the SharePoint Site, here the name of SharePoint site is Communication site. 2. Now let's create the SharePoint list by clicking on +New at the left-hand side of our screen. 3. After clicking on + New, it shows a drop-down that shows List, Document Library, Page, Space, News post, News link, App. Here we will be clicking on List. 4. Click on Blank list. We have different options here to create our SharePoint list which can either use a blank list, from an already existing list or from an Excel sheet. Our data is an Excel file and we might think of going for this option but it most advisable to create the list from blank. 5. After clicking on the Blank list option for the SharePoint list, now we need to give the list a name and description which is optional. Here on Name I am naming my list as Employee Sample Data to make it easier for me to identify what the SharePoint is for. Click on Create. 6. We will adding the columns shown in the Excel sheet to the list. The first column we will be creating here is EEID which the data type is a single line of text. Click on +Add Column, select Text as the data type and this is a Single line of text. Click on Next. 7. On Name, give your column a name. Here I will be using EEID. Click on Save Note: None of this columns created here are required columns, so take notice of this when creating your column. When creating a column the field for Description is optional. 8. From the screenshot above you can notice the column named Title, this is a default column that is created with the SharePoint list and would not be needed. In this step, will be the hiding the Title Column. Click on drop-down beside Title. Click on Column settings. Click on Show/hide column.On click on Title and then click on Apply. 8. Let’s add the next column to the SharePoint list. Click on +Add Column.Select Text. Click on Next. Give the column a name here on Name I will be giving my Column Job Title. Click on Save. Next, add the remaining columns to the SharePoint List with their specific data types. Column Data Type EEID Single line of text Job Title Single line of text Department Single line of text Business Unit Single line of text Gender Single line of text Ethnicity Single line of text Age Number Hire Date Date Annual Salary Currency Country Single line of the text City Single line of text Exit Date Date Populate the SharePoint List using Power Automate In this step, we will be working on creating the flow that will be used to auto populate the SharePoint list with the data from the Excel sheet. 1. Login Power Automate 2. On the Home screen at the left-side of your screen. Click on Create. Here we will creating an Instant cloud flow; this is a type of Power Automate cloud flow that only runs when a button is triggered. Click on Instant cloud flow. 3. Next thing here is to name your flow and select the trigger. Give your flow a name you can easily identify. Here, I will be using Populate Employee Record. From choose how to trigger this flow, select the trigger Manually trigger a flow. Click on Create. 4. Add another action to the flow. Click on +New Step. 5. On choose an operation, search for the action, List rows present in table. Click on the action. 6. In the List rows present in a table action, we have location, document library, file and table. On Location we will be selecting the SharePoint site where our document library is located. On the drop down or search for the name of your SharePoint site and click on it. On Document Library; select the name of the document library you uploaded your Excel sheet. 7. On File; click on the folder icon at the right-hand side. Next, select the file uploaded to the document library. 8. On Table; click on the dropdown and select the Excel table. 9. Add the Apply to each action to the flow. Click on +New step. On choose an operation, search for the action, Apply to each. Click on it. 10. In the Apply to each action, where we have Select an output from previous steps click on the box and go Dynamic content and select value (this is coming from the action List rows present in a table. The screenshot image of this is shown below). 11. Here we will be adding an action inside of the Apply to each. Click on Add an action. On choose an operation, search for the action, Create item and select (The create item action is coming from SharePoint). 12. In the Create item action; on Site Address, click on the dropdown or search for the SharePoint site and select your SharePoint site where your SharePoint list is located. On List name; click on the drop-down and select the name of your SharePoint list. 13. In the Create item action, we have our columns from our SharePoint list listed in the action from the first column EEID to the last column Exit Date. Here, for each columns in the action we will be adding Dynamics contents to them where the Dynamics contents are coming from the action List rows present in a table (which is the data in our excel sheet). On the EEID column in the action, go the Dynamic content and click on the dynamic content EEID. As seen the screenshot image below. Repeat this step for the remaining columns in the action except Title (which we are not using) and Hire date, exit date. 14. For the Hire Date column in the action, while running the flow I ran into an issue in the Hire Date and Exit Date column that addressed that the datetime string must match ISO 8601 format.'. I will be discussing more about this in my newsletter in the following weeks on how I used Copilot to resolve it but here let's go ahead and understand the actions and steps used. For the Hire Date column, before the apply to each action, add the Initialize variable action to the flow. In the initialize variable; on Name give your variable a name and select the Type as a String. Next, add a Set variable action inside of the Apply to each action (this action should come before the Create item action). In the Set variable action; on Name go to your dynamic content and select the variable coming from the initialize variable action. On Value add the expression addDays('1899-12-30',int(items('Apply_to_each')?['Hire Date']),'yyyy-MMM-dd') Now go ahead to the Create item action and on the Hire Date column, go to the dynamic content and select the variable. Repeat this step for Exit Date. 15. So here let's make a few changes to our flow, this step allows the flow to populate more than 150 items to the SharePoint list. Click on the three dots at the right-hand side of the action List row present in a table action. Click on Settings. 16. On the toggle button for Pagination, switch it on and on Threshold enter the value 2000. Click on Done. Save and run the flow. Thank you for reading! Resources How to delete items in a SharePoint list using Power Automate39KViews0likes2Comments
Check on double entries in Sharepoint list
Hello I'm looking for a way to prevent double entries in a Sharepoint list. I have 3 lists: One list with names and addresses of Students. (called students), one with names of courses they can subscribe for (called courses) and another called subscriptions, used when a student subscribes for a course. A student can subscribe for multiple courses. I want to prevent that when subscribing a student for a course, the student allready has a subscription for this course. Sometimes it happens that a student does a subscription and has to wait for the course to start (sometimes more than one year). In that case they sometimes come back a few months after the first subscription and want to subscribe again for the same course. To prevent double entries, I want sharepoint to do a checkup before subscribing the same student for the same course again. If the check is positive, I want the user to be prompted that the student allready has a subscription for this course. When the check is negative, I want the data entered in the subscription form to be saved in the sharepoint list. Because the subscription list uses lookup fields from both the courses and students list, sharepoint doesn't let me combine values from those fields in a calculated column to make sure these values are unique entries. I read that to solve this problem, I need to use Power automate to do the check-up. Is that correct, and is it the simplest solution? How do I get started? Thanks!
Auto generating new post/page in the SharePoint site from the item of SharePoint List
Hi everyone, I'm looking to create a page on SharePoint site that is generated based on the value of item from a SharePoint list. I have created a list that has a column with the type of multiple lines of text and the specification of the type of the text is Enhanced rich text (Rich text with pictures, tables, and hyperlinks). Does anyone have any ideas on how to generate page content from the values in this column? Thank you10KViews0likes6Comments
SharePoint list in Document library folder
Hello! I have set up a power automate flow to gather information from another teams SharePoint excel document to my teams SharePoint list for easier access. I will be doing the same with other SharePoint excel documents, but I am looking for a way to place these lists in one document library this way I have all the lists in one place instead of having multiple lists in our navigation pane. From what I have read and understand this is not possible to do, but I am hoping someone has a workaround. Any help is appreciated.13KViews0likes8Comments
Extract .png from person/group column
Any help would be extremely helpful, I am unable to create a solution to this issue. I am looking to create a flyer generator. Users will be using their photo associated with my SharePoint employee list, but this is my issue: When I pull the dynamic action of a picture from a group/person column it displays a link: https://lnfcompanies.sharepoint.com/sites/PropertyServices/%5C%5C%5C%5C%5C%5C%5C%5C%5C%5C_layouts/15/UserPhoto.aspx?Size=L&AccountName=email address removed for privacy reasons, and once I go to this link it displays a new link: https://lnfcompanies.sharepoint.com/_vti_bin/afdcache.ashx/_userprofile/userphoto.jpg?_oat_=1694724778_b1f6f762a9b3e08a18b0e6972cb0631a3badaed82ab7210fae40e4f56cf71c1c&P1=1694707665&P2=-1205102505&P3=1&P4=pn%2bVpCQ6BCG1Wk9dlEGXck3%2bFhetPXcuGoPPchUnf79TdkZlEcxc8zKbKzg9Z9294lpey7DAWzuVwyCTfa0Ix364sqtgPyW5xdMP%2fA%2bPHFhIOPqELeYzb3MVcWaG26BZJqaTIi1JV%2bDaQKVkWe6jjQ%2bGieQ2R2RmWwlcLiuGcIfqLgL2HKdeHTqmcju5hjIMy5y4WG6BhaWK6ChF%2bmsmCqgMks%2fF2DpBbmf921oWEeypP9ujHY6cYQ%2bwOUZfH%2fMk29Z2dHV4lGxL%2bd5vaDHNjSQwlShFogedXk7G4JD%2bXVEd5WNh%2bDmfGBYmuMVeM%2fzokjoyEOt7Z5PkZ0QEP1RJXA%3d%3d&size=L&accountName=email address removed for privacy reasons&default=true The issue I am having is that I need to display an image in my "Populate a word template" action, but I need to add file contents of a JPG or PNG image as the value. The value should look like this: { "$content-type": "image/png", "$content": "iVBORw0KG...i/DhQmCC" } where the content is the base64 encoded image. How can I extract the image file from the redirected link, because the "Populate a word template" action requires a file and not a link. Thank you so much.SolvedSharePoint List - Concatenate multiple rows
Hello! Thank you so much for any assistance, truly. I am hoping to create a SharePoint calculated column. I have a SharePoint list In which I display agent's leads. Within the list, it shows the lead, the agent assigned, and which region the lead is assigned to; moreover, I want to create a calculated column that will be next to the my agent assigned column that will display the name of the different region choices they are assigned to. So, if an agent is assigned to multiple, different, regions, it will display such (even if they are viewing only one of their leads). If I need to make a calculated column, I can group the agents based on their email column.4.9KViews0likes12Comments
Having problems with image type column in sharepoint
The SharePoint list doesn't store images (in image type column) in sites assets folder and uploads them with this prefix Reserved_ImageAttachment_[]_fileName. Does anyone know why is this happening? Is there some setting that not correct? As seen in the image, when I upload an image to image type column, the attachment column shows the page clip logo. And when no image is uploaded, the attachment field is blank. My images column type is Image/Thumbnail10KViews1like17CommentsSending ticket sender notification when ticket is completed
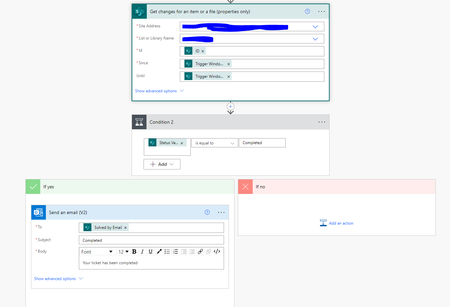
Hi, I have created a flow for tickets with power automate. I also have a sharepoint list where I am supposed to collect the tickets. I'm trying to get a notification for the ticket sender when the ticket status has been changed to Completed, however it doesn't work. Is there a way I can fix this? Here is the part of my flow where I have tried to create the notification:533Views0likes0Comments