developer
8231 TopicsWhat's New in Microsoft Teams | August - September 2026
A quick note before we get into it: What's New in Teams is shifting from a monthly to a quarterly rhythm. You'll hear from us next in December, March, and June, and each edition will round up everything announced and released over the full quarter. One post, one fuller view of what's new. Two investments shape where Teams is heading, and you'll see both in this quarter's releases: AI transforming teamwork with agents as part of the team, and a simpler, smarter, more secure foundation underneath it all. AI in Teams is showing up in the flow of your work. Teams Phone Agent brings that to your phone line, helping callers with common requests in more than 60 languages and routing them with context attached, so a missed call turns into a next step instead of a lost one. Context carries forward, too. Video recap turns a meeting you missed into a short, narrated highlight reel, so what a meeting decided outlasts the conversation itself. And protection for everyday collaboration is always top of mind. The new Security Detection Report brings detections such as impersonation and malicious URLs into one view in the Teams admin center, so admins see the whole picture in one place. Read on for all the latest updates! Feature categories: (All features listed are generally available unless otherwise noted) Chat and Collaboration Meetings Teams Phone Workplace Teams Events Fundamentals and Security Teams Platform Certified devices Chat and Collaboration Ask Copilot in Teams conversations Stay in the flow of work and get help from Copilot directly within your conversations. Open Copilot from a message or selected text in a Teams conversation, with the relevant context already included, making it easier to gain insights, explore questions, and move work forward without needing to re-explain information. Find agents and apps faster through Teams search Discover the tools you need with agents and apps surfaced directly in Teams search results. As you type in the search bar, matching agents and apps appear alongside other relevant results, helping you spend less time searching and more time getting things done. Find and share files faster in Teams Locate the files you need while sharing content in Teams. Search for cloud-based files directly from the attachment experience, making it easier to find and share the right content without interrupting the flow of collaboration. Emoji shortcuts on iOS and Android Express yourself with emoji shortcuts. Desktop emoji shortcuts now work on iOS and Android. Insert emojis directly in the compose box by typing a word between colons, so :smile: becomes 😊. Autocomplete suggestions help speed up entry, and custom emojis are also supported. Clearer text highlighting in dark mode and high contrast mode Make highlighted text easier to read while composing messages in Teams. Improvements to text highlighting in dark mode and high contrast mode provide a more consistent and accessible editing experience, helping content stand out more clearly. Meetings Video recap in Teams Meeting recap now delivers a bite-sized video recap of with key highlights from your Teams meeting. It combines AI-generated voiceover summaries with video snippets, spotlighting the most important moments while preserving the original tone and flow, so you can catch up on key topics in a few minutes. Video recaps now support meetings in 23 languages across 31 regional variants, learn more. Translation button to change the language for intelligent meeting recaps After an intelligent meeting recap is generated, you can change the recap language at any time using a translation button, even if a different language was selected during the meeting. Multilingual teams get more flexibility to read meeting insights, action items, and discussion summaries in the language that is most comfortable for them. Teams Phone Teams Phone Agent Teams Phone Agent is an AI-powered receptionist for your business’s phone line, so callers can get help with common requests even after hours. For customer-facing organizations and departments using Teams Phone, such as bank branches or IT help desks, it takes repetitive calls off employees' plates so they can focus on the conversations that truly need a human touch. With support for over 60 languages and locales, Teams Phone Agent handles common requests such as answering routine questions or booking appointments. , And it can route a caller to the right department or employee with an AI-generated summary of the conversation, so customers do not have to navigate phone menus or repeat themselves. Custom voice agents are available for specialized workflows. Teams Phone Agent is now generally available, learn more. If the player doesn’t load, open the video in a new window: Open video Intelligent call recap in Queues app Intelligent call recaps in Queues app help you catch up on recorded or transcribed queue calls with AI-generated summary notes covering key discussion points and follow-up actions. To open a recap, find the call record in the Queues app call history and select Recap. Copilot in Queues app’s shared call history for post-call insights Quickly catch up on a call queue call and uncover key details with the ability to use Copilot in the shared call history in Queues app. After a recorded call is completed, users with Copilot can now open the call record in the shared call history, access the Copilot Chat sidecar from the Recap tab, and ask questions about the call. Automatic recording and transcription for call queues Capture customer interactions without requiring your organization’s calling representatives to manually start recording. Admins can enable automatic recording and transcription for individual Teams call queues and control access to recordings. Recordings are stored in SharePoint and accessible through call recaps in the shared call history in Queues app. View and manage auto attendant shared voicemails in Queues app Help your team stay on top of customer messages by managing auto attendant shared voicemails directly in Queues app. Calls routed from an auto attendant to voicemail will appear in Queues app, giving collaborative calling teams a centralized place to track, triage, and respond to messages. Customize recording and transcription notifications for Teams calls Give your organization greater control over how recording and transcription are communicated during Teams calls. IT admins can customize select user notification strings for recording and transcription in the Teams admin center, helping tailor the experience for participants in Teams VoIP calls. Enhance control of delegated calls with call lock and delegate join alerts Call delegation in Teams gains real controls: a delegator can lock an active call and see when a delegate joins. Locking prevents delegates from joining or resuming the call, and optional warning tones notify participants when a delegate joins or resumes. Workplace Interpreter agent support in Teams Rooms on Android The Interpreter agent acts as a translator in Microsoft Teams meetings, letting participants listen in their chosen language with real-time translation. It is now available in Teams Rooms on Android licensed for Teams Rooms Pro. Zero-touch provisioning on Teams MDEP-based Android devices IT teams can deploy MDEP-based Android devices at scale with automated, hands-off provisioning, cutting manual setup and applying security policies from first boot, similar to Autopilot for Windows. Deployment is managed from the Teams Rooms Pro Management portal. New room optimization mode in Teams desktop Room optimization mode makes it easier to use your laptop for meetings and collaboration in spaces such as focus or huddle rooms that do not yet have a Teams Rooms system. It replaces shared display mode, has a new location, and enables or disables room-specific features. When room peripherals are connected, Teams can automatically select audio and video devices, enable speaker recognition and shared display, and disable voice isolation. Meeting room join time comparison analytics in the Pro Management portal Admins can now compare meeting join times between Teams Rooms and bring-your-own-device rooms. These analytics help monitor the experience and plan workspaces, and the portal uses the comparison metrics to recommend actions proactively. Available with Teams Rooms Pro and Teams Shared Space licenses. Enhanced bookable desk experience with Teams panel-based desk hub devices The Teams panel app now enables devices to enhance bookable desk experiences, indicating at-a-glance availability and letting visitors book directly on the device, so people have better experiences in flexible work environments. Each device requires a Teams Shared Space license. Modernized Gallery view in Teams Rooms on Android The updated Gallery view in Teams Rooms on Android prioritizes video on the meeting stage, arranges participants in consistent aspect ratios, and minimizes movement of participant tiles on stage. You can hide the room self-preview video and choose to see audio and video participants equally on stage instead of prioritizing video participants. Admins can set the default behavior using local device settings and the Pro Management portal. Teams Events Breakout rooms in Teams Meetings & Events Breakout rooms are now supported in Teams Meetings & Teams Events with up to 1,000 participants across 100 rooms, increased from the previous limit of 300 participants across 50 rooms. Organizers can use breakout rooms to create smaller focused sessions within an event for more interaction and collaboration. Specify who has control of production tools in Teams Events Organizers can designate who controls production tools, granting chosen people access to Manage what attendees see and the green room so event production stays with the right crew. The setting is a new meeting option applied when the event is set up. Expanding presenter visibility in “Manage what attendees see” Producers can resize and expand the presenter panel in Manage what attendees see, making it easier to view, manage, and switch between presenters while a live event is running. New layout when sharing content for Teams events Organizers and presenters who have access to production tools now see updated layout options when sharing content in the “Manage what attendees see” experience for Teams events. The available layouts are speaker focused, content focused, and content only. The new speaker focused layout prioritizes presenter video alongside shared content for greater visibility. Available for Teams events organizers on Teams for Windows desktop and Mac desktop. Fundamentals and Security Enhanced real-time alerting rule management in Teams admin center Administrators can now duplicate an existing alerting rule to create a similar configuration without rebuilding it, bulk upload users when creating or editing a rule, and delete rules directly from the management experience. These capabilities are available for in-progress meetings and calls rule types, and organizations can configure monitoring for up to 500 users across their real-time alerting rules. Security Detection Report in Teams admin center A new Security Detection Report in the Teams admin center gives admins a unified view of messaging security detections across signals such as impersonation, malicious URLs, and weaponizable file types. Admins can review detection activity in one place and export detailed data for further investigation, improving visibility into threats in Teams. Single pane for monitoring and troubleshooting meetings and calls (Windows) Administrators can monitor meeting and call health across the organization from one place, identifying recurring issues, uncovering trends, and proactively troubleshooting problems affecting people in both live and past meetings and calls. Meeting participant detail audit records in all participating tenants Admins can now access participant-level audit records for their own users in cross-tenant meetings, helping investigate incidents even when another organization hosted the meeting. Teams audit logging now shares meeting participant detail records with all participating tenants, not just the organizer tenant, and each record includes organizer information so admins can tell whether a meeting was organized inside or outside their tenant. Teams optimization for VDI now supports Teams Events (Windows) Attendees joining Teams Events from virtualized Windows desktops can offload audio and video to their local device, supporting high definition playback while easing load on the virtual desktop. Optimization works on Windows endpoints connecting to Azure Virtual Desktop, Windows 365, Citrix, Omnissa, or Amazon. Captions, DVR, reactions, streaming chat, and Q&A are all supported, as are first-party and third-party eCDNs. Teams Platform Unified agent and app installation management across Microsoft 365 and Teams admin center (Windows) Administrators using the Microsoft 365 admin center and Teams admin center can apply app and agent installation changes once and have them enforced consistently across Teams, Outlook, and Microsoft 365 Copilot. Previously, installation changes made in the Microsoft 365 admin center applied only to Outlook and Microsoft 365, and changes made in the Teams admin center applied only to Teams. Identify custom Teams apps that need updates for private and shared channels Admins can view a list in Teams admin center of custom apps in their tenant that need updates to work in private and shared channels. The list helps admins identify impacted apps, understand which ones require developer action, and coordinate updates so people can keep using custom apps across all supported channel types. Prominent search for app and agent discovery in the Store Search now sits in the middle of the Store page, with improved type-ahead suggestions, a more informative results page, and natural language processing to surface the most relevant apps and agents. Add multiple steps when building a workflow from scratch When building a workflow from scratch, you can add several steps at once, so you can assemble multi-step automation without returning to edit it step by step, reducing repetitive setup work and simplifying the creation of more advanced automations. Collect information with List Form in Workflows A workflow can open with a form that gathers the details it needs up front, so automation runs on structured input rather than chasing information midway. Single-character keyboard shortcuts for focused message actions (Windows) Single-character shortcuts let you quickly take common messaging actions such as edit, delete, reply, forward, pin, save, mark unread, quote reply, and react when a message has keyboard focus. The shortcuts are a predefined messaging set, and they are discoverable and customizable in the keyboard shortcuts dialog. Certified devices EPOS IMPACT 1000 MS UC ANC WL USB-C+A On-ear Bluetooth® headset. Supplied with a BTD 900c dongle, a USB‑C to USB‑A adapter, and a USB‑C charging cable. Features ANC, EPOS BrainAdapt™ technologies, and EPOS AI™‑powered voice pickup and noise cancellation, ensuring your voice sounds natural and clear in any environment. EPOS IMPACT 1000 MS UC ANC WL USB-C+A Stand On-ear Bluetooth® headset. Supplied with a table stand for wireless charging, a BTD 900c dongle, a USB‑C to USB‑A adapter, and a USB‑C charging cable. Features ANC, EPOS BrainAdapt™ technologies, and EPOS AI™‑powered voice pickup and noise cancellation, ensuring your voice sounds natural and clear in any environment. EPOS IMPACT 1000 MS UC Mono WL / ANC WL Dongle-free Bluetooth® headsets available in monaural and binaural on-ear configurations. Supplied with a USB-C charging cable and a USB-C to USB-A adapter. Features EPOS BrainAdapt™ technologies and EPOS AI™-powered voice pickup and noise cancellation for clear, natural-sounding communication in any environment. The binaural ANC WL model also includes Active Noise Cancellation (ANC) to help reduce background distractions. EPOS IMPACT 1000 MS UC ANC WL Stand On-ear, dongle-free Bluetooth® headset. Supplied with a table stand for wireless charging, a USB‑C charging cable, and a USB‑C to USB‑A adapter. Features ANC, EPOS BrainAdapt™ technologies, and EPOS AI™‑powered voice pickup and noise cancellation, ensuring your voice sounds natural and clear in any environment. Q-SYS RoomSuite Collaboration Bar + Controller The Q-SYS RoomSuite Collaboration Bar and expansion devices provide a scalable AV solution for standard small-to-large meeting spaces. This Windows-based solution features built-in audio, video, and supports Microsoft Teams Rooms and bring-your-own-meeting conferencing. Includes a touch panel for control and allows for optional table microphones for extended audio coverage. Q-SYS RoomSuite Collaboration Bar + Controller + Expansion Mic The Q-SYS RoomSuite Collaboration Bar and expansion devices provide a scalable AV solution for standard small-to-large meeting spaces. This Windows-based solution features built-in audio, video, and supports Microsoft Teams Rooms and bring-your-own-meeting conferencing. Includes a touch panel for control and allows for optional table microphones for extended audio coverage. The Q-SYS RoomSuite Collaboration Bar can support up to 4 expansion mics. Shure IntelliMix Room Kit 30 | 50 | 70 | 80 Microsoft Teams Rooms-certified solutions for small, medium, and large meeting spaces. Shure IntelliMix Room Kits include a Windows-based Teams Rooms compute with Shure’s premium audio signal processing, an intuitive touch panel, an all-in-one ceiling array microphone and loudspeaker, and intelligent high-resolution video. Designed for streamlined deployment with zero-touch or low-touch setup, the kits provide high-quality audio and video experiences across a range of room sizes. Simply connect devices, power on, and sign in to get started. Shure IntelliMix™ Bar Pro Kit (Black) Clearly capture precise audio and video for AI-powered meetings in medium to large collaboration spaces with this powerful all-in-one Android based video conference bar. Enterprise ready with auto-setup and simple global management, IT managers can create meeting experiences focused on participants with reliable transcription for enhanced AI tools. Yealink MP66W Powered by the Microsoft Device Ecosystem Platform (MDEP) and Android 15, the Yealink MP66W offers accelerated performance and enterprise-level security. With an IP67 rating for water and dust resistance, 1.8-meter drop protection, and an antibacterial, chemical-cleaning-resistant housing, the MP66W is built for mobile workers in healthcare, manufacturing, retail, and warehouse environments. Armed with Yealink's Optima HD Audio and AI Noise Cancellation Technology, MP66W delivers distraction-free, natural-sounding calls even in loud environments. Moreover, MP66W keeps mobile teams connected thanks to its support for Wi-Fi 6E, Bluetooth 5.3, and up to 8 hours of talk time on a single charge. Neat Pad Generation 2 Neat Pad Generation 2 keeps Microsoft Teams meetings moving. As a meeting room controller or scheduling display, it gives teams instant, familiar control and IT a simple, scalable way to standardize rooms across every space. A built-in microphone extends audio pickup in the room, helping conversations sound clearer without extra hardware. Built-in sensors monitor temperature, humidity, and air quality for a healthier workspace. Mount it on a wall, table, or mullion and power it with a single PoE cable — plug in and go. Manage every device remotely with Neat Pulse, and count on Neat's next-generation P2 platform for lasting performance as your needs evolve. Compact, reliable, and easy to deploy, it delivers a consistent experience so every room just works. Barco ClickShare Hub Pro, Huddly® L1™ and Shure for Teams Rooms on Android This ClickShare Hub Pro, Huddly® L1™ and Shure bundle is a certified Microsoft Teams Rooms solution for medium meeting rooms. ClickShare Hub Pro enables one-click, wireless conferencing and 4K content sharing, with two next-gen ClickShare Buttons (featuring Wi-Fi 6E and USB-C DisplayPort™) and dual screen support. Built on the Microsoft Device Ecosystem Platform (MDEP), it’s designed for a secure meeting experience. Huddly® L1™ delivers engaging video collaboration with an on-device AI director, exceptional image quality, and software-defined longevity. The Shure MXA902 ceiling array microphone and loudspeaker with the ANIUSB-MATRIX USB audio network interface provide top-quality audio. Shure MXA925 Ceiling Array Microphone + MXP-6 Pendant Passive Loudspeaker + MXN-AMP PoE + IntelliMix P300 This Microsoft Teams–certified bundle combines the MXA925 ceiling array microphone, IntelliMix® P300 DSP, MXN‑AMP PoE+ multichannel amplifier, and MXP‑6 pendant loudspeakers to deliver a fully validated, end‑to‑end room audio solution for medium to large spaces. Designed to meet Microsoft’s performance and reliability requirements, it provides automatic, precise speech capture, enterprise‑grade echo cancellation, and evenly distributed sound reinforcement while simplifying deployment through networked audio, PoE+ power, and a single‑vendor ecosystem. Shure MXA925 Ceiling Array Microphone + MXP-5 Ceiling-Mount Passive Loudspeaker + MXN-AMP PoE + IntelliMix P300 This Microsoft Teams–certified bundle delivers a complete, scalable room audio solution by combining the MXA925 ceiling array microphone with IntelliMix P300 DSP, the MXN‑AMP PoE+ multichannel amplifier, and MXP‑5 ceiling speakers for clear speech capture and consistent sound coverage in medium to large meeting spaces. The MXA925 uses Automatic Coverage™ and advanced IntelliMix DSP to capture natural, intelligible speech without complex setup, while the P300 provides powerful echo cancellation, noise reduction, and USB connectivity to Teams Rooms systems. The MXN‑AMP and MXP‑5 speakers simplify installation with networked audio and PoE+ power, delivering balanced, room‑filling audio for both in‑room and remote participants. Shure MXA320 Table Array Microphone+MXN5-C Networked Loudspeaker + Intellimix P300 Audio Conferencing Processor The Shure MXA320 Table Array Microphone, MXN5‑C Networked Loudspeaker System, and IntelliMix P300 Conferencing Processor form a fully certified Microsoft Teams Rooms audio bundle designed for Medium meeting spaces. This integrated solution delivers clear, consistent, and intelligible audio through advanced DSP, Steerable Coverage™ technology, and optimized networked loudspeaker performance. The MXA320 captures voices with precision while minimizing ambient noise, the P300 enhances audio quality with powerful IntelliMix® processing, and the MXN5‑C ensures natural, room‑filling sound playback. Together, they provide a seamless, scalable, and easy‑to‑deploy conferencing experience that meets Microsoft’s stringent certification requirements for performance, reliability, and user experience. Shure MXA902 Ceiling Microphone & Loudspeaker + ANIUSB-MATRIX Audio Conferencing Ki High-quality, reliable meeting room audio is now easier than ever. Certified for Microsoft Teams, the Shure MXA902 Integrated Ceiling Array Microphone + Loudspeaker, paired with the ANIUSB-MATRIX Audio Network Interface, delivers a complete, easy to install, ready to use audio solution. Designed for small and medium sized spaces, it provides premium sound, full room coverage, and seamless connectivity. Shure MXW neXt 4&8 Wireless Microphone Systems with boundary microphone configuration + MXN5W-C Networked Loudspeaker This Microsoft Teams-certified solution combines MXW neXt wireless microphones, IntelliMix® DSP, and the MXN5W-C networked ceiling loudspeaker to deliver consistent speech capture and clear room audio for hybrid learning and collaboration spaces. With flexible wireless deployment, integrated signal processing, and cloud-based management, the solution simplifies installation while providing reliable audio performance for both in-room and remote participants. Shure MXW neXt 2 Wireless Microphone System with Boundary Microphone Configuration and MXN5W-C This Microsoft Teams certified bundle combines the MXW neXt 2 wireless microphone system with boundary microphones and the MXN5W-C networked ceiling loudspeaker to deliver clear speech capture and consistent room audio for classrooms and collaboration spaces. Easy to deploy and cloud enabled for remote management, the solution simplifies installation while providing reliable wireless performance for both in-room and remote participants. Barco ClickShare Hub Pro and Huddly ®C1™ Crew for Teams Rooms on Android The ClickShare Hub Pro, Huddly C1 Crew bundle is a certified Microsoft Teams Rooms solution for small-to-medium meeting rooms. ClickShare Hub Pro enables one-click, wireless conferencing and 4K content sharing, with two next-gen ClickShare Buttons (featuring Wi-Fi 6E and USB-C DisplayPort™) and dual screen support. Built on the Microsoft Device Ecosystem Platform (MDEP), it’s designed for a secure meeting experience. Huddly C1 Crew adds AI-driven multi-camera video with integrated audio. Its on-device AI director frames people naturally for inclusive meetings, with clear image and sound throughout the room. For meeting participants, this bundle ensures intuitive, engaging meetings. For IT managers, it provides modular flexibility, enterprise-grade security, compliance, and standardized integration. Logitech Zone Vibe Pro for Business Zone Vibe Pro for Business is certified for Microsoft Teams and offers the over-ear design that people love — purpose-built for open offices and wide deployment. Our AI-powered voice isolation uses machine learning to capture your voice clearly. Adaptive hybrid ANC minimizes distractions, while custom 40 mm drivers deliver vivid, true-to-life audio.1.5KViews1like0CommentsMicrosoft Graph PowerShell SDK V2.41 Finally Fixes Assembly Clash
The Microsoft Graph PowerShell SDK has long been plagued by assembly clashes that meant it couldn’t be used in the same session as other Microsoft 365 modules. After Microsoft engineering groups looked at the problem for 18 months, a solution was found by MVP Stephen van Rooij and is now available in V2.41. Apart from an issue with old PowerShell V7 versions (which affects Azure Automation runtime environments), the fix looks solid and the SDK can once again be loaded into PowerShell sessions alongside the Exchange Online and Teams modules. https://office365itpros.com/2026/10/05/microsoft-graph-powershell-sdk-fix/18Views0likes0Comments
Excel can still use legacy “Move and Size with Cells” checkboxes — but can no longer create them
Excel Can Still Use “Move and Size with Cells” Form Checkboxes — But It Can No Longer Create Them A reproducible Excel compatibility regression hiding inside legacy Form Controls For years, I have used Excel workbooks containing hundreds of Form Control checkboxes attached to product rows. These checkboxes behaved exactly as you would expect: - change the row height, and the checkbox stays inside that row; - filter the worksheet, and the checkbox disappears together with its product; - remove the filter, and the checkbox returns to the correct row; - no overlapping controls; - no “click one checkbox, activate another” behaviour. Recently, while rebuilding one of these workbooks in Excel 2024 LTSC, I discovered something very strange. The old checkboxes still work perfectly. But if I delete one and recreate it — even using the same VBA code that originally created the controls — Excel creates a different kind of placement behaviour. After a full day of controlled testing, XML inspection and A/B workbook comparison, the problem became clear: Excel can still read, display, save and execute legacy Form Control checkboxes using true “Move and size with cells” behaviour — but current Excel cannot recreate that same state for a newly created Form Control checkbox through the normal UI or VBA object model. That is not just inconvenient. For existing business workbooks, it is a serious backward-compatibility problem. The simple VBA code that used to work The original controls were created with ordinary Excel VBA: Set myCBX = wks.CheckBoxes.Add( _ Top:=cell.Top, _ Left:=cell.Left, _ Width:=cell.Width, _ Height:=cell.Height) Nothing exotic. No custom event engine. No ActiveX. No external add-in. Just a standard Excel Form Control checkbox positioned exactly over a cell. The workbook contains roughly 1,000 of these controls. The old ones still behave correctly today. The problem starts only after deleting them and creating new ones. What changes? In the Excel UI, the difference is immediately visible. For an original legacy checkbox: Format Control → Properties shows: Move and size with cells The option is selected, although it is greyed out. For a newly created checkbox in current Excel: Move but don’t size with cells is selected instead. That already suggests something changed internally. But the real evidence is inside the .xlsm package. The OOXML tells the story I created two controlled test workbooks: Workbook A Original legacy Form Control checkboxes that behave correctly. Workbook B The same workbook, but the checkboxes were deleted and recreated in current Excel using the original VBA logic. The internal OOXML differs. The working legacy controls contain placement information equivalent to: moveWithCells="1" sizeWithCells="1" and use genuine two-cell anchoring. The newly generated controls are instead stored using one-cell-style placement semantics, including: <xdr:twoCellAnchor editAs="oneCell"> The important part is not merely the XML syntax. The resulting behaviour is observably different. With the legacy control, both ends of the object are anchored to the worksheet grid. With the newly created control, Excel effectively preserves the control size while cells move underneath it. That distinction becomes disastrous when rows are resized, hidden or filtered. Why filtering exposes the problem Imagine a checkbox sitting on row 50. With the legacy behaviour: Checkbox ↔ Row 50 boundaries When row 50 changes size, the checkbox changes with it. If row 50 is filtered out, the control disappears with the row. When the row becomes visible again, the control is still exactly where it belongs. With the newly generated control, its dimensions are not tied to both cell boundaries in the same way. After repeated resizing and filtering, controls can begin to overlap. That leads to one of the worst possible spreadsheet UI failures: You click the checkbox you can see, but another checkbox receives the click. For a workbook containing hundreds or thousands of rows, this makes the controls unreliable. “Just use .Placement = xlMoveAndSize” That was the obvious first solution. Excel VBA defines: xlMoveAndSize as the placement mode where an object moves and resizes with cells. So I tested: myCBX.Placement = xlMoveAndSize and: myCBX.Placement = 1 I also tested placement through the corresponding Shape: ws.Shapes(myCBX.Name).Placement = xlMoveAndSize And through a ShapeRange. And through DrawingObjects. And even the commonly suggested workaround: Group controls → set Group.Placement = xlMoveAndSize → Ungroup None of these recreated the original internal state in Excel 2024 LTSC. The workbook continued to serialize the new controls differently. This matches long-standing Microsoft guidance that Form Control checkboxes do not normally support “Move and size with cells” as an editable option, while ActiveX checkboxes do. And yet — this is the important part — existing legacy Form Control checkboxes in real workbooks can still possess and use that state. The most revealing experiment I then modified the OOXML manually. I took the newly generated workbook and patched the checkbox placement metadata to match the working legacy controls: moveWithCells="1" sizeWithCells="1" with proper two-cell anchoring and without the one-cell override. Then I reopened the workbook in Excel 2024 LTSC. And it worked. Immediately. No custom VBA reposition engine. No ActiveX. No workaround running continuously. The same Excel installation that would not create this state through VBA had absolutely no problem: - reading it, - displaying it, - saving it, - resizing the controls with rows, - and filtering them correctly. That is the key finding. The Excel rendering and file engines still fully understand this checkbox state. The missing part is the supported creation path. So is this an unsupported feature or a compatibility regression? Microsoft has historically documented Form Control checkboxes as not supporting “Move and size with cells” in the normal UI. That makes the situation unusual. The issue is not simply: “Excel removed a documented checkbox feature.” The stronger and more accurate statement is: Excel supports a legacy Form Control state in existing workbooks, continues to execute it correctly, but no longer provides an ordinary supported mechanism to reproduce that same state for a replacement control. For users maintaining long-lived Excel systems, the difference is academic. If an old control is accidentally deleted, replacing it with an apparently identical Form Control changes the behaviour of the workbook. That is a backward-compatibility problem. Why not switch to ActiveX? ActiveX checkboxes support richer placement behaviour. But that creates another problem. Microsoft now disables ActiveX controls by default in Microsoft 365 and Office 2024 for security reasons. When ActiveX is disabled, users cannot create new ActiveX objects or interact with existing ones. So the official alternatives are hardly attractive: Legacy Form Controls Lightweight and reliable — but cannot reproduce this legacy placement state normally. ActiveX Supports more control behaviour — but is now a legacy security-sensitive technology disabled by default in current Office. New in-cell checkboxes Architecturally much better — because the checkbox is part of the cell and represents TRUE/FALSE. But Microsoft’s own documentation currently lists the feature for: - Excel for Microsoft 365 - Excel for Microsoft 365 for Mac not Excel 2024 LTSC. That leaves perpetual Office users in an uncomfortable middle ground. This is where the product story becomes difficult to defend I am not claiming that Microsoft intentionally removed this behaviour in order to sell subscriptions. There is no evidence for that claim. But the resulting user experience is still hard to justify: 1. Excel can execute the legacy checkbox behaviour. 2. Excel can preserve it. 3. Excel can save it. 4. Excel accepts a manually patched workbook containing it. 5. Excel’s current object model does not provide a reliable way to recreate it. 6. The modern replacement — native in-cell checkboxes — is documented for Microsoft 365 rather than Excel 2024 LTSC. 7. The other legacy alternative, ActiveX, is now disabled by default for security reasons. For users maintaining mature Excel applications, this is a poor migration path. Why this matters beyond checkboxes This is not really a story about one checkbox property. It is about the contract users expect from long-lived productivity software. Excel workbooks are often not disposable documents. They can be: - product-management systems, - pricing tools, - engineering calculators, - operational forms, - purchasing systems, - inventory tools, - reporting applications, - or business processes maintained for ten or twenty years. When Excel continues to support the execution of an old document feature but silently prevents users from recreating an equivalent object, maintaining those systems becomes unnecessarily difficult. Backward compatibility should mean more than: “The file still opens.” It should also mean: “A user can maintain the workbook without reverse-engineering its OOXML package.” What Microsoft could do There are several reasonable fixes. Option 1 — Restore proper placement support Allow: CheckBox.Placement = xlMoveAndSize to generate the same placement state that Excel already understands for legacy controls. Option 2 — Expose the existing capability If the engine already supports it, expose “Move and size with cells” again for Form Control checkboxes. Option 3 — Provide a migration path Make the new in-cell checkbox functionality available to perpetual Excel releases as well, or provide an official conversion tool from legacy Form Controls to cell checkboxes. Option 4 — At minimum, document the limitation If this legacy state is intentionally read-only for compatibility, document it clearly. Currently, a user can spend hours debugging VBA without realizing that two visually identical Form Control checkboxes can have fundamentally different internal placement semantics. A workaround exists — but users should not need it The workaround I eventually used was to modify the .xlsm OOXML package so that newly generated controls use the same anchor metadata as the working legacy controls. That solved the problem immediately. But manually patching Office XML should not be necessary to restore behaviour that Excel itself already supports. It is a useful proof of concept. It is not an acceptable product-level solution. The reproducible evidence I have retained minimal A/B test workbooks demonstrating the problem: OLD Original Form Control checkboxes with correct legacy placement. NEW The same workbook after deleting and recreating the controls. The differences can be reproduced and inspected directly in the workbook OOXML. I would be happy to provide the files to Microsoft Excel engineering. Final thought Excel’s reputation was built partly on extraordinary backward compatibility. That is why companies still trust .xls and .xlsx files created years — sometimes decades — ago. This case shows an uncomfortable edge of that compatibility: Excel remembers how to use an old feature, but appears to have forgotten how to create it. When the workaround is to unzip an .xlsm, manually alter OOXML placement records, rebuild the package and reopen it in Excel — and Excel then works perfectly — it is difficult to argue that the capability itself is gone. The engine still knows how. The user simply no longer has a supported button or VBA path to ask for it. Microsoft, please give that capability back — or provide a proper migration path. Sources Microsoft documentation for native cell-based checkboxes: https://support.microsoft.com/en-us/excel/using-check-boxes-in-excel Microsoft-hosted discussion on Form Control checkbox limitations: https://learn.microsoft.com/en-us/answers/questions/4813119/is-there-a-way-to-assign-a-checkbox-to-a-cell Microsoft documentation on ActiveX controls being disabled by default: https://support.microsoft.com/en-us/office/vba/activex-controls-are-disabled-by-default-in-microsoft-365-and-office-202498Views0likes2Comments
Teams unexpectedly ends calls with Anker PowerConf S3 A3302 over USB
ANKER POWERCONF Sthree Unintended Teams call terminations Diagnostic dossier - public version Model Athree three zero two ; Public version: hostname, GUIDs and original archive names removed Summary for support intake Teams calls end spontaneously when PowerConf Sthree is used over USB with Sync device buttons enabled. The issue is reported on two units and multiple PCs, both laptops and desktops. The user is disconnected from the call; this is not merely a loss of audio. The weblogs identify an Sthree HID call-control hangup: telephony off-hook state is inactive ; followed by onDidHook ; followed by leaveCallContext=hid_triggered. An independent USB trace shows a brief stop/restart of microphone streaming immediately before the zero report. A physical button press is not required to observe these states. With synchronization OFF, we recorded the same stop/start and zero report during a call that continued. The issue is also reproduced without the Trust two four five three zero receiver. Two Bluetooth calls with synchronization saved as ON were stable, using a different control path. Observed environment Item ; Details - Speakerphone ; Anker PowerConf Sthree Athree three zero two; USB VID two nine oneA / PID three three zero two - Firmware ; two dot two dot eight reported by the user; not verified separately for both units - Teams ; two six two four six dot one six zero four dot five one three three dot eight three eight - Windows ; Microsoft components one zero dot zero dot two six one zero zero.x; detailed collection on a test PC - USB conditions ; Sthree port and cable unchanged throughout. No active Sthree Bluetooth connection reported during USB tests. - Receiver compared ; Trust two four five three zero, keyboard/mouse kit; not required to reproduce the issue Responsibility remains unresolved: neither the requester of the initial microphone stop nor the responsible component among Anker firmware, the Windows audio/HID stack and Teams interpretation has been established. The termination chain is identified; the internal cause still requires investigation. one. Comparison of tests Italian local times, UTC+zero two hours zero zero minutes, on one October two zero two six. ON/OFF refers to button synchronization. IDs Eone-Enine reference the archives in the archive index below. These outcomes are not statistical estimates of reliability. Test ; Configuration ; Outcome and evidence - Eone ; one four hours five two minutes ; USB; ON ; Call ended: Sthree telephony off-hook state is inactive report, onDidHook, hid_triggered. - Etwo ; one five hours one zero minutes ; USB; ON ; Reports transition from inactive to active about six zero ms apart; ETW shows microphone stop/start before zero. Weblog for the same session unavailable. - Ethree ; one five hours three five minutes ; Outside Teams ; Three recording cycles: microphone start ; followed by telephony off-hook state is active; stop is followed by the inactive state. Teams not detected in one four snapshots. - Efour ; one five hours four three minutes ; USB; OFF ; Stable call ~twomzero six. Stop/start and zero report at one five hours four four minutes zero two seconds; Teams logs disabled controls. - Efive ; one six hours zero one minutes ; USB; ON; Trust removed ; Stable call ~twomfive zero. No intermediate stop/start. Manual termination verified. - Esix ; one six hours one five minutes ; USB; ON; Trust reinserted ; First call stable ~fivemone six and ended manually. Second ended through HID after a brief stop/start. - Eseven ; one six hours two six minutes ; USB; ON; Trust removed ; Issue reproduced. Five transient USB/HID cycles; final hangup directly confirmed in weblogs. - Eeight ; one six hours three five minutes ; Bluetooth; OFF ; Stable call ~threemthree one. OFF saved before the call; manual termination verified. - Enine ; one six hours four two minutes ; Bluetooth; ON saved ; Two stable calls reported. No HID hangup in the available window; second manual termination verified. Additional user observations A one zero-minute call did not end unexpectedly with synchronization OFF. In the problematic tests, the option was already enabled before starting the call. The user reports no Sthree button presses during the unexpected terminations. Trust hypothesis: updated after the control test The initial stable test without the dongle was a provisional lead. Subsequent reproduction without Trust rules it out as a necessary cause. There is insufficient evidence to attribute the terminations to radio interference from the receiver or to recommend replacing it. two. Termination chain observed in Teams and USB Eone - HID-triggered termination at one four hours five two minutes Italian local time ; Relevant log line/event - one four hours five two minutes four zero seconds one six zero milliseconds ; PowerConf Sthree, Standard Hook Protect USB: Telephony usage telephony off-hook state (three two), value zero; received hook event; invoking onDidHook. - one four hours five two minutes four zero seconds one six one milliseconds ; onDidHook: leaves active call; startHangupScenario. - one four hours five two minutes four zero seconds two two zero milliseconds ; telephony off-hook state is active and line busy tone state is active: state restored after about six zero ms. - one four hours five two minutes four one seconds one six three milliseconds ; leaving call, leaveCallContext=hid_triggered. - one four hours five two minutes four one seconds three six five milliseconds ; calling_call_disconnected, same hid_triggered context. LocalUserInitiated is the software classification of the local termination and does not prove a human action. Standard Hook Protect USB is the name of the HID handler selected by Teams; it does not establish that a proprietary Anker driver is damaged. Eseven - Reproduction without Trust at one six hours two eight minutes Italian local time ; Event - one six hours two eight minutes four zero seconds five five four milliseconds ; Teams: connected call state three, active call. - one six hours two eight minutes four six seconds three nine four milliseconds ; Sthree USB microphone: interface three, alternate setting zero. - one six hours two eight minutes four six seconds four zero zero milliseconds ; Teams: received hook event on StandardHookProtectUSB. - one six hours two eight minutes four six seconds four zero five milliseconds ; Sthree Raw Input: zero two-zero zero-zero zero, telephony off-hook state is inactive. - one six hours two eight minutes four six seconds four four four milliseconds ; USB: interface three alternate setting one; restart after five zero ms. - one six hours two eight minutes four six seconds four six four milliseconds ; Sthree Raw Input: zero two-zero three-zero zero, telephony off-hook state is active. - one six hours two eight minutes four seven seconds four one four milliseconds ; Teams: leaving call, hid_triggered, leaveCallState three. - one six hours two eight minutes four seven seconds five six three milliseconds ; Teams: disconnected, leaveCallContext=hid_triggered. The initial stop/start sequence precedes the hangup. Stops and zero reports after termination may instead be consequences of it. ETW and Raw Input observe different points in the stack: timestamp differences do not measure firmware latency alone. three. Independent verification and controls Report identification and decoding The Sthree USB Raw Input path is HID / VID_two nine oneA & PID_three three zero two / MI_zero zero / Colzero two. Captured preparsed data was used with HidP_GetUsages from hid.dll, Input report and Telephony Usage Page zeroxzeroB. Decoding is based on the descriptor, not an assumption about a byte. Report ; Parser result - zero two-zero zero-zero zero ; No active telephony usages: telephony off-hook state (usage three two) is inactive, line busy tone state (usage one five one) is inactive. - zero two-zero three-zero zero ; Usages three two and one five one active: telephony off-hook state is active, line busy tone state is active. USB interface three is AudioStreaming: class zeroxzero one, subclass zeroxzero two. Alt zero has zero endpoints; alt one enables IN endpoint zeroxeight one, the microphone stream. Stopping/starting the stream is not equivalent to physically disconnecting the port. Ethree - Three recordings outside Teams USB microphone operation ; Subsequent report ; Approx. interval - one five hours three six minutes three zero seconds one eight eight milliseconds ; start ; one five hours three six minutes three zero seconds two three seven milliseconds ; telephony off-hook state is active ; four nine ms - one five hours three six minutes three six seconds eight one four milliseconds ; stop ; one five hours three six minutes three six seconds eight two zero milliseconds ; telephony off-hook state is inactive ; six ms - one five hours three six minutes four one seconds zero zero eight milliseconds ; start ; one five hours three six minutes four one seconds zero three three milliseconds ; telephony off-hook state is active ; two five ms - one five hours three six minutes four nine seconds two three four milliseconds ; stop ; one five hours three six minutes four nine seconds two four one milliseconds ; telephony off-hook state is inactive ; seven ms - one five hours three six minutes five one seconds eight six two milliseconds ; start ; one five hours three six minutes five one seconds eight eight seven milliseconds ; telephony off-hook state is active ; two five ms - one five hours three six minutes five seven seconds nine three nine milliseconds ; stop ; one five hours three six minutes five seven seconds nine five zero milliseconds ; telephony off-hook state is inactive ; one one ms Teams is not detected in the one four process snapshots for Ethree; sampling is not a continuous trace of all process starts. This comparison shows that Teams is not required to observe the zero state when the microphone stops, but does not distinguish firmware from the Windows stack. Efour - Same phenomenon, stable call with OFF During the call: alt zero at one five hours four four minutes zero two seconds zero two seven milliseconds, Raw telephony off-hook state is inactive at zero four zero milliseconds within the same second, alt one at zero eight eight milliseconds within the same second, Raw telephony off-hook state is active at one one three milliseconds within the same second. Teams logs audio device sync is disabled and controls not enabled. The call continues until the manual click at one five hours four five minutes five one seconds zero three zero milliseconds. OFF does not necessarily eliminate the reports: it prevents their use as call controls. four. Bluetooth and alternative hypotheses Enine - Two calls with synchronization saved as ON At one six hours four two minutes three four seconds five eight one milliseconds, the client logs “Toggling sync device buttons enabled to true”; at five eight four milliseconds within the same second, “audioDeviceSyncEnabled: true”. No synchronization-disabled or HID-hangup log lines appear within the two-call window available in the weblogs. First call: connected at one six hours four two minutes five three seconds zero three eight milliseconds. Manual termination is reported by the user; the corresponding explicit hangup line is absent from the examined user-log segment. Second call: connected at one six hours four five minutes zero five seconds three zero three milliseconds, hangup click at one six hours four six minutes five eight seconds five three three milliseconds/five three five milliseconds within the same second, disconnected at seven zero five milliseconds within the same second with multi-window_hangup-button_click. Selected Bluetooth endpoints: microphone [endpoint ID omitted] and speaker [endpoint ID omitted]. The monitor confirms active endpoints and Sthree USB endpoints in the unplugged state; no Sthree USB HID reports captured. Why Bluetooth is not an identical control to USB Teams uses call-control-service-vtwo / VoipCallCoordinator for the Bluetooth path. The USB HID handler does not associate these endpoints with the USB telephony device. Saving ON also logs “Slimcore version doesnt support toggle sync”: the client’s true value is confirmed, but does not establish identical propagation and handling of all native controls. Conclusion: Bluetooth is stable in the short tests and supports a USB/HID-path-specific issue. This does not establish lasting stability under all conditions or, by itself, assign responsibility to a component. Dongle, radio and USB connection The Trust two four five three zero is not required to reproduce the issue. The logs do not establish that it generates the hangup command: the decisive reports belong to the Sthree. Radio effects at two dot four GHz, USB controller/power issues and software interactions are distinct mechanisms and must not be conflated. Etwo includes two USBHUBthree “Client Initiated Recovery Action” events on Generic USB Hub VID_zero fiveEthree/PID_zero six one zero, root port four, about one minute before the main sequence. The Sthree is on root port three, not directly downstream of that hub. These events do not establish the cause of the hangup. five. Instrumentation, limitations and support requests SthreeMonitor vthree collection Raw Input and preparsed HID data; PnP inventory/changes; audio endpoint/default snapshots; processes and network; Windows events; USB ETW trace through USBXHCI, UCX and USBHUBthree. The supervisor separates collectors into processes with timeouts, writes logs during collection and handles markers and stopping. It was introduced to fix the console freeze in the previous synchronous collection. ETW session ; Events processed / lost - Etwo ; one six,one three four / zero - Ethree ; one six,two seven three / zero - Efour ; nine,eight six seven / zero - Efive ; three,one six one / zero - Esix ; two four,four one six / zero - Eseven ; eight,four four nine / zero Checked Sthree USB completions show no errors. Pending status zeroxfour zero zero zero zero zero zero zero and rundown values are not treated as completion errors. In Etwo, no Sthree PnP/Raw Input removals are recorded; audio polling at two s does not exclude shorter pauses. Collected drivers: Microsoft USB audio one zero dot zero dot two six one zero zero dot nine four four four (wdma_usb.inf); HID telephony/headset one zero dot zero dot two six one zero zero dot nine two seven eight (hidtelephonydriver.inf); HID consumer one zero dot zero dot two six one zero zero dot one (hidserv.inf); USB composite one zero dot zero dot two six one zero zero dot nine four four four (usb.inf). Different versions of different components do not establish a conflict. Limitations to retain in the assessment Raw Input is downstream of drivers, not a direct capture of bytes on the wire. Kernel-context ETW PIDs do not identify the originating client. teams.jsonl is empty in the collections considered: separate weblogs are the application-level source. In Etwo, the detailed PnP baseline is incomplete; the marker arrived after stopping began. Internal firmware and RF interference are not measured; the initial Teams export and some windows do not retain all lines at the same level of detail. Request to Microsoft Identify the client and reason for the initial microphone reconfiguration. Review telephony off-hook state handling during transient USB-stream pauses and protection against unintended hangups in the Standard Hook Protect USB handler. Specify the audio/HID capture with client attribution needed to complete the diagnosis. Request to Anker Review the telephony state exposed by Athree three zero two with firmware two dot two dot eight when the USB microphone stops/starts; confirm expected behavior and Teams compatibility. Identify any firmware fix for the exact model, avoiding unrelated updates. Mitigation verified in the tests: USB with synchronization OFF. Bluetooth is an alternative that was stable in the short tests. No indiscriminate driver reinstallation has been performed, nor has a need to replace the Trust been established. six. Archive index and references This post summarizes the evidence; full logs are not included. The table uses aliases, not original filenames. Technical sequence timestamps and software versions are retained. Full archives should only be shared through a private channel agreed with support. ID ; Archive aliases (original names omitted) - Eone ; Teams-WebLogs-Eone.zip - Etwo ; SthreeMonitor-Etwo.zip - Ethree ; SthreeMonitor-Ethree.zip - Efour ; SthreeMonitor-Efour.zip / Teams-WebLogs-Efour.zip - Efive ; SthreeMonitor-Efive.zip / Teams-WebLogs-Efive.zip - Esix ; SthreeMonitor-Esix.zip / Teams-WebLogs-Esix.zip - Eseven ; SthreeMonitor-Eseven.zip / Teams-WebLogs-Eseven.zip - Eeight ; SthreeMonitor-Eeight.zip / Teams-WebLogs-Eeight.zip - Enine ; SthreeMonitor-Enine.zip / Teams-WebLogs-Enine.zip Export mentioned but unavailable at the time of the relevant analysis: Teams-WebLogs-unavailable.zip. No conclusion relies on its contents. Local CSV/TXT analyses are derived from the files above and do not replace the originals. Official technical references Windows HID parser - HidP_GetUsages https://learn.microsoft.com/en-us/windows-hardware/drivers/ddi/hidpi/nf-hidpi-hidp_getusages USB alternate settings https://learn.microsoft.com/en-us/windows-hardware/drivers/usbcon/select-a-usb-alternate-setting Teams - device and button settings https://support.microsoft.com/en-us/teams/notifications-settings/manage-your-device-settings-in-microsoft-teams Anker - PowerConf / Sthree / PowerConf+ FAQ https://www.ankerjapan.com/blogs/faq/powerconf-powerconf-sthree-powerconf Summary based on logs and tests provided by the user. It distinguishes observed evidence, reported outcomes and unresolved hypotheses. It does not assign unproven responsibility to Microsoft, Anker or Trust.34Views0likes0CommentsWhen AI Starts Taking Action: Building Execution Boundaries with OpenSandbox and AKS
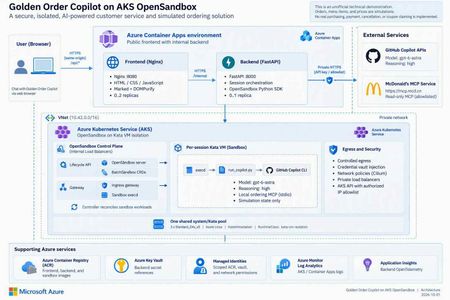
1. An agent needs more than a smarter model Imagine you are building a food-ordering assistant. In its first version, it says, “You might enjoy a burger and fries.” That is primarily a content-generation problem. In the next version, it queries coupons, reads a menu, calculates prices, creates files, and calls a local program to create an order. The engineering problem has changed. You are no longer asking a model to speak. You are allowing software to act on someone's behalf. This is a distinction I emphasize in technical talks: model capability determines what the agent can propose; the execution platform determines where, with which permissions, and for how long those proposals can become actions. Running every agent's tool processes inside the business API container creates awkward coupling. Leftover files, stuck processes, dependency changes, or excessive resource consumption from one session can affect another. Even if customers cannot invoke an arbitrary shell, CLI processes, tool dependencies, and temporary state still need boundaries. A sandbox is therefore not an instruction that says “please be safe.” It is a working environment with a lifecycle, a resource budget, and an access policy. Figure 1. A tool protocol, a working environment, and runtime isolation solve different problems. 2. Separate three concepts that often get conflated MCP describes tool interaction; it does not put tools inside a VM The Model Context Protocol gives model-facing applications a consistent way to discover and invoke tools. But “called through MCP” does not automatically mean “executed within a security boundary.” An MCP server can run on a developer's laptop, in a business-service container, remotely, or in a dedicated sandbox. Whether a tool can write data, who may invoke it, and how its side effects can be reversed are separate design questions. OpenSandbox makes the working environment an application resource OpenSandbox is an open-source platform for agent execution environments. It exposes sandbox lifecycle, command execution, file operations, and network-access capabilities. Applications use SDKs and APIs to create environments, run work, retrieve results, and clean up. Docker supports a local starting point; Kubernetes provides a cluster deployment path.1 Think of it as a workspace management system: it allocates a room, delivers materials, exposes ways to work, and reclaims the room at the end of its lease. The strength of the walls depends on the runtime and deployment underneath. OpenSandbox is not a language model, not a replacement for Kubernetes, and not synonymous with Kata. The upstream project also provides pools, multiple runtime paths, and snapshot-related capabilities. Availability, state semantics, and infrastructure requirements must be checked against the selected version and runtime. A project-wide feature list is not a promise that every backend behaves identically.1, 5 Kata adds a separate guest kernel to the sandbox pod Conventional containers generally share the host kernel. Kata Containers runs workloads in lightweight virtual machines, adding a VM boundary. With AKS Pod Sandboxing, the isolation unit is the pod using the Kata runtime, with its own guest kernel.2, 3 That does not mean every container in the same pod gets its own VM. Nor does a VM replace application authentication, outbound restrictions, or business approvals. The useful summary is: MCP defines the tool interface. OpenSandbox manages the working environment. Kata provides runtime isolation. The application still owns authorization and business rules. 3. What does “per-session Kata VM” actually isolate? In this project, a session is identified by session_id. The backend creates an OpenSandbox sandbox for a new session, and its pod selects the Kata RuntimeClass. Later requests in the same session reuse that environment. Several distinctions matter: It is not a new VM for every message. Related turns can reuse files and temporary state produced by the tools. It is not an Azure VM purchased for every user. Kata pod VMs run on AKS nodes; multiple sandboxes can share a node's underlying compute resources. It is not one sandbox per node. Capacity depends on resource settings, VM overhead, system components, and concurrent work. A session ID is not authorization. It identifies routing and resource mappings; production services must validate session ownership. My favorite analogy is a campus: AKS is the campus, nodes are buildings, Kata sandboxes are workrooms, and OpenSandbox is the workspace management system. A session repeatedly uses the same room; a lifecycle policy eventually clears it. That final step matters. Files surviving between turns does not mean they survive sandbox deletion. Orders, code artifacts, or audit records that must outlive the environment need explicit, governed persistence. Figure 2. This project hosts its frontend and backend in regular ACA, and OpenSandbox/Kata on AKS. Model inference is called through an external API, not hosted on the AKS nodes. 4. OpenSandbox on AKS: installation is not the finish line Kubernetes supplies scheduling and declarative resource management. OpenSandbox turns that infrastructure into sandbox operations that an application can consume. The execution path in this project is: The FastAPI backend requests a sandbox through the OpenSandbox SDK. The lifecycle service creates a BatchSandbox resource. The controller reconciles that declaration into a sandbox pod. The pod starts with the Kata runtime. The SDK accesses execd through the gateway for command and file operations. Deletion or expiration reclaims the sandbox. The upstream Kubernetes operator also supports pool allocation. However, warming an image in this sample is not the same as maintaining a ready-to-allocate pool of sandbox instances. Cached image layers and ready idle sandboxes are different latency optimizations.5 4.1 Declare the runtime, then verify the running boundary The important part of the project's BatchSandbox pod template is: spec: runtimeClassName: kata-vm-isolation nodeSelector: kubernetes.azure.com/kata-vm-isolation: "true" securityContext: seccompProfile: type: RuntimeDefault This is a fragment of the pod template, not a complete manifest that works independently of cluster prerequisites. The deployed example uses one shared system/Kata pool: three Standard_D4s_v5 Azure Linux nodes with KataVmIsolation, created through AKS API 2026-07-01. The model is gpt-6-astra accessed through GitHub Copilot APIs; this is not a GPU model-serving deployment. To avoid confusing “Kata appears in the configuration” with “the boundary is working,” deployment checks inspect the actual pool properties, three Ready nodes, the RuntimeClass, and the guest kernel inside a temporary Kata pod. The kernel check is a deployment acceptance signal, not a formal proof of the entire system's security. 4.2 More platform control also means more platform ownership OpenSandbox on AKS gives a team control over its runtime, images, network layout, and application integration. It also leaves the team responsible for node capacity, image provenance, control-plane upgrades, resource budgets, observability, recovery, and removal of temporary installation privileges. For simplicity, this demonstration uses a shared system/Kata pool. Three nodes are not presented as a high-availability guarantee. A production design should reconsider dedicated system and workload pools, zones, quotas, and tenant separation rather than copy the demonstration's footprint. 4.3 Credentials should be usable without being casually readable Credential Vault is especially interesting here. The trusted backend supplies credentials and bindings to OpenSandbox's egress sidecar. The Copilot workload process receives placeholders; the proxy injects authentication into matching outbound HTTPS requests.4 Precision matters: this reduces the workload's direct access to long-lived credentials; it does not make credentials disappear from the system. The backend and egress sidecar remain in the trusted computing base. It would be inaccurate to claim that real credentials can never exist anywhere within the pod VM. Preventing a model from reading a token also does not prevent misuse of operations authorized by that token. This project still restricts remote tools to read-only operations and uses exact hostname bindings for credential injection. Production systems should further scope operations, paths, tenants, and data. The upstream guide also explains that Kubernetes pause/resume can recreate the sidecar, requiring a trusted client to repopulate its in-memory vault.4 That distinction is valuable: restoring compute state, restoring identity context, and restoring business permissions are different operations. 5. Before comparing ACA Sandbox, stop treating it as another name for Dynamic Sessions Azure Container Apps includes several compute models: Model Primary concern Regular Container Apps Web apps, APIs, continuous services, and replica scaling Jobs Tasks that start, run, and complete Dynamic Sessions Isolated execution through a session pool and identifier Sandboxes Explicit lifecycle, state, and policy control over individual environments The current official overview describes ACA Sandboxes as a distinct resource model. A Microsoft.App/SandboxGroups resource is the management boundary for sandboxes, disk images, snapshots, volumes, and related resources. Documented capabilities include suspend/resume, memory and disk state, ports, egress policies, and Azure Blob/Data Disk volumes.6 Integration has its own control-plane contract: ARM manages sandbox groups, while the Sandboxes data plane manages individual instances, files, and related resources. The documentation requires a Microsoft Entra ID identity and the Container Apps SandboxGroup Data Owner role for sandbox management, assigned at an appropriate scope rather than granting broad access by default. These platform access requirements still do not replace your application's end-user authentication and authorization.6 Dynamic Sessions centers on Session Pool + identifier. A pool allocates a session, routes related requests to it, and reclaims it according to lifecycle and cooldown settings. Context can survive while that session exists; calling it “completely stateless per request” would be misleading. But it is not the same abstraction as a workspace with explicit snapshot and volume management.7, 8 There is also a release-status caveat. At the time of review, Microsoft Learn described these Sandboxes capabilities, while Microsoft's earlier repository documentation still carried an Early Access label and warned that early resources might need recreation.9 This article does not infer universal GA or regional access, nor does it treat the older “SDK coming soon” wording as current. Verify access, SDKs, RBAC, networking options, and service terms before adoption. Figure 3. This is an ownership comparison, not a security rating or performance ranking. 5.1 A comparison that helps make a decision Dimension OpenSandbox on AKS: this project's path ACA Sandboxes ACA Dynamic Sessions Main object OpenSandbox sandbox and Kubernetes workload Sandbox group and individual sandbox Session pool and identifier Platform operations Team operates OpenSandbox and configures AKS workloads/nodes; Azure still manages the AKS control plane Azure manages underlying infrastructure; the app explicitly manages sandbox lifecycle Azure manages pool allocation and session lifecycle Isolation This project explicitly selects Kata pod VMs Documented independent security boundary; this article does not infer a particular open-source runtime Officially documented Hyper-V isolation State Temporary per-session state here; upstream persistence/snapshot paths need separate configuration and validation Explicit suspend, resume, snapshots, and volumes Context while a session exists; treat state as ephemeral after reclamation Images and tools Custom images, CLI, MCP, and runtime policy OCI images converted to root filesystems; validate workload compatibility Built-in interpreters or custom container pools Network and credentials Team combines private networking, egress policy, Vault, and app authorization Service identity/network/policy capabilities; do not assume equivalence to OpenSandbox Vault Pool access and network controls; app owns identity and tool authorization Startup experience Depends on cache, scheduling, runtime, and initialization; no instant-start guarantee in this sample Documentation describes prewarmed subsecond startup/restore; measure your own workload Documentation describes low-latency prewarmed allocation; distinguish spare pool capacity from cold starts Team fit Kubernetes expertise and a need for deeper runtime control Managed infrastructure with explicit workspace state control Managed execution sessions without managing every environment's full lifecycle The ACA entries describe documented capabilities, not measurements from this project.6, 7, 8 A shared OCI image format does not make SDKs and APIs interchangeable. The existing backend depends on OpenSandbox creation, command-log, health, credential-proxy, and deletion semantics. Moving it to ACA Sandboxes requires mapping and testing those contracts, not changing an endpoint URL. Cost is also more than a price per hour. A useful measure is total cost per successfully completed task: execution resources, warm capacity, state storage, images, networking, logs, model usage, and operational effort. ACA documentation says stopped sandboxes incur no CPU/memory fees; that does not zero the bill for the application, storage, or dependencies. Deleting an AKS sandbox does not eliminate fixed node costs either.6 6. How I would choose for different scenarios Scenario A: upload a CSV and ask AI to run a short analysis If work is brief, the built-in runtime is sufficient, and state can be discarded afterward, I would evaluate Dynamic Sessions first to reduce platform work. Generated code remains untrusted input, and downloadable outputs still need content and authorization checks. Scenario B: a coding agent that works across turns and time This agent may need dependencies, a source tree, and process state. A user leaves, the environment pauses, and work continues later. ACA Sandboxes' explicit lifecycle is a compelling capability to validate. The design must still decide what may enter a snapshot, how credentials are reauthorized after restore, and how deletion policies meet business obligations. Scenario C: an enterprise with an established AKS platform If a team needs existing Kubernetes governance, runtime control, custom toolchains, or a platform built around a unified sandbox API, OpenSandbox on AKS is attractive. Its benefit is control and composability, not the assumption that open source removes operating costs. Scenario D: the agent only calls a governed business API If there is no generated-code execution, local tool process, or temporary filesystem requirement, a sandbox per user may be unnecessary. A regular ACA API with authentication, server-side permissions, and a well-defined tool gateway can be simpler. Not every agent needs a sandbox platform. These choices are not mutually exclusive. Our project uses regular ACA for the lightweight web/API layer and AKS for the execution plane. Different task classes could eventually use different execution backends, provided identity, lifecycle, results, and error contracts are explicit. 7. The concrete example: an ordering assistant that does not place real orders Project: kinfey/aks_opensbx_ghc_demo. This is an unofficial McDonald's-themed technical demonstration, not an official service or a real transaction system. Its value is not that AI can recommend a burger. It places several boundaries in an understandable business story: Application boundary: a public Nginx frontend and an internal FastAPI backend. Execution boundary: per-session OpenSandbox/Kata running Copilot CLI and local MCP. Operation boundary: selected read-only remote queries; order creation exists only in local simulation tools. Credential boundary: placeholders in the CLI workload, with authentication injected for allowed requests by a trusted egress proxy. Presentation boundary: original Markdown preserved in transit and sanitized before browser rendering. Figure 4. Querying external information and writing a simulated order are different paths, even when they appear in the same conversation. 7.1 What should a reasonable interaction look like? The following is an illustrative workflow, not an invented transcript of a live customer: A user asks, “Check current offers, then calculate a simulated meal.” The backend creates or reuses the session sandbox. Copilot invokes a read-only remote MCP tool for official offers rather than inventing them. Local get_menu and calculate_order tools price the simulation, clearly distinguished from official quotes. The assistant displays items and the total and asks for confirmation. Only after confirmation does it call local create_order, producing an explicitly simulated order. Session completion or the idle policy triggers sandbox cleanup; the order file is not retained as a durable business record. The tool rejects confirmed=false. Its limit should also be clear in any technical presentation: an agent-supplied boolean is not an independently authenticated, auditable purchase-approval system. Real commerce would require server-verifiable authorization bound to a user and the exact order contents. The current backend keeps session mappings in memory, runs at most one replica, and does not provide public user login or authenticated session ownership. These are demonstration constraints, not a production multitenancy template.10 7.2 Three lessons from making it work First: startup latency is not one number. An initial pull of the roughly 2.8 GB sandbox image took almost six minutes. That delay was not slow model inference, and it could not simply be attributed to feature approval. We moved image warmup outside the user request path and waited for actual execd health. End-to-end latency = queue/scheduling + image pull + guest startup + certificate/proxy setup + CLI startup + model/tool execution + result transport and rendering This is why a documented subsecond allocation from warm capacity should not be compared directly with one cold image pull in this project. A meaningful evaluation controls the image, cache state, concurrency, region, and measurement boundary, then tracks percentiles, failure rates, and cost per successful task. Second: a working isolation boundary does not guarantee a working data contract. We encountered a deceptively simple issue: the web renderer supported Markdown, but real replies still had no proper tables. CSS was not the problem: Copilot's default terminal output had already converted Markdown tables into character borders. Execd's line-oriented logging removed the terminators from nonempty lines. The fix extracted original assistant content from CLI JSONL, encoded it in a single-line JSON envelope across command logs, and decoded it back into Markdown in the backend. Marked and DOMPurify then preserved tables, headings, and code without inserting arbitrary model-generated HTML directly into the page. Third: acceptance must cover the real path. A browser test with a fixed reply proves that the renderer works, not that model output survives the CLI, logs, and API. The project added a live-model test that checks raw Markdown, actual DOM tables, mobile layout, and confirmed sandbox deletion.11 Similarly, successful remote tool use should be established from tool-execution events, not merely from the model saying “I checked.” The broader engineering rule is the same: prove completion with structured results and actual side effects, not a success-shaped sentence. 8. What I would add before calling this production I would not start by adding more tools. I would answer five questions: Question Required design Who owns the session? Authentication, tenant binding, server-side session ownership, and resource authorization Which state deserves to survive? Separate temporary workspace files, durable artifacts, business orders, and audit records Who may cause side effects? User approval bound to contents, idempotency, and auditable authorization beyond model instructions Where can the system fail? Stage-level startup metrics, admission control, budgets, timeouts, retries, and resource reclamation Can the execution backend change? Contract tests for create, execute, files, credentials, state restoration, and deletion For the last question, ACA Sandboxes is a worthwhile alternative backend to evaluate. But it should be a measured migration experiment with a deliberate identity design, not an untested promise of a seamless swap. Closing thought: an agent platform puts capability inside boundaries OpenSandbox gives applications an abstraction for working environments. AKS and Kata let a team implement that abstraction on observable, configurable infrastructure. ACA Sandboxes and Dynamic Sessions offer managed alternatives with different levels of operational ownership. I prefer to rewrite the selection question as three questions: What do we need to control? What are we willing to operate? How will we prove that execution completed as intended? Those questions are more useful than a simple “self-hosted versus serverless” debate. A reliable AI application needs both a capable model and a workspace with clear boundaries, a reclaimable lifecycle, and an auditable record of what happened. Further reading and scope Full deployment instructions: English README. Runnable source: project repository. The four diagram sets are original technical illustrations. imgs/ contains Chinese and English PNGs, scalable SVGs, and matching editable .excalidraw files. They are not benchmarks or product certifications. Resource descriptions are generic. Supply your own AZURE_RESOURCE_GROUP, AKS_NAME, and other configuration when reproducing the deployment. Sources OpenSandbox: scope, SDKs, runtimes, and examples Kata Containers: lightweight VM isolation OpenSandbox Credential Vault: broker and restore semantics, pinned revision OpenSandbox Kubernetes operator: BatchSandbox, Pool, snapshots, pinned revision Azure Container Apps Sandboxes overview Azure Container Apps Dynamic Sessions overview Official comparison of Dynamic Sessions and Sandboxes Microsoft's earlier ACA Sandboxes Early Access documentation This project: session management and runtime boundaries This project: real-reply end-to-end browser test176Views0likes0CommentsRegain Access to M365 Developer Sandbox
I have lost access to my M365 Developer Sandbox. I had set up MFA with only the Authenticator app and then changed to a new phone. Is there a way that my MFA options can be reset, or am I only left with the option of deleting my profile and waiting 60 days to recreate the sandbox? I only had the single administrator account setup in the sandbox.1.3KViews0likes4Comments
Static Tab and Chat Tab Order Is Not Persisting in Microsoft Teams
manifest file: "staticTabs": [ { "entityId": "schedule", "name": "Schedule", "contentUrl": "...", "websiteUrl": "...", "scopes": ["personal"] }, { "entityId": "conversations", "scopes": ["personal"] } ] the Schedule tab is intentionally place before conversations: it initially appears correctly, but after navigating away from the app and returning, Teams places Chat/Conversations before Shcedule. I'm using schema version 1.12. The tabs are configured in the specified order in the manifest file, and the expected tab order is displayed correctly when the app is initially opened. However, when I navigate to the Chat section, the tab order changes and does not persist as defined in the manifest file.53Views0likes0CommentsSending Email from an AKS Pod Without a Single Secret
The problem You have a workload running in AKS that occasionally needs to send an email — a notification, an alert, a report. The obvious options all come with baggage: An SMTP relay means yet another credential to store, rotate, and eventually leak. A shared "app password" mailbox account means an identity nobody really owns, that can authenticate as itself forever. Granting Mail.Send as a Microsoft Graph application permission is tempting — until you realize it lets your app send email as any mailbox in the entire tenant, not just the one you intended. This post walks through a pattern that avoids all three: Azure Workload Identity for the pod, Microsoft Graph for sending, and Exchange Online RBAC for Applications to scope the identity down to exactly one authorized mailbox. No secrets stored anywhere in the cluster, and no tenant-wide send permission. Architecture Pod (AKS) -- federated OIDC token --> Workload Identity Workload Identity -- client_credentials + client_assertion--> Microsoft Entra ID Entra ID -- access token (aud=Graph) --> Pod Pod -- POST /v1.0/users/{sender}/sendMail (Bearer token)--> Microsoft Graph --> Exchange Online The pod never handles a password or a client secret. It reads a federated identity token that Azure Workload Identity's webhook mounts automatically, exchanges it with Entra ID for a Graph access token, and calls sendMail directly. The only thing that determines which mailbox it's allowed to send as is a role assignment on the Exchange Online side — not anything configured in Kubernetes. Step 1 — Get a Workload Identity bound to your namespace This is a platform-team request, not something you self-service from inside the cluster: you need a Managed Identity (or App Registration) with a Federated Identity Credential issued for your specific Kubernetes namespace and ServiceAccount subject. Give your platform/identity team: The target namespace (e.g. my-namespace) The target ServiceAccount name (e.g. my-mail-service-account) The intended use case (application email via Microsoft Graph) They hand you back a Client ID — that's all your manifest needs. One important thing to not ask for: don't request the Graph Mail.Send application permission on this identity. That permission, if granted directly in Entra ID, is unscoped — it lets the identity send as anyone. The actual sending restriction is going to live in Exchange, not in Entra ID (see Step 2). Step 2 — Restrict sending to one mailbox with Exchange Online RBAC for Applications Microsoft's currently recommended way to scope application email-sending rights is RBAC for Applications in Exchange Online — the modern replacement for the deprecated Application Access Policies. The short version: The Managed Identity gets no unscoped Graph Mail.Send grant in Entra ID. (Entra ID and Exchange RBAC authorizations are additive — if you leave an unscoped grant in place, it defeats the whole point.) Exchange Online registers a pointer to the Managed Identity's service principal (New-ServicePrincipal), then assigns it the Application Mail.Send role, scoped to a Management Scope that resolves to exactly one mailbox (or one security group of mailboxes). The identity can now call /users/{authorized-mailbox}/sendMail and get a 202. Any other mailbox returns 403. This part is usually owned by whoever administers your Exchange Online tenant, not by the application team — it's a five-minute PowerShell runbook for them (New-ManagementScope, New-ServicePrincipal, New-ManagementRoleAssignment), fully documented in Microsoft's RBAC for Applications docs. For reference, here's the actual runbook: # 0. Make sure no unscoped Graph Mail.Send grant exists on the identity first $mi = Get-EntraServicePrincipal -ServicePrincipalId $MiObjectId $graphSp = Get-EntraServicePrincipal -Filter "appId eq '00000003-0000-0000-c000-000000000000'" $mailSendRole = $graphSp.AppRoles | Where-Object { $_.Value -eq "Mail.Send" -and $_.AllowedMemberTypes -contains "Application" } Get-EntraServicePrincipalAppRoleAssignment -ServicePrincipalId $mi.Id | Where-Object { $_.ResourceId -eq $graphSp.Id -and $_.AppRoleId -eq $mailSendRole.Id } | ForEach-Object { Remove-EntraServicePrincipalAppRoleAssignment -ServicePrincipalId $mi.Id -AppRoleAssignmentId $_.Id } # 1. Connect to Exchange Online Connect-ExchangeOnline # 2. Scope to exactly one mailbox (filter on ExternalDirectoryObjectId, not SMTP address) $mbx = Get-EXORecipient -Identity $AllowedMailbox -Properties ExternalDirectoryObjectId New-ManagementScope -Name $ScopeName ` -RecipientRestrictionFilter "ExternalDirectoryObjectId -eq '$($mbx.ExternalDirectoryObjectId)'" # 3. Register the service principal pointer (this is NOT a new identity, just a reference) $exoSp = New-ServicePrincipal -AppId $MiAppId -ObjectId $MiObjectId -DisplayName $MiDisplayName # 4. Assign exclusively Application Mail.Send, scoped New-ManagementRoleAssignment -Name $AssignmentName ` -App $exoSp.ObjectId -Role "Application Mail.Send" -CustomResourceScope $ScopeName # 5. Validate both directions Test-ServicePrincipalAuthorization -Identity $exoSp.ObjectId -Resource $AllowedMailbox # expect InScope = True Test-ServicePrincipalAuthorization -Identity $exoSp.ObjectId -Resource $BlockedMailbox # expect InScope = False Two things that trip people up here: -App in step 3/4 expects the Object ID of the Enterprise application / service principal, not the App Registration object — and never fall back to Application Mail Full Access or an exclusive management scope, since Microsoft explicitly notes exclusive scopes don't restrict application access. Worth calling out explicitly: this RBAC scope restricts the sender only. It has no concept of a recipient allowlist. Once your identity is authorized to send as a mailbox, it can send to anyone, inside or outside your tenant. If you need recipient-side restrictions, that has to be application logic — Exchange RBAC won't do it for you. Step 3 — The Kubernetes manifest Three resources: a ServiceAccount annotated with the Client ID from Step 1, a ConfigMap holding the send script, and a Deployment that mounts it. Here's the complete manifest: --- apiVersion: v1 kind: ServiceAccount metadata: annotations: azure.workload.identity/client-id: <CLIENT-ID-FROM-YOUR-IDENTITY-TEAM> name: my-mail-service-account namespace: my-namespace --- apiVersion: v1 kind: ConfigMap metadata: name: send-email namespace: my-namespace data: send-email.sh: | #!/bin/bash set -euo pipefail if [ $# -lt 2 ]; then echo "Usage: $0 <sender-email> <recipient-email> [recipient-email...]" exit 1 fi SENDER_EMAIL="$1" shift RECIPIENTS=("$@") TENANT_ID="${AZURE_TENANT_ID:-}" CLIENT_ID="${AZURE_CLIENT_ID:-}" FEDERATED_TOKEN_FILE="${AZURE_FEDERATED_TOKEN_FILE:-}" if [ -z "$TENANT_ID" ] || [ -z "$CLIENT_ID" ] || [ -z "$FEDERATED_TOKEN_FILE" ]; then echo "ERROR: Workload Identity variables not set" exit 1 fi FEDERATED_TOKEN=$(cat "$FEDERATED_TOKEN_FILE") TOKEN_RESPONSE=$(curl -s -X POST \ "https://login.microsoftonline.com/${TENANT_ID}/oauth2/v2.0/token" \ -H "Content-Type: application/x-www-form-urlencoded" \ -d "client_id=${CLIENT_ID}" \ -d "scope=https://graph.microsoft.com/.default" \ -d "client_assertion_type=urn:ietf:params:oauth:client-assertion-type:jwt-bearer" \ -d "client_assertion=${FEDERATED_TOKEN}" \ -d "grant_type=client_credentials") ACCESS_TOKEN=$(echo "$TOKEN_RESPONSE" | grep -o '"access_token":"[^"]*' | cut -d'"' -f4) if [ -z "$ACCESS_TOKEN" ]; then echo "ERROR: Failed to get token" echo "$TOKEN_RESPONSE" exit 1 fi RECIPIENTS_JSON="" for r in "${RECIPIENTS[@]}"; do if [ -n "$RECIPIENTS_JSON" ]; then RECIPIENTS_JSON="${RECIPIENTS_JSON}," fi RECIPIENTS_JSON="${RECIPIENTS_JSON}{\"emailAddress\":{\"address\":\"${r}\"}}" done cat > /tmp/email.json <<EOF { "message": { "subject": "Test from AKS", "body": { "contentType": "Text", "content": "Test email from Workload Identity" }, "toRecipients": [${RECIPIENTS_JSON}] }, "saveToSentItems": "true" } EOF HTTP_CODE=$(curl -s -w "%{http_code}" -o /tmp/response.json \ -X POST "https://graph.microsoft.com/v1.0/users/${SENDER_EMAIL}/sendMail" \ -H "Authorization: Bearer ${ACCESS_TOKEN}" \ -H "Content-Type: application/json" \ -d @/tmp/email.json) if [ "$HTTP_CODE" -eq 202 ]; then echo "Email sent successfully" else echo "ERROR: HTTP ${HTTP_CODE}" cat /tmp/response.json exit 1 fi --- apiVersion: apps/v1 kind: Deployment metadata: name: debug-deployment namespace: my-namespace labels: app: debug azure.workload.identity/use: "true" # Required. Only pods with this label can use workload identity. spec: replicas: 1 selector: matchLabels: app: debug template: metadata: labels: app: debug azure.workload.identity/use: "true" # Required. Only pods with this label can use workload identity. spec: serviceAccount: my-mail-service-account serviceAccountName: my-mail-service-account containers: - name: debug image: <your-registry>/az-init:0.1 command: ["sleep", "3600"] readinessProbe: exec: command: ["ls"] livenessProbe: exec: command: ["ls"] resources: requests: memory: "256Mi" cpu: "250m" limits: memory: "512Mi" cpu: "500m" volumeMounts: - name: script mountPath: "/script" volumes: - name: script configMap: name: send-email defaultMode: 0555 Two details that will bite you if you skip them: /me/sendMail doesn't work here. In a client_credentials flow (app-only, no signed-in user), /me returns 400 BadRequest: /me request is only valid with delegated authentication flow. You must call /users/{sender}/sendMail and name the sender explicitly. configMap.defaultMode matters. 0500 only grants execute to the file's owner (root); if your container runs as non-root, you'll get a Permission denied on exec. Use 0555. Step 4 — Test it kubectl apply -f email-pod.yaml kubectl exec -n my-namespace -it deploy/debug-deployment -- \ /script/send-email.sh authorized-sender@yourcompany.com \ recipient1@yourcompany.com recipient2@yourcompany.com A 202 and Email sent successfully means it worked. Try it again with a sender mailbox that isn't in your RBAC scope — you should get a clean 403. If you don't, go back and check that no unscoped Graph Mail.Send grant is still sitting on the identity in Entra ID; that's the most common way this containment silently fails. Conclusion This solution addresses an application email-sending need without introducing static credentials into the cluster or broadening permissions beyond what is strictly necessary. Full cloud, with no on-premises dependency or manually managed secret: No password, API key, or certificate is stored in Kubernetes (Secret, ConfigMap, or anywhere else). Authentication relies entirely on OIDC federation between the Kubernetes ServiceAccount and Microsoft Entra ID (Workload Identity) — the federated token is issued and mounted automatically by the webhook, never manually generated or distributed. The entire authentication and sending chain (Entra ID, Microsoft Graph, Exchange Online) goes through Microsoft-managed HTTPS endpoints; no on-premises component is involved in the application path (section A.3 covers a pitfall related to Exchange hybrid setups on the target mailbox side, not the authentication path itself). Provisioning the sender mailbox and the RBAC configuration are themselves managed natively within Microsoft 365 / Exchange Online, with no extra script or infrastructure to maintain on the client side. Secure by design (least privilege): The OIDC federated token is short-lived (limited lifetime, automatically renewed by the webhook) and scoped to the my-mail-service-account ServiceAccount in the my-namespace namespace — it cannot be reused outside this specific context. No tenant-wide Microsoft Graph Mail.Send permission is granted to the identity: without this precaution, the identity could send as any mailbox in the tenant. Exchange Online RBAC for Applications carries the real authorization, strictly scoped to the mailboxes that are members of the dedicated Exchange group. The containment is verified both positively and negatively before going to production — not only tested on the case that must succeed. Known and documented limitation: this RBAC model restricts only the sender, never the recipient — application-side control is still required if recipient restriction is ever needed. See You in the Cloud JamesdldSPFx Web Part Not Visible for External User in Client Tenant
Hi everyone, One of our team members has developed an SPFx web part that we have deployed and published in our client's SharePoint tenant using a service account. The web part is working as expected when we access the client tenant using the service account. However, when I access the same client tenant using my external/guest user account, I cannot see or use the SPFx web part. Current setup: The SPFx web part was developed by one of our team members. The solution has been deployed and published in the client's SharePoint tenant using a service account. The service account can see and use the web part successfully. My account has also been added to the client tenant as an external/guest user. However, when I access the same SharePoint site using my external account, the SPFx web part is not visible/available. I would like to understand whether this is expected behavior for SPFx web parts when accessed by external/guest users, or if we are missing some configuration. Could this be related to SharePoint permissions, Entra ID guest-user settings, the App Catalog, API permissions, or the SPFx solution deployment configuration? Are there any specific permissions or tenant-level settings that we should check to allow external users to access the SPFx web part? Is there any Microsoft-side restriction that prevents external/guest users from accessing SPFx web parts? Any guidance on what could be causing this issue and how we can troubleshoot or resolve it would be greatly appreciated. Thanks in advance!51Views0likes0Comments
Is there any rate limiting on inbound messages through bot framework?
I found this documentation regarding rate limits for app using bot framework - https://learn.microsoft.com/en-us/microsoftteams/platform/bots/how-to/rate-limit. However, it seems to be applicable to outbound messages from our service backend to MS Teams. Is there any similar rate limiting for messages being pushed to our backend from Teams conversations?60Views0likes0Comments