virtual machine
363 Topics
Unable to Uninstall Security Update (KB5094128) on Azure Hosted Windows Server 2022 VM
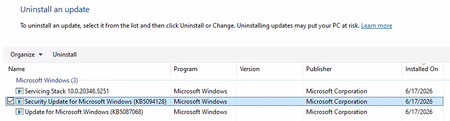
Hi All, I'm building up a system on Azure of Windows Server 2022 VMs for a PoC. Each Windows Server 2022 VM has been created using a company hardened golden image. After configuring the VM successfully, I am unable to run a software. Through research, the solution to run the software is to uninstall 'Security Update for Microsoft Windows (KB5094128)'. The issue is that I cannot uninstall the update normally. I have looked up various solutions and the following have been unsuccessful: Attempt #1 Powershell (Admin): sfc /scannow wusa /uninstall /kb:5094128 Result: Error 0x800f0905. Attempt #2 Powershell (Admin): Dism /Online /Cleanup-Image /CheckHealth Dism /Online /Cleanup-Image /ScanHealth Dism /Online /Cleanup-Image /RestoreHealth wusa /uninstall /kb:5094128 Result: No corruption detected, error 0x800f0905. Attempt #3 Powershell (Admin): net stop wuauserv net stop cryptSvc net stop bits net stop msiserver ren C:\Windows\SoftwareDistribution SoftwareDistribution.old ren C:\Windows\System32\catroot2 catroot2.old net start wuauserv net start cryptSvc net start bits net start msiserver wusa /uninstall /kb:5094128 Result: All services started and stopped. Error error 0x800f0905. Attempt #4 Windows Update Troubleshooter: Running the windows update troubleshooter gives the following output. The event viewer is suggesting there is a corrupted file error, but as seen above nothing is wanting to remove that file. Does anyone have any other options they could suggest? Or has anyone had success with this issue before? Is it a lost cause as we have to use company hardened golden images? Any suggestions would be appreciated!228Views0likes2CommentsCannot Connect to VMs in Windows Admin Center
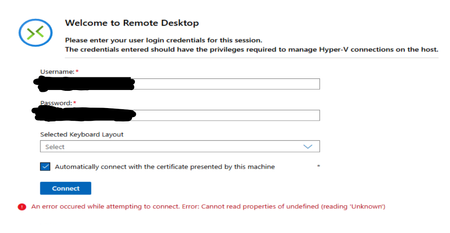
Hi all, I have 1 Server Cluster made up of 3 Server 2022 Hosts on which there is a large number of VMs running on Hyper-V. The typical process for accessing the VMs has been through Windows Admin Center, which is hosted on one of the VMs in the cluster. Around 1 week ago, it was no longer possible to connect to the VMs through Windows Admin Center as an infinite loading screen was presented. Sometimes, the following error shows up in VMConnect: The cluster and servers are still connected to WAC and all the VMs that are expected are present on WAC. Since then, the following things have been attempted: - Restart all servers - Rebuild WAC on Current VM - Build WAC on Fresh VM with the same and different network configuration, using current (2606) and previous (2511) versions of WAC - Build WAC on one of the hosts All these attempts result in the same error as seen before. Has anyone experienced this issue before? Or does anyone have any advice? Thank you in advance!Solved846Views2likes13CommentsCustomer Offerings: Hyper-V - Implementation, Migration, and Management
Happy April everyone! Brandon here, back once again to talk to you about a couple of new offerings that have just been released to assist our Unified customers with their on-premises virtualization needs! I continue to have the privilege of leading a great program and team helping customers to migrate from VMware to more cost-effective and/or modern solutions. These new offerings are <drum roll>: Hyper-V - Implementation, Migration, and Management Azure Local - Implementation, Migration, and Management NOTE: These offerings do not provide hands on keyboard support, do not create custom documentation for customers, and cannot provide direct support for any 3 rd party products that may be used in the process of migrations. Many customers are taking a closer look at Microsoft Hyper‑V as a strategic alternative to traditional virtualization platforms. Whether driven by changing licensing models, cost optimization, or the need for deeper hybrid cloud integration, a successful transition requires more than a technology shift—it requires a structured, outcome‑focused approach. While we are providing these new offerings to customers, you do also have the option of more extended engagements as well that are broader in scope and more tailored to the end goals while we work side by side with you. If you are a Unified customer and looking to move off of VMware to Hyper-V, or you just need help with your on-premises Microsoft virtualization technologies in general, have your account manager (CSAM) reach out to me! Planning to go at it alone?? I’m starting here for a very good reason… Virtually (no pun intended) every environment reviewed by my team (and that is a LOT) that was set up for a VMware migration, will have configuration issues, many times warranting a complete redesign and re-deployment. Problem 1: There are some potentially significant differences between the way VMware and Hyper-V are architected from the start, especially in areas of networking and storage, where mimicking methods used in the VMware world can actually lead to performance degradation in your target Hyper-V environment. Problem 2: To achieve feature parity, or near feature parity, your management method must also change. Additionally, if you are converting/migrating to Hyper-V, the available methods need to be determined, the terminology and functional differences identified and learned, well, honestly, I could go on for awhile on this, but I’ll spare you until we talk… Problem 3: Perhaps the most obvious is that this may be a new platform for your team, and its important for them to gain experience through guided actions and knowledge transfer on the fly for those questions they really have, which is exactly what we aim to provide in guiding implementations and migrations! You mentioned management and conversion tools, what do you mean?? Hyper‑V has several methods for management, which can vary based on the feature needs and environment size. As a simple example, if I have 1500 virtualization hosts and 30,000 virtual machines spread out globally, its probably not going to be as efficient to manage everything only through locally available consoles. The capabilities of these management methods are continuing to grow and improve based on customer feedback, along with feedback from the field team. Let’s take a quick look at these options: Native Windows tools: Hyper-V management console, Failover Clustering management console, Server Manager, etc This management method is typically used for small labs or smaller production environments (for migrations/conversions these methods do not provide feature parity with VMware). System Center Virtual Machine Manager (SCVMM) This management method is fully supported for environments of all sizes. For migrations/conversions this method provides feature parity with VMware for management and features, along with offering VMware migration/conversion capability (offline). If you are already using any product from the System Center suite (SCCM, SCOM, SCORCH, SCSM, or DPM) then this can prove to be a great no cost option for you! Windows Admin Center: Administration Mode (aMode) This management method is fully supported for environments of all sizes, however, is not designed as an infrastructure wide virtualization management method, but for server management and administration. If your environment isn’t extremely large, and VMware feature parity is not a necessity, this can provide a great no cost option for management of your physical and virtual servers. In addition, this method provides an online conversion option (currently public preview), allowing for a more seamless migration from VMware. Windows Admin Center: Virtualization Mode (vMode) (currently public preview) This management method is fully supported for environments of all sizes, and is designed solely for the purpose of managing the Hyper-V virtualization infrastructure, tying together the primary needs for virtualization fabric into an easy to navigate web-based UI. Azure You can Arc enable any Windows host or virtual machine and have a method of management and integration with cloud based services. In addition, these can work in conjunction with all of the above options to improve your management experience for your platform, and allows for the easy implementation and integration of many cloud based technologies (such as Hyper-V replica backups to ASR) NOTE: You can learn more about Windows Admin Center evolution here: Windows Admin Center Architectural Changes | Microsoft Community Hub A Structured Engagement Model Successful Hyper‑V implementations are built around a guided engagement model rather than a one‑size‑fits‑all checklist. Each engagement is tailored to the customer environment, acknowledging that differences in scale, workloads, hardware, and operational maturity directly influence the migration approach. The framework emphasizes collaboration, clarity of expectations, and incremental progress instead of disruptive “lift‑and‑shift” execution. Whether we are talking about a migration from another virtualization platform, or simply trying to reduce costs by implementing a new virtualization infrastructure, we’re here to help! Key Phases of a Hyper‑V Implementation and/or Migration Most Hyper‑V engagements progress through a common set of phases: Engagement scoping and technical discovery to understand goals and current state (this is the conversation I, or one of the TZ Leads in the VMware Migration Program have with customers) Planning and design aligned to business and operational outcomes, with a limited scope Deployment and configuration validation to ensure platform readiness Security and migration testing to reduce risk and confirm workload compatibility Optional feature enablement, including Azure Arc, to extend governance and management While these phases provide structure, the sequence and depth of each stage are adapted based on the customer environment and objectives. Key Outcomes for Customers Organizations that engage in Hyper-V implementation or migration efforts commonly achieve: Deeper familiarity with Microsoft virtualization technologies Successful deployment of PoC, pilot, or production environments Validated test migrations of virtual machines Identification and resolution of technical blockers Increased confidence in operational readiness These engagements are advisory and collaborative in nature, prioritizing customer enablement and success. Knowledge Transfer and Operational Readiness A central focus of a Hyper‑V engagement is ensuring that IT teams are prepared to operate the platform long after deployment completes. Knowledge transfer is embedded throughout the engagement through working sessions and direct participation in implementation activities. This approach helps organizations move confidently into steady‑state operations without relying on long‑term external support. As I mentioned above, if you do feel you will need longer term support, we have your back on that front as well. Looking Beyond Migration A Hyper‑V migration is often the first step in a broader transformation journey. Many organizations use this transition to enable hybrid management, strengthen security posture, and prepare for future application or cloud modernization initiatives. When approached strategically, Hyper‑V becomes a platform for long‑term innovation, not just a replacement hypervisor. Conclusion Moving from VMware to Hyper‑V is not simply a technical migration—it is an opportunity to modernize how infrastructure is managed and governed. With structured planning, guided execution, and a focus on operational readiness, organizations can transition with confidence to a virtualization platform built for today’s hybrid cloud realities and tomorrow’s growth. Thanks for reading, and maybe we’ll talk soon!
Creating Azure SQL VM with same name as VM
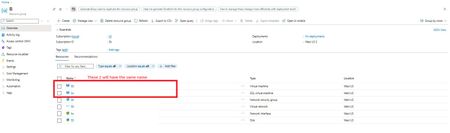
Hi, Currently we have a resource group, which contains a Virtual Machine and SQL Virtual Machine (and a few other resources). The VM and SQL VM has the same name: I want to move this resource group (and its resources) to another subscription. We tried using Resource Mover, but we couldn't as there are backups. I tried the steps in the following link: https://petri.com/copy-azure-vm-using-managed-disk-snapshots/ I was successful in moving 5 of the 6 resources to the new subscription, but was unable to move the SQL virtual machine: I tried to create a SQL virtual machine, but it says I can't create one with the same name: I found that in order to create a VM and SQL VM's with the same name, in the above image, I have to choose an image that has SQL Server and Windows. But this doesn't allow me to use the original managed disk (it only has an OS disk) and it also creates a couple of more disks, which are not in the original resource group. I was wondering if there are recommendations on how to create a SQL VM that has the same name as the VM in the same resource group and are also linked to each other. Jason244Views0likes3Comments
Network Monitoring
Hi, I recently applied Network Security Groups on Virtual Networks (NSG). Now my question is, is it possible to monitor / record the network traffic? For example, I've configured many rules on the NSG, now a application on a Server won't work and my first guess is the NSG is blocking the communication. How do I see now which port the application is using so I can set a new rule to the NSG? I know when you already know the port you can check it in Network Watcher "IP flow verify and NSG diagnostics" as a whatif state. Traffic Analytics isn't the right answer too or am I seeing it wrong? Vnet Flow Logs should be the right thing. I configured it, applied traffic analytics and a account storage. Applied it for testing on a nic but I don't see anything practical for my use? The only thing Iwish is to see live or logged the traffic if the NSG blocked anything and troubleshoot.695Views0likes5CommentsBoosting Performance with the Latest Generations of Virtual Machines in Azure
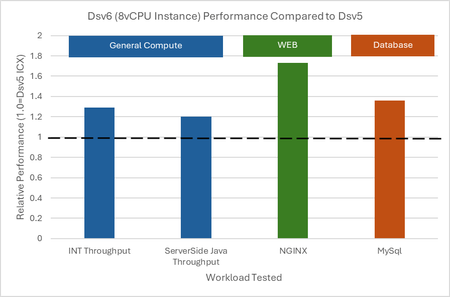
Microsoft Azure recently announced the availability of the new generation of VMs (v6)—including the Dl/Dv6 (general purpose) and El/Ev6 (memory-optimized) series. These VMs are powered by the latest Intel Xeon processors and are engineered to deliver: Up to 30% higher per-core performance compared to previous generations. Greater scalability, with options of up to 128 vCPUs (Dv6) and 192 vCPUs (Ev6). Significant enhancements in CPU cache (up to 5× larger), memory bandwidth, and NVMe-enabled storage. Improved security with features like Intel® Total Memory Encryption (TME) and enhanced networking via the new Microsoft Azure Network Adaptor (MANA). By Microsoft Evaluated Virtual Machines and Geekbench Results The table below summarizes the configuration and Geekbench results for the two VMs we tested. VM1 represents a previous-generation machine with more vCPUs and memory, while VM2 is from the new Dld e6 series, showing superior performance despite having fewer vCPUs. VM1 features VM1 - D16S V5 (16 Vcpus - 64GB RAM) VM1 - D16S V5 (16 Vcpus - 64GB RAM) VM2 features VM2 - D16ls v6 (16 Vcpus - 32GB RAM) VM2 - D16ls v6 (16 Vcpus - 32GB RAM) Key Observations: Single-Core Performance: VM2 scores 2013 compared to VM1’s 1570, a 28.2% improvement. This demonstrates that even with half the vCPUs, the new Dld e6 series provides significantly better performance per core. Multi-Core Performance: Despite having fewer cores, VM2 achieves a multi-core score of 12,566 versus 9,454 for VM1, showing a 32.9% increase in performance. VM 1 VM 2 Enhanced Throughput in Specific Workloads: File Compression: 1909 MB/s (VM2) vs. 1654 MB/s (VM1) – a 15.4% improvement. Object Detection: 2851 images/s (VM2) vs. 1592 images/s (VM1) – a remarkable 79.2% improvement. Ray Tracing: 1798 Kpixels/s (VM2) vs. 1512 Kpixels/s (VM1) – an 18.9% boost. These results reflect the significant advancements enabled by the new generation of Intel processors. Score VM 1 VM 1 VM 1 Score VM 2 VM 2 VM 2 Evolution of Hardware in Azure: From Ice Lake-SP to Emerald Rapids Technical Specifications of the Processors Evaluated Understanding the dramatic performance improvements begins with a look at the processor specifications: Intel Xeon Platinum 8370C (Ice Lake-SP) Architecture: Ice Lake-SP Base Frequency: 2.79 GHz Max Frequency: 3.5 GHz L3 Cache: 48 MB Supported Instructions: AVX-512, VNNI, DL Boost VM 1 Intel Xeon Platinum 8573C (Emerald Rapids) Architecture: Emerald Rapids Base Frequency: 2.3 GHz Max Frequency: 4.2 GHz L3 Cache: 260 MB Supported Instructions: AVX-512, AMX, VNNI, DL Boost VM 2 Impact on Performance Cache Size Increase: The jump from 48 MB to 260 MB of L3 cache is a key factor. A larger cache reduces dependency on RAM accesses, thereby lowering latency and significantly boosting performance in memory-intensive workloads such as AI, big data, and scientific simulations. Enhanced Frequency Dynamics: While the base frequency of the Emerald Rapids processor is slightly lower, its higher maximum frequency (4.2 GHz vs. 3.5 GHz) means that under load, performance-critical tasks can benefit from this burst capability. Advanced Instruction Support: The introduction of AMX (Advanced Matrix Extensions) in Emerald Rapids, along with the robust AVX-512 support, optimizes the execution of complex mathematical and AI workloads. Efficiency Gains: These processors also offer improved energy efficiency, reducing the energy consumed per compute unit. This efficiency translates into lower operational costs and a more sustainable cloud environment. Beyond Our Tests: Overview of the New v6 Series While our tests focused on the Dld e6 series, Azure’s new v6 generation includes several families designed for different workloads: 1. Dlsv6 and Dldsv6-series Segment: General purpose with NVMe local storage (where applicable) vCPUs Range: 2 – 128 Memory: 4 – 256 GiB Local Disk: Up to 7,040 GiB (Dldsv6) Highlights: 5× increased CPU cache (up to 300 MB) and higher network bandwidth (up to 54 Gbps) 2. Dsv6 and Ddsv6-series Segment: General purpose vCPUs Range: 2 – 128 Memory: Up to 512 GiB Local Disk: Up to 7,040 GiB in Ddsv6 Highlights: Up to 30% improved performance over the previous Dv5 generation and Azure Boost for enhanced IOPS and network performance 3. Esv6 and Edsv6-series Segment: Memory-optimized vCPUs Range: 2 – 192* (with larger sizes available in Q2) Memory: Up to 1.8 TiB (1832 GiB) Local Disk: Up to 10,560 GiB in Edsv6 Highlights: Ideal for in-memory analytics, relational databases, and enterprise applications requiring vast amounts of RAM Note: Sizes with higher vCPUs and memory (e.g., E128/E192) will be generally available in Q2 of this year. Key Innovations in the v6 Generation Increased CPU Cache: Up to 5× more cache (from 60 MB to 300 MB) dramatically improves data access speeds. NVMe for Storage: Enhanced local and remote storage performance, with up to 3× more IOPS locally and the capability to reach 400k IOPS remotely via Azure Boost. Azure Boost: Delivers higher throughput (up to 12 GB/s remote disk throughput) and improved network bandwidth (up to 200 Gbps for larger sizes). Microsoft Azure Network Adaptor (MANA): Provides improved network stability and performance for both Windows and Linux environments. Intel® Total Memory Encryption (TME): Enhances data security by encrypting the system memory. Scalability: Options ranging from 128 vCPUs/512 GiB RAM in the Dv6 family to 192 vCPUs/1.8 TiB RAM in the Ev6 family. Performance Gains: Benchmarks and internal tests (such as SPEC CPU Integer) indicate improvements of 15%–30% across various workloads including web applications, databases, analytics, and generative AI tasks. My personal perspective and point of view The new Azure v6 VMs mark a significant advancement in cloud computing performance, scalability, and security. Our Geekbench tests clearly show that the Dld e6 series—powered by the latest Intel Xeon Platinum 8573C (Emerald Rapids)—delivers up to 30% better performance than previous-generation machines with more resources. Coupled with the hardware evolution from Ice Lake-SP to Emerald Rapids—which brings a dramatic increase in cache size, improved frequency dynamics, and advanced instruction support—the new v6 generation sets a new standard for high-performance workloads. Whether you’re running critical enterprise applications, data-intensive analytics, or next-generation AI models, the enhanced capabilities of these VMs offer significant benefits in performance, efficiency, and cost-effectiveness. References and Further Reading: Microsoft’s official announcement: Azure Dld e6 VMs Internal tests performed with Geekbench 6.4.0 (AVX2) in the Germany West Central Azure region.1.5KViews0likes3CommentsVM DSC Extension - Repository doesn't match Reality
Hi, I am provisioning VMs as session hosts for AVD, using Entra ID for login. During the deployment process, one of the resources is Microsoft.Compute/virtualMachines/extensions/Microsoft.PowerShell.DSC. Based on the deployment information, the artifacts (scripts) that are being used come from this path: https://wvdportalstorageblob.blob.core.windows.net/galleryartifacts/Configuration_1.0.02893.601.zip The confusing part is that when I view those files, they are a bit different than the ones stored in the Azure GitHub repo here: https://github.com/Azure/RDS-Templates/tree/master/ARM-wvd-templates/DSC Is the GitHub repo just out of date or need review? I have questions on the implementation of the scripts, but it seems like figuring this out is the necessary first step.356Views1like2Comments
Determining sizing requirements for GPU enabled Azure VM
Greetings, We are trying to determine the correct VM sizing requirement for our AI workload, which is used for NLP processing. This workload does not require any training, but will only be used for inference. We have the following software configuration: a C# application that is heavily multithreaded using a lot of socket I/O. The application has concentrated bursts where 10-20 threads are fired concurrently to perform tasks (mostly socket I/O). This app communicates via dedicated sockets to: a Python application which performs various NLP tasks. This app is also multithreaded to handle multiple incoming requests from the .NET app. This app sends queries to a local LLM (model size will vary based on query type). We estimate we will need to support sub-second performance (at the very least) on a 7B parameter model. Ultimately, we may need to go to larger model sizes if accuracy is insufficient. The amount of text passed to the LLM will range from 300-3000 tokens. In short, we need: a) a CPU with sufficient cores to handle multiple concurrent threads on the .NET side. The app will have 5 or 6 background threads running continuously, and sudden bursts of activity which will require a minimum of 10-20 threads to run shorter-lived tasks. b) a GPU with sufficient VRAM to handle at the very least, a 7B parameter model. Ultimately, we may need to support larger models to perform the same task due to insufficient accuracy. We need the ideal configuration of GPU/VRAM and CPU/RAM to handle these tasks, and also, potentially, larger LLM sizes of up to 14B or 70B parameters. We are looking at the NC-series VMs, with a budget of about $1,000/month (see https://learn.microsoft.com/en-us/answers/questions/2150959/determining-sizing-requirements-for-gpu-enabled-az?comment=question). Any feedback on the optimal configuration in terms of CPU/GPU would be greatly appreciated. Thank you in advance.1.5KViews0likes2CommentsApp Attach only working if the App is Installed Locally First
I am trying to use App Attach to provide an application to my virtual desktop environment. The environment is currently 100% Entra ID, no DS if possible. RemoteApp host pool with Standard_D4as_v6 VMs running Windows 11 24H2 multi-session (no office 365 apps). I am having troubles getting App Attach working as I understand it should. I packaged my app into MSIX on one of the session hosts via admin account. My app is self-signed with .PFX, each session host has the corresponding .CER file in Trusted People AND Trusted Root Certification Authorities (conflicting advice online led me to just do both). I converted .MSIX to .CIM disk via MSIXMGR on the same session host. msixmgr.exe -Unpack -packagePath "path\file.msix" -destination "path\file.cim" -applyACLs -create -fileType cim -rootDirectory apps I uploaded the .CIM file and the 6 supporting files to Azure Files Storage Account. All hosts have access to the azure storage account via access key, which I know is working because I’m using a different File Share in the same Storage Account to run FSLogix which has been working great. I haven't made any NTFS changes in my environment so far. On the storage account: Reader and Data Access is granted to Windows Virtual Desktop and Windows Virtual Desktop ARM Provider. Storage File Data SMB Share Reader is granted to each VM. Create App Attach resource, assigned it to the associated app group/workspace/host pool. I can see my app under the Apps tab in the Windows App/Remote Desktop app. Now into the Windows App: when I click my app, it will load forever on “Securing Remote Session…” and if I click “Show Details” to see the Windows login screen, it is always frozen on “Preparing Windows”. I’ve switched the host pool to “Desktop” mode and my user can log in to the full desktop with no issues, it is just the remote app that gets hung up. BUT if I log into the VM with my admin account, I launch my MSIX package, and approve the installation of my app, that makes it all work. Now I can go back to the Windows App and launch my remote app as a regular user, and it works perfectly. (Assuming I make the host pool assign the user to the session host where I manually installed the app) As far as I understand, this shouldn’t be a requirement to get App Attach working, so I’m looking for advice or information as to why manually installing the app would fix my problem. I am suspicious of the self-signed certificate; I’d rather not buy one but let me know if that’s what I’m stuck doing. I’m also curious if the “App-Attached” version of my app is running, or if its just targeting the locally installed version behind the scenes on me… I am going to do more testing and see if I can prove that. Thanks for the help!Solved1.5KViews1like10Comments
Adding VM Instance View Details, e.g. osName, to the VM Resource Object JSON (for Custom Policy Use)
I'm requesting to add more details to the JSON of the VM resource object, particularly from the VM instance view data. This is to include operating system information, such as the name and version (osName and osVersion), for use in a custom Policy. Although these details are visible in the portal, they're not present in the VM's resource object, which is necessary for our custom policy.436Views0likes1Comment