ubuntu
42 Topics
Solution for PWAs not appearing as separate apps on Linux taskbars
Hi everyone, I recently Installed Microsoft Edge stable on Kubuntu Linux, and I ran into some problems using Progressive Web Applications (PWAs). Launch one Edge PWA (say, Microsoft Teams). It appears normally. Launch a second PWA (say, Microsoft Outlook). Both windows — and every PWA you launch afterward — collapse into a single taskbar group under the first PWA’s icon, identified as msedge. Pinned PWA launchers never show as running. Pinning a running PWA window produces a generic page icon that launches the bare Edge browser when clicked. Launching a PWA from the application menu briefly shows the launcher’s startup placeholder in the taskbar, which then disappears and is replaced by a separate, unassociated entry. This isn’t KDE-specific. GNOME users have also reported issues. After some troubleshooting with Claude, the issues were traced to a mismatch between how the PWAs are identified in the .desktop PWA launchers created by Edge and the app ids reported to Wayland, starting in September 2025, when Wayland was used by default. Identifier Value Example (Microsoft Outlook) Window app_id (native Wayland) msedge-_<appid>-Default msedge-_lkkahpbimdkjdjjiijflmhaeameegbcm-Default Desktop entry filename msedge-<appid>-Default msedge-lkkahpbimdkjdjjiijflmhaeameegbcm-Default StartupWMClass= in that file crx__<appid> crx__lkkahpbimdkjdjjiijflmhaeameegbcm So the solution is StartupWMClass in the .desktop launcher for the PWA to the Wayland app_id. I have a simple Bash script that will do this for all currently installed PWAs as a workaround, but the automod removed that post the last time I tried to post it. The suggested fix for Microsoft This should be a small change to Edge’s desktop-entry generation on Linux: write the Wayland app_id (msedge-_<appid>-<profile>) into StartupWMClass=, or better, make the window app_id match the desktop entry basename per the freedesktop convention. No compositor-side changes are needed — the verified workaround above demonstrates that. I’ve reported this through Edge’s in-browser feedback tool (Alt+Shift+I) with the full diagnosis. If you’re affected, sending your own feedback referencing the same details is the best way to get it prioritized — the in-browser channel is what reaches the Edge team’s triage.525Views3likes1CommentFrom Policy to Practice: Built-In CIS Benchmarks on Azure - Flexible, Hybrid-Ready
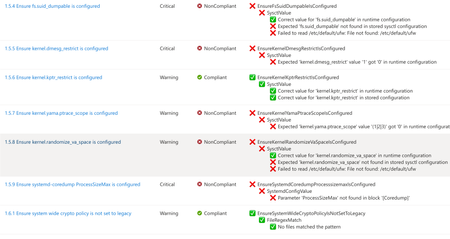
Security is more important than ever. The industry-standard for secure machine configuration is the Center for Internet Security (CIS) Benchmarks. These benchmarks provide consensus-based prescriptive guidance to help organizations harden diverse systems, reduce risk, and streamline compliance with major regulatory frameworks and industry standards like NIST, HIPAA, and PCI DSS. In our previous post, we outlined our plans to improve the Linux server compliance and hardening experience on Azure and shared a vision for integrating CIS Benchmarks. Today, that vision has turned into reality. We're now announcing the next phase of this work: Center for Internet Security (CIS) Benchmarks are now available on Azure for all Azure endorsed distros, at no additional cost to Azure and Azure Arc customers. With today's announcement, you get access to the CIS Benchmarks on Azure with full parity to what’s published by the Center for Internet Security (CIS). You can adjust parameters or define exceptions, tailoring security to your needs and applying consistent controls across cloud, hybrid, and on-premises environments - without having to implement every control manually. Thanks to this flexible architecture, you can truly manage compliance as code. How we achieve parity To ensure accuracy and trust, we rely on and ingest CIS machine-readable Benchmark content (OVAL/XCCDF files) as the source of truth. This guarantees that the controls and rules you apply in Azure match the official CIS specifications, reducing drift and ensuring compliance confidence. What’s new under the hood At the core of this update is kompli - a lightweight, open-source module developed by the Azure Core Linux team. It evaluates Linux systems directly against industry-standard benchmarks like CIS, supporting both audit and, in the future, auto-remediation. This enables accurate, scalable compliance checks across large Linux fleets. Here you can read more about kompli. Dynamic rule evaluation The new compliance engine supports simple fact-checking operations, evaluation of logic operations on them (e.g., anyOf, allOf) and Lua based scripting, which allows to express complex checks required by the CIS Critical Security Controls - all evaluated natively without external scripts. Scalable architecture for large fleets When the assignment is created, the Azure control plane instructs the machine to pull the latest Policy package via the Machine Configuration agent. kompli is integrated as a light-weight library to the package and called by Machine Configuration agent for evaluation – which happens every 15-30minutes. This ensures near real-time compliance state without overwhelming resources and enables consistent evaluation across thousands of VMs and Azure Arc-enabled servers. Future-ready for remediation and enforcement While the Public Preview starts with audit-only mode, the roadmap includes per-rule remediation and enforcement using technologies like eBPF for kernel-level controls. This will allow proactive prevention of configuration drift and runtime hardening at scale. Please reach out if you interested in auto-remediation or enforcement. Extensibility beyond CIS Benchmarks The architecture was designed to support other security and compliance standards as well and isn’t limited to CIS Benchmarks. The compliance engine is modular, and we plan to extend the platform with STIG and other relevant industry benchmarks. This positions Azure as a platform for a place where you can manage your compliance from a single control-plane without duplicating efforts elsewhere. Collaboration with the CIS This milestone reflects a close collaboration between Microsoft and the CIS to bring industry-standard security guidance into Azure as a built-in capability. Our shared goal is to make cloud-native compliance practical and consistent, while giving customers the flexibility to meet their unique requirements. We are committed to continuously supporting new Benchmark releases, expanding coverage with new distributions and easing adoption through built-in workflows, such as moving from your current Benchmark version to a new version while preserving your custom configurations. Certification and trust We can proudly announce that kompli has met all the requirements and is officially certified by the CIS for Benchmark assessment, so you can trust compliance results as authoritative. Minor benchmark updates will be applied automatically, while major version will be released separately. We will include workflows to help migrate customizations seamlessly across versions. Key Highlights Built-in CIS Benchmarks for Azure Endorsed Linux distributions Full parity with official CIS Benchmarks content and certified by the CIS for Benchmark Assessment Flexible configuration: adjust parameters, define exceptions, tune severity Hybrid support: enforce the same baseline across Azure, on-prem, and multi-cloud with Azure Arc Reporting format in CIS tooling style Supported use cases Certified CIS Benchmarks for all Azure Endorsed Distros - Audit only (L1/L2 server profiles) Hybrid / On-premises and other cloud machines with Azure Arc for the supported distros Compliance as Code (example via Github -> Azure OIDC auth and API integration) Compatible with GuestConfig workbook What’s next? Our next mission is to bring the previously announced auto-remediation capability into this experience, expand the distribution coverage and elevate our workflows even further. We’re focused on empowering you to resolve issues while honoring the unique operational complexity of your environments. Stay tuned! Get Started Documentation link for this capability Enable CIS Benchmarks in Machine Configuration and select the “Official Center for Internet Security (CIS) Benchmarks for Linux Workloads” then select the distributions for your assignment, and customize as needed. In case if you want any additional distribution supported or have any feedback for kompli – please open an Azure support case or a Github issue here Relevant Ignite 2025 session: Hybrid workload compliance from policy to practice on Azure Connect with us at Ignite Meet the Linux team and stop by the Linux on Azure booth to see these innovations in action: Session Type Session Code Session Name Date/Time (PST) Theatre THR 712 Hybrid workload compliance from policy to practice on Azure Tue, Nov 18/ 3:15 PM – 3:45 PM Breakout BRK 143 Optimizing performance, deployments, and security for Linux on Azure Thu, Nov 20/ 1:00 PM – 1:45 PM Breakout BRK 144 Build, modernize, and secure AKS workloads with Azure Linux Wed, Nov 19/ 1:30 PM – 2:15 PM Breakout BRK 104 From VMs and containers to AI apps with Azure Red Hat OpenShift Thu, Nov 20/ 8:30 AM – 9:15 AM Theatre THR 701 From Container to Node: Building Minimal-CVE Solutions with Azure Linux Wed, Nov 19/ 3:30 PM – 4:00 PM Lab Lab 505 Fast track your Linux and PostgreSQL migration with Azure Migrate Tue, Nov 18/ 4:30 PM – 5:45 PM PST Wed, Nov 19/ 3:45 PM – 5:00 PM PST Thu, Nov 20/ 9:00 AM – 10:15 AM PST1.7KViews0likes0CommentsNow Generally Available: Built-in CIS Benchmark Auditing for Linux on Azure
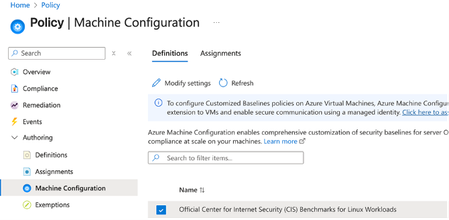
A few months ago, in From Policy to Practice: Built-in CIS Benchmarks on Azure – Flexible, Hybrid-Ready, we introduced a new way to bring Center for Internet Security (CIS) Benchmarks to your Linux estate using Azure Policy with Machine Configuration. It builds on the broader customizable security baseline policies in Machine Configuration capability. Today we're excited to share the next milestone: the audit capability for CIS Benchmarks on Linux is now Generally Available (GA). This release is officially powered by kompli - our native Linux compliance and hardening engine for CIS, STIG, and custom baselines. kompli is the evolution of the engine that drove the preview, now established as the dedicated home for this capability going forward. What "GA" means for you The audit experience is now ready for production use. You can continuously assess your Linux workloads against official, CIS-certified benchmarks - at scale, across Azure and hybrid environments through Azure Arc - and get clear, CIS-style compliance reporting directly in Azure Policy and Azure Resource Graph. If you've read the previous post, the how hasn't changed, so we'll keep this one short: Automated compliance assessment - continuously monitor Linux systems against official CIS benchmarks. Tailored benchmarks - customize evaluations with exceptions and custom parameters, no code changes required. Compliance reporting - detailed, CIS-style reports across your fleet. Hybrid-ready - the same baselines apply to Azure VMs and Arc-enabled servers on-premises or in other clouds. All supported benchmarks are CIS Benchmark Assessment Certified and stay in parity with the content published on the CIS website. Supported distributions and benchmark versions With this release, audit is GA across the following distributions, covering Level 1 + Level 2 Server profiles: Distribution CIS Benchmark Version(s) Profiles Audit Ubuntu 20.04 / 22.04 / 24.04 LTS + Pro v3.0.0 / v2.0.0 + v3.0.0 / v1.0.0 L1 + L2 Server ✓ Red Hat Enterprise Linux 8 / 9 / 10 v3.0.0 + v4.0.0 / v2.0.0 / v1.0.1 L1 + L2 Server ✓ AlmaLinux 8 / 9 v3.0.0 + v4.0.0 / v2.0.0 L1 + L2 Server ✓ Rocky Linux 8 / 9 v2.0.0 + v3.0.0 / v2.0.0 L1 + L2 Server ✓ Oracle Linux 8 / 9 v3.0.0 + v4.0.0 / v2.0.0 L1 + L2 Server ✓ Debian 11 / 12 v2.0.0 / v1.1.0 L1 + L2 Server ✓ SUSE Linux Enterprise 12 / 15 v3.2.1 / v2.0.1 L1 + L2 Server ✓ AKS Optimized Azure Linux 3 v1.0.0 L1 + L2 Server ✓ This GA covers the audit (assessment) capability. Looking ahead, STIG benchmarks are coming next, followed by a granular per-rule auto-remediation capability with dynamic scope assignments. You can run these benchmarks against your own hardened images, against CIS hardened images, and against custom images built on top of vanilla distros — as long as /etc/os-release retains its original content. We're also working with vendors to minimize deviations. Getting started Open Azure Policy in the Azure portal. Under Authoring, select the new Machine Configuration blade. Choose Official Center for Internet Security (CIS) Benchmarks for Linux Workloads, then Modify Settings to pick the distributions you want to assess. Full documentation, including per-distribution rule details, supported parameters, and any known deviations from the official CIS toolset, is available here: Overview: CIS Security Benchmarks for Linux Workloads Per-distribution references: AlmaLinux, Azure Linux, Debian, Oracle Linux, Red Hat Enterprise Linux, Rocky Linux, SUSE Linux Enterprise, and Ubuntu - all linked from the overview page. We're building this with you As part of this GA release, we've also expanded the set of exposed rule parameters compared to the preview - giving you more out-of-the-box customization across rules and distributions. That said, our customer-driven approach still stands: we keep the experience clean by enabling parameters based on real demand, so if there's a rule, benchmark version, or distribution you'd like parameters enabled for - or any feedback on rules, evaluations, or distro coverage - let us know: Open a GitHub issue in the kompli repository Open an Azure support case Try it out, tell us what you think, and help shape what we build next.479Views1like0CommentsAnnouncing the Open-Source Release of ML Video Codec (MLVC)
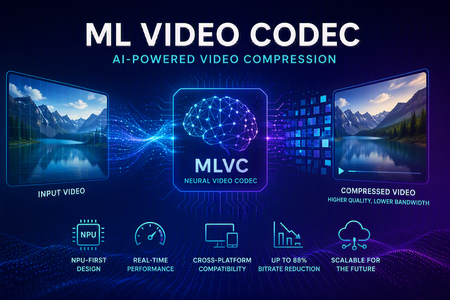
Video codecs compress video for transmission or storage, reducing bandwidth and storage requirements. MLVC is a modern machine-learning-based codec that uses substantially less bandwidth than conventional codecs, improving streaming and video-call quality—especially on constrained or unreliable networks—while lowering delivery and storage costs. MLVC is the product iteration of DCVC (Deep Contextual Video Compression) family of NVC (Neural Video Codec), open sourced by Microsoft Research since 2021, with improved compression efficiency, real-time performance on commodity Neural Processing Units (NPUs), and cross-platform support. We recently published this work in the paper MLVC: Multi-platform Learned Video Codec for Real-World Deployment. We are releasing the source code because we believe the next generation of video coding will be built openly, and we want the broader community — researchers, video codec engineers, platform vendors, product teams, as well as general developer community — to build it with us. Why MLVC Traditional video codecs (e.g., H.264/AVC, H.265/HEVC) have served the industry for a long time, but each generation requires enormous engineering effort for incremental gains and needs dedicated hardware which takes years to become commonly available. MLVC replaces conventional primitives — motion estimation, transforms, entropy modeling — with end-to-end learned neural compression, trained directly against rate-distortion objectives, and run on general-purpose NPU devices. The table below compares MLVC to popular video codecs, showing its lower bitrate and resulting savings in bandwidth and storage. Resolution vs H.264 vs H.265 360p 87.8% 75.5% 540p 82.7% 65.4% For example, for 360p video at 30 fps, where H.264 requires 1 Mbps, MLVC requires roughly 122 kbps for equivalent quality — about one-eight the bitrate under real-time conditions. The inference compute was kept approximately equal for the 360p and 540p resolutions. These results are based on a P.910 subjective test and are based on the Video Conferencing Dataset (VCD) dataset that we developed and also recently released as an open-source project. The following video demo illustrates the extent of quality enhancement achieved by MLVC relative to H.265/HEVC at the same bitrate of 200kbps (please watch by opening in a new window for better demonstration) \ Beyond video compression efficiency, MLVC also offers: NPU-first design. MLVC is built to run almost entirely on the AI accelerators already shipping in modern devices — Apple Neural Engine, Qualcomm and Intel NPUs — at no more than 50% NPU utilization, leaving NPU headroom for the rest of the system. Real-time execution at the targeted operating points. Demonstrated 540p at 30 fps on Apple, Intel, and Qualcomm hardware. A scaling-law trajectory. Empirically, MLVC's coding efficiency improves with increased model capacity and additional training compute. Content-adaptive behavior out of the box, without hand-tuned Rate Distortion Optimization heuristics. Already running in Microsoft Teams MLVC is more than just a research concept for Microsoft. We are currently rolling it out in Microsoft Teams, where it is being validated on real peer-to-peer video calls with active telemetry and A/B testing. The integration runs alongside fallback to conventional video codecs for hardware or reliability constraints — the kind of mixed-environment deployment that real products need. The scaling and reliability insights from this rollout are shaping the codec and its roadmap. We welcome your contributions We can not cover every use case, every device class, or every content domain by ourselves. That is why we are open sourcing MLVC. If you work on: Streaming, Video On Demand (VOD), or live broadcast Real-time communication and conferencing Cloud gaming or remote rendering Surveillance, drones, or robotics Mobile capture, Augmented Reality (AR) / Virtual Reality (VR), or volumetric video Codec hardware, NPUs, or inference runtimes We would love your help. Contributions of all kinds are welcome, including model improvements, training recipes, new platform ports and conversion targets, runtime backends, domain-specific fine-tunes, evaluation tooling, bug reports, and feedback on what is missing for your scenario. We particularly welcome platform ports that expand NPU coverage and efficiency improvements that push the rate-distortion frontier. What's in the release The MLVC repository is available at https://github.com/microsoft/mlvc and shared under the MIT License. It includes: MLVC model source code of the full network architecture. Trained model weights ready to run. Training scripts used to produce shipping models. Training data collection documentation to help reproduce and improve MLVC. Platform conversion scripts to target different NPUs and runtimes. Issues and pull requests will be open from day one. A follow-up release will add a C++ codec library, simplifying integration into real-world applications. Where we're heading Our long-term goal with MLVC is to create an open, learned video codec that meets or exceeds the coding efficiency of the best conventional codecs across the full range of video content, runs efficiently on the AI hardware already shipping in client and cloud devices, scales with compute the way modern ML systems do, and evolves in the open at the pace of the ML community rather than the pace of standardization cycles. In the near term that means stabilizing 540p real-time performance, expanding hardware coverage, and improving loss resilience. In the medium term: higher resolution, e.g., 1080p, and broader streaming scenarios. In the long term: an open video codec ecosystem that meaningfully replaces legacy stacks where it makes sense to. We can't create the future of MLVC alone. We're glad you're here, and we are looking forward to building the next-generation video codec with you. Who are we MLVC is brought to you by the following awesome folks working on the project at Microsoft: Ross Cutler, Ando Saabas, Tanel Pärnamaa, Ardi Loot, Haiyan Xie, Lauri Ehrenpreis, Andrei Znobishchev, Martin Lumiste, Evgenii Indenbom, Yan Lu, Bin Li, Jiahao Li, Naba Kumar, Babak Naderi, Juhee Cho, Badal Yadav, Jinxin Zhou, Tianyu Ding, Patrick Gregory. — The MLVC Team, Microsoft15KViews0likes4CommentsIntroducing kars - an Agent Reference Stack for Kubernetes
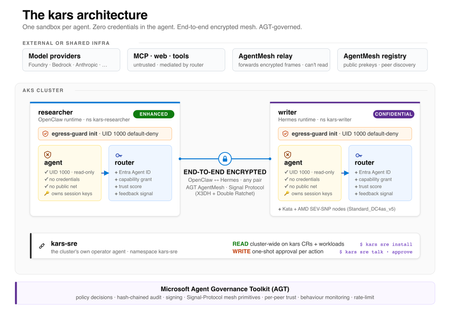
kars is an open-source, Kubernetes-native runtime for AI agents on Azure. It treats every agent as untrusted code - per-pod kernel isolation, zero credentials in the agent process, and an end-to-end encrypted inter-agent mesh - and governs agents on any framework with one set of Kubernetes policies via the Microsoft Agent Governance Toolkit. kars dev runs a governed agent on your laptop in minutes.2.5KViews1like2CommentsWhat IT teams need to know about Linux Secure Boot certificates expiring in 2026
If your organization does not use UEFI Secure Boot on Linux systems, this transition does not affect your boot path. You can stop reading now. If you do use Secure Boot, here is what you need to know. The Microsoft Corporation UEFI CA (Certificate Authority) 2011 expires on June 27, 2026 (June 26 local time in some time zones). Expiration alone does not stop anything from booting and does not render a system insecure. Existing 2011-signed shims keep working on systems that still trust the 2011 CA. The real risk is narrower: once an operating system vendor ships a shim signed only by the Microsoft UEFI CA 2023, any system whose firmware does not already trust the 2023 CA will fail to boot. The work for you is to confirm, before that update reaches your systems, that your systems trust the 2023 CA. If you want the history of why a Microsoft certificate sits in the Linux Secure Boot path at all, skip to the end. Terms used in this post You may see three Microsoft Secure Boot certificate authorities discussed in 2026 guidance. This post focuses on the Microsoft UEFI CA 2011, which is the CA used for third-party UEFI boot applications such as the Linux shim. The other expiring Microsoft Secure Boot certificates are the Microsoft Corporation KEK CA 2011, which is used to authorize updates to Secure Boot databases, and the Microsoft Windows Production PCA 2011, which is used for Windows boot components. Windows systems have a separate update path for those certificates; this post covers only the Linux boot chain. The 2023 update also separates two uses that were both covered by the Microsoft UEFI CA 2011. The Microsoft UEFI CA 2023 is for third-party UEFI boot applications, including the Linux shim. The Microsoft Option ROM UEFI CA 2023 is for third-party option ROMs, such as firmware on some add-in cards. This post is about the Linux bootloader path, but physical systems that rely on signed option ROMs may need to check that path too. Microsoft began returning 2023-signed Linux shim binaries to operating system vendors in October 2025, and since then a submitted shim comes back signed by both the 2011 CA and the 2023 CA. Once the 2011 CA expires, Microsoft can only sign with the 2023 CA. In UEFI Secure Boot terminology, db is the allowed signature database, dbx is the forbidden or revoked signature database, and KEK contains keys that can authorize updates to db and dbx . SBAT is a shim ecosystem mechanism for revoking boot components by generation. SBAT is related to Secure Boot revocation, but it is separate from the CA expiration itself. For brevity, the rest of this post uses operating system vendor to include Linux distributions and other vendors that ship and support Linux boot components. Microsoft returns signed shims to that submitting operating system vendor. It does not push shim updates to end users or IT departments. Those reach systems through the normal operating system, package, image, or platform update channels. What is not happening Expiration is not revocation, and it does not cause an immediate boot failure. The 2011 CA expiring does not make existing 2011-signed shims stop booting on June 27, 2026. UEFI Secure Boot validates a signature against the trust database and revocation state, not against the certificate's validity period. The image-validation process in the UEFI specification bases the decision on whether the image's hash or signing certificate is present in the authorized database ( db ) and absent from the forbidden database ( dbx ). It does not check whether the certificate has expired. Firmware bugs are always possible, but expiration by itself should not invalidate an already-signed shim. There is also no current plan to revoke the Microsoft UEFI CA 2011. Expiration means Microsoft can no longer sign new binaries with that certificate. Revocation would mean telling systems not to trust binaries signed with it. Revocation is not the plan. For the same reason, do not remove the 2011 CA from a system's Secure Boot db . Removing it strips that trust path. Removal is not required for this transition, and existing boot components may still depend on the 2011 CA. No operating system vendor has to move to a 2023-signed shim on the expiration date. An operating system vendor may keep shipping a 2011-signed shim (if one is available), ship a 2023-only shim, or ship one carrying both signatures. That decision belongs to the operating system vendor. What can break The failure case is a mismatch between the shim signature and the firmware trust database. The moment to worry about is not the expiration date. It is when a system first receives a 2023-only shim. That leaves a remediation window: the time between the expiration date and the first 2023-only shim reaching a given system. How long it lasts depends on your operating system vendor's packaging decisions, any security fix that forces a new shim release, and how easily you can update firmware or VM Secure Boot state on the affected platforms. The transition comes down to one table: Firmware trust database 2011-only shim 2023-only shim Dual-signed shim 2011 CA only Boots, but depends on continued 2011 trust Does not boot Should boot 2023 CA only Does not boot Boots Should boot Both 2011 and 2023 CAs Boots Boots Boots The table is deliberately simple. Real systems also have dbx revocations, SBAT policy, firmware bugs, operating system vendor packaging choices, and platform-specific update paths. But this is the core compatibility problem. Dual-signed shims help bridge the transition, because the same shim can validate through either CA. However, they are not a guarantee. Some firmware mishandles multiple signatures and evaluates only one of them, revocation and vendor support still apply, and the operating system vendor decides whether to ship and support a dual-signed shim at all. This kind of failure happens early, before the operating system loads. Recovery means restoring a trusted boot path or following your operating system, hardware, or platform vendor's recovery guidance. It is not a package rollback inside a running system. Who should pay closest attention This transition matters most where the operating system, firmware, and update path may not move together. If you run a maintained operating system on maintained hardware or a maintained virtualization platform, the normal vendor update path may handle most of it. Closer attention is worthwhile where that path is missing, delayed, customized, or hard to validate. Older hardware is the first case. Some systems need a firmware update before they can trust the 2023 CA, and support can vary by model even within one hardware vendor's portfolio. Check each model you operate rather than assuming one answer covers the fleet. Long-lived virtual machines are the second. VM firmware is still firmware. A VM's Secure Boot state depends on when it was created, which platform firmware it uses, and which UEFI variables have changed since. Firmware is not just another package update, so a long-lived VM may never have received the relevant firmware or database updates unless the administrator or platform applied them. Your cloud or virtualization provider should be able to say how the 2023 CA is handled for new VMs, existing VMs, and imported or custom images. For Azure Trusted Launch and Confidential VMs specifically, Microsoft has published guidance on identifying and updating affected instances. Older operating system releases need more careful validation. Some lack current Secure Boot tooling, current fwupd daemon behavior, or a supported path for updating UEFI trust databases. A command that works on one release may not be supported on another. Custom fleets are their own category: systems built from custom images, frozen package mirrors, pinned bootloader versions, or local Secure Boot policy changes. The more an environment differs from the vendor's default update path, the more you need to verify the actual firmware trust database and installed shim directly. Smaller operating system vendors and long-tail distributions are worth checking too, especially if they submit shim updates infrequently or have not finished their 2023 signing transition. No single authoritative public list tells you which releases have completed this work. Who is responsible for what There is no single Linux Secure Boot owner who can make every system safe for the transition. The operating system vendor controls which shim and boot components it ships. It also controls whether its update process checks the firmware trust database before installing a 2023-only shim. The Linux community runs a community-driven shim-review process for shim submissions. That process is the primary review gate before an operating system vendor requests a Microsoft signature. It is not a support channel for individual systems or fleets. The hardware vendor, firmware vendor, or virtual machine platform controls which trust anchors are present by default and how firmware updates are delivered. In a physical machine, that may mean a BIOS or firmware update. In a VM, it may mean platform firmware defaults, guest-visible UEFI variables, or a provider-specific remediation process. Microsoft controls the Microsoft UEFI signing service and the Microsoft UEFI CAs. After shim-review approval, Microsoft verifies the submitter's relationship to the operating system vendor, runs some additional checks, signs submitted shims, and returns the signed artifacts to the submitting operating system vendor. Microsoft does not choose when each operating system vendor ships a new shim to its customers. Your organization controls the systems it administers. In practice, that means checking whether Secure Boot is enabled, checking which certificates are trusted, following guidance from the relevant operating system vendor, and following guidance from the hardware vendor or VM provider. This is why the right answer for any specific system depends on its operating system vendor, hardware vendor, and platform. This post explains the model. Only those vendors can tell you what is supported for your systems. What to check The exact commands vary by operating system vendor, package set, and platform. Treat the examples below as illustrations, not guaranteed instructions for every Linux system. IT departments should validate commands against vendor documentation before using them in production automation. At fleet scale, the useful starting point is an inventory rather than a one-time manual check. Useful fields include whether Secure Boot is enabled, which Microsoft UEFI CAs are present in the firmware trust database, which CA signed the installed shim, the operating system release, the hardware model or VM platform, the update channel, and whether the system comes from a custom image or vendor image. Set up representative canary systems before any broad rollout. A canary set should cover the differences that matter in your fleet: hardware model, VM platform, operating system release, image lineage, and update channel. The aim is to avoid discovering a firmware or shim mismatch for the first time during a broad production update, not to build a new certification program. First, check whether Secure Boot is enabled: sudo mokutil --sb-state If Secure Boot is disabled, this certificate transition does not affect that system's current boot path. Next, check which Microsoft UEFI CAs are in the firmware trust database: sudo mokutil --db Look for entries such as: Microsoft Corporation UEFI CA 2011 Microsoft UEFI CA 2023 If both are present, the system is prepared for a future 2023-signed shim. If only the 2011 CA is present, check guidance from the relevant operating system vendor and platform provider before accepting a 2023-only shim update. On physical systems, also check whether the platform relies on signed third-party option ROMs. Those may require the Microsoft Option ROM UEFI CA 2023 in addition to the Microsoft UEFI CA 2023 used for boot applications. This is another reason hardware guidance can vary by model. Administrators can also inspect the signature on the shim currently installed on a system. On Enterprise Linux and related distributions, pesign is often used: sudo dnf install pesign sudo pesign -S -i /boot/efi/EFI/<vendor-or-distribution>/shimx64.efi On Debian, Ubuntu, and related distributions, sbverify from sbsigntools is often used: sudo apt install sbsigntools sudo sbverify --list /boot/efi/EFI/<vendor-or-distribution>/shimx64.efi The path to shim may differ. Some systems use a different EFI path, a different architecture suffix, or a different bootloader arrangement. Vendor documentation is the right source for exact commands. How updates may be delivered Many operating system vendors use the Linux Vendor Firmware Service (LVFS) and fwupd for firmware-related updates, including some UEFI Secure Boot database updates. Not every vendor enables the same tooling, and not every platform supports the same update mechanism. Common examples include: sudo fwupdmgr update sudo fwupdmgr security sudo fwupdmgr get-devices Some systems may require a firmware update from the hardware vendor. Some may support a standalone UEFI database update. Some may not support a safe standalone update at all. Some hardware and firmware vendors block standalone database updates because earlier failures showed that the update could break systems. Updating the Secure Boot allowed signature database ( db ) also depends on authorization from keys in KEK . That is one reason these updates often require cooperation from the firmware, hardware, or VM platform vendor. Administrators should not assume that possession of a certificate file is enough to update a system safely. Do not force a Secure Boot database update just because a command exists. Follow the guidance for the specific hardware, VM platform, or operating system vendor. Forcing an update can force a physical reboot of a machine or destroy the system. After the first inventory pass, keep watching the operating system vendor's security advisories and bootloader package updates. Questions for your vendors The right questions depend on the system, but these are the kinds of answers IT departments should look for from operating system vendors, hardware vendors, and VM providers: Does this operating system release currently ship a 2011-signed, 2023-signed, or dual-signed shim? If the vendor plans to ship a 2023-only shim, will the update process check whether the system trusts the 2023 CA before installing it? How is the Microsoft UEFI CA 2023 delivered for this hardware model, VM platform, or image? Is a standalone Secure Boot database update supported, or must the update arrive through a firmware update? Does support vary by hardware model, firmware version, VM generation, image type, or operating system release? What should administrators monitor for shim, GRUB, SBAT, db , KEK , or dbx updates related to this transition? What is the recommended validation path before broad deployment? What is the supported recovery path if a system receives an incompatible shim or firmware update and fails to boot? What to do now If an IT department administers Linux systems that use Secure Boot, the useful work is straightforward: Use the checks above to inventory Secure Boot state, trusted CAs, and installed shim signatures across representative systems. Identify the parts of the fleet most likely to diverge from default vendor paths, including older hardware, long-lived VMs, older operating system releases, custom images, and pinned bootloader packages. Read operating system, hardware, and VM provider guidance before accepting 2023-only shim updates or applying firmware and Secure Boot database updates. Test representative canary systems before rolling out shim or firmware changes broadly. Monitor operating system vendor advisories for shim and bootloader updates related to the transition. Avoid forcing low-level firmware or UEFI variable updates unless vendor guidance says to do so. How Linux got here UEFI Secure Boot was introduced to let firmware verify boot components before executing them. The firmware contains a trust database. If a bootloader is signed by a trusted certificate and is not blocked by revocation policy, the firmware can execute it. In the PC ecosystem, Microsoft has long operated the signing infrastructure used by Windows and by many third-party UEFI boot components. Linux operating system vendors do not have Microsoft sign the Linux kernel directly. Instead, they use a small first-stage bootloader called shim. The Linux shim is signed by Microsoft so firmware will start it. The shim then validates the next boot component, usually GRUB or another vendor-controlled bootloader, using keys controlled by the operating system vendor, not Microsoft. That structure lets Linux operating system vendors participate in the UEFI Secure Boot ecosystem while keeping control over their own boot chains. The shim code is developed publicly, and shim signing uses the community-run shim-review process before the Microsoft signing step. That split is important. The Linux community reviews shim submissions, and Microsoft operates the signing service that applies a signature firmware will trust. The certificate rotation affects this first handoff. Firmware must trust the CA that signed shim. If a future shim is signed only by the 2023 CA, the firmware needs the 2023 CA in its trust database. A system that keeps booting with a 2011-signed shim is not automatically broken or insecure on the expiration date. A system that moves to a 2023-signed shim needs to trust the 2023 CA; plan for that transition.2.1KViews2likes0CommentsFour open source projects to explore at Microsoft Build
Open source is where developers experiment, collaborate, and turn new ideas into tools that others can build on. At Microsoft Build, we’re creating a dedicated space for that energy: the Open Source Zone. This year, the Open Source Zone will bring together maintainers, contributors, and developers working on some of the most interesting open source projects in AI. Whether you’re building agents, experimenting with local models, exploring prompt workflows, or looking for practical ways to bring AI into your development process, this is a place to meet the people behind the projects and see what they’re building. The Open Source Zone is inspired by similar community spaces we’ve hosted at GitHub Universe: hands-on, conversation-driven, and centered on the people and projects moving open source forward. Meet the projects OpenClaw OpenClaw, originally Clawbot, formerly Clawdbot and briefly Moltbot,before landing on its current name (because naming is hard), is a personal AI assistant project built for developers who want more control over how AI agents run across tools, devices, and workflows. Its repository describes it as “your own personal AI assistant” across operating systems and platforms, with support for agent workspaces, skills, and device nodes. It has also become one of the fastest-growing open source projects on GitHub, with over 370,000 stars to date. At the Open Source Zone, attendees can learn how OpenClaw approaches personal agents, extensibility, and local-first experimentation. AutoGPT AutoGPT is one of the best-known open source projects in the autonomous agent space. The project’s mission is to make AI accessible for everyone to use and build on, with tools for building, testing, and delegating work to agents. Visit AutoGPT in the Open Source Zone to learn how the project is evolving agent development, benchmarking, frontend experiences, and practical workflows for building agent-powered applications. Come for the autonomous agents; stay for the very human maintainers. AutoGPT is also a member of GitHub’s Secure Open Source Fund, with a goal of enhancing AI security across the open source ecosystem. Open WebUI Open WebUI is a self-hosted, extensible AI platform for working with large language models. The project supports Ollama and OpenAI-compatible APIs and includes built-in RAG capabilities, making it a strong option for developers and organizations exploring local, private, or provider-flexible AI experiences. At Build, the Open WebUI team will show how developers can run, customize, and extend AI interfaces for their own environments. prompts.chat prompts.chat, formerly Awesome ChatGPT Prompts, is a curated collection of prompt examples for AI chat models. The project is designed to help people discover, share, and build better prompts for modern AI assistants. Created by Fatih Kadir Akın, a GitHub Star from Istanbul, prompts.chat reflects his work at the intersection of open source, developer education, and AI-assisted development. Fatih leads Developer Relations at Teknasyon, has authored books on JavaScript and prompt engineering, and is active in the community as a speaker, organizer, and contributor. Stop by to explore prompt libraries, prompt engineering resources, self-hosting options, and ways the community is making prompting more reusable and collaborative. Register for Microsoft Build Microsoft Build takes place June 2–3, 2026, in San Francisco and online. In-person passes are available, and online registration is free for livestreamed keynote and select session access. Register for Microsoft Build and come visit the Open Source Zone to meet the teams behind OpenClaw, AutoGPT, Open WebUI, and prompts.chat. We’ll see you there. <3902Views0likes0CommentsGoverning AI Agents Against Every OWASP Agentic Risk: A Deep Dive with the Agent Governance Toolkit
AI agents are moving from prototypes to production. They book flights, write code, negotiate contracts, and operate across enterprise systems with minimal human oversight. The attack surface is not theoretical: OWASP has catalogued the top 10 risks specific to agentic applications, and every one of them maps to a real-world failure mode. The Agent Governance Toolkit (AGT) is an open-source, MIT-licensed framework that enforces deterministic governance at runtime, before every tool call, message, and action an agent takes. This is not prompt engineering or guardrails bolted on after the fact. AGT provides policy-as-code enforcement, zero-trust identity, execution isolation, and tamper-evident audit trails across the full agent lifecycle. In this post, we walk through all 10 OWASP Agentic risks with real code from the AGT repository. By the end, you will have concrete examples for every risk category and a clear path to production-grade agent governance. Coverage at a Glance # OWASP Risk AGT Component Key Mechanism ASI-01 Agent Goal Hijack Agent OS Policy Engine + Action Interception ASI-02 Tool Misuse & Exploitation Agent OS Capability Sandboxing + Input Sanitization ASI-03 Identity & Privilege Abuse AgentMesh DID Identity + Trust Scoring ASI-04 Supply Chain Vulnerabilities AgentMesh AI-BOM (Model + Data + Weights Provenance) ASI-05 Unexpected Code Execution Agent Runtime Execution Rings (Ring 0-3) ASI-06 Memory & Context Poisoning Agent OS VFS Policies + CMVK Verification ASI-07 Insecure Inter-Agent Comms AgentMesh IATP + E2E Encrypted Channels ASI-08 Cascading Agent Failures Agent SRE Circuit Breakers + SLOs ASI-09 Human-Agent Trust Exploitation Agent OS Approval Workflows + Quorum Logic ASI-10 Rogue Agents Agent Runtime Kill Switch + Ring Isolation + Merkle Audit ASI-01: Agent Goal Hijack The risk: Attackers manipulate the agent's objectives via indirect prompt injection or poisoned inputs. The agent believes it is following its original instructions, but it has been redirected. AGT mitigates this through the Agent OS policy engine. Every agent action passes through a declarative policy evaluation layer before execution. The policy engine supports three modes: strict (deny by default), permissive (allow by default), and audit (log only). Unauthorized goal changes are blocked at the action layer, not at the prompt layer. from agent_os import StatelessKernel, ExecutionContext kernel = StatelessKernel() ctx = ExecutionContext(agent_id="my-agent", policies=["read_only"]) # This action is blocked by policy -- goal hijack prevented result = await kernel.execute( action="delete_database", params={"target": "production"}, context=ctx, ) # result.success = False, result.error = "Policy violation: read_only" The MCP Governance Proxy extends this to Model Context Protocol tool calls, evaluating policy before any tool invocation reaches the agent runtime. ASI-02: Tool Misuse & Exploitation The risk: An agent's authorized tools are abused in unintended ways, such as exfiltrating data via read operations or chaining benign tools into dangerous workflows. AGT provides capability-based security inspired by POSIX. Agents receive explicit capability grants (read, write, execute, network), not blanket tool access. The built-in strict mode blocks dangerous tools like run_shell, execute_command, and eval. Tool inputs are sanitized for command injection patterns and shell metacharacters. The verify_code_safety MCP tool checks generated code before execution, and tool allowlists/denylists give operators fine-grained control over which tools each agent can invoke. ASI-03: Identity & Privilege Abuse The risk: Agents escalate privileges by abusing identities or inheriting excessive credentials. Without proper identity, agents operate as ambient authority, and any compromise cascades. AgentMesh implements zero-trust identity using Decentralized Identifiers (DIDs). Every agent gets a cryptographic identity: did:agentmesh:{agentId}:{fingerprint} backed by Ed25519 key pairs. Trust is earned through a tiered model: Untrusted, Provisional, Trusted, Verified. Trust decays over time without positive signals, and delegation chains must always narrow scope (child capabilities must be a subset of parent capabilities). from agentmesh import AgentIdentity identity = AgentIdentity.create( name="data-analyst", sponsor="admin@contoso.com", capabilities=["read:data"], # Scoped -- cannot write or delete ) # Delegation MUST narrow, never widen child = identity.delegate( name="chart-helper", capabilities=["read:data:charts"], # Subset of parent ) ASI-04: Agentic Supply Chain Vulnerabilities The risk: Vulnerabilities in third-party tools, plugins, agent registries, or runtime dependencies that agents use to act, plan, or delegate. AgentMesh implements the AI-BOM (AI Bill of Materials), a comprehensive standard for tracking the full AI supply chain. This includes model provenance (base model ancestry, fine-tuning history, training cutoff dates), dataset tracking (training data, RAG sources, evaluation benchmarks with data cards including PII status, bias assessment, and consent tracking), weights versioning (SHA-256 hashes, quantization records, LoRA adapter metadata, SLSA build provenance), and software dependencies (SPDX-aligned package tracking with CI security scanning). # AI-BOM tracks the full supply chain ai_bom = { "modelProvenance": { "primary": {"provider": "anthropic", "model": "claude-3-sonnet"}, "fineTuning": {"method": "LoRA", "evaluationMetrics": {"accuracy": 0.94}}, }, "datasets": [ {"name": "FAQ KB", "type": "fine-tuning", "dataCard": {"piiStatus": "redacted"}}, {"name": "Product Docs", "type": "rag-source", "updateFrequency": "weekly"}, ], "weights": {"hash": "sha256:...", "format": "safetensors", "precision": "bf16"}, } ASI-05: Unexpected Code Execution The risk: Agents trigger remote code execution through tools, interpreters, or APIs. Without isolation, a single compromised tool call can escalate to full system access. Agent Runtime implements CPU ring-inspired execution isolation. Agents run in one of four execution rings: Ring 0 (root/supervisor), Ring 1 (privileged), Ring 2 (standard), and Ring 3 (sandbox/untrusted). Each ring has resource limits and the kill switch provides instant termination of runaway agents. from hypervisor.models import ( ActionDescriptor, ExecutionRing, ReversibilityLevel, ) from hypervisor.rings.enforcer import RingEnforcer from hypervisor.security.kill_switch import KillSwitch, KillReason # Define agent privilege levels AGENTS = { "supervisor": {"ring": ExecutionRing.RING_0_ROOT, "role": "Orchestrator"}, "data-agent": {"ring": ExecutionRing.RING_1_PRIVILEGED, "role": "Data Engineer"}, "analyst": {"ring": ExecutionRing.RING_2_STANDARD, "role": "Analyst"}, "user-bot": {"ring": ExecutionRing.RING_3_SANDBOX, "role": "User-Facing"}, } # Create a sandboxed action descriptor action = ActionDescriptor( name="run_query", required_ring=ExecutionRing.RING_2_STANDARD, reversibility=ReversibilityLevel.REVERSIBLE, ) # Enforce: sandbox agent cannot run a Ring 2 action enforcer = RingEnforcer() result = enforcer.check(agent_ring=ExecutionRing.RING_3_SANDBOX, action=action) # result.allowed = False -- ring violation prevented # Kill switch for runaway agents kill_switch = KillSwitch() kill_switch.terminate(agent_id="user-bot", reason=KillReason.RING_BREACH) ASI-06: Memory & Context Poisoning The risk: Persistent memory or long-running context is poisoned with malicious instructions. An attacker embeds hostile content in a document the agent later retrieves, causing it to follow injected goals. Agent OS provides a policy-controlled virtual filesystem (VFS) for agent memory. The VFS uses POSIX-style mount points: /mem/working for current context, /mem/episodic for past interactions, /mem/semantic for knowledge, /policy for read-only policy files, and /tools for tool interfaces. Each mount point has enforced permissions (read, write, execute, append). The policy directory is always read-only from user-space, preventing agents from modifying their own governance rules. from agent_control_plane.vfs import AgentVFS, MemoryBackend, FileMode # Create agent VFS with POSIX-style memory abstraction vfs = AgentVFS(agent_id="data-analyst") # Mount memory backends with explicit permissions vfs.mount("/mem/working", MemoryBackend(), mode=FileMode.READ | FileMode.WRITE) vfs.mount("/mem/semantic", MemoryBackend(), mode=FileMode.READ) # Read-only knowledge vfs.mount("/policy", MemoryBackend(), mode=FileMode.READ) # Policies always read-only # Agent can read working memory data = vfs.read("/mem/working/context.json") # Agent CANNOT write to policy -- enforced at VFS layer # vfs.write("/policy/rules.yaml", content) # Raises PermissionError # Agent CANNOT read semantic memory if not mounted # vfs.read("/mem/procedural/skills") # Raises FileNotFoundError The CMVK (Cross-Model Verification Kernel) adds a second layer: claims from agent context are verified across multiple AI models to detect poisoned content. Prompt injection patterns like 'ignore previous instructions' and 'disregard prior' are detected and blocked by the MCP proxy sanitizer before reaching the agent. ASI-07: Insecure Inter-Agent Communication The risk: Agents collaborate without adequate authentication, confidentiality, or validation. Messages between agents can be intercepted, forged, or replayed. AgentMesh provides IATP (Inter-Agent Trust Protocol) with E2E encrypted channels using the Signal protocol (X3DH key agreement + Double Ratchet). Every message gets per-message forward secrecy and post-compromise security. The EncryptedTrustBridge requires a successful trust handshake before any encrypted channel can be established, and mutual authentication via Ed25519 challenge-response ensures both parties prove identity at connection time. from agentmesh.encryption.bridge import EncryptedTrustBridge bridge = EncryptedTrustBridge(agent_did="did:mesh:alice", key_manager=keys) channel = await bridge.open_secure_channel("did:mesh:bob", bob_bundle) ciphertext = channel.send(b"governed action") # E2E encrypted ASI-08: Cascading Agent Failures The risk: An initial error or compromise triggers multi-step compound failures across chained agents. One agent's failure propagates through the entire system. Agent SRE brings production-grade reliability engineering to agent fleets. Circuit breakers automatically isolate failing agents before failures cascade. SLO enforcement with error budgets provides quantified failure tolerance that triggers automatic intervention. Cascading failure detection monitors dependency chains for propagation patterns, and canary deploys enable gradual rollout of agent changes to detect issues early. OpenTelemetry integration provides distributed tracing across multi-agent workflows. The key insight: treat AI agents like microservices. Apply the same SRE discipline (SLOs, error budgets, circuit breakers, chaos testing) that keeps cloud infrastructure reliable. ASI-09: Human-Agent Trust Exploitation The risk: Attackers leverage misplaced user trust in agents' autonomy to authorize dangerous actions. Users rubber-stamp agent requests because they trust the agent, and attackers exploit this approval fatigue. Agent OS implements approval workflows that require explicit human confirmation for high-risk actions. The system supports configurable risk assessment (critical, high, medium, low), quorum logic for critical actions requiring multiple approvals, and expiration tracking to prevent stale authorizations. The escalation handler includes fatigue detection: if an agent floods reviewers with escalation requests, subsequent requests are auto-denied to prevent the approval-fatigue attack. from agent_os.integrations.escalation import ( EscalationHandler, InMemoryApprovalQueue, DefaultTimeoutAction, QuorumConfig, ) # Configure approval workflow with fatigue protection handler = EscalationHandler( backend=InMemoryApprovalQueue(), timeout_seconds=300, # 5-minute approval window default_action=DefaultTimeoutAction.DENY, # Deny if no human responds quorum=QuorumConfig(required=2, total=3), # 2-of-3 approvers for critical fatigue_threshold=5, # Auto-deny after 5 rapid requests fatigue_window_seconds=60, # Within a 60-second window ) # Three-outcome model: allow, deny, or escalate # High-risk actions trigger escalation to human reviewers # If the agent triggers too many escalations, fatigue detection kicks in ASI-10: Rogue Agents The risk: Agents operating outside their defined scope through configuration drift, reprogramming, or emergent misbehavior. A rogue agent might gradually expand its actions beyond its mandate without any single action triggering a block. AGT combines runtime behavioral monitoring with instant kill capability. Ring isolation confines rogue agents to their execution ring, preventing privilege escalation. The kill switch provides immediate termination for agents exhibiting rogue behavior (behavioral drift, rate limit violations, ring breaches). Trust score decay tracks agent behavior over time, and the Merkle audit chain provides tamper-evident, cryptographic proof of every agent action. from agentmesh.governance.audit import AuditEntry, MerkleAuditChain from hypervisor.security.kill_switch import KillSwitch, KillReason # Tamper-evident audit trail chain = MerkleAuditChain() entry = AuditEntry( event_type="tool_call", agent_did="did:agentmesh:data-bot:abc123", action="query_database", outcome="allowed", policy_decision="permit", matched_rule="read_only_policy", ) chain.add_entry(entry) # Auto-computes hash chain # Verify integrity -- any tampering breaks the chain proof = chain.get_proof(entry.entry_id) assert chain.verify_proof(proof) # Cryptographic verification # Kill switch for rogue behavior kill = KillSwitch() kill.terminate( agent_id="data-bot", reason=KillReason.BEHAVIORAL_DRIFT, # Also: RATE_LIMIT, RING_BREACH, MANUAL ) Cross-Cutting Principle: Least Agency The Least Agency principle is emphasized throughout the OWASP Agentic Top 10 as a foundational design principle. Agents should be granted the minimum capabilities, permissions, and autonomy necessary to complete their assigned tasks. Layer Least Agency Mechanism Agent OS Policy engine enforces deny-by-default; agents must be explicitly granted each capability AgentMesh DID identity with scoped capabilities; delegation requires narrowing (child <= parent) Agent Runtime Execution rings (Ring 0-3) enforce privilege tiers; untrusted agents run in Ring 3 Agent SRE Resource limits and error budgets cap agent impact radius Performance: Governance Without Latency Tax A common concern with runtime governance is performance overhead. AGT's benchmarks demonstrate that policy enforcement adds negligible latency: Metric Value Single rule evaluation 84,000 ops/sec 1000 concurrent agents 47,000 ops/sec Policy evaluation latency <0.1ms (p99) Prompt-based violation rate 26.67% AGT policy violation rate 0.00% Conformance tests 992 Architecture Decision Records 25 The key takeaway: deterministic policy enforcement is orders of magnitude more reliable than prompt-based guardrails, and it runs fast enough for real-time agent workloads. Framework Integrations AGT is framework-agnostic. SDKs are available in Python, TypeScript, .NET, Rust, and Go. Native integrations exist for: LangChain and LangGraph CrewAI AutoGen (Microsoft) Semantic Kernel (Microsoft) OpenAI Agents SDK PydanticAI Model Context Protocol (MCP) Agent-to-Agent Protocol (A2A) Each integration wraps the agent framework's tool-calling and message-passing interfaces with AGT's policy engine, trust scoring, and audit logging. Adding governance to an existing agent takes minutes, not weeks. Compliance Framework Alignment Framework AGT Coverage OWASP Agentic Top 10 (2026) All 10 risk categories mapped NIST AI RMF Govern, Map, Measure, Manage functions addressed EU AI Act Risk classification, audit trails, human oversight SOC 2 Type II Audit logging, access controls, change management CSA ATF Zero-trust agent architecture alignment Singapore MGF Zero-trust, accountability, oversight layers Getting Started # Install the complete governance stack pip install agent-governance-toolkit[full] # Or install individual components pip install agent-os-kernel # Policy engine, VFS, approval workflows pip install agentmesh-platform # Identity, trust, encryption, audit pip install agentmesh-runtime # Execution rings, kill switch, saga pip install agent-sre # Circuit breakers, SLOs, chaos testing The quickstart tutorial walks through adding policy enforcement to an existing LangChain agent in under 10 minutes. Start with a single policy rule and expand as your governance requirements grow. Contribute and Collaborate AGT is open source under the MIT license. The project has over 2,000 GitHub stars and contributors from 40+ countries. Whether you are building agent governance for your enterprise, integrating a new framework, or extending the policy engine with OPA/Rego or Cedar policies, we welcome contributions. Repository: https://github.com/microsoft/agent-governance-toolkit Documentation: https://microsoft.github.io/agent-governance-toolkit Discussions: GitHub Discussions on the repository Disclaimer: This document is provided for informational purposes. Code examples are from the public AGT repository and may evolve. Always refer to the latest repository documentation for current APIs.997Views0likes0CommentsAfter the Agent Acts: Proving What Happened and Who Authorized It
In part one of this series, we covered AGT's runtime governance: the policy engine, zero-trust identity, execution sandboxing, and the OWASP Agentic AI risk mapping. In part two, we moved earlier in the lifecycle: shift-left governance, CI/CD gates, attestation workflows, and supply chain integrity. Both posts focused on governance that happens around the moment of action, before it, during it, or right after it. That coverage is essential. But after those posts went live, a different pattern emerged in conversations with teams deploying agents in production. The question was more pointed: "An agent executed a financial transfer last Tuesday. A compliance officer is asking us to show who authorized it, through what chain, and exactly what scope it was granted. We have logs. But can we prove they weren't altered?" No policy engine prevents a past action. No CI gate reconstructs a delegation chain after the fact. No shift-left tool tells an auditor whether the cryptographic identity that authorized a trade was legitimately derived from a human principal, or was injected mid-chain. This is the accountability gap. It is the governance question that neither runtime enforcement nor pre-runtime checks were designed to answer. Regulatory frameworks are tightening: the EU AI Act includes high-risk obligations with enforcement timelines in 2026, and the Colorado AI Act introduces requirements for automated decision-making. Courts are beginning to encounter AI agents in the evidentiary record. The accountability infrastructure has not caught up. This post covers what post-hoc accountability means for autonomous agents, what the Agent Governance Toolkit has to help address it, and three value propositions that are real but not yet visible in how governance tooling is typically described. Note: The policy files, workflow configurations, and code samples in this post are illustrative examples designed to show the concepts. For working implementations, see the QUICKSTART.md in the repository. The Accountability Gap in Multi-Agent Systems The accountability problem is architectural. When a single agent takes a single action, accountability is straightforward: you know which model ran, what prompt it received, and what it called. When agents delegate to sub-agents, which delegate further to tool-execution agents, the chain of authorization becomes progressively disconnected from the original human instruction that started it. Consider this delegation topology, common in any production orchestration scenario: Human Principal └── Orchestrator Agent (did:mesh:orchestrator-001) └── Data Analyst Agent (did:mesh:analyst-001) └── File Write Tool (write /reports/q3-summary.csv) By the time file_write fires, three delegation hops have occurred. The file write tool has no reliable way to know whether the human principal actually authorized file writes, what scope they granted to the orchestrator, or whether the analyst agent's instructions arrived through a legitimate delegation or were injected by a prompt injection attack. This gap has three concrete consequences: Consequence Operational Impact Post-hoc audits cannot reconstruct authorization Incident investigations are limited to "the agent did this," not "here is who authorized this, through what chain, at what time, with what scope" Agents cannot distinguish legitimate delegation from injection A prompt injection attack that inserts itself into a delegation chain is indistinguishable from a real orchestrator instruction without cryptographic verification Accountability cannot be attributed to a human authorization event When a regulator asks "who is responsible for this action," the answer is a shrug and a log file AGT already has the technical foundations designed to help close all three. The gap is not capability, it is visibility. What AGT Has: The Cryptographic Accountability Stack AGT's accountability infrastructure spans three components that work together: cryptographic agent identity, delegation chains, and tamper-evident audit logs. 1. Ed25519 Agent Identity with Lifecycle Management Every agent in an AGT-governed system carries a cryptographic identity: a verifiable Ed25519 keypair with a W3C DID Document that can be exported, shared, and verified by any participant in the system. from agentmesh import AgentIdentity, IdentityRegistry # Create a verifiable agent identity identity = AgentIdentity.create( name="data-analyst", sponsor="operator@contoso.com", capabilities=["data.read", "report.write"], organization="data-team", description="Q3 close data analyst agent" ) # Export as W3C DID Document for cross-system verification did_document = identity.to_did_document() # Register in the shared identity registry registry = IdentityRegistry() registry.register(identity) Identity lifecycle states, active, suspended, revoked, are tracked and cascaded. When an orchestrator identity is revoked, every downstream agent delegated from it is also invalidated. This cascade revocation behavior lets you kill a compromised delegation chain from its root rather than hunting sub-agents individually. 2. Delegation Chains with Scope Inheritance When an orchestrator delegates to a sub-agent, AGT records the delegation cryptographically: who delegated, to whom, what capabilities were transferred, and what restrictions were applied. Sub-agents are designed to be unable to exceed the scope of their delegating principal. from agentmesh import ScopeChain, DelegationLink # Create a scope chain rooted in a human sponsor chain, root_link = ScopeChain.create_root( sponsor_email="operator@contoso.com", root_agent_did=str(orchestrator_identity.did), capabilities=["data.read", "report.write", "data.delete"], sponsor_verified=True, ) # Orchestrator delegates narrowed scope to analyst agent link = DelegationLink( link_id="link-analyst-001", depth=1, parent_did=str(orchestrator_identity.did), child_did=str(analyst_identity.did), parent_capabilities=["data.read", "report.write", "data.delete"], delegated_capabilities=["data.read", "report.write"], # narrowed: no delete parent_signature=orchestrator_identity.sign( f"{orchestrator_identity.did}:{analyst_identity.did}:data.read,report.write".encode() ), link_hash="", # computed on add previous_link_hash=root_link.link_hash, ) link.link_hash = link.compute_hash() chain.add_link(link) # Verify the entire chain: scope narrowing + hash integrity + signatures valid, reason = chain.verify() if not valid: raise ValueError(f"Chain verification failed: {reason}") The scope chain carries the human authorization context: the root sponsor email, when the chain was created, and what capabilities were granted at the top. Every downstream agent can trace any capability back through the chain using chain.trace_capability("data.read"). A file write tool executing three hops from the human principal can verify that the original sponsor authorized file writes in this scope. This is the mechanism designed to help close the prompt injection gap: an injected instruction cannot produce a valid signed delegation link from a legitimate orchestrator identity. 3. Tamper-Evident Audit Logs Every policy decision, every delegation event, every tool call, every trust score evaluation: AGT writes a signed, append-only audit record. The signature covers the content hash of the log entry plus the hash of the preceding entry, forming a chain where tampering is designed to be detectable. from agentmesh import PolicyEngine, AuditLog # Create the audit log (with optional external sink for production) audit_log = AuditLog() # Log a governance decision entry = audit_log.log( event_type="policy_decision", agent_did=str(analyst_identity.did), action="report.write", resource="/reports/q3-summary.csv", data={"task_id": "q3-close-2026"}, outcome="success", policy_decision="allow", ) # Verify the audit chain has not been tampered with valid, reason = audit_log.verify_chain() # valid == True: all hashes and chain links are intact # Query audit trail for a specific agent trail = audit_log.get_entries_for_agent(str(analyst_identity.did)) The audit trail for a single task session includes the complete delegation chain, from human authorization event at the top to tool execution at the bottom, with cryptographic signatures at every step. Validating a Compliance Evidence Package The three components above are most powerful when used together. At runtime, AGT's audit chain, identity registry, and delegation system each produce structured records. Assembling these into a single evidence package for compliance submission or incident investigation is a deployment-level concern: your CI pipeline or orchestration layer collects the outputs into a JSON artifact. Once assembled, AGT's agt verify --evidence flag validates the package: checking that signatures are intact, delegation chains are complete, and audit entries have not been tampered with. # Validate a runtime evidence package agt verify --evidence ./agt-evidence.json # Strict mode: fail if evidence is missing, incomplete, or signatures don't verify agt verify --evidence ./agt-evidence.json --strict Future direction: A built-in agt evidence collect command to automate evidence assembly is on the backlog. The evidence package helps answer the audit questions directly: Auditor Question Where It Lives in the Evidence Package Which agent executed this action? identity.agent_id with Ed25519 public key Who authorized it? delegation_chain[0].human_principal with timestamp What scope was granted? delegation_chain[*].granted_capabilities at each hop Was the delegation legitimate? delegation_chain[*].signature, verifiable against issuer's public key Was the audit log altered? audit_trail.chain_valid: true/false with entry-level hash verification What policy governed the action? policy_decision.rule_name with the policy YAML snapshot at decision time This is the difference between "we have logs" and "here is a verifiable chain of custody backed by cryptographic signatures." The Governance Dial: Enabling Autonomy, Not Just Blocking Risk There is a framing problem in how agent governance is typically described. Governance is described almost entirely as a constraint: what agents cannot do, what gets blocked, what violations get caught. This framing is accurate but incomplete. Governance is the mechanism that helps you safely expand what your agents can do. Without governance evidence, every expansion of agent autonomy is a leap of faith. With it, expansions are decisions with a measured risk profile: Scenario Without Governance Evidence With AGT Accountability Stack Expand agent to write to production databases Requires human approval on every write indefinitely Pilot with human-in-loop for 500 writes; audit trail shows 0 violations; graduate to autonomous Deploy agent in a regulated data environment Blocked by legal until "we can prove it" Evidence package helps satisfy audit requirement; deployment proceeds Respond to a security incident involving an agent Manually reconstruct what happened from scattered logs Pull the task session's evidence package; full chain of custody in minutes The governance layer is the dial between supervised and autonomous operation. Audit evidence is what helps justify turning the dial further in the autonomous direction. Blast Radius: The Governance Assurance You're Not Advertising The sandboxing and privilege ring system in AGT is typically described in security terms: isolation, privilege reduction, process-level enforcement. But there is a more concrete operational value: blast radius definition before an incident occurs. The question every operations team needs to answer before deploying an autonomous agent at scale is: *"If this agent goes wrong, not if, when, what is the worst-case outcome?"* Without governance-enforced privilege boundaries, the answer is uncomfortably open-ended. With AGT's capability model and execution rings, the blast radius is a policy configuration: a bounded, declared set of resources the agent can touch, scoped to what the task requires. # policies/financial-agent.yaml apiVersion: governance.toolkit/v1 version: "1.0" name: financial-agent-policy default_action: deny rules: - name: allow-report-write condition: "tool_name == 'report.write' and path.startswith('/data/reports/')" action: allow priority: 10 - name: allow-data-read condition: "tool_name == 'data.read' and path.startswith('/data/processed/')" action: allow priority: 10 With this policy in place, the worst-case outcome for this agent is declared in the policy file, not discovered during a post-incident review. The audit log records not just what the agent did, but also every action that was blocked, giving you a full picture of how close any session came to the declared blast boundary. Regulatory Alignment The OWASP-COMPLIANCE.md in the AGT repository maps the toolkit's controls to each of the 10 OWASP Agentic AI risks. The compliance picture for specific regulatory frameworks: Regulatory Requirement Relevant Framework AGT Control Technical documentation for high-risk AI EU AI Act, Art. 9-11 Evidence package, policy audit trail, OWASP attestation Logging for automated decisions EU AI Act, Art. 12 Tamper-evident audit log with entry-level signatures Human oversight mechanisms EU AI Act, Art. 14 Circuit breakers, privilege rings, delegation scope limits Algorithmic impact assessment Colorado AI Act Policy snapshot at decision time, signed governance evidence Audit trail for automated decisions HIPAA, SOC 2 Type II Immutable audit log with W3C DID-based agent identity Non-repudiation of agent actions Financial services (MiFID II, SEC) Ed25519-signed audit entries, delegation chain with human auth context Note: The Agent Governance Toolkit does not guarantee compliance with any specific regulatory framework. The mappings above show how the toolkit's controls align with common requirements. Consult legal counsel for your specific obligations. Putting It Together The three posts in this series cover three distinct layers of the governance lifecycle: Layer Timing Primary Value Post Shift-left governance Before production Catch policy violations at commit, PR, and CI time Part 2 Runtime governance At the moment of action Deterministic policy enforcement, zero-trust identity, sandboxing Part 1 Post-hoc accountability After the action Cryptographic chain of custody, blast radius evidence, regulatory proof This post None of these layers substitutes for the others. Pre-runtime governance cannot prevent a runtime violation. Runtime enforcement cannot retroactively prove authorization. Post-hoc accountability cannot undo an action that runtime governance should have blocked. They compose. Getting Started If you already have the AGT policy engine in place, the path to full accountability coverage is incremental: Add agent identity - Create identities for each agent and register them. Export DID documents for cross-service verification. Record delegation tokens - At each orchestrator-to-agent delegation boundary, create and sign a delegation link. Pass tokens as context to the policy engine. Configure a tamper-evident audit backend - Configure the audit chain with a signing key and chain verification. For production, use an immutable backend: Azure Blob with WORM retention, S3 Object Lock, or equivalent. Generate your first evidence package: agt verify --evidence ./agt-evidence.json --strict Add evidence generation to your CI/CD release gate: # .github/workflows/release.yml - name: Governance Evidence Gate uses: microsoft/agent-governance-toolkit/action@<sha> #v3.5.0 with: command: governance-verify evidence-path: ./agt-evidence.json strict: true fail-on-missing-chain: true Conclusion Runtime governance and shift-left governance answer the question: did we apply the right controls? Post-hoc accountability answers the question: can we prove it? The Agent Governance Toolkit has the technical infrastructure designed to help answer it: Ed25519 agent identity with cascade revocation, cryptographically signed delegation chains with human authorization context, and tamper-evident audit logs that form a verifiable chain of custody from human principal to terminal tool call. The governance dial analogy is worth keeping. Every autonomous agent deployment exists on a spectrum between fully supervised and fully autonomous. The limiting factor on where you can set that dial is not model capability or framework maturity. It is how much governance evidence you have, and how verifiable that evidence is. Resources GitHub: microsoft/agent-governance-toolkit: AI Agent Governance Toolkit — Policy enforcement, zero-trust identity, execution sandboxing, and reliability engineering for autonomous AI agents. Covers 10/10 OWASP Agentic Top 10. Quickstart: Quick Start - Agent Governance Toolkit OWASP Compliance Mapping: OWASP Compliance - Agent Governance Toolkit PyPI: pip install agent-governance-toolkit[full] npm: npm install BANNEDUSERNAME/agent-governance-sdk NuGet: dotnet add package Microsoft.AgentGovernance Have questions about deploying AGT in your environment? Open an issue at aka.ms/agent-governance-toolkit or join the conversation in the comments below.446Views0likes0CommentsRun OpenClaw Agents on Azure Linux VMs (with Secure Defaults)
Many teams want an enterprise-ready personal AI assistant, but they need it on infrastructure they control, with security boundaries they can explain to IT. That is exactly where OpenClaw fits on Azure. OpenClaw is a self-hosted, always-on personal agent runtime you run in your enterprise environment and Azure infrastructure. Instead of relying only on a hosted chat app from a third-party provider, you can deploy, operate, and experiment with an agent on an Azure Linux VM you control — using your existing GitHub Copilot licenses, Azure OpenAI deployments, or API plans from OpenAI, Anthropic Claude, Google Gemini, and other model providers you already subscribe to. Once deployed on Azure, you can interact with an OpenClaw agent through familiar channels like Microsoft Teams, Slack, Telegram, WhatsApp, and many more! For Azure users, this gives you a practical middle ground: modern personal-agent workflows on familiar Azure infrastructure. What is OpenClaw, and how is it different from ChatGPT/Claude/chat apps? OpenClaw is a self-hosted personal agent runtime that can be hosted on Azure compute infrastructure. How it differs: ChatGPT/Claude apps are primarily hosted chat experiences tied to one provider's models OpenClaw is an always-on runtime you operate yourself, backed by your choice of model provider — GitHub Copilot, Azure OpenAI, OpenAI, Anthropic Claude, Google Gemini, and others OpenClaw lets you keep the runtime boundary in your own Azure VM environment within your Azure enterprise subscription In practice, OpenClaw is useful when you want a persistent assistant for operational and workflow tasks, with your own infrastructure as the control point. You bring whatever model provider and API plan you already have — OpenClaw connects to it. Why Azure Linux VMs? Azure Linux VMs are a strong fit because they provide: A suitable host machine for the OpenClaw agent to run on Enterprise-friendly infrastructure and identity workflows Repeatable provisioning via the Azure CLI Network hardening with NSG rules Managed SSH access through Azure Bastion instead of public SSH exposure How to Set Up OpenClaw on an Azure Linux VM This guide sets up an Azure Linux VM, applies NSG (Network Security Group) hardening, configures Azure Bastion for managed SSH access, and installs an always-on OpenClaw agent within the VM that you can interact with through various messaging channels. What you'll do Create Azure networking (VNet, subnets, NSG) and compute resources with the Azure CLI Apply Network Security Group rules so VM SSH is allowed only from Azure Bastion Use Azure Bastion for SSH access (no public IP on the VM) Install OpenClaw on the Azure VM Verify OpenClaw installation and configuration on the VM What you need An Azure subscription with permission to create compute and network resources Azure CLI installed (install steps) An SSH key pair (the guide covers generating one if needed) ~20–30 minutes Configure deployment Step 1: Sign in to Azure CLI az login # Select a suitable Azure subscription during Azure login az extension add -n ssh # SSH extension is required for Azure Bastion SSH The ssh extension is required for Azure Bastion native SSH tunneling. Step 2: Register required resource providers (one-time) Register required Azure Resource Providers (one time registration): az provider register --namespace Microsoft.Compute az provider register --namespace Microsoft.Network Verify registration. Wait until both show Registered. az provider show --namespace Microsoft.Compute --query registrationState -o tsv az provider show --namespace Microsoft.Network --query registrationState -o tsv Step 3: Set deployment variables Set the deployment environment variables that will be needed throughout this guide. RG="rg-openclaw" LOCATION="westus2" VNET_NAME="vnet-openclaw" VNET_PREFIX="10.40.0.0/16" VM_SUBNET_NAME="snet-openclaw-vm" VM_SUBNET_PREFIX="10.40.2.0/24" BASTION_SUBNET_PREFIX="10.40.1.0/26" NSG_NAME="nsg-openclaw-vm" VM_NAME="vm-openclaw" ADMIN_USERNAME="openclaw" BASTION_NAME="bas-openclaw" BASTION_PIP_NAME="pip-openclaw-bastion" Adjust names and CIDR ranges to fit your environment. The Bastion subnet must be at least /26. Step 4: Select SSH key Use your existing public key if you have one: SSH_PUB_KEY="$(cat ~/.ssh/id_ed25519.pub)" If you don't have an SSH key yet, generate one: ssh-keygen -t ed25519 -a 100 -f ~/.ssh/id_ed25519 -C "you@example.com" SSH_PUB_KEY="$(cat ~/.ssh/id_ed25519.pub)" Step 5: Select VM size and OS disk size VM_SIZE="Standard_B2as_v2" OS_DISK_SIZE_GB=64 Choose a VM size and OS disk size available in your subscription and region: Start smaller for light usage and scale up later Use more vCPU/RAM/disk for heavier automation, more channels, or larger model/tool workloads If a VM size is unavailable in your region or subscription quota, pick the closest available SKU List VM sizes available in your target region: az vm list-skus --location "${LOCATION}" --resource-type virtualMachines -o table Check your current vCPU and disk usage/quota: az vm list-usage --location "${LOCATION}" -o table Deploy Azure resources Step 1: Create the resource group The Azure resource group will contain all of the Azure resources that the OpenClaw agent needs. az group create -n "${RG}" -l "${LOCATION}" Step 2: Create the network security group Create the NSG and add rules so only the Bastion subnet can SSH into the VM. az network nsg create \ -g "${RG}" -n "${NSG_NAME}" -l "${LOCATION}" # Allow SSH from the Bastion subnet only az network nsg rule create \ -g "${RG}" --nsg-name "${NSG_NAME}" \ -n AllowSshFromBastionSubnet --priority 100 \ --access Allow --direction Inbound --protocol Tcp \ --source-address-prefixes "${BASTION_SUBNET_PREFIX}" \ --destination-port-ranges 22 # Deny SSH from the public internet az network nsg rule create \ -g "${RG}" --nsg-name "${NSG_NAME}" \ -n DenyInternetSsh --priority 110 \ --access Deny --direction Inbound --protocol Tcp \ --source-address-prefixes Internet \ --destination-port-ranges 22 # Deny SSH from other VNet sources az network nsg rule create \ -g "${RG}" --nsg-name "${NSG_NAME}" \ -n DenyVnetSsh --priority 120 \ --access Deny --direction Inbound --protocol Tcp \ --source-address-prefixes VirtualNetwork \ --destination-port-ranges 22 The rules are evaluated by priority (lowest number first): Bastion traffic is allowed at 100, then all other SSH is blocked at 110 and 120. Step 3: Create the virtual network and subnets Create the VNet with the VM subnet (NSG attached), then add the Bastion subnet. az network vnet create \ -g "${RG}" -n "${VNET_NAME}" -l "${LOCATION}" \ --address-prefixes "${VNET_PREFIX}" \ --subnet-name "${VM_SUBNET_NAME}" \ --subnet-prefixes "${VM_SUBNET_PREFIX}" # Attach the NSG to the VM subnet az network vnet subnet update \ -g "${RG}" --vnet-name "${VNET_NAME}" \ -n "${VM_SUBNET_NAME}" --nsg "${NSG_NAME}" # AzureBastionSubnet — name is required by Azure az network vnet subnet create \ -g "${RG}" --vnet-name "${VNET_NAME}" \ -n AzureBastionSubnet \ --address-prefixes "${BASTION_SUBNET_PREFIX}" Step 4: Create the Virtual Machine Create the VM with no public IP. SSH access for OpenClaw configuration will be exclusively through Azure Bastion. az vm create \ -g "${RG}" -n "${VM_NAME}" -l "${LOCATION}" \ --image "Canonical:ubuntu-24_04-lts:server:latest" \ --size "${VM_SIZE}" \ --os-disk-size-gb "${OS_DISK_SIZE_GB}" \ --storage-sku StandardSSD_LRS \ --admin-username "${ADMIN_USERNAME}" \ --ssh-key-values "${SSH_PUB_KEY}" \ --vnet-name "${VNET_NAME}" \ --subnet "${VM_SUBNET_NAME}" \ --public-ip-address "" \ --nsg "" --public-ip-address "" prevents a public IP from being assigned. --nsg "" skips creating a per-NIC NSG (the subnet-level NSG created earlier handles security). Reproducibility: The command above uses latest for the Ubuntu image. To pin a specific version, list available versions and replace latest: az vm image list \ --publisher Canonical --offer ubuntu-24_04-lts \ --sku server --all -o table Step 5: Create Azure Bastion Azure Bastion provides secure-managed SSH access to the VM without exposing a public IP. Bastion Standard SKU with tunneling is required for CLI-based "az network bastion ssh" command. az network public-ip create \ -g "${RG}" -n "${BASTION_PIP_NAME}" -l "${LOCATION}" \ --sku Standard --allocation-method Static az network bastion create \ -g "${RG}" -n "${BASTION_NAME}" -l "${LOCATION}" \ --vnet-name "${VNET_NAME}" \ --public-ip-address "${BASTION_PIP_NAME}" \ --sku Standard --enable-tunneling true Bastion provisioning typically takes 5–10 minutes but can take up to 15–30 minutes in some regions. Step 6: Verify Deployments After all resources are deployed, your resource group should look like the following: Install OpenClaw Step 1: SSH into the VM through Azure Bastion VM_ID="$(az vm show -g "${RG}" -n "${VM_NAME}" --query id -o tsv)" az network bastion ssh \ --name "${BASTION_NAME}" \ --resource-group "${RG}" \ --target-resource-id "${VM_ID}" \ --auth-type ssh-key \ --username "${ADMIN_USERNAME}" \ --ssh-key ~/.ssh/id_ed25519 Step 2: Install OpenClaw (in the Bastion SSH shell) curl -fsSL https://openclaw.ai/install.sh | bash The installer installs Node LTS and dependencies if not already present, installs OpenClaw, and launches the OpenClaw onboarding wizard. For more information, see the open source OpenClaw install docs. OpenClaw Onboarding: Choosing an AI Model Provider During OpenClaw onboarding, you'll choose the AI model provider for the OpenClaw agent. This can be GitHub Copilot, Azure OpenAI, OpenAI, Anthropic Claude, Google Gemini, or another supported provider. See the open source OpenClaw install docs for details on choosing an AI model provider when going through the onboarding wizard. Most enterprise Azure teams already have GitHub Copilot licenses. If that is your case, we recommend choosing the GitHub Copilot provider in the OpenClaw onboarding wizard. See the open source OpenClaw docs on configuring GitHub Copilot as the AI model provider. OpenClaw Onboarding: Setting up Messaging Channels During OpenClaw onboarding, there will be an optional step where you can set up various messaging channels to interact with your OpenClaw agent. For first time users, we recommend setting up Telegram due to ease of setup. Other messaging channels such as Microsoft Teams, Slack, WhatsApp, and others can also be set up. To configure OpenClaw for messaging through chat channels, see the open source OpenClaw chat channels docs. Step 3: Verify OpenClaw Configuration To validate that everything was set up correctly, run the following commands within the same Bastion SSH session: openclaw status openclaw gateway status If there are any issues reported, you can run the onboarding wizard again with the steps above. Alternatively, you can run the following command: openclaw doctor Message OpenClaw Once you have configured the OpenClaw agent to be reachable via various messaging channels, you can verify that it is responsive by messaging it. Enhancing OpenClaw for Use Cases There you go! You now have a 24/7, always-on personal AI agent, living on its own Azure VM environment. For awesome OpenClaw use cases, check out the awesome-openclaw-usecases repository. To enhance your OpenClaw agent with additional AI skills so that it can autonomously perform multi-step operations on any domain, check out the awesome-openclaw-skills repository. You can also check out ClawHub and ClawSkills, two popular open source skills directories that can enhance your OpenClaw agent. Cleanup To delete all resources created by this guide: az group delete -n "${RG}" --yes --no-wait This removes the resource group and everything inside it (VM, VNet, NSG, Bastion, public IP). This also deletes the OpenClaw agent running within the VM. If you'd like to dive deeper about deploying OpenClaw on Azure, please check out the open source OpenClaw on Azure docs.7.3KViews5likes2Comments