purview
207 TopicsScaling classification and labeling: an interactive reference architecture update
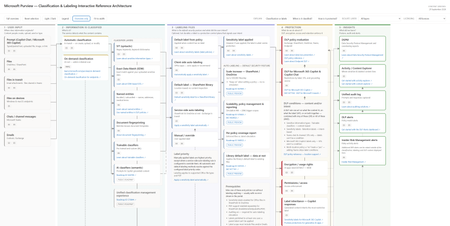
In April, I published a set of referential architecture diagrams for Microsoft Purview — Microsoft Purview Referential Architecture Diagrams. They have been useful in workshops and training sessions for a simple reason: one picture is worth a thousand words - attempting to explain the complex in a single image. Today I'm publishing an update focused on classification and labeling — and on the wave of public previews that make auto-labeling something you can scale across the entire estate with ease. ➡️ Download the interactive architecture on GitHub here. It's a self-contained HTML file - and it's a lot more than this picture! Why now: auto-labeling scales to the whole estate The most consequential change is surprisingly small. An auto-labeling policy can now be kept on while you edit it, without re-triggering simulation. Anyone who has run auto-labeling at scale knows why that matters. Until now, tuning a policy meant turning enforcement off, re-simulating, waiting, and turning it back on — delays every time you refined a rule. That friction made it challenging for organizations from broadening scope as fast as they wanted to. Removing it changes the operating model: you can simulate once with your conditions and expand scope (sites) when you're ready, without hitting the simulation limit. It arrives alongside a set of previews that lift every ceiling that used to cap the motion: Capacity is up 5x. Auto-labeling for SharePoint and OneDrive moves from 100,000 to up to 500,000 files per tenant per day (Roadmap ID 567890). Simulation goes from 4M to 20M items, so you can model against a real estate rather than a sample. Policy scope gets much bigger. Select up to 1,000 individual SharePoint sites per policy, adaptive scopes support up to 50,000 sites, and you can filter sites by the SiteTemplate property when configuring a policy (Roadmap ID 570445, MC1469958). Reporting finally tells you what happened. Audit and reporting now summarize the sensitive information types detected when labels are applied, and a new 30-day chart shows files processed per day so you can watch policy throughput. A per-policy coverage report correlates files processed during enforcement to the latest simulation run — including the files that enforcement processed but simulation never saw (Roadmap ID 568935). SharePoint library default labels now reach data at rest, applying the library's default label to existing files instead of only new or edited ones (Roadmap ID 559105, MC1477181). Read together, these are one story: classify and label the whole estate — unblocking your Microsoft 365 Copilot deployment by securing the data that matters to you most. The scalability improvements are on by default, and existing policies continue to function unmodified with no end-user impact. What the architecture shows The diagram follows content through five stages, each framed as the question it answers: User input — where information originates: files, email, Teams messages, files on devices, files in transit, and prompts. Information is classified — what is it? SITs, Exact Data Match, named entities, document fingerprinting, trainable classifiers, and AI classifiers, with automatic (in-transit) and on-demand (at-rest) classification as the two entry paths. Labeling files — what is the default security posture, and what did the user intend? Five labeling methods — default label from policy, client-side, library default, service-side auto-labeling, and manual — all converging on one node: the label is applied. Protection — what do we do about it? DLP (including DLP for Copilot), encryption and usage rights, permissions, label inheritance on Copilot responses, Adaptive Protection, and retention. Insights — what did we learn? DSPM, Activity and Content Explorer, the unified audit log, DLP alerts, and Insider Risk alerts. How to use it - it's interactive! It's a single self-contained HTML file — no dependencies or API call — it works offline. Click any node to light up its full upstream and downstream path; everything unrelated dims. The detail panel then shows what it feeds from, what it feeds into, what it sees, what it can do, and — the section I'd argue matters most — what it can't do. Explain runs three guided walkthroughs: Classification vs labels, When is it classified?, and How is it protected? These are my go-to openers for a workshop. Isolate layer cuts the diagram by control plane — sensitivity label, SITs, classifiers, DLP, encryption, permissions, retention, audit. Licensing lens filters to Included in E3, E5 only — the delta over E3, or Pay-as-you-go. Use it to answer entitlement questions honestly: where Microsoft publishes no SKU, the node says so instead of guessing. Always confirm entitlements on a quote, not from a diagram. Overview only strips to titles for a clean read; Fit to width scales the whole thing to the window; light/dark follows your OS or the toggle; it prints cleanly to PDF. Keyboard: Tab between nodes, Enter to select, Esc to reset. Auto-labeling at scale If you're standing up auto-labeling at scale, confirm the prerequisites node first — sensitivity labels enabled for Office files in SharePoint and OneDrive, PDF support enabled separately via EnableSensitivityLabelForPDF, auditing on (simulation requires it), labels published to at least one user, and label scope covering Files and/or Emails. Simulate on your priority sites, review, enforce, then expand scope to more sites or all sites and keep going. Combine that with capabilities already GA — labeling files contextually by site + file types, and overriding manually applied labels — and you can finally clear the backlog of unlabeled files. note: more to come soon for a full deployment guide. Feedback welcome — if a node is wrong, missing a limitation, or missing a link, tell me in the comments and I'll fix it in the next revision.2KViews5likes1CommentMeet the New Microsoft Purview Classifiers Experience: Your Admin Playbook for Public Preview
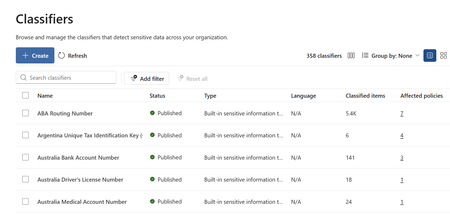
Microsoft Purview Unified Classification Management Experience Feature overview and administrator playbook Overview The new Classifiers experience brings supported Microsoft Purview classification types into one place where administrators can discover, create, inspect, and manage classifiers. It adds practical visibility into classified-item counts and policy dependencies so administrators can make more informed, lower-risk changes. Why this experience is important Classification underpins data protection, data loss prevention, and data security. As classifier inventories grow, administrators need a consistent way to understand what exists, where it is used, and what could be affected by a change. Centralized visibility Search and filter supported classifiers from a unified inventory instead of navigating separate management locations. Safer change decisions Review classified-item counts and affected policies before editing or deleting a classifier. Stronger governance Establish clear ownership, testing, approval, validation, and review expectations. Better coverage analysis Use matched-item information and Data Explorer to understand where classifications occur and where gaps may exist. What administrators can do Discover supported classifier types and understand what the organization already uses. Create classifiers from a single entry point with type-specific preparation guidance. Review classified-item counts and inspect policies that depend on a classifier. Validate matched items across supported data sources and investigate unexpected coverage. Access Classifiers through Information Protection, Data Loss Prevention, or Data Security Posture Management, depending on tenant availability. Supported classification capabilities include sensitive information types, named entities, Exact Data Match, trainable classifiers, credentials, document fingerprinting, optical character recognition, and on-demand classification. How the experience can help Reduce context switching: Use one inventory to find and inspect supported classifiers. Understand impact earlier: Identify policy dependencies before a change reaches enforcement. Improve accountability: Connect classifiers to business owners, policy owners, and reviewers. Standardize operations: Apply the same lifecycle to routine maintenance, quality improvements, and retirement decisions. How the admin playbook helps The companion playbook turns the preview into a practical operating guide. It is designed to be the first place an administrator goes to understand the value of the experience and apply it safely. Explains the administrator value of unified classifier management. Provides a continuous Inventory Offers a decision guide for selecting an appropriate classification method. Shows how to review policy impact and validate matched items. Includes customer scenarios and answers to common licensing, permissions, and coexistence questions. INVENTORY → ASSESS → TEST → APPROVE → CHANGE → VALIDATE → REVIEW Resources Public documentation Current availability, permissions, supported classification capabilities, and product guidance. Administrator playbook A self-contained, interactive guide with workflows, screenshots, scenarios, and FAQs.1.7KViews2likes0CommentsMicrosoft Purview Referential Architecture Diagrams
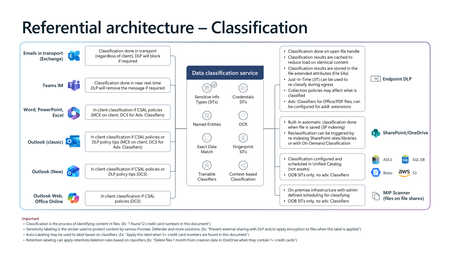
Microsoft Purview architecture diagrams provide a reference view of how classification, sensitivity labelling, Data Loss Prevention (DLP), Insider Risk Management, and Microsoft 365 Copilot protections work together across Microsoft 365 workloads. They illustrate how organisations can consistently identify, label, and protect sensitive data across endpoints, email, collaboration services, browsers, and AI‑assisted workflows—without prescribing a single deployment model. Classification generates sensitivity signals, labels express organizational protection intent, and DLP enforces that intent in real time across devices, apps, and services. Together, these patterns show how Copilot inherits existing security controls so AI‑generated content remains governed within the same compliance boundaries as organizational data.22KViews24likes9Comments
Updating Purview DLP Sensitive Service Domain Groups with PowerShell
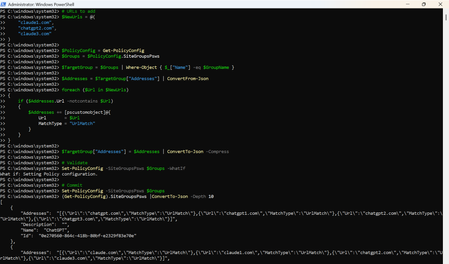
Introduction Microsoft Purview Data Loss Prevention (DLP) can use Sensitive Service Domain Groups to organize websites and other network destinations that are referenced by endpoint DLP rules. Administrators can manage these settings in the Purview portal, while PowerShell is useful when changes must be repeatable, reviewed, and validated before they are committed. This article demonstrates how to retrieve the tenant policy configuration, identify an existing group, add new URL entries only when they are not already present, validate the change, commit it, and verify the final configuration. Important The SiteGroupsPsws object contains tenant-wide endpoint restriction settings. Test the script in a non-production tenant first, export the original configuration, and use change control. Microsoft documents Get-PolicyConfig and Set-PolicyConfig for viewing and modifying endpoint restrictions, but the internal shape of individual hashtable entries can evolve. Prerequisites Requirement Guidance Permissions Use an account assigned the required Microsoft Purview permissions for the configuration being changed. Microsoft states that Get-PolicyConfig and Set-PolicyConfig require permissions in Security & Compliance PowerShell. PowerShell module Install or update the ExchangeOnlineManagement module. Security & Compliance PowerShell uses this module for connectivity. Connection Connect to Security & Compliance PowerShell by using Connect-IPPSSession before running the policy configuration cmdlets. Existing group The target Sensitive Service Domain Group must already exist. This script updates a group named Claude; it does not create the group. Change controls Run the discovery and backup commands first, use -WhatIf before commit, and retain the exported JSON for rollback analysis. Step 1: Install the module and connect Install-Module -Name ExchangeOnlineManagement -Scope CurrentUser Import-Module ExchangeOnlineManagement Connect-IPPSSession Confirm that the policy configuration can be retrieved: Get-PolicyConfig | Format-List Step 2: Discover available group names List the names exposed in SiteGroupsPsws and confirm that the target group exists before making any change. (Get-PolicyConfig).SiteGroupsPsws | Where-Object { $_.ContainsKey("Name") } | ForEach-Object { $_.Name } Step 3: Back up the current configuration Export the current SiteGroupsPsws representation before modifying the in-memory object. $BackupPath = ".\SiteGroupsPsws-backup-{0}.json" -f (Get-Date -Format "yyyyMMdd-HHmmss") (Get-PolicyConfig).SiteGroupsPsws | ConvertTo-Json -Depth 20 | Set-Content -Path $BackupPath -Encoding UTF8 Write-Host "Backup written to $BackupPath" -ForegroundColor Cyan Step 4: Define the target group and URLs $GroupName = "Claude" $NewUrls = @( "claude1.com", "chatgpt2.com", "claude3.com" ) Replace the sample values with the approved production URLs. Use only the domain or wildcard format supported by your DLP design. Step 5: Retrieve and validate the target group $PolicyConfig = Get-PolicyConfig $Groups = $PolicyConfig.SiteGroupsPsws $TargetGroup = $Groups | Where-Object { $_["Name"] -eq $GroupName } if (-not $TargetGroup) { $AvailableGroups = $Groups | Where-Object { $_.ContainsKey("Name") } | ForEach-Object { $_.Name } throw "Sensitive Service Domain Group '$GroupName' was not found. Available groups: $($AvailableGroups -join ', ')" } Complete script # Target Sensitive Service Domain Group $GroupName = "Claude" # URLs to add $NewUrls = @( "claude1.com", "chatgpt2.com", "claude3.com" ) $PolicyConfig = Get-PolicyConfig $Groups = $PolicyConfig.SiteGroupsPsws $TargetGroup = $Groups | Where-Object { $_["Name"] -eq $GroupName } $Addresses = $TargetGroup["Addresses"] | ConvertFrom-Json foreach ($Url in $NewUrls) { if ($Addresses.Url -notcontains $Url) { $Addresses += [pscustomobject]@{ Url = $Url MatchType = "UrlMatch" } } } $TargetGroup["Addresses"] = $Addresses | ConvertTo-Json -Compress # Validate Set-PolicyConfig -SiteGroupsPsws $Groups -WhatIf # Commit Set-PolicyConfig -SiteGroupsPsws $Groups Step 6: Verify the change Retrieve a fresh copy from the service rather than validating only the modified local object. $VerifiedGroups = (Get-PolicyConfig).SiteGroupsPsws $VerifiedTarget = $VerifiedGroups | Where-Object { $_["Name"] -eq $GroupName } $VerifiedAddresses = @($VerifiedTarget["Addresses"] | ConvertFrom-Json) $Verification = foreach ($Url in $NormalizedNewUrls) { [pscustomobject]@{ Group = $GroupName Url = $Url Present = ($VerifiedAddresses.Url -contains $Url) } } $Verification | Format-Table -AutoSize if ($Verification.Present -contains $false) { throw "Verification failed: one or more URLs were not found after the update." } Write-Host "Verification passed for all requested URLs." -ForegroundColor Green Step 7: Optional full configuration views # Writable PowerShell representation (Get-PolicyConfig).SiteGroupsPsws | ConvertTo-Json -Depth 20 # Service view (Get-PolicyConfig).SiteGroups Sample output The sample is illustrative. Actual service output and formatting can vary by module version and tenant configuration. Troubleshooting Symptom Recommended check Get-PolicyConfig or Set-PolicyConfig is not recognized Confirm that the ExchangeOnlineManagement module is installed and that the session was connected with Connect-IPPSSession. Access denied or authorization error Verify the administrator account has the required Purview role-group permissions, then reconnect after role propagation. Target group not found Run the discovery command and use the exact group name returned by SiteGroupsPsws. Addresses cannot be parsed Inspect the raw Addresses property before changing anything. Restore from the exported JSON if the object shape is unexpected. -WhatIf succeeds but verification fails Retrieve Get-PolicyConfig again, check for service-side errors, and confirm no competing administrator update overwrote the configuration. Summary PowerShell provides a controlled way to update Microsoft Purview DLP Sensitive Service Domain Groups at scale. The safest pattern is to discover the exact group name, export the current configuration, validate the target object, normalize and de-duplicate input, run Set-PolicyConfig with -WhatIf, commit the change, and then verify it through a fresh Get-PolicyConfig call. This validation-first workflow improves repeatability and reduces the risk of unintended tenant-wide configuration changes. References Get-PolicyConfig cmdlet reference https://learn.microsoft.com/en-us/powershell/module/exchangepowershell/get-policyconfig?view=exchange-ps Set-PolicyConfig cmdlet reference https://learn.microsoft.com/en-us/powershell/module/exchangepowershell/set-policyconfig?view=exchange-ps Security & Compliance PowerShell overview https://learn.microsoft.com/en-us/powershell/exchange/scc-powershell?view=exchange-ps Configure Endpoint DLP settings https://learn.microsoft.com/en-us/purview/dlp-configure-endpoint-settings
DLP Controls Not Enforced for Outlook Attachments Opened in Protected View
Good day, We are experiencing an inconsistency with Microsoft Purview Endpoint DLP enforcement and would appreciate guidance from the community. Environment Sensitivity labels: Confidential and Secret DLP policy configured to block copy and print activities Policy scope includes both Devices and Exchange Online Observed Behaviour When a labeled document is received via Outlook and opened directly from the email: The document initially opens in Protected View. If the user selects "Enable Editing" and/or "Enable Printing", the DLP controls are not enforced. The user is able to print or copy content despite the DLP policy being configured to block these actions. However, if the exact same document is first saved locally to the device and then opened from the local file system, the DLP policy is enforced correctly and the copy/print restrictions work as expected. Troubleshooting Performed As part of troubleshooting, we disabled the recommended Endpoint DLP file path exclusions for: %AppData% %LocalAppData% These locations are commonly used by Office Protected View and Outlook temporary files. Despite removing these exclusions, the behaviour remains unchanged. Question Has anyone encountered a similar issue where Endpoint DLP controls are not applied to Outlook attachments opened directly from Protected View but work correctly once the file is saved locally? Could this be related to: How Office Protected View handles temporary files? The file's classification state while opened from Outlook? Endpoint DLP monitoring limitations for transient Outlook/Office cache locations? Another known product limitation or configuration requirement? Any insights, known limitations, or recommended diagnostic steps would be greatly appreciated. Thank you.109Views0likes0Comments
Anthropic Claude Purview Data Connector showing all users as Guests..
It appears this connector is not mapping fields properly causing internal users to be mapped as "guests", and since prompts/data isn't maintained for guest users the connector is effectively not gathering anything but noise. Unlike the other data connectors, one cannot create field mappings. Also the app being named using the guid of Microsoft's own "dataassessments" service principal I don't think is intended either. Has anybody else experienced this? See below for an example.880Views3likes8Comments
Microsoft Purview | Share block at external users
Hello community. I have an issue with Microsoft Purview DLP policies. I am trying to create a policy that prevents documents from being shared through OneDrive with external users, while allowing certain exceptions. However, when I select the option "Block Access to external domains and users" and assign a specific email address to be blocked, it does not work. The configured email address is not being blocked. I was reviewing this with Copilot, and it mentioned that if the external user you are sharing with already exists in Entra ID, the tenant may treat the user differently (not necessarily as an external user). My external user exists in Entra ID as a Guest account. The external user is registered as follows: Displayname: User Name Userprincipalname: user.name_external.domain#EXT#@company.onmicrosoft.com User Type: Guest Has anyone else experienced this issue? I am sharing evidence of the policy configuration.1KViews0likes7CommentsClose the gaps: layered data protection with Microsoft Purview across endpoint, browser, and network
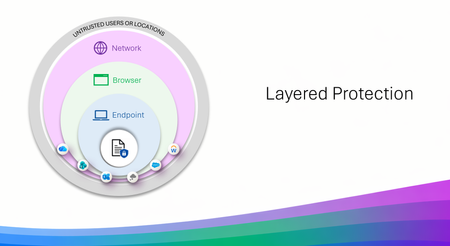
Three layers that work like a good team and slides to show it Data Loss Prevention (DLP) is not new, many use it daily without ever even knowing it, but with AI bringing faster results for productivity so does the risk of data leakage. That is where we take a layered approach, meeting the end user exactly where they are working, on a device, or in a browser, or through that cute cat Office add-in that had to be installed. But don't think of layered protection as three products but more as three specialists who are each excellent at their own job and have the good sense not to try doing everyone else's. Endpoint DLP lives on the device. USB and removable media, clipboard, print, restricted apps. It carries the deepest classification support, EDM, fingerprinting, OCR, and it works offline, which turns out to be more useful than it sounds at 30,000 feet. Browser Data Security lives in the session, inline in Edge for Business, checking content before an upload or a form submission. It is the most precise layer for AI prompts and for activity happening inside a managed web app, where nothing else is standing close enough to help. Network Data Security lives on the wire, via Entra Global Secure Access or a third-party SASE. It handles traffic that never touches a browser at all, desktop apps, Office add-ins quietly phoning a friend, and it is the layer that supports inbound classification of content coming back from cloud and AI apps. Each one has natural technical boundaries, and those are a design decision rather than an oversight. A network proxy is never going to have strong opinions about a USB stick. An endpoint agent is not positioned to unwrap an encrypted API call from a third-party add-in. Ask any one of them to cover all three domains and you would end up with something slower and less capable at each. Deployed together, though, the edges line up rather nicely. That is the entire premise of layered protection, and it is what I built this asset to show. What is actually in the slides A coverage view across all three layers. Common activities — removable media, RDP sessions, add-in API calls, in-session copy and paste, inbound AI content, classification depth, inline prompt inspection — matched to the layer best positioned for each. Six scenario walkthroughs. Realistic situations traced attempt by attempt, including one determined individual who tries three separate routes to get the same file to a consumer AI service. A departing employee and a USB drive. A contractor on a personal laptop. Files headed to personal cloud storage. Each shows which layer engages, and why. Deployment flows you can follow. Prerequisites, permissions, policy names, conditions, actions. Both browser patterns (managed device with unmanaged apps, unmanaged device with managed apps) and both network paths (Entra GSA, and third-party SASE including Netskope and iBoss). Four reference architectures. Traffic flow diagrams for each browser and network model — what gets evaluated, where the Purview verdict comes from, where enforcement lands. Collection policies explained thoroughly. The unsung plumbing underneath all of it. Anatomy, the full flow from event source to Activity Explorer, Insider Risk Management, eDiscovery, and Data Security Posture Management (DSPM), plus the operational details that are much nicer to learn about in a deck than in production. The parts people keep coming back to The coverage view is usually where planning conversations start. It gives everyone a shared picture of what is deployed today and what a sensible next step looks like; adding the browser layer to an existing Endpoint DLP footprint, say, or bringing in the network layer to extend coverage to add-ins and desktop apps. The scenario walkthroughs are where it tends to click for a wider audience. Following one situation through several routes and watching a different layer step in at each turn, does more for the story than any static diagram I have drawn. And the deployment flows are genuinely meant to be executed. Everyone is written to run against a pilot group first, with Conditional Access in report-only mode in production until you have confirmed the behavior. Please do that part. Your future self will appreciate it. Who it is for Architects scoping a deployment. Partners running workshops. Admins with Endpoint DLP already humming along who are working out what comes next. Anyone who would like a single starting point instead of a browser window that has stopped showing page titles. Take whatever is useful. Pull individual slides into your own narrative or run the whole thing end to end it was built to be borrowed. Things to keep in mind Several capabilities in here are in preview or Pay-As-You-Go backed, and network-layer coverage depends on supported SASE/SSE integrations and how traffic is routed. The deck flags this as it goes. Check current availability on Microsoft Learn, and with your SASE provider for the network layer. Now the fun The full slide set is at https://aka.ms/purviewlayeredprotection. It is a living reference, and it will keep evolving with the product. If it helps you plan something, or if there is a scenario you would like to see in the next version, I would love to hear about it.1.8KViews4likes0Comments[HELP] "Action required for browser protections" alert
Hello! I have an Endpoint DLP policy with Device location. After several scoping changes (device groups, inclusions/exclusions) to narrow it to a specific target group, the orange alert appeared: Action required for browser protections. One or more policies were not applied in Edge for Business. This could be due to a policy sync issue, lack of required permissions, or an issue with the server. Either resync these policies or contact an admin with the required permissions to resync. After resyncing, you might still see this message for up to 1 day while the system completes the sync and activates protections. The policies were working before. Clicked Resync multiple times, only for the error to return. Please help!705Views1like4Comments