office 365
10 Topics
Azure AI Gateway is now generally available: Ship faster, stay in control
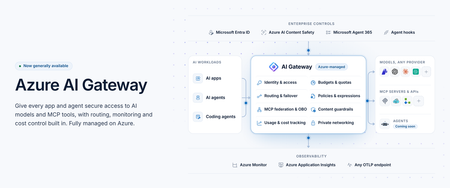
Today at Microsoft Ignite 2026, we're announcing the general availability of Azure AI Gateway, a fully managed Azure service that lets you set up a single, controlled path from your AI applications and agents to models and tools across providers. Developers build with the models and tools they choose, and platform teams manage access, enforce policies, control costs, and monitor usage from one place, without operating gateway infrastructure. Azure AI Gateway, previously in public preview as the AI Gateway tier of Azure API Management, is now a standalone product optimized for governing access to AI models and tools, with a roadmap focused entirely on AI. You can use it by itself with any app or agent, or together with Microsoft Foundry, where you build and run agents, and Microsoft Agent 365, where you manage them. Azure AI Gateway is available today in 17 Azure regions. To make it easy to get started, it offers a freemium, per-use pricing model with 10,000 free requests per gateway each month. Paid billing begins January 1, 2027. See the Regions and pricing section below for details. Why enterprise AI needs a unified governance layer Enterprise AI has moved beyond one app calling one model. Organizations use models from several providers, build agents that act through enterprise tools, and scale AI across teams. When each app manages its own credentials, routing, safety, and usage limits, governance becomes fragmented. Developers struggle to find approved models and tools, and platform teams can't see who is using what, what it costs, or which policies apply. Azure AI Gateway lets you move those controls out of individual apps and into one place, where they apply consistently to every app and agent you connect. How Azure AI Gateway works Apps and agents you connect call the gateway instead of calling each model or tool directly. On every request, the gateway authenticates the caller with Microsoft Entra ID or a gateway access key, enforces access rules and your policies, routes the request to the right model or tool, and records telemetry. Figure 1. Azure AI Gateway sits between callers and backends, governing every request that passes through it. What you can do with Azure AI Gateway Build with models and tools across providers Any model, one name: Use models from Microsoft Foundry, Azure OpenAI, OpenAI, Anthropic, Amazon Bedrock, Google Vertex AI, or any OpenAI-compatible endpoint. Apps call each model by an alias you define, so you can switch models without changing app code. Routing and failover: Route by priority, weight, or custom conditions, with configurable failover, or let Model Router (preview) choose by cost or quality. Consolidated tools: Federate MCP servers and turn OpenAPI specs, connectors, and API Management APIs into MCP tools. Multiple MCP spec versions are supported, including the latest (July 2026). The APIs you know: Call models through an OpenAI-compatible API or the Anthropic Messages API and connect agents to tools from any MCP client. Govern and observe AI interactions Access with Entra ID: Built-in roles control who can use models and tools. Provider keys and tool credentials never reach app code. Safety on every prompt: Screen prompts and responses with Azure AI Content Safety. Only approved tools: Curate and block tools at the gateway, or through Microsoft Agent 365 policies. Protection from poisoned tools (preview): Through the Microsoft Agent 365 integration, Microsoft Defender and Microsoft Purview inspect tool calls and results and block threats before an agent acts. Delegated identity: With on-behalf-of (OBO) authentication, tools act with the signed-in user’s own permissions. Every call on record: Record the caller, target, tokens, and outcome of each model and tool call, trace each call to its agent, and export the data over OpenTelemetry to Application Insights, Datadog, Splunk, Grafana Cloud, or any OTLP endpoint. Private by design: Private Link (preview) for inbound calls, VNet integration (preview) for private backends, IP filtering, and managed identity. Control AI spend as adoption scales See who spends what: Track tokens and estimated cost by user, team, app, agent, provider. Enforced budgets: Cost limits stop new requests once estimated spend reaches a budget. Fair sharing: Token and request limits keep one caller from crowding out the rest. Discover, build, and operate in your existing workflow Coding agent plugin: Developers find approved models and tools and connect their apps from their coding agent. Portal, CLI, Bicep, and REST API: Configure in the portal or with the CLI, then deploy the same setup as code from your CI/CD pipelines with Bicep or the REST API. See Azure AI Gateway in action From connecting models and MCP tools to securing access, controlling costs, and monitoring AI traffic, this demo shows how Azure AI Gateway helps you run AI applications with confidence. Extend AI governance across your Microsoft ecosystem Already using Microsoft Foundry, Microsoft Agent 365, or Azure API Management? Azure AI Gateway works with all three. Microsoft Foundry: Foundry has governance built in for its resources and projects. When AI spreads across teams, Foundry resources, subscriptions, and other providers, the gateway adds a shared layer on top. In a hub-and-spoke model, the gateway is the hub: a central platform team sets the rules once, and developers keep building in their Foundry projects, the spokes, using approved models and tools without managing credentials. Projects can share one deployment, including PTU, and fail over to another Foundry resource or provider. Foundry prompt agents can use gateway models through a model connection (preview), without code changes. Microsoft Agent 365: Agent 365 discovers the gateway’s MCP servers and lets you set tool policies. The gateway enforces those policies, alongside its own, on every tool call, with added threat protection (preview) from Defender and Purview. Regions and pricing Azure AI Gateway is available today in 17 Azure regions: East US, East US 2, East US 2 EUAP, West US, West US 2, Central US, North Central US, South Central US, Canada East, West Europe, North Europe, UK South, France Central, Sweden Central, Australia East, Japan East, and Southeast Asia. Azure AI Gateway offers a freemium, per-use pricing model with 10,000 free requests per gateway each month. Paid billing begins January 1, 2027. Monthly gateway requests Service fee Additional request charges Up to 10,000 Free None More than 10,000, up to 10 million $500 per month, per gateway, billed hourly None (includes 10 million requests) More than 10 million $500 per month, per gateway, billed hourly $20 per additional million requests, billed in increments of 10,000 requests Prices are in US dollars and may vary by region. Exact regional prices will be available when billing begins. Get started with Azure AI Gateway Create a gateway at ai.gateway.azure.com. It’s ready in about a minute and free to start. Then: Connect an existing model and give it an alias. Expose the MCP tools your agents need. Give your team access with an AI Gateway role. Set a cost limit. Point your app or agent at the gateway. Or start from your coding agent. Install the Azure AI Gateway plugin, and it finds approved models and tools and connects your app for you. Explore the documentation and quickstarts at ai.gateway.azure.com/docs.6.1KViews1like1CommentOffice 365 Outlook Adapters in Action
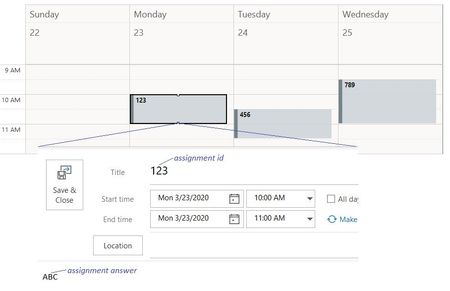
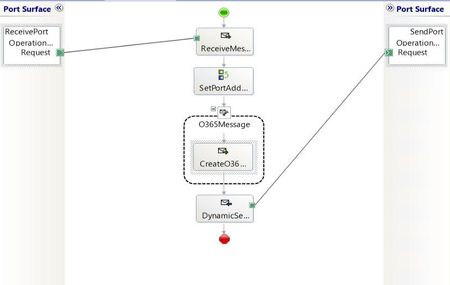
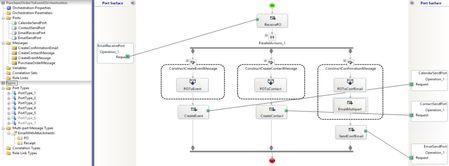
This article presents all Office 365 Outlook adapters integrated in a simplified e-tailer scenario. The goal is to show one way to get started with the adapters in a minimal yet complete BizTalk application. The adapters are: - Office 365 Outlook Email - Office 365 Outlook Calendar - Office 365 Outlook Contact All files used in the BizTalk solution are attached. Scenario A customer (Contoso) submits a purchase order (PO) by plain text email from an Office 365 account to an e-tailer (Fabrikam). The content of the email follows a custom purchase order xml schema defined by the e-tailer. One of the elements is a due date by which the order and an invoice will be sent. Upon receiving the email, Fabrikam will do the following in parallel: - Schedule sending the customer invoice. - Create or update the customer contact information. - Send a confirmation email to the customer. On the due date, Fabrikam sends an invoice to Contoso. Receive-Side: Processing the purchase order Fabrikam implements the PO processing by using a BizTalk orchestration (shown below) and the construction of three messages: calendar event, contact, and email. The PO follows the schema: The order is received on an Office 365 email account, in plain text, with the following content in the email body: <ns0:PurchaseOrder xmlns:ns0="http://CreateEventFromPurchaseOrder.PurchaseOrder"> <PONumber>PONumber_0</PONumber> <CustomerInfo> <Name>Contoso</Name> <Email>contoso@outlook.com</Email> </CustomerInfo> <Description> <Item>Item_0</Item> <Count>5</Count> </Description> <DueDate>2020-04-08</DueDate> </ns0:PurchaseOrder> Note: In desktop Outlook, the default text format in HTML. It needs to be changed to Plain Text. In the BizTalk message constructions, the PO xml schema is mapped to calendar event, contact and confirmation email schemas. For the calendar and contact schemas, we copied into our BizTalk project the schemas provided in the BizTalk installation folder under C:\Program Files (x86)\Microsoft BizTalk Server\SDK\Schemas: The resulting maps are shown below: For contact, givenName element must be provided. The confirmation email also contains the original PO and an additional document as attachments. This is done by defining a multi-part message in the orchestration. The PO-to-email map takes care of creating the email body. Then, email attachments are added in the message assignment shape with the following code: CreateConfirmationEmail.PO = PurchaseOrderMessage; CreateConfirmationEmail.PO(Microsoft.XLANGs.BaseTypes.ContentType) = "application/xml"; CreateConfirmationEmail.Receipt(Microsoft.XLANGs.BaseTypes.ContentType) = "text"; // NOTE: all message parts must be instanciated before the context properties are assigned. CreateConfirmationEmail(OfficeMail.Subject) = "Order Confirmation for " + PurchaseOrderMessage.PONumber + " due date " + System.String.Format("{0}", PurchaseOrderMessage.DueDate); CreateConfirmationEmail(OfficeMail.AttachedFiles) = "C:\\Brochure.xml"; CreateConfirmationEmail(OfficeMail.To) = PurchaseOrderMessage.CustomerInfo.Email; All parts have to be instantiated before the context properties are assigned. For a complete list of the context properties, refer to Office 365 Outlook Email. Context properties for the calendar event (not used here) are also available and documented in Office 365 Outlook Calendar. (Attachment support for calendar events may be added in future BizTalk releases if there are enough requests for the feature.) As a result, on the customer's side, the confirmation email will look like: The orchestration is bound to an email receive port, and to calendar/contact/email send ports. The default XML receive pipeline is used in the email receive location. The setup is summarized below. Send-Side: Sending invoice on the due date Fabrikam gets notified on the due date that the invoice needs to be emailed to Contoso. The following orchestration is used to define the business flow: Once again, the BizTalk message for the email is constructed in two steps. First, Office365OutlookCalendarReceive.xsd (copied from the SDK/Schemas folder) is mapped to a custom schema defining the invoice email content. Then, the following message assignment shape is used to create the email subject and extract the recipient's email from the received calendar event, which corresponds to the second element in the attendee list (hence the [2] in the xpath): CreateInvoiceMessage(OfficeMail.Subject) = "Order Invoice for " + ReceiveEventMessage.subject; CreateInvoiceMessage(OfficeMail.To) = xpath(ReceiveEventMessage, "string(/*[local-name()='Event' and namespace-uri()='http://schemas.microsoft.com/BizTalk/Office365OutlookCalendar/Receive']/*[local-name()='attendees' and namespace-uri()=''][2]/*[local-name()='emailAddress' and namespace-uri()='']/*[local-name()='address' and namespace-uri()='']/text())"); The orchestration is bound to a calendar receive port with a 1-day time horizon to get notified within 24h before the due date. In our solution, we reuse the existing email send port bound to the first orchestration. However, a new email send port may be warranted if different default adapter properties (shown below) are required, or if invoices need to be sent from a different Office 365 email account. In Summary The Contoso-Fabrikam business scenario was implemented by integrating all Office 365 Outlook adapters in receive- and send-side transforms and orchestrations. BizTalk artifacts are attached to this article for reference.Attachments in the Office 365 Outlook Email Adapter
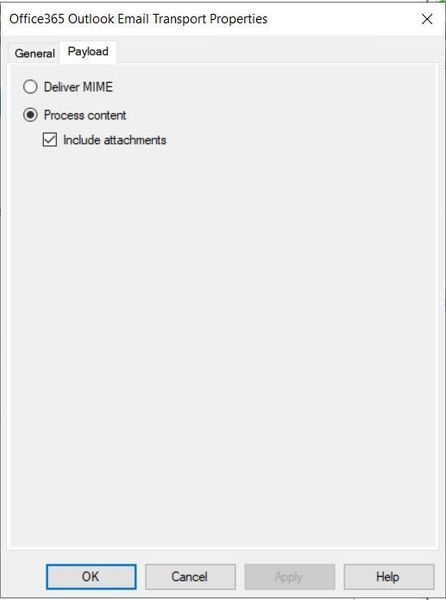
Starting with the release of BizTalk Server 2020, email attachments are supported by the Office 365 Outlook Email adapter. As a growing number of businesses are adopting Office 365, this new feature is an interesting alternative to the POP3 Adapter on the receive side, and to the SMTP Adapter on the send side, in scenarios such as (non-exhaustive list): Migration of existing deployed POP3/SMTP BizTalk applications to a more modern platform; Integration of Office 365 and BizTalk to transfer data via email attachment payloads; Organizations that use Outlook 365 by connecting other email accounts. The article Office 365 Outlook Adapters in Action provides an example of how to use attachments in a BizTalk ochestration. Receiving Attachments 1. Multipart BizTalk Messages The first way to receive and save attachments in the Office 365 Outlook Email adapter is by creating a multipart BizTalk message where each part corresponds to an attachment. This is equivalent to the Apply MIME decoding option set to true in the POP3 adapter configuration. The receive location transport property settings for this configuration are shown below. Note that by default, the "Include attachments" checkbox is unchecked, and it needs to be checked explicitly. As an example, let's receive the following email with attachments (as shown in the Outlook desktop app): The corresponding BizTalk message, shown in the screenshot below, will have one part per attachment. The part named "body" corresponds to the email body as sent by the server, which is with HTML body type by default in Outlook 365. Subsequent parts are named after the attachment names. Each part of the BizTalk message contains character set information, and MIME type as content type. 2. MIME Content The second way to receive attachments is by choosing MIME email payload, as shown below: In this case, the BizTalk message body will contain the entire MIME representation of the email (headers, body and attachments). Sending Attachments Let's consider an email send port with the configuration below. Send ports with transport type Office 365 Outlook Email can be configured to attach the parts of a multipart BizTalk message to an email, as well as specific files. This is the equivalent of the MessagePartsAttachments and Attachments properties in the SMTP send port configuration. For illustration, we forwarded the email with attachments received earlier. The corresponding BizTalk multipart message looked like: The email sent by the send port is shown below, in the Outlook desktop client app used by the recipient. Note that the attachment types are preserved, and the body is shown as HTML in the same way as the original email. References: Office365 Outlook Email adapter POP3 Adapter SMTP Adapter Office 365 Outlook Adapters in Action