microsoft purview
660 Topics
Best Way to Exclude Delta _delta_log Folders from Purview Scans?
Hi Purview Community, We're scanning ADLS Gen2 assets with Microsoft Purview Data Map and have encountered issues with _delta_log folders being ingested as catalog assets. Initially, _delta_log folders were included in scans and were ingested into the Data Map. This appears to have introduced a large number of technical assets that are not useful for business users and may be contributing to unexpected metadata and row count discrepancies. Questions What is the recommended ignore pattern to exclude all _delta_log folders from ADLS Gen2 / Fabric scans? After updating a scan rule to exclude _delta_log, how can previously ingested _delta_log assets be completely removed from the Data Map? Is deleting the assets from Data Map sufficient? Is there a metadata purge process? Are there any known limitations where deleted _delta_log assets still affect resource sets, lineage, profiling, DQ, or row count calculations? Has anyone experienced inflated row counts or profiling results after _delta_log folders were previously scanned? For example, we're seeing significant differences between Purview-reported row counts and source system row counts even after excluding _delta_log folders and deleting the corresponding assets. Any guidance, best practices, or Microsoft documentation references would be greatly appreciated. Thanks!8Views0likes0Comments
Objects in a Retention Policy populated by Adaptive Scopes
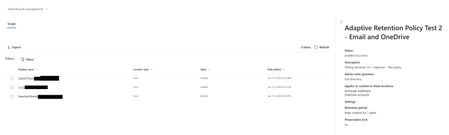
I need a way to get all users in a retention policy that is populated by an adaptive scope. I can get all the members of the scope, and I can show that the policy uses that adaptive scope. But I know my audience. They will want to see that the users are actually in the policy. They will probably even want to see that it matches the users in the adaptive scope. In the GUI, I can click on an adaptive retention policy and click on "policy details". This will show all the users that the policy applies to and the date/time they were added, if they were removed from the policy, etc. And I can even export that. How can I get this same information via PowerShell? It's going to be important because, as you can see, there's a big difference in the date/time added. they were all in the adaptive scope BEFORE this policy was created, but it still took nearly 24 hours for all users to be added. Which is fine, and typical, but if a user gets added to the adaptive scope and does not have the policy applied to them within 24 hours, we need to know this. The goal is as much automation as possible, with checks and balances in place. Checks and balances require gathering information. That's going to require getting this information via PowerShell.478Views0likes7Comments
Updating Purview DLP Sensitive Service Domain Groups with PowerShell
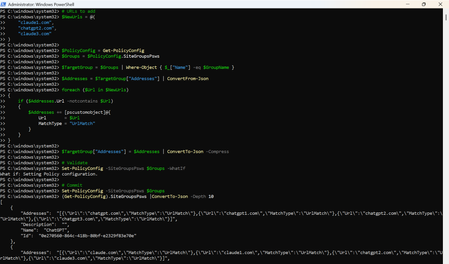
Introduction Microsoft Purview Data Loss Prevention (DLP) can use Sensitive Service Domain Groups to organize websites and other network destinations that are referenced by endpoint DLP rules. Administrators can manage these settings in the Purview portal, while PowerShell is useful when changes must be repeatable, reviewed, and validated before they are committed. This article demonstrates how to retrieve the tenant policy configuration, identify an existing group, add new URL entries only when they are not already present, validate the change, commit it, and verify the final configuration. Important The SiteGroupsPsws object contains tenant-wide endpoint restriction settings. Test the script in a non-production tenant first, export the original configuration, and use change control. Microsoft documents Get-PolicyConfig and Set-PolicyConfig for viewing and modifying endpoint restrictions, but the internal shape of individual hashtable entries can evolve. Prerequisites Requirement Guidance Permissions Use an account assigned the required Microsoft Purview permissions for the configuration being changed. Microsoft states that Get-PolicyConfig and Set-PolicyConfig require permissions in Security & Compliance PowerShell. PowerShell module Install or update the ExchangeOnlineManagement module. Security & Compliance PowerShell uses this module for connectivity. Connection Connect to Security & Compliance PowerShell by using Connect-IPPSSession before running the policy configuration cmdlets. Existing group The target Sensitive Service Domain Group must already exist. This script updates a group named Claude; it does not create the group. Change controls Run the discovery and backup commands first, use -WhatIf before commit, and retain the exported JSON for rollback analysis. Step 1: Install the module and connect Install-Module -Name ExchangeOnlineManagement -Scope CurrentUser Import-Module ExchangeOnlineManagement Connect-IPPSSession Confirm that the policy configuration can be retrieved: Get-PolicyConfig | Format-List Step 2: Discover available group names List the names exposed in SiteGroupsPsws and confirm that the target group exists before making any change. (Get-PolicyConfig).SiteGroupsPsws | Where-Object { $_.ContainsKey("Name") } | ForEach-Object { $_.Name } Step 3: Back up the current configuration Export the current SiteGroupsPsws representation before modifying the in-memory object. $BackupPath = ".\SiteGroupsPsws-backup-{0}.json" -f (Get-Date -Format "yyyyMMdd-HHmmss") (Get-PolicyConfig).SiteGroupsPsws | ConvertTo-Json -Depth 20 | Set-Content -Path $BackupPath -Encoding UTF8 Write-Host "Backup written to $BackupPath" -ForegroundColor Cyan Step 4: Define the target group and URLs $GroupName = "Claude" $NewUrls = @( "claude1.com", "chatgpt2.com", "claude3.com" ) Replace the sample values with the approved production URLs. Use only the domain or wildcard format supported by your DLP design. Step 5: Retrieve and validate the target group $PolicyConfig = Get-PolicyConfig $Groups = $PolicyConfig.SiteGroupsPsws $TargetGroup = $Groups | Where-Object { $_["Name"] -eq $GroupName } if (-not $TargetGroup) { $AvailableGroups = $Groups | Where-Object { $_.ContainsKey("Name") } | ForEach-Object { $_.Name } throw "Sensitive Service Domain Group '$GroupName' was not found. Available groups: $($AvailableGroups -join ', ')" } Complete script # Target Sensitive Service Domain Group $GroupName = "Claude" # URLs to add $NewUrls = @( "claude1.com", "chatgpt2.com", "claude3.com" ) $PolicyConfig = Get-PolicyConfig $Groups = $PolicyConfig.SiteGroupsPsws $TargetGroup = $Groups | Where-Object { $_["Name"] -eq $GroupName } $Addresses = $TargetGroup["Addresses"] | ConvertFrom-Json foreach ($Url in $NewUrls) { if ($Addresses.Url -notcontains $Url) { $Addresses += [pscustomobject]@{ Url = $Url MatchType = "UrlMatch" } } } $TargetGroup["Addresses"] = $Addresses | ConvertTo-Json -Compress # Validate Set-PolicyConfig -SiteGroupsPsws $Groups -WhatIf # Commit Set-PolicyConfig -SiteGroupsPsws $Groups Step 6: Verify the change Retrieve a fresh copy from the service rather than validating only the modified local object. $VerifiedGroups = (Get-PolicyConfig).SiteGroupsPsws $VerifiedTarget = $VerifiedGroups | Where-Object { $_["Name"] -eq $GroupName } $VerifiedAddresses = @($VerifiedTarget["Addresses"] | ConvertFrom-Json) $Verification = foreach ($Url in $NormalizedNewUrls) { [pscustomobject]@{ Group = $GroupName Url = $Url Present = ($VerifiedAddresses.Url -contains $Url) } } $Verification | Format-Table -AutoSize if ($Verification.Present -contains $false) { throw "Verification failed: one or more URLs were not found after the update." } Write-Host "Verification passed for all requested URLs." -ForegroundColor Green Step 7: Optional full configuration views # Writable PowerShell representation (Get-PolicyConfig).SiteGroupsPsws | ConvertTo-Json -Depth 20 # Service view (Get-PolicyConfig).SiteGroups Sample output The sample is illustrative. Actual service output and formatting can vary by module version and tenant configuration. Troubleshooting Symptom Recommended check Get-PolicyConfig or Set-PolicyConfig is not recognized Confirm that the ExchangeOnlineManagement module is installed and that the session was connected with Connect-IPPSSession. Access denied or authorization error Verify the administrator account has the required Purview role-group permissions, then reconnect after role propagation. Target group not found Run the discovery command and use the exact group name returned by SiteGroupsPsws. Addresses cannot be parsed Inspect the raw Addresses property before changing anything. Restore from the exported JSON if the object shape is unexpected. -WhatIf succeeds but verification fails Retrieve Get-PolicyConfig again, check for service-side errors, and confirm no competing administrator update overwrote the configuration. Summary PowerShell provides a controlled way to update Microsoft Purview DLP Sensitive Service Domain Groups at scale. The safest pattern is to discover the exact group name, export the current configuration, validate the target object, normalize and de-duplicate input, run Set-PolicyConfig with -WhatIf, commit the change, and then verify it through a fresh Get-PolicyConfig call. This validation-first workflow improves repeatability and reduces the risk of unintended tenant-wide configuration changes. References Get-PolicyConfig cmdlet reference https://learn.microsoft.com/en-us/powershell/module/exchangepowershell/get-policyconfig?view=exchange-ps Set-PolicyConfig cmdlet reference https://learn.microsoft.com/en-us/powershell/module/exchangepowershell/set-policyconfig?view=exchange-ps Security & Compliance PowerShell overview https://learn.microsoft.com/en-us/powershell/exchange/scc-powershell?view=exchange-ps Configure Endpoint DLP settings https://learn.microsoft.com/en-us/purview/dlp-configure-endpoint-settings
Anthropic Claude Purview Data Connector showing all users as Guests..
It appears this connector is not mapping fields properly causing internal users to be mapped as "guests", and since prompts/data isn't maintained for guest users the connector is effectively not gathering anything but noise. Unlike the other data connectors, one cannot create field mappings. Also the app being named using the guid of Microsoft's own "dataassessments" service principal I don't think is intended either. Has anybody else experienced this? See below for an example.754Views3likes8CommentsWhy Some Purview DLP Policies Need Days to Start Working
While testing the new DLP capabilities to block sharing to users and domains and stop Copilot from using external email, it was noticeable how long it took before policies became active. DLP policy synchronization to workloads is reasonably work (and getting faster), but these policies have a new retrospective effect that requires workloads to process files and messages to stop them being available. It’s a new twist to the DLP story. https://office365itpros.com/2026/09/11/dlp-policies-take-time/104Views1like0CommentsTeams Private Channels: Group-Based Compliance Model & Purview eDiscovery Considerations
Microsoft Teams Private Channels are undergoing an architectural change that will affect how your organisations uses Microsoft Purview eDiscovery to hold and discovery these messages going forward. In essence, copies of private channel messages will now be stored in the M365 Group mailbox, aligning their storage with how standard and shared channels work today. This shift, due to roll out from early October 2025 to December 2025, brings new benefits (like greatly expanded channel limits and meeting support) and has the potential to impact your Purview eDiscovery searches and legal holds workflows. In this blog post, we’ll break down what’s changing, what remains the same, and provide you with the information you need to review your own eDiscovery processes when working with private channel messages. What’s Changing? Private channel conversation history is moving to a group-based model. Historically, when users posted in a private channel, copies of those messages were stored in each member of the private channel’s Exchange Online mailbox (in a hidden folder). This meant that Microsoft Purview eDiscovery search and hold actions for private channel content had to be scoped to the member’s mailbox, which added complexity. Under the new model rolling out in late 2025, each private channel will get its own dedicated channel mailbox linked to the parent Teams’ M365 group mailbox. In other words, private channel messages will be stored similarly to shared channel messages; where the parent Teams’ M365 group mailbox is targeted in eDiscovery searches and holds, instead of targeting the mailboxes of all members of the private channel. Targeting the parent Teams’ M365 Group mailbox in a search or a hold will extend to all dedicated channel mailboxes for shared and private channels within the team as well as including any standard channels. After the transition, any new messages in a private channel will see the message copy being stored in the channel’s group mailbox, not in users’ mailboxes. Why the change? This aligns the retention and collection of private channel messages to standard and shared channel messages. Instead of having to include separate data sources depending on the type of Teams channel, eDiscovery practitioners can simply target the Team’s M365 Group mailbox and cover all its channel, no matter it’s type. This update will introduce major improvements to private channels themselves. This includes raising the limits on private channels and members, and enabling features that were previously missing: Maximum private channels per team: increasing from 30 to 1000. Maximum members in a private channel: increasing from 250 to 5000. Meeting scheduling in private channels: previously not supported, now allowed under the new model. The table below summarizes the old vs new model for Teams private channel messages: Aspect Before (User Mailbox Model) After (Group Mailbox Model) Message Storage Messages copied into each private channel member’s Exchange Online mailbox. Messages are stored in a channel mailbox associated with the parent Teams’ M365 group mailbox. eDiscovery Search Had to search private channel member’s mailboxes to find channel messages. Search the parent M365 group mailbox for new private channel messages and user mailboxes for any messages that were not migrated to the group mailbox. Legal Hold Placement Apply hold on private channel member’s mailbox to preserve messages. Apply hold on the parent M365 group mailbox. Existing holds may need to include both the M365 group mailbox and members mailboxes to cover new messages and messages that were not migrated to the group mailbox. Things to know about the changes During the migration of Teams private channel messages to the new group-based model, the process will transfer the latest version of each message from the private channel member’s mailbox to the private channel’s dedicated channel mailbox. However, it’s important to note that this process does not include the migration of held message versions; specifically, any messages that were edited or deleted prior to the migration. These held messages, due to a legal hold or retention policy, will remain in the individual user mailboxes where they were originally stored. As such, eDiscovery practitioners should consider, based on their need, including the user mailboxes in their search and hold scopes. Legal Holds for Private Channel Content Before the migration, if you needed to preserve a private channel’s messages, you placed a hold on the mailboxes of each member of the private channel. This ensured each user’s copy of the channel messages was held by the hold. Often, eDiscovery practitioners would also place a hold on the M365 group mailbox to also hold the messages from standard and shared channels After the migration, this workflow changes: you will instead place a hold on the parent Team’s M365 group mailbox that corresponds to the private channel. Before migration: It is recommended to update any existing hold that are intended to preserve private channel messages so that it includes the parent Team’s M365 group mailbox in addition to the private channel members’ mailboxes. This ensures continuity as any new messages (once the channel migrates) will be stored in the group mailbox. After migration: For any new eDiscovery hold involving a private channel, simply add the parent Teams’ M365 group mailbox to the hold. As previously discussed eDiscovery practitioners should consider, based on need, if the hold also needs to include the private channel members mailboxes due to non-migrated content. Any private channel messages currently held in the user mailbox will continue to be preserved by the existing hold, but to hold any future messages sent post migration will require a hold placed on the group mailbox. eDiscovery Search and Collection Performing searches related to private channel messages will change after the migration: Before Migration: To collect private channel messages, you targeted the private channel member’s mailbox as a data source in the search. After migration: The private channel messages will be stored in a channel mailbox associated with the parent Team’s M365 group mailbox. That means you include the Team’s M365 group mailbox as a data source in your search. As previously discussed eDiscovery practitioners should consider, based on need, if the search also needs to include the private channel members mailboxes due to non-migrated content. What Isn’t Changing? It’s important to emphasize that only Teams private channel messages are changing in this rollout. Other content locations in Teams remain as they were, so your existing eDiscovery processes remain unchanged: Standard channel messages: These are been stored in the Teams M365 group mailbox. You will continue to place holds on the Team’s M365 group mailbox for standard channel content and target it in searches to do collections. Shared channel messages: Shared channels messages are stored in a channel mailbox linked to the M365 group mailbox for the Team. You continue to place holds and undertake searches by targeting the M365 group mailbox for the Team that contains the shared channel. Teams chats (1:1 or group chats): Teams chats are stored in each user’s Exchange Online mailbox. For eDiscovery, you will continue to search individual user mailboxes for chats and place holds on user mailboxes to preserve chat content. Files and SharePoint data: Any file shared in teams message or uploaded to a SharePoint site associated with a channel remains as it is today. In conclusion For more information regarding timelines, refer to the to the Microsoft Teams blog post “New enhancements in Private Channels in Microsoft Teams unlock their full potential” as well as checking for updates via the Message Center Post MC1134737.
Microsoft Purview | Share block at external users
Hello community. I have an issue with Microsoft Purview DLP policies. I am trying to create a policy that prevents documents from being shared through OneDrive with external users, while allowing certain exceptions. However, when I select the option "Block Access to external domains and users" and assign a specific email address to be blocked, it does not work. The configured email address is not being blocked. I was reviewing this with Copilot, and it mentioned that if the external user you are sharing with already exists in Entra ID, the tenant may treat the user differently (not necessarily as an external user). My external user exists in Entra ID as a Guest account. The external user is registered as follows: Displayname: User Name Userprincipalname: user.name_external.domain#EXT#@company.onmicrosoft.com User Type: Guest Has anyone else experienced this issue? I am sharing evidence of the policy configuration.897Views0likes7CommentsNew Archiving Capability for Purview Data Lifecycle Management
Tenants with Microsoft 365 Archive configured can incorporate an archiving step in how Purview retention policies and labels process SharePoint Online and OneDrive for Business files. It makes perfect sense to move inactive files to lower-cost archive storage as an intermediate point some time before their final deletion. You’ll save on storage and stop AI tools processing the digital debris that invariably accumulates in SharePoint. https://office365itpros.com/2026/08/20/microsoft-365-archive-retention/177Views0likes0CommentsInsider Risk Level not being correctly picked up by DLP
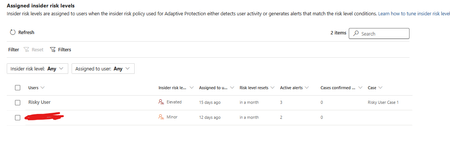
I have two users currently with assigned Insider Risk levels, one elevated and one minor. I have taken the templated DLP policy (DSPM for AI - Block sensitive info from AI sites) which looks for sensitive information being pasted to generative AI sites, and applies a block if the user is an elevated risk user, and a block with override for a moderate/minor risk user (this was audit only originally). For each advanced DLP rule within that policy, I have a separate policy tip which shows so I know which Advanced DLP rule has been hit. However, I'm having some discrepancies with the correct insider risk level being identified by Purview and therefore the wrong advanced DLP rule is being applied. Testing examples: Logged into a Windows 11 PC with the account, and using Medium confidence UK NINO's I try pasting the content into ChatGPT: Elevated risk user: Block with Override Minor Risk user: Block with Override If I try the exact same scenario on a different PC, I can sometimes get to the point where even though its the same set of data, Purview allows me to paste it at after checking the data. Or in another scenario, I was getting both users hitting the "elevated risk" advanced DLP rule. The Devices are all showing as up to date sync wise with DLP policies, and the policy itself is showing as fully synced. Assigned insider risk levels: DLP Rules: Elevated: Moderate/Minor:Solved469Views0likes2Comments