microsoft entra id
31 TopicsMicrosoft Entra Connect 2.x Version Retirement Reminder
Microsoft is retiring older versions of Microsoft Entra Connect Sync 2.x as part of its version lifecycle policy. Version 2.5.79.0 Retirement date: 23 October 2026 This version will retire 12 months after the release of version 2.5.190.0. Important to know Microsoft Entra Connect Sync 2.x versions retire 12 months after a newer version is released. This retirement policy has been in effect since 15 March 2023. For new installations: Always install the latest available version. For existing environments: Plan your upgrade to the latest version before your currently installed version reaches its retirement date.521Views0likes1CommentLessons Learned #552:10 Lines in an SSMS MSAL Trace That Tell You Almost Everything You Need to Know
In one of our support cases, a customer reported higher-than-expected connection times when connecting from SQL Server Management Studio (SSMS) to Azure SQL Database using Microsoft Entra authentication. The behavior was also not completely consistent. Sometimes the connection required interaction with the account selection experience. Other times, subsequent connections were noticeably faster. At first, there were several possible areas to investigate: Was Azure SQL taking too long to authenticate the user? Was there a networking, proxy, or firewall issue? Was access to login.microsoftonline.com being delayed or denied? Was Microsoft Entra authentication itself taking the time? Was Conditional Access or MFA involved? Was SSMS using the expected Microsoft Entra account? Was the delay happening before or after the access token was obtained? The important question became: Where exactly was the connection time being spent? Instead of treating the SSMS connection as a single operation, I enabled verbose MSAL tracing in SSMS and started following the authentication process. SSMS exposes the MSAL Output Window Trace Level under Tools → Options → Azure Services. The same options page exposes the Microsoft Entra authority, Azure SQL Database service principal name, and Web Account Manager settings. The resulting trace was large—hundreds of lines. But while analyzing it, I realized something useful: I didn't need to understand every line in the MSAL trace. A small number of search strings were enough to reconstruct almost the entire authentication story. These are the 10 things I learned to look for. 1. CorrelationId — First, make sure I am following the same authentication request One of the first things I learned was not to read the trace only by timestamp. MSAL performs several related operations: GetAccounts. AcquireTokenSilent. ReadAccountById AcquireTokenInteractive Broker operations Token cache operations Some can happen almost at the same time, and they don't necessarily share the same correlation ID. For example, in one reproduction, the silent authentication attempt had one correlation ID, while the subsequent interactive request used another one. So my first search became: CorrelationId I learned not to calculate latency by simply subtracting two nearby timestamps. First I identify: Operation + CorrelationId + Start / End and only then interpret the timing. This becomes particularly valuable if the logs later need to be correlated with identity-service investigations. MSAL exposes the correlation ID specifically to piece together an authentication flow. 2. ApiId — Was SSMS trying silent or interactive authentication? My second search became: ApiId In the first connection attempt I found: ApiId - AcquireTokenSilent That immediately told me that SSMS was not initially trying to display an authentication UI. It first attempted to obtain the token silently. But later in the same reproduction I found: ApiId - AcquireTokenInteractive Now the flow was becoming clearer: SSMS ->AcquireTokenSilent -> Silent authentication cannot continue -> AcquireTokenInteractive This was my first important lesson from the case: An SSMS Microsoft Entra connection isn't necessarily interactive from the beginning. MSAL can first try silent authentication and only switch to an interactive mechanism if necessary. Microsoft documents MsalUiRequiredException precisely for situations in which a non-interactive acquisition cannot continue without user interaction—for example because sign-in, MFA, consent, or another requirement must be satisfied. 3. Authority — Where was the authentication request actually going? The next thing I wanted to know was whether the delay could be associated with reaching Microsoft Entra. I searched for: Authority - The trace showed: Authority - https://login.microsoftonline.com/<tenant-id>/ This single line gives us two very important pieces of information: https://login.microsoftonline.com/ -> Microsoft Entra tenant -> Identity authority That means that before blaming Azure SQL, I can establish which identity endpoint SSMS/MSAL is using. This is also where a frequently reported problem such as: "It looks like access to login.microsoftonline.com is denied." can be investigated much more precisely. If I see something such as: MsalServiceException StatusCode: 403 AADSTS.... then I need to inspect the Microsoft Entra response and its error code. If I see a DNS, TLS, proxy, connection timeout, or similar exception, the network path to the identity endpoint becomes much more relevant. Those are very different problems. MSAL distinguishes client/library errors (MsalClientException), token-provider/service responses (MsalServiceException), and scenarios requiring interaction (MsalUiRequiredException). Network failures that MSAL doesn't handle are propagated to the application. One thing I would not conclude from a 403 alone is: "The firewall is blocking login.microsoftonline.com." The ErrorCode, AADSTS code, StatusCode, and ResponseBody together are much more useful than the HTTP status alone. 4. Scopes — Which resource was SSMS requesting the token for? Another line that became essential was: Scopes - Our trace showed: Scopes - https://database.windows.net//.default This helped me separate two parts of the connection that are easy to mix together: Microsoft Entra Authority login.microsoftonline.com -> issues / obtains identity token Token requested for database.windows.net -> Azure SQL The Authority tells me where authentication is being performed. The scope tells me for which resource the token is being requested. SSMS documents https://database.windows.net/ as the Azure SQL Database service principal name used when obtaining a Microsoft Entra token. That gave me another troubleshooting rule: Don't treat a Microsoft Entra token acquisition problem and an Azure SQL authorization problem as the same thing. 5. LoginHint — What identity did SSMS suggest? The next search gave us one of the most interesting findings of the investigation: LoginHint In one reproduction we had: LoginHint provided: True and later: LoginHint - user@contoso.com In another reproduction, a different login hint was supplied, and MSAL eventually returned: MsalUiRequiredException ErrorCode: no_account_for_login_hint with the explanation that no account in the token cache matched that login hint. At first sight, it is tempting to interpret: no_account_for_login_hint as: Incorrect username But the other traces showed me that this interpretation is too simplistic. LoginHint is better understood as: "Try to locate or preselect this identity" It doesn't necessarily mean: "This is already the resolved MSAL account" . That distinction turned out to be very important. 6. Account provided and GetAllAccounts — LoginHint and Account are not the same thing This became perhaps my favorite finding from the investigation. I started searching for: GetAllAccounts and: Account provided In one trace we had: GetAllAccounts ... found 1 accounts but: LoginHint provided: True Account provided: false MSAL nevertheless ended with: no_account_for_login_hint This originally looked contradictory. There was an account in the cache, but MSAL said there was no account for the login hint. It isn't contradictory. What I learned was: An account exists ≠ An account matching this LoginHint exists Then I captured another scenario: LoginHint provided: False Account provided: Account username: user@contoso.com Now SSMS/MSAL wasn't trying to resolve a textual login hint. It already had a concrete account. I started thinking of the two cases like this: LoginHint -> "Try this identity" Account provided -> "Use this resolved identity" This distinction can be especially useful when investigating aliases, UPNs, multiple Windows accounts, cached identities, or cross-tenant accounts. The same error can also have another explanation Another reproduction made the lesson even clearer. This time the trace started with: GetAllAccounts ... found 0 accounts Found 0 RTs and 0 accounts SSMS attempted: LoginHint provided: True Account provided: false and again received: ErrorCode: no_account_for_login_hint But this time the UPN itself was valid. The cache simply contained no suitable account. So another important lesson was: Never diagnose no_account_for_login_hint from the error text alone. Check GetAllAccounts, LoginHint, and Account provided together. 7. ErrorCode, AADSTS, StatusCode — The error tells me where to investigate next At this point I realized that one of the fastest troubleshooting searches was simply: ErrorCode together with: AADSTS StatusCode ResponseBody MsalUiRequiredException MsalServiceException MsalClientException For example: MsalUiRequiredException ErrorCode: no_account_for_login_hint immediately tells me that I am still dealing with token acquisition/account resolution. I haven't reached the point where Azure SQL database permissions would explain this particular failure. This became my mental decision table: Evidence in the trace Where I would investigate first no_account_for_login_hint LoginHint / cached account / account resolution MsalUiRequiredException Why silent authentication requires interaction authentication_canceled Interactive UI / broker / user cancellation AADSTSxxxxx Microsoft Entra authentication or policy MsalServiceException Token provider/service response MsalClientException Client/library/device side DNS/TLS/proxy exception Connectivity to identity service Access token obtained successfully Move the investigation beyond token acquisition 8. Broker, WAM, authorization_type — Who was really authenticating me? This was another part that changed how I read SSMS authentication traces. I searched for: Broker WAM RuntimeBroker auth_flow authorization_type and found: Broker is configured followed by: Using Windows account picker and: Calling SignInInteractivelyAsync The telemetry then reported: auth_flow: Broker authorization_type: Interactive So the authentication path was more accurately represented as: SSMS -> MSAL -> Windows Web Account Manager -> Account / authentication broker -> Microsoft Entra WAM is a Windows component that MSAL can use as an authentication broker. It can integrate with accounts already known to Windows and provide SSO and account-selection capabilities. But another trace showed: authorization_type: WindowsIntegratedAuth during a silent acquisition. That taught me something else: The same SSMS connection target does not necessarily follow the same identity path every time. Account state, cache state, WAM, tenant, identity configuration, MFA, Conditional Access, and whether interaction is required can all affect the path. 9. AccessToken returned — This is the line that changes the investigation Eventually, I found the line that I consider one of the most useful in the entire trace: AccessToken returned: True In our successful authentication we also had: AccessToken Type: Bearer and later: === Token Acquisition finished successfully source: Broker This became a very useful troubleshooting boundary for me: Identity troubleshooting: Account LoginHint MSAL WAM MFA / CA Authority Token acquisition -> AccessToken returned: True -> Azure SQL Token validation Principal resolution Database authentication Authorization Permissions If the token has been successfully obtained, asking: "Why can't MSAL authenticate?" is probably no longer the most useful question. Now I want to know: "What happens when this token is presented to Azure SQL?" That doesn't prove that the complete SQL connection will succeed, but it gives us a very useful point at which to change troubleshooting direction. 10. DurationTotalInMs — Finally, I could see where the connection time was going This was the original reason for the support investigation. The customer reported high connection times. So eventually the most important searches became: DurationTotalInMs DurationInHttpInMs DurationInCacheInMs request_duration time_in_queue_ms Microsoft defines DurationTotalInMs as the total time spent by MSAL acquiring a token, including network and cache operations. DurationInHttpInMs represents time spent in HTTP calls made by MSAL to the identity provider, and DurationInCacheInMs measures cache activity. And now we finally had evidence from our reproduction. The first token acquisition reported: DurationTotalInMs: 2185 DurationInCacheInMs: 0 DurationInHttpInMs: 0 But the broker telemetry contained another very interesting metric: time_in_queue_ms: 2152 and request_duration: 2183 That changed the quality of the diagnosis completely. Instead of saying: "SSMS authentication seems to take around two seconds." I could say: The captured token acquisition took approximately 2.18 seconds, and approximately 2.15 seconds were represented as broker queue time in the MSAL/WAM telemetry. That is actionable evidence. Putting the 10 searches together By the end of the investigation, this became the sequence I would use when somebody sends me an SSMS MSAL trace: Search for What I want to know CorrelationId Am I following the same authentication operation? ApiId Silent or interactive token acquisition? Authority Which Microsoft Entra endpoint and tenant? Scopes Which resource is the token intended for? LoginHint Which identity did SSMS suggest? Account provided / GetAllAccounts Is an identity already resolved or cached? ErrorCode / AADSTS Why did the authentication step fail? Broker / WAM / authorization_type Which authentication mechanism actually handled the request? AccessToken returned / source: Was a usable token obtained, and from where? DurationTotalInMs and related metrics Where was the authentication time spent? With those ten searches, a trace containing hundreds of lines becomes much easier to read. Appendix – Sanitized MSAL Trace Sample The following extract is a sanitized and condensed version of the MSAL trace used in this investigation. User names, tenant IDs, correlation IDs, account identifiers, and other PII have been replaced with placeholders. The goal is to provide a practical sample where you can apply the 10 searches described in this article. First connection ==== GetAccounts started ==== GetAllAccounts ... found 0 accounts Found 0 RTs and 0 accounts in MSAL cache === AcquireTokenSilent Parameters === LoginHint provided: True Account provided: false Authority - https://login.microsoftonline.com/<tenant-id>/ Scopes - https://database.windows.net//.default ApiId - AcquireTokenSilent CorrelationId - <correlation-id-1> === Token Acquisition (SilentRequest) started === MsalUiRequiredException ErrorCode: no_account_for_login_hint No account was found in the token cache having this login hint. MSAL then moved to interactive authentication: === InteractiveParameters Data === LoginHint provided: True Prompt: select_account Authority - https://login.microsoftonline.com/<tenant-id>/ Scopes - https://database.windows.net//.default ApiId - AcquireTokenInteractive LoginHint - user@contoso.com CorrelationId - <correlation-id-2> Broker is configured Using Windows account picker Calling SignInInteractivelyAsync The broker successfully obtained the token: auth_flow: Broker authorization_type: Interactive time_in_queue_ms: 2152 request_duration: 2183 WAM response status success Successfully retrieved token AccessToken returned: True AccessToken Type: Bearer === Token Acquisition finished successfully === source: Broker DurationTotalInMs: 2185 DurationInCacheInMs: 0 DurationInHttpInMs: 0 Second connection A few seconds later, the account was already available: GetAllAccounts ... found 1 accounts Returning 1 accounts === AcquireTokenSilent Parameters === LoginHint provided: False Account provided: Account username: user@contoso.com Authority - https://login.microsoftonline.com/<tenant-id>/ Scopes - https://database.windows.net//.default ApiId - AcquireTokenSilent CorrelationId - <correlation-id-3> This time the broker completed the request silently: Acquiring token silently authorization_type: WindowsIntegratedAuth auth_flow: AT request_duration: 2 WAM response status success Successfully retrieved token AccessToken returned: True === Token Acquisition finished successfully === source: Broker DurationTotalInMs: 13 DurationInCacheInMs: 0 DurationInHttpInMs: 0 What changed? First connection No account → LoginHint → AcquireTokenSilent → no_account_for_login_hint → Interactive / WAM → Token → 2185 ms Second connection Resolved Account → AcquireTokenSilent → WAM → Token → 13 ms These extracts contain the main strings I now look for when reviewing an SSMS MSAL trace: CorrelationId ApiId Authority Scopes LoginHint Account provided / GetAllAccounts ErrorCode / AADSTS Broker / WAM AccessToken returned DurationTotalInMs386Views0likes0CommentsLessons Learned #551: Azure SQL Connection Timeouts: Three Things to Check
An application starts reporting intermittent timeouts when connecting to Azure SQL Database. Some requests succeed, others fail, and a test from a developer’s laptop works perfectly. The database appears online, no recent deployment seems related, and the natural reaction is to ask: Is Azure SQL unavailable? Is the firewall blocking the connection? Should we increase the connection timeout? Should we change the driver or scale the database? Those are reasonable questions, but they may lead the investigation in the wrong direction. The most important lesson is simple: A timeout tells us how long the application waited. It does not tell us what the application was waiting for. Not every “SQL timeout” happens inside Azure SQL From the application’s point of view, opening a database connection may involve several operations: Resolving the server name. Reaching the SQL endpoint. Obtaining a Microsoft Entra access token. Waiting for an available pooled connection. Completing the SQL login. Executing the first command. When all these operations are reported through the same application method or log entry, it can look as though Azure SQL took thirty seconds to accept the connection. In reality, only part of that time may have been spent connecting to the database. In one anonymized support scenario, the application experienced problems mainly on its first connection. Network tests were successful and no corresponding SQL connection failure was identified. The investigation eventually showed that access-token acquisition was consuming a significant part of the available time. Increasing the SQL timeout or changing the firewall would not have addressed the real delay. Check 1: Capture the complete error and the exact time A screenshot containing only “Connection Timeout Expired” is rarely enough. Capture: The complete exception and inner exception. The operation being performed. The driver and version. The authentication method. The exact timestamp in UTC. Whether the issue affects every connection or only some of them. The wording around the timeout matters. For example, a timeout while obtaining a connection from the pool points toward the application’s pooling and concurrency behavior. A pre-login or TLS error belongs to a different investigation. A command timeout after the connection was established is usually a query-performance problem rather than a connection problem. Check 2: Measure the application timeline The application should record important operations separately. A simple timeline can completely change the investigation: 10:14:20.100 Token acquisition started 10:14:28.400 Token acquired 10:14:28.405 SQL connection started 10:14:29.050 SQL connection established The complete operation took almost nine seconds, but Azure SQL connection establishment took less than one second. Useful measurements include: Token-acquisition duration. Time waiting for a pooled connection. SQL connection-open duration. SQL command duration. Number of retry attempts. Applications using Microsoft Entra authentication must obtain an access token before authenticating to Azure SQL. Measuring that operation separately helps distinguish an identity delay from a database connectivity problem. This is particularly useful when the issue appears: On the first connection after startup. After a token expires. Only with Managed Identity or Workload Identity. Intermittently, while SQL authentication connections remain unaffected. Check 3: Test from the application environment A successful connection from a laptop does not validate the path used by an application running in: Azure App Service. Azure Functions. Azure Kubernetes Service. A virtual machine. An on-premises application server. A container or integration runtime. The laptop and the application may use different DNS servers, routes, firewalls, proxies and identities. Connectivity and DNS tests should therefore be performed from the environment that is actually failing. This becomes especially important when Private Endpoint is used. The application should continue connecting with: <server>.database.windows.net It should not use the Private Endpoint IP address or the privatelink.database.windows.net hostname directly. Direct login attempts using the private IP or the private-link FQDN fail; the normal logical-server FQDN must remain in the connection string. From the affected environment, confirm that: The expected DNS server answers the request. The server FQDN resolves to the expected private IP. The Private Endpoint connection is approved. The Private DNS zone is linked correctly. The resolved address is reachable through the intended route. A test from an unrelated machine is still useful for comparison, but it does not prove that the application path is healthy. Observed symptom Likely investigation area Timeout while obtaining a connection from the pool Application connection pooling Server name cannot be resolved DNS TCP connection to the endpoint cannot be established Network path, firewall or routing Error during the pre-login handshake TLS, driver, network interruption or pre-login processing Authentication or access-token error Microsoft Entra authentication, identity or token acquisition Timeout during the post-login phase Login completion, session initialization or server-side processing Execution or command timeout after connecting Query execution and database performance Avoid changing several things at once During a production incident, it is tempting to: Increase the timeout. Add firewall rules. Change the connection policy. Upgrade the driver. Restart the application. Clear connection pools. Applying several changes together makes it difficult to determine which one helped, and some may only hide the symptom. A better approach is to define one hypothesis: We believe DNS in the application environment is resolving the public endpoint instead of the Private Endpoint. Then define: The evidence supporting the hypothesis. One controlled change. The expected result. How the result will be measured. How the change will be reverted. Azure SQL supports Proxy and Redirect connection policies, which determine how traffic flows after reaching the Azure SQL gateway. The policy is configured for the logical server, so it should be verified before making firewall assumptions or changes. What should we collect before opening a support request? A small but precise evidence package can avoid several rounds of questions: Complete error and inner exception. Exact UTC timestamps. Application platform and location. Public or Private Endpoint. Server FQDN used by the application. Driver and version. Authentication method. Token, pool, connection and command durations. DNS result from the affected environment. Whether the issue is constant, intermittent or limited to the first connection. Recent application, network, identity or configuration changes.455Views0likes0CommentsMigrating frontline mobile devices: Identity considerations for assigned and shared devices
By: Carol Burns - Principal Product Manager | Microsoft Intune and Sucheta Gawade, Microsoft MVP (Azure & Security / Intune) Practitioner perspective from Sucheta Gawade, Microsoft MVP (Azure & Security / Intune), with deep experience in secure frontline mobility, including regulated healthcare environments. In previous articles in this series, we focused on understanding the reality of your frontline device estate and preparing for real-world testing through stakeholder alignment. One of the most critical areas to get right during the testing phase is identity and security, particularly given the often fast-paced, shift-based nature of frontline work, where organizations must account for the distinct requirements and challenges of devices assigned to a single individual versus devices shared across multiple users or shifts. Identity decisions directly affect security posture, sign‑in experience, operational support overhead, and worker productivity. Getting them wrong is one of the most common reasons pilots stall or fail. This article explores how to think about identity on frontline devices by distinguishing between assigned and shared usage models, clarifying when individual sign-in is required, and highlighting patterns to avoid such as shared accounts and passwords. Start by distinguishing device usage models Frontline mobile devices generally fall into one of two broad categories. Assigned devices Assigned devices are issued to a specific individual, often for the duration of their role. These devices: Typically require persistent access to user‑specific data Align with user‑based identity, Microsoft Entra ID Conditional Access, and audit controls. Enable greater accountability and traceability by associating activity with an individual user rather than a shared credential. Common examples include: A doctor using an individually assigned clinical tablet, where uninterrupted access to patient data and clinical systems is essential and actions must always be attributable to a named identity A field engineer assigned a single device that retains configuration, credentials, and offline content across jobs and locations An inspector or supervisor using an assigned device for approvals, reporting, and decision‑making that requires traceability Shared devices Shared devices are used by multiple people across shifts or tasks. These scenarios introduce additional identity complexity and generally fall into two distinct models. Shared devices without user sign-in (task or kiosk-based) Some frontline devices exist to perform a narrow, often repetitive task and don’t require sign in with a user account. Typical examples include: Retail price-check devices used on the shop floor to scan an item and display its current price or stock availability, with no need for access to personal or user-specific information Environmental monitoring devices used to read and record temperature or humidity in a storage area, ward, or vehicle, where the task is simple, repetitive, and not tied to an individual user identity Warehouse or facility scanning devices used for a narrow operational task such as scanning an asset, bin, or location code to confirm status, location, or completion of a step in a process In these cases: Devices are locked down to a specific task No user-specific data is stored, and access is limited to the minimum required for the task “When a device is truly task-only, removing sign-in friction is a huge win, but only if we’re aware what data the device can access. When things like patient context or personalized tasks enter the picture, identity becomes required” - Sucheta Gawade, Microsoft MVP Shared devices with individual user sign-in Organizations are increasingly digitizing and modernizing frontline workflows end-to-end. Paper processes and simple apps give way to connected systems, manual handovers are replaced with digital task lists, and workers begin to rely on mobile devices as their primary interface from completing tasks. As roles evolve, workers are expected to: Receive tasks, schedules, and updates digitally Communicate with supervisors and peers using collaboration tools such as Microsoft Teams Capture information at the point of work rather than transcribing later Interact with workflows that are increasingly automated or assisted by AI, such as guided steps, data validation, or suggested actions This shift delivers clear productivity and quality benefits, but it also means access must now be tied to individual identity to protect sensitive data, support auditability, and prevent information from being carried over between users. Common scenarios include: Retail store associates rotating across shifts, moving from paper schedules and verbal handovers to digital task lists, real-time communications, and collaboration tools such as Microsoft Teams Nurses sharing mobile devices in a hospital ward, where paper notes and whiteboards are replaced with secure access to patient-linked applications, care coordination tools, and role-based alerts Logistics workers signing in to shared devices to complete role-based tasks, capture data at the point of work, and interact with AI-assisted workflows. Don’t use shared credentials, always prefer individual sign-in Shared credentials may seem like a shortcut in frontline environments, but they undermine accountability and make policy enforcement and incident response significantly harder. “Shared credentials feel ‘efficient’ until your first incident. You lose auditability, Conditional Access becomes meaningless, and investigations turn into guesswork. Individual identity is the only scalable model.” -Sucheta Gawade, Microsoft MVP If access involves corporate systems or sensitive data, each worker should use their individual credentials to sign in, even on a shared device. Identity decision checklist for frontline devices Use the checklist to validate identity choices and confirm that the overall security posture matches the way the device is used. Decision area Indicators Use individual sign-in Users access personal or role-specific data. Auditability or compliance is required. Conditional Access or multifactor authentication (MFA) must be enforced. Applications rely on user identity. Use kiosk-style or device-only identity Devices perform a single task. No user-specific or sensitive organizational data is accessed. Workflows are entirely device-centric. Speed and simplicity outweigh personalization. Avoid entirely Shared usernames or passwords. Reused local accounts across shifts. MFA exclusions that weaken security without compensating controls. Choosing the right sign‑in experience The challenge in frontline environments is balancing: Security requirements Speed of access Ease of use across shifts “Frontline setups may fail because the sign-in flow doesn’t match reality. If authentication takes 60 seconds and the worker has to do it 30 times a shift, they’ll find a workaround.” -Sucheta Gawade, Microsoft MVP Typing complex usernames and passwords repeatedly during a shift is often impractical on mobile devices. QR code authentication is one effective option for shared frontline devices, but it’s not the only supported approach. For other supported methods, see Microsoft Entra authentication methods overview. QR code authentication Microsoft Entra QR code authentication is designed for frontline workers to sign-in efficiently on shared Android and iOS/iPadOS devices without repeatedly entering usernames and passwords. Note: For individually assigned devices, phishing-resistant, passwordless authentication methods are the recommended approach, such as Passkeys. QR code authentication enables workers to sign in using a unique QR code and a personal numeric PIN. This approach: Eliminates typed usernames and passwords Preserves individual identity Works well for shared devices with frequent user turnover Integration with Microsoft Intune, Managed Home Screen and Conditional Access QR code authentication should always be: Scoped to specific users and devices Combined with Conditional Access policies Evaluated during real‑world testing to ensure the right balance of usability and security Security posture and Conditional Access for frontline devices Individual identity is a critical foundation for stronger security posture, but it’s not enough on its own. Frontline device security also depends on management, data and app protection, session handling, and access policies that reflect the actual usage model. Conditional Access is an important part of securing frontline environments, but its effectiveness depends on aligning policies to the actual device and identity model in use. To ensure that the QR code authentication method can only be used by the frontline workers it’s intended for, create a custom authentication methods policy, which you can use in a dedicated Conditional Access policy. That Conditional Access policy should then be scoped to the group of users (frontline workers) who should log on using the QR code authentication method, and have the Require authentication strength control configured, which targets the custom authentication strength for "QR Code" which was previously created. During real‑world testing: Validate that design and controls support the intended usage model Ensure policies don’t block legitimate workflows Confirm sessions, access, and user targeting behave as expected These decisions should also be validated in practice: can users sign in and out reliably across shifts, is personal data cleared between sessions, and does the chosen experience match the pace of frontline work? Summary This article walks through how identity choices shape security, usability, and day-to-day success for frontline mobile devices. It explains the difference between assigned and shared devices, when individual sign-in is needed, and why shared credentials can create risk. It also highlights QR code authentication and Conditional Access as practical ways to keep each worker’s identity protected while making sign-in simple enough for fast-paced frontline workflows. What’s next in the series In the next article, we’ll focus on Microsoft Intune enrollment models, exploring how different enrollment approaches support—or constrain—the identity and usage patterns discussed here, including their role in protecting session identity, enforcing the intended sign-in model, and preventing one user’s access or data from carrying over to the next. As always, we welcome your feedback and experience. If you’ve navigated identity decisions for shared or frontline devices, share your advice and lessons learned in the comments, or reach out to us on X @IntuneSuppTeam. For more guidance across frontline scenarios, explore our broader From the Frontlines series on frontline worker management with Microsoft Intune. Join our community! Discuss real-world scenarios, get expert guidance, connect with peers, and influence the future of Microsoft Security products. Learn more at aka.ms/JoinIntuneCommunity.1.3KViews2likes1CommentStreamlining macOS security: Automatically enable AutoFill after Platform SSO registration
By: Chris Kunze - Principal Product Manager | Microsoft Intune Platform single sign-on (SSO) improves how macOS devices establish identity with Microsoft Entra ID, enabling a more secure and streamlined authentication experience. However, completing Platform SSO registration isn’t enough to deliver a fully passwordless workflow. To enable passwordless authentication in Safari, Microsoft Edge, and Google Chrome, the Company Portal AutoFill extension must also be enabled. In many deployments, this step still depends on the user. Devices may be fully enrolled, and Platform SSO may be successfully registered, yet users can still fall back to entering credentials manually if Company Portal AutoFill is not enabled. At scale, even small manual configuration steps can lead to inconsistent results. The goal of this post is to remove that dependency by automatically enabling AutoFill after Platform SSO registration, so users receive a complete passwordless experience without any additional steps. The challenge After Platform SSO is deployed to a macOS device, two conditions must be met before users receive the intended passwordless experience: Platform SSO registration must be completed The device must complete Platform SSO registration with Microsoft Entra ID. Company Portal AutoFill must be enabled The Company Portal AutoFill extension must be enabled for supported browsers so credentials can be supplied automatically. When Platform SSO registration happens after Setup Assistant, the user is prompted through the registration flow and receives a reminder to enable Company Portal AutoFill. However, enabling AutoFill is still a separate manual step that the user must complete. If the user skips or overlooks that step, the device can be successfully registered for Platform SSO while still requiring credentials to be entered manually. The result is a deployment that appears complete but does not consistently deliver the intended passwordless experience or security posture. Authentication should not depend on user action after enrollment. Especially valuable with the “Enable Registration During Setup” setting This approach becomes especially impactful when combined with the Enable Registration During Setup setting for Platform SSO. When used with Automated Device Enrollment (ADE), Platform SSO registration can be completed automatically during Setup Assistant before the user reaches the desktop. This helps ensure identity registration completes as part of the provisioning experience rather than requiring additional post-enrollment actions. Automating AutoFill after Platform SSO registration After registration has completed, AutoFill often becomes the final remaining step that still depends on user action. To close this gap, you can use a custom script to enable the Company Portal AutoFill extension after Platform SSO registration is complete. The sample script, Check-PSSO.zsh, available in the GitHub repository, was written by the Intune Customer Experience Engineering team. The script detects when Platform SSO registration has completed on a device and then enables AutoFill automatically. Important: Microsoft supports Intune’s ability to deploy scripts, but not the scripts themselves. Microsoft fully supports Intune and its script deployment capabilities. However, Microsoft does not provide support for individual scripts, including scripts published in Microsoft GitHub repositories. These scripts are provided as examples only. You are responsible for reviewing, validating, and testing their behavior in your environment before deploying them broadly. The script essentially performs four key actions: Wait for a user session - The script detects when a user session is active to ensure the device is ready for configuration. Verify Platform SSO registration - It confirms that Platform SSO registration has completed successfully before proceeding. Detect the AutoFill extension - The script waits until the Company Portal AutoFill extension becomes available on the device. Enable AutoFill automatically - Once detected, the script enables AutoFill programmatically, eliminating the need for users to manually configure the setting in System Settings. All activities are logged locally, providing visibility for auditing and troubleshooting. Supported browsers The Company Portal AutoFill extension works with: Safari (native support) Microsoft Edge (native support) Google Chrome (requires Microsoft Single Sign On extension) Once AutoFill is enabled, users can authenticate across all supported browsers on their macOS device without manually entering passwords. System requirements macOS 15 or later Company Portal version 5.2604.0 or later installed on the device Platform SSO configured via an Intune SSO extension profile Deployment via Intune The Check-PSSO script is deployed using a lightweight, scalable approach aligned with modern macOS management practices. The recommended method is to package the script as a payloadless PKG with a pre-install script. High-level steps: Build an empty PKG Attach the Check-PSSO script as a pre-install script Upload the package to Intune Assign it as Required Verify successful deployment through script logs Detailed instructions are available in the GitHub repository. Key Features Polling with timeouts The script waits for the required conditions to be met before continuing, including an active user session and completed Platform SSO registration. To avoid indefinite loops in edge-case scenarios, it uses timeouts while polling for those conditions. Diagnostic logging and auditing Optional verbose logging provides detailed troubleshooting information and an audit trail confirming AutoFill was enabled. Each run is logged locally under: /Library/Logs/Microsoft/IntuneScripts/checkPSSO Clear exit codes Exit 0: Success Exit 1: Failure Benefits of automating AutoFill Automating AutoFill helps ensure users can take advantage of passwordless authentication without additional configuration steps. It reduces reliance on user action, improves deployment consistency, improves security posture, and supports zero-touch provisioning. It also provides admins with verification through centralized logging and reporting. Get started If you’ve already deployed Platform SSO, automating AutoFill is a natural next step toward delivering a complete passwordless experience. By removing a manual configuration step that often depends on user action, you can improve consistency and user experience across devices. When combined with the Enable Registration During Setup setting, this helps create a true zero-touch experience from enrollment through authentication. Learn more Platform SSO for macOS Company Portal for macOS Payloadless Packages in Intune (Tech Community) Microsoft shell-intune-samples Repository Let us know if you have questions by leaving a comment below or reaching out on X @IntuneSuppteam. Join our community! Discuss real-world scenarios, get expert guidance, connect with peers, and influence the future of Microsoft Security products. Learn more at aka.ms/JoinIntuneCommunity.7.4KViews0likes4CommentsAuthenticating AWS Workloads to Azure Functions using Workload Identity Federation
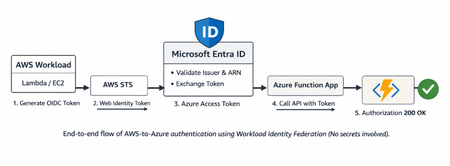
Step-by-step guide to configuring Workload Identity Federation between AWS and Azure, enabling service-to-service authentication where AWS workloads can securely call Azure Functions using token-based access instead of stored credentials.
Deploying Platform SSO for pre macOS 26 with Microsoft Intune: Lessons Learned
By: Naveen Akkugari, Sr. Service Engineer and Michael Griswold, Principal Service Engineering Manager | Microsoft Intune Who we are Our internal Intune administration team at Microsoft is responsible for running Intune and Configuration Manager for the devices used by employees. We receive early access to features for evaluation and feedback using real world usage scenarios. As such, some features may be changed before the public release and be slightly different. The experience should be similar and we wanted to share our learnings when deploying platform single sign-on (PSSO). It is worth noting that since the time of this experience a new method for newer OS versions is available and you can read more about it at: New Platform SSO with registration during Automated Device Enrollment on macOS | Microsoft Community Hub. Why we implemented Platform single sign-on (PSSO) and what we learned As IT admins managing a growing Mac fleet, we kept running into the same gap. Our Windows devices had hardware-backed authentication, token protection, and seamless SSO through Windows Hello for Business, but our Macs were still relying on browser-based prompts with no easy way to enforce the same level of security and identity protection. Platform SSO finally closed that gap for us. It’s worth noting that new macOS allows new capabilities in this space and we are evaluating them as well. The new flow can be read about at https://aka.ms/Intune/MacPSSO-Setup. While there were fewer pip-ups, we found the changes in the security layer to be the real value to our operations. Platform SSO binds authentication tokens (Primary Refresh Tokens) to the device’s Secure Enclave hardware. Even if a PRT is intercepted, it’s designed to not be replayed from another device. For our team, this unlocked two things we couldn’t do on macOS before: Token protection policies: Conditional Access can now verify that tokens are device-bound, the same enforcement we had been relying on with Windows Hello for Business Phishing-resistant MFA: Secure Enclave keys act as FIDO2 passkeys, so users authenticate with Touch ID instead of passwords or SMS codes Getting from documentation to production took real effort for us. A password policy issue that silently blocked registration for half our pilot group, users who swiped away the registration banner without knowing what it was, and macOS updates that broke SSO overnight. This blog post is what we wish someone had written before we started. How it works under the hood: Intune delivers the SSO extension profile → macOS prompts the user to register → the device registers with Microsoft Entra ID and gets a hardware-bound workplace (WPJ) certificate → a PRT is issued and bound to device hardware (not designed to be exported) → SSO works across Microsoft 365 apps, browsers, and Kerberos resources, all with token protection enforced. Available authentication methods when we implemented Capability Secure Enclave Smart Card Password Sync Passwordless and phishing-resistant ✅ ✅ ❌ Touch ID / passkey (WebAuthn) ✅ ❌ Touch ID only ❌ Local password synced with Microsoft Entra ❌ ❌ ✅ Minimum macOS 13.0 14.0 13.0 Recommendation: Start with Secure Enclave. Keys are hardware-bound, phishing-resistant, and double as FIDO2 passkeys via WebAuthn, enabling browser-based passwordless login (Touch ID instead of passwords) and meeting Conditional Access multi-factor authentication (MFA) requirements. Unlike iCloud-synced passkeys, these are device-bound, aligning with Zero Trust. Quick setup using the Intune settings catalog Prerequisites: macOS 13+, Intune with Microsoft Entra ID, Intune Company Portal v5.2404.0+ In the Intune admin center, navigate to Devices > Configuration > Create > macOS > Settings Catalog > Authentication > Extensible SSO Setting Value Extension Identifier com.microsoft.CompanyPortalMac.ssoextension Team Identifier UBF8T346G9 Type Redirect Registration Token {{DEVICEREGISTRATION}} Use Shared Device Keys Enabled Screen Locked Behavior DoNotHandle URLs https://login.microsoftonline.com https://login.microsoft.com https://sts.windows.net https://login-us.microsoftonline.com Users see a “Registration required” notification → sign in → complete MFA → SSO works everywhere. What the user experience looks like Knowing what users see on their screen helps you write better rollout communications and cuts down help desk tickets. First-time registration flow: Profile arrives silently: After enrollment, Intune pushes the SSO extension profile to the Mac. Nothing visible to the user yet. Registration banner appears: macOS displays a notification: “Registration required: Your organization requires you to register your device.” The user must click this to proceed. (This is our #1 learning point, users swipe it away, and there’s no simple way to retrigger it.) Sign-in window: The user enters their Microsoft Entra ID email and password. MFA challenge: Authenticator app push, phone call, or other configured method. Secure Enclave key creation: macOS generates a hardware-bound key pair. The user may see a Touch ID or local password prompt to authorize this. Registration completes: Device registers with Microsoft Entra ID, a WPJ certificate and PRT are issued. User sees a success confirmation. SSO is active: From here, Microsoft 365 apps, Edge (natively), Chrome (with SSO extension), and Kerberos resources authenticate without prompts. Touch ID replaces password entry. Missed the registration notification? Here is how to manually register: This was our most common help desk ticket during rollout. If a user dismissed or missed the banner, they can still register manually through the following options: (Recommended) System Settings → Users & Groups → Network Account Server: This is the easiest method. Go to System Settings → Users & Groups, scroll down to “Network Account Server” and click “Edit.” This opens a panel showing two sections: Network Servers and Platform single sign-on. If the Platform SSO policy is deployed, “Mac SSO Extension” will be listed under Platform single sign-on. If the device isn’t registered, there will be a “Register” button that can be selected to start the Platform SSO device registration flow. Lock / Sign out and back in: Performing a lock or signing out of macOS followed by signing back in can retrigger the registration notification upon the next login attempt. Wait for the notification to reappear: macOS retries the notification periodically around every 15 mins. Last resort, reprofile: If none of the above work, an IT admin can remove and reassign the SSO extension profile in Intune. Before doing so, ensure any stale device objects are cleared from Microsoft Entra ID to avoid conflicts. Once the new profile lands on the device, the registration notification reappears. How to verify Platform SSO registration One of the first questions we got after rollout was “how do I know it’s actually working?” Here’s how both users and IT admins can confirm. For IT admins (Microsoft Entra ID & Intune admin centers): What to check Platform SSO registered device Non-registered device Microsoft Entra ID → Devices Join Type shows Microsoft Entra joined Join Type shows Microsoft Entra registered Intune → Device configuration SSO extension profile shows Succeeded Profile may show Pending, Error, or not assigned For users (on the Mac): System Settings → Users & Groups → Network Account Server: Scroll down in Users & Groups to “Network Account Server” and click “Edit.” If the Platform SSO policy is deployed, they will see “Mac SSO Extension” listed under Platform Single Sign-on. A registered device shows a green dot with “Registered” status and a “Repair” button (useful if registration gets into a bad state). If not registered, they will see a “Register” button instead. This is the quickest at-a-glance check for users. System Settings → Users & Groups: Click on the user account name in Users & Groups (on macOS 14+, click the info button “i” next to the user name). When Platform SSO registration is complete, a “Platform Single Sign-on” section will be listed under the account. If Platform SSO is active, the user account shows the Microsoft Entra ID identity linked to the local account. Company Portal app → Devices: The device should show as “Compliant” and “Microsoft Entra ID registered.” If registration failed, it shows “Registration required.” Terminal command: Run app-sso platform -s to check Platform SSO status. Troubleshooting Platform SSO errors If you run into issues during deployment, here’s how you can diagnose and fix issues. Step 1: Check the Platform SSO profile in Intune device management Before troubleshooting on the Mac itself, confirm the profile reached the device: In Intune: Go to Devices → select the device → Device configuration. The SSO extension profile should show “Succeeded.” If it shows “Pending” or “Error,” the device hasn’t received the policy. Check assignment groups, sync status, and whether the device is enrolled. Then on the Mac: Go to System Settings → General → Device Management (or Profiles on older macOS). Look for the SSO extension profile (com.apple.extensiblesso). It should show as “Installed” with no errors. If the profile isn’t listed, it hasn’t been delivered yet. Check Intune assignment and device sync. Step 2: Check registration status on the Mac Refer to the previous section “How to verify Platform SSO registration” for steps. Step 3: Check SSO extension logs Run in Terminal for real-time logs: log stream --predicate 'subsystem == "com.apple.AppSSO"' --level debug Then prompt a sign-in (open Edge or Outlook). Look for: Error 10002: Duplicate SSO profiles. Remove the extra one from Intune. Error 10003: Registration failed. Usually a network issue or TLS inspection blocking auth URLs. User cancelled: User dismissed the registration banner. Token refresh failed: PRT could not refresh. Check network and whether the Microsoft Entra ID password was recently changed. Step 4: Verify from the admin side Check How What It Tells You Profile delivery Intune > Devices > select device > Device configuration Whether the SSO profile reached the device and its install status Registration state Entra ID > Devices > search device > Properties Whether the device has PSSO registration and NGC credential Sign-in failures Entra ID > Sign-in logs > filter by user Error codes like AADSTS50076 MFA required, AADSTS700024 token issue, or AADSTS7000218 client assertion Token protection Entra ID > Sign-in logs > Conditional Access tab Whether token protection policy was applied or skipped Company Portal version Intune > Apps > macOS > Company Portal Must be v5.2404.0+ for PSSO; older versions silently fail Common error codes and fixes: Error Cause Fix 10002 Multiple SSO extension profiles assigned Remove duplicate profiles; keep only the Settings Catalog policy 10003 Registration failed network/TLS Allowlist Apple and Microsoft auth URLs from TLS inspection AADSTS50076 MFA required but not completed User needs to complete MFA during registration AADSTS700024 Client assertion invalid Password likely needs reset; have user reset Entra ID password and retry AADSTS7000218 Request body must contain client_assertion Company Portal version too old; update to v5.2404.0+ Best practices Have newer OS devices and use the new flow: New Platform SSO with registration during Automated Device Enrollment on macOS. Have users reset their password before Platform SSO registration. During initial enrollment, if password configuration or compliance policies are applied, users are required to reset their password after device enrollment and prior to initiating Platform SSO registration. Skipping this step can result in silent registration failures that are difficult to diagnose. Ensure this is communicated as the first step in your rollout guidance. Assign the SSO profile during enrollment, not after. Deploying during enrollment means the registration prompt shows up at first login, a natural part of setup. Retrofitting existing devices forces users to notice and click a notification banner. Many will not. macOS Tahoe (26) Simplified Setup will auto-register, removing this friction. One SSO profile per device, no exceptions. Duplicate profiles cause Error 10002. If you are migrating from a Device Features template to Settings Catalog, remove the old one first. Pilot with realistic scenarios. Don’t just test “can I open Outlook.” Test registration, SSO to Microsoft 365, on-prem file shares, password change mid-session, reboot behavior, and what happens when a user dismisses the registration banner. We found issues in every one of these. Align password policies end-to-end. For Password Sync, Intune compliance and Microsoft Entra ID password policies must match: length, complexity, expiration. Integrate legacy Kerberos properly. If you run a standalone Kerberos SSO extension, set usePlatformSSOTGT = true in its ExtensionData to reuse Platform SSO TGT instead of running duplicate flows. Requires macOS 14.6+ and Company Portal 5.2408.0+. Enable Kerberos SSO to on-premises Active Directory and Microsoft Entra ID Kerberos Resources in Platform SSO. Allowlist auth URLs from TLS inspection. Apple and Microsoft authentication endpoints must be excluded from proxy/TLS inspection. If they are not, registration fails silently with no error. Challenges we faced Challenge What we experienced Solution Password must be reset before registration during the new enrollment Half our pilot group could not register after the new enrollment as their Entra ID password had not been reset. Require a password reset before rollout; make this step 1 in user communications Users dismiss the registration banner The notification is easy to swipe away. Once dismissed, there is no simple way to retrigger it. Send screenshots and instructions before rollout; macOS Tahoe auto-registers via Simplified Setup SSO breaks after macOS updates After point updates, SSO stopped working until re-registration. Restart swcd process; some cases required full re-registration; check release notes Password policy mismatch Users changed Microsoft Entra password, but local Mac password did not sync, causing lockouts. Match Intune compliance and Microsoft Entra ID password policies exactly; test end-to-end Browser SSO inconsistency Edge worked natively, Chrome needed extension, Safari varied by OS. Deploy Chrome SSO extension via Intune; test Safari on each target OS version Conclusion Platform SSO delivers phishing-resistant passwordless authentication, seamless cross-platform SSO, and Conditional Access compliance with hardware-backed identity. Start your implementation with Secure Enclave, deploy via Intune Settings Catalog, pilot small, then scale. If you have questions on implementing Platform SSO, leave a comment below or reach out to us on X @IntuneSuppTeam. Join our community! Discuss real-world scenarios, get expert guidance, connect with peers, and influence the future of Microsoft Security products. Learn more at aka.ms/JoinIntuneCommunity.8KViews0likes6CommentsMDOP is out of support: What to do next with Microsoft Intune
By: Joe Lurie – Sr. Product Manager | Microsoft Intune On April 14, 2026, the Microsoft Desktop Optimization Pack (MDOP) reached the end of extended support. Microsoft no longer provides security updates, bug fixes, or technical support for MDOP components. For more information, refer to: Microsoft Desktop Optimization Pack (MDOP) support extended. If your organization still relies on parts of MDOP, it’s time to move to supported options. In most cases, including Windows desktop management, app virtualization, BitLocker administration, and Group Policy change control, you can handle the same workloads with capabilities in Microsoft Entra ID, Intune, Windows 11, and Configuration Manager. Moving these workloads to the cloud does more than keep you supported. It removes on-premises server infrastructure you have to stand up and patch, brings management of cross-platform devices into a unified console, and connects capabilities like encryption and recovery into a Zero Trust framework with Conditional Access. Quick start checklist Inventory what you actually use. Confirm whether Application Virtualization (App-V) server components, Microsoft BitLocker Administration and Monitoring (MBAM), Diagnostics and Recovery Toolset (DaRT), User Experience Virtualization (UE-V), or Advanced Group Policy Management (AGPM) are still in production. Prioritize BitLocker Management first. If you still rely on MBAM, plan your move to BitLocker management in Intune and confirm recovery key escrow is working as expected. Plan your App-V exit. Keep existing App-V packages running where needed but shift net-new packaging work to MSIX. Validate your PC recovery story. Document how you’ll handle common break/fix scenarios using Quick Machine Recovery, WinRE, bootable media, and Intune remote actions. Decide how you want to handle policy change management. For cloud policy, we recommend Multi Admin Approval for sensitive actions and policy-as-code practices for versioning and review. App-V App-V let you virtualize applications so they could run in isolated environments without a traditional install, which helped avoid app conflicts. It was especially useful for legacy line-of-business apps that were hard to install or update cleanly. Important The App-V server components (Management Server, Publishing Server, Reporting Server) reached end of extended support in April 2026. The App-V client and sequencer are still included with Windows Enterprise and Education editions. They will continue to receive security fixes for the support lifecycle of the Windows versions they ship with. If you are distributing App-V packages today via Configuration Manager, that can still work. The key change is that you should not plan on using the standalone App-V server infrastructure going forward. For more details refer to: App-V in Windows support policy. What to do instead: For new packaging work, we recommend moving to MSIX. MSIX is a modern packaging format that supports clean install and uninstall and more predictable updating. The MSIX Packaging Tool can help you convert existing installers. In Azure Virtual Desktop, MSIX App Attach can deliver apps without baking them into the base image. A good starting point is to inventory your App-V packages, identify the ones you still need, and prioritize candidates to convert to MSIX. MBAM MBAM gave IT admins centralized control over BitLocker, including policy enforcement, compliance reporting, and a self-service recovery portal. Many organizations used MBAM as their standard management solution. What to do instead: We recommend replacing MBAM with Microsoft Intune’s BitLocker policy management through an Endpoint security policy. Intune management provides backup of recovery keys to Microsoft Entra ID, reporting, and Conditional Access integration so you can require encryption for access to company resources. If you already manage devices with Intune, you may only need to create a disk encryption policy and confirm recovery keys are being escrowed. For detailed guidance, review Encrypt Windows devices with BitLocker using Intune. DaRT DaRT provided a bootable recovery environment with advanced tools like file recovery, registry editing, and offline troubleshooting. You typically used DaRT when a machine wouldn’t boot and you needed to repair it or recover data without reimaging. What to do instead: Windows includes the Windows Recovery Environment (WinRE) with tools like Startup Repair, System Restore, command prompt, and reset options. For many scenarios DaRT covered, WinRE is enough. You can also boot from a Windows installation USB, select "Repair your computer," and use the recovery tools for tasks like offline troubleshooting. For managed devices, you can pair recovery options with Intune remote actions, such as restart, wipe, or collect diagnostics, or use Quick Machine Recovery. Additionally, Quick Machine Recovery can automatically detect and fix boot failures using cloud-based remediation delivered through Windows Update, with no hands-on IT intervention required for managed devices running Windows 11 version 24H2 or later. You can enable and configure it through the settings catalog in Intune, and Windows Autopilot scenarios for redeployment. These don’t replace every DaRT capability, but they cover many common use cases and work without shipping a separate recovery toolkit. UE-V UE-V roamed (synchronized) some user application and OS settings to persist across devices so users could sign in to a different Windows PC and keep a familiar experience. This was often used in shared workstation scenarios. What to do instead: For Windows settings roaming, Windows Backup for Organizations syncs certain Windows settings across Microsoft Entra ID joined devices. Review the latest guidance to confirm which settings are covered and how to enable it in your environment. Important: Windows Backup for Organizations syncs Windows settings (theme, password, language) but doesn’t roam per-application settings for Win32 apps. Some apps may provide their own cloud-based sync. Windows Backup for Organizations is not a direct replacement for UE-V. For user files, we recommend OneDrive Known Folder Move to back up Desktop, Documents, and Pictures so content follows the user. Many Microsoft applications also sync their own settings through the cloud, which reduces the need for an OS-level roaming solution. Another option is to use a virtualized solution, like Azure Virtual Desktop or Windows 365. With a Cloud PC, users connect to the same environment from any device, so settings and apps are already there when they sign in. For scenarios where UE-V mattered most, like shared workstation environments, Windows 365 can be a practical alternative. And for Azure Virtual Desktop, FSLogix is a viable option. Important: Enterprise State Roaming does not roam per-application settings for traditional Win32 desktop apps the way UE-V did. So, Windows 365 may not be the right fit if you need settings roaming across multiple physical devices. AGPM AGPM brought version control, change tracking, and approval workflows to Group Policy management. Instead of an admin changing Group Policy Objects (GPOs) directly in production, AGPM enforced a check-out and check-in model with full audit history. This mattered most in environments with strict change management requirements. What to do instead: Move to cloud-managed endpoints and replace Group Policy settings with Intune configuration profiles and security baselines. The settings catalog in Intune includes thousands of settings, including many ADMX-backed policies. If you use custom ADMX files for third-party or internal applications, you can import them into Intune. For settings that aren’t available in the catalog, custom OMA-URI profiles can sometimes be used, depending on the CSP support for that setting. For change management, Intune offers Multi Admin Approval for certain policy changes, which can add a second-admin approval step. If you want deeper versioning and review workflows, we often see teams using Configuration as Code. Teams practicing Configuration as Code define Intune policies as code or structured data, such as in a JSON file stored outside the Intune admin center. This can be stored in version control like Azure DevOps or GitHub, and use Microsoft Graph – directly or via tooling – to deploy and reconcile the service. This enables deep versioning, peer review, and repeatable, auditable changes. And with Intune, you can use Graph API to get two years of audit events. Summary MDOP tool What it did Cloud-native replacement App-V (Server) Application virtualization and streaming MSIX packaging and Intune deployment (client still supported in Windows) MBAM BitLocker management and recovery Intune management of BitLocker and Microsoft Entra ID key escrow DaRT Bootable diagnostics and recovery Windows Recovery Environment (WinRE), bootable USB, and Intune remote actions UE-V User settings roaming Windows 365 Cloud PC, Windows Backup for Organizations, OneDrive Known Folder Move, app-native sync AGPM GPO version control and approval workflows Intune settings catalog, Multi Admin Approval, policy-as-code in source control Moving forward By moving to cloud endpoint management, most MDOP scenarios are covered through Microsoft Intune and Microsoft Entra ID supported capabilities with less infrastructure to maintain, making it easier for you to manage. If you haven’t started planning yet, we suggest starting with MBAM since Intune is the most direct replacement. Then, you can work through App-V, DaRT, UE-V, and AGPM based on what’s still in use. If you’re in the middle of an MDOP exit and need help leave a comment below or reach out to us on X @IntuneSuppTeam. Tell us which components you still have and how you manage endpoints today (Intune, Configuration Manager, hybrid, or other). We can help you sanity-check dependencies, choose an order of operations, and avoid common migration pitfalls. Join our community! Discuss real-world scenarios, get expert guidance, connect with peers, and influence the future of Microsoft Security products. Learn more at aka.ms/JoinIntuneCommunity.3.6KViews0likes10CommentsNew Platform SSO with registration during Automated Device Enrollment on macOS
By Iris Yuning Ye, Product Manager – Microsoft Intune & Justin Ploegert, Principal Product Manager – Microsoft Entra A new setting ‘Enable Registration During Setup’ for Platform single sign-on (PSSO) during Automated Device Enrollment (ADE) is now generally available for macOS devices in Microsoft Intune. With this new setting and a compatible version of the Intune Company Portal (5.2604.0 and newer), this feature enables users sign in with their Microsoft Entra account during Setup Assistant, complete device registration before reaching the desktop, and get immediate access to work resources and ready to be productive sooner. Why this matters Previously, Platform SSO registration occurred only after users completed Setup Assistant and reached the desktop. They then had to notice and act on a separate notification to finish Platform SSO registration. When Platform SSO registration isn't completed, it can cause issues with app authentication or lead to noncompliance, delaying users from getting started on the device: Missed notifications - Users dismiss or ignore the post-enrollment PSSO prompt, leaving devices in an incomplete device registration state. Broken app authentication - Apps like Microsoft Outlook could fail to authenticate because SSO isn’t fully configured. Compliance gaps - Devices are flagged as noncompliant in the Intune Company Portal because Platform SSO registration isn’t completed. Helpdesk burden - IT teams field repeated tickets for issues that should have been handled automatically during provisioning. Migration blocker - Incomplete Platform SSO setup slows down migrating macOS devices to Intune. Platform SSO during ADE with EnableRegistrationDuringSetup key eliminates these issues. Device registration, identity bootstrap, and credential setup all happen inline during Setup Assistant before the user ever reaches the desktop. What the feature enables Capability Details Microsoft Entra device registration during ADE The device registers with Microsoft Entra ID before the user reaches the desktop. A hardware-bound Workplace Join certificate is issued and stored securely on the device. Early device identity Device identity is established early in the provisioning process, enabling immediate access to apps and resources protected by Conditional Access. Platform SSO credentials during initial setup When configured with Secure Enclave, Platform SSO credentials are stored in the device’s Secure Enclave, providing hardware-bound, phishing-resistant protection aligned with Zero Trust principles. Minimized setup delays Users arrive at the desktop already signed in and ready to work, with fewer authentication prompts, less policy wait time, and fewer setup-related app access issues. How it works This feature requires three policies that work together. All three must be configured correctly before enrollment starts and assigned to the same static user groups: A Platform SSO settings catalog policy with “Enable Registration During Setup” configured to Enabled. Intune Company Portal (version 5.2604 or newer) deployed as a line-of-business (LOB) app, which provides the Microsoft Enterprise SSO extension. An ADE enrollment profile configured with Setup Assistant with modern authentication and Await final configuration = Yes. When a device enrolls with these three policies in place, here's what happens: The device powers on and begins the ADE enrollment flow. Intune delivers the Platform SSO settings catalog policy with Enable Registration During Setup enabled. Intune Company Portal is installed automatically as a LOB app, providing the Microsoft Enterprise SSO plug-in. During Setup Assistant, the user signs in with their Microsoft Entra credentials. This first sign-in starts the regular enrollment process. A second sign-in authenticates the identity in Intune Company Portal and fetches the SSO extension. The device registers with Microsoft Entra ID, and a Microsoft Entra device registration certificate is issued. The user arrives at the desktop fully authenticated, with SSO active and Conditional Access satisfied. Note: During enrollment, users are prompted to enter their Microsoft Entra credentials at least twice. We're working on improvements to reduce the number of sign-ins in a future update. Prerequisites Requirement Details macOS version macOS 26 or later. Enrollment method Automated Device Enrollment (ADE) through Apple Business Manager. Intune Company Portal Version 5.2604.0 or later, deployed as a line-of-business (LOB) app. Download it from Microsoft Download Center . Intune role for configuration An administrator account with, at minimum, the built-in Policy and Profile Manager role. Group type Assigned (static) user groups only. Dynamic groups and device groups are not supported. Important: Review the full Platform SSO prerequisites in the Platform SSO configuration guide before you begin. High level step-by-step configuration Step 1: Create or update the Platform SSO settings catalog policy In the Microsoft Intune admin center, go to Devices > Manage devices > Configuration. If this is your first time configuring Platform SSO, follow the full Platform SSO configuration guide. Add and configure the following setting: Setting Value Description Authentication > Extensible Single Sign On > Platform SSO > Enable Registration During Setup Enabled Enables the Platform SSO registration process during Setup Assistant. If using the Password authentication method, it’s recommended to add for password sync function: Setting Value Description Authentication > Extensible Single Sign On > Platform SSO > Enable Create First User During Setup Enabled Enables the password synchronization experience during Setup Assistant. This configuration is recommended when using the Password authentication method. Tip: Microsoft recommends using Secure Enclave as the authentication method for the strongest hardware-backed security. Assign the policy to your static user groups. Filter is also supported with correct static group setting. Step 2: Install Intune Company Portal as a LOB app Download the Company Portal for macOS PKG from the Microsoft Download Center. In the Intune admin center, go to Apps > All Apps > Create. Add Intune Company Portal as a macOS LOB app. Make it a required app and assign it to the same groups as the Platform SSO policy from Step 1. Important: Company Portal 5.2604.0 and newer is required. If you install an older version, Platform SSO fails. When Intune detects Company Portal as a deployed policy, it sends it with priority during enrollment. And clean up the App bundle ID that are not related to Company Portal, make sure only com.microsoft.CompanyPortalMac as the relevant App bundle ID is kept. Step 3: Set up the enrollment profile In the Intune admin center, go to Devices > Device onboarding > Enrollment > Apple tab. Create or edit an Automated Device Enrollment profile with these Management settings: Setting Value User affinity Enroll with User Affinity Authentication Setup Assistant with modern authentication Await final configuration Yes Locked enrollment Yes Assign the profile to the devices afflicated with the users targeted as Steps 1 and 2. Critical: You must assign all three policies to the devices afflicated with the users targeted. If any policy is assigned to a different group, or if any step is misconfigured, enrollment will fail. In that case, wipe the device and re-enroll with all steps correctly configured. Key things to remember ✅ Three policies, one group: Settings catalog, Company Portal LOB app, and ADE enrollment profile, all assigned to the same static groups or devices/users affliated with the groups. ✅ Static groups only: This feature does not work with device groups or dynamic groups. ✅ One SSO policy per device: If you already have a Platform SSO policy assigned to enrolled devices, make sure device is wiped appropriately before kicking of enrollment with new PSSO flow. ✅ Latest Intune Company Portal: Version 5.2604.0 or newer is required. ✅ macOS 26 required: This feature is supported on macOS 26 and newer. ✅ Secure Enclave recommended: For the strongest hardware-backed credential protection. For more details, refer to Configure Platform Single Sign-On (PSSO) during Automated Device Enrollment for macOS devices. Looking ahead: Reducing Platform SSO sign-in prompts Signing in multiple times during enrollment isn't the ideal experience, and we're actively working to streamline it with a new enrollment setting that enables users to complete both Intune enrollment and Platform SSO device registration with a single sign-in. This will further simplify the onboarding experience, reduce friction for users, and bring macOS enrollment closer to a truly seamless, zero-touch provisioning flow. Stay tuned to What’s new in Intune for the release. Related resources SSO in ADE profile (new article): Add Platform SSO policy to ADE Profile on macOS devices SSO scenarios: Platform SSO scenarios for macOS devices Platform SSO configuration guide for macOS devices using Microsoft Intune Common Platform SSO scenarios for macOS devices Install Company Portal for macOS as a macOS LOB app Set up automated device enrollment (ADE) Troubleshoot the Microsoft Enterprise SSO Extension plugin on Apple devices macOS Platform single sign-on known issues and troubleshooting As always, we'd love your feedback. If you've piloted Platform SSO during Setup Assistant, share your tips and lessons learned in the comments below or reach out to us on X @IntuneSuppTeam. Post Updates: 6/8/26: Refreshed guidance recommending this configuration for the Password authentication method and clearer targeting language around devices and users affiliated with the groups targeted.20KViews2likes32CommentsMicrosoft Entra Agent ID explained
See every agent in one place, understand what it can access, detect agent sprawl early, and apply least-privilege permissions using the same Microsoft Entra tools you already use for users — without introducing new governance models. Approve and scope agent access with accountability, enforce agent-specific Conditional Access in real time, automatically block risky behavior, and ensure every agent always has an owner, even as people change roles or leave. Leandro Iwase, Microsoft Entra Senior Product Manager shows how to keep agents operating securely, transparently, and predictably across their entire lifecycle. AI agents get real identities. See how to apply permissions, protections, and policies. Treat agents like human users with Microsoft Entra Agent ID. Gain full visibility for each agent in your tenant. See how many agents exist, which are active or unmanaged, and where sprawl is starting — before it becomes a risk. Check out Microsoft Entra Agent ID. Control what agents can access in real time. Apply Conditional Access policies directly to agents using Microsoft Entra Agent ID. Start here. QUICK LINKS: 00:00 — Treat AI Agents Like Real Identities 00:42 — Stop Agent Sprawl 02:26 — Least Privilege with Agent Blueprints 03:39 — Scope Agent Access 05:10 — Create agent specific Conditional Access policies 06:12 — Protect against a sponsor account 07:01 — Agents flagged as risky 07:50 — Ownerless agents 09:00 — Wrap up Link References Check out https://aka.ms/EntraAgentID Unfamiliar with Microsoft Mechanics? As Microsoft’s official video series for IT, you can watch and share valuable content and demos of current and upcoming tech from the people who build it at Microsoft. Subscribe to our YouTube: https://www.youtube.com/c/MicrosoftMechanicsSeries Talk with other IT Pros, join us on the Microsoft Tech Community: https://techcommunity.microsoft.com/t5/microsoft-mechanics-blog/bg-p/MicrosoftMechanicsBlog Watch or listen from anywhere, subscribe to our podcast: https://microsoftmechanics.libsyn.com/podcast Keep getting this insider knowledge, join us on social: Follow us on Twitter: https://twitter.com/MSFTMechanics Share knowledge on LinkedIn: https://www.linkedin.com/company/microsoft-mechanics/ Enjoy us on Instagram: https://www.instagram.com/msftmechanics/ Loosen up with us on TikTok: https://www.tiktok.com/@msftmechanics Video Transcript: -As more AI agents become active in your environment, you need control over them and what they can access. That’s where Microsoft Entra Agent ID comes in. It lets you treat agents like you would treat human users with their own built-in identities. Agent ID lets you define permissions and extend new and existing protections to them. You stay in control across their entire life cycle, from initial creation to monitoring the day-to-day activities where we continuously check for risk and protect access to resources, to switching their ownership if their sponsors no longer around, and disabling them when they’re no longer needed. The good news is that you can use the same tools in Microsoft Entra that they use to manage human identities today. Let me show you. Here in the Entra Domain Center, you see a new type under Entra ID called Agent ID. In the overview, you’ll find a summary with key metrics. These insights highlight what you need to know about your agents. -For example, how many agents are in your tenant, the number of agents recently created, how many are active or unmanaged and without identities. Each are starting point for understanding agent activity and spotting early signs of agent sprawl. Moving to the agent registry, you get visibility for each agent in your tenant and what platform they were built on and whether they have an Agent ID or not. The agents here are mixture of Microsoft-built agents, agents that you built in Microsoft Foundry, Copilot Studio, as well as Security Copilot. And no Microsoft agents using APIs and SDK supporting Agent ID. In fact, Agent Registry in Microsoft Entra is a shared center registry also used by the Agent 365 control plane. Next, in our agent identities, we can see all AI agents with an agent ID. Here, each agent automatically gets identity record, which is immutable object ID, just like a user or app registration would. It can quickly filter the list of the agents I want to manage. And by clicking into an agent like this one for HR self-service, we can see each details like the agent status, sponsor, permissions, roles, and associated policies. -Then, agent blueprints are templates for how agent identities are created. They ensure that any agent created has the right controls and is aligned with organizational policies. In the blueprint, we can see that it has one linked agent identity, which is actually itself. That said, this blueprint could be used for other agents as they are created. In fact, let me show you how this works with a blueprint that has more linked agent IDs. Back in our agent identities view, I’ll take a look at this HR Test agent to verify its agent blueprint. Here’s one has two linked agent identities. One has been named an Actor agent and is active. I’ll click into its access details. Here, I can see the details for each permissions. It has Application.ReadWrite.All permissions in the Microsoft Graph, which means it’s over permission, so it’s potentially dangerous. If I go back to the agent page, I can disable this agent. And if I confirm, this will block the agent to improve security and prevent and authorize access to it. So as an administrator, you have full visibility into your agent details and their correspondent permissions for accessing your resources. -Next, for scoping access to just what an agent needs to perform his tasks, we use access packages in Microsoft Entra. Let me show you. We start under Identity Governance, from Entitlement management and Access packages. You can see that I’ve already got one for a sponsor-initiated access package created. This includes the resources to help automate HR-related tasks for our agents. In Resource roles, you can see the specific Microsoft Graph API-related roles. Under Policies, that is just one initial policy. And clicking into it, we can see who can request access. I can choose from Admin, Self, Agent Sponsor, or Owner. -Importantly, these access package requires agent sponsor to approve any agent requests for access and it requires a business justification as well. Let me show you how the access request process works. I’m logged in as a human agent sponsor with the My Access portal open. I’ll browse Available access package. And here, the Sponsor-Initiated Agent Access package that we saw before. Clicking to exposes which identity I’m requesting access for, and I’ll keep the Sponsor agent option, and I’ll choose our HR Actions Agent. Next, I just need to enter a business justification. I’ll enter Timebound access for HR agents, then submit the request. Once the request has been approved, the agent will work according to my policies. And now, I can even create specific conditional access policies that will assess this realtime as agents try to access resources. -Here, I’ve created a Conditional Access policy to prevent agents from requesting sensitive information. In Assignments, there is now an option to apply the policy to agents. Under Grant, you see that this policy blocks all access requests by default, and you can see all agent identities are in scope. In my case, I want to make one exception. I want to make sure only approve HR agents can access HR information and stop our other agents. We can do that using an exclusion for HR-approved agents. Back in my policy, if I move over to Exclude, I can exclude one or more agent IDs from the policy. Using filter rules, this is how I can only allow the agents that were approved by HR to get access to dedicated HR resources, as you can see here. Under Target resources and in the filter, you also see that this policy covers all resources. So that was a very target Conditional Access policy. -We can also apply broader policies for all agents at risk to protect against a sponsor accounting being compromised and giving the agent malicious instructions. I move over to another Conditional Access policy that I’ve started. Just notice the identities in scope are, again, all agents. Target resources are all resources. But under Conditions, there is a new one called Agent risk. And when I’m look at what’s configured, you see the now we have High, Medium, and Low risk level options. I’ve chosen High. And once that’s enabled, condition access, you assess agent risk in realtime based on its likelihood of compromise and automatically block access to any resource per this policy scope. -Now, we’ve protected from risk agents when they request access to resources. And from Microsoft Entra, you can see which agents are currently flagged as risky in your tenant. Right from Identity Protection, you find your risky agents. So let’s take a look. We have three of them here. Our HR Actor agent from before shows high risk. By clicking in, you can see why. It looks like this agent tried to access resources that it does not usually access. Remember, this policy was a scoped to all agents without any exclusions, so if you block our HR agents too in case high risk is detected. So now our agents are running with their own identities and our resources are protected. -Since agents have one or more human sponsor, let’s move on to what happens if a sponsor leaves or change roles and makes the agent ownerless. For that, using lifecycle workflows, we can automatically notify the right people when agents become ownerless. Work workflows are a great way to automate routine tasks like employee onboarding and offboarding, and they work for agents too. I will narrow my list down by searching for a sponsor. There’s my workflow for AI agents to configure their sponsor in the event of a job profile change. Drilling into the workflow and then into its tasks, you see that we have two tasks defined for the what happens when the job profile changes. The first is an email to notify the manager of the user move, and I’ll click into the second task, which sends an email to the manager to notify them about agent identity sponsorship change they will need to action. -Let me show you an example when an agent sponsor leaves their role. Here, we’re seeing the manager’s mobile device. There’s a come in for an Outlook. And when we open it, in the mail, we can see that the manager needs to identify a sponsor for the two HR agents listed. This way, you can ensure the agents always have assigned sponsors. -Microsoft Entra Agent ID provides comprehensive identity, access, and lifecycle management for agents, with the same familiar tools you leverage already for users. To learn more, checkout aka.ms/EntraAgentID. Keep checking back to Microsoft Mechanics for the latest tech updates, and thanks for watching.4KViews0likes0Comments