hyper-v
470 TopicsStep-By-Step: Enabling Hyper-V for Use on Windows 11
Want to use Hyper-V on Windows 11? Hyper-V is a virtualization technology that is valuable not only for developers and IT Professionals, but also for college and university students. This step-by-step guide will show you how to enable Hyper-V on your Windows 11 machine.1.3MViews12likes36CommentsWindows Server on ARM64 (Insider Previews)
When will there be a preview build of Windows Server on ARM? There is demand for it from developers, and devops personal as well. It is known that it already partial exists due to the article on Azure Host OS. Azure Host OS – Cloud Host - Microsoft Community Hub Please release this so we can test it against our code.52KViews11likes23CommentsBypass LBFO Teaming deprecation on Hyper-V and Windows Server 2022
Starting with Windows Server 1903 and 1909, Hyper-V virtual switches on an LBFO-type network adapter cluster are deprecated (see documentation). The technology remains supported, but it will not evolve. It is recommended to create an aggregate of type SET. In practice The SET is a very interesting technology that has some constraints. The interfaces used must have identical characteristics: Manufacturer Model Link speed Configuration Even if these constraints do not seem huge, we are very far from the flexibility of LBFO Teaming. As a reminder, this one has absolutely no constraints. In practice the SET is recommended with network interfaces of 10Gb or more. Therefore, we are very far from the target of the LBFO (use of all integrated boards with motherboard pro, Home Lab, refurbish). If SET cannot be used As of Windows Server 2022, it is not possible to use the Hyper-V Management Console to create a virtual switch with LBFO, as it will prompt an error saying that LBFO have been depreciated. However, it is possible to use PowerShell to create this virtual switch. First, create the Teaming of your network cards using the Server Manager, in my case the teaming will be with LACP mode and Dynamic load balancing mode. Then execute the below PowerShell Command to create the virtual switch based on the teaming created in the previous step: New-VMSwitch -Name "LAN" -NetAdapterName "LINK-AGGREGATION" -AllowNetLbfoTeams $true -AllowManagementOS $true In detail: The virtual switch will be named "LAN" The network adapter cluster teaming is named "LINK-AGGREGATION" The aggregate remains usable to access the Hyper-V host. You will see your network teaming up and running on Hyper-V host. Thats it!163KViews7likes10CommentsWorry about Nano Server Future ...
I'm really worry about future of Nano Server. I read this https://blogs.technet.microsoft.com/hybridcloud/2017/06/15/delivering-continuous-innovation-with-windows-server/on technet and I have many doubts about. I think this is a really bad idea "downgrade" Nano Server as a standalone server. There are many escenarios that is perfect, DNS Server, IIS Server, Storage Server, Hyper-V host, Container host, Azure Server, Host Guardian Server, and many many others. Limit Nano Server to a Container is really sad. What about headless is great ! Less surface of attack, more secure ! Small footprint and less services running ! Nano Server is the future of cloud server ! Please reconsider that decission, If we want to use Server Core, Full desktop or Nano Server, let us decide, please. I love Nano Server and I expend many hours testing and making manuals like https://gallery.technet.microsoft.com/Manual-implementacin-paso-af8b12ba. Hope Microsoft Server Team consider this post.Solved3.2KViews6likes2CommentsMicrosoft Hyper-V Server 2019 release delayed
Microsoft Hyper-V Server has a new composition, and as a result we are finding new issues that are delaying the release. We are working through solutions and apologize again for the delay. If you installed the original RTM version when it was available, you may not be offered updates via Windows update. Microsoft recommends installing the latest cumulative update (KB4489899) from the Microsoft Update Catalog. Microsoft remains absolutely committed to shipping Hyper-V Server – thanks to our wonderful community for your patience.5.8KViews6likes0Comments
WSL 2 not working after installing 20262
Just getting involved with Insider Preview...upgraded 2019 Datacenter (latest official release) to 20262. After the upgrade, downloaded and ran the Linux Kernel update package. When running WSL commands from the command-line, almost every command I run returns the same output that wsl --help enumerates. If I run wsl --set-default-version 2, it enumerates the help context. Did I miss a step to get this to work or is this a known bug?40KViews6likes35CommentsHyper-V for Developers on Windows 10
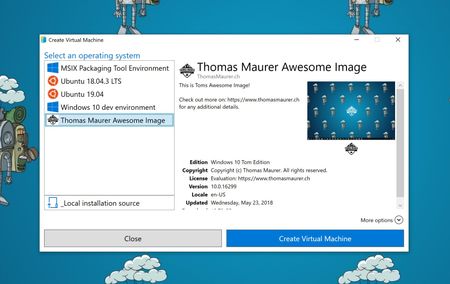
Hyper-V is more known as a server virtualization technology; however, since Windows 8, it is also available in the client operating system. In Windows 10, Microsoft improved the experience drastically to make Hyper-V a great solution for developers and IT Pros.35KViews6likes7Comments
Announcing Trusted Launch for Virtual Machines for Windows Server Insiders
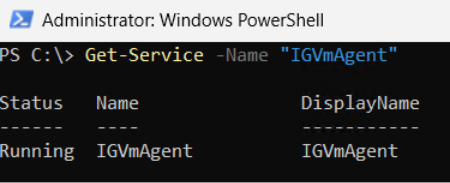
Trusted Launch for virtual machines We are excited to announce Trusted Launch for virtual machines (TVMs) in Windows Server Insider Preview. Trusted Launch is a security feature you can enable when creating Hyper-V Generation 2 VMs. It enables Secure Boot, installs a virtual Trusted Platform Module (vTPM), protects vTPM state at rest, and supports boot integrity verification (ability to verify if the VM started in a well-known good state). Further, when the VM runs in a Failover Cluster, the vTPM state is automatically made available when the VM live migrates or fails over to other nodes in the cluster – this ensures the VM remains available after migration or failover. This is unlike a Generation 2 VM with a vTPM, which will not start after migration or failover to another node in the cluster – the TPM state protection key needs to be moved to the destination node manually so the VM can start. With boot integrity verification, the entire boot path is measured and boot integrity is verified by Microsoft Azure Attestation service. This helps detect any alterations to the boot path or boot components. Such alterations, e.g. implanting malware in the boot path, can be detected by boot integrity verification. Increasingly attackers prefer implanting malware in the boot path for a variety of reasons: the OS layer is usually well protected, while firmware – as highly privileged code – can be used to alter what gets loaded (boot loader and drivers). Such alterations are not easily detectable by anti-virus software running at the OS layer. Boot integrity verification helps detect such alterations so a relying party (such as an app or service) can take suitable remediation actions, e.g. shutting down the VM. Boot integrity verification is an important part of establishing trust by verifying that the virtual machine started in a well-known good state. Insider preview TVMs are available for preview starting with Windows Server Insider preview build 29621. This initial preview only supports some of the Trusted Launch capabilities: Secure boot, vTPM, and vTPM state protection (at rest). You can create and manage TVMs using PowerShell. Guest state protection: The guest state (including the vTPM state) for each TVM is protected using a unique key that is stored in a KSP (Key Storage Provider) local to the server. Without this key, the VM will not start. Moving the VM to another server is not supported in this release. Not supported in this release: Moving TVMs to another server. TVMs in Failover Clusters or Hyper-V Replica. Boot integrity verification. Support for TVMs in Windows Admin Center (WAC). Instructions At a high-level, the steps involve: Install Windows Server Insider preview build on your server Enable Hyper-V Enable Trusted Launch feature Verify guest state protection 1. Install Windows Server Insider preview build Trusted Launch for virtual machines is available starting with the Windows Insider preview build number 29621. Install this build or a later build on your server. (Join Windows Server Insiders if you haven’t already!) 2. Enable Hyper-V (if it is not already enabled) Install-WindowsFeature -Name Hyper-V -IncludeManagementTools -Restart After enabling Hyper-V, the server needs to be restarted. 3. Set registry key property value (required to enable the Trusted Launch feature) New-Item -Path "HKLM:\SOFTWARE\Microsoft\AszIgvmAgent" -Force New-ItemProperty -Path "HKLM:\SOFTWARE\Microsoft\AszIgvmAgent" -Name "TvmWinServer" -Value 1 -PropertyType DWord -Force Setting the above regkey informs relevant system components that the Trusted Launch feature is being used in a Windows Server environment. 4. Enable Trusted Launch feature Enable-WindowsOptionalFeature -Online -FeatureName "IsolatedGuestVm" -NoRestart 5. Verify if IgvmAgent is running IgvmAgent (Isolated Guest Virtual Machine agent) is a system-level service that helps support Trusted Launch capabilities. Get-Service -Name "IGVmAgent" The output should show Status as Running. If the Status is Running, you can skip to next step. If the Status is not Running, please report the issue. Add the following event logs to the report: Event Viewer: Applications and Services Logs => Microsoft => Windows => IGVmAgent => Operational Event Viewer: Applications and Services Logs => Microsoft => Windows => IGVmSystem => Operational You can open Event Viewer via the Run dialog: Press Win + R → type "eventvwr.msc" → press Enter 6. Create an external virtual switch (if you don't already have one you can use) Create and configure a virtual switch with Hyper-V | Microsoft Learn To see available external virtual switches: (Get-VMSwitch | Where-Object { $_.SwitchType -eq "External" }).Name 7. Create TVM If you already have a virtual hard disk (VHD or VHDX) for a Gen 2 VM with an installed guest OS, run: New-VM -Name <VMName> -Generation 2 -GuestStateIsolationType TrustedLaunch -SwitchName <virtual switch name> -VHDPath <path to vhdx> -Path <path to where VM config files will be stored> Else, run: New-VM -Name <VMName> -SwitchName <virtual switch name> -NewVHDPath <path to where new VHD will be stored> -NewVHDSizeBytes 40GB -Generation 2 -GuestStateIsolationType TrustedLaunch -Path <path to where VM config files will be stored> Then, add to the VM a virtual DVD drive containing an ISO image for the guest OS (Windows or Linux OS-compatible with Hyper-V Gen 2 virtual machine). Add-VMDvdDrive -VMName <VMName> -Path <Guest OS ISO image path> Note: The guest OS will be installed when the VM starts up. When connecting to the VM you will be prompted to install the guest OS from the DVD drive. Make sure that the DVD drive is at the top of the boot order specified in the firmware so the VM will boot from the DVD drive. For more information, see New-VM. 8. Verify VM guest state isolation type (Get-VM -name <VMName>).GuestStateIsolationType should return "TrustedLaunch". 9. Verify guest state protection To verify guest state protection, stop IGVmAgent service and restart the VM. Without IGVmAgent in Running state, a TVM with guest state protection will not start. Call to action Trusted Launch brings foundational VM security — Secure Boot, a vTPM, and protected guest state — to Windows Server, helping safeguard your VMs against boot-level and firmware threats. Please try out TVMs and provide your feedback via the Windows Server Insiders Forum. — Christina Curlette and Ram Jeyaraman (and the Windows Server team)Great Manager for Storage Spaces Direct from Starwind Manager
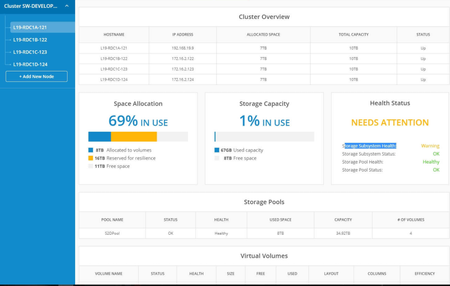
Are you deploying Storage Spaces Direct you need to get this amazing free tool from Starwind Software called Starwind Manager https://www.starwindsoftware.com/starwind-manager Check it out let me know what you think.1.2KViews3likes0Comments