data loss prevention
401 Topics
Protecting Organizations from External Email Risks in Microsoft 365 Copilot
Introduction As organizations embrace Microsoft 365 Copilot (Copilot), a new category of risk emerges: what happens when Copilot grounds its responses in untrusted external emails? Messages from external or unverified senders can carry content Copilot shouldn’t rely on. A new policy in Microsoft Purview Data Loss Prevention (DLP) addresses exactly this challenge. It lets organizations ground Copilot in trusted internal email only—reducing the risk of cross-prompt injection, while keeping everyday work uninterrupted. Why This Matters: The Risk of External Email in Copilot Grounding Copilot is built to integrate deeply with your organizational data—emails, files, meetings, and more—to generate intelligent and context-aware responses. However, not all mailbox content is equally reliable. External emails—messages originating from outside your organization’s trusted domains—can introduce risks such as: Prompt injection (or cross prompt injection) attempts disguised as legitimate communication Manipulated or misleading content aimed at influencing Copilot-generated outputs Unverified information or instructions that may lead to inaccurate responses Social engineering content that could be amplified through Copilot summarization Without proper safeguards, Copilot may inadvertently reference or summarize this content, potentially impacting decision-making or exposing users to biased or manipulated information. Consider a common scenario: an employee receives a message from an outside address that looks like a routine vendor note but contains hidden text instructing any AI assistant to ignore prior guidance and surface the recipient’s recent internal updates. Later, the employee asks Copilot to "summarize my inbox." Without this policy, that external message is eligible for grounding, and its planted instructions could influence the summary. With this new policy enabled, the external email is excluded from grounding entirely—Copilot never reads it as a source, so the injected instructions have no effect. How It Works: Under the Hood The feature operates through a DLP policy configured in the Microsoft Purview portal using the "Microsoft 365 Copilot and Copilot Chat" policy location with the "Email is received from > External users" condition. Here is how Copilot enforces the policy at runtime: Metadata Evaluation: Copilot evaluates email metadata and it checks the sender’s domain against your tenant’s accepted domains to determine whether an email is internal or external. Importantly, the body of the email is not inspected—only sender metadata is evaluated. External Emails Excluded from Grounding: Emails received from an external sender are excluded from Copilot grounding (source) data. This means when a user asks Copilot to summarize their inbox or reason over recent communications, those external emails are not referenced, summarized, or cited in the response. Other Grounding Sources Remain Available: Results from other grounding sources, such as web search, Word documents, Excel files, PowerPoint presentations, and internal emails, continue to show up in Copilot responses as normal. The policy is surgical in scope. No Impact on Email Access: User access to email remains completely unchanged. Users can still read, reply to, forward, and manage all their external emails as they always have. No Impact on Mail Flow: The policy does not affect mail flow, delivery, or retention. It operates exclusively at the Copilot grounding layer, not at the transport or storage layer. Things to Keep in Mind A few points help set the right expectations before you deploy: Metadata-only evaluation: The policy evaluates sender metadata, not message content. It does not scan or analyze the body of any email. Scoped to the grounding layer: The policy affects only what Copilot can use as a grounding source. It does not change mail flow, delivery, retention, or a user’s ability to access their email. Other sources are unaffected: Internal emails, files, and web results remain available to Copilot, so most everyday scenarios are unchanged. Validate before enforcing: Assess where external email is important to business workflows, then use simulation mode to validate impact and apply the protection only where it is relevant and needed. Key Benefits for Your Organization Mitigates Cross-Prompt Injection Risk: By excluding untrusted external email from Copilot’s grounding data, organizations significantly reduce the attack surface for prompt injection attempts embedded in incoming email. Applies protection where it is needed: Organizations can use the policy when external email presents a meaningful risk to Copilot grounding, while leaving external email available in scenarios where it is relevant and trusted. Ensures Copilot Responses Are Grounded in Trusted Data: Copilot responses reflect only your organization’s internal, verified communications, building greater confidence in Copilot generated insights. Minimal Disruption to Productivity: The feature keeps everyday work uninterrupted. Users retain full access to all their emails, and Copilot continues to function using all other permitted data sources. Simple Policy-Based Administration: Configured through familiar Microsoft Purview DLP policy workflows, making it easy for compliance and security teams to deploy and manage. Transparent User Experience: Users receive clear notifications when organizational policies restrict content, maintaining trust and transparency in the Copilot experience. Prerequisites Before you begin, make sure you have: Permissions: An account with the Compliance Administrator or Data Loss Prevention administrator role, or equivalent permissions to create DLP policies in the Microsoft Purview portal. Accepted domains: Your tenant’s accepted (internal) domains configured correctly, since these determine which senders are treated as internal versus external. How to Set It Up Setting up this protection is straightforward: Sign in to the Microsoft Purview portal (https://purview.microsoft.com). Navigate to Data Loss Prevention > Policies and select + Create policy. Choose the Custom template, then Custom policy. On the Locations page, enable the Microsoft 365 Copilot and Copilot Chat location. Add a rule with the condition "Email is received from," and set the value to External users. Set the action to "Prevent Copilot from processing content". Deploy the policy in simulation (test) mode first, and review the impact to confirm only the intended external email is affected. Once validated, save and activate (enforce) the policy. Conclusion As M365 Copilot becomes central to enterprise productivity, organizations must control what data feeds its responses. This new policy features adds a critical layer of defense, grounding M365 Copilot in trusted internal data while keeping the door open to seamless collaboration. By deploying this DLP policy, you protect more than data—you protect the integrity and trustworthiness of every Copilot-generated insight your organization relies on. Ready to get started? Create the policy in simulation mode today, validate the impact, and enforce it once you’re confident—so every Copilot response your organization relies on is grounded in data you trust. Learn more: https://learn.microsoft.com/en-us/purview/dlp-microsoft365-copilot-location-learn-aboutWhy DLP for External Web Search in Microsoft 365 Copilot Matters?
Introduction Microsoft 365 Copilot (Copilot) grounds its responses in your organizational data—emails, files, chats—and, optionally, the public web. With web search enabled, Copilot fetches real-time information from the Bing search service to deliver richer, more current answers. But what happens when a user’s prompt contains sensitive data such as credit card numbers, passport numbers, or Social Security numbers? That’s where a new feature in Microsoft Purview Data Loss Prevention (DLP) becomes essential: it keeps sensitive information from reaching external web search during Copilot’s query generation, preventing inadvertent data leakage while preserving the productivity benefits of AI. At a Glance In short: admin and user toggles decide whether Copilot can search the web; Microsoft Purview DLP decides what data may leave when it does. . Admin and user toggles are binary on/off controls—they aren’t aware of sensitive data. Prevents Copilot from using external web search as a grounding source for that prompt. It does not block the prompt itself or prevent Copilot from generating a response using permitted sources. It works regardless of your web search configuration,even as a safety net if web search is disabled. The Web Search Landscape in Copilot Before diving into the DLP feature, it’s important to understand the web search controls already available in Copilot and how they interact with this DLP feature. How Web Search Works in Copilot When web search is enabled, Copilot parses user prompts and generates search queries sent to the Bing search service. These generated queries are different from the user’s original prompt—they consist of a few words informed by the prompt. Importantly: The user’s entire prompt is NOT sent to Bing (unless it’s very short) Entire Microsoft 365 files (emails, documents) are NOT included in the search query User and tenant identifiers are removed before queries reach Bing Web search queries are not used to improve Bing, create advertising profiles, or train AI models Queries are treated as customer confidential information Admin Controls for Web Search IT administrators have several options to manage web search through the "Allow web search in Copilot" policy in Cloud Policy service for Microsoft 365: Enabled in Microsoft 365 Copilot and Microsoft 365 Copilot Chat: Web search is available across all Copilot experiences. Users get the Web content toggle to control it personally. Disabled in Microsoft 365 Copilot and Microsoft 365 Copilot Chat: Web search is completely turned off. The Web content toggle is dimmed and unavailable to users. Disabled in Work mode; Enabled in Web mode and Copilot Chat: A hybrid approach where web search is blocked in Work mode (where organizational data is accessed) but available in Web mode and Copilot Chat. User-Level Control: The Web Content Toggle When the admin enables web search, users in Copilot (Work chat) have a "Web content" toggle that is ON by default. Users can turn it off to exclude web content from their Copilot responses. This toggle is NOT available in Copilot Chat. The Gap: Why Admin Controls and User Toggles Are Not Enough Here’s the critical question: What if your organization has web search enabled (for good reasons—better answers, real-time data, improved productivity) but a user inadvertently includes sensitive information in their prompt? Consider these scenarios: A user asks Copilot: "What are the compliance requirements for processing credit card number 4532-XXXX-XXXX-1234?" An employee types: "Find regulations related to passport number AB1234567 for our international transfer." A prompt includes a customer’s Social Security number while asking about tax filing procedures. In each case, if web search is enabled, Copilot might generate a search query informed by the sensitive data in the prompt. Even though Copilot doesn’t send the entire prompt to Bing, the generated search query could still be influenced by or contain fragments of sensitive information. This is the gap that DLP for external web search fills—and it works regardless of which web search configuration option your admin has chosen. The Solution: DLP Policy to Restrict Web Search When Prompts Contain Sensitive Data Microsoft Purview DLP allows you to create a policy that detects when a user’s prompt contains sensitive information types (SITs)—such as credit card numbers, passport numbers, Social Security numbers, or custom SITs defined by your organization—and automatically prevents Copilot from using external web search as a grounding source for that specific prompt. How It Works Real-Time Detection: The DLP policy evaluates each prompt in real time, checking for configured sensitive information types before Copilot generates any web search query. Surgical Blocking: Only the web search component is prevented for that specific prompt. Copilot continues to generate responses using permitted internal Microsoft 365 data sources (emails, files, chats) where applicable. Per-Prompt Enforcement: The restriction applies only to prompts that actually contain sensitive data. The next prompt from the same user (without sensitive data) will use web search normally. Supports various available SIT Types: Works with Microsoft-provided SITs (credit cards, passports, SSNs, etc.) and custom SITs defined by your organization. Clear User Notification: Users are informed that web search was restricted for their prompt due to organizational policy, maintaining transparency. Why This Feature Is Critical, Regardless of Your Web Search Configuration This is the key insight that every security and compliance team must understand: The DLP policy for external web search provides a fundamentally different layer of protection than the admin toggle or user toggle for web search. Scenario 1: Web Search Fully Enabled With web search enabled across all Copilot experiences—the most common setup—the DLP policy acts as a safety net. Normal prompts get full web-grounded answers, but the moment a prompt contains sensitive data, web search is blocked for that prompt alone. External web grounding is prevented for that prompt when the policy detects configured sensitive content. Scenario 2: Web Search Disabled in Work Mode, Enabled in Web Mode Even here, users in Web mode and Copilot Chat still have web search active. The mode-level toggle is binary (on/off) and can’t tell safe prompts from sensitive ones—so if a prompt in these modes contains sensitive data, DLP adds prompt-level, data-aware protection beyond binary web-search controls.. Scenario 3: Web Search Enabled with User Toggle Available Expecting users to toggle off web search before every sensitive prompt is unrealistic—they don’t always know when content counts as sensitive by compliance standards. The DLP policy removes that human error, detecting and blocking automatically on a per-prompt basis. Scenario 4: Even When Web Search Is Fully Disabled Even with web search disabled entirely, the DLP policy adds defense-in-depth. Configurations change, policies get modified, and new users join groups with different settings. If web search is ever re-enabled—intentionally or not—the policy keeps sensitive data protected. Comparing the Controls: A Side-by-Side View Control Scope Granularity Sensitive Data Aware? Admin Policy (Allow web search) Tenant/User Group Binary: On or Off per mode No User Web Content Toggle Individual User Binary: On or Off No DLP: Block Web Search for SITs (Recommended) Per Prompt (Real-Time) Layered defense-in-depth; Conditional Block: Only when SITs detected Yes Key Takeaway: The admin toggle and user toggle control whether web search is available. The DLP policy controls what data can be sent when web search is available. These are complementary, not overlapping controls. Prerequisites Before you configure the policy, make sure you have: Licensing: Microsoft 365 Copilot licenses for your users, plus Microsoft Purview Data Loss Prevention (included with Microsoft 365 E5 or E5 Compliance, or an equivalent plan). Permissions: An account with a role that can create DLP policies for the Copilot location, e.g. Compliance Administrator or the Purview Data Security AI Admin role. Sensitive information types: The Microsoft-provided or custom SITs you want to detect (credit card numbers, passport numbers, SSNs, and so on) identified ahead of time. How to Configure the DLP Policy Follow these steps to set up the protection in Microsoft Purview: Sign in to the Microsoft Purview portal (https://purview.microsoft.com). Go to Data Loss Prevention > Policies and select + Create policy. Select the Custom template, then Custom policy. On the Locations page, set the Microsoft 365 Copilot and Copilot Chat location to On. Add a rule with the "Content contains" > "Sensitive information types" condition and choose the SITs you want to detect (e.g., Credit Card Number, Passport Number, SSN, or custom SITs). In the same rule, set the action to "Prevent Copilot from processing content" > "Performing Web Searches". Save and turn on the policy. Policy Design note: Conditions based on sensitive information types and sensitivity labels must be configured in separate rules within the same policy. Note: DLP policy changes can take up to 4-8 hours to take effect in Copilot. Deploy in simulation (test) mode first to review the impact before you enforce the policy. Real-World Use Case: Contoso Contoso wants employees to use Copilot for productivity and has web search enabled to provide the best possible responses. However, they don’t want sensitive customer data—such as credit card numbers or national identification numbers—to be sent to external web search when Copilot grounds responses on the web. They configure a DLP policy targeting the Microsoft 365 Copilot and Copilot Chat location with a rule that detects their relevant SITs and sets the action to "Prevent Copilot from processing content" > "Performing Web Searches". Result: When a user submits a prompt containing those SITs, Copilot does not send the prompt to external web search. Copilot still returns a response grounded in internal Microsoft 365 data sources where the user has access. For all other prompts, web search works normally. Other prompts can continue to use web search, subject to applicable settings and policies Best Practices Deploy the DLP web search policy alongside your existing web search admin controls for defense-in-depth. Include both Microsoft-provided and custom SITs relevant to your industry and data classification. Use simulation mode first to understand the impact before enforcing the policy. Combine with the "Prevent sensitive information types in prompts" DLP action for comprehensive protection (note: these must be separate rules within the same policy). Regularly review DLP alerts to identify patterns of sensitive data in prompts that may indicate user training needs. Document your layered approach: admin toggle for broad control, DLP for data-aware conditional control. Conclusion The “Restrict Microsoft 365 Copilot from using external web search when prompts contain sensitive data” DLP capability fills a critical gap. Admin policies and user toggles give broad on/off control over web search availability, but they can’t tell a prompt that’s safe to ground on the web from one carrying sensitive information that must never leave your Microsoft 365 boundary. This DLP feature adds intelligent, real-time, per-prompt protection that works regardless of your web search configuration. Users keep the productivity benefits of web-grounded Copilot responses without compromising data security—a clear example of security enabling productivity rather than restricting it. Bottom line: If your organization uses M365 Copilot with web search in any capacity, this DLP policy isn’t optional—it’s essential. References DLP for Microsoft 365 Copilot, Copilot Chat and Cowork: https://learn.microsoft.com/en-us/purview/dlp-microsoft365-copilot-location-learn-about Data, Privacy, and Security for Web Search in Copilot: https://learn.microsoft.com/en-us/microsoft-365/copilot/manage-public-web-access
From DLP Alert Volume to Measurable Detection Assurance
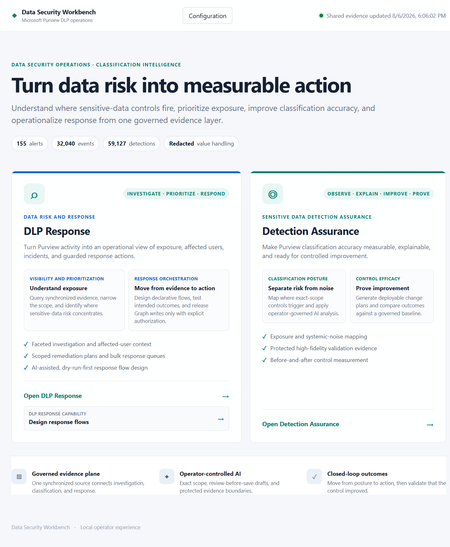
Introducing Data Security Workbench Built on the newly released Microsoft Purview DLP API, Data Security Workbench is an open-source starting point for any customer who wants to turn DLP alert volume into explainable detection assurance and controlled response. The gap between alert volume and operational confidence Microsoft Purview surfaces the activity that matters. But security teams still face the same operational challenge: connecting alerts to event evidence, understanding why a Sensitive Information Type fired, identifying the right business owner, deciding what should change, and responding without exposing the data they are trying to protect. That work is typically split across scripts, exports, spreadsheets, portals, and one-off analyst knowledge. The result is familiar — alert volume grows faster than confidence, tuning decisions are hard to defend, and remediation becomes either too cautious to help or too broad to trust. The goal is not to process more alerts. It is to make detection quality and response safety measurable operational controls. Detection Assurance: a closed-loop control cycle Detection Assurance determines whether your sensitive-data controls are behaving accurately. It explains why they fire, produces reviewable improvements, and proves whether those improvements worked — all as a repeatable, closed-loop process. STEP 1: Observe Define the SIT boundary, tuning profile, and control language STEP 2: Explain Analyze detections to separate signal from systemic noise STEP 3: Improve Generate a reviewable Purview implementation plan STEP 4: Prove Compare post-change outcomes against the original baseline Full transparency into detection behavior Each assessment produces a verbose Classification Efficiency Report documenting every detection across the scoped estate. It shows the total matches processed, how much noise was identified, the contextual patterns, underlying taxonomies, and where false positives concentrate. If you need to understand exactly what was flagged and why, the report gives full transparency — noise detection rate, primary workload, false-positive reduction opportunity, and pattern-level detail for every SIT rule in scope. From report to reviewable Purview implementation plan From this evidence, the system generates a Purview implementation plan. Each recommended step specifies the exact tuning change to make in your environment — the target SIT, the exact portal path, the current problem, and the precise configuration steps. Critically, each step explains why the change is safe to implement, quantifies the expected reduction in false positives, and flags associated risks. For example, it may recommend refining a sensitive information type pattern to exclude authentication token structures generating false matches, and tells you the expected noise reduction from that single change. From assurance to operational response Each tuning round also updates a DLP response store with the AI verdict for every analyzed incident. The system triages events — identifying which are genuine exposure and which are systemic noise — and records a privacy-safe rationale alongside each verdict. These verdicts can then be written in bulk back to the Purview incidents (as comments and tags in Microsoft Defender), or used to reach out to affected end users with guided remediation steps via email or Teams. After an explicitly approved incident update, the privacy-safe Detection Assurance rationale appears in the Microsoft Defender incident activity timeline — making outcomes easy to explain without requiring a separate incident queue. Useful AI without an uncontrolled data boundary Evidence is redacted by default. Classification boundaries fail closed. Microsoft Graph writes remain explicitly controlled. The default assessment mode excludes detected values, identities, recipients, content names, senders, and subjects from the AI payload. Departments are resolved locally before identity redaction — the model receives the department, not the person used to resolve it. Sensitive-value analysis, when needed, requires separate configuration, a confirmation phrase, DPAPI protection, and an explicit per-run choice. Live Graph actions (incident updates, email, Teams notifications) are disabled by default and require server enablement, an exact confirmation phrase, bounded targets, and an execution ledger. Dry-run is always the first gate. Model routing The workbench uses a luna model for high-volume event analysis and triage, and a Terra model for generating reports, implementation plans, and next-step recommendations. All AI is grounded in Purview data — no external training, no hosted data path, no opaque execution. Get started Turn your next DLP review into a measurable control cycle Built on the newly released Microsoft Purview DLP API, this open-source workbench is a starting point any customer can build from. Local-first, transparent, and ready to adapt to your organization. Explore the project →
From “No” to “Now”: A 7-Layer Strategy for Enterprise AI Safety
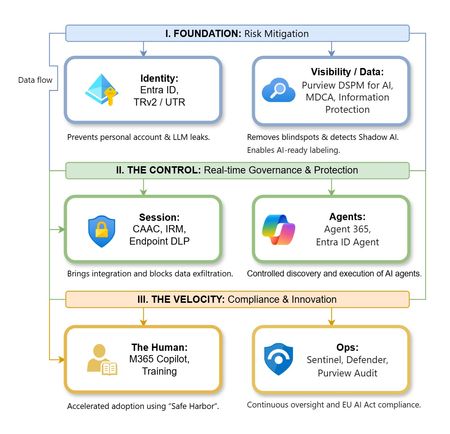
The “block” posture on Generative AI has failed. In a global enterprise, banning these tools doesn't stop usage; it simply pushes intellectual property into unmanaged channels and creates a massive visibility gap in corporate telemetry. The priority has now shifted from stopping AI to hardening the environment so that innovation can run at velocity without compromising data sovereignty. Traditional security perimeters are ineffective against the “slow bleed” of AI leakage - where data moves through prompts, clipboards, and autonomous agents rather than bulk file transfers. To secure this environment, a 7-layer defense-in-depth model is required to treat the conversation itself as the new perimeter. 1. Identity: The Only Verifiable Perimeter Identity is the primary control plane. Access to AI services must be treated with the same rigor as administrative access to core infrastructure. The strategy centers on enforcing device-bound Conditional Access, where access is strictly contingent on device health. To solve the "Account Leak" problem, the deployment of Tenant Restrictions v2 (TRv2) is essential to prevent users from signing into personal tenants using corporate-managed devices. For enhanced coverage, Universal Tenant Restrictions (UTR) via Global Secure Access (GSA) allows for consistent enforcement at the cloud edge. While TRv2 authentication-plane is GA, data-plane protection is GA for the Microsoft 365 admin center and remains in preview for other workloads such as SharePoint and Teams. 2. Eliminating the Visibility Gap (Shadow AI) You can’t secure what you can't see. Microsoft Defender for Cloud Apps (MDCA) serves to discover and govern the enterprise AI footprint, while Purview DSPM for AI (formerly AI Hub) monitors Copilot and third-party interactions. By categorizing tools using MDCA risk scores and compliance attributes, organizations can apply automated sanctioning decisions and enforce session controls for high-risk endpoints. 3. Data Hygiene: Hardening the “Work IQ” AI acts as a mirror of internal permissions. In a "flat" environment, AI acts like a search engine for your over-shared data. Hardening the foundation requires automated sensitivity labeling in Purview Information Protection. Identifying PII and proprietary code before assigning AI licenses ensures that labels travel with the data, preventing labeled content from being exfiltrated via prompts or unauthorized sharing. 4. Session Governance: Solving the “Clipboard Leak” The most common leak in 2025 is not a file upload; it’s a simple copy-paste action or a USB transfer. Deploying Conditional Access App Control (CAAC) via MDCA session policies allows sanctioned apps to function while specifically blocking cut/copy/paste. This is complemented by Endpoint DLP, which extends governance to the physical device level, preventing sensitive data from being moved to unmanaged USB storage or printers during an AI-assisted workflow. Purview Information Protection with IRM rounds this out by enforcing encryption and usage rights on the files themselves. When a user tries to print a "Do Not Print" document, Purview triggers an alert that flows into Microsoft Sentinel. This gives the SOC visibility into actual policy violations instead of them having to hunt through generic activity logs. 5. The “Agentic” Era: Agent 365 & Sharing Controls Now that we're moving from "Chat" to "Agents", Agent 365 and Entra Agent ID provide the necessary identity and control plane for autonomous entities. A quick tip: in large-scale tenants, default settings often present a governance risk. A critical first step is navigating to the Microsoft 365 admin center (Copilot > Agents) to disable the default “Anyone in organization” sharing option. Restricting agent creation and sharing to a validated security group is essential to prevent unvetted agent sprawl and ensure that only compliant agents are discoverable. 6. The Human Layer: “Safe Harbors” over Bans Security fails when it creates more friction than the risk it seeks to mitigate. Instead of an outright ban, investment in AI skilling-teaching users context minimization (redacting specifics before interacting with a model) - is the better path. Providing a sanctioned, enterprise-grade "Safe Harbor" like M365 Copilot offers a superior tool that naturally cuts down the use of Shadow AI. 7. Continuous Ops: Monitoring & Regulatory Audit Security is not a “set and forget” project, particularly with the EU AI Act on the horizon. Correlating AI interactions and DLP alerts in Microsoft Sentinel using Purview Audit (specifically the CopilotInteraction logs) data allows for real-time responses. Automated SOAR playbooks can then trigger protective actions - such as revoking an Agent ID - if an entity attempts to access sensitive HR or financial data. Final Thoughts Securing AI at scale is an architectural shift. By layering Identity, Session Governance, and Agentic Identity, AI moves from being a fragmented risk to a governed tool that actually works for the modern workplace.Authorization and Governance for AI Agents: Runtime Authorization Beyond Identity at Scale
Designing Authorization‑Aware AI Agents at Scale Enforcing Runtime RBAC + ABAC with Approval Injection (JIT) Microsoft Entra Agent Identity enables organizations to govern and manage AI agent identities in Copilot Studio, improving visibility and identity-level control. However, as enterprises deploy multiple autonomous AI agents, identity and OAuth permissions alone cannot answer a more critical question: “Should this action be executed now, by this agent, for this user, under the current business and regulatory context?” This post introduces a reusable Authorization Fabric—combining a Policy Enforcement Point (PEP) and Policy Decision Point (PDP)—implemented as a Microsoft Entra‑protected endpoint using Azure Functions/App Service authentication. Every AI agent (Copilot Studio or AI Foundry/Semantic Kernel) calls this fabric before tool execution, receiving a deterministic runtime decision: ALLOW / DENY / REQUIRE_APPROVAL / MASK Who this is for Anyone building AI agents (Copilot Studio, AI Foundry/Semantic Kernel) that call tools, workflows, or APIs Organizations scaling to multiple agents and needing consistent runtime controls Teams operating in regulated or security‑sensitive environments, where decisions must be deterministic and auditable Why a V2? Identity is necessary—runtime authorization is missing Entra Agent Identity (preview) integrates Copilot Studio agents with Microsoft Entra so that newly created agents automatically get an Entra agent identity, manageable in the Entra admin center, and identity activity is logged in Entra. That solves who the agent is and improves identity governance visibility. But multi-agent deployments introduce a new risk class: Autonomous execution sprawl — many agents, operating with delegated privileges, invoking the same backends independently. OAuth and API permissions answer “can the agent call this API?” They do not answer “should the agent execute this action under business policy, compliance constraints, data boundaries, and approval thresholds?” This is where a runtime authorization decision plane becomes essential. The pattern: Microsoft Entra‑Protected Authorization Fabric (PEP + PDP) Instead of embedding RBAC logic independently inside every agent, use a shared fabric: PEP (Policy Enforcement Point): Gatekeeper invoked before any tool/action PDP (Policy Decision Point): Evaluates RBAC + ABAC + approval policies Decision output: ALLOW / DENY / REQUIRE_APPROVAL / MASK This Authorization Fabric functions as a shared enterprise control plane, decoupling authorization logic from individual agents and enforcing policies consistently across all autonomous execution paths. Architecture (POC reference architecture) Use a single runtime decision plane that sits between agents and tools. What’s important here Every agent (Copilot Studio or AI Foundry/SK) calls the Authorization Fabric API first The fabric is a protected endpoint (Microsoft Entra‑protected endpoint required) Tools (Graph/ERP/CRM/custom APIs) are invoked only after an ALLOW decision (or approval) Trust boundaries enforced by this architecture Agents never call business tools directly without a prior authorization decision The Authorization Fabric validates caller identity via Microsoft Entra Authorization decisions are centralized, consistent, and auditable Approval workflows act as a runtime “break-glass” control for high-impact actions This ensures identity, intent, and execution are independently enforced, rather than implicitly trusted. Runtime flow (Decision → Approval → Execution) Here is the runtime sequence as a simple flow (you can keep your Mermaid diagram too). ```mermaid flowchart TD START(["START"]) --> S1["[1] User Request"] S1 --> S2["[2] Agent Extracts Intent\n(action, resource, attributes)"] S2 --> S3["[3] Call /authorize\n(Entra protected)"] S3 --> S4 subgraph S4["[4] PDP Evaluation"] ABAC["ABAC: Tenant · Region · Data Sensitivity"] RBAC["RBAC: Entitlement Check"] Threshold["Approval Threshold"] ABAC --> RBAC --> Threshold end S4 --> Decision{"[5] Decision?"} Decision -->|"ALLOW"| Exec["Execute Tool / API"] Decision -->|"MASK"| Masked["Execute with Masked Data"] Decision -->|"DENY"| Block["Block Request"] Decision -->|"REQUIRE_APPROVAL"| Approve{"[6] Approval Flow"} Approve -->|"Approved"| Exec Approve -->|"Rejected"| Block Exec --> Audit["[7] Audit & Telemetry"] Masked --> Audit Block --> Audit Audit --> ENDNODE(["END"]) style START fill:#4A90D9,stroke:#333,color:#fff style ENDNODE fill:#4A90D9,stroke:#333,color:#fff style S1 fill:#5B5FC7,stroke:#333,color:#fff style S2 fill:#5B5FC7,stroke:#333,color:#fff style S3 fill:#E8A838,stroke:#333,color:#fff style S4 fill:#FFF3E0,stroke:#E8A838,stroke-width:2px style ABAC fill:#FCE4B2,stroke:#999 style RBAC fill:#FCE4B2,stroke:#999 style Threshold fill:#FCE4B2,stroke:#999 style Decision fill:#fff,stroke:#333 style Exec fill:#2ECC71,stroke:#333,color:#fff style Masked fill:#27AE60,stroke:#333,color:#fff style Block fill:#C0392B,stroke:#333,color:#fff style Approve fill:#F39C12,stroke:#333,color:#fff style Audit fill:#3498DB,stroke:#333,color:#fff ``` Design principle: No tool execution occurs until the Authorization Fabric returns ALLOW or REQUIRE_APPROVAL is satisfied via an approval workflow. Where Power Automate fits (important for readers) In most Copilot Studio implementations, Agents calls Power Automate (agent flows), is the practical integration layer that calls enterprise services and APIs. Copilot Studio supports “agent flows” as a way to extend agent capabilities with low-code workflows. For this pattern, Power Automate typically: acquires/uses the right identity context for the call (depending on your tenant setup), and calls the /authorize endpoint of the Authorization Fabric, returns the decision payload to the agent for branching. Copilot Studio also supports calling REST endpoints directly using the HTTP Request node, including passing headers such as Authorization: Bearer <token>. Protected endpoint only: Securing the Authorization Fabric with Microsoft Entra For this V2 pattern, the Authorization Fabric must be protected using Microsoft Entra‑protected endpoint on Azure Functions/App Service (built‑in auth). Microsoft Learn provides the configuration guidance for enabling Microsoft Entra as the authentication provider for Azure App Service / Azure Functions. Step 1 — Create the Authorization Fabric API (Azure Function) Expose an authorization endpoint: HTTP Step 2 — Enable Microsoft Entra‑protected endpoint on the Function App In Azure Portal: Function App → Authentication Add identity provider → Microsoft Choose Workforce configuration (enterprise tenant) Set Require authentication for all requests This ensures the Authorization Fabric is not callable without a valid Entra token. Step 3 — Optional hardening (recommended) Depending on enterprise posture, layer: IP restrictions / Private endpoints APIM in front of the Function for rate limiting, request normalization, centralized logging (For a POC, keep it minimal—add hardening incrementally.) Externalizing policy (so governance scales) To make this pattern reusable across multiple agents, policies should not be hardcoded inside each agent. Instead, store policy definitions in a central policy store such as Cosmos DB (or equivalent configuration store), and have the PDP load/evaluate policies at runtime. Why this matters: Policy changes apply across all agents instantly (no agent republish) Central governance + versioning + rollback becomes possible Audit and reporting become consistent across environments (For the POC, a single JSON document per policy pack in Cosmos DB is sufficient. For production, add versioning and staged rollout.) Store one PolicyPack JSON document per environment (dev/test/prod). Include version, effectiveFrom, priority for safe rollout/rollback. Minimal decision contract (standard request / response) To keep the fabric reusable across agents, standardize the request payload. Request payload (example) Decision response (deterministic) Example scenario (1 minute to understand) Scenario: A user asks a Finance agent to create a Purchase Order for 70,000. Even if the user has API permission and the agent can technically call the ERP API, runtime policy should return: REQUIRE_APPROVAL (threshold exceeded) trigger an approval workflow execute only after approval is granted This is the difference between API access and authorized business execution. Sample Policy Model (RBAC + ABAC + Approval) This POC policy model intentionally stays simple while demonstrating both coarse and fine-grained governance. 1) Coarse‑grained RBAC (roles → actions) FinanceAnalyst CreatePO up to 50,000 ViewVendor FinanceManager CreatePO up to 100,000 and/or approve higher spend 2) Fine‑grained ABAC (conditions at runtime) ABAC evaluates context such as region, classification, tenant boundary, and risk: 3) Approval injection (Agent‑level JIT execution) For higher-risk/high-impact actions, the fabric returns REQUIRE_APPROVAL rather than hard deny (when appropriate): How policies should be evaluated (deterministic order) To ensure predictable and auditable behavior, evaluate in a deterministic order: Tenant isolation & residency (ABAC hard deny first) Classification rules (deny or mask) RBAC entitlement validation Threshold/risk evaluation Approval injection (JIT step-up) This prevents approval workflows from bypassing foundational security boundaries such as tenant isolation or data sovereignty. Copilot Studio integration (enforcing runtime authorization) Copilot Studio can call external REST APIs using the HTTP Request node, including passing headers such as Authorization: Bearer <token> and binding response schema for branching logic. Copilot Studio also supports using flows with agents (“agent flows”) to extend capabilities and orchestrate actions. Option A (Recommended): Copilot Studio → Agent Flow (Power Automate) → Authorization Fabric Why: Flows are a practical place to handle token acquisition patterns, approval orchestration, and standardized logging. Topic flow: Extract user intent + parameters Call an agent flow that: calls /authorize returns decision payload Branch in the topic: If ALLOW → proceed to tool call If REQUIRE_APPROVAL → trigger approval flow; proceed only if approved If DENY → stop and explain policy reason Important: Tool execution must never be reachable through an alternate topic path that bypasses the authorization check. Option B: Direct HTTP Request node to Authorization Fabric Use the Send HTTP request node to call the authorization endpoint and branch using the response schema. This approach is clean, but token acquisition and secure secretless authentication are often simpler when handled via a managed integration layer (flow + connector). AI Foundry / Semantic Kernel integration (tool invocation gate) For Foundry/SK agents, the integration point is before tool execution. Semantic Kernel supports Azure AI agent patterns and tool integration, making it a natural place to enforce a pre-tool authorization check. Pseudo-pattern: Agent extracts intent + context Calls Authorization Fabric Enforces decision Executes tool only when allowed (or after approval) Telemetry & audit (what Security Architects will ask for) Even the best policy engine is incomplete without audit trails. At minimum, log: agentId, userUPN, action, resource decision + reason + policyIds approval outcome (if any) correlationId for downstream tool execution Why it matters: you now have a defensible answer to: “Why did an autonomous agent execute this action?” Security signal bonus: Denials, unusual approval rates, and repeated policy mismatches can also indicate prompt injection attempts, mis-scoped agents, or governance drift. What this enables (and why it scales) With a shared Authorization Fabric: Avoid duplicating authorization logic across agents Standardize decisions across Copilot Studio + Foundry agents Update governance once (policy change) and apply everywhere Make autonomy safer without blocking productivity Closing: Identity gets you who. Runtime authorization gets you whether/when/how. Copilot Studio can automatically create Entra agent identities (preview), improving identity governance and visibility for agents. But safe autonomy requires a runtime decision plane. Securing that plane as an Entra-protected endpoint is foundational for enterprise deployments. In enterprise environments, autonomous execution without runtime authorization is equivalent to privileged access without PIM—powerful, fast, and operationally risky.
Insider Risk Level not being correctly picked up by DLP
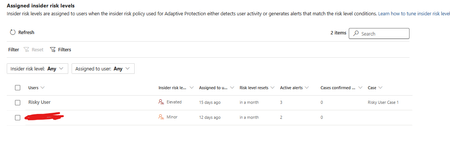
I have two users currently with assigned Insider Risk levels, one elevated and one minor. I have taken the templated DLP policy (DSPM for AI - Block sensitive info from AI sites) which looks for sensitive information being pasted to generative AI sites, and applies a block if the user is an elevated risk user, and a block with override for a moderate/minor risk user (this was audit only originally). For each advanced DLP rule within that policy, I have a separate policy tip which shows so I know which Advanced DLP rule has been hit. However, I'm having some discrepancies with the correct insider risk level being identified by Purview and therefore the wrong advanced DLP rule is being applied. Testing examples: Logged into a Windows 11 PC with the account, and using Medium confidence UK NINO's I try pasting the content into ChatGPT: Elevated risk user: Block with Override Minor Risk user: Block with Override If I try the exact same scenario on a different PC, I can sometimes get to the point where even though its the same set of data, Purview allows me to paste it at after checking the data. Or in another scenario, I was getting both users hitting the "elevated risk" advanced DLP rule. The Devices are all showing as up to date sync wise with DLP policies, and the policy itself is showing as fully synced. Assigned insider risk levels: DLP Rules: Elevated: Moderate/Minor:Solved663Views0likes2CommentsSensitivity Auto-labelling via Document Property
Why is this needed? Sensitivity labels are generally relevant within an organisation only. If a file is labelled within one environment and then moved to another environment, sensitivity label content markings may be visible, but by default, the applied sensitivity label will not be understood. This can lead to scenarios where information that has been generated externally is not adequately protected. My favourite analogy for these scenarios is to consider the parallels between receiving sensitive information and unpacking groceries. When unpacking groceries, you might sit your grocery bag on a counter or on the floor next to the pantry. You’ll likely then unpack each item, take a look at it and then decide where to place it. Without looking at an item to determine its correct location, you might place it in the wrong location. Porridge might be safe from the kids on the bottom shelf. If you place items that need to be protected, such as chocolate, on the bottom shelf, it’s not likely to last very long. So, I affectionately refer to information that hasn’t been evaluated as ‘porridge’, as until it has been checked, it will end up on the bottom shelf of the pantry where it is quite accessible. Label-based security controls, such as Data Loss Prevention (DLP) policies using conditions of ‘content contains sensitivity label’ will not apply to these items. To ensure the security of any contained sensitive information, we should look for potential clues to its sensitivity and then utilize these clues to ensure that the contained information is adequately protected - We take a closer look at the ‘porridge’, determine whether it’s an item that needs protection and if so, move it to a higher shelf in the pantry so that it’s out of reach for the kids. Effective use of Purview revolves around the use of ‘know your data’ strategies. We should be using as many methods as possible to try to determine the sensitivity of items. This can include the use of Sensitive Information Types (SITs) containing keyword or pattern-based classifiers, trainable classifiers, Exact Data Match, Document fingerprinting, etc. Matching items via SITs present in the items content can be problematic due to false positives. Keywords like ‘Sensitive’ or ‘Protected’ may be mentioned out of context, such as when referring to a classification or an environment. When classifications have been stamped via a property, it allows us to match via context rather than content. We don’t need to guess at an item’s sensitivity if another system has already established what the item’s classification is. These methods are much less prone to false positives. Why isn’t everyone doing this? Document properties are often not considered in Purview deployments. SharePoint metadata management seems to be a dying artform and most compliance or security resources completing Purview configurations don’t have this skill set. There’s also a lack of understanding of the relevance of checking for item properties. Microsoft haven’t helped as the documentation in this space is somewhat lacking and needs to be unpicked via some aligning DLP guidance (Create a DLP policy to protect documents with FCI or other properties). Many of these configurations will also be tied to regional requirements. Document properties being used by systems where I’m from, in Australia, will likely be very different to those used in other parts of the world. In the following sections, we’ll take a look at applicable use cases and walk through how to enable these configurations. Scenarios for use Labelling via document property isn’t for everyone. If your organisation is new to classification or you don’t have external partners that you collaborate with at higher sensitivity levels, then this likely isn’t for you. For those that collaborate heavily and have a shared classification framework, as is often seen across government, this is a must! This approach will also be highly relevant to multi-tenant organisations or conglomerates where information is regularly shared between environments. The following scenarios are examples of where this configuration will be relevant: 1. Migrating from 3 rd party classification tools If an item has been previously stamped by a 3 rd party classification tool, then evaluating its applied document properties will provide a clear picture of its security classification. These properties can then be used in service-based auto-labelling policies to effectively transition items from 3 rd party tools to Microsoft Purview sensitivity labels. As labels are applied to items, they will be brought into scope of label-based controls. 2. Detecting data spill Data spill is a term that is used to define situations where information that is of a higher than permitted security classification land in an environment. Consider a Microsoft 365 tenant that is approved for the storage of Official information but Top Secret files are uploaded to it. Document properties that align with higher than permitted classifications provide us with an almost guaranteed method of identifying spilled items. Pairing this document property with an auto-labelling policy allows for the application of encryption to lock unauthorized users out of the items. Tools like Content Explorer and eDiscovery can then be used to easily perform cleanup activities. If using document properties and auto-labelling for this purpose, keep in mind that you’ll need to create sensitivity labels for higher than permitted classifications in order to catch spilled items. These labels won’t impact usability as you won’t publish them to users. You will, however, need to publish them to a single user or break glass account so that they’re not ignored by auto-labelling. 3. Blocking access by AI tools If your organization was concerned about items with certain properties applied being accessed by generative AI tools, such as Copilot, you could use Auto-labelling to apply a sensitivity label that restricts EXTRACT permissions. You can find some information on this at Microsoft 365 Copilot data protection architecture | Microsoft Learn. This should be relevant for spilled data, but might also be useful in situations where there are certain records that have been marked via properties and which should not be Copilot accessible. 4. External Microsoft Purview Configurations Sensitivity labels are relevant internally only. A label, in its raw form, is essentially a piece of metadata with an ID (or GUID) that we stamp on pieces of information. These GUIDs are understood by your tenant only. If an item marked with a GUID shows up in another Microsoft 365 tenant, the GUID won’t correspond with any of that tenant’s labels or label-based controls. The art in Microsoft Purview lies in interpreting the sensitivity of items based on content markings and other identifiers, so that data security can be maintained. Document properties applied by Purview, such as ClassificationContentMarkingHeaderText are not relevant to a specific tenant, which makes them portable. We can use these properties to help maintain classifications as items move between environments. 5. Utilizing metadata applied by Records Management solutions Some EDRMS, Records or Content Management solutions will apply properties to items. If an item has been previously managed and then stamped with properties, potentially including a security classification, via one of these systems, we could use this information to inform sensitivity label application. 6. 3 rd party classification tools used externally Even if your organisation hasn’t been using 3rd party classification tools, you should consider that partner organisations, such as other Government departments, might be. Evaluating the properties applied by external organisations to items that you receive will allow you to extend protections to these items. If classification tools like Janus or Titus are used in your geography/industry, then you may want to consider checking for their properties. Regarding the use of auto-classification tools Some organisations, particularly those in Government, will have organisational policies that prevent the use of automatic classification capabilities. These policies are intended to ensure that each item is assessed by an actual person for risk of disclosure rather than via an automated service that could be prone to error. However, when auto-labelling is used to interpret and honour existing classifications, we are lowering rather than raising the risk profile. If the item’s existing classification (applied via property) is ignored, the item will be treated as porridge and is likely to be at risk. If auto-labelling is able to identify a high-risk item and apply the relevant label, it will then be within scope of Purview’s data security controls, including label-based DLP, groups and sites data out of place alerting, and potentially even item encryption. The outcome is that, through the use of auto-labelling, we are able to significantly reduce risk of inappropriate or unintended disclosure. Configuration Process Setting up document property-based auto-labelling is fairly straightforward. We need to setup a managed property and then utilize it an auto-labelling policy. Below, I've split this process into 6 steps: Step 1 – Prepare your files In order to make use of document properties, an item with the properties applied will first need to be indexed by SharePoint. SharePoint will record the properties as ‘crawled properties’, which we’ll then need to convert into ‘managed properties’ to make them useful. If you already have items with the relevant properties stored in SharePoint, then they are likely already indexed. If not, you’ll need to upload or create an item or items with the properties applied. For testing, you’ll want to create a file with each property/value combination so that you can confirm that your auto-labelling policies are all working correctly. This could require quite a few files depending on the number of properties you’re looking for. To kick off your crawled property generation though, you could create or upload a single file with the correct properties applied. For example: In the above, I’ve created properties for ClassificationContentMarkingHeaderText and ClassificationContentMarkingFooterText, which you’ll often see applied by Purview when an item has a sensitivity label content marking applied to it. I’ve also included properties to help identify items classified via JanusSeal, Titus and Objective. Step 2 – Index the files After creating or uploading your file, we then need SharePoint to index it. This should happen fairly quickly depending on the size of your environment. I'd expect to wait sometime between 10 minutes and 24 hrs. If you're not in a hurry, then I'd recommend just checking back the next day. You'll know when this has been completed when you head into SharePoint Admin > Search > Managed Search Schema > Crawled Properties and can find your newly indexed properties: Step 3 – Configure managed properties Next, the properties need to be configured as managed properties. To do this, go to SharePoint Admin > More features > Search > Managed Search Schema > Managed Properties. Create a new managed property and give it a name. Note that there are some character restrictions in naming, but you should be able to get it close to your document property name. Set the property’s type to text, select queryable and retrievable. Under ‘mappings to crawled properties’, choose add mapping, search for and select the property indexed from the file property. Note that the crawled property will have the same name as your document property, so there’s no need to browse through all of them: Repeat this so that you have a managed property for each document property that you want to look for. Step 4 – Configure Auto-labelling policies Next up, create some auto-labelling policies. You’ll need one for each label that you want to apply, not one per property as you can check multiple properties within the one auto-labelling policy. - From within Purview, head to Information Protection > Policies > Auto-labelling policies. - Create a new policy using the custom policy template. - Give your policy an appropriate name (e.g. Label PROTECTED via property). - Select the label that you want to apply (e.g. PROTECTED). - Select SharePoint based services (SharePoint and OneDrive). - Name your auto-labelling rules appropriately (e.g. SPO – Contains PROTECTED property) - Enter your conditions as a long string with property and value separated via a colon and multiple entries separated with a comma. For example: ClassificationContentMarkingHeaderText:PROTECTED,ClassificationContentMarkingFooterText:PROTECTED,Objective-Classification:PROTECTED,PMDisplay:PROTECTED,TitusSEC:PROTECTED Note that the properties that you are referencing are the Managed Property rather than the document property. This will be relevant if your managed property ended up having a different name due to character restrictions. After pasting in your string into the UI, the resultant rule should look something like this: When done, you can either leave your policy in simulation mode or save it and then turn it on from the auto-labelling policies screen. Just be aware of any potential impacts, such as accidently locking users out by automatically deploying a label with encryption configuration. You can reduce any potential impact by targeting your auto-labelling policy at a site or set of sites initially and then expanding its scope after testing. Step 5 - Test Testing your configuration will be as easy as uploading or creating a set of files with the relevant document properties in place. Once uploaded, you’ll need to give SharePoint some time to index the items and then the auto-labelling policy some time to apply sensitivity labels to them. To confirm label application, you can head to the document library where your test files are located and enable the sensitivity column. Files that have been auto-labelled will have their label listed: You could also check for auto-labelling activity in Purview via Activity explorer: Step 6 – Expand into DLP If you’ve spent the time setting up managed properties, then you really should consider capitalizing on them in your DLP configurations. DLP policy conditions can be configured in the same manner that we configured Auto-labelling in Step 3 above. The document property also gives us an anchor for DLP conditions that is independent of an item’s sensitivity label. You may wish to consider the following: DLP policies blocking external sharing of items with certain properties applied. This might be handy for situations where auto-labelling hasn’t yet labelled an item. DLP policies blocking the external sharing of items where the applied sensitivity label doesn’t match the applied document property. This could provide an indication of risky label downgrade. You could extend such policies into Insider Risk Management (IRM) by creating IRM policies that are aligned with the above DLP policies. This will allow for document properties to be considered in user risk calculation, which can inform controls like Adaptive Protection. Here's an example of a policy from the DLP rule summary screen that shows conditions of item contains a label or one of our configured document properties: Thanks for reading and I hope this article has been of use. If you have any questions or feedback, please feel free to reach out.4.7KViews9likes9Comments
How can we identify the size of a Microsoft Purview DLP policy and individual DLP rules?
Hello Microsoft Community, According to the Microsoft Purview DLP policy reference, the following platform limits apply: Maximum size of a DLP policy: 100 KB Maximum size of an individual DLP rule: 100 KB or 102,400 characters Maximum number of rules within a policy: Limited by the overall policy size I would like to understand how these limits are calculated and how administrators can monitor the current size of an existing DLP policy or rule. Could someone please clarify the following? What exactly is included when calculating the 100 KB DLP policy size? Does the policy size include only policy-level configuration, such as locations, users, groups, administrative units, inclusions and exclusions, or does it also include the combined definitions of all rules associated with the policy? What exactly is included in the 100 KB individual rule size? Sensitive information types and their GUIDs Condition groups Instance-count and confidence-level configurations Exceptions Endpoint DLP restrictions User notifications and policy-tip messages Override options Alert and incident-report settings Recipient lists Advanced rule configuration For example, does it include: The documentation describes the rule limit as “100 KB (102,400 characters).” Is the limit based on: The number of characters The UTF-8 or Unicode byte size The serialized JSON/XML representation An internally generated policy payload Is there a supported method in the Microsoft Purview portal, Security & Compliance PowerShell, Microsoft Graph, or another API to display the current size of: A DLP policy Each DLP rule The remaining available policy capacity Can the size be estimated by exporting the output from Get-DlpCompliancePolicy and Get-DlpComplianceRule? If so, which properties should be included in the calculation, and what encoding or serialization format should be used? Does the 100 KB policy limit represent the combined size of the policy and all its rules, or are the policy and rule limits evaluated independently? What error or warning is generated when a policy or rule approaches or exceeds the limit? Is there any notification before the limit is reached? We are designing global Microsoft Purview DLP policies containing multiple Sensitive Information Types, condition groups and workload-specific rules. We need a reliable method to measure policy and rule sizes during design and ongoing policy governance. Any official guidance, supported script, API property, or calculation method would be appreciated.Solved509Views0likes2CommentsRegistration Open: Community-Led Purview Lightning Talks
Get ready for an electrifying event! The Microsoft Security Community proudly presents Purview Lightning Talks; an action-packed series featuring your fellow Microsoft users, partners and passionate Microsoft Security community members of all sorts. Each 3-12 minute talk cuts straight to the chase, delivering expert insights, real-world use cases, and even a few game-changing tips and tricks. Don’t miss this opportunity to learn, connect, and be inspired! Secure your spot now for the big day: April 30th at 8am Redmond Time. See agenda details below and follow this blog post (sign in and click the "follow" heart in the upper right) to receive notifications. ❗UPDATE❗This event is expected to last around 2 hours and 15 minutes, due to the incredible number of community sessions that were submitted! 💖 Please see the timing table below broken out into sections of four talks each, and plan to arrive 10 minutes before the section that interests you, OR stay for the whole time! Speakers will be available in the chat to answer your questions; please ask your questions during their session. Spillover Q&A forum links will also be shared. The full session recording will be indexed and posted to Microsoft Security Community YouTube within 24 hours after the event. Bookmark this page or follow this blog post for updates! Agenda Legend ↩️ Data Lifecycle Management 🔐 Information Protection 🚫 Data Loss Prevention (DLP) 🦾 Data Security Posture Management (DSPM) for AI 🤖 Purview for AI 👁️ Insider Risk Management (IRM) 🔍 eDiscovery 📊 Governance 🗒️ Compliance Manager 🛡️ Data Security All times are listed in US Pacific/Redmond Time. Session lengths are rounded to the nearest minute. AGENDA Section 1 - approximately 8:00 am - 8:43 am ↩️ The Day Offboarding Exposed Infinite Retention — Nikki Chapple Length: 10 minutes | Topic: Data Lifecycle Management A routine Purview request led to an unexpected discovery: more than 9,000 orphaned OneDrives and thousands of inactive mailboxes still storing content long after employees had left. This talk explains how a retain-only policy created hidden retention debt and how Adaptive Scopes can help organisations separate active users from leavers to avoid similar pitfalls. 🔐 The Purview Label Engine: Automated Classification, Translation, and co-Documentation for Enterprise Tenants — Michael Kirst-Neshva Length: 12 minutes | Topic: Information Protection Global enterprises face the challenge of implementing uniform data protection standards across borders and languages. In this talk, I’ll present a framework that makes Microsoft Purview labels truly scalable. Discover how to roll out parent and child label logics automatically, manage priorities with a single click, and generate instant compliance documentation for every business unit. 🗒️ What's In My Compliance Manager Toolbox: A Cloud Security Architect's Perspective — Jerrad Dahlager Length: 8 minutes | Topic: Compliance Manager A practical walkthrough of how I use Compliance Manager across real client engagements to map controls, track improvement actions, and simplify multi-framework compliance. No theory, just what works in the field. 🛡️ Stop, Think, Protect: Data Security in Real Life with Purview — Oliver Sahlmann Length: 8 minutes | Topic: Data Security With simple labels and matching DLP policies, Purview offers a practical and accessible way to approach data security. This lightning talk uses a real-life traffic light concept to show how a low barrier to adoption can still drive meaningful protection and awareness. Section 2 - approximately 8:44 am - 9:15 am 🔐 Using Purview to prevent oversharing with AI services — Viktor Hedberg Length: 10 minutes | Topic: Information Protection In this day and age, AI is the big thing. However, Copilot has access to everything you can access, including potentially sensitive data. In this session we will look at how to prevent Copilot to access highly sensitive data, using Information Protection. 🦾 How I Helped My Customers Understand their AI Usage (and protect their sensitive data) — Bram de Jager Length: 5 minutes | Topic: Data Security Posture Management (DSPM) for AI As AI tools explode across the web, many organizations still have no idea what’s actually happening in the browser—where employees type prompts, paste sensitive data, or visit public AI sites outside corporate governance. In this lightning talk, I’ll share how I helped customers shine a light on this issue. We’ll explore how Purview Data Security Posture Management (DSPM) can reveal which AI tools employees use, what types of data they input, and where sensitive information may leak through prompts. I’ll walk through real customer scenario where we detected risky AI usage patterns—such as employees pasting confidential documents into public chatbots. 🔐 Four Labels Max for Daily Use: Which Ones & Why? — Romain Dalle Length: 8 minutes | Topic: Information Protection Sensitivity labels are one of the most critical parts of a Purview Risk and compliance deployment, if not the most critical, because it directly impacts how end-users and business units should allow or restrict themselves to share their business data, internally and externally, on a daily basis. Labels have not other options than being precise, meaningful, and balanced in terms of embedded data security. Setting the right taxonomy is core to success, and is everything but a one-time project. 🚫 Data-driven Endpoint DLP Solution with Advanced Hunting — Tatu Seppälä Length: 8 minutes | Topic: Data Loss Prevention (DLP) This lightning talk shows you how to use KQL queries in advanced hunting to easily build initial sensitive service domain groups for authorized and unauthorized domains based on your organization's usage patterns. The same approach can be used for numerous other similar solution refinement and design purposes. Section 3 - approximately 9:16 am - 9:46 am 🔐 The Purview Hack No One Talks About: Container Sensitivity Labels That Fix Oversharing Fast — Nikki Chapple Length: 10 minutes | Topic: Information Protection Most organizations tackle oversharing with manual fixes, but the fastest solution is often overlooked. In this lightning talk, I show how container sensitivity labels automatically apply the right sharing and collaboration controls, ensuring every new Group, Team or SharePoint site starts secure by default. 🔍 Does M365 Support eDiscovery? — Julian Kusenberg Length: 11 minutes | Topic: eDiscovery A myth-busting session that separates perception from reality when it comes to Microsoft 365 eDiscovery capabilities. 📊 Improving Discovery, Trust, and Reuse of Analytics with Purview Data Products — Craig Wyndowe Length: 5 minutes | Topic: Governance This talk shows how bringing Power BI and Fabric assets into Microsoft Purview Governance Domains and Data Products creates a single, trusted view of enterprise analytics. By connecting reports, semantic models, and underlying data with shared metadata, ownership, and business context, organizations can make existing assets easy to discover and safe to reuse. 🔐 Why You Should Create Your Own Sensitive Information Types (SITs) — Niels Jakobsen Length: 5 minutes | Topic: Information Protection An in depth analysis of why Microsoft SITs are not one-size-fits-all, and how to create your own using what Microsoft has already built for you. Section 4 - approximately 9:47 am-10:30 am 👁️ From Zero to First Signal: Insider Risk Management Prerequisites That Actually Matter — Sathish Veerapandian Length: 8 minutes | Topic: Insider Risk Management (IRM) A focused live demo showing the real world prerequisites required for Microsoft Purview Insider Risk Management to work effectively. This session highlights the critical Entra ID, Intune, Microsoft Defender for Endpoint, and Purview DLP configurations that must be in place before creating IRM policies. 🤖 Securing data in the age of AI — Júlio César Gonçalves Vasconcelos Length: 11 minutes | Topic: Purview for AI AI will transform business as we know it; but without proper governance, it can introduce serious risks. We’ll show you how Microsoft Purview enables organizations to accelerate AI adoption while maintaining security, compliance, and transparency. 🔍 Beyond eDiscovery - Purview DSI for Security Investigation — Susantha Silva Length: 11 minutes | Topic: eDiscovery Most people hear “Microsoft Purview” and immediately think compliance, eDiscovery, or legal holds. But this session highlights Data Security Investigations, showing how DSI lets you take a DLP alert or insider risk signal and turn it into a structured investigation. 🚫 Elevating Purview DLP with a real world use case — Victor Wingsing Length: 14 minutes | Topic: Data Loss Prevention (DLP) Learn how I hardened Microsoft Purview DLP beyond out of the box defaults—closing real world data loss gaps, tuning policies to actual user behavior, and turning noisy alerts into protection that really blocks exfiltration. - Quick Closing/ Resource Sharing2.8KViews7likes2Comments