azure dns
31 Topics
Azure VM Losing Network Connectivity after Doomain Removal
I currently have Azure VM domain joined servers running Server 2019 Std which are being upgraded via an in-place upgrade to Server 2025 Std. After the upgrade I will be un-joining from the domain and then joining a WORKGROUP to allow Entra ID joining of the servers. I have completed this on a non-critical server but upon removing from the domain the server appears to have lost network connectivity and displays a Computer Icon with a flashing cable, then eventually fails. I noticed the Ethernet displays now “Public” so I changed back to “Private” and removed “Network Level Authentication” from RDP. I also removed the Custom DNS server settings that were on the NIC in Azure Portal and set to “Virtual Network Inherited” to allow Azure DNS. Unfortunately, the same events occur time and time again with no network connectivity. I have reset the NIC and network via Powershell and CMD commands as suggested in most Google searches along with recreating the VM NIC in Azure, but still the same! Does anyone have any idea what could be causing the issue and how to resolve it as someone must have experienced similar in the past when unjoining an Azure VM from a corporate domain? I have been directing all traffic from server via the Azure FW using a Route table with a route directing all traffic via Azure FW and associating the subnets being used: Address Prefix: 0.0.0.0/0 - Next Hop type: Virtual Appliance – Next Hop IP address: <IP of Azure FW Private IP> I assume this would remain the same too? Please any advice or suggestions would be greatly appreciated? Thanks144Views0likes2Comments
Enabling fallback to internet for Azure Private DNS Zones in hybrid architectures
Introduction Azure Private Endpoint enables secure connectivity to Azure PaaS services such as: Azure SQL Managed Instance Azure Container Registry Azure Key Vault Azure Storage Account through private IP addresses within a virtual network. When Private Endpoint is enabled for a service, Azure DNS automatically changes the name resolution path using CNAME Redirection Example: myserver.database.windows.net ↓ myserver.privatelink.database.windows.net ↓ Private IP Azure Private DNS Zones are then used to resolve this Private Endpoint FQDN within the VNet. However, this introduces a critical DNS limitation in: Hybrid cloud architectures (AWS → Azure SQL MI) Multiregion deployments (DR region access) Crosstenant / Crosssubscription access MultiVNet isolated networks If the Private DNS zone does not contain a corresponding record, Azure DNS returns: NXDOMAIN (NonExistent Domain) When a DNS resolver receives a negative response (NXDOMAIN), it sends no DNS response to the DNS client and the query fails. This results in: ❌ Application connectivity failure ❌ Database connection timeout ❌ AKS pod DNS resolution errors ❌ DR failover application outage Problem statement In traditional Private Endpoint DNS resolution: DNS query is sent from the application. Azure DNS checks linked Private DNS Zone. If no matching record exists: NXDOMAIN returned DNS queries for Azure Private Link and network isolation scenarios across different tenants and resource groups have unique name resolution paths which can affect the ability to reach Private Linkenabled resources outside a tenant's control. Azure does not retry resolution using public DNS by default. Therefore: Public Endpoint resolution never occurs DNS query fails permanently Application cannot connect Microsoft native solution Fallback to internet (NxDomainRedirect) Azure introduced a DNS resolution policy: resolutionPolicy = NxDomainRedirect This property enables public recursion via Azure’s recursive resolver fleet when an authoritative NXDOMAIN response is received for a Private Link zone. When enabled: ✅ Azure DNS retries the query ✅ Public endpoint resolution occurs ✅ Application connectivity continues ✅ No custom DNS forwarder required Fallback policy is configured at: Private DNS Zone → virtualnetwork link Resolution policy is enabled at the virtual network link level with the NxDomainRedirect setting. In the Azure portal this appears as: Enable fallback to internet How it works Without fallback: Application → Azure DNS → Private DNS Zone → Record missing → NXDOMAIN returned → Connection failure With fallback enabled: Application → Azure DNS → Private DNS Zone → Record missing → NXDOMAIN returned → Azure recursive resolver → Public DNS resolution → Public endpoint IP returned → Connection successful Azure recursive resolver retries the query using the public endpoint QNAME each time NXDOMAIN is received from the private zone scope Real world use case AWS Application Connecting to Azure SQL Managed Instance You are running: SQL MI in Azure Private Endpoint enabled Private DNS Zone: privatelink.database.windows.net AWS application tries to connect: my-mi.database.windows.net If DR region DNS record is not available: Without fallback: DNS query → NXDOMAIN → App failure With fallback enabled: DNS query → Retry public DNS → Connection success Step-by-step configuration Method 1 – Azure portal Go to: Private DNS Zones Select your Private Link DNS Zone: Example: privatelink.database.windows.net Select: Virtual network links Open your linked VNet Enable: ✅ Enable fallback to internet Click: Save Method 2 – Azure CLI You can configure fallback policy using: az network private-dns link vnet update \ --resource-group RG-Network \ --zone-name privatelink.database.windows.net \ --name VNET-Link \ --resolution-policy NxDomainRedirect Validation steps Run from Azure VM: nslookup my-mi.database.windows.net Expected: ✔ Private IP (if available) ✔ Public IP (if fallback triggered) Security considerations Fallback to internet: ✅ Does NOT expose data ✅ Only impacts DNS resolution ✅ Network traffic still governed by: NSG Azure Firewall UDR Service Endpoint Policies DNS resolution fallback only triggers on NXDOMAIN and does not change networklevel firewall controls. When should you enable this? Recommended in: Hybrid AWS → Azure connectivity Multiregion DR deployments AKS accessing Private Endpoint services CrossTenant connectivity Private Link + VPN / ExpressRoute scenarios Conclusion Fallback to Internet using NxDomainRedirect provides: Seamless hybrid connectivity Reduced DNS complexity No custom forwarders Improved application resilience and simplifies DNS resolution for modern Private Endpointenabled architectures.1KViews0likes0CommentsHelp! - How is VNet traffic reaching vWAN/on‑prem when the VNet isn’t connected to the vWAN hub
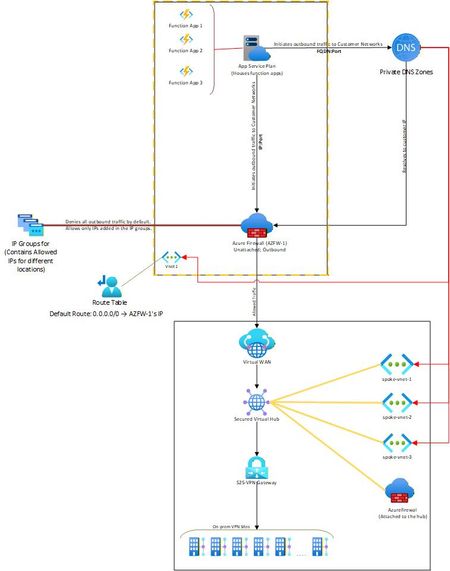
Hello, I needed some clarity on how the following is working: Attached is a network diagram of our current setup. The function apps (in VNet-1) initiate a connection(s) to a specific IP:Port or FQDN:Port in the on-premises network(s). A Private DNS zone ensures that any FQDN is resolved to the correct internal IP address of the on-prem endpoint. In our setup, both the function app and the external firewall reside in the same VNet. This firewall is described as “Unattached” because it is not the built-in firewall of a secured vWAN hub, but rather an independent Azure Firewall deployed in that VNet. The VNet has a user-defined default route (0.0.0.0/0) directing all outbound traffic to the firewall’s IP. The firewall then filters the traffic, allowing only traffic destined to whitelisted on-premises IP: Port or FQDN: Port combinations (using IP Groups), and blocking everything else. The critical question and the part that I am unable to figure out is: Once the firewall permits a packet, how does Azure know to route it to the vWAN hub and on to the site-to-site VPN? Because VNet-1 truly has no connection at all to the vWAN hub (no direct attachment, no peering, no VPN from the NVA). But the traffic is still reaching the on-prem sites. Unable to figure out how this is happening. Am I missing something obvious? Any help on this would be appreciated. Thank you!427Views0likes4CommentsSave the date - January 26, 2026 - AMA: Best practices for applying Zero Trust using Intune
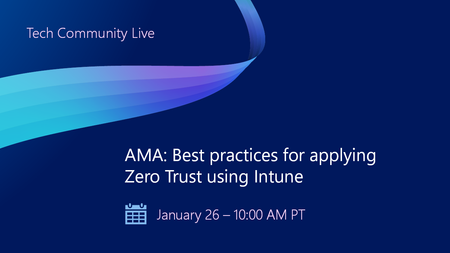
Join us on January 26 at 10:00 AM PT, to Ask Microsoft Anything (AMA) and get the answers you need to implement the right policies, security settings, device configurations, and more. Never trust, always verify. Tune in for tips and insights to help you secure your endpoints using Microsoft Intune as part of your larger Zero Trust strategy. Find out how you can use Intune to protect both access and data on organization-owned devices and personal devices used for work. Go to aka.ms/AMA/IntuneZeroTrust and select "attend" to add this event to your calendar. Have questions? Submit them early by signing in to Tech Community and posting them on the event page!
Announcing Azure DNS security policy with Threat Intelligence feed general availability
Azure DNS security policy with Threat Intelligence feed allows early detection and prevention of security incidents on customer Virtual Networks where known malicious domains sourced by Microsoft’s Security Response Center (MSRC) can be blocked from name resolution. Azure DNS security policy with Threat Intelligence feed is being announced to all customers and will have regional availability in all public regions.3.1KViews3likes0CommentsAzure traffic to storage account
Hello, I’ve set up a storage account in Tenant A, located in the AUEast region, with public access. I also created a VM in Tenant B, in the same region (AUEast). I’m able to use IP whitelisting on the storage account in Tenant A to allow traffic only from the VM in Tenant B. However, in the App Insights logs, the traffic appears as 10.X.X.X, likely because the VM is in the same region. I'm unsure why the public IP isn't reflected in the logs. Moreover, I am not sure about this part https://learn.microsoft.com/en-us/azure/storage/common/storage-network-security-limitations#:~:text=You%20can%27t%20use%20IP%20network%20rules%20to%20restrict%20access%20to%20clients%20in%20the%20same%20Azure%20region%20as%20the%20storage%20account.%20IP%20network%20rules%20have%20no%20effect%20on%20requests%20that%20originate%20from%20the%20same%20Azure%20region%20as%20the%20storage%20account.%20Use%20Virtual%20network%20rules%20to%20allow%20same%2Dregion%20requests. This seems contradictory, as IP whitelisting is working on the storage account. I assume the explanation above applies only when the client is hosted in the same tenant and region as the storage account, and not when the client is in a different tenant, even if it's in the same region. I’d appreciate it if someone could shed some light on this. Thanks, Mohsen257Views0likes3CommentsAzure Networking Portfolio Consolidation
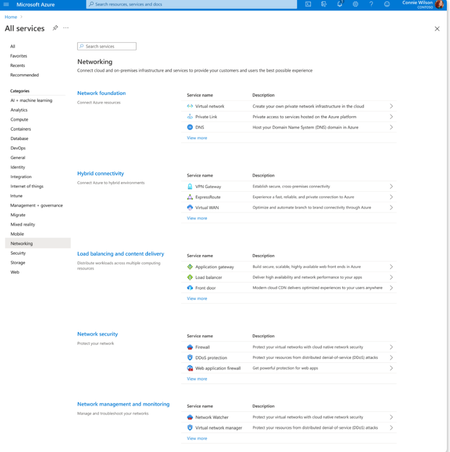
Overview Over the past decade, Azure Networking has expanded rapidly, bringing incredible tools and capabilities to help customers build, connect, and secure their cloud infrastructure. But we've also heard strong feedback: with over 40 different products, it hasn't always been easy to navigate and find the right solution. The complexity often led to confusion, slower onboarding, and missed capabilities. That's why we're excited to introduce a more focused, streamlined, and intuitive experience across Azure.com, the Azure portal, and our documentation pivoting around four core networking scenarios: Network foundations: Network foundations provide the core connectivity for your resources, using Virtual Network, Private Link, and DNS to build the foundation for your Azure network. Try it with this link: Network foundations Hybrid connectivity: Hybrid connectivity securely connects on-premises, private, and public cloud environments, enabling seamless integration, global availability, and end-to-end visibility, presenting major opportunities as organizations advance their cloud transformation. Try it with this link: Hybrid connectivity Load balancing and content delivery: Load balancing and content delivery helps you choose the right option to ensure your applications are fast, reliable, and tailored to your business needs. Try it with this link: Load balancing and content delivery Network security: Securing your environment is just as essential as building and connecting it. The Network Security hub brings together Azure Firewall, DDoS Protection, and Web Application Firewall (WAF) to provide a centralized, unified approach to cloud protection. With unified controls, it helps you manage security more efficiently and strengthen your security posture. Try it with this link: Network security This new structure makes it easier to discover the right networking services and get started with just a few clicks so you can focus more on building, and less on searching. What you’ll notice: Clearer starting points: Azure Networking is now organized around four core scenarios and twelve essential services, reflecting the most common customer needs. Additional services are presented within the context of these scenarios, helping you stay focused and find the right solution without feeling overwhelmed. Simplified choices: We’ve merged overlapping or closely related services to reduce redundancy. That means fewer, more meaningful options that are easier to evaluate and act on. Sunsetting outdated services: To reduce clutter and improve clarity, we’re sunsetting underused offerings such as white-label CDN services and China CDN. These capabilities have been rolled into newer, more robust services, so you can focus on what’s current and supported. What this means for you Faster decision-making: With clearer guidance and fewer overlapping products, it's easier to discover what you need and move forward confidently. More productive sales conversations: With this simplified approach, you’ll get more focused recommendations and less confusion among sellers. Better product experience: This update makes the Azure Networking portfolio more cohesive and consistent, helping you get started quickly, stay aligned with best practices, and unlock more value from day one. The portfolio consolidation initiative is a strategic effort to simplify and enhance the Azure Networking portfolio, ensuring better alignment with customer needs and industry best practices. By focusing on top-line services, combining related products, and retiring outdated offerings, Azure Networking aims to provide a more cohesive and efficient product experience. Azure.com Before: Our original Solution page on Azure.com was disorganized and static, displaying a small portion of services in no discernable order. After: The revised solution page is now dynamic, allowing customers to click deeper into each networking and network security category, displaying the top line services, simplifying the customer experience. Azure Portal Before: With over 40 networking services available, we know it can feel overwhelming to figure out what’s right for you and where to get started. After: To make it easier, we've introduced four streamlined networking hubs each built around a specific scenario to help you quickly identify the services that match your needs. Each offers an overview to set the stage, key services to help you get started, guidance to support decision-making, and a streamlined left-hand navigation for easy access to all services and features. Documentation For documentation, we looked at our current assets as well as created new assets that aligned with the changes in the portal experience. Like Azure.com, we found the old experiences were disorganized and not well aligned. We updated our assets to focus on our top-line networking services, and to call out the pillars. Our belief is these changes will allow our customers to more easily find the relevant and important information they need for their Azure infrastructure. Azure Network Hub Before the updates, we had a hub page organized around different categories and not well laid out. In the updated hub page, we provided relevant links for top-line services within all of the Azure networking scenarios, as well as a section linking to each scenario's hub page. Scenario Hub pages We added scenario hub pages for each of the scenarios. This provides our customers with a central hub for information about the top-line services for each scenario and how to get started. Also, we included common scenarios and use cases for each scenario, along with references for deeper learning across the Azure Architecture Center, Well Architected Framework, and Cloud Adoption Framework libraries. Scenario Overview articles We created new overview articles for each scenario. These articles were designed to provide customers with an introduction to the services included in each scenario, guidance on choosing the right solutions, and an introduction to the new portal experience. Here's the Load balancing and content delivery overview: Documentation links Azure Networking hub page: Azure networking documentation | Microsoft Learn Scenario Hub pages: Azure load balancing and content delivery | Microsoft Learn Azure network foundation documentation | Microsoft Learn Azure hybrid connectivity documentation | Microsoft Learn Azure network security documentation | Microsoft Learn Scenario Overview pages What is load balancing and content delivery? | Microsoft Learn Azure Network Foundation Services Overview | Microsoft Learn What is hybrid connectivity? | Microsoft Learn What is Azure network security? | Microsoft Lea Improving user experience is a journey and in coming months we plan to do more on this. Watch out for more blogs over the next few months for further improvements.3.2KViews4likes0Comments
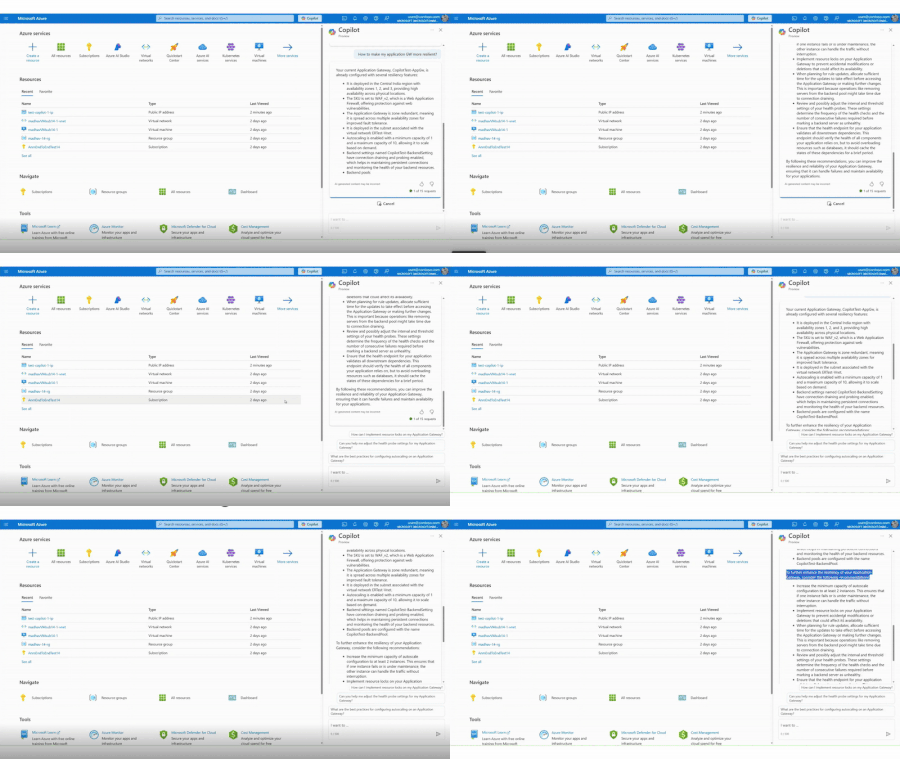
Accelerate designing, troubleshooting & securing your network with Gen-AI powered tools, now GA.
We are thrilled to announce the general availability of Azure Networking skills in Copilot, an extension of Copilot in Azure and Security Copilot designed to enhance cloud networking experience. Azure Networking Copilot is set to transform how organizations design, operate, and optimize their Azure Network by providing contextualized responses tailored to networking-specific scenarios and using your network topology.1.9KViews1like1CommentDeploy Open Web UI on Azure VM via Docker: A Step-by-Step Guide with Custom Domain Setup.
Introductions Open Web UI (often referred to as "Ollama Web UI" in the context of LLM frameworks like Ollama) is an open-source, self-hostable interface designed to simplify interactions with large language models (LLMs) such as GPT-4, Llama 3, Mistral, and others. It provides a user-friendly, browser-based environment for deploying, managing, and experimenting with AI models, making advanced language model capabilities accessible to developers, researchers, and enthusiasts without requiring deep technical expertise. This article will delve into the step-by-step configurations on hosting OpenWeb UI on Azure. Requirements: Azure Portal Account - For students you can claim $USD100 Azure Cloud credits from this URL. Azure Virtual Machine - with a Linux of any distributions installed. Domain Name and Domain Host Caddy Open WebUI Image Step One: Deploy a Linux – Ubuntu VM from Azure Portal Search and Click on “Virtual Machine” on the Azure portal search bar and create a new VM by clicking on the “+ Create” button > “Azure Virtual Machine”. Fill out the form and select any Linux Distribution image – In this demo, we will deploy Open WebUI on Ubuntu Pro 24.04. Click “Review + Create” > “Create” to create the Virtual Machine. Tips: If you plan to locally download and host open source AI models via Open on your VM, you could save time by increasing the size of the OS disk / attach a large disk to the VM. You may also need a higher performance VM specification since large resources are needed to run the Large Language Model (LLM) locally. Once the VM has been successfully created, click on the “Go to resource” button. You will be redirected to the VM’s overview page. Jot down the public IP Address and access the VM using the ssh credentials you have setup just now. Step Two: Deploy the Open WebUI on the VM via Docker Once you are logged into the VM via SSH, run the Docker Command below: docker run -d --name open-webui --network=host --add-host=host.docker.internal:host-gateway -e PORT=8080 -v open-webui:/app/backend/data --restart always ghcr.io/open-webui/open-webui:dev This Docker command will download the Open WebUI Image into the VM and will listen for Open Web UI traffic on port 8080. Wait for a few minutes and the Web UI should be up and running. If you had setup an inbound Network Security Group on Azure to allow port 8080 on your VM from the public Internet, you can access them by typing into the browser: [PUBLIC_IP_ADDRESS]:8080 Step Three: Setup custom domain using Caddy Now, we can setup a reverse proxy to map a custom domain to [PUBLIC_IP_ADDRESS]:8080 using Caddy. The reason why Caddy is useful here is because they provide automated HTTPS solutions – you don’t have to worry about expiring SSL certificate anymore, and it’s free! You must download all Caddy’s dependencies and set up the requirements to install it using this command: sudo apt install -y debian-keyring debian-archive-keyring apt-transport-https curl -1sLf 'https://dl.cloudsmith.io/public/caddy/stable/gpg.key' | sudo gpg --dearmor -o /usr/share/keyrings/caddy-stable-archive-keyring.gpg curl -1sLf 'https://dl.cloudsmith.io/public/caddy/stable/debian.deb.txt' | sudo tee /etc/apt/sources.list.d/caddy-stable.list sudo apt update && sudo apt install caddy Once Caddy is installed, edit Caddy’s configuration file at: /etc/caddy/Caddyfile , delete everything else in the file and add the following lines: yourdomainname.com { reverse_proxy localhost:8080 } Restart Caddy using this command: sudo systemctl restart caddy Next, create an A record on your DNS Host and point them to the public IP of the server. Step Four: Update the Network Security Group (NSG) To allow public access into the VM via HTTPS, you need to ensure the NSG/Firewall of the VM allow for port 80 and 443. Let’s add these rules into Azure by heading to the VM resources page you created for Open WebUI. Under the “Networking” Section > “Network Settings” > “+ Create port rule” > “Inbound port rule” On the “Destination port ranges” field, type in 443 and Click “Add”. Repeat these steps with port 80. Additionally, to enhance security, you should avoid external users from directly interacting with Open Web UI’s port - port 8080. You should add an inbound deny rule to that port. With that, you should be able to access the Open Web UI from the domain name you setup earlier. Conclusion And just like that, you’ve turned a blank Azure VM into a sleek, secure home for your Open Web UI, no magic required! By combining Docker’s simplicity with Caddy’s “set it and forget it” HTTPS magic, you’ve not only made your app accessible via a custom domain but also locked down security by closing off risky ports and keeping traffic encrypted. Azure’s cloud muscle handles the heavy lifting, while you get to enjoy the perks of a pro setup without the headache. If you are interested in using AI models deployed on Azure AI Foundry on OpenWeb UI via API, kindly read my other article: Step-by-step: Integrate Ollama Web UI to use Azure Open AI API with LiteLLM Proxy5KViews2likes1Comment
DNS Private Resolver forwarding ruleset resiliency
We are using DNS Private Resolver for all our tenant's Azure DNS resolution. We have a DNS forwarding ruleset set up that forwards all DNS requests for "ourcompany.com." to 10.0.0.100 (primary onprem DNS server IP) and 10.0.0.200 (secondary onprem DNS server IP). This is all working fine. We have just been looking at the resiliency of this setup. If both IPs were unreachable for five minutes, would the DNS private resolver return any cached DNS results for *.ourcompany.com or would the queries simply fail? If only the primary IP (10.0.0.100) were unavailable, presumably DNS queries would still succeed due to use of the secondary IP, but would there be any noticeable increase in the time to respond to DNS queries as a result?706Views0likes1Comment