artificial intelligence
53 TopicsMicrosoft Foundry Guardrails Getting in Your Way? Here’s How to Dial Them Down
How This All Started So here’s the story. I just got back from a trip and had a pile of footage sitting on my laptop. Being the lazy (sorry, efficient) person I am, I fired up OpenCode and asked GPT-6 Astra, running on Microsoft Foundry, to cut me a travelogue. Nothing fancy: under two minutes, nice lighting, clean transitions, no cringy effects, a quick QA before showing me, and the output in its own folder. Easy, right? Nope. This is what I got instead: “Image processing blocked due to content policy violation.” Seriously? It’s holiday footage! Nothing even remotely dodgy in there. This is a classic false positive from the default guardrails, and the good news is it’s totally fixable. Let me show you how. My Setup Quick context before we dive in: I’ve got two models deployed on Microsoft Foundry, gpt-6-astra and gpt-6-sol. Both were running on Microsoft’s out-of-the-box guardrail. Step 1: Find the Guardrails Page Head over to the Microsoft Foundry portal, click Build, then hit Guardrails in the left menu. You’ll see three guardrails that Microsoft gives you by default: Microsoft.Default, Microsoft.DefaultV2 and Microsoft.MAIDefault. Microsoft.DefaultV2 is the one every new deployment gets, which is why it’s sitting on both of my models. Here’s the catch: you can’t edit or delete these Microsoft-managed defaults. So instead of tweaking them, we’re going to build our own guardrail and swap it in. Step 2: Create Your Own Guardrail Smash that "Create" button and you’ll land on the Create guardrail page. This is where all the knobs and switches live: Every control has three bits: the risk type, the intervention point (does it check what you send in, what the model spits out, or both?) and the action. The magic trick for loosening things up is flipping the action from Block to Annotate. With Annotate, Foundry still scans the content and tags it in the API response, but it stops slamming the door on your request. So What Does Each Setting Actually Do? Before you go on a switching-off spree, it’s worth knowing what each of these does and what you’re giving up when you loosen it. Here’s the quick tour: Jailbreak: This one catches prompts trying to trick the model into ignoring its rules. On Block, those prompts get rejected outright. On Annotate, they go through with a flag. Turn it off completely and you’re trusting the model’s own training to keep it in line. Network (egress rules): Controls which outbound calls a hosted agent is allowed to make. As the portal points out, it only applies to hosted agents, so for plain model deployments like mine it doesn’t change a thing. Indirect prompt injections: Watches user input and tool responses (files, docs, web pages the model reads) for sneaky instructions someone has planted. Leave it on and your agents are protected when they read outside content; switch it off and a dodgy file could quietly hijack your model. For an agentic tool like OpenCode, which reads files and runs shell commands, I’d honestly keep this one on, even if it’s just on Annotate. Spotlighting (Preview): Tags external content inside the prompt so the model can tell your real instructions apart from random untrusted data. Think of it as an extra seatbelt against indirect attacks. Content harms (Hate, Sexual, Self-harm, Violence): Each of these has a severity slider that starts at Medium blocking, meaning anything rated medium or higher gets blocked. Slide it down to Lowest blocking and only the really nasty stuff gets stopped, which kills off most false positives like mine. The asterisk means these four are mandatory: you can turn the dial down, but you can’t switch them off. Blocklists: Want to ban specific words or phrases, like profanity or your competitor’s name? This is where you do it. It’s off by default. Protected material for code and text: Checks whether the model is about to spit out known copyrighted text (song lyrics, articles and so on) or code lifted from public repos. Block stops it; Annotate lets it through with a flag. Switch it off and you’re rolling the dice on your app reproducing someone else’s copyrighted work. Step 3: Pick Your Models Hit Next and Foundry asks which agents and models you want this guardrail on. Any model you’ve already deployed in your project shows up here. For me that’s gpt-6-astra and gpt-6-sol, so I ticked both. Step 4: Name It and Pick a Streaming Mode One more Next and you’re on the Review page. Give your guardrail a name (I went with NoGuardrails, because subtlety isn’t my thing) and pick a streaming mode. You’ve got two choices: Default: Foundry buffers the response and runs it through the guardrail before each chunk goes out. Nothing reaches the user until it’s been checked. Safest option, but you’ll feel a bit of lag when streaming. Asynchronous: Content streams back the moment it’s generated, with the filters running in the background. Much snappier, but flagged content might flash up briefly before the filter catches it, so your app has to clean up after the fact. Microsoft pitches this for low-latency stuff like internal dev tools, which is exactly my use case. Give the summary a quick once-over, then click Create. Done! Did It Work? Yep! With my shiny new guardrail in place, I fired off the exact same request, this time to GPT-6 Sol. And boom: no more content policy error. The model went straight to work scanning my footage and putting the video together. Wrapping Up Look, Microsoft’s default guardrails are a solid starting point, but they can be a bit trigger-happy when you’re doing perfectly legit stuff like video editing, creative work or internal tooling. Since you can’t touch the defaults, the trick is to roll your own: flip Block to Annotate where it makes sense, drag those content harm sliders down, pick the streaming mode that fits your app, and assign it to your deployments. That’s it! One friendly word of warning though: with great power comes great responsibility. Only loosen what you actually need, keep things like indirect prompt injection detection switched on for any agent that reads files or browses the web, and think twice before doing this on anything customer-facing. And if you want to go further than the portal lets you, like switching content filters off completely, you’ll need to apply to Microsoft for approval first. Happy building!99Views0likes0CommentsSet Up Plaud Note Pro with Microsoft Foundry
Prerequisites Riffado, up and running: follow the setup guide in the official Riffado repository to get it going with Docker Compose. A Microsoft Foundry (formerly Azure AI Foundry) resource, with the models you want deployed; in my case, whisper for transcription and o3-mini for summaries. A Plaud device, or any audio recordings you can import into Riffado. Once Riffado is up, head to the Settings page > Providers > Add Provider, and select Custom. This is where the Azure details will go. Why "OpenAI-compatible" isn’t one thing on Microsoft Foundry Azure AI Foundry exposes two different API surfaces on the same resource, and which one serves your model depends on the model: Surface Path shape Serves OpenAI-compatible? v1 route /openai/v1/… gpt-4o-transcribe, gpt-4o-mini-transcribe, chat models, embeddings Yes: Bearer auth, model in the body, no api-version needed Classic route /openai/deployments/{name}/… Whisper (and other legacy audio) No: deployment name lives in the URL, and ?api-version= is mandatory A generic OpenAI client (Riffado's included) can only speak the first dialect. It has nowhere to put a deployment name in the path and no way to append a query parameter. That single fact drives everything below. Part 1 - Transcription Whisper and the DeploymentNotFound mystery Symptom My very first transcription attempt in Riffado failed with 404 Resource not found. Off to a flying start. Configured provider: base URL https://<resource>.services.ai.azure.com, model whisper. Dead end #1: the missing path The first bug was mine: the base URL had no path. Riffado's OpenAI client appends /audio/transcriptions to whatever you give it, so requests were hitting https://<resource>…/audio/transcriptions, a path that doesn't exist on the resource at all. Fixing the base URL to end in /openai/v1 got us to a more interesting error: POST /openai/v1/audio/transcriptions · model=whisper {"error":{"code":"DeploymentNotFound","message":"The API deployment for this resource does not exist. If you created the deployment within the last 5 minutes, please wait a moment and try again."}} Dead end #2: catalog ≠ deployment Worth checking before anything else: selecting a model in the Foundry catalog is not deploying it. GET /openai/v1/models lists everything you could deploy; only Deployments → Deploy model creates an endpoint that answers. If you get DeploymentNotFound, first confirm a deployment actually exists (the listing below requires only the API key): enumerate real deployments (classic control-plane, key auth) curl -s -H "api-key: $KEY" \ "https://<resource>.openai.azure.com/openai/deployments?api-version=2023-03-15-preview" # → {"data":[{"id":"whisper","model":"whisper","status":"succeeded",…}]} The actual cause Here is the part that nearly drove me mad: the deployment existed and was succeeded, yet the v1 route still said DeploymentNotFound. Because Whisper deployments are not served on the v1 route at all. They only answer on the classic path. Verified side by side with the same tiny WAV file: Request Result POST /openai/v1/audio/transcriptions · model=whisper · Bearer 404 DeploymentNotFound POST /openai/deployments/whisper/audio/transcriptions?api-version=2024-06-01 · Bearer 200 {"text":"you"} Same classic path, without ?api-version= 404 Resource not found Three constraints, then: Whisper needs the classic path; the classic path needs api-version; Riffado can send neither. One piece of good news hiding in the table: the classic route accepts Authorization: Bearer, not just Azure's api-key header, so the shim doesn't have to touch auth at all. The fix: a Caddy shim Drop a stock caddy:2-alpine container into the Compose network. Riffado points at it as if it were OpenAI; the shim rewrites the path, injects api-version, and proxies to Azure. The Bearer header passes through untouched. azure-shim.Caddyfile { admin off auto_https off } :80 { @transcribe path /v1/audio/transcriptions /audio/transcriptions handle @transcribe { rewrite * /openai/deployments/whisper/audio/transcriptions?api-version=2024-06-01 reverse_proxy https://<resource>.services.ai.azure.com { header_up Host <resource>.services.ai.azure.com } } handle { respond "azure-shim ok" 200 } } docker-compose.yml (added service) azure-shim: image: caddy:2-alpine restart: unless-stopped volumes: - ./azure-shim.Caddyfile:/etc/caddy/Caddyfile:ro Riffado's provider settings become: Field Value Base URL http://azure-shim/v1 Model whisper (must equal the deployment name) API key the Azure resource key (forwarded as Bearer) Verified From inside the Riffado container: POST http://azure-shim/v1/audio/transcriptions → 200 {"text":"…"}. Transcription works end-to-end in the UI. Part 2 · Summaries & titles o3-mini and the empty answer Symptom The summary button showed "An unexpected error occurred." The container logs were more honest: riffado-app logs Error generating title: TypeError: undefined is not an object (evaluating 'C.choices[0]') Riffado calls chat/completions and reads choices[0] without checking whether the response was an error. So anything the API refuses becomes "an unexpected error." What was it refusing? Cause 1: reasoning models reject the classic knobs o3-mini belongs to Azure/OpenAI's o-series reasoning models, which hard-reject parameters every classic chat client sends. Riffado sends temperature: 0.7 and max_tokens: 50 for titles (0.5 / 2000 for summaries), and o3-mini answers: POST /openai/v1/chat/completions · model=o3-mini HTTP 400 {"error":{"message":"Unsupported parameter: 'max_tokens' is not supported with this model. Use 'max_completion_tokens' instead.", …}} # and with max_tokens fixed: HTTP 400 {"error":{"message":"Unsupported parameter: 'temperature' is not supported with this model.", …}} Cause 2: reasoning tokens starve the output Stripping the bad params gets you to 200, and then comes a subtler failure, my personal favourite of this whole saga. Reasoning models spend completion tokens on internal "thinking" before emitting a single visible character. Riffado's 50-token title budget is consumed entirely by reasoning, and the reply comes back syntactically valid and empty: max_completion_tokens reasoning_effort finish_reason content 50 not set length "" (all 50 spent reasoning) 2000 not set stop "Q3 Budget Planning Strategy Meeting" 2000 low stop same, less reasoning overhead The fix: a Node shim that rewrites the request body Caddy can rewrite paths but not JSON bodies, so this shim is ~60 lines of dependency-free Node on node:20-alpine. Per request it: converts max_tokens → max_completion_tokens, strips temperature / top_p / penalties, floors the token budget at 4000, sets reasoning_effort: "low", maps /v1/* → /openai/v1/*, and forwards to the Azure resource. o3-shim.js const http = require('http'); const https = require('https'); const UPSTREAM_HOST = '<resource>.services.ai.azure.com'; // Params o-series reasoning models reject on chat/completions. const STRIP = ['temperature','top_p','presence_penalty', 'frequency_penalty','logprobs','top_logprobs']; const server = http.createServer((req, res) => { const chunks = []; req.on('data', c => chunks.push(c)); req.on('end', () => { let body = Buffer.concat(chunks); // Riffado's base_url is http://o3-shim/v1 → map to Azure's /openai/v1 let path = req.url; if (path.startsWith('/v1/')) path = '/openai' + path; const ct = (req.headers['content-type'] || '').toLowerCase(); if (ct.includes('application/json') && body.length) { try { const j = JSON.parse(body.toString('utf8')); if (j && typeof j === 'object' && !Array.isArray(j)) { if ('max_tokens' in j) { if (!('max_completion_tokens' in j)) j.max_completion_tokens = j.max_tokens; delete j.max_tokens; } // Reasoning spends tokens before any visible output; small // budgets (Riffado sends 50 for titles) return empty strings. if (Array.isArray(j.messages)) { j.max_completion_tokens = Math.max(Number(j.max_completion_tokens) || 0, 4000); if (!('reasoning_effort' in j)) j.reasoning_effort = 'low'; } for (const k of STRIP) delete j[k]; body = Buffer.from(JSON.stringify(j)); } } catch (_) { /* not JSON - forward untouched */ } } const headers = { ...req.headers, host: UPSTREAM_HOST, 'content-length': Buffer.byteLength(body) }; const up = https.request( { host: UPSTREAM_HOST, port: 443, method: req.method, path, headers }, upRes => { res.writeHead(upRes.statusCode, upRes.headers); upRes.pipe(res); } ); up.on('error', e => { res.writeHead(502, {'content-type':'application/json'}); res.end(JSON.stringify({error:{message:'o3-shim upstream error: '+e.message}})); }); up.end(body); }); }); server.listen(80, () => console.log('o3-shim listening on :80')); docker-compose.yml (added service) o3-shim: image: node:20-alpine restart: unless-stopped working_dir: /app command: ["node", "/app/o3-shim.js"] volumes: - ./o3-shim.js:/app/o3-shim.js:ro Add a second provider in Riffado (base URL http://o3-shim/v1, model o3-mini, the resource's API key) and set it as the default enhancement provider (summaries/titles), keeping the Whisper one as default for transcription. Riffado's exact title request (temperature: 0.7, max_tokens: 50) through the shim → 200, finish_reason: stop, real title text. A full meeting-transcript summary returns structured key points and action items. The final shape Reading it left to right: Riffado never talks to Azure directly. Transcription requests pass through azure-shim, a stock Caddy container that rewrites each request onto Whisper's classic deployment path and injects the mandatory api-version parameter. Summary and title requests pass through o3-shim, a tiny Node server that rewrites the request body into the shape o3-mini accepts and floors the token budget so the model's internal reasoning cannot starve the actual answer. As far as Riffado is concerned, it is simply talking to two ordinary OpenAI providers. Both shims live on the Compose network only; nothing is exposed publicly. Riffado is unmodified. Verification checklist Each layer, testable in isolation. Run these before blaming the app: smoke tests # 1. Key + resource alive? (v1 models listing, Bearer auth) curl -s -H "Authorization: Bearer $KEY" \ https://<resource>.services.ai.azure.com/openai/v1/models | head -c 200 # 2. Whisper answers on the classic path? curl -s -H "Authorization: Bearer $KEY" -F file=@test.wav \ "https://<resource>.services.ai.azure.com/openai/deployments/whisper/audio/transcriptions?api-version=2024-06-01" # 3. Shim translates correctly? (from inside the compose network) docker exec riffado-app node -e "fetch('http://azure-shim/') .then(r=>r.text()).then(console.log)" # 4. o3-mini via shim, sending the params Riffado sends? # (temperature + max_tokens:50; the shim must absorb both) If you'd rather not run shims Both shims exist because of the specific models chosen. Pick models that live natively on the v1 route and Riffado connects directly, with base URL https://<resource>.services.ai.azure.com/openai/v1 and zero extra containers: Transcription: deploy gpt-4o-mini-transcribe (or gpt-4o-transcribe) instead of Whisper. Summaries: deploy a non-reasoning chat model such as gpt-4o-mini, which happily accepts temperature and max_tokens. The shim approach earns its keep when you're standardized on specific models (Whisper's transcription quality, o3-mini's reasoning), or when you want a control point to add logging, retries, or budget caps later. For reference, this is what the finished setup looks like on Riffado's side. Each shim is registered as a plain Custom provider. Here is the whisper provider pointing at azure-shim, with Use for transcription ticked: And once both are saved, they sit side by side in the providers list, whisper tagged for transcription and o3-mini tagged for enhancement: A quick look at the Foundry portal In the Microsoft Foundry portal, head over to Models > AI Services and you will find a pleasant surprise: fifteen AI service models already deployed and ready to use, covering the Azure Speech family (including Voice Live and Speech to Text), Azure Translator, Azure Language, and Content Understanding: You can of course deploy another model for this, but the pre-deployed ones are a handy cost-saving option. Click on the Azure Speech – Voice Live radio button and you will be shown the Base URL and API Key, which you can then paste into the provider settings on Riffado's Settings page. A quick note on cost: these services are not free. They are billed pay-as-you-go based on usage. Azure Speech transcription is charged per audio hour, and Voice Live pricing is tiered by the model you choose. The free tier does include a monthly allowance, though. Check the Azure Speech pricing page before committing. And if you would rather deploy a dedicated transcription model such as whisper, Foundry gives you the flexibility to do just that. Open the model page in the catalogue, click Deploy, and go with Default settings unless you need custom quotas or guardrails: Let's test the setup On your Plaud device, just tap to start recording. The little LED bars light up to show it is listening: Or skip the device entirely and upload an audio file straight into Riffado using the Upload Audio button. Either way, the recording lands on the Recordings page; hit Transcribe and let the spinner do its thing: As you can see below, whisper, the transcription model we deployed earlier, even managed to transcribe a recording in Malay without a hitch. My 3:32 test clip came back as 186 words of clean Malay, with the language correctly detected and tagged: I have also set o3-mini as the enhancement provider, and it enhanced the transcription with a proper summary, key points, and title as well! The Meeting Notes-style summary came straight out of o3-mini through the shim, with zero manual prompting. Wrapping up What started as a TikTok-fuelled impulse buy nearly killed off by subscription pricing ended up as a fully self-hosted pipeline: Plaud for recording, Riffado as the interface, and Microsoft Foundry serving whisper and o3-mini behind two tiny shims. The total extra infrastructure came to two containers and roughly sixty lines of code, and not a single monthly subscription in sight. If you try this setup and run into a failure mode I have not covered here, do share it in the comments. Half the fun is in the debugging.398Views0likes0CommentsStop Drawing Architecture Diagrams Manually: Meet the Open-Source AI Architecture Review Agents
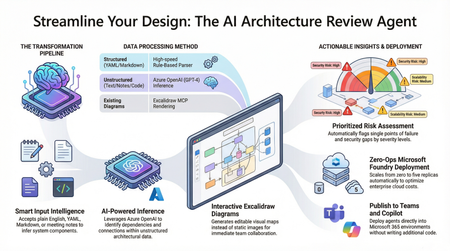
Designing and documenting software architecture is often a battle against static diagrams that become outdated the moment they are drawn. The Architecture Review Agent changes that by turning your design process into a dynamic, AI-powered workflow. In this post, we explore how to leverage Microsoft Foundry Hosted Agents, Azure OpenAI, and Excalidraw to build an open-source tool that instantly converts messy text descriptions, YAML, or README files into editable architecture diagrams. Beyond just drawing boxes, the agent acts as a technical co-pilot, delivering prioritized risk assessments, highlighting single points of failure, and mapping component dependencies. Discover how to eliminate manual diagramming, catch security flaws early, and deploy your own enterprise-grade agent with zero infrastructure overhead.18KViews7likes5CommentsPower Up Your Open WebUI with Azure AI Speech: Quick STT & TTS Integration
Introduction Ever found yourself wishing your web interface could really talk and listen back to you? With a few clicks (and a bit of code), you can turn your plain Open WebUI into a full-on voice assistant. In this post, you’ll see how to spin up an Azure Speech resource, hook it into your frontend, and watch as user speech transforms into text and your app’s responses leap off the screen in a human-like voice. By the end of this guide, you’ll have a voice-enabled web UI that actually converses with users, opening the door to hands-free controls, better accessibility, and a genuinely richer user experience. Ready to make your web app speak? Let’s dive in. Why Azure AI Speech? We use Azure AI Speech service in Open Web UI to enable voice interactions directly within web applications. This allows users to: Speak commands or input instead of typing, making the interface more accessible and user-friendly. Hear responses or information read aloud, which improves usability for people with visual impairments or those who prefer audio. Provide a more natural and hands-free experience especially on devices like smartphones or tablets. In short, integrating Azure AI Speech service into Open Web UI helps make web apps smarter, more interactive, and easier to use by adding speech recognition and voice output features. If you haven’t hosted Open WebUI already, follow my other step-by-step guide to host Ollama WebUI on Azure. Proceed to the next step if you have Open WebUI deployed already. Learn More about OpenWeb UI here. Deploy Azure AI Speech service in Azure. Navigate to the Azure Portal and search for Azure AI Speech on the Azure portal search bar. Create a new Speech Service by filling up the fields in the resource creation page. Click on “Create” to finalize the setup. After the resource has been deployed, click on “View resource” button and you should be redirected to the Azure AI Speech service page. The page should display the API Keys and Endpoints for Azure AI Speech services, which you can use in Open Web UI. Settings things up in Open Web UI Speech to Text settings (STT) Head to the Open Web UI Admin page > Settings > Audio. Paste the API Key obtained from the Azure AI Speech service page into the API key field below. Unless you use different Azure Region, or want to change the default configurations for the STT settings, leave all settings to blank. Text to Speech settings (TTS) Now, let's proceed with configuring the TTS Settings on OpenWeb UI by toggling the TTS Engine to Azure AI Speech option. Again, paste the API Key obtained from Azure AI Speech service page and leave all settings to blank. You can change the TTS Voice from the dropdown selection in the TTS settings as depicted in the image below: Click Save to reflect the change. Expected Result Now, let’s test if everything works well. Open a new chat / temporary chat on Open Web UI and click on the Call / Record button. The STT Engine (Azure AI Speech) should identify your voice and provide a response based on the voice input. To test the TTS feature, click on the Read Aloud (Speaker Icon) under any response from Open Web UI. The TTS Engine should reflect Azure AI Speech service! Conclusion And that’s a wrap! You’ve just given your Open WebUI the gift of capturing user speech, turning it into text, and then talking right back with Azure’s neural voices. Along the way you saw how easy it is to spin up a Speech resource in the Azure portal, wire up real-time transcription in the browser, and pipe responses through the TTS engine. From here, it’s all about experimentation. Try swapping in different neural voices or dialing in new languages. Tweak how you start and stop listening, play with silence detection, or add custom pronunciation tweaks for those tricky product names. Before you know it, your interface will feel less like a web page and more like a conversation partner.2.8KViews3likes2CommentsAI Agents in Production: From Prototype to Reality - Part 10
This blog post, the tenth and final installment in a series on AI agents, focuses on deploying AI agents to production. It covers evaluating agent performance, addressing common issues, and managing costs. The post emphasizes the importance of a robust evaluation system, providing potential solutions for performance issues, and outlining cost management strategies such as response caching, using smaller models, and implementing router models.1.8KViews3likes1CommentAI Agents: Planning and Orchestration with the Planning Design Pattern - Part 7
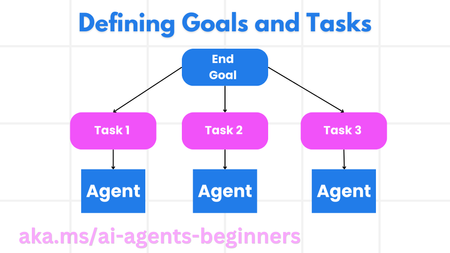
This blog post, Part 7 in a series on AI agents, focuses on the Planning Design Pattern for effective task orchestration. It explains how to define clear goals, decompose complex tasks into manageable subtasks, and leverage structured output (e.g., JSON) for seamless communication between agents. The post includes code snippets demonstrating how to create a planning agent, orchestrate multi-agent workflows, and implement iterative planning for dynamic adaptation. It also links to a practical example notebook (07-autogen.ipynb) and further resources like AutoGen Magnetic One, encouraging readers to explore advanced planning concepts. Links to the previous posts in the series are provided for easy access to foundational AI agent concepts.3KViews1like0CommentsUtilizando Slash commands en GitHub Copilot para Visual Studio
En este blog, demostraremos más información de los comandos de barra diagonal (slash commands). Como los llama Bruno Capuano en un video, "pequeños hechizos mágicos"; en otras palabras, al escribir una barra diagonal (/) en un símbolo del sistema de GitHub Copilot, se abre una opción en la que puede elegir algunos comandos que tendrán una acción predefinida. [Blog original en inglés creado por Laurent Bugnion y Bruno Capuano] Abriendo el menú de los comandos “Slash” Para abrir el menú de comandos de barra diagonal, puedes hacer clic en el botón Barra diagonal dentro de la ventana de chat de GitHub Copilot, como se muestra en la imagen inferior. Otra opción es simplemente escribir una barra diagonal en el área de GitHub Copilot Chat. Cualquiera de las dos acciones abrirá el menú que se ve así: Repasemos los comandos: doc: Este comando ayuda a crear un comentario de documentación relacionado con la selección determinada. Por ejemplo, si el cursor está dentro de un método, GitHub Copilot propondrá un comentario para este método. exp: Este comando comienza un nuevo hilo de conversación, con un contexto completamente nuevo. Después, puedes cambiar entre conversaciones desde un cuadro combinado en la parte superior de la ventana de chat. explain: Este comando explicará una parte del código. Si seleccionas un código, GitHub Copilot te explicará este código. También puedes utilizar el comando # para especificar un contexto diferente. fix: Este comando propondrá una corrección para el código seleccionado. generate: Este comando generará un código correspondiente a la pregunta que acabas de hacer. help: Este comando mostrará ayuda sobre GitHub Copilot. optimize: Este comando analizará el código en contexto y propondrá una optimización (en términos de rendimiento, líneas de código, etc.). tests: Este comando creará una prueba unitaria para el código seleccionado. Obtendremos más detalles sobre cada uno de estos comandos en futuras publicaciones. Más información Como siempre, puedes encontrar más información, en nuestra colección de Microsoft Learn. Mantente al tanto de este blog para obtener más contenido. Y, por supuesto, ¡también puedes suscribirte a nuestro canal de YouTube!335Views0likes0CommentsUtilizando un archivo en GitHub Copilot para Visual Studio
Cuando creas un nuevo proyecto desde cero en Visual Studio, algunos archivos se crean. Hay muchas plantillas disponibles, para muchos tipos de aplicaciones, desde aplicaciones simples hasta aplicaciones web complejas, así como aplicaciones móviles, sin servidor y muchas más. Todos estos proyectos constan de varios archivos. Tienes tus archivos de código, que contienen el software que se ejecutará, organizados en clases, frecuentemente cada clase en su propio archivo. Tienes los archivos de configuración, ya sea JSON, XML, YAML u otros. Incluso puedes tener archivos de datos, incrustados en la aplicación cuando está construida. En un video que se publicó, mi compañera Gwyn muestra cómo puedes usar el atajo Hash (#) para hacer referencia a otro archivo. [Este post es una traducción del blog original escrito en inglés por Laurent Bugnion y Gwyn Peña-Sigüenza] El contexto lo es todo Como mencionamos en varias ocasiones, lo que hace que una respuesta de GitHub Copilot sea buena comienza con un buen prompt. Sin embargo, el prompt no es solo pedirle al modelo de lenguaje que haga algo; también es necesario proporcionar contexto. En el mundo de la IA, nos referimos a esto como 'grounding' del modelo con datos, o Generación Aumentada por Recuperación (RAG). A través de su entrenamiento, Copilot tiene acceso a conocimientos generales sobre la plataforma que estás utilizando, así como a conocimientos específicos sobre bibliotecas y frameworks. Sin embargo, lo que falta es tu propio código privado, el código que el resto del mundo no ve. Por ejemplo, puedes informar a GitHub Copilot que otro archivo contiene una serie de métodos que la clase actual puede utilizar. En el ejemplo, Gwyn le indica a GitHub Copilot un archivo JSON que contiene datos para generar una prueba. Esto añade un contexto valioso, permitiendo que Copilot genere el código correcto de manera más rápida. Más información Como siempre, puedes encontrar muchos recursos educativos gratuitos en esta colección de Microsoft Learn. Y, por supuesto, la mejor manera de estar al día es suscribirse al canal de YouTube de Visual Studio, al Visual Studio DevBlog y, por supuesto, a este blog.257Views1like1Comment¿Cómo instalar GitHub Copilot en Visual Studio?
[Blog original en inglés] GitHub Copilot es un asistente de programación impulsado por Inteligencia Artificial (IA) que puede ejecutarse en varios entornos, ayudándote a ser más eficiente en tus tareas diarias de programación. En este blog, te mostraremos específicamente cómo funciona GitHub Copilot en Visual Studio y cómo puede aumentar tu productividad. Comprendiendo la diferencia entre GitHub Copilot y GitHub Copilot Chat: GitHub Copilot funciona directamente en tus archivos de código, proporcionando sugerencias para tu código. Funciona de manera similar a IntelliSense, pero es capaz de proponer bloques completos de código en base a lo que estás escribiendo. También proporciona acceso a comandos, puede explicar el código y ofrecer funciones adicionales directamente respecto a tus archivos. GitHub Copilot Chat funciona en una ventana independiente dentro del entorno de Visual Studio. Proporciona un asistente de chat que puede recordar el contexto de la conversación y ofrecer sugerencias inteligentes. Ambas extensiones se pueden instalar por separado. Te recomendamos probar ambas para que puedas elegir la que prefieras. En próximas oportunidades, te mostraremos más detalles sobre cada una de estas extensiones. Instalando las extensiones de GitHub Copilot Ambas extensiones se pueden instalar directamente desde Visual Studio, a través del menú Extensiones / Administrar extensiones. Desde allí, busca GitHub Copilot y GitHub Copilot Chat. También puedes dirigirte a Visual Studio Marketplace, que contiene una gran cantidad de extensiones para mejorar tu experiencia con Visual Studio. Ten en cuenta que GitHub Copilot requiere Visual Studio 2022 17.5.5 o posterior. Más información Para obtener más información, consulta nuestra colección de recursos aquí. Mantente al tanto de este blog para más contenido sobre Visual Studio. Y, por supuesto, ¡también puedes suscribirte a nuestro canal de YouTube para más contenido!715Views0likes0CommentsPrepare and get ready for AI-900 Certification
The Azure AI Fundamentals Training program is designed to provide a foundational understanding of artificial intelligence (AI) concepts and how AI services can be utilized on Azure. This training is ideal for individuals new to AI, aiming to build a solid understanding of AI concepts, practical applications, and the Responsible AI considerations involved. Throughout the program, participants will explore various AI services available on Azure. By the end of the program, attendees will be equipped with the knowledge to implement and manage AI solutions using Azure's tools and services The training program will run from 7th January, and we will have live sessions on YouTube and Discord from 8 - 9pm GMT+3 Earn a Certification Voucher Upon successful completion of the program, Kenyan participants will receive a certification voucher. By earning this certification, you'll be able to showcase your knowledge and skills to potential employers and colleagues, giving you a competitive edge in the job market. Key Program Takeaways Gain a foundational understanding of AI concepts and their applications. Explore Azure's AI services and tools. Learn how to implement practical AI solutions using Azure. Understand the responsible AI considerations and best practices for developing and deploying AI projects. Learner Checklist As a learner/participant, this is how you can participate in the program: Catch up and rewatch our previous AI sessions on Microsoft Reactor. Link: https://aka.ms/aifundamentalstraining-reactors Sign up and participate in the Microsoft Learn Challenge: https://aka.ms/aifundamentalstraining-csc - closing soon! Certification vouchers are up for grabs once you complete the challenge for all Kenyan participants. Once you sign up or complete the challenge, fill the form https://aka.ms/aifundamentalstraining-voucher to be eligible for a certification voucher. Join the Discord Community to interact with other learners: https://aka.ms/aifundamentalstraining-discord Sign up to the AINSI Skills Navigator to customize your learning journey at https://aka.ms/aifundamentalstraining-navigator Continue learning and exploring: https://aka.ms/aifundamentalstraining-collection Online Sessions Calendar The training program will run from 7th January, and we will have live sessions on YouTube and Discord from 8 - 9pm GMT+3 Week Topic Live Sessions Link Description 7 Jan Introduction to Artificial Intelligence and Azure AI Services YouTube Embark on a journey to explore the fundamentals of artificial intelligence (AI) with Azure. 9 Jan Microsoft Azure AI Fundamentals: Computer Vision YouTube Dive into the world of computer vision with Azure and discover how to harness the power of AI to analyze and interpret visual data. 14 Jan Microsoft Azure AI Fundamentals: Natural Language Processing YouTube Dive into the fascinating world of natural language processing (NLP) with Azure and learn how to build intelligent applications that can understand and interpret human language 16 Jan Generative AI pt 1 - Fundamentals of Generative AI YouTube Step into the world of generative AI with Azure and discover how to create new content such as text, images, music, and code using advanced AI models. 23 Jan Responsible generative AI YouTube Explore the principles and practices of responsible AI with Azure. 28 Jan Document Intelligence and Knowledge Mining YouTube Discover the power of Azure AI Search and learn how to build intelligent search solutions that can transform your data into actionable insights 29 Jan Generative AI pt 2 - Introduction to Azure AI Foundry YouTube Step into the world of generative AI with Azure and discover how to create new content such as text, images, music, and code using advanced AI models in Azure AI Foundry. 30 Jan Certification Readiness Session Discord Prepare to ace your Microsoft certification exams with this comprehensive walkthrough session. What are you waiting for? Rewatch and engage with live sessions https://aka.ms/aifundamentalstraining-reactors Join in and learn together with us! Remember, certification vouchers are up for grabs! Preparing for the AI-900 Certification can be a rewarding experience that opens up new opportunities in the field of AI and ML. By following the tips and utilizing the resources provided, you'll be well on your way to achieving your certification. Stay motivated, keep learning, and good luck on your journey to becoming AI-900 certified! All learning resources can be found at: MS Learn Collection: https://aka.ms/aifundamentalstraining-collection Enjoyed the session? Send us your feedback, the good, the bad and the ugly at: https://aka.ms/aifundamentalstraining-feedback5.2KViews4likes7Comments