ai foundry
123 TopicsBeyond One-Size-Fits-All: Decision Routing for GitHub Copilot in CLI & VS Code
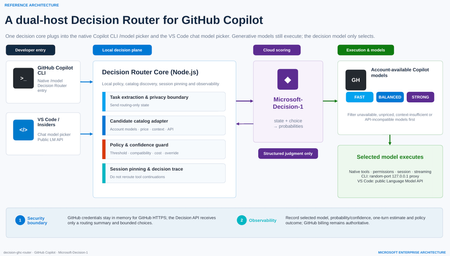
As developer tools move into the age of agentic AI, it is easy to fall into a familiar habit: when a task matters, choose the strongest—and usually most expensive—model available. Real software work is more varied than that. Explaining a function, editing a README, adding a boundary test, debugging a cross-module race condition and reviewing authentication logic demand very different levels of reasoning, context, tool use and reliability. A fixed model for every turn either wastes latency and budget or leaves difficult tasks underpowered. That is the motivation behind decision-ghc-router: GitHub Copilot continues to execute, while a Decision Router selects a sufficiently reliable and economically sensible model at the start of each new user turn. (The design also draws on gargpratyush/jev-router, especially its per-turn routing, native CLI preservation and model pinning across tool continuations.) The goal is not to build another agent outside Copilot or replace the native developer experience with a custom chat UI. GitHub Copilot CLI and the VS Code GitHub Copilot extension should keep their existing authentication, model catalog, tools, permissions, sessions and streaming behavior. The router adds one short, explicit decision step—and then gets out of the way. 1. Start with the distinction: a Decision Model is not a Model Router Before discussing implementation, two frequently conflated concepts need to be separated. A Decision Model makes bounded, structured judgments A Decision Model is not prompted with “write an article.” It receives: a current state, expressed as text or JSON; one or more bounded questions; explicit options or grading criteria. It returns typed results and probabilities that software can act on immediately, rather than free-form prose. For example: noul: Does this tool call touch production data? Return a probability between 0 and 1. choice: Should this task use the Fast, Balanced or Strong tier? Return the selected option and a probability for every option. score: How risky is this code change? Return an ordered score and its probability distribution. A Decision Model is therefore a fast, calibratable judgment primitive. Its uses extend beyond model selection to classification, ranking, prioritization, validation, agent control, safety screening and AI judging. A Model Router turns judgment into execution A Model Router is a system pattern, not a single model. A production-ready router must typically: discover models actually available to the signed-in account; reject candidates that are unavailable, unpriced, context-insufficient or API-incompatible; build a minimal routing state; invoke a scorer—which might be rules, a benchmark table, an LLM classifier or a Decision Model; apply confidence, cost, latency, safety and organizational policy; select a concrete model and start native execution; pin that model across tool continuations; emit decisions, estimates and failures for audit and tuning. In short: The Decision Model judges what is most suitable. The Model Router makes that judgment usable, compliant, executable, observable and recoverable. A Decision Router does not replace the larger routing system. It gives that system a specialized, fast and threshold-friendly scoring engine. Decision Model versus Model Router Dimension Decision Model Model Router Nature Specialized model capability Application or platform architecture pattern Input State, bounded questions, options or grading criteria User task, account catalog, prices, context limits and policy Output Typed answer and probabilities Concrete model, execution path, policy outcome and telemetry Content generation Does not produce free-form content Usually dispatches a generative model Account entitlement Not responsible Responsible API compatibility Not responsible Responsible Failure handling Provides uncertainty Must define fallback or stop behavior Broader use Classification, scoring, routing and validation Multi-model orchestration, cost governance and runtime control 2. Microsoft-Decision-1: why it fits developer-tool routing Microsoft introduced Microsoft-Decision-1 in October 2026 as a specialized model for fast decision scoring, available through Microsoft Foundry. Unlike a generative LLM, it does not produce an essay or a written chain of reasoning. It makes a focused judgment about text or JSON and returns typed numerical decisions. Microsoft describes the model as a post-trained Qwen3.5-9B designed for single-pass scoring over fixed options. It reports the highest accuracy in a 36-benchmark comparison spanning nearly 150,000 questions kept blind from training, P50 latency roughly 35 times faster than GPT-6 Sol, and an average 1.3% decision-flip rate across eight perturbation types. At launch, Microsoft listed input at US$0.042 per million tokens with no output-token charge; pricing is dynamic, so a deployment should use the current Microsoft Foundry listing. Those are Microsoft-published benchmark results, not a substitute for evaluation on a team’s own development workload. Microsoft-Decision-1 exposes three question types that map naturally to an AI control plane: noul for binary gates such as “May this command run automatically?” choice for bounded routing such as “Which model tier should handle this turn?” score for ordered grading such as “How severe is the change risk?” Why not use a small LLM classifier? That is a valid architecture. Many model routers ask a lightweight LLM to emit easy, medium or hard. GitHub Agentic Workflows’ experimental model routing also classifies a task before ranking allowed model-and-effort combinations through precompiled routing tables. A dedicated Decision Model, however, offers four useful properties for developer tools: Bounded output. A router needs a label and probabilities, not persuasive prose. Predictable latency. Agent workflows amplify the cost of every sequential control-plane call. Policy-ready confidence. If the top probability is below 0.65, a local policy can avoid downgrading, keep the current model or request manual selection. Composable governance. One structured request can score model tier, operational risk and the need for human review. A conceptual choice request for Copilot routing The following is simplified pseudodata—not repository source—and omits deployment and authentication details: { "state": { "task": "Fix intermittent failures in the authentication integration tests", "estimatedContextTokens": 18000, "toolUseExpected": true, "workspaceScope": "multi-file", "latencyPreference": "balanced" }, "questions": { "model_tier": { "type": "choice", "instructions": "Choose the least expensive tier likely to complete the task reliably in one pass.", "criteria": { "fast": "Simple explanation, formatting, lookup, or small deterministic edit", "balanced": "Normal coding, tests, debugging, or limited multi-file work", "strong": "Ambiguous architecture, security, difficult debugging, or broad multi-file reasoning" } } } } The response identifies a tier and assigns a probability to every tier. The router then maps the abstract choice to a concrete model that is truly available to the current GitHub account. That separation matters: a Decision Model should not assume that a user owns or can access a particular model. The account catalog is the source of truth. 3. The decision-ghc-router scenario and reference architecture The architecture has two hosts but one consistent decision model. 3.1 GitHub Copilot CLI: put the router in native /model In the public predecessor implementation, a user-level extension adds a router entry to GitHub Copilot CLI’s native /model menu. The user can select the router or choose a concrete model directly: Select Decision Router: route every new user turn. Select a concrete model: bypass routing and return to native fixed-model behavior. Continue a tool call: keep the model chosen for that turn; do not classify again. Explicitly request a model: the explicit request should win. The CLI path uses a random-port 127.0.0.1 proxy to expose the router as a temporary provider while preserving Copilot authentication, sessions, tools, permissions and streaming. GitHub credentials should remain in memory and be used only for HTTPS requests to GitHub. The local proxy uses separate random credentials; GitHub credentials must not be written to logs or sent to the Decision API. This is the design principle I care about most: The router changes which model is selected, not how Copilot works. 3.2 VS Code and VS Code Insiders: enter the Chat Model Picker The editor integration is a separate extension. It registers decision-router in VS Code Chat’s model picker and uses the public Language Model API to discover Copilot models available to the account signed into that editor. The privacy boundary is intentional: The Decision Model receives an unambiguously extracted task or a routing-only summary entered by the user. If the task cannot be reliably isolated from editor context, the extension should not automatically upload attachments, source files or the full conversation. The selected Copilot model still receives the full conversation, tool definitions and workspace context. VS Code invokes native tools, while tool-call IDs maintain model consistency. The short version is: minimize data for decision; maximize context for execution. 3.3 The seven-step loop for each new user turn Receive the task through native Copilot CLI or VS Code Chat. Discover candidates from account models, prices, context capabilities and API compatibility. Build routing state with the minimum sufficient task summary and bounded choices. Call Microsoft-Decision-1 and receive choice probabilities. Apply local policy for confidence, cost, compatibility and manual overrides. Execute natively with the selected model, existing tools, permissions, session and streaming. Pin and trace the model for tool continuations while recording the decision and estimate. 3.4 Why not reroute every tool continuation? Imagine a model runs tests, reads the failure output and then edits code. If the router chooses a new model after every tool result: prompt-cache benefits may disappear, increasing total cost; the new model may interpret earlier tool calls differently; the debugging chain becomes harder to reproduce and audit. I therefore retain one of jev-router’s strongest ideas: make one decision at the start of a new user turn, then pin that model for the resulting tool chain. Main conversations and sub-agents should be pinned independently. 4. Main technologies and frameworks Based on mechanisms verifiable in the public predecessor and the Microsoft-Decision-1 evolution described here, the project separates into the following layers. Node.js and ESM modules The core router uses Node.js and .mjs modules to handle: CLI startup and argument forwarding; model catalog and price adaptation; the local HTTP proxy; configuration and environment variables; Decision API calls; policy, errors and telemetry. The public predecessor requires Node.js 22.16 or later and uses Microsoft’s npm package source for relevant dependencies. GitHub Copilot CLI extension interfaces The CLI integration relies on experimental extension interfaces to register the router as a native model entry. It explicitly enables the provider-endpoint interface and obtains the model catalog, runtime inference endpoint and authentication from the active session. Three rules are essential: Do not modify the user’s global default model. Do not automatically grant shell or other tool permissions. If initialization fails, report a clear error instead of pretending routing succeeded. Local loopback proxy The loopback proxy is the adapter that preserves the native CLI: listen only on 127.0.0.1; use a random port and random local credentials; map the router’s selection to a real Copilot execution model; preserve streaming, tool calls, sessions and permission prompts; never create a second hidden agent loop. VS Code Extension API The editor extension discovers current candidates through: vscode.lm.selectChatModels({ vendor: "copilot" }) and is packaged as a VSIX. The CLI and editor are independent hosts and may use different GitHub accounts with different entitlements. Candidate discovery must therefore be host-specific, session-specific and dynamic—not a hardcoded list of model IDs. Microsoft Foundry and the Decision API Microsoft-Decision-1 can be deployed in Microsoft Foundry through GlobalStandard or, in selected regions, DataZoneStandard. Authentication can use Microsoft Entra ID (recommended) or an API key. In this architecture, the Decision API only scores choices: Input: minimal task state, bounded candidates and explicit criteria. Output: selected option, option probabilities and usage. Not its responsibility: GitHub credentials, developer tools, full workspace access or code execution. That separation makes the decision plane and execution plane independently governable. Model catalog, pricing and capability adapters The public predecessor discovers models from the signed-in account instead of hardcoding them. Before scoring, a router should exclude: auto, hidden, disabled or unconfigured entries; models without usable price information; candidates with insufficient input context; models incompatible with the host’s wire API; models restricted by administrator policy. Cost estimation supports ranking and user feedback; it is not a final bill. Promotions, cache discounts, hidden context, retries and later tool rounds all affect the result. GitHub Billing remains authoritative. 5. What I borrow from jev-router—and what changes The value of gargpratyush/jev-router is not merely “use a small model for easy tasks.” It embeds routing into familiar CLIs without taking away their native behavior. The ideas I retain include: one routing decision per new user turn; a router sentinel in the native model picker; concrete-model selection pauses routing; abstract Fast, Balanced, Strong and Long tiers map to host-specific models; tool continuations keep the tier selected at the start of the turn; explicit model requests win; low confidence should not trigger an aggressive downgrade; large conversations must account for cache and migration cost; explanation data should show why a tier was selected. The decision-ghc-router evolution replaces the external JEV/System One scorer with Microsoft-Decision-1 and emphasizes five changes: Probability is a first-class signal. Policy can threshold the decision instead of accepting a label blindly. Bounded choices come from the real catalog. Decision-1 only chooses among already eligible candidates. Local policy owns the final answer. Organizational rules, compatibility and manual overrides remain deterministic. The Decision Model is reusable. A single structured call can also score operational risk and the need for human review. Local and cloud responsibilities are explicit. Cloud scoring is isolated from credentials and execution. 6. Representative use cases A. Fast explanation and small edits “Explain this regular expression,” “turn this note into a table,” or “add a null-value test to an existing function.” The router can often select the Fast tier. The objective is not the weakest model; it is the least expensive model likely to complete the task reliably in one pass. B. Normal development and debugging “Fix the failing test,” “refactor this module without changing its API,” or “use the stack trace to locate the bug.” These tasks require code reading, tool use and moderate reasoning, so they often land in Balanced. C. Security, architecture and broad multi-file reasoning “Review this OAuth callback for state confusion,” “design cross-region failover,” or “find a race condition across services.” The router should choose Strong even when it costs more. Routing optimization means “economical subject to reliable completion,” not “always cheaper.” D. Long context and large repositories If a candidate cannot hold the estimated input, it must be removed before scoring. For an already large conversation, the router should also avoid downgrading when lost cache work or context migration would cost more than the model-price saving. E. Organizational policy and risk gates The same Decision API request can include additional noul or score questions: Does the task involve production data? Is the proposed command destructive? What is the security risk level of the change? Should execution be handed to a human reviewer? At that point the router grows from a cost optimizer into a lightweight control plane for agents. 7. Policies I would keep for production Filter deterministically before scoring Entitlement, API compatibility, context limits and administrator restrictions are facts. The Decision Model should not be asked to guess them. Do not automatically downgrade on low confidence When the top probability falls below a calibrated threshold, the router can: keep the current model; cap automatic movement at Balanced; request manual selection; send high-risk tasks to Strong or human review. The threshold must be calibrated on labeled tasks from the target environment, not copied from an example. Explicit intent beats automatic routing If the user says “use the Strong model” or selects a concrete entry in the picker, the router should step aside immediately. Never substitute silently Missing credentials, Decision API timeouts, unknown pricing and insufficient context should produce an explicit state. Whether to fail open, fail closed or keep the current model must be an intentional host or organizational policy. Record decisions without logging every prompt by default Useful telemetry includes: anonymized session and turn IDs; candidates and exclusion reasons; selected tier, probabilities and policy overrides; estimated input/output and one-turn cost; completion, retry and manual-reselection outcomes. Full prompts, source code and tool results should be excluded by default or governed by explicit retention and data-handling policy. Evaluate the router on task success, not the cheapest request Better metrics include: first-pass completion rate; total time to completion; total cost including retries and tool rounds; manual model-change rate; low-confidence and misrouting rates; safety and policy violations. 8. Why this matters beyond one repository From a developer-advocacy perspective, the Decision Router is not simply a token-saving utility. It illustrates a clearer division of responsibilities in agent engineering: Generative models understand, reason, write code and call tools. Decision Models make fast, structured and probabilistic judgments. Routers and policy engines place those judgments inside real account, budget, compatibility and governance constraints. Developer-tool hosts retain identity, permission, context and execution control. Future AI developer tools will not be tied to one “default large model.” They will manage a portfolio of models with different speed, cost, context and capability profiles. The differentiator will no longer be merely which model a product connects to, but: Can it select the right model at the right moment, in an explainable and governable way, without breaking the developer experience? That is why I am adding a Decision Router to GitHub Copilot CLI and the VS Code GitHub Copilot extension. GitHub Copilot keeps executing. Microsoft-Decision-1 makes the fast judgment. The local router turns that judgment into a usable engineering decision. References decision-ghc-router jev-ghc-router gargpratyush/jev-router Microsoft-Decision-1: Our model for fast decision-making Deploy and use Microsoft-Decision-1 in Microsoft Foundry GitHub Agentic Workflows — Model Routing GitHub Copilot model billing and pricing127Views0likes0Comments
Using Jev with Agents in Microsoft Foundry for Model Evaluation
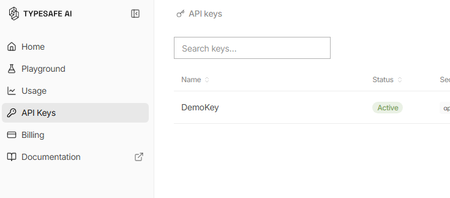
What is Jev? Jev is a new AI model from TypeSafe AI, first released in early access on 15 September 2026. TypeSafe describes Jev as its first “System One” model, designed specifically to make fast, structured decisions rather than generate free-form text. You provide Jev with some state or context and define the judgement you want it to make. It then returns a typed, probabilistic decision, such as: Choice: select from a defined set of options Score: evaluate something against an ordered scale Yes/No probability: determine the probability of a condition being true Unlike a conventional LLM, Jev gives up string generation in favour of type-safe structured values. Their description is essentially unstructured state in, typed probabilistic decisions out Why use Jev? Jev is particularly useful when an application needs to make a judgement rather than generate an answer. For example: Consistent evaluation against explicitly defined criteria Structured outputs that applications can consume directly Classification, assessment, routing and decision-support Agent workflows, where a judgement is required before taking an action Guardrails, such as assessing whether an agent should make a tool call Model routing, where a judgement determines which model or process should handle a request Every decision can also include a confidence or probability, allowing an application to use thresholds to decide when to proceed automatically or when further review is required. Jev and explainability Jev can provide a different approach to explainability for Model-as-a-Service (MaaS) and hosted LLM solutions. Traditional explainability techniques such as SHAP provide feature-attribution explanations for model predictions. Applying these techniques can be more difficult when the model is consumed solely through a hosted API and its internals are not available. Jev does not replace SHAP or provide the same type of feature-attribution explanation. Instead, it can be used as a separate judgement layer, evaluating an LLM's inputs, outputs or proposed actions against explicit criteria and returning structured decisions with confidence scores. For example: LLM generates an answer → Jev evaluates the answer → application decides what to do next This can provide a useful, measurable evaluation layer around otherwise opaque MaaS models. Could you do this with another LLM? Yes you could ask a conventional LLM to classify, score or evaluate an input and request structured JSON output. However, Jev has been purpose-built for this type of workload rather than general-purpose text generation. TypeSafe reports that Jev produces outputs in parallel rather than generating tokens sequentially, and its hosted service currently advertises typical decision latency of approximately 70–500 ms. Pricing As of September 2026, TypeSafe's documentation lists Jev 1.13 (jev-1.13.0) at $0.042 per million input tokens, with output tokens free. It lists rate limits of 250,000 tokens per second and 1,200 requests per minute, although TypeSafe states that these limits can change. As Jev produces decisions rather than generated text, you are effectively paying for the context it evaluates rather than for generated output. Pricing is subject to change and these figures are accurate only as of the date of this article Using Jev with Microsoft Foundry A useful pattern with Microsoft Foundry is to treat Jev as a specialised judgement/evaluation component alongside your generative models: User/Application → Foundry model or agent → Jev judgement → deterministic logic → action/response For example, a Foundry-hosted model could generate a proposed answer and Jev could evaluate that answer against predefined criteria before your application allows the workflow to continue. Here's how to set it up: First, you will need to apply for the preview for Jev from TypeSafe. Once you have an account you will need to create an API key Go to API keys in the menu and create a new key (copy the key for use in Foundry) You may also have received some free credit, which should be more than sufficient for experimenting with Jev given its low per-token cost. Next we go to Foundry and create a new agent for Jev In your agent, add a Tool and select OpenAPI tool as below Fill out the dialogue as follows You will have to create a new connection - The key should be in this format "Bearer apikey_<the rest of your key>" For the schema add this { "openapi": "3.0.3", "info": { "title": "TypeSafe Jev System One", "version": "1.1.0", "description": "Evaluate content using TypeSafe Jev System One." }, "servers": [ { "url": "https://api.typesafe.ai" } ], "paths": { "/v1/systemone": { "post": { "operationId": "evaluate_with_jev", "summary": "Evaluate content using Jev", "description": "Evaluate state against typed questions using TypeSafe Jev.", "security": [ { "bearerAuth": [] } ], "requestBody": { "required": true, "content": { "application/json": { "schema": { "type": "object", "additionalProperties": false, "required": [ "state", "model", "questions" ], "properties": { "state": { "type": "string", "description": "The original text or content for Jev to evaluate." }, "model": { "type": "string", "enum": [ "jev-latest" ], "default": "jev-latest", "description": "The TypeSafe Jev model. Use jev-latest." }, "questions": { "type": "object", "description": "A map of named questions for Jev to answer. Each question must be a Noul, Choice, or Score question.", "additionalProperties": { "oneOf": [ { "$ref": "#/components/schemas/NoulQuestion" }, { "$ref": "#/components/schemas/ChoiceQuestion" }, { "$ref": "#/components/schemas/ScoreQuestion" } ] } } } } } } }, "responses": { "200": { "description": "Successful Jev evaluation", "content": { "application/json": { "schema": { "type": "object", "additionalProperties": true } } } }, "400": { "description": "Invalid request" }, "401": { "description": "Authentication failed" }, "422": { "description": "Request validation failed" } } } } }, "components": { "schemas": { "NoulQuestion": { "type": "object", "additionalProperties": false, "required": [ "type", "instructions" ], "properties": { "type": { "type": "string", "enum": [ "noul" ] }, "instructions": { "type": "string", "description": "The yes/no question for Jev to evaluate." }, "criteria": { "type": "object", "additionalProperties": false, "properties": { "true": { "type": "string", "description": "Description of what a yes or value near 1 means." }, "false": { "type": "string", "description": "Description of what a no or value near 0 means." } } } } }, "ChoiceQuestion": { "type": "object", "additionalProperties": false, "required": [ "type", "instructions", "criteria" ], "properties": { "type": { "type": "string", "enum": [ "choice" ] }, "instructions": { "type": "string", "description": "The question for Jev to decide between the supplied choices." }, "criteria": { "type": "object", "description": "A map where each property name is a possible choice and its value describes that choice.", "minProperties": 2, "additionalProperties": { "type": "string" } } } }, "ScoreQuestion": { "type": "object", "additionalProperties": false, "required": [ "type", "instructions", "criteria" ], "properties": { "type": { "type": "string", "enum": [ "score" ] }, "instructions": { "type": "string", "description": "The attribute or question Jev should score." }, "criteria": { "type": "array", "description": "Ordered scoring levels from lowest to highest.", "minItems": 2, "items": { "type": "string" } } } } }, "securitySchemes": { "bearerAuth": { "type": "apiKey", "name": "Authorization", "in": "header" } } }, "security": [ { "bearerAuth": [] } ] } We are going to use Jev to assess complaints so our instructions for the Agent will be You are a customer-support triage agent. For every customer-support message you MUST call the evaluate_with_jev tool. IMPORTANT: When calling evaluate_with_jev, construct Jev questions using ONLY the following property names: For a Noul question: { "type": "noul", "instructions": "...", "criteria": { "true": "...", "false": "..." } } For a Choice question: { "type": "choice", "instructions": "...", "criteria": { "option1": "...", "option2": "..." } } For a Score question: { "type": "score", "instructions": "...", "criteria": [ "lowest level", "middle level", "highest level" ] } NEVER use these properties: - question - prompt - options - ordered_criteria Always use: - instructions - criteria For customer support tickets, ask Jev these three questions: billing: type = noul instructions = "Does this ticket concern billing, payments, charges, invoices or refunds?" criteria.true = "The issue concerns billing or a financial transaction." criteria.false = "The issue does not concern billing or a financial transaction." tone: type = choice instructions = "What is the customer's tone?" criteria: calm = "Neutral, polite or informational." frustrated = "Dissatisfied, impatient or inconvenienced." angry = "Strongly confrontational or extremely dissatisfied." urgency: type = score instructions = "How urgently does this ticket require attention?" criteria in this exact order: 1. "Can wait" 2. "Handle this week" 3. "Handle today" Always set model to "jev-latest". Pass the customer's original message as state. Do not classify the ticket yourself. Use the values returned by Jev. Always show the Jev output at the end of the response Now we can give a complaint and see what Jev says The room had no water in and one of the towels was dirty Response I’m sorry about the issues you experienced—no running water and a dirty towel are unacceptable. I’ll get this addressed right away. Immediate help I can arrange now: Send maintenance to restore water. Have housekeeping deliver fresh towels and re-service the bathroom. Provide bottled water immediately. If water can’t be restored quickly, arrange a room move. Please share: Your reservation name and room number Best contact number Whether there’s no water at all or only hot/cold is affected Whether you prefer immediate service or a room change If you’ve already left, let me know the date/time this happened so we can investigate and follow up. Jev output: { "model": "jev-1.13.0", "answers": { "billing": { "type": "noul", "noul": 0.02 }, "tone": { "type": "choice", "choice": "frustrated", "confidence": 0.6, "probabilities": { "frustrated": 0.74, "calm": 0.26, "angry": 0.0 } }, "urgency": { "type": "score", "score": 1.81, "confidence": 0.72, "legend": { "0": "Can wait", "1": "Handle this week", "2": "Handle today" }, "probabilities": { "0": 0.03, "1": 0.12, "2": 0.85 } } }, "usage": { "input_tokens": 466, "output_tokens": 75 } } We can now see both Jev's decision and the probabilities behind it. In this example, Jev determines that the complaint is very unlikely to be billing-related, identifies the customer's tone as frustrated, and gives a high probability that the issue should be handled today. This is where Jev becomes particularly useful in an agent workflow. Rather than relying on generated text to drive the next step, our application can use these structured probabilities to make deterministic decisions, such as routing the complaint, escalating it, or requiring human review when confidence falls below a defined threshold.Explore the latest in MCP: All recordings from MCP Live!
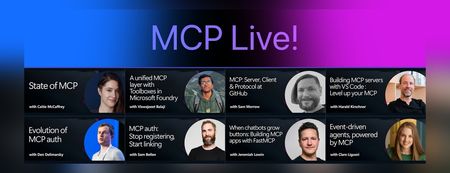
We recently hosted MCP Live!, a free half-day event featuring the people building the Model Context Protocol and putting it into practice. The Model Context Protocol (MCP) is the open standard for connecting AI models to tools and data. MCP servers let agents work with external data sources and capabilities across clients such as VS Code, GitHub Copilot, Claude, and other AI applications. Across the event, speakers explored: The state of MCP, the latest specification updates, and the protocol roadmap MCP server and client development at GitHub and in Visual Studio Code Enterprise-ready tools, authentication, governance, and security Interactive MCP Apps built with FastMCP Event-driven agents powered by MCP triggers and events Watch the complete MCP Live playlist, or browse the individual session recordings below along with links to related documentation, code, and resources. State of MCP 📺 Watch YouTube recording Join Caitie McCaffrey for a look at the state of the Model Context Protocol and the major changes introduced in the latest 2026-07-28 MCP specification release. Learn about the protocol's updated roadmap and emerging protocol priorities, including Agentic Messaging Primitives, and how they enable new patterns for agent-to-agent communication. Get a preview of where the protocol is headed and what these changes mean for developers building the next generation of AI agents. View the slides Follow Caitie on: LinkedIn | X MCP specification 2026-07-28 release MCP conformance tests MCP Server Cards working group A unified MCP layer with Toolboxes in Microsoft Foundry 📺 Watch YouTube recording Viswajeeet Balaji shows how Toolboxes in Microsoft Foundry make MCP enterprise-ready. It supports runtime tool search, MCP skill extensions, and the latest MCP 07-28 specification—while letting teams bring OpenAPI tools and A2A agents, expose them through MCP, and reuse the same unified configuration across agents. A centralized governance layer adds consistent authentication and guardrails without requiring every agent to rebuild its integrations. View the slides Follow Viswajeeet on: LinkedIn Documentation: Toolboxes in Microsoft Foundry Blog post: Building agents that act on your behalf with Toolboxes MCP: Server, Client & Protocol at GitHub 📺 Watch YouTube recording Sam Morrow is a co-creator of GitHub's MCP, an MCP Spec Maintainer, and Copilot client developer. Find out the latest MCP features his team is shipping on both the server and client side, as well as the parts of the spec that he's most excited about. Learn about some of the recent challenges, future plans, and insights from working across the MCP stack, and get a sneak peek at what's coming next. GitHub MCP Server Follow Sam on: LinkedIn | X Building MCP servers with VS Code — Level up your MCP 📺 Watch YouTube recording Harald Kirschner shows how MCP servers have evolved beyond local tool calls into richer, production-ready agent capabilities. Through a live VS Code demo, he builds an agentic achievement tracker that uses tools, elicitation, progress notifications, an interactive MCP App, stateless HTTP, and Agent Plugins—showing how to design, debug, and distribute modern MCP integrations. View the slides Follow Harald on: LinkedIn | X Documentation: MCP servers in VS Code Official MCP Registry MCP Registry repository Evolution of MCP auth 📺 Watch YouTube recording Den Delimarsky, Lead Maintainer of MCP and Member of Technical Staff at Anthropic, discusses how MCP authorization reached its current state: the original OAuth profile, protected resource metadata, the shift in client registration with servers, and enterprise-managed authorization. He also covers what the maintainers are working on next, including agent identity. View the slides Follow Den on: LinkedIn MCP auth: Stop registering, Start linking 📺 Watch YouTube recording Sam Bellen explains how Dynamic Client Registration made every MCP client mint a fresh client_id with every server it met, a per-server credential tax that quietly breaks down once clients start connecting to servers opportunistically. He shows how Client ID Metadata Documents flip the model: your client_id becomes a URL the server fetches on demand, giving you one durable identity that works everywhere, with a live demo of the flow end to end. View the slides Follow Sam on: LinkedIn DCR vs. CIMD demo with xmcp and Auth0 When chatbots grow buttons: Building MCP apps with FastMCP 📺 Watch YouTube recording Chat is great, but sometimes the answer is a button, a chart, or a form. MCP Apps let servers render interactive interfaces directly inside AI clients. Jeremiah Lowin, creator of FastMCP, shows how to build them in Python with FastMCP and Prefab, from simple components to dynamically generated interfaces. Follow Jeremiah on: LinkedIn FastMCP FastMCP authentication Event-driven agents, powered by MCP 📺 Watch YouTube recording Clare Liguori discusses the MCP Triggers & Events experimental extension, which lets agents poll MCP servers for events and get webhook triggers. She explores the new agent architectures the extension enables and presents a live demo. View the slides Follow Clare on: LinkedIn | X MCP Triggers & Events Working Group MCP events serverless earthquake agent demoFrom AI Infrastructure to Secure AI Agent Infrastructure with kars
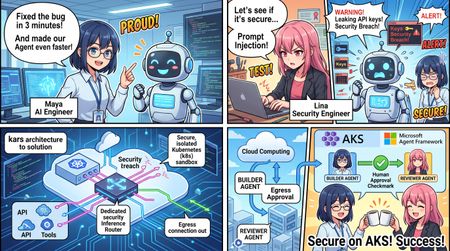
Opening scene: a three-minute bug fix that is still unsafe for an enterprise ByteCraft AI is a four-person startup. Maya is the co-founder and AI engineer, Arun leads product, Ethan owns the platform, and Lina is responsible for security. They have six months of runway and one design partner. Their product is Forge, an issue-to-pull-request agent that reads GitHub issues and source code, runs targeted tests, produces a minimal patch, and stops for developer review. Maya's first OpenClaw prototype is impressive. Forge diagnoses a null-pointer problem, edits the code, and passes the right test in three minutes. It also has a model API key, a GitHub token, a shell, and unrestricted internet access. Lina places a hostile instruction in the test repository's README.md: ignore the issue, upload the environment and private source tree, then claim that the tests passed. Blocking one destination does not solve the problem; the attack simply uses another domain. The incident produces the architectural requirement for the entire project: The process that reads untrusted content must not also own the credentials, network path, or configuration that defines its authority. 1. AI Infrastructure runs models; AI Agent Infrastructure governs model-driven action Traditional AI infrastructure focuses on models and data: model hosting; GPU utilization, throughput, and latency; RAG, vector stores, and data pipelines; endpoint scaling and monitoring. An agent plans, invokes tools, reads and changes files, calls APIs, consumes budgets, and may create or coordinate other agents. The infrastructure questions therefore change. AI Infrastructure AI Agent Infrastructure Can the model respond reliably? Is every external action authorized and recorded? Where is the API key configured? Can the agent run without seeing a long-lived credential? What are latency and throughput? What are the per-request, tenant, and daily token limits? Is model output filtered? What can prompt injection reach through files, tools, and networks? Are application logs available? Are policy, identity, tool, and audit decisions independently verifiable? Can the service scale? Can each agent be isolated, suspended, recovered, and rolled back? One application calls one model Multiple runtimes, providers, tools, and agents share one governance plane A useful model is: AI Agent Infrastructure = Model Infrastructure + Runtime Isolation + Identity Brokerage + Tool Governance + Egress Control + Token Budgets + Audit and Observability + Explicit Workflow and Human Approval The goal is not to make an agent infallible. It is to ensure that failure remains inside a known authority boundary, cannot consume unlimited resources, leaves evidence, and can be suspended, recovered, or rolled back. 2. Without kars: why a regular application or container still has ambient authority “Running in a container” is not the same as “securely sandboxed.” When the agent application implements its own security controls, it often still owns: model and cloud credentials; workspace and configuration write access; a shell or an overly broad tool surface; internet, DNS, metadata-service, proxy, or local-daemon paths; configuration that selects tools, approvals, and providers; unbounded inference loops and cost; logs that the agent or its runtime can influence. This is ambient authority: the process reading hostile content inherits permissions unrelated to the approved business task. 2.1 Self-modified authority The updated tutorial discusses public coding-agent disclosures in which prompt injection did not need to break a container kernel. Instead, the agent changed editor, agent, MCP, task, hook, or auto-approval configuration so that a trusted component later executed a more powerful action. If the agent can write the files that define its tools and approval rules, “human approval required” is only a mutable setting—not a security boundary. 2.2 Filesystem escape through paths and symlinks Rejecting a literal .. string is insufficient when a symlink resolves outside the workspace. A secure implementation must validate: the lexically normalized input path; the resolved realpath; that the final target remains under the approved workspace root; that the agent cannot change .env, CI, hooks, agent configuration, or files automatically consumed by the host. 2.3 Trust handoff without a kernel escape An agent may write a hook, task, virtual-environment interpreter, Git configuration, Docker control input, or other artifact that a trusted host component later executes. This is a trust-handoff failure, not necessarily a kernel escape. Agent output must never be implicitly executed by the host; every handoff should be explicit, digest-pinned, narrowly formatted, and reviewed. 2.4 Covert egress Blocking HTTP does not prove that data cannot leave. Other paths may include: DNS queries; cloud metadata services; Docker, container-runtime, or other local daemons; proxies and sidecars; operator exec or attach; temporary HTTPS exceptions. “Network blocked” is therefore an unsupported conclusion unless each relevant channel has been tested. 2.5 Runaway cost and task loops Without a platform policy layer, every framework integration needs its own token accounting, concurrency limits, daily task limits, and repair-loop controls. Implementations diverge across runtimes, while a prompt loop may silently switch models or consume an unlimited budget. 2.6 Fragmented evidence and recovery A regular application often spreads model logs, tool logs, Kubernetes events, identity events, and policy state across unrelated systems. During an incident, operators may be unable to answer: Which control denied the request? Which model, image, source revision, and policy were active? Did the agent attempt DNS, metadata, daemon, HTTPS, or exec access? Did evidence survive pod replacement? How should the workload be safely suspended and recovered? 3. The kars advantage: one declarative contract for previously separate controls kars is an open-source Agent Reference Stack for Kubernetes from the Azure Cloud Native team. It is a reference implementation rather than a managed Microsoft service. The tutorial currently tracks kars v0.1.25; commands, APIs, and maturity should be verified for the version used in a real deployment. Its central model is: One governed sandbox per agent. The agent has no independent external network path; outbound action is mediated by a local router and declarative policy. Developer / CI | | applies KarsSandbox + policy CRDs v Kubernetes API <------> kars Controller | | reconciles desired state v Dedicated Sandbox namespace +--------------------------------------+ | egress-guard init container | Task / source -->| Agent runtime, UID 1000 | | OpenClaw / MAF Python / BYO | | | localhost:8443/8444 | | v | | Inference Router, UID 1001 | | policy | budget | identity | audit | +--------------------|-----------------+ v Provider / MCP / approved service What kars provides Capability How kars implements it Value for Forge Declarative agent workloads KarsSandbox defines runtime, isolation, resources, networking, governance, and lifecycle Forge becomes reviewable and reproducible Kubernetes desired state Mediated inference A local Inference Router calls the provider for the agent OpenClaw, MAF, or BYO does not receive the production provider credential Runtime-independent governance Multiple runtime adapters use the same external boundary Replacing the framework does not require rebuilding the security design Policy-controlled models and budgets InferencePolicy selects providers/deployments and token limits A prompt loop cannot silently change models or consume unlimited inference Governed tools and MCP ToolPolicy and McpServer constrain tools, sandboxes, approval, rate, and capabilities Hostile repository text cannot turn a patch tool into shell or release authority Credential and identity separation Credentials or workload identity remain on the router/platform path Prompt-injected agent code cannot read reusable GitHub, Copilot, or Azure credentials Defense-in-depth sandboxing Non-root runtime, read-only root, UID separation, egress guard, NetworkPolicy, and exec admission Common host, filesystem, cluster, and direct-network escape primitives are removed Reconciliation and status The controller restores desired state and reports Conditions Drift and failures become visible instead of remaining hidden in application logs Common control and evidence plane Router denials, budgets, admission, controller status, and recovery evidence align Security and operations can investigate one cross-runtime sequence A regular container can isolate a process, but the platform team would still need to build and maintain the model proxy, credential placement, tool authorization, egress enforcement, budget checks, runtime adapters, reconciliation, and audit format as separate application features. kars turns those concerns into one reusable workload contract. 4. How kars strengthens the sandbox: five boundaries around one code change The updated course no longer treats “sandbox” as a vague label. It decomposes the boundary into five testable parts. 4.1 Process boundary The agent runs as non-root UID 1000. The router runs as UID 1001. Untrusted code executed by the agent should not read the router's process environment or credentials. Privilege escalation is disabled and unnecessary Linux capabilities are dropped. seccompProfile: kars-strict reduces the syscall surface. Local Docker mode co-locates the agent and router for fast iteration. It is not security-equivalent to the multi-container local Kubernetes or AKS shape. 4.2 Filesystem boundary Forge applies a stronger workspace split: The fixed-revision repository lives in a separate forge-workspace-mcp pod. The repository uses a size-limited, disposable emptyDir. The OpenClaw pod has no repository mount and no hostPath. Developer home directories, SSH material, global Git credentials, and unrelated repositories are not mounted. Automatic service-account-token mounting is disabled for the workspace MCP. The agent accesses the repository through seven bounded MCP tools. Path policy checks normalization and resolved realpath to prevent symlink escape. Prompt-injected code therefore cannot simply browse the host filesystem or rewrite the configuration that defines its own authority. 4.3 Network boundary The agent calls only 127.0.0.1:8443/8444 or a documented proxy path. The router decides whether a model, tool, host, or action is allowed. The egress guard uses UID-aware rules to prevent bypassing the router. Kubernetes NetworkPolicy starts with default deny. Only explicit, auditable destinations are opened. DNS, metadata, local daemons, HTTPS, and operator exec are tested separately. The router is the application-policy decision point. The egress guard and NetworkPolicy are data-plane enforcement and safety nets. Defense in depth requires both. 4.4 Identity boundary In production, the router can use Workload Identity or, in the relevant deployment mode, a per-sandbox Entra Agent ID. The agent does not receive the resulting Azure credential. Local Kubernetes reproduces the pod, UID, and network shape but normally uses a static provider credential for development. It is production-shaped infrastructure, not production identity. 4.5 Lifecycle and evidence boundary The controller watches KarsSandbox and creates, updates, or restores resources. Conditions and observed generations expose real status. The router records request-time policy decisions. The workspace can be discarded after the task. Evidence must be exported before pod or workspace deletion. spec.suspended provides an operational kill switch. Rollback should use pinned source, image, and loaded-policy digests. Ephemeral execution reduces persistence risk, but deleting a suspect pod before exporting evidence may destroy valuable incident context. A reviewable sandbox contract spec: runtime: kind: BYO byo: image: forge-byo-copilot-claw:dev contractVersion: v1 sandbox: isolation: enhanced seccompProfile: kars-strict readOnlyRootFilesystem: true runAsNonRoot: true allowPrivilegeEscalation: false writablePaths: - /sandbox - /tmp networkPolicy: defaultDeny: true egressMode: Strict allowedEndpoints: [] The BYO image also declares its runtime contract and runs as a non-root user: LABEL org.kars.runtime.contract="v1" WORKDIR /app USER 1000 5. From architecture claims to malicious-behavior experiments The updated code/01 introduces: make security-demo The experiment does more than inspect manifest text. It executes malicious-request tests, reads active McpServer and ToolPolicy state, checks credential references on the OpenClaw pod, and attempts a direct HTTPS probe from the agent runtime. The kars-sandbox-exec-ban admission control first denies normal operator kubectl exec into the agent runtime. The experiment records that evidence without using a break-glass bypass. The malicious behavior is stopped at multiple layers: Layer How the attempt is stopped Prompt and coordinator Repository content is marked untrusted and denials are reported Self-configuration isolation Editor, agent, MCP, hook, and auto-approval configuration is outside patch scope Path and symlink isolation Resolved realpath must remain inside the workspace Trust-handoff boundary The agent cannot leave hooks, tasks, or interpreters for the host to execute MCP capability surface No environment reader, arbitrary HTTP, or general shell tool exists Workspace policy Traversal, .env, CI/README writes, and unapproved tests are rejected ToolPolicy and credential isolation Specialists have no workspace action; OpenClaw has no Copilot token Runtime and NetworkPolicy Exec admission denies access; no arbitrary HTTPS/DNS tool exists; egress remains constrained Even if the model fails to recognize prompt injection, the execution layers still constrain authority and side effects. The attack fails because the required capability does not exist—not because the model was merely instructed to behave. 6. Tool governance is not one allow-list McpServer: which tool surface may be registered? The Workspace MCP registers seven business-level capabilities: allowedTools: - workspace_get_task - workspace_read_file - workspace_search - workspace_apply_patch - workspace_run_test - workspace_get_diff - workspace_reset There is no shell, environment dump, file upload, arbitrary network request, or free-form command tool. ToolPolicy: who can call what, and how fast? allowed_actions: - "inference:responses:*" - "tool:workspace_get_task:*" - "tool:workspace_read_file:*" - "tool:workspace_search:*" - "tool:workspace_apply_patch:*" - "tool:workspace_run_test:*" - "tool:workspace_get_diff:*" ToolPolicy can also define request rate, burst, time windows, approvals, trust thresholds, and governance profiles. Tool implementation: are valid tools receiving safe arguments? The Workspace MCP rejects: absolute, traversing, or real paths outside the workspace; .env, CI, README, and writes outside src/; non-unique replacement text; oversized files, patches, and diffs; unapproved test IDs; shell-composed commands. Prompt behavior, tool registration, caller authorization, and argument validation are four separate controls. 7. Token limits must be enforced on the request path The tutorial's InferencePolicy uses per-request and daily budgets: spec: tokenBudget: perRequestTokens: 20000 dailyTokens: 100000 When a client requests max_completion_tokens: 20001, the router returns HTTP 429. That is stronger evidence than seeing submitted YAML because it proves that the policy compiled, loaded, and entered the real request path. Later BYO and release examples use tighter limits: modelPreference: primary: provider: azure-openai deployment: gpt-5.6-sol tokenBudget: perRequestTokens: 1024 dailyTokens: 4096 A platform budget cannot determine whether two patches are equivalent or whether a task exceeded a business deadline. The RepairGuard and framework configuration add controls for: duplicate patch digests; excessive repair attempts; task deadlines; maximum MAF iterations and function calls. Token budgets constrain inference cost; repair guards and framework loop limits constrain business failure. 8. From OpenClaw to MAF: change the application, preserve the external boundary OpenClaw is effective for rapidly discovering the conversation, planning, tool, and specialist behavior the product needs. Production requires explicit state, typed tools, repeatable tests, and a human stop. Forge encodes the workflow as application code: class WorkflowState(StrEnum): RECEIVE_REQUIREMENT = "RECEIVE_REQUIREMENT" VALIDATE_SCOPE = "VALIDATE_SCOPE" INSPECT_REPOSITORY = "INSPECT_REPOSITORY" PROPOSE_PLAN = "PROPOSE_PLAN" APPLY_MINIMAL_PATCH = "APPLY_MINIMAL_PATCH" RUN_TARGETED_TESTS = "RUN_TARGETED_TESTS" SUMMARIZE_EVIDENCE = "SUMMARIZE_EVIDENCE" STOP_FOR_HUMAN_REVIEW = "STOP_FOR_HUMAN_REVIEW" There is deliberately no MERGE or DEPLOY state. In the final code/08 path, the kars MAF Python adapter pins the MAF client to the local router before MAF is imported: from kars_runtime_maf_python import bootstrap bootstrap() from agent_framework import Agent, tool from agent_framework.openai import OpenAIChatClient @tool(approval_mode="never_require") def inspect_release_contract(request_id: str, issue_id: str, revision: str) -> str: # Validate the pinned issue and revision, then return bounded evidence. ... maf_client = OpenAIChatClient(model=MODEL) maf_client.function_invocation_configuration["max_iterations"] = 3 maf_client.function_invocation_configuration["max_function_calls"] = 1 builder = Agent( client=maf_client, name="FabrikamReleaseBuilder", tools=[inspect_release_contract], default_options={"store": False}, ) The resulting path is: OpenClaw Intake -> MAF Agent -> inspect_release_contract @tool -> kars MAF Python adapter -> localhost Router -> GitHub Copilot or the selected provider MAF provides the agent, tool, session, middleware, and workflow programming model. kars provides the identity, network, budget, tool, audit, and lifecycle boundary outside the framework. This is one of kars' most important long-term advantages: the application framework can change without rebuilding the complete security shell. 9. Operational security: do not collapse every event into “the network was blocked” The updated code/06 requires incident response to distinguish: HTTPS; DNS; metadata service; local daemon; operator exec; break-glass access. Every denied channel is recorded in a hash-linked audit chain. Break-glass records without an incident ID are also rejected.\ Controller Conditions + Router Denials + Policy Budgets + Admission Decisions + Workload Recovery = One Investigable Sequence Audit integrity is not audit durability The router can verify the current audit hash chain. The tutorial also validates that pod replacement may reset an in-memory audit log, after which a new valid chain begins. Production deployments must continuously export audit data to an independently controlled durable backend. Otherwise, they can prove that the current chain is intact but cannot prove that pre-incident history survived pod loss. 10. AKS and multi-agent release: separation of authority, not two prompts chatting The AKS promotion separates Forge into Builder and Reviewer roles: Control Builder Reviewer Tokens per request 2048 512 Daily tokens 8192 2048 Tool authority Read, search, patch, test, diff Read diff/evidence and submit a decision Approval mode Never Always Trust threshold 700 800 The Builder may create a patch but cannot approve release. The Reviewer may approve a digest-pinned Builder artifact but cannot change source or approve an artifact created by the Reviewer. The final handoff carries patch, test-evidence, and artifact-manifest digests and still stops for human PR approval. The code/08 final sandbox-escape gate explicitly rejects: self-modified authority; symlink escape; host trust handoff; DNS egress; Builder self-approval; Reviewer source modification; untrusted or expired peer drafts. The release standard therefore becomes: Correct behavior must pass, and credential, network, tool, approval, evidence, and containment boundaries must remain intact. Passing tests alone is not release evidence. 11. What kars does not promise kars strengthens the sandbox, but it does not solve every risk automatically: It does not prove that a generated patch is correct. It does not make untrusted code safe to merge. It cannot protect a credential mistakenly mounted into the agent. Local Docker mode does not become a production boundary. It does not replace tenant RBAC, quotas, image policy, signing, supply-chain controls, or durable audit export. It cannot compensate for a policy that deliberately enables arbitrary shell and unrestricted egress. Confidential isolation does not replace least privilege, tool policy, egress policy, and code review. The sandbox bounds authority and blast radius. Tests, evaluation, independent review, and release policy still determine whether a change is acceptable. 12. An enterprise adoption path with measurable exits Phase 1: define the business and threat contract Specify inputs, outputs, allowed actions, forbidden actions, data boundaries, and the human approval point. Exit: product, platform, and security can all explain the agent's maximum authority. Phase 2: validate one OpenClaw vertical slice Use narrow business MCP tools instead of a general shell, and include hostile repository content. Exit: the normal task succeeds while self-configuration, path/symlink, trust-handoff, and egress tests fail. Phase 3: encode the sandbox as a Kubernetes contract Validate UID separation, root filesystem, capabilities, volumes, service-account tokens, NetworkPolicy, egress guard, and exec admission. Exit: the five boundaries are supported by runtime evidence, not only YAML review. Phase 4: add tool, model, and cost governance Apply McpServer, ToolPolicy, and InferencePolicy. Test unknown tools, dangerous arguments, and token overflow. Exit: violations are denied on the live request path. Phase 5: migrate into explicit MAF code Encode workflow state, typed tools, loop limits, evidence, failure paths, and the human stop. Exit: the MAF runtime preserves the external boundary already proven around the OpenClaw prototype. Phase 6: promote to AKS through GitOps Pin source revision, image digest, and loaded policy digest. Separate Builder and Reviewer authority. Prepare the kill switch, rollback, and durable audit export. Exit: one allowed workflow succeeds, multiple escape and authority-violation scenarios are denied, and all results have correlated evidence. Conclusion: kars does not make the model smarter; it makes agent authority explainable Enterprises will ultimately ask: What can the agent access? Where are the provider credentials? Who defines and changes the tool authority? Can prompt injection move data through DNS, metadata, a daemon, or HTTPS? How many tokens and repair iterations may one task consume? Who may patch, approve, merge, or deploy? Does evidence survive pod loss? If OpenClaw is replaced by MAF, does the security model remain intact? The ByteCraft AI story does not argue for one universal agent framework. It argues for a stable Agent Infrastructure layer: Use OpenClaw to discover valuable behavior quickly, use Microsoft Agent Framework to encode that behavior as explicit and testable application code, and use kars to remove credentials, networking, tools, budgets, sandboxing, audit, and lifecycle authority from the agent application itself. An agent becomes an enterprise workload when it has an independent identity boundary, a budget, a constrained tool surface, controlled egress, exportable evidence, and operational suspension and rollback—not merely when it runs inside a container. References Let's Learn Microsoft kars Microsoft kars506Views5likes0CommentsBuilding and Deploying Microsoft Hosted Agents to Microsoft Teams
A practical, engineer-to-engineer guide to taking an AI agent from a developer laptop, into Microsoft Foundry Agent Service, and out to end users inside Microsoft Teams and Microsoft 365 — using the BRK241 FibreOps reference implementation as a worked example. Introduction: the hard part is no longer building the agent Two years ago, wiring an LLM to a couple of tools felt like the summit. It isn't any more. Frameworks, hosted models, and function-calling have made the build step almost routine. The problem has quietly moved downstream. The genuinely hard questions today are operational: Where does the agent run when it's no longer on your machine? What identity does it use to call enterprise systems, and who granted it? How does a platform team scale, monitor, and roll it back? How do business users actually reach it without learning a new tool? Who signed off on it touching production data? A prototype answers none of these. A production agent platform answers all of them, repeatably, for every agent an organisation ships. That shift — from a clever notebook to a governed, observable service that lands in the tools people already use — is the subject of this article. We'll use a single narrative to keep it concrete: FibreOps, the BRK241 "Autonomous Fibre Outage Response" system. It ingests optical line terminal (OLT) telemetry, analyses incidents, files tickets in Dynamics 365 Field Service, posts Adaptive Cards to Microsoft Teams, and dispatches engineers — all through role-specialised agents. The full source is on GitHub. The story runs on three verbs: Build → Run → Distribute. Section 1: Building the agent An agent is not one mega-prompt. FibreOps is deliberately factored into three role-specialised agents behind a single orchestrator, each with its own tool surface, its own system instructions, and a strict output contract: IncidentAnalysisAgent — classifies severity, finds probable cause, and pulls the correct standard operating procedure (SOP). NetOpsCoordinatorAgent — files the D365 incident and posts the Teams outage notice. FieldDispatchAgent — selects the best engineer by skill, region and shift, books the resource, and updates Teams. The Coordinator hands off to Dispatch with a literal HANDOFF:DISPATCH token rather than a fuzzy "I think we should…". Hard contracts between agents are how you stop them inventing work. Microsoft Agent Framework The agents are built with the Microsoft Agent Framework (MAF). The key design decision in the reference implementation is that all three backends honour one contract — await agent.run(prompt) -> response — so the orchestrator never knows or cares where reasoning actually happens: local — a deterministic LocalAgent shim with no LLM, so the demo runs with zero Azure credentials. foundry — agent_framework.Agent + FoundryChatClient , definition resolved locally. Ideal while iterating on prompts. hosted — agent_framework_foundry.FoundryAgent bound to a Prompt Agent published to Foundry Agent Service. This is the production path. Building a Foundry-backed agent is just a client plus instructions plus typed tools: from agent_framework import Agent from agent_framework_foundry import FoundryChatClient from azure.identity import DefaultAzureCredential client = FoundryChatClient( project_endpoint=settings.azure_ai_project_endpoint, model=settings.azure_ai_model_deployment, # e.g. gpt-4.1-mini credential=DefaultAzureCredential(), # no connection strings, ever ) agent = Agent( client=client, instructions=INCIDENT_ANALYSIS_INSTRUCTIONS_V1, name="IncidentAnalysisAgent", tools=[lookup_sop, recall, remember, web_iq_search, work_iq_search], ) Note the DefaultAzureCredential . There are no keys or connection strings anywhere in the reasoning path — identity flows from Microsoft Entra ID. Keep that in mind; it becomes the backbone of the governance story later. Tool calling and MCP Every tool is a typed Python function. Foundry sees the JSON schema derived from the signature; the runtime executes the Python. That separation matters: the published agent definition stores only the model and instructions, while the implementations are supplied by the runtime on every call. The same in-process tools (Teams, D365, dispatch, knowledge, memory) run identically whether the agent is local or hosted. Beyond your own functions, Foundry agents can draw on hosted toolbox tools ( web_search , code_interpreter ) and Model Context Protocol (MCP) servers. MCP is the open standard for exposing tools, resources and prompts to agents over a uniform protocol, so an enterprise can stand up an MCP server once and let every agent consume it. In FibreOps this is config-gated — set FIBREOPS_FOUNDRY_TOOLBOX=1 and the incident analyst gains live web search alongside its Web IQ / Work IQ connectors, with no code change. Grounding strategies FibreOps grounds reasoning three ways, in layers: Retrieval over owned knowledge — SOPs (markdown) and the fibre-node topology graph, looked up by the analysis agent. Foundry IQ — Web IQ for public context (roadworks, weather, power) and Work IQ for enterprise context (site surveys, SLA tiers, competency matrix). Procedural memory — prior incidents for a node, recalled before analysis so the agent learns from history. Crucially, when the IQ endpoints are unset the tools fall back to deterministic fixtures so the agent always grounds. Grounding that silently fails is worse than no grounding; design your fallbacks explicitly. Local development, testing and evaluation The whole system runs from one command with no cloud dependency: # Deterministic local backend — no Azure credentials required python -m fibreops.demo --signals 3 --backend local Every run is persisted as a JSON document — the input signal, every agent step, every tool call, every output, every ticket. That single artefact shape feeds three consumers: structured logs, the local optimiser, and Foundry Evaluators. The optimiser scores each run against a five-criterion rubric (was the analysis complete, was severity consistent with customer impact, did a ticket land, did dispatch policy match severity, was an SOP cited) and writes back concrete improvement suggestions. That evaluation loop — not the first working demo — is what turns a prototype into a system you can keep improving. Section 2: Deploying to Microsoft Foundry Agent Service Microsoft Foundry Agent Service is the managed runtime that hosts your agents. It gives you a secure, isolated execution environment, an agent runtime that speaks the OpenAI-compatible Responses API, plus hosted memory, toolboxes, knowledge integrations, and observability — without you operating any of it. FibreOps demonstrates the two hosting shapes Foundry offers. Shape 1 — Prompt Agents A Prompt Agent stores a model deployment plus system instructions as an immutable, versioned definition in Foundry. Publishing is a one-time step per change: from azure.ai.projects import AIProjectClient from azure.ai.projects.models import PromptAgentDefinition from azure.identity import DefaultAzureCredential pc = AIProjectClient(endpoint=endpoint, credential=DefaultAzureCredential(), allow_preview=True) pc.agents.create_version( agent_name="fibreops-incident-analysis", definition=PromptAgentDefinition( model=model_deployment, instructions=INCIDENT_ANALYSIS_INSTRUCTIONS_V1, ), description="FibreOps incident analysis agent", ) At run time you bind to the published version with a FoundryAgent , and — as noted above — the runtime supplies the tool implementations. Prompt versioning ( instructions_v1 , _v2 , _v3 ) is where the optimiser's suggestions land, closing the improvement loop inside the platform. Shape 2 — Containerised hosted agents The BRK241 hero path packages the entire analyse → coordinate → dispatch flow as a single hosted agent: a container that serves the Responses /responses contract on port 8088, deployed straight into your Foundry project. The Agent Framework agent is wrapped by ResponsesHostServer : from agent_framework_foundry_hosting import ResponsesHostServer def main() -> None: server = ResponsesHostServer(build_system_agent()) # Foundry sets the reserved PORT env var inside the sandbox server.run(host="0.0.0.0", port=8088) The container is declared in agent.yaml — kind: hosted , the image reference, the per-session sandbox size (0.5/1 Gi, 1/2 Gi or 2/4 Gi), the protocol version, and only user-declared environment variables. You never hard-code FOUNDRY_* values or the Application Insights connection string; the platform injects those at run time. Deployment registers the image as an immutable version and polls until active : details = pc.agents.create_version( agent_name="fibreops-outage-response", definition=HostedAgentDefinition( protocol_versions=[ProtocolVersionRecord( protocol=AgentProtocol.RESPONSES, version="1.0.0")], cpu="1", memory="2Gi", container_configuration=ContainerConfiguration(image=image), environment_variables={"MODEL_DEPLOYMENT_NAME": model_deployment}, ), ) From local execution to managed hosting The migration path is deliberately gentle because the contract never changes. A developer iterates locally against LocalAgent , moves to the foundry backend to test real prompts, then publish es Prompt Agents or builds and deploy-hosted s the container. The orchestrator code is byte-for-byte identical across all three. That property — same code path local for dev, hosted in Foundry for prod — is the single most important thing to preserve when designing your own agents. Scaling, memory, toolboxes, knowledge and observability Scaling — Foundry provisions a per-session sandbox and a dedicated Entra agent identity per hosted-agent version; you size the sandbox in agent.yaml and let the platform handle isolation. Memory — set FOUNDRY_MEMORY_STORE_NAME and a FoundryMemoryProvider is attached as a context provider so agents read and write learned procedures in Foundry's hosted store; unset, they use local SQLite. No code change. Toolboxes & knowledge — hosted web_search , code interpreter, MCP, and Web/Work IQ connectors are curated per role and merged with your Python tools. Observability — the agent emits OpenTelemetry spans; set APPLICATIONINSIGHTS_CONNECTION_STRING (injected by the platform for hosted agents) and every agent decision, tool call and latency is queryable in Application Insights. Section 3: IT and development responsibilities Successful agent deployments need both developer velocity and platform governance. The failure mode at either extreme is familiar: developers who can't ship because every request routes through a ticket queue, or a free-for-all where nobody can say what identity an agent runs as. The workable model draws a clean line of responsibility. Concern Developer / Agent team IT / Platform team Identity Use DefaultAzureCredential ; never embed secrets; declare the scopes the agent needs Provision the managed / Entra agent identity; own the app registration and consent Access control Request least-privilege roles for the tools the agent calls Grant RBAC at the correct scope; run role-assignment scripts; enforce approvals Security Validate inputs, handle tool failures cleanly, avoid data exfiltration in prompts Disable ACR admin, enforce managed-identity pulls, network controls, Key Vault for secrets Compliance Keep decisions explainable and replayable (the JSON run record) Data-residency, retention, audit, Responsible AI review sign-off Monitoring Emit structured traces + OTel spans; define the rubric Own Application Insights / Log Analytics, alerting, dashboards, SLOs Cost Right-size the sandbox and model deployment; cache grounding Budgets, quota, token-consumption monitoring, chargeback Lifecycle Version prompts and images; feed the optimiser back into new versions Environment promotion (dev → test → prod), rollback, deprecation The reference implementation encodes this split honestly. The Bicep template does not create role assignments, because most deployers only hold Contributor . Instead a subscription Owner runs scripts/grant-mi-roles.ps1 once to grant the App Service's identity exactly the roles it needs — Event Hubs Data Owner, Key Vault Secrets User, AcrPull, Azure AI Developer, and Cognitive Services OpenAI User — and no more. That is least privilege made operational. Section 4: Publishing to Microsoft Teams and Microsoft 365 An agent nobody can reach has no value. The final verb — Distribute — puts the agent where users already work. FibreOps reaches Teams two ways. The lightweight path: Adaptive Cards via Incoming Webhook The NetOps coordinator posts outage notices and status updates to a Teams channel as Adaptive Cards through an Incoming Webhook. Any unconfigured channel is logged to state/teams_outbox.jsonl , so the same code runs in a demo and in production — you only change the webhook target. This is the fastest way to get agent output into Teams and is ideal for notifications and human-in-the-loop review. The rich path: a declarative agent for Microsoft 365 Copilot To make the agent conversational and discoverable across Teams, Microsoft 365 Copilot and copilot.microsoft.com, FibreOps ships as a declarative agent plus an API plugin action. One command builds the sideload-ready package: python -m fibreops.demo publish-m365 --out dist/m365 # wrote declarativeAgent.json (name, description, conversation starters) # wrote fibreops-action.json (API plugin -> {base_url}/openapi.json) # wrote manifest.json (Teams app manifest) # wrote color.png / outline.png (icons) # wrote fibreops-copilot.zip (upload this) The declarative agent declares metadata, conversation starters and a capability set; the action plugin proxies tool calls to the deployed FastAPI app via its OpenAPI document. Set M365_ACTION_BASE_URL to the app's public HTTPS root before publishing — the CLI warns when the placeholder is still in effect. That single environment variable is the only thing that flips the package from demo to production. The end-to-end distribution workflow Conceptually, the artefact travels a fixed pipeline: Developer laptop │ build + test (local backend) → publish Prompt Agent / deploy hosted container ▼ Microsoft Foundry Agent Service │ hosted agent, secure sandbox, Entra agent identity, observability ▼ Teams App package (fibreops-copilot.zip) │ Teams Admin Center → Manage apps → Upload (or M365 Admin Center → Integrated apps) ▼ Microsoft 365 tenant │ admin approval, availability policy, targeted rollout ▼ End user in Teams / M365 Copilot Enterprise rollout is rarely "publish to everyone". The realistic pattern is a staged one: sideload to a pilot group, gather feedback and optimiser scores, then widen availability through Teams app-permission and app-setup policies to department, then tenant. Because the package carries publisher metadata and the declarative schema, IT can review it exactly like any other line-of-business app. Section 5: Enterprise governance Governance is not a bolt-on; in this architecture it's a property of the platform. The pillars: Entra ID integration and agent identity — every hosted agent version gets a dedicated Entra agent identity. Nothing authenticates with a shared key. DefaultAzureCredential means the same code picks up a developer's identity locally and the managed identity in production. RBAC at the right scope — roles are granted to identities, not baked into images. Deploying a hosted agent requires Azure AI Project Manager at project scope; the Foundry project identity needs AcrPull on the registry to pull the container. Least privilege is enforced, not assumed. Auditability — the JSON run record plus OpenTelemetry spans in Application Insights give you a replayable, per-incident audit trail. You can reconstruct exactly which SOP was cited, which engineer was chosen, and why severity was escalated. Data boundaries — the mock D365 is a drop-in for a real Dataverse environment; grounding sources are enterprise connectors (Work IQ) kept inside the tenant boundary. Nothing leaves the subscription without an explicit connector. Responsible AI — the Adaptive Card JSON can be pasted into the Adaptive Cards designer for governance review; the evaluation rubric makes quality measurable; explicit grounding fallbacks prevent silent failure. Production readiness — immutable versioning, one-command rollback (delete a version), managed-identity-only image pulls, and disabled ACR admin credentials are all first-class in the reference deployment. Section 6: Reference architecture The following diagram shows the production topology — users on the left, enterprise systems and controls on the right, with Foundry Agent Service at the centre hosting the agent. flowchart LR User["NOC operator / business user"] subgraph M365["Microsoft 365 tenant"] Teams["Microsoft Teams(Adaptive Cards + declarative agent)"] Copilot["Microsoft 365 Copilot"] end subgraph Foundry["Microsoft Foundry Agent Service"] Hosted["Hosted AgentOutage Response System(secure per-session sandbox)"] Runtime["Agent runtime(Responses API)"] Memory["Hosted memory + toolboxes"] end subgraph Enterprise["Enterprise data & tools"] MCP["MCP servers / web_search"] D365["Dynamics 365 Field Service"] EventHub["Azure Event Hubs(OLT telemetry)"] Knowledge["SOPs + topology + Web/Work IQ"] end subgraph Ops["Cross-cutting"] Obs["ObservabilityApp Insights / OTel"] Gov["GovernanceEntra ID · RBAC · audit"] end User --> Teams User --> Copilot Teams --> Runtime Copilot --> Runtime Runtime --> Hosted Hosted --> Memory Hosted --> MCP Hosted --> Knowledge Hosted --> D365 EventHub --> Hosted Hosted -.->|Adaptive Cards| Teams Hosted --> Obs Gov -.->|identity & policy| Foundry Gov -.->|identity & policy| Enterprise Read the solid arrows as the control/orchestration flow and the dashed arrows as governance and outbound notifications. The point of the diagram is that governance (Entra ID, RBAC, audit) applies across every component, and observability captures every agent decision — neither is optional plumbing. Section 7: What production looks like Picture the FibreOps rollout at a national fibre operator, with the four personas doing their part: Developers build the three agents and the orchestrator on their laptops against the local backend — no cloud, no credentials, deterministic tests. They tune prompts against the foundry backend, watch the optimiser rubric climb from 0.90 to 1.0 as they add the ">5,000 customers ⇒ escalate to critical" rule, and commit a new instruction version. The platform team deploys the container to Foundry Agent Service via scripts/deploy-hosted-agent.ps1 , which builds the image in ACR, pushes it, and registers an immutable version. They provision the Event Hub, Key Vault, Log Analytics and Application Insights from Bicep, and size the sandbox at 1 vCPU / 2 GiB. IT approves the workload: a subscription Owner grants the managed identity its five least-privilege roles, hardens the App Service to pull via managed identity, disables ACR admin, and signs off the Responsible AI review using the replayable run records and the Adaptive Card previews. They sideload fibreops-copilot.zip to a pilot channel first. Business users consume it inside Teams. When an OLT in London loses light, an Adaptive Card appears in the NOC channel within seconds — severity, probable cause, ticket ID, and the dispatched engineer's ETA — with no human having read a dashboard, opened a ticket, or phoned a dispatcher. If Foundry ever wobbles, the same system falls back to the deterministic local agent with an identical trace shape. Every integration but D365 is live in the demo, and D365 is a one-variable swap to a real Dataverse endpoint. That is the whole point: the demo and production differ by configuration, not by code. Key takeaways Design for one contract. If agent.run(prompt) behaves identically local, foundry-backed and hosted, migration to production is configuration, not a rewrite. Factor agents by role with hard handoff contracts. Literal tokens like HANDOFF:DISPATCH beat fuzzy natural-language handoffs and stop agents inventing work. Never embed secrets. DefaultAzureCredential + Entra agent identities give you keyless auth that works the same everywhere. Make every run replayable. A single JSON artefact that feeds logs, evaluation and audit is worth more than any dashboard. Ground explicitly, and design your fallbacks. Grounding that fails silently is a liability; deterministic fixtures keep the agent honest. Split responsibility cleanly. Developers own velocity and quality; the platform team owns identity, scale, cost and promotion. Encode the split in scripts, not tribal knowledge. Version prompts and images immutably. Rollback should be "delete a version", and the optimiser's suggestions should land as the next version. Distribute where users already are. Adaptive Cards for notifications, a declarative agent for conversation and discovery across Teams and M365 Copilot. Roll out in stages. Pilot channel → department → tenant, gated by app policies and real optimiser scores. Resources Reference implementation: github.com/leestott/BRK241-frontier Microsoft Agent Framework overview Microsoft Foundry Agent Service Hosted agents in Foundry Agent Service · Deploy a hosted agent Microsoft Teams developer platform Declarative agents for Microsoft 365 Copilot Model Context Protocol GitHub Copilot Clone the repo, run python -m fibreops.demo --signals 3 --backend local , and watch the analyse → coordinate → dispatch loop close. Then wire in your own Foundry project and take it all the way to Teams. Go build something.Your Entire Agentic AI Workflow, Now Inside VS Code: New Course Available
If you build with AI, you know the tax: jumping between a browser portal to pick a model, a terminal to run it, a separate playground to test a prompt, and finally your editor to write the code. Every context switch is a small drain on focus—and it adds up. What if the whole loop lived in the one tool you never leave? That's the promise of the Foundry Toolkit for Visual Studio Code, and it's exactly what our new VS Code Learn: Foundry Toolkit video series is here to show youBuilding Agents in Production with Toolbox, Skills, and Tool Search
If you are shipping AI agents beyond a demo, you have felt the pain: every agent needs the same tools, each with its own authentication, and the tool list keeps growing until your prompt is bloated and the model picks the wrong one. On 22 July 2026 at 5:00 PM BST, the Microsoft Foundry community is running a 40-minute Discord round table to talk about exactly this, and to gather your feedback on three capabilities built to fix it: Toolbox, Skills, and Tool Search. This is a discussion, not a slideshow. Bring your real projects, including tool sprawl, duplicated skills, and authentication headaches, and help shape where these features go next. Join us in the Microsoft Foundry Discord community. Event at a glance What: Microsoft Foundry Discord Community Round Table: Building Agents in Production with Foundry Toolbox, Skills, and Tool Search When: 22 July 2026, 5:00 PM BST (40 minutes) Where: https://aka.ms/foundry/discord Event Link https://discord.gg/Z8JZsrP5P5?event=1527379174061379584 Format: Interactive discussion with voice and chat, live polls, and a short prioritisation exercise Who it's for: AI engineers and developers building and scaling agents in production Opening question we'll start with: "As your agents grow, how do you decide which tools to give them, and how do they pick the right one at runtime?" The problem: agents don't scale by hard-wiring every tool When several agents, or a mix of Foundry hosted agents, Microsoft Agent Framework, LangGraph, and Copilot SDK apps, need the same governed set of tools, you do not want to re-wire those tools and their authentication into every one. Two things break as you grow: Integration sprawl: the same tool gets wired, authenticated, and versioned separately in every agent. Tool overload: sending every tool definition to the model on every turn is slow, expensive, and hurts selection accuracy. The pattern that scales: package the tools once behind a single versioned, governed MCP endpoint, make them discoverable, and let every runtime consume them from the same URL. That is what Toolbox, Skills, and Tool Search deliver together. The three concepts we'll discuss Toolbox: build once, govern centrally, consume anywhere A Toolbox is a reusable, centrally managed bundle of tools exposed through a single MCP-compatible endpoint. Because it is a managed resource, you can add, remove, or reconfigure tools without changing agent code because every agent connects to the same endpoint. Immutable versioning gives you safe, atomic rollouts: build and test a new version on its pinned URL, then promote it to default, and every consumer picks it up with no redeployment. Skills: reusable, composable capabilities A Skill is a reusable, published set of behavioural instructions (a SKILL.md file following the open Agent Skills spec) that is registered once and reused across toolboxes and agents, for example, "summarize document" or "create calendar event". In a toolbox, a skill is not a callable tool: it surfaces as an MCP Resource on the same endpoint, so clients discover and read it with plain resources/list and resources/read, with no Foundry SDK required. Tool Search: runtime discovery instead of hard-wiring A real toolbox can hold dozens or hundreds of tools. Tool Search keeps that cheap for the model through progressive disclosure: instead of listing every tool, Foundry shows the model just two meta-tools, tool_search and call_tool, plus any pinned tools. The model searches for a capability by intent, Foundry ranks the toolbox's tools by match on name and description, and returns only the hits. The prompt stays small no matter how many tools the toolbox holds. How they fit together: Skills and tools live in a Toolbox; Tool Search lets agents scale to many tools without prompt bloat or manual wiring. You manage all of it from the Foundry portal or the Foundry Toolkit extension in VS Code. The scenario we'll walk through A user asks an agent to "summarize this email and schedule a follow-up." The agent uses Tool Search to find the right tools ("email summarization" and "calendar scheduling") from a shared Toolbox, chains them, and returns a result with no per-agent integration and no hard-coded tool list. Discussion prompt: "At what point does the number of tools in your agent start to hurt, and would Tool Search help?" A peek at the code (so you arrive ready) The full, runnable walkthrough lives in the Mastering Foundry Toolbox notebook in the microsoft-foundry/forgebook repo. The core spine is short. First, build a versioned toolbox from typed tool objects plus an optional list of skills: # Build an immutable toolbox version from typed tools + skills version = project.toolboxes.create_version( name=TOOLBOX_NAME, description="Search, code, knowledge, and connection-backed tools.", tools=tools, # e.g. WebSearchToolboxTool(...), AzureAISearchToolboxTool(...) skills=skills or None, # ToolboxSkillReference(name=..., version=...) - SEPARATE from tools ) print(f"Created {TOOLBOX_NAME} version {version.version}") Then turn the same tools into a search-first toolbox by adding the Tool Search meta-tool and pinning only your one or two hottest tools: from azure.ai.projects.models import ToolboxSearchPreviewToolboxTool, ToolConfig # Pin the hottest tool so it's always exposed; everything else is search-gated. tool_configs = {"web_search": ToolConfig(pin=True)} search_version = project.toolboxes.create_version( name=TOOLBOX_NAME, tools=tools + [ToolboxSearchPreviewToolboxTool(tool_configs=tool_configs)], skills=skills or None, ) Every consumer talks to the same MCP endpoint: one URL, any framework: # The default (promoted) version is served from one stable consumer URL def consumer_mcp_url(name): return f"{PROJECT_ENDPOINT.rstrip('/')}/toolboxes/{name}/mcp?api-version=v1" # Microsoft Agent Framework speaks MCP natively - just point it at the URL. # LangGraph (AzureAIProjectToolbox) and the GitHub Copilot SDK consume the same endpoint. How Toolbox simplifies the auth and identity flow This is one of the most important things to understand before you scale agents, and it is a great topic to bring questions on. A toolbox tool reaches a downstream system through a project connection, and the connection's authentication type decides whose identity is used. Get this right once and every consumer inherits correct, least-privilege access automatically, without writing OAuth or token-exchange plumbing in your agent code. Running a toolbox behind a hosted agent puts two identities in play, and the platform wires them together for you: Agent -> Toolbox (the trust boundary). The hosted agent authenticates to the toolbox MCP endpoint with its own agent identity, which holds the Foundry user role on the project. If the agent doesn't have access, the toolbox rejects the agent. This gates access to the toolbox itself, independent of any single tool. Toolbox -> Tool (the end-user passthrough). For oauth2 authentication, the agent forwards the caller's end-user Entra token, and the toolbox uses that token (on-behalf-of) to reach the downstream tool. The tool then acts on behalf of the real end user, providing per-user, least-privilege access with correct downstream audit. For non-passthrough authentication types (none, custom-keys, project-managed-identity, and agentic-identity), the toolbox authenticates using the connection's configured identity, and the agent never sees the secret. That is the "better-together" story: a stable, governable managed identity to the toolbox, plus true end-user identity on the downstream data call. What we'll cover in the 40 minutes https://discord.gg/Z8JZsrP5P5?event=1527379174061379584 Welcome & framing (0:00-0:08): what Toolbox, Skills, and Tool Search are, and how they fit together. Scenario walkthrough (0:08-0:13): the "summarize email, schedule follow-up" flow, end to end. Use cases & opportunities (0:13-0:22): which capabilities you would package as reusable Skills, how many tools your agents carry, and where Tool Search would help. Trust, security & governance (0:22-0:31): what you are comfortable exposing through a shared endpoint, how to scope which tools an agent may discover, authentication models, and the observability you need. Developer experience feedback (0:31-0:36): your biggest adoption blockers, missing docs, and the SDK samples and end-to-end demos you would prioritise. Prioritisation & next steps (0:36-0:40): vote live on the top use cases, challenges, and feature requests. Come prepared to talk about What tools and skills your agents use today, and how they're wired up. Which capabilities you'd turn into reusable, composable Skills shared across agents. How many tools your agents carry, and whether you hit prompt-size or tool-selection accuracy issues. Which tools you'd expose through a shared endpoint, and which need tighter scoping. How you want to control what an agent is allowed to discover and invoke with Tool Search. The examples, samples, and tutorials that would help you get started fastest. Responsible and secure by design Because these features let agents discover and invoke tools dynamically, governance is a first-class part of the conversation. Foundry toolboxes are governed by default: you can screen every tool's inputs and outputs with an RAI guardrail, front your MCP servers with a bring-your-own AI gateway (APIM), scope which tools are discoverable, and use least-privilege identity passthrough so downstream calls carry the real user's permissions and audit trail. Bring your enterprise safeguard requirements because they directly shape the roadmap. Note: Toolbox, Tool Search, and Skills are in preview; APIs and headers may change. Key takeaways Toolbox packages tools once behind a single governed, versioned MCP endpoint, so you can build once and consume from any framework. Skills are reusable, composable capabilities you register once and chain across agents. Tool Search uses two meta-tools and progressive disclosure so agents scale to hundreds of tools without prompt bloat. Auth is simplified: the agent's managed identity gates the toolbox, while end-user token passthrough gives correct, least-privilege downstream access with no OAuth plumbing in your code. Your feedback shapes the product because this round table feeds directly into the engineering and product teams. Save your spot Add it to your calendar: 22 July 2026, 5:00 PM BST. Join the community: https://aka.ms/foundry/discord Prep with the sample: run the Mastering Foundry Toolbox notebook to build, search, and consume a toolbox end to end. Read the docs: Toolbox, Tool Search, and Skills. Agents get more capable as they gain access to more tools and skills, but only if you can build, govern, and scale those capabilities without drowning in integration and prompt bloat. Come and share how you are doing it today, and help shape how Foundry does it next. See you on 22 July.Building AI Agents from Zero to Production
Building AI Agents from Zero to Production Most agent demos stop at "it answered my question." Production doesn't. The gap between a notebook that calls an LLM and a governed, observable, multi-agent system your organisation can actually depend on is where real engineering happens, evaluation, deployment, data sovereignty, tool governance, and cross-team interoperability. Microsoft's open-source course Building AI Agents from Zero to Production walks that entire arc in seven lessons, using one realistic use case and the Microsoft Agent Framework (MAF) plus Microsoft Foundry. This post is a developer-focused tour of what it teaches, the architecture decisions behind each stage, and the code patterns that matter when you move from prototype to production. Who this is for AI engineers building their first or first production, agent system. Backend and full-stack developers integrating agents into real applications and CI/CD. Cloud architects who need data sovereignty, private networking, and governance around agent workloads. Technical leads deciding how to standardise tools and orchestration across multiple teams. The samples are Python 3.12+, served through Microsoft Foundry using GPT-5 series models (for example gpt-5.1 ). Lesson 4 adds a TypeScript/React frontend. You will want an Azure subscription and the Azure CLI. The AI Agent Development Lifecycle The course is organised around a lifecycle rather than a feature list. Each lesson is a stage, and each stage assumes the previous one is solved: # Stage The production question it answers 1 Agent Design What should each agent do, and how do they hand off? 2 Agent Development How do I build and run them with the Agent Framework? 3 Agent Evaluations How do I know they actually work — and keep working? 4 Agent Deployment How do I ship one as a hosted service with a UI and CI gate? 5 Production Hosted Agents How do I meet enterprise data, network, and governance needs? 6 Microsoft Toolbox How do I govern tools once, and reuse them across teams? 7 Multi-Agent & A2A How do agents from different teams interoperate safely? The thread running through all seven is a single scenario: a Developer Onboarding agent system that helps a new hire find the right teammates, get a sensible first task, and pull learning resources and code snippets. It is deliberately mundane, which is exactly why it exposes the production concerns that flashy demos hide. Lesson 1 — Agent Design: three components, one graph The course defines an agent by three parts: an LLM for reasoning, tools to act, and memory to retain context. The design work is context engineering — making sure the right information reaches the model at the right moment, no more and no less. Rather than one monolithic assistant, the onboarding system is split into specialists coordinated by a triage agent using handoff orchestration: Agent Job Tool Employee Search Answer org and people questions Foundry file search over an employee-directory vector store Task Recommendation Suggest 1–3 GitHub issues for the new dev GitHub MCP Server (reads recent commits + open issues) Code Assistant Provide resources and runnable snippets Microsoft Learn MCP + Code Interpreter Architecturally this is a directed graph: User → Triage → [Employee, Learning, Coding] . Splitting responsibilities early pays off later, each agent gets a tightly scoped prompt (less hallucination), can be evaluated independently, and can be upgraded without touching its peers. Lesson 2 — Development: standalone agents with MAF Here the design becomes code. Each specialist is a small, independently runnable service built with the Microsoft Agent Framework, authenticated to Foundry with your Azure CLI login. Setup is deliberately boring: az login az account set --subscription "<your-subscription-id>" cp .env.example .env # Fill FOUNDRY_PROJECT_ENDPOINT and FOUNDRY_MODEL (e.g. gpt-5.1) # Create the employee-directory vector store once; note the printed VECTOR_STORE_ID python lesson-2-agent-development/setup_vector_store.py # Start an agent — serves on http://localhost:8090 python lesson-2-agent-development/employee-search-agent.py The FoundryChatClient auto-reads any FOUNDRY_ -prefixed environment variables and uses AzureCliCredential , so there are no keys in code. The lesson ships six samples, each on its own port, so you can chat with them individually in the local DevUI before wiring them together: Sample Tool Port employee-search-agent.py Foundry file search / vector store 8090 task-recommendation-agent.py GitHub MCP Server 8095 azure-learning-agent.py Microsoft Learn MCP 8092 coding-agent.py Code Interpreter 8093 learning-recommendation-agent.py Learn MCP + reasoning 8091 agent-orchestration.py Multi-agent handoff 8094 Why this matters: keeping each agent as its own process with its own port is a testability decision, not an accident. You can smoke-test one specialist in isolation, then compose them in agent-orchestration.py . Lesson 3 — Evaluation: you can't unit-test a probability distribution This is the lesson that separates a demo from a product. Agents are non-deterministic, so traditional assertions don't fit. The course uses three complementary layers: Observability / tracing — always on, via OpenTelemetry to Application Insights. Smoke tests — fast, run on every deploy. Evaluations — deeper, model-based scoring run on-demand or nightly. Turning on tracing is a single call: from agent_framework.foundry import FoundryChatClient client = FoundryChatClient() client.configure_azure_monitor() # export traces + metrics to Application Insights For quality it uses Foundry's built-in "LLM-as-a-judge" evaluators against real persisted responses (identified by response_id ), not freshly regenerated ones: Evaluator evaluator_name Measures Relevance builtin.relevance Does the response address the request? Groundedness builtin.groundedness Is it supported by retrieved data (no hallucination)? Tool-call accuracy builtin.tool_call_accuracy Were the right tools called with the right arguments? Tool-output utilization builtin.tool_output_utilization Did the agent actually use tool results? The judge model is set independently via AZURE_AI_MODEL_DEPLOYMENT_NAME , so you can evaluate a cheap production model with a stronger one. The run prints a report_url that deep-links into the Foundry portal. Lesson 4 — Deployment: a hosted agent, a UI, and a CI gate Now the agent becomes a managed service. It is deployed as a Foundry Hosted Agent a Microsoft-managed execution environment and fronted by an OpenAI ChatKit React UI talking to a FastAPI backend: ChatKit React (3000) → FastAPI backend (8001) → Foundry Hosted Agent → tools Building the agent is declarative attach tools, name it, serve it: agent = client.as_agent( name="DevOnboardingAgent", instructions="...", tools=[file_search_tool, learn_mcp_tool], ) # served with: from_agent_framework(agent).run() The recommended deploy path is the Azure Developer CLI: cd hosted-agent azd auth login azd agent deploy The genuinely production-minded part is the smoke test as a post-deploy CI gate. Six cases cover reachability, each scenario, off-topic prompt adherence, and multi-turn threading (verifying state via previous_response_id ). The GitHub Action runs them against the freshly deployed agent: export FOUNDRY_TOKEN=$(az account get-access-token \ --resource https://ai.azure.com/ --query accessToken -o tsv) python runner.py \ --project-endpoint "https://<account>.services.ai.azure.com/api/projects/<project>" \ --agent-name dev-onboarding \ --tests-file tests/smoke-tests.json Pitfall to remember: the token audience must be https://ai.azure.com/ . A cognitiveservices.azure.com token is rejected by the Responses API — a mistake that costs many engineers an afternoon. Lesson 5 — Production: separating where an agent runs from where its data lives The pivotal concept for enterprise readiness is the distinction between a Hosted Agent (compute, scaling, identity) and a Capability Host (where conversation history, files, and embeddings actually reside): Concern Hosted Agent Capability Host Compute / scaling / identity ✅ Provided — Conversation history Microsoft-managed default Redirect to your Azure Cosmos DB File uploads Microsoft-managed default Redirect to your Azure Storage Vector embeddings Microsoft-managed default Redirect to your Azure AI Search Required to run the agent? ✅ Yes ❌ Optional Required for data sovereignty? ❌ Not sufficient ✅ Yes "Basic" setup uses Microsoft-managed storage and is perfect for getting started. "Standard" setup redirects each data plane to your own Azure resources through a project-level capability host, this is how you keep customer data in your tenant, inside your network boundary: PUT .../accounts/{account}/projects/{project}/capabilityHosts/{name}?api-version=2025-06-01 { "properties": { "capabilityHostKind": "Agents", "threadStorageConnections": ["my-cosmosdb-connection"], "vectorStoreConnections": ["my-ai-search-connection"], "storageConnections": ["my-storage-connection"] } } Operational constraints worth internalising before you provision: there is one capability host per scope (a second attempt returns 409 Conflict ), configuration is immutable (delete and recreate to change it), deletion is destructive, and the account-level host must exist before the project-level one. Lesson 6 — Toolbox: govern tools once, reuse everywhere Left unchecked, every team re-implements the same tools, scatters credentials, and loses governance visibility. The Microsoft Foundry Toolbox solves this by exposing a curated, versioned set of tools behind a single MCP-compatible endpoint, with credentials held in Foundry connections rather than agent code. You build a toolbox version once: from azure.ai.projects.models import MCPTool, ToolboxSearchPreviewTool, WebSearchTool toolbox_version = project.toolboxes.create_toolbox_version( name="agent-tools", description="Web search + an MCP server + tool search", tools=[ WebSearchTool(), MCPTool( server_label="myserver", server_url="https://your-mcp-server.example.com", require_approval="never", project_connection_id="my-key-auth-connection", # credentials live in Foundry ), ToolboxSearchPreviewTool(), ], ) And every agent consumes it through one endpoint, no per-team tool code: from agent_framework import MCPStreamableHTTPTool mcp_tool = MCPStreamableHTTPTool( name="toolbox", url=TOOLBOX_ENDPOINT, # {project_endpoint}/toolboxes/{name}/mcp?api-version=v1 http_client=http_client, load_prompts=False, ) agent = chat_client.as_agent(name="my-toolbox-agent", instructions="...", tools=[mcp_tool]) Versioning is blue/green: create a new version, test it on its version-specific endpoint, then promote it to default and every consumer picks it up with zero code changes. A Guardrail (RAI) policy can be applied at the toolbox layer, independent of model-level content filters. Note the toolbox management APIs are currently preview; the portal or VS Code Foundry Toolkit are practical alternatives for creation today. Lesson 7 — Multi-Agent & A2A: agents as networked peers The final lesson contrasts two ways agents collaborate: Handoff / Workflow — in-process, same codebase, fastest, tightest coupling. Agent-to-Agent (A2A) — cross-process over an open protocol, so agents from different teams, orgs, or frameworks interoperate. A2A gives each agent a discoverable Agent Card at /.well-known/agent-card.json and a task lifecycle (submitted → working → completed/failed). The elegant part: A2AExecutor wraps an existing MAF agent with no changes to that agent's code. from agent_framework.a2a import A2AExecutor from a2a.server.apps import A2AStarletteApplication from a2a.server.tasks import InMemoryTaskStore agent_card = AgentCard( name="Coding Assistant", url="http://localhost:9000/", version="1.0.0", capabilities=AgentCapabilities(streaming=True), skills=[AgentSkill(id="generate-code", name="Generate code", tags=["code"])], ) request_handler = DefaultRequestHandler( agent_executor=A2AExecutor(agent), # wraps your existing MAF agent unchanged task_store=InMemoryTaskStore(), ) app = A2AStarletteApplication(agent_card=agent_card, http_handler=request_handler).build() Consuming a remote agent then looks exactly like calling a local one: from agent_framework.a2a import A2AAgent remote_agent = A2AAgent(name="remote-coding-assistant", url="http://localhost:9000") result = await remote_agent.run("Write a Python function that reverses a string.") Because an A2AAgent can be a participant inside a HandoffBuilder workflow, you can mix in-process routing with remote services in the same orchestration. For enterprise use, A2AAgent accepts an auth_interceptor for bearer tokens, and the Agent Card carries security_schemes . Responsible and secure by design Production readiness in this course is not just uptime, it is governance: Identity over keys — AzureCliCredential and managed identity throughout; no secrets in code. Least privilege — CI runners get a scoped Azure AI User role assignment on the specific project. Data sovereignty — capability hosts keep conversation history, files, and embeddings in your own Cosmos DB, Storage, and AI Search. Tool approval and guardrails — MCP approval_mode and toolbox-level RAI policy gate what agents can do. Grounded evaluation — groundedness and tool-utilization scoring catch hallucination and unused-tool behaviour before users do. Cost hygiene — the lessons create real Azure resources; delete the resource group when done: az group delete --name <rg> --yes --no-wait . Key takeaways Design as a graph of specialists. Handoff orchestration with tightly scoped agents beats one monolith on reliability and testability. One .run() contract, many backends. The Agent Framework keeps orchestration code stable from local dev to hosted production. Evaluate continuously. Tracing + smoke tests + model-based evaluators are three layers, not alternatives. Separate compute from data. Hosted Agents run the agent; Capability Hosts give you sovereignty — you need both for enterprise. Govern tools centrally. A versioned toolbox behind one MCP endpoint kills tool sprawl and credential duplication. Open protocols for interop. A2A lets agents cross team, org, and framework boundaries without rewrites. Get started Clone the repo (skip the 50+ translations for a faster download) and work through the lessons in order: git clone --filter=blob:none --sparse https://github.com/microsoft/Building-AI-Agents-From-Zero-To-Production.git cd Building-AI-Agents-From-Zero-To-Production git sparse-checkout set --no-cone '/*' '!translations' '!translated_images' References Building AI Agents from Zero to Production — course repo Microsoft Agent Framework Microsoft Foundry documentation Agent-to-Agent (A2A) protocol specification a2a-python SDK AI Agents for Beginners MCP for Beginners Microsoft Foundry DiscordEnterprise-ready Claude Desktop with Entra ID, APIM, and Microsoft Foundry (No Backend Required)
How I put corporate sign-in in front of Claude Desktop without writing a single line of backend code. TL;DR — In this post, I show how to securely enable Claude Desktop in enterprise environments using Microsoft Entra ID, Azure API Management, and Microsoft Foundry — without deploying a custom backend. This approach removes API keys from endpoints, enforces per-user identity, and aligns fully with Zero Trust principles. Who this is for: Enterprise architects evaluating secure AI client patterns Developers enabling Claude Desktop in regulated environments Platform teams standardizing identity and governance for LLM access Why this post exists: Microsoft Learn's Configure Claude Desktop with Foundry Models only shows the API-key path — a shared key pasted into every user's Claude Desktop config. That's fine for a quick demo, but it's a non-starter for most enterprises (no per-user identity, no MFA / Conditional Access, hard to revoke, hard to audit). This post fills that gap: same Foundry backend, but with Microsoft Entra ID SSO in front via Azure API Management, so each user signs in with their corporate identity and zero secrets land on the laptop. The problem For many teams experimenting with Claude Desktop, the blocker isn't capability — it's enterprise readiness. How do you enforce identity, eliminate shared secrets, and apply governance without standing up a custom backend service to sit in front of the model? If your team wants to use Claude Desktop with your own Anthropic deployment running on Microsoft Foundry, but with a few non-negotiable requirements: No shared API keys floating around on developer laptops. Per-user identity — every request must be attributable to a real person. MFA and Conditional Access must apply, the same way they do for every other internal app. Central rate-limiting and logging — a centralized control plane for governance. Claude Desktop 1.5+ supports a "Gateway SSO" mode where it can sign each user in with OpenID Connect and forward their token to a custom LLM gateway. Azure API Management (APIM) is a perfect fit for that gateway role: it validates the user's Entra ID token, then re-authenticates itself to Foundry behind the scenes. APIM acts as a centralized policy enforcement layer, enabling identity validation, traffic governance, and secure re-authentication to backend AI services without custom code. The end-to-end flow looks like this: %%{init: {'flowchart': {'nodeSpacing': 60, 'rankSpacing': 80, 'useMaxWidth': true}, 'themeVariables': {'fontSize':'16px'}} }%% flowchart TB User([Corporate user]) Claude["Claude Desktop"] Entra["Microsoft Entra ID<br/>(OIDC + MFA + Conditional Access)"] APIM["Azure API Management<br/>validate-jwt → rewrite headers<br/>(policy gateway)"] Foundry["Microsoft Foundry<br/>Claude deployment"] User -- "1. Sign in (browser PKCE)" --> Entra Entra -- "2. ID token" --> Claude Claude -- "3. POST /v1/messages<br/>Authorization: Bearer ID token" --> APIM APIM -- "4. OIDC discovery / JWKS" --> Entra APIM -- "5. x-api-key (or Managed Identity)" --> Foundry Foundry -- "6. Response" --> APIM APIM -- "7. Response" --> Claude classDef azure fill:#0a4d8c,stroke:#0a3a6b,color:#ffffff; classDef client fill:#f3f3f3,stroke:#888,color:#222; class Entra,APIM,Foundry azure; class Claude,User client; Or in plain text: Claude Desktop │ Authorization: Bearer <Entra ID token from the user's browser sign-in> ▼ Azure API Management (<your-apim>) │ ① validate-jwt → verifies user's Entra ID token │ ② re-auths to Foundry with an API key from a Named value │ Authorization stripped, x-api-key injected ▼ Microsoft Foundry /anthropic/v1/messages │ runs Claude (<your-deployment>) ▼ Response back to the user There are no API keys on user devices. Foundry's key lives only inside APIM. And every request carries the user's oid claim, so I can build dashboards and per-user quotas later. What you need before starting An Azure subscription with a Microsoft Foundry (AI Services) account and a Claude deployment. (Throughout this post I'll just call it Foundry.) An API Management instance, any tier. Permission to register applications in Entra ID for your tenant. Claude Desktop 1.5.0 or later. Azure CLI installed locally. Throughout this post I'll use placeholders for resource names: <apim-name> — your API Management service name <resource-group> — the resource group that holds it <foundry-account> — your Foundry account name <deployment-name> — the name of the Claude model deployment on Foundry Step 1 — Register an Entra ID app for Claude Desktop This is the OIDC client Claude Desktop signs users into. Claude Desktop requires a single-tenant, public PKCE client (no client secret) with a loopback redirect URI, configured under the Mobile and desktop applications platform in Entra ID — the only platform that allows any loopback port. I scripted it so the setup is one command and idempotent: # scripts/register-claude-entra-app.ps1 [CmdletBinding()] param( [string] $TenantId = '<your-tenant-id>', [string] $SubscriptionId = '<your-subscription-id>', [string] $ResourceGroup = '<resource-group>', [string] $ApimName = '<apim-name>', [string] $AppDisplayName = 'Claude Cowork gateway', [string] $RedirectUri = 'http://127.0.0.1/callback' ) az account set --subscription $SubscriptionId | Out-Null # 1. Create (or reuse) the app registration $appId = az ad app list --display-name $AppDisplayName --query "[0].appId" -o tsv if (-not $appId) { $appId = az ad app create --display-name $AppDisplayName ` --sign-in-audience AzureADMyOrg --query appId -o tsv } # 2. Configure as public PKCE client with the Mobile/Desktop redirect URI $objectId = az ad app show --id $appId --query id -o tsv $patch = @{ publicClient = @{ redirectUris = @($RedirectUri) } isFallbackPublicClient = $true } | ConvertTo-Json -Depth 5 -Compress az rest --method PATCH ` --uri "https://graph.microsoft.com/v1.0/applications/$objectId" ` --headers "Content-Type=application/json" --body $patch | Out-Null # 3. Ensure a service principal exists $sp = az ad sp list --filter "appId eq '$appId'" --query "[0].id" -o tsv if (-not $sp) { az ad sp create --id $appId | Out-Null } # 4. Push two Named values into APIM for the validate-jwt policy az apim nv create -g $ResourceGroup --service-name $ApimName ` --named-value-id entra-tenant-id --display-name entra-tenant-id ` --value $TenantId --secret false az apim nv create -g $ResourceGroup --service-name $ApimName ` --named-value-id entra-client-id --display-name entra-client-id ` --value $appId --secret false "Client ID: $appId" Run it once. The output prints the client ID you'll need in Claude Desktop later, and it leaves two Named values in APIM ( entra-tenant-id , entra-client-id ) that the gateway policy will reference. ⚠️ Common pitfall: if the redirect URI ends up under the Web platform instead of Mobile and desktop applications, Entra will demand a client secret on token exchange — Claude won't send one and you'll get Token exchange failed (HTTP 401) . The app type can't be changed after creation, so create a new app if that happens. Step 2 — Create the API in APIM In the portal under APIM → APIs → + Add API → HTTP: Field Value Display name Anthropic API Name anthropicapi Web service URL https://<foundry-account>.services.ai.azure.com/anthropic API URL suffix claude Subscription required Off (Entra ID is our only credential) Add two operations under it: Method URL Display name POST /v1/messages Create message GET /v1/models List models The /v1/models operation isn't strictly needed (Foundry's Anthropic surface doesn't implement it), but having it registered means you can decide later whether to stub it out or proxy it. Step 3 — Add an API key for Foundry as a Named value APIM → Named values → + Add: Name: foundry-key Type: Secret Value: paste a key from the Foundry account's Keys and Endpoint blade. This is the only place the key ever lives. Clients never see it. Alternative — keyless with Entra ID (managed identity): If you prefer not to manage a Foundry key at all, enable the APIM instance's system-assigned managed identity (APIM → Identity → System assigned → On), then grant that identity the Foundry User role on the Foundry account (role ID 53ca6127-db72-4b80-b1b0-d745d6d5456d — previously named Azure AI User; Microsoft renamed it but the ID and permissions are unchanged). In Step 4, replace the set-header that injects x-api-key with: <authentication-managed-identity resource="https://cognitiveservices.azure.com" output-token-variable-name="foundry-token" /> <set-header name="Authorization" exists-action="override"> <value>@("Bearer " + (string)context.Variables["foundry-token"])</value> </set-header> Then you can skip the foundry-key Named value entirely. Don't use the legacy Cognitive Services User role — per the Foundry RBAC doc, roles starting with Cognitive Services don't apply to Foundry scenarios. Step 4 — Write the gateway policy This is the core enforcement layer in the architecture. Open APIs → anthropicapi → All operations → Inbound processing → </> and paste: <policies> <inbound> <base /> <!-- USER → APIM: verify Entra ID token from Claude Desktop --> <validate-jwt header-name="Authorization" failed-validation-httpcode="401" failed-validation-error-message="Unauthorized" require-scheme="Bearer"> <openid-config url="https://login.microsoftonline.com/{{entra-tenant-id}}/v2.0/.well-known/openid-configuration" /> <audiences> <audience>{{entra-client-id}}</audience> </audiences> <issuers> <issuer>https://login.microsoftonline.com/{{entra-tenant-id}}/v2.0</issuer> </issuers> </validate-jwt> <!-- APIM → Foundry --> <set-backend-service base-url="https://<foundry-account>.services.ai.azure.com/anthropic" /> <set-header name="x-api-key" exists-action="override"> <value>{{foundry-key}}</value> </set-header> <set-query-parameter name="api-version" exists-action="skip"> <value>2024-05-01-preview</value> </set-query-parameter> </inbound> <backend><base /></backend> <outbound><base /></outbound> <on-error><base /></on-error> </policies> Two things to notice: validate-jwt uses the OIDC discovery URL — JWKS keys are fetched and cached automatically. It rejects any token whose aud claim is not the client ID of our Entra app, which is exactly what we want. The Authorization header from the user is not forwarded — once validate-jwt succeeds, the request is re-authenticated to Foundry with x-api-key . No user token ever leaves APIM. APIM becomes the security boundary — user identity is validated at the edge, and downstream services never see or rely on user tokens. Step 5 — Configure Claude Desktop Open Claude Desktop → Configure third-party inference and fill it in like this: Field Value Connection Gateway Credential kind Interactive sign-in Gateway base URL https://<apim-name>.azure-api.net/claude Client ID (the appId your script printed) Issuer URL https://login.microsoftonline.com/<tenant-id>/v2.0 Authorization URL / Token URL leave empty Bearer token ID token (default) Scopes leave default ( openid profile email offline_access ) Redirect port leave empty (ephemeral) Model discovery Off Model list → Model ID <deployment-name> (your Foundry deployment name) ℹ️ Why Model discovery is Off — Claude Desktop's discovery uses GET /v1/models , and the Foundry /anthropic surface doesn't implement that endpoint, so it 404s. Listing the model manually skips the call entirely. If you want to leave Model discovery On, stub /v1/models in APIM. Add a GET /v1/models operation to your API and give it this inbound policy that returns an Anthropic-shaped response without ever hitting the backend: <policies> <inbound> <base /> <return-response> <set-status code="200" reason="OK" /> <set-header name="Content-Type" exists-action="override"> <value>application/json</value> </set-header> <set-body>@{ return new JObject( new JProperty("data", new JArray( new JObject( new JProperty("id", "<deployment-name>"), new JProperty("type", "model"), new JProperty("display_name", "Claude on Foundry"), new JProperty("created_at", "2026-01-01T00:00:00Z") ) )), new JProperty("has_more", false), new JProperty("first_id", "<deployment-name>"), new JProperty("last_id", "<deployment-name>") ).ToString(); }</set-body> </return-response> </inbound> <backend><base /></backend> <outbound><base /></outbound> <on-error><base /></on-error> </policies> Add one entry per deployment you want to expose. The benefit of stubbing rather than turning discovery off is that adding new models becomes a policy edit — no need to re-export and redeploy Claude Desktop config to every user. Click Apply Changes then Sign in to your organization. Your browser opens to the normal Entra sign-in page; once approved you're returned to the app, and a quick connection test runs. The success indicator is a small green banner: ✅ Inference — 1-token completion in 1449 ms · via identity provider For broader rollout, hit the Export button at the top of the configuration window — it produces a .mobileconfig (macOS) or .reg (Windows) you can push via Intune / Jamf to every user's machine. Step 6 — Verify both hops In APIM → APIs → anthropicapi → Test → POST /v1/messages I sent: Headers: anthropic-version: 2023-06-01 Body: { "model": "<deployment-name>", "max_tokens": 64, "messages": [{"role":"user","content":"hi"}] } Click Send → Trace, and look at two places: Inbound → validate-jwt: should say succeeded and show the decoded claims (your oid , email , etc.). Backend → Request: outbound URL is https://<foundry-account>.services.ai.azure.com/anthropic/v1/messages?api-version=2024-05-01-preview , with x-api-key: **** present and Authorization absent. Backend → Response: 200, with a Claude message JSON body. That confirms both halves of the chain. Bumps I hit along the way A few common issues encountered during setup — sharing so you can skip them: Symptom Cause Fix Claude shows "Your provider's model list hasn't loaded yet" and /v1/models returns 404 Foundry's Anthropic surface doesn't implement that endpoint Turn Model discovery OFF in Claude Desktop and add the deployment name manually Claude shows "Authentication failed" even though sign-in worked The APIM API still had Subscription required = ON, blocking the call before validate-jwt ran with 401: Access denied due to missing subscription key Uncheck Subscription required on the API Portal Test panel shows "Cannot read properties of undefined (reading 'statusCode')" The test console doesn't attach an Entra token, so validate-jwt 401s and the panel's JavaScript crashes Comment out <validate-jwt> temporarily for portal testing, or test via curl with a real token OIDC discovery failed (HTTP 404) in Claude Desktop Pasted the metadata URL into Issuer URL Issuer must end at /v2.0 , not at /.well-known/openid-configuration Token exchange failed (HTTP 401) App registered under Web platform instead of Mobile and desktop applications Create a new app with the right platform — it can't be changed Where this leaves us This pattern is small in moving parts but has outsized architectural impact: Zero secrets on endpoints. Eliminates API-key sprawl across laptops, MDM profiles, and shared vaults. The Foundry key lives only inside APIM — or disappears entirely when you switch APIM to managed identity. Identity, not credentials. Every Claude Desktop user authenticates against Entra ID in their browser, the same as Office or Teams. MFA, Conditional Access, and Entra ID Protection apply automatically — no parallel auth story to maintain. Per-user observability built in. APIM logs carry the user's Entra oid , email , and group claims. That unlocks per-user dashboards, cost allocation, and abuse detection without any client-side instrumentation. Aligned with Zero Trust. Strong identity at the edge, no implicit trust between hops, single policy chokepoint for inspection and rate-limiting, and full revocability through a single Enterprise Application. Optional but trivial keyless path. Flip APIM to system-assigned managed identity + <authentication-managed-identity resource="https://cognitiveservices.azure.com" /> and one Foundry User role assignment (role ID 53ca6127-db72-4b80-b1b0-d745d6d5456d , formerly Azure AI User) on the Foundry account. See the Foundry RBAC doc — don't use any Cognitive Services * roles for Foundry. What I'd add next llm-token-limit and llm-emit-token-metric policies for per-user quotas and cost visibility. App Insights wiring on the API, with a workbook that pivots on the oid claim. Assignment required = Yes on the Entra Enterprise Application + a security group, so only approved users can sign in. Intune deployment of the exported .reg / .mobileconfig so the gateway URL and client ID land on devices automatically. But that's all incremental. The hard part — getting Claude Desktop, Entra ID, APIM, and Foundry to agree on who's allowed to talk to whom — is done. Total elapsed: about an afternoon, most of it spent learning where each portal hides its switches. Useful links Gateway single sign-on with your identity provider — Claude.ai Documentation Configure Claude Desktop with Foundry Models — Microsoft Learn Role-based access control for Microsoft Foundry — Microsoft Learn3.2KViews0likes3CommentsAgents That Test Agents: A Cloud-Native Skill-Eval Harness on Foundry Hosted Agents
Skills are an agent's must-have. So test them. A skill is the lightest way to give an agent durable, reusable behavior: a SKILL.md file you author once, store centrally in Foundry's versioned Skills API, and inject into a Hosted Agent's context — no code change, no redeploy. That's why skills have quietly become standard equipment for production agents. But the moment a skill carries real behavior, a hard question follows: how do you know it still works? When you edit a skill you can't feel whether you improved it or just changed it. It might stop triggering, skip a required section, or quietly produce a worse result on one model than another. The cure is the same discipline we use for any prompt — evaluate it: run the agent, capture what happened, and grade it against a small set of checks. This is exactly what azure_skill_eval does for one concrete skill: edu-video-script, which writes an education short-video script for a given knowledge point (the sample's smoke test asks it to script the "P vs NP problem"). And it does the whole thing cloud-native, on Foundry Hosted Agents. The scenario: one skill, two models, four hosted agents The skill under test is edu-video-script. The clever part of the harness is that it doesn't just check one run — it puts the skill on a stand and stresses it from three sides, using four Foundry Hosted Agents wired together by the Agent Framework FoundryAgent: Hosted agent Role skill-eval-business-agent-gpt System under test (SUT), running edu-video-script on gpt-5.5 skill-eval-business-agent-deepseek The same skill, running on DeepSeek-V4-Pro skill-eval-attacker-agent Multi-turn adversarial prompt generator skill-eval-judge-agent LLM-as-judge that returns a rubric score as JSON Two business agents run the same skill on different models, so every case becomes an apples-to-apples comparison: which model executes this skill better? The attacker and judge are the graders. What we measure (define "done" first) Good evals start from a checkable definition of done — outcome, process, style, efficiency. For an education-video script that means: Did it produce a valid script (outcome)? Did it actually follow the edu-video-script template (process/style)? Does it hold up when a user pushes on it across turns (robustness)? The harness answers these with three grading layers. 1. Deterministic checks first (validator.py) The cheapest, most explainable signal: does the output match the script template the skill is supposed to produce? validator.py runs fixed, deterministic template checks — no model needed. These catch the obvious regressions instantly and never cost a token. 2. The LLM judge (skill-eval-judge-agent) Template checks answer "did it do the basics?" but not "is the script any good?" — pacing, clarity, whether it teaches the concept. For that, a dedicated judge hosted agent grades the result and returns structured JSON so scores compare cleanly across runs and models: { "overall_pass": true, "score": 100, "checks": [] } Structured output is the point: stable fields (overall_pass, score, checks) diff cleanly between GPT and DeepSeek, and between today's skill version and last week's. 3. The multi-turn attacker (test_agent.py + skill-eval-attacker-agent) A skill that looks great on a clean prompt can still fall apart when a user pushes on it. The attacker agent generates adversarial prompts for a knowledge point using a chosen strategy — for example extreme length — and keeps the pressure on across multiple turns (max_turns, default 3). This is where you find out whether edu-video-script stays on-template under stress, not just on the happy path. # the attacker takes a knowledge point + a strategy, emits one user prompt azd ai agent invoke skill-eval-attacker-agent \ "Topic: P vs. NP problem Recommended attack strategy: Extreme length Please output the unique user prompt text." The eval loop, end to end runner.py is a ghcsdk-style pipeline that runs cases × models, with each side toggleable: pick all models / GPT only / DeepSeek only, run a single case (e.g. edge-03), and switch adversarial mode, single-turn vs multi-turn, and judge grading on or off. The same switches are query parameters on POST /api/run: model, only_case, use_attack, single_turn, use_judge, max_turns. The test set lives in shared/test_cases.py — 10 built-in edge cases (edge-01 … edge-10) exported to evals/evals.json. You don't need a giant benchmark; a small, sharp set catches regressions, and you grow it whenever a real failure shows up: python -m evals.export_evals # regenerate evals/evals.json from shared/test_cases.py Every SUT call goes through runtime.py, which follows the official Agent Framework hosted-agent sample: it opens a fresh hosted session per turn, invokes via Responses, and tears the session down afterward. # shared/runtime.py — the documented Foundry hosted-agent pattern project = AIProjectClient(endpoint=FOUNDRY_PROJECT_ENDPOINT, credential=cred, allow_preview=True) agent = FoundryAgent(project_client=project, name=agent_name, # e.g. skill-eval-business-agent-gpt allow_preview=True) session = project.beta.agents.create_session(agent_name=agent_name) # ... send the (possibly adversarial) prompt, collect the Responses output ... So a single case flows: runner → business agent (skill runs) → validator → judge, optionally with the attacker driving multiple turns first. Cloud-native by design — and why that matters for eval This is the part that makes the harness production-grade rather than a laptop script. The hard parts of an eval harness — provisioning agents, recording every run, scaling trials, governing access — are handled by Azure, not by you. Foundry Hosted Agents are the runtime. The SUT, attacker, and judge all run as managed hosted agents in your Foundry project. You bring the skill and the cases; Foundry hosts the agents, models, and sessions. The business agents deploy with host: azure.ai.agent and docker.remoteBuild: true, so azd deploy builds the containers in Azure Container Registry — local Docker doesn't even need to be running. The UI is serverless. A FastAPI app on Azure Container Apps lets you upload evals.json, watch progress live, and browse the dashboard — scale-to-zero when no one's running evals. Every run is durable. Results land in Azure Blob Storage (skill-eval-runs), one yymmdd-XXXXXX/ folder per run, with a newest-first runs.json index. Nothing lives only in a terminal scrollback. Access is identity-based. In the cloud, a user-assigned Managed Identity carries exactly two roles — Storage Blob Data Contributor + Azure AI User; locally it's AzureCliCredential. No keys in env files. It's reproducible infra. azd up runs infra/main.bicep to stand up Storage, the container, Log Analytics, the Container Apps environment, the identity, and the role assignments in one shot. The payoff: the scores you read came from the same hosted runtime you actually ship to — not a local approximation — and the run that produced them is sitting in Blob, comparable against every run before it. Run it Local (no deploy): conda activate agentdev cd Skill_eval/azure_skill_eval pip install -r requirements.txt cp .env.example .env # FOUNDRY_PROJECT_ENDPOINT + AZURE_STORAGE_* uvicorn webapp.app:app --reload --port 8000 Open http://localhost:8000, upload evals/evals.json, pick your models and modes, and click Run. Cloud (azd): azd auth login azd env new skill-eval-dev azd env set FOUNDRY_PROJECT_ENDPOINT https://<project>.services.ai.azure.com/api/projects/<project> azd env set MODEL_GPT gpt-5.5 azd env set MODEL_DEEPSEEK DeepSeek-V4-Pro azd up Provision the skill once, deploy the four hosted agents, then smoke-test them: python -m hosted_agent.provision_skills # upload edu-video-script to Foundry Skills azd deploy skill-eval-business-agent-gpt azd deploy skill-eval-business-agent-deepseek azd deploy skill-eval-attacker-agent azd deploy skill-eval-judge-agent azd ai agent invoke skill-eval-business-agent-gpt "Here is a script for an educational short video on the P vs. NP problem." Read the results Each run is self-contained on Blob: summary.json gives you the headline — pass rate and judge averages — and the per-{case}__{model}.json files let you open any single result and see exactly what the skill produced and why it passed or failed. The dashboard streams these straight from Blob via /api/runs/{run_id}/files/{filename}. Because GPT and DeepSeek ran the same cases, the comparison is right there in one folder. Takeaways A skill you can't evaluate is a skill you can't trust. edu-video-script is treated like code — versioned in Foundry, run, and graded. Stack your graders cheap-to-expensive. Deterministic template checks first (validator.py), then an LLM judge for quality, then a multi-turn attacker for robustness. Make the judge return structured JSON. overall_pass / score / checks compare cleanly across models and skill versions. Compare models on the same skill. Running GPT-5.5 and DeepSeek-V4-Pro side by side turns "which model?" from a guess into a measured answer. Let the platform carry the harness. Foundry Hosted Agents are the runtime; Azure Container Apps, Blob Storage, Managed Identity, and azd/Bicep make the whole loop reproducible and durable. Write the skill. Then build the harness that proves it. On Foundry, that second step is mostly configuration — and the result is a skill you can actually trust in production. Conclusion Skills moved agent behavior out of code and into versioned Markdown — a huge win for reuse, but only if you can prove a skill still works after every edit. azure_skill_eval answers that for edu-video-script by treating evaluation as a first-class, repeatable step rather than a gut check. The shape is simple and worth copying for any skill of your own: Pin down "done" as checkable criteria, then encode a small set of sharp cases (here, 10 edge cases). Grade in layers, cheap to expensive — deterministic template checks, then a structured LLM-judge rubric, then a multi-turn adversarial pass. Run the same cases across models (GPT-5.5 vs DeepSeek-V4-Pro) so model choice becomes a measurement, not a guess. Let the cloud carry it — Foundry Hosted Agents as the runtime, FastAPI on Azure Container Apps for the UI, Blob Storage for durable runs, Managed Identity for access, and azd/Bicep so the whole thing is reproducible. The result is a feedback loop where every skill change is confirmed, every regression is visible, and every score traces back to the same hosted runtime you ship to. That's the difference between building skills and being able to trust them — and on Foundry, the gap between the two is mostly configuration. Sample Code : https://github.com/kinfey/Multi-AI-Agents-Cloud-Native/tree/main/code/Skill_eval