For a long time, ForeFront TMG (and ISA before it) has been the go-to Microsoft reverse proxy solution for many applications, including Exchange Server. However, with no more development roadmap for TMG 2010 a lot of customers are looking out for an alternative solution that works well with Exchange Server 2013.
The Windows team have added an additional component called Application Request Routing (ARR, or as Greg the pirate says, ARR!) 2.5 to the Internet Information Service (IIS) role, which enables IIS to handle reverse proxy requests. By using the URL Rewrite Module and Application Request Routing you can implement complex and flexible load balancing and reverse proxy configurations.
There are two options when implementing this solution and each have their pros and cons, which I'll cover in three posts. In this first post, we'll take a look at:
- Installation steps.
- Option 1 of implementing ARR as a reverse proxy solution for Exchange 2013 (this option is the simplest of the three configurations).
In the next 2 posts in the series, we'll cover the second option and some troubleshooting steps. The troubleshooting steps would also help you to verify if you have implemented the reverse proxy solution correctly.
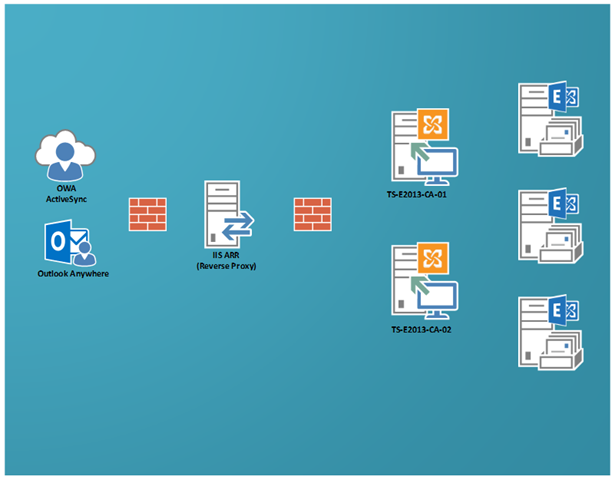
Here's a diagram of the environment we'll use when discussing how to implement ARR.
Prerequisites
- The IIS ARR server need not be domain joined. It's your choice to decide if you want to domain join this server or not.
- The IIS ARR server should have two NICs, one for the internal network and the other for the external network.
TIP To make sure you're configuring and using the right network interface, rename the NICs to Internal and External.
- If you're not using an internal DNS server, you should update the HOSTS file on the IIS ARR server so that it can perform name resolution for the internal CAS and the published Exchange namespaces.
- Make sure you have already set the Internal and External URL’s for Outlook Anywhere, OWA, EWS and EAS, have your certificates installed correctly and this is all working as expected. If not, get it working first before you start adding ARR into the mix.
Installing ARR
Requirements: IIS ARRis supported on Windows Server 2008, Windows Server 2008 R2, and Windows Server 2012. It is also supported on Windows Vista, Windows 7, and Windows 8 with the Web services features installed. Note that IIS ARR does not require IIS 6.0 compatibility mode.
Note: As with all such changes, we recommend that you test this in a non-production environment before deploying in production environment.
To install IIS with the ARR module on the server identifid as the Reverse Proxy:
- 1. Install IIS, including .NET 3.5.1 and Tracing. You can use run this command in PowerShell to add all of the required features.
Import-Module ServerManager
Add-WindowsFeature Web-Static-Content,Web-Default-Doc,Web-Dir-Browsing,Web-Http-Errors,Web-Net-Ext,Web-Http-Logging,Web-Request-Monitor,Web-Http-Tracing,Web-Filtering,Web-Stat-Compression,Web-Mgmt-Console,NET-Framework-Core,NET-Win-CFAC,NET-Non-HTTP-Activ,NET-HTTP-Activation,RSAT-Web-Server - Export the Exchange certificate (from a CAS) and import the certificate to the local machine certificate store on the IIS Reverse Proxy, together with any required root or intermediate certificates. See the following topics on how to export & import certificates:
- On the Default Web Site, add an HTTPS binding and associate the (imported) Exchange certificate.
- Download and Install the latest version: IIS ARR 2.5.
If you don’t have internet access on the IIS ARR server, you can use the steps highlighted in How to install Application Request Routing (ARR) 2.5 without Web Platform Installer (WebPI).
OPTION 1
This is the simplest way of implementing IIS ARR as a Reverse Proxy solution for Exchange Server 2013. This implementation requires a minimum number of SAN entries in your certificate and minimum number of DNS entries.
This set up assumes that all protocols (OWA, ECP, EWS etc) have been published with the mail.tailspintoys.com namespace.
- Certificate: mail.tailspintoys.com, autodiscover.tailspintoys.com
- DNS: Public IP address for each of the above namespaces
Step 1: Create a Server Farm
- Open IIS and click on Server Farm.
- Create a new farm and give it a name as shown below.
- On the Add Server page, add each of the Client Access server and click Finish.
- Select Yesat the below prompt.
Step 2: Server Farm Configuration Changes
On the Server Farm settings node make the configuration changes as detailed below:
- Select Caching and choose Disable Disk Cache.
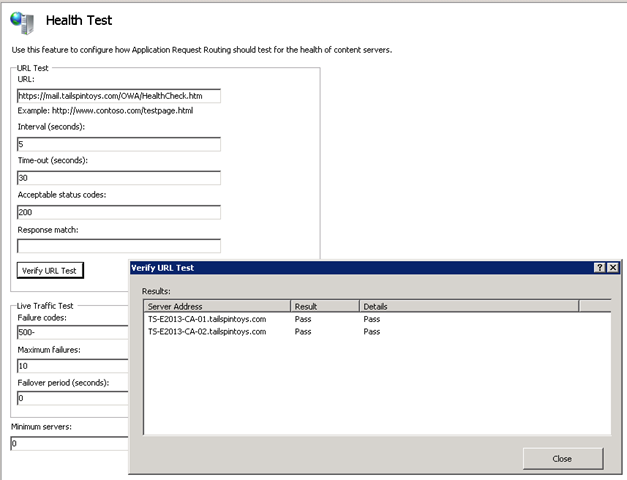
- Select Health Test. This is used to make sure that a particular application is up and running. It is similar to a Load Balancer’s service availability test.
In Exchange 2013 there is a new component called Managed Availability and it uses various checks to make sure that each of the protocols (OA, OWA, EWS, etc.) are up and running. If any protocol fails this check then an appropriate action is automatically taken. (This was just a very simple explanation as to what Managed availability is of course, but if you can take it, and want a more detailed understanding watch Ross Smith IV’s TechEd 2013 Session). We are going to leverage one of these checks to make sure that the service/protocol is available.
https://<fqdn>/<protocol>/HealthCheck.htm is the default web page present in Exchange 2013. These URL’s are specific for each protocol and do not have to be created by the administrator.
Examples:
https://autodiscover.tailspintoys.com/Autodiscover/HealthCheck.htm
https://mail.tailspintoys.com/EWS/HealthCheck.htm
https://mail.tailspintoys.com/OAB/HealthCheck.htm
Configure the Health Test with the following settings:
URL: https://mail.tailspintoys.com/OWA/HealthCheck.htm
Interval: 5 seconds
Time-Out: 30 seconds
Acceptable Status Code: 200
- Select Load Balance and choose Least Current Request. There are other options, but for this scenario, we find this to be simple and effective.
- Select Monitoring and Management. This shows the current state of the CAS that are part of this Server Farm. The Health Status is based on the output of the Health Test mentioned above.
- Select Proxy. Change the below two values. The actual value for these settings may need to be tweaked for your deployment, but these usually work well as a starting point.
Time-Out: 200 seconds
Response Buffer threshold: 0
- Select Routing Rules and uncheck Enable SSL Offloading as it is not supported in Exchange 2013.
- Select Server Affinity. Due to major architectural changes in the way CAS works in Exchange 2013 we do not need to maintain session affinity. As long as you can get to a CAS server, you will be able to access your mailbox. Thus leave this setting as is. Which means, no changes required.
Step 3: Create URL Rewrite Rules
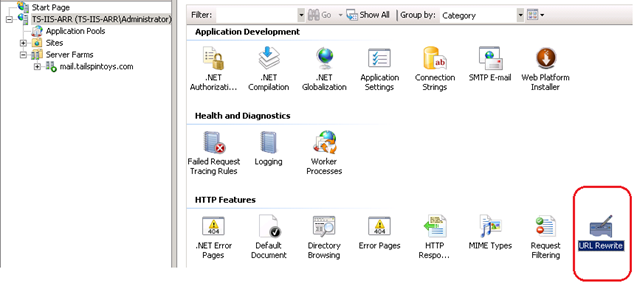
- At the IIS Root (this is the root and not the properties of the Default Web Site) click on URL Rewrite.
- You should see two URL Rewrite rules already created (these were created when you selected “Yes” at the end of Server Farm creation).
- Deletethe one for HTTP .
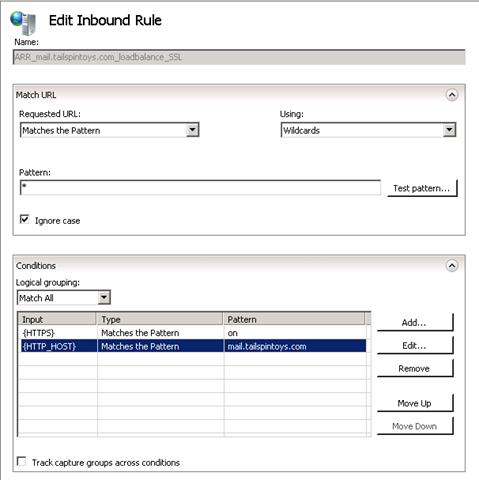
- Open the properties of the HTTPS rule and make the changes as below;
- Under Conditions add a condition for {HTTP_HOST} and make sure it looks like this:
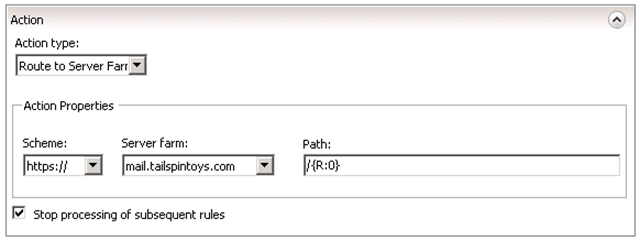
- Under Action make sure that you have the below options set i.e.: choose the appropriate Server Farm from the drop down menu.
Note: Make sure the option “Stop processing of subsequent rules” is selected. This is to make sure that the validation process stops once the requested URL finds a match.
- Repeatthe same steps of creating a Server Farm and URL Rewrite rule for your AutoDiscover URL (i.e., autodiscover.tailspintoys.com). The final result is as shown below.
That’s it!!!! ....You are now all set and have a reverse-proxy-with-load-balancing solution for your Exchange 2013 environment!
Give it a try and see how it works. Make sure DNS for mail.tailspintoys.com resolves to your reverse proxy and try connecting a client. And if it doesn’t work, go back through the steps and see where you went wrong. And if it still doesn’t work, post a comment here, or wait for Part 3, Troubleshooting (so please don’t do all this for the first time in a production environment! Really, we mean it!).
Finally, here are a couple of additional changes we recommend you review and optionally consider making to your IIS ARR configuration.
- Implement the changes (Step3 and Step4) from Install Application Request Routing Version 2.
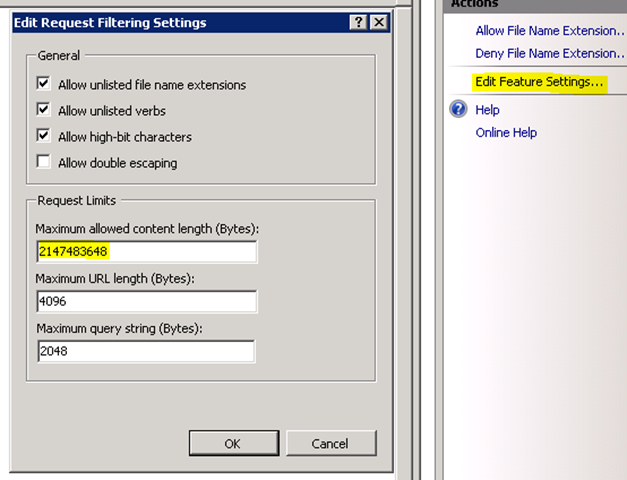
- For optimization of RPC-HTTP traffic make the changes as stated. Click on the root of IIS and open the properties for Request Filtering. Then click on “Edit Feature Settings” and change the settings for “Maximum allowed content length” to the below.
We've spent time testing this configuration and found it to work as we hoped and expected. Note that support for IIS ARR is provided by the Windows/IIS team, not Exchange. That's no different than support for TMG or UAG (if you use either of these products to publish Exchange).
We would really appreciate any feedback on your implementation and/or any configuration where this doesn’t seem to work.
Keep your eyes peeled for the next set of articles where we’ll talk about slightly complex and interesting implementations of IIS ARR for Exchange 2013.
I would like to thank Greg Taylor (Principal PM Lead) for his help in reviewing this article.
References
- ARR as generic proxy in Hotmail and SkyDrive
- Achieving High Availability and Scalability - ARR and NLB
- IIS ARR
- Using IIS ARR as a Reverse Proxy for Lync Server 2013
B. Roop Sankar
Premier Field Engineer, UK
