private endpoint
16 TopicsVerifying private network paths before you deploy: a what-if for Azure private endpoints
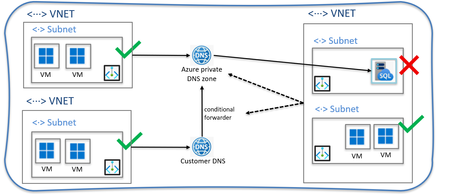
A common Azure scenario: public access is disabled on a PaaS resource, a private endpoint is created, and the connection shows as Approved. The application still times out. Resource-level checks such as what-if report nothing wrong, because every resource is configured. What they do not verify is whether the name the application uses resolves to the private address from the application's VNet. In my experience, most private connectivity failures come from DNS configuration, not from firewall rules. What must be true For a workload in a VNet to reach a PaaS service privately: The private endpoint connection is Approved. The matching privatelink private DNS zone exists. The zone is linked to the VNet that performs the lookup. The zone contains an A record for the resource. If the VNet uses custom DNS servers, they forward privatelink zones to Azure DNS (168.63.129.16) or to an Azure DNS Private Resolver. The third point is the one that is easy to miss: the zone and the record exist, but the VNet performing the lookup cannot see the zone, so the name resolves to the public address. An approach: check the whole path in one command I wrote a small, read-only script that takes a target resource and a source VNet, then reports PASS, WARN, or FAIL for each requirement above, with a suggested fix. It uses the Azure CLI and needs only Reader access. Checks performed: publicNetworkAccess on the target resource Private endpoint connections and their approval state Expected privatelink zone for the endpoint's group id Whether the zone is linked to the source VNet Whether the zone has an A record for the resource Whether the source VNet uses custom DNS servers (reported as a warning for manual review) It exits with code 1 on any failure, so it can run as a pipeline gate after a Dev deployment. Limitations It does not test the network path itself (NSGs, firewalls, routing, ports). Azure Network Watcher covers that. It reads configuration and does not resolve DNS from inside the VNet. A real lookup from a VM in the VNet remains the final proof. In hub-and-spoke designs, the hub VNet may need to be passed as the source. The built-in zone table covers a few services (storage, Key Vault, SQL, Databricks) and needs extending for others. Why I think this matters for AI-assisted infrastructure Script and sample pipeline: Ping me or message me When infrastructure code is generated by an AI assistant, a private endpoint without its DNS zone link is a plausible output: the code is valid and the deployment succeeds. Independent, read-only checks like this one are the kind of gate that lets teams review generated changes with confidence. Questions for the community Which private endpoint failure costs your team the most troubleshooting time? How do you manage DNS in hub-and-spoke networks: Private Resolver, DNS forwarders, or another pattern? Would a check like this be more useful as an Azure Policy, a Network Watcher feature, or a pipeline step? Which services should be added to the DNS zone table first? Shivanna Gundanavar71Views2likes0CommentsLessons Learned #551: Azure SQL Connection Timeouts: Three Things to Check
An application starts reporting intermittent timeouts when connecting to Azure SQL Database. Some requests succeed, others fail, and a test from a developer’s laptop works perfectly. The database appears online, no recent deployment seems related, and the natural reaction is to ask: Is Azure SQL unavailable? Is the firewall blocking the connection? Should we increase the connection timeout? Should we change the driver or scale the database? Those are reasonable questions, but they may lead the investigation in the wrong direction. The most important lesson is simple: A timeout tells us how long the application waited. It does not tell us what the application was waiting for. Not every “SQL timeout” happens inside Azure SQL From the application’s point of view, opening a database connection may involve several operations: Resolving the server name. Reaching the SQL endpoint. Obtaining a Microsoft Entra access token. Waiting for an available pooled connection. Completing the SQL login. Executing the first command. When all these operations are reported through the same application method or log entry, it can look as though Azure SQL took thirty seconds to accept the connection. In reality, only part of that time may have been spent connecting to the database. In one anonymized support scenario, the application experienced problems mainly on its first connection. Network tests were successful and no corresponding SQL connection failure was identified. The investigation eventually showed that access-token acquisition was consuming a significant part of the available time. Increasing the SQL timeout or changing the firewall would not have addressed the real delay. Check 1: Capture the complete error and the exact time A screenshot containing only “Connection Timeout Expired” is rarely enough. Capture: The complete exception and inner exception. The operation being performed. The driver and version. The authentication method. The exact timestamp in UTC. Whether the issue affects every connection or only some of them. The wording around the timeout matters. For example, a timeout while obtaining a connection from the pool points toward the application’s pooling and concurrency behavior. A pre-login or TLS error belongs to a different investigation. A command timeout after the connection was established is usually a query-performance problem rather than a connection problem. Check 2: Measure the application timeline The application should record important operations separately. A simple timeline can completely change the investigation: 10:14:20.100 Token acquisition started 10:14:28.400 Token acquired 10:14:28.405 SQL connection started 10:14:29.050 SQL connection established The complete operation took almost nine seconds, but Azure SQL connection establishment took less than one second. Useful measurements include: Token-acquisition duration. Time waiting for a pooled connection. SQL connection-open duration. SQL command duration. Number of retry attempts. Applications using Microsoft Entra authentication must obtain an access token before authenticating to Azure SQL. Measuring that operation separately helps distinguish an identity delay from a database connectivity problem. This is particularly useful when the issue appears: On the first connection after startup. After a token expires. Only with Managed Identity or Workload Identity. Intermittently, while SQL authentication connections remain unaffected. Check 3: Test from the application environment A successful connection from a laptop does not validate the path used by an application running in: Azure App Service. Azure Functions. Azure Kubernetes Service. A virtual machine. An on-premises application server. A container or integration runtime. The laptop and the application may use different DNS servers, routes, firewalls, proxies and identities. Connectivity and DNS tests should therefore be performed from the environment that is actually failing. This becomes especially important when Private Endpoint is used. The application should continue connecting with: <server>.database.windows.net It should not use the Private Endpoint IP address or the privatelink.database.windows.net hostname directly. Direct login attempts using the private IP or the private-link FQDN fail; the normal logical-server FQDN must remain in the connection string. From the affected environment, confirm that: The expected DNS server answers the request. The server FQDN resolves to the expected private IP. The Private Endpoint connection is approved. The Private DNS zone is linked correctly. The resolved address is reachable through the intended route. A test from an unrelated machine is still useful for comparison, but it does not prove that the application path is healthy. Observed symptom Likely investigation area Timeout while obtaining a connection from the pool Application connection pooling Server name cannot be resolved DNS TCP connection to the endpoint cannot be established Network path, firewall or routing Error during the pre-login handshake TLS, driver, network interruption or pre-login processing Authentication or access-token error Microsoft Entra authentication, identity or token acquisition Timeout during the post-login phase Login completion, session initialization or server-side processing Execution or command timeout after connecting Query execution and database performance Avoid changing several things at once During a production incident, it is tempting to: Increase the timeout. Add firewall rules. Change the connection policy. Upgrade the driver. Restart the application. Clear connection pools. Applying several changes together makes it difficult to determine which one helped, and some may only hide the symptom. A better approach is to define one hypothesis: We believe DNS in the application environment is resolving the public endpoint instead of the Private Endpoint. Then define: The evidence supporting the hypothesis. One controlled change. The expected result. How the result will be measured. How the change will be reverted. Azure SQL supports Proxy and Redirect connection policies, which determine how traffic flows after reaching the Azure SQL gateway. The policy is configured for the logical server, so it should be verified before making firewall assumptions or changes. What should we collect before opening a support request? A small but precise evidence package can avoid several rounds of questions: Complete error and inner exception. Exact UTC timestamps. Application platform and location. Public or Private Endpoint. Server FQDN used by the application. Driver and version. Authentication method. Token, pool, connection and command durations. DNS result from the affected environment. Whether the issue is constant, intermittent or limited to the first connection. Recent application, network, identity or configuration changes.439Views0likes0CommentsFinOps Hub Privado: Implementação Manual em Ambientes Corporativos
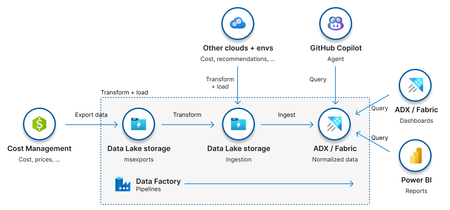
O que é o FinOps Hub? O FinOps Hub é uma solução open source da Microsoft, parte do FinOps Toolkit, que fornece uma base escalável e extensível para análise, governança e otimização de custos em nuvem. A solução centraliza dados de custos por meio de recursos de armazenamento e pipelines de dados, permitindo que as organizações padronizem a forma como analisam seus gastos na nuvem, adotando o modelo de dados FOCUS definido pela FinOps Foundation. Além de disponibilizar relatórios e dashboards prontos, o FinOps Hub expõe os dados de custos de forma estruturada por meio do Azure Data Explorer ou do Microsoft Fabric, possibilitando a criação de relatórios customizados no Power BI e o desenvolvimento de soluções internas sob medida, de acordo com as necessidades do negócio. Objetivo Esse artigo visa orientar a implementação manual do acesso privado ao FinOps Hub após uma implementação pública, sem usar diretamente a opção de implementação privada oferecida pelo template. Por que implementar o FinOps Hub com acesso privado de forma manual? O template disponibilizado para a implementação do FinOps Hub permite que selecionemos duas formas de implementação: Pública: forma de implementação mais simples e comum. Os recursos são provisionados com acesso público habilitado, sendo acessados por meio de seus endpoints públicos padrões do Azure. O controle de acesso é feito exclusivamente via permissões RBAC. Privada: forma de implementação mais segura. Os recursos são provisionados com acesso público desabilitado e expostos apenas por meio de private endpoints, ficando acessíveis somente através de redes privadas que possuem conectividade com a rede onde esses endpoints estão implementados. Embora a comunicação privada traga ganhos significativos de segurança, sua habilitação através do template do FinOps Hub introduz algumas implicações importantes no processo de implantação. O template, de forma automática, tenta: Criar uma rede virtual (/26); Provisionar Private DNS Zones; Criar os registros DNS associados aos private endpoints; Configurar os links entre as VNets e as zonas DNS. Em muitas organizações, esse tipo de configuração é restrito por políticas internas. A criação de redes, zonas DNS e seus respectivos vínculos costuma ser responsabilidade de times especializados, que garantem a padronização e a aderência às diretrizes arquiteturais definidas pela empresa. Em cenários onde a organização adota, por exemplo, uma topologia Hub & Spoke, com landing zones bem definidas para workloads e conectividade, é fundamental considerar alguns pontos adicionais: Garantir que a rede criada para os private endpoints não tenha sobreposição (overlap) com outras redes existentes; Assegurar que exista peering com a VNet de hub; Integrar os registros DNS dos novos private endpoints às Private DNS Zones centralizadas; Configurar corretamente os VNet links; Garantir que a resolução de nomes esteja funcional no ambiente on-premises, permitindo o acesso ao FinOps Hub por meio de VPN, ExpressRoute ou outras formas de conectividade híbrida. Esses fatores explicam por que, em muitos casos, o uso do template com configuração privada se torna inviável quando utilizado de forma isolada. Isso ocorre porque, frequentemente, o time de FinOps não é o mesmo time responsável por redes e DNS, possuindo permissão para implantar apenas parte dos recursos necessários. Nesses cenários, a implementação privada exige a orquestração entre diferentes times, cada um atuando dentro de suas responsabilidades. Como resultado, algumas etapas que o template tenta executar automaticamente precisam ser realizadas manualmente, conforme descrito nas próximas seções. Passo a Passo para Implementação Faça a implementação do template seguindo o tutorial documentado, com “Networking” em modo público. Assim que o template é implementado, alguns scripts de configuração são executados. Aguarde até que esses scripts sejam executados, ou seja, desapareçam do grupo de recursos onde o FinOps Hub foi implementado para seguir com os próximos passos. Exemplos dos “Deployment Scripts” que desaparecerão: Crie uma rede de tamanho mínimo /26 – valide com o time de infraestrutura o espaçamento que pode ser utilizado. Dentro dessa rede implemente uma subrede: private-endpoint-subnet (/28) – subrede para os private endpoints. Garanta a existência das Private DNS Zones: se seu ambiente possui zonas de DNS privadas centralizadas pré-configuradas. Garanta que as seguintes zonas já existam na subscription padrão para os seus recursos de rede: privatelink.blob.core.windows.net– para o Data Explorer e storage privatelink.dfs.core.windows.net– para o Data Explorer and o data lake hospedando os dados de FinOps data e configuração das pipelines privatelink.table.core.windows.net– para Data Explorer privatelink.queue.core.windows.net– para o Data Explorer privatelink.{location}.kusto.windows.net– para Data Explorer Configurando a Storage Account com Acesso Privado O primeiro recurso que a ser configurado será a Storage Account. A configuração a seguir deve ser realizada duas vezes uma para o target sub-resource “blob” e outra para o target sub-resource “dfs”. Acesse “Networking” e a aba “Private Endpoints” Na aba “Basics” defina: Subscription: mesma que o FinOps Hub foi implementado Resource Group: mesmo que o FinOps Hub foi implementado Name: use um nome que remeta ao recurso criado (private endpoint) e o sub recurso que ele fará exposição (blob/dfs). Exemplo: pe-storageaccount-blob/ pe-storageaccount-dfs Na aba “Resource” defina o target sub-resource para o qual a configuração está sendo feita. No caso, primeiro foi feito para “blob” e depois “dfs”. Na aba “Virtual Network”, deve-se selecionar a rede criada para os private endpoints bem como a subrede (private-endpoint-subnet). Na aba “DNS” selecione a private DNS zone na qual são realizados os registros do seus private endpoints. Quando estiver configurando o private endpoint para blob será privatelink.blob.core.windows.net e para dfs privatelink.dfs.core.windows.net. Adicione Tags caso seja necessário. Clique em “Review + create”. Ao final, dois private endpoints devem estar criados para a storage account: Agora será necessário configurar o private endpoint usado pelo Data Factory para acessar a Storage Account. Acesse o Data Factory e clique em "Launch Studio". No menu lateral, selecione a opção "Manage" -> "Linked services": Selecione o serviço correspondente ao Azure Data Lake Storage Gen2. Em “Connect via integration runtime” substitua “AutoResolveIntegrationRuntime” por New+: Em “Integration runtime setup” selecione “Azure” -> Botão “Continue”: Na aba “Settings”, apenas altere o campo “Name”. Use algo como “ManagedIntegrationRuntime”. Os demais campos, mantenha como estão: Na aba “Virtual Network”, configure conforme a imagem abaixo: Por fim, na aba “Data flow runtime”, use as configurações abaixo: Clique em “Create”. Agora, voltando a página “Edit linked Service”, adicione o “Managed Private Endpoint”. Ele ficará em estado “Pending”. Clique em “Save”. Além disso, use a managed identity fornecida na página “Edit linked Service”, e lhe dê os seguintes acessos na storage account: Reader Storage Account Contributor Storage Blob Data Contributor Por fim, acesse a seção “Networking” da Storage Account novamente, selecione o private endpoint criado pelo Data Factory e clique no botão “Approve”. Configurando o Linked Service ftkRepo no Data Factory Voltando na seção “Manage” do Azure Data Factory, será necessário editar o serviço “ftkRepo”. Nele, o único campo a ser alterado é o “Connect via integration runtime” usando o “ManagedIntegrationRuntime” criado na etapa de configuração da storage account. Clique em “Save”. Configurando o Azure Data Explorer com Acesso Privado Acesse a seção “Networking” cluster do Data Explorer criado pelo script do FinOps Hub e acesse a aba “Private Endpoint Connections” Clique em “+ Private Endpoint”. Em “Basics” inclua um nome para o private endpoint e garanta que a região selecionada é a de implementação do seu FinOps Hub e da vnet criada para ele. Na aba “Virtual Network” selecione a rede e subrede criadas para os private endpoints. Na aba “DNS”, associar cada configuração a sua private DNS zone correspondente. Se essas zonas já existirem no ambiente e forem utilizadas de forma centralizada, usar as existentes. Caso contrário, a configuração poderá criar private DNS zones novas: Novamente será preciso configurar o private endpoint gerenciado pelo Data Factory. Para isso, acesse “Managed” -> “Linked Services” e selecione o serviço referente ao Azure Data Explorer. Nessa seção, o único campo a ser editado é o “Connect via integration runtime” usando o “ManagedIntegrationRuntime” criado na etapa de configuração da storage account. Agora ainda em “Manage” no Data Factory, selecione a opção “Managed Private Endpoints”. Clique em “+New” -> “Azure Data Explorer (Kusto)” Forneça um nome para o private endpoint, marque a subscription na qual o Data Explorer foi implementado e em "Cluster" selecione o recurso implementado via template do FinOps Hub: Ao final, deve-se ter dois private endpoints configurados no Azure Data Explorer: Ajustes Finais e Validações de Conectividade Tanto para a Storage Account quanto para o Data Explorer, acesse as configurações de rede e altere o Public network access para “Disabled”. Por fim, no seu servidor local de DNS, crie o registro para o Data Explorer apontando para o forwarder correto no Azure seja ele uma máquina virtual ou o inbound endpoint do Azure Private Resolver. Não use o domínio com privatelink, mas sim o padrão, no caso do Data Explorer a forma geral é <localização>.kusto.windows.net conforme o exemplo abaixo: Ao configurar os apontamentos corretamente, será possível configurar os dashboards em máquinas locais/on-premises que tenham acesso privado ao ambiente Azure. Os dashboards precisam ser capazes de resolver a URL do cluster Data Explorer que é apontado como parâmetro do Dashboard em PowerBI. Se desejar validar a comunicação antes de configurar o dashboard de Power BI, teste da sua máquina local a resolução da URI do Data Explorer implementado para o FinOps Hub, usando nslookup conforme o exemplo abaixo.479Views5likes0CommentsStep-by-Step: How to Configure a Private Endpoint to Secure Azure Static Web Apps
Learn how to secure your web apps with Azure Static Web Apps by configuring a private endpoint. This feature, also known as private link, allows developers to link network isolated backends for added security and seamless routing. This step-by-step guide explains the benefits and process of setting up a private endpoint in Azure Static Web Apps. Don't leave your web apps vulnerable, ensure their safety with a private endpoint.14KViews0likes3Comments
SQL MI Private Endpoint in One Picture
PRIVATE ENDPOINT – SQL MANAGED INSTANCE Where PE can be located? Key points Connections only in one direction, from PE to SQL MI and traffic in port 1433 When using PE, there’s no need to set up VNET peering or public endpoint Connection string needs SQL MI hostname / IP address is not supported Customer DNS or Azure DNS private zone is needed PE establishes secure and isolated connectivity PE always use proxy connection type PE can be created in different Azure tenant When connecting from same VNET than SQL MI, TLS certificate configuration needed Article link - https://learn.microsoft.com/en-us/azure/azure-sql/managed-instance/private-endpoint-overview?view=azuresql&tabs=separate-vnets346Views0likes0CommentsHow to automate the deployment of an Elastic Job Agent with a Private Endpoint via Bicep
Environment Overview Recently, I worked on a case where our customer encountered an issue during the deployment of an Elastic Job Agent (EJA) and a Private Endpoint (PEP) using a Bicep deployment script. The process resulted in an endless deployment loop. In this article, I will guide you step by step through creating an EJA with a PEP and demonstrate how to automatically approve the connection using a Bicep deployment script. Technical Issue The main challenge is that the EJA PEP is fully managed by Microsoft, which means you cannot specify a name during the script authorization process—the system assigns one randomly. To address this, we will use deploymentScripts in combination with PowerShell to monitor and authorize the process automatically. For more details, please refer to the following resources: References Use deployment scripts in Bicep https://learn.microsoft.com/en-us/azure/azure-resource-manager/bicep/deployment-script-bicep?tabs=azure-cli Elastic jobs in Azure SQL Database https://learn.microsoft.com/en-us/azure/azure-sql/database/elastic-jobs-overview?view=azuresql Elastic job private endpoints https://learn.microsoft.com/en-us/azure/azure-sql/database/elastic-jobs-overview?view=azuresql#elastic-job-private-endpoints The Idea Since it's not possible to specify the EJA PEP name as a variable for direct approval—unlike standard PEPs—the approach was to intercept the auto-generated PEP by its ID or name and then authorize it automatically. (Remember to always follow the Principle of Least Privilege (PoLP)); in my example, I used Contributor permissions for simplicity. ****************************************************************************************************************************************************************************************************** /*Disclaimer: ****************************************************************************************************************************************************************************************************** This script is not supported under any Microsoft standard support program or service. This script is provided AS IS without warranty of any kind. Microsoft further disclaims all implied warranties including, without limitation, any implied warranties of merchantability or of fitness for a particular purpose. The entire risk arising out of the use or performance of the script and documentation remains with you. In no event shall Microsoft, its authors, or anyone else involved in the creation, production, or delivery of the script be liable for any damages whatsoever (including, without limitation, damages for loss of business profits, business interruption, loss of business information, or other pecuniary loss) arising out of the use of or inability to use the current script or documentation, even if Microsoft has been advised of the possibility of such damages. I’m not a programmer or a Bicep expert. I simply put together what I was able to reason through in order to meet our client’s request. Any suggestions or modifications are welcome. ****************************************************************************************************************************************************************************************************** This article was written in August 2025; code and modules may change over time. ****************************************************************************************************************************************************************************************************** */ param prefix string = 'bicep' param environment string = 'test' param sqlServerName string = 'bicep-test-sqleja-sqlsrv' param location string = 'westeurope' param forceUpdateTag string = utcNow() //let's check that the previously manually created server is present resource sqlServer 'Microsoft.Sql/servers@2021-11-01' existing = { name: sqlServerName } //create the database resource sqlDb 'Microsoft.Sql/servers/databases@2021-11-01' = { parent: sqlServer name: '${prefix}-${environment}-sqleja-sqldb' location: location properties: { requestedBackupStorageRedundancy: 'Local' maxSizeBytes: 5368709120 } sku: { name: 'S3' } } //create the Job Agent resource sqlJob 'Microsoft.Sql/servers/jobAgents@2024-05-01-preview' = { parent: sqlServer location: location name: '${prefix}-${environment}-sqleja-sqljobagent' properties: { databaseId: sqlDb.id } sku: { name: 'JA100' } } //defines a Target Group within a Job Agent resource targetGroup 'Microsoft.Sql/servers/jobAgents/targetGroups@2024-05-01-preview' = { parent: sqlJob name: '${prefix}-${environment}-sqleja-targetgroup' properties: { members: [ { membershipType: 'Include' serverName: sqlServer.name type: 'SqlServer' } ] } } //generate an UMI to auth and deploy the PS script resource scriptIdentity 'Microsoft.ManagedIdentity/userAssignedIdentities@2023-01-31' = { name: '${prefix}-${environment}-deployscript-umi' location: location } //assign the role to the script UMI //https://learn.microsoft.com/en-us/azure/role-based-access-control/built-in-roles resource scriptRoleAssignment 'Microsoft.Authorization/roleAssignments@2022-04-01' = { name: guid(scriptIdentity.id, 'script-role-assignment') properties: { roleDefinitionId: subscriptionResourceId('Microsoft.Authorization/roleDefinitions', 'b24988ac-6180-42a0-ab88-20f7382dd24c') // Contributor principalId: scriptIdentity.properties.principalId } dependsOn: [ delayScript ] } //let's generate a delay to allow Azure AD permissions propagation resource delayScript 'Microsoft.Resources/deploymentScripts@2023-08-01' = { name: 'sleep-60s-bash' location: location kind: 'AzureCLI' identity: { type: 'UserAssigned' userAssignedIdentities: { '${scriptIdentity.id}': {} } } properties: { azCliVersion: '2.76.0' scriptContent: ''' echo "Sleeping for 60 seconds..." sleep 60 echo "Done sleeping." ''' retentionInterval: 'P1D' cleanupPreference: 'Always' timeout: 'PT5M' forceUpdateTag: forceUpdateTag } dependsOn: [ scriptIdentity ] } //create the eja pep resource privateEndpoint 'Microsoft.Sql/servers/jobAgents/privateEndpoints@2024-05-01-preview' = { parent: sqlJob name: '${prefix}-${environment}-sqleja-pep' properties: { targetServerAzureResourceId: sqlServer.id } } //PS script to approve the MS fully managed PEP resource approvePrivateEndpointConnection 'Microsoft.Resources/deploymentScripts@2023-08-01' = { name: 'ps-to-approve-eja-pep-by-script' location: location kind: 'AzurePowerShell' identity: { type: 'UserAssigned' userAssignedIdentities: { '${scriptIdentity.id}': {} } } properties: { azPowerShellVersion: '11.0' scriptContent: ''' Connect-AzAccount -Identity $SqlServerResourceIdForPrivateLink = '/subscriptions/<yourSubID>/resourceGroups/bicep-rg/providers/Microsoft.Sql/servers/bicep-test-sqleja-sqlsrv' $SQLprivateEndpoints = Get-AzPrivateEndpointConnection -PrivateLinkResourceId $SqlServerResourceIdForPrivateLink foreach ($privateEndpoint in $SQLprivateEndpoints) { if ($privateEndpoint.PrivateLinkServiceConnectionState.Status -eq "Pending") { $id = $privateEndpoint.id Write-Output "Approving Private Endpoint Connection: $id" Approve-AzPrivateEndpointConnection -ResourceId "${id}" -Description "Approved by Bicep Deployment Script" } } ''' retentionInterval: 'P1D' cleanupPreference: 'Always' timeout: 'PT30M' forceUpdateTag: forceUpdateTag } dependsOn: [ sqlJob scriptRoleAssignment ] } Deployment Details Below is an overview of the resources created by the automation Conclusion With this article, I’ve wanted to share how to automate the creation of an Elastic Job Agent Private Endpoint without requiring manual approval. Kindly note that the products and options presented in this article are subject to change, this article reflects for Azure SQL Database in September 2025. Please also make sure to review the code carefully. It is provided as-is, with no guarantees, warranties, or support. Any suggestions or improvements are welcome. I hope you find this guide useful and that it inspires you to experiment freely with your deployments. Thank you. Best Regards, Vittorio
Securing VNet-Integrated Azure Functions with Blob Triggers: Private Endpoints and No Public Access
Azure Blob Trigger in Azure Functions enables automatic function invocation based on changes in Blob Storage, streamlining serverless integration with cloud storage. To ensure reliability, it handles failures by using poison blob queues and configurable retry mechanisms.
Purview Synapse Workspace Connection denied
Have a classic Purview setup and trying to scan a Synapse workspace serverless with an integration runtime and a service principal. When we try to select from synapse workspace on the scan, we an error. We can scan dedicated from the with the same integration runtime and service principal. Here is the error. Can anyone assist? Reason: An instance-specific error occurred while establishing a connection to SQL Server. Connection was denied since Deny Public Network Access is set to Yes (https://docs.microsoft.com/azure/azure-sql/database/connectivity-settings#deny-public-network-access). To connect to this server, use the Private Endpoint from inside your virtual network (https://docs.microsoft.com/azure/sql-database/sql-database-private-endpoint-overview#how-to-set-up-private-link-for-azure-sql-database).346Views0likes3CommentsLesson Learned #517:Connection Timeouts to Azure SQL Database Using Private Endpoint with HikariCP
Recently, we have been working on a support case where our customer reported the following error message: ERROR com.zaxxer.hikari.pool.HikariPool - HikariPool-1 - Exception during pool initialization. com.microsoft.sqlserver.jdbc.SQLServerException: The TCP/IP connection to the host myserverX.database.windows.net, port 1433 has failed. Error: 'Connection timed out: no further information. Verify the connection properties. Make sure that an instance of SQL Server is running on the host and accepting TCP/IP connections at the port. Make sure that TCP connections to the port are not blocked by a firewall.' I would like to share the lessons learned during the troubleshooting and resolution process Initially, what caught our attention were the first two messages: Exception during pool initialization and Connection Timeout out. This indicates that Hikari was unable to create the connection pool during the initialization process (one of the first steps in connection pooling) due to a connection timeout. Therefore, we began working on connectivity options and started investigating, asking if our customer is using public endpoint or private endpoint, they confirmed the private endpoint usage. The following factors could be identified as possible causes: Private Endpoint Misconfiguration: The Private Endpoint was not correctly associated with the Azure SQL Database. DNS Resolution Issues: The database hostname was not resolving to the Private Endpoint's private IP address. Network Security Group (NSG) Restrictions: The NSG attached to the subnet hosting the Private Endpoint was blocking inbound traffic on port 1433. Firewall Settings on Azure SQL Database: Firewall rules were not allowing connections from the source network. Redirect Mode Configuration: Additional ports required for redirect mode were blocked or misconfigured. Our troubleshooting steps started running using nslookup myserverX.database.windows.net to ensure that the database hostname resolves to the Private Endpoint's private IP address. If the IP is public instead of private, we verify the DNS configuration or use Azure DNS. Our second step was to validate the Java Application host can reach Azure SQL Database on port 1433 or the redirect port (if our customer use redirect connection policy) using the command telnet myserverX.database.windows.net 1433 or the Linux command nc -vz myserverX.database.windows.net 1433 and we identified the connections fails. Check this Azure SQL Database and Azure Synapse Analytics connectivity architecture and Azure Private Link - Azure SQL Database & Azure Synapse Analytics | Microsoft Learn for more details. Following we verify the Network Security Group attached to the subnet if allows outbound traffic to the port 1433 and we found that the NSG rule doesn't exist for private endpoint. Once the rule was added the Java Application was able to connect.872Views0likes0Comments