privacy
62 TopicsThe CISO Cheat Sheet to Microsoft Digital Defense Report 2026
I know we’re all busy, so I’ve pulled the most important data from this year’s Microsoft Digital Defense Report into one short read. The full report is well worth exploring, but this article focuses on the numbers and trends most relevant to security leaders. This year’s edition shows that AI is lowering the time, expertise and cost required to discover and exploit weaknesses, enabling attackers to operate with greater speed, scale and autonomy. The report describes this as AI “changing the physics of cybersecurity”: attack timelines are compressing and agentic systems are beginning to automate more of the attack lifecycle. Trend 1: Time has collapsed The clearest finding is about speed. Vulnerability discovery is increasingly running ahead of remediation, while the time from discovery to weaponisation is shrinking. In the AI era, weaponisation can follow in hours. Vulnerability discovery and weaponisation now often needs only a well-written prompt. The median time from discovery in the wild to weaponisation is below 24 hours. Vulnerabilities were on track for a record estimated 72,000 CVEs in 2026. The report expects a multi-year period in which the number of known but unpatched vulnerabilities rises sharply before eventually declining. The median time from container start to first exploit attempt is 5.3 hours. The ransomware actor Storm-1175 moved from web-facing exploitation to deploying Medusa ransomware in as little as 24 hours. CISA added over 110 CVEs to its Known Exploited Vulnerabilities catalogue between November 2025 and May 2026, most within a week of disclosure. The mismatch with enterprise reality is the uncomfortable part. The report says the disclosure-to-exploitation window has shrunk to single-digit days. Between November 2025 and May 2026, CISA added more than 110 vulnerabilities to its Known Exploited Vulnerabilities catalogue, most within a week of disclosure. In one example, Storm-1175 moved from exploiting a web-facing vulnerability to deploying Medusa ransomware in as little as 24 hours. Microsoft’s Red Team makes an important point: a patch is also a disclosure. Every fix points attackers towards the flaw it closes. As AI-assisted analysis makes reversing patches faster and more reliable, the report argues that patch velocity, not simply patch availability, becomes the control that matters. Trend 2: Attack chains are gaining autonomy The report charts a clear progression: September–November 2025: AI assists in orchestrating a campaign, as in the Anthropic-reported espionage case. April–June 2026: Full-chain autonomy is demonstrated in labs. July 2026: Real-world autonomous attacks of increasing complexity appear. Two frontier models, Mythos and GPT-5.5, completed a 32-step attack chain against an emulated enterprise with no human help. The test environment had no defenders. The UK AI Security Institute reached a similar finding independently. GPT-5.5 was the second model to solve its end-to-end corporate network attack simulation, a task AISI estimates would take a human about 20 hours. Open-weight models lag closed models at orchestrating attacks by about seven months. In the wild, early July 2026 saw the first documented automated ransomware extortion attack, named JADEPUFFER by Sysdig. Microsoft has seen AI-orchestrated intrusions that share elements with it. Initial access consistently came from internet-exposed services running known-vulnerable software. The report is measured on this point. Volumes of AI-orchestrated activity remain low. In most observed real-world operations, complex end-to-end intrusions still retain meaningful human direction. The Red Team's framing is the most useful one: AI doesn't create a new class of attack, it collapses the effort needed to find and exploit existing attack paths. Trend 3: AI has become an attack surface The report's second takeaway is that attackers are already targeting AI itself. The adoption numbers explain why. 88% of enterprises are experimenting with agents, and 82% of leaders plan broader rollouts within 12–18 months. The report cites industry projections of roughly 1.3 billion agents in production by 2028. What attackers are doing to AI systems: Four techniques accounted for roughly 90% of observed attack activity in telemetry from Azure AI workloads: malicious link injection (52%), jailbreaks (16%), tool and agent abuse (12%), and identity and credential abuse (10%). Memory poisoning: An attacker who can place content anywhere an agent reads can often place it where the agent remembers. Email is the dominant pathway the Red Team has observed. Human-in-the-loop isn't a complete control: Red team testing saw approval prompts ignored, or bypassed by a policy stored in poisoned memory. Developer tools turned against their owners: The "s1ngularity" malware hijacked locally installed AI command-line tools to hunt for secrets. It leaked about 2,000 secrets and 20,000 files across 225 victims. AI browsers: In daily use at more than 40% of organisations in Microsoft's dataset, they were the initial infection vector in incidents involving 57 malware families in a May 2026 analysis. Chat histories as a target: Malicious AI-assistant extensions reached nearly 900,000 installs and more than 20,000 enterprise tenants, harvesting AI chat histories that often contain code, architecture and credentials. The identity implications are direct. Each agent needs its own identity, not one borrowed from an employee, and a named human sponsor. The report also treats revocation latency, the time to cut off a compromised agent, as a measured outcome. Trend 4: The front door is still identity AI changes the speed and personalisation of social engineering. It hasn't changed where attacks start. Initial access in Defender Experts data: User execution: 30% Valid accounts: 20% Malicious copy-and-paste: 13% Phishing: 11% Together, user execution and valid accounts account for over half of observed activity. In incident response engagements, phishing as an initial access vector jumped from 7% to 23% year on year. The standout numbers: ClickFix: Defender saw user-pasted malicious commands on more than 1.1 million unique devices between February and early May 2026, roughly an 8x increase. AiTM: URLs accounted for 45% of the identified phishing techniques in the report’s breakdown. Separately, the share of AiTM phishing and token-theft attacks more than doubled during the first six months of 2026, although the report notes that their overall share remained comparatively small. Teams vishing: Weekly confirmed malicious volume increased 502% year on year. Per attempt, 48% of vishing calls kept the victim engaged for more than 20 seconds, and 30% lasted more than one minute. When a call succeeds, attackers can persuade the victim to install a remote-management tool and complete reconnaissance in two minutes or less. Business contact impersonation (BCI): The report introduces this term for conversations that start with a trusted-looking contact. Microsoft detected more than 46 million attacks in 12 months, with a 121% spike in April 2026. The share of first-contact messages that explicitly asked for money or documents fell from 17% to 3%. The first message is deliberately bland, like "Are you at your desk?" Password attacks declined 26% year on year, which the report describes as strong evidence that MFA and passkeys are forcing attackers to pivot. That pivot includes techniques such as fatigue attacks, AiTM phishing and token theft designed to circumvent conventional MFA. Trend 5: Attackers are inheriting trust rather than breaking in The report's headline theme is that risk is increasingly interconnected. Threats travel through the trusted relationships between identities, software supply chains, partners and cloud platforms. The numbers: Supply chain: Major open-source ecosystems saw attacks roughly every ten days, accelerating through Q2 2026. Shai-Hulud 2.0 affected 25,000 repositories. Megalodon backdoored 5,561 GitHub repositories in under six hours. Trusted signing: In May 2026, Microsoft disrupted Fox Tempest, a "malware-signing-as-a-service" operation that obtained genuine certificates for ransomware loaders and infostealers. Microsoft revoked over a thousand fraudulent code-signing certificates. Legitimate access: An unsanctioned remote monitoring tool is now one of the most reliable mid-stage indicators of a human-operated intrusion. Cloud identity: Cloud identity abuse was the most observed technique against critical infrastructure, representing 78% of the technique mix in Microsoft’s data for March to June 2026. Hybrid intrusions: The Storm-2885 case showed an attacker using a privileged cloud identity to close and downgrade security alerts. The report says identity governance and alert-handling workflows deserve Tier 0 treatment. Dwell time: DART data shows a statistically significant increase in dwell time year on year, meaning organisations took longer to detect intrusions. Ransomware shows the same ecosystem pattern. Qilin led leak-site data with 16.4% of victims, up 386%. Defender detections tell a different story, with Akira at 22%. Trend 6: Defence works best when it's connected The report is not only a catalogue of threats. The strongest defensive evidence: Disruption works. Following the March 2026 disruption, Tycoon2FA activity had fallen 95% from its November 2025 peak by June. Its share of CAPTCHA-gated phishing declined from 76% in December 2025 to 12% in June 2026. Correlation is the highest-leverage variable. The report argues that how well defenders share and correlate signals across endpoint, identity, cloud, email and network is one of the highest-leverage strategic variables under their control. AI is also changing defensive operations. The report describes AI-assisted triage, incident summarisation, hunting-query generation and detection engineering as ways to accelerate investigations and allow analysts to concentrate on higher-value work. Automated disruption can compress response time. The report says that when a correlated incident reaches a defined confidence threshold, defensive systems can automatically isolate devices, disable compromised accounts, revoke sessions or quarantine affected cloud resources. It also stresses the importance of appropriate governance and human oversight for high-risk AI actions. The report also recommends changing what leaders measure. It suggests moving from patches deployed to exposure reduced, detection coverage increased and time-to-mitigate compressed. What the MDDR recommends: ten security priorities The report starts its recommendations with the foundations: Secure by Design, Secure by Default and Secure Operations, applied through identity-centric Zero Trust. Microsoft says these keep the priorities below durable as AI adds more identities, applications, agents and dependencies to govern. Govern cyber risk at leadership level. Report identity exposure, patch latency, agent permissions, critical dependencies, dwell time and recovery readiness to the board. Defend identity as the primary control plane. Deploy passkeys and phishing-resistant MFA, reduce privilege and govern human and non-human identities. Invalidate and rotate tokens and session credentials quickly. Establish governance, visibility and data controls for AI. Keep visibility of approved AI tools, services and agents, and monitor for unauthorised or unmanaged use. Apply sensitivity-aware access and data protection to the data those systems can reach. Reduce exposure and edge risk. Continuously discover internet-facing assets and patch edge devices quickly. Centralise high-fidelity logging, enforce strong authentication and combine network visibility with threat intelligence. Focus on cross-signal correlation. Correlate endpoint, identity, cloud, application, email and network signals to detect intrusions earlier. Correlation also helps defenders anticipate attack paths and likely targets. Enact a continuous threat and vulnerability management model. Combine asset visibility, vulnerability identification, threat detection and AI-accelerated insight into a single continuous programme. Validate exposure through proactive testing. Run assume-breach exercises on cloud services, SaaS platforms, APIs and workflow automation. Prioritise them by where your highest-value data is stored, accessed or aggregated. Secure software dependencies. Harden software installation, keep a software inventory and validate provenance. Monitor packages and prepare for rapid containment. Participate in collective defence. Share actionable threat indicators and victim-informed intelligence with trusted partners and law enforcement. This supports coordinated tracking, investigation and disruption. Prepare for long-horizon technology transitions. Build a cryptographic inventory and advance post-quantum planning alongside AI governance. Read together, the numbers tell one story: the attacker’s workflow is becoming faster and less expensive. AI can shorten vulnerability discovery, exploitation, secret discovery and lateral movement, while organisations still face the slower operational work of testing, coordinating and deploying safe changes across complex environments. At the same time, agent identities can proliferate faster than organisations can inventory, govern and revoke them The defining question for boards today is not whether disruption will occur, but whether the organization can continue operating, contain harm, recover quickly, and maintain trust when it does. Source: Microsoft Digital Defense Report 2026, Version 1.1. Reporting period: July 2025–June 2026.
Bitlocker TPM+PIN - Safety only when TPM is safe?
Hello, i habe read the microsoft docs about Bitlocker on Windows 11. At the moment i understand, that the feature TPM+PIN ask for a PIN at startup. From the PIN Bitlocker creates a SHA-256 Hash and use only 160Bit for Authentication with the TPM. Are the PCR Register and the PIN is correct, the TPM give Bitlocker the Authenticationcode free and Bitlocker can unecrypt der Disk. The safety of this require the safety from the TPM. Is the safety of the TPM compromised, than Bitlocker is unsafe, too. Knowledge of the PIN can be unnecessary. Why Bitlocker don’t use the 96bit from the Hash, strechted the 96 Bit with a salt (saved on the unencrypted disk space), use a cryptographic safe hash function (e.g. Argon2id) and use this hash XOR with the TPM set free Authenticationcode as key for the master key? Steps: PIN from user -> SHA-256 -> 160 bit for TPM S1 and 96Bit for the second half of the master key. -> Argon2id( 96bit ) S2 -> S1 XOR S2 -> Master key. Pro: If someone can crack the TPM the attacker has only the half of the Masterkey. Cons: little more calculation steps. This make the safety better, because it need knowledge and hardware security. What do you think about it? Sincerely yours, ElGuy116Views0likes1Comment
Edge on Android: Syncs personal data (e.g. history, payment methods), despite me turning them off
Sync settings chosen during first-run setup are ignored. All sync types get turned on. Steps taken Install Outlook. (Link: https://play.google.com/store/apps/details?id=com.microsoft.office.outlook ) Sign in to Outlook. Uninstall and re-install Edge. (Link: https://play.google.com/store/apps/details?id=com.microsoft.emmx ) Choose whether to set Edge as default browser. Tap the tiny blue text, which says "Sync settings". (Not the tiny blue text immediately underneath, which says "Microsoft Privacy Statement"). All sync types are turned on by default. Turn off all sync items except one, e.g. Passwords. Dismiss "Sync settings" Re-open "Sync settings", to confirm your settings are still there. Then dismiss it again. Sign in, or "Continue". Continue setting up Edge. Open the Edge menu. Tap your account Tap Sync. Result: ALL sync items are turned on, despite having turned them off in step 6. Request Is this bug fixed, in a later version of Edge? Note: This bug does not fit in the official feedback method for Edge for Android. I am hoping the helpful elves at the other end of the Edge feedback form are reading this question. Because I have sent them the link to https://learn.microsoft.com/en-us/answers/questions/6035494/edge-on-android-syncs-personal-data-history-paymen. My environment Google Pixel 10a Android 17 Edge version 155.0.4283.48 (also reproduced with earlier version: 154.0.4258.38) OR Edge Canary version 157.0.4338.0 (Downloaded 2026-10-19)95Views0likes0Comments
From “No” to “Now”: A 7-Layer Strategy for Enterprise AI Safety
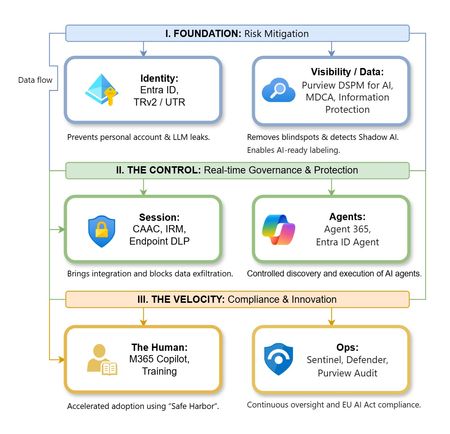
The “block” posture on Generative AI has failed. In a global enterprise, banning these tools doesn't stop usage; it simply pushes intellectual property into unmanaged channels and creates a massive visibility gap in corporate telemetry. The priority has now shifted from stopping AI to hardening the environment so that innovation can run at velocity without compromising data sovereignty. Traditional security perimeters are ineffective against the “slow bleed” of AI leakage - where data moves through prompts, clipboards, and autonomous agents rather than bulk file transfers. To secure this environment, a 7-layer defense-in-depth model is required to treat the conversation itself as the new perimeter. 1. Identity: The Only Verifiable Perimeter Identity is the primary control plane. Access to AI services must be treated with the same rigor as administrative access to core infrastructure. The strategy centers on enforcing device-bound Conditional Access, where access is strictly contingent on device health. To solve the "Account Leak" problem, the deployment of Tenant Restrictions v2 (TRv2) is essential to prevent users from signing into personal tenants using corporate-managed devices. For enhanced coverage, Universal Tenant Restrictions (UTR) via Global Secure Access (GSA) allows for consistent enforcement at the cloud edge. While TRv2 authentication-plane is GA, data-plane protection is GA for the Microsoft 365 admin center and remains in preview for other workloads such as SharePoint and Teams. 2. Eliminating the Visibility Gap (Shadow AI) You can’t secure what you can't see. Microsoft Defender for Cloud Apps (MDCA) serves to discover and govern the enterprise AI footprint, while Purview DSPM for AI (formerly AI Hub) monitors Copilot and third-party interactions. By categorizing tools using MDCA risk scores and compliance attributes, organizations can apply automated sanctioning decisions and enforce session controls for high-risk endpoints. 3. Data Hygiene: Hardening the “Work IQ” AI acts as a mirror of internal permissions. In a "flat" environment, AI acts like a search engine for your over-shared data. Hardening the foundation requires automated sensitivity labeling in Purview Information Protection. Identifying PII and proprietary code before assigning AI licenses ensures that labels travel with the data, preventing labeled content from being exfiltrated via prompts or unauthorized sharing. 4. Session Governance: Solving the “Clipboard Leak” The most common leak in 2025 is not a file upload; it’s a simple copy-paste action or a USB transfer. Deploying Conditional Access App Control (CAAC) via MDCA session policies allows sanctioned apps to function while specifically blocking cut/copy/paste. This is complemented by Endpoint DLP, which extends governance to the physical device level, preventing sensitive data from being moved to unmanaged USB storage or printers during an AI-assisted workflow. Purview Information Protection with IRM rounds this out by enforcing encryption and usage rights on the files themselves. When a user tries to print a "Do Not Print" document, Purview triggers an alert that flows into Microsoft Sentinel. This gives the SOC visibility into actual policy violations instead of them having to hunt through generic activity logs. 5. The “Agentic” Era: Agent 365 & Sharing Controls Now that we're moving from "Chat" to "Agents", Agent 365 and Entra Agent ID provide the necessary identity and control plane for autonomous entities. A quick tip: in large-scale tenants, default settings often present a governance risk. A critical first step is navigating to the Microsoft 365 admin center (Copilot > Agents) to disable the default “Anyone in organization” sharing option. Restricting agent creation and sharing to a validated security group is essential to prevent unvetted agent sprawl and ensure that only compliant agents are discoverable. 6. The Human Layer: “Safe Harbors” over Bans Security fails when it creates more friction than the risk it seeks to mitigate. Instead of an outright ban, investment in AI skilling-teaching users context minimization (redacting specifics before interacting with a model) - is the better path. Providing a sanctioned, enterprise-grade "Safe Harbor" like M365 Copilot offers a superior tool that naturally cuts down the use of Shadow AI. 7. Continuous Ops: Monitoring & Regulatory Audit Security is not a “set and forget” project, particularly with the EU AI Act on the horizon. Correlating AI interactions and DLP alerts in Microsoft Sentinel using Purview Audit (specifically the CopilotInteraction logs) data allows for real-time responses. Automated SOAR playbooks can then trigger protective actions - such as revoking an Agent ID - if an entity attempts to access sensitive HR or financial data. Final Thoughts Securing AI at scale is an architectural shift. By layering Identity, Session Governance, and Agentic Identity, AI moves from being a fragmented risk to a governed tool that actually works for the modern workplace.1.4KViews1like1Comment
How do you handle sensitive PDF files in Edge without third-party cloud uploads?
Hi everyone, When working with sensitive PDF documents (like financial or personal files), most online PDF editors require uploading files to third-party cloud servers. This raises obvious privacy and security concerns for many users. The most reliable way to maintain data privacy today is using Client-Side Browser Processing (WebAssembly & JavaScript), where operations run entirely inside the local browser memory without transmitting any data over the internet. Key advantages of pure client-side processing: Total Privacy: Zero file transfers or external server logs. Instant Speed: Processing relies on your local CPU, bypassing slow upload/download waiting times. No Software Installation: Works directly inside browsers like Microsoft Edge. For those looking for a practical example of this architecture, https://pdfdocflow.com is a free tool offering 24 browser-based tools (merging, splitting, compressing, watermarking, and signing) operating 100% locally with zero server uploads. How do you usually handle sensitive PDFs while browsing, and do you prefer client-side web tools over installing dedicated software?232Views0likes0Comments
Outlook on Windows 11: when local sync re‑contaminates global settings
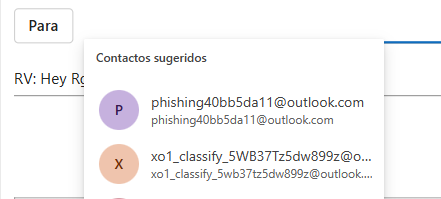
Introduction I want to share a finding that I believe is concerning: the Outlook client on Windows 11 can act as a vector of “re‑contamination” of local data, reactivating settings that were already disabled in the cloud. While this is not malware in the strict sense, the behavior is contradictory enough that it undermines privacy and user trust. Context of the issue To avoid any doubt, I disabled the Expanded People Suggestions option in all three possible places: Outlook client on Windows 11. Outlook Web. Global Privacy settings in my Microsoft Account. In every case, the option was disabled and the exported configuration file appeared empty, confirming that the deletion had been applied correctly. Cross‑account contamination → when another account was added to the Outlook client, the contaminated suggestions were transferred and appeared in that account as well, even though those addresses had never been used there. Evidence observed Empty file in the cloud → confirms that the deletion was effective. Desktop client re‑sync → uploads obsolete local data and reactivates the option. Result → the global configuration once again shows suggestions that had already been disabled. Injected email addresses → the suggestions included addresses that I have never used or contacted. These appear to have been introduced by third parties or internal contamination, not by my own activity. Cross‑account contamination → when another account was added to the Outlook client, the contaminated suggestions were transferred and appeared there too. Implications The Outlook client does not respect privacy preferences set in the cloud. Local data takes precedence over global settings, which contradicts modern synchronization logic. The presence of never‑used, injected email addresses raises serious concerns about data integrity and possible external contamination. This may affect many users, not just an isolated case. Reflection This behavior creates the perception that the client acts like intrusive software: even if the user deletes data in the cloud, the client “resurrects” it from its local cache. In practical terms, it is a form of re‑contamination that compromises confidence in synchronization between client and server. The fact that injected addresses appear in suggestions makes the issue even more problematic, as it suggests external influence beyond the user’s own history. Conclusion The cloud should be the source of truth. If a user disables data in Outlook Web and in the global Microsoft Account settings, no local client should have the ability to reactivate it. This finding deserves attention because it directly affects privacy, data integrity, and the coherence of the Microsoft ecosystem. Invitation Has anyone else observed this behavior in Outlook for Windows 11? Have you seen deleted cloud settings reappear after reinstalling or re‑synchronizing the client, or injected email addresses that were never used showing up in suggestions?284Views0likes1CommentPrivacy Settings and Exclusions
How does a company exclude the following information from analysis: Certain email domains (eg, @gmail, @yahoo, etc.) Emails from external employees who have an account with the Company's domain The subject of emails Employee activity that took place on a certain date and time (eg exclude activity carried out at night or on weekends)Solved3.2KViews0likes5CommentsStep by Step: 2-Tier PKI Lab
Purpose of this blog Public Key Infrastructure (PKI) is the backbone of secure digital identity management, enabling encryption, digital signatures, and certificate-based authentication. However, neither setting up a PKI nor management of certificates is something most IT pros do on a regular basis and given the complexity and vastness of the subject it only makes sense to revisit the topic from time to time. What I have found works best for me is to just set up a lab and get my hands dirty with the topic that I want to revisit. One such topic that I keep coming back to is PKI - be it for creating certificate templates, enrolling clients, or flat out creating a new PKI itself. But every time I start deploying a lab or start planning a PKI setup, I end up spending too much time sifting through the documentations and trying to figure out why my issuing certificate authority won't come online! To make my life easier I decided to create a cheatsheet to deploy a simple but secure 2-tier PKI lab based on industry best practices that I thought would be beneficial for others like me, so I decided to polish it and make it into a blog. This blog walks through deploying a two-tier PKI hierarchy using Active Directory Certificate Services (AD CS) on Windows Server: an offline Root Certification Authority (Root CA) and an online Issuing Certification Authority (Issuing CA). We’ll cover step-by-step deployment and best practices for securing the root CA, conducting key ceremonies, and maintaining Certificate Revocation Lists (CRLs). Overview: Two-Tier PKI Architecture and Components In a two-tier PKI, the Root CA sits at the top of the trust hierarchy and issues a certificate only to the subordinate Issuing CA. The Root CA is kept offline (disconnected from networks) to protect its private key and is typically a standalone CA (not domain-joined). The Issuing CA (sometimes called a subordinate or intermediate CA) is kept online to issue certificates to end-entities (users, computers, services) and is usually an enterprise CA integrated with Active Directory for automation and certificate template support. Key components: Offline Root CA: A standalone CA, often on a workgroup server, powered on only when necessary (initial setup, subordinate CA certificate signing, or periodic CRL publishing). By staying offline, it is insulated from network threats. Its self-signed certificate serves as the trust anchor for the entire PKI. The Root CA’s private key must be rigorously protected (ideally by a Hardware Security Module) because if the root is compromised, all certificates in the hierarchy are compromised. Online Issuing CA: An enterprise subordinate CA (domain-joined) that handles day-to-day certificate issuance for the organization. It trusts the Root CA (via the root’s certificate) and is the one actually responding to certificate requests. Being online, it must also be secured, but its key is kept online for operations. Typically, the Issuing CA publishes certificates and CRLs to Active Directory and/or HTTP locations for clients to download. The following diagram shows the simplified view of this implementations: The table below summarizes the roles and differences: Aspect Offline Root CA Online Issuing CA Role Standalone Root CA (workgroup) Enterprise Subordinate CA (domain member) Network Connectivity Kept offline (powered off or disconnected when not issuing) Online (running continuously to serve requests) Usage Signs only one certificate (the subordinate CA’s cert) and CRLs Issues end-entity certificates (users, computers, services) Active Directory Not a member of AD domain; doesn’t use templates or auto-enrollment Integrated with AD DS; uses certificate templates for streamlined issuance Security Extremely high: physically secured, limited access, often protected by HSM Very High: server hardened, but accessible on network; HSM recommended for private key CRL Publication Manual. Admin must periodically connect, generate, and distribute CRL. Delta CRLs usually disabled. Automatic. Publishes CRLs to configured CDP locations (AD DS, HTTP) at scheduled intervals. Validity Period Longer (e.g. 5-10+ years for the CA certificate) to reduce frequency of renewal. Shorter (e.g. 2 years) to align with organizational policy; renewed under the root when needed. In this lab setup, we will create a Contoso Root CA (offline) and a Contoso Issuing CA (online) as an example. This mirrors real-world best practices which is to "deploy a standalone offline root CA and an online enterprise subordinate CA”. Deploying the Offline Root CA Setting up the offline Root CA involves preparing a dedicated server, installing AD CS, configuring it as a root CA, and then securing it. We’ll also configure certificate CDP/AIA (CRL Distribution Point and Authority Information Access) locations so that issued certificates will point clients to the correct locations to fetch the CA’s certificate and revocation list. Step 1: Prepare the Root CA Server (Offline) Provision an isolated server: Install a Windows Server OS (e.g., Windows Server 2022) on the machine designated to be the Root CA. Preferably on a portable enterprise grade physical server that can be stored in a safe. Do not join this server to any domain – it should function in a Workgroup to remain independent of your AD forest. System configuration: Give the server a descriptive name (e.g., ROOTCA) and assign a static IP (even though it will be offline, a static IP helps when connecting it temporarily for management). Install the latest updates and security patches while it’s still able to go online. Lock down network access: Once setup is complete, disable or unplug network connections. If the server must remain powered on for any reason, ensure all unnecessary services/ports are disabled to minimize exposure. In practice, you will keep this server shut down or physically disconnected except when performing CA maintenance. Step 2: Install the AD CS Role on the Root CA Add the Certification Authority role: On the Root CA server, open Server Manager and add the Active Directory Certificate Services role. During the wizard, select the Certification Authority role service (no need for web enrollment or others on the root). Proceed through the wizard and complete the installation. You can also install the CA role and management tools via PowerShell: Install-WindowsFeature AD-Certificate -IncludeManagementToolsThis Role Services: Choose Certification Authority. Setup Type: Select Standalone CA (since this root CA is not domain-joined). CA Type: Select Root CA. Private Key: Choose “Create a new private key.” Cryptography: If using an HSM, select the HSM’s Cryptographic Service Provider (CSP) here; otherwise use default. Choose a strong key length (e.g., 2048 or 4096 bits) and a secure hash algorithm (SHA-256 or higher). CA Name: Provide a common name for the CA (e.g., “Contoso Root CA”). This name will appear in issued certificates as the Issuer. Avoid using a machine DNS name here for security – pick a name without revealing the server’s actual hostname. Validity Period: Set a long validity (e.g., 10 years) for the root CA’s self-signed certificate. A decade is common for enterprise roots, reducing how often you must touch the offline CA for renewal. Database: Specify locations for the CA database and logs (the defaults are fine for a lab). Review settings and complete the configuration. This process will generate the root CA’s key pair and self-signed certificate, establishing the Root CA.Post-install configuration: After the binary installation, click Configure Active Directory Certificate Services (a notification in Server Manager). In the configuration wizard: You can also perform this configuration via PowerShell in one line: Install-AdcsCertificationAuthority ` -CAType StandaloneRootCA ` -CryptoProviderName "YourHSMProvider" ` -HashAlgorithmName SHA256 -KeyLength 2048 ` -CACommonName "Contoso Root CA" ` -ValidityPeriod Years -ValidityPeriodUnits 10 This would set up a standalone Root CA named "Contoso Root CA" with a 2048-bit key on an HSM provider, valid for 10 years. Step 3: Integrate an HSM (Optional but Recommended) If your lab has a Hardware Security Module, use it to secure the Root CA’s keys. Using an HSM provides a dedicated, tamper-resistant storage for CA private keys and can further protect against key compromise. To integrate: Install the HSM vendor’s software and drivers on the Root CA server. Initialize the HSM and create a security world or partition as per the vendor instructions. Before or during the CA configuration (Step 2 above), ensure the HSM is ready to generate/store the key. When running the AD CS configuration, select the HSM’s CSP/KSP for the cryptographic provider so that the CA’s private key is generated on the HSM. Secure any HSM admin tokens or smartcards. For a root CA, you might employ M of N key splits – requiring multiple key custodians to collaborate to activate the HSM or key – as part of the key ceremony (discussed later). (If an HSM is not available, the root key will be stored on the server’s disk. At minimum, protect it with a strong admin passphrase when prompted, and consider enabling the option to require administrator interaction (e.g., a password) whenever the key is accessed.) Step 4: Configure CA Extensions (CDP/AIA) It’s critical to configure how the Root CA publishes its certificate and revocation list, since the root is offline and cannot use Active Directory auto-publishing. Open the Certification Authority management console (certsrv.msc), right-click the CA name > Properties, and go to the Extensions tab. We will set the CRL Distribution Points (CDP) and Authority Information Access (AIA) URLs: CRL Distribution Point (CDP): This is where certificates will tell clients to fetch the CRL for the Root CA. By default, a standalone CA might have a file:// path or no HTTP URL. Click Add and specify an HTTP URL that will be accessible to all network clients, such as: http://<IssuingCA_Server>/CertEnroll/<CaName><CRLNameSuffix><DeltaCRLAllowed>.crl For example, if your issuing CA’s server name is ISSUINGCA.contoso.local, the URL might be http://issuingca.contoso.local/CertEnroll/Contoso%20Root%20CA.crl This assumes the Issuing CA (or another web server) will host the Root CA’s CRL in the CertEnroll directory. Check the boxes for “Include in the CDP extension of issued certificates” and “Include in all CRLs. Clients use this to find Delta CRLs” (you can uncheck the delta CRL publication on the root, as we won’t use delta CRLs on an offline root). Since the root CA won’t often revoke its single issued cert (the subordinate CA), delta CRLs aren’t necessary. Note: If your Active Directory is in use and you want to publish the Root CA’s CRL to AD, you can also add an ldap:///CN=... path and check “Publish in Active Directory”. However, publishing to AD from an offline CA must be done manually using the following command when the root is temporarily connected. certutil -dspublish Many setups skip LDAP for offline roots and rely on HTTP distribution. Authority Information Access (AIA): This is where the Root CA’s certificate will be published for clients to download (to build certificate chains). Add an HTTP URL similarly, for example: http://<IssuingCA_Server>/CertEnroll/<ServerDNSName>_<CaName><CertificateName>.crt This would point to a copy of the Root CA’s certificate that will be hosted on the issuing CA web server. Check “Include in the AIA extension of issued certificates”. This way, any certificate signed by the Root CA (like your subordinate CA’s cert) contains a URL where clients can fetch the Root CA’s cert if they don’t already have it. After adding these, remove any default entries that are not applicable (e.g., LDAP if the root isn’t going to publish to AD, or file paths that won’t be used by clients). These settings ensure that certificates issued by the Root CA (in practice, just the subordinate CA’s certificate) will carry the correct URLs for chain building and revocation checking. Step 5: Back Up the Root CA and Issue the Subordinate Certificate With the Root CA configured, we need to issue a certificate for the Issuing CA (subordinate). We’ll perform that in the next section from the Issuing CA’s side via a request file. Before taking the root offline, ensure you: Back up the CA’s private key and certificate: In the Certification Authority console, or via the CA Backup wizard, export the Root CA’s key pair and CA certificate. Protect this backup (store it offline in a secure location, e.g., on encrypted removable media in a safe). This backup is crucial for disaster recovery or if the Root CA needs to be migrated or restored. Save the Root CA Certificate: You will need the Root CA’s public certificate (*.crt) to distribute to other systems. Have it exported (Base-64 or DER format) for use on the Issuing CA and for clients. Initial CRL publication: Manually publish the first CRL so that it can be distributed. Open an elevated Command Prompt on the Root CA and run: certutil -crl This generates a new CRL file (in the CA’s configured CRL folder, typically %windir%\system32\CertSrv\CertEnroll). Take that CRL file and copy it to the designated distribution point (for example, to the CertEnroll directory on the Issuing CA’s web server, as per the HTTP URL configured). If using Active Directory for CRL distribution, you would also publish it to AD now (e.g., certutil -dspublish -f RootCA.crl on a domain-connected machine). In most lab setups, copying to an HTTP share is sufficient. With these tasks done, the Root CA is ready. At this point, disconnect or power off the Root CA and store it securely – it should remain offline except when it’s absolutely needed (like publishing a new CRL or renewing the subordinate CA’s certificate in the far future). Keeping the root CA offline maximizes its security by minimizing exposure to compromise. Best Practices for Securing the Root CA: The Root CA is the trust anchor, so apply stringent security practices: Physical security: Store the Root CA machine in a locked, secure location. If it’s a virtual machine, consider storing it on a disconnected hypervisor or a USB drive locked in a safe. Only authorized PKI team members should have access. An offline CA should be treated like crown jewels – offline CAs should be stored in secure locations. Minimal exposure: Keep the Root CA powered off and disconnected when not in use. It should not be left running or connected to any network. Routine operations (like issuing end-entity certs) should never involve the root. Admin access control: Limit administrative access on the Root CA server. Use dedicated accounts for PKI administration. Enable auditing on the CA for any changes or issuance events. No additional roles or software: Do not use the Root CA server for any other function (no web browsing, no email, etc.). Fewer installed components means fewer potential vulnerabilities. Protect the private key: Use an HSM if possible; if not, ensure the key is at least protected by a strong password and consider splitting knowledge of that password among multiple people (so no single person can activate the CA). Many organizations opt for an offline root key ceremony (see below) to generate and handle the root key with multiple witnesses and strict procedures. Keep system time and settings consistent: If the Root CA is powered off for long periods, ensure its clock is accurate whenever it is started (to avoid issuing a CRL or certificate with a wrong date). Don’t change the server name or CA name after installation (doing so invalidates issued certs). Periodic health checks: Even though offline, plan to turn on the Root CA at a secure interval (e.g., semi-annually or annually) to perform tasks like CRL publishing and system updates. Make sure to apply OS security updates during these maintenance windows, as offline does not mean immune to vulnerabilities (especially if it ever connects to a network for CRL publication or uses removable media). Deploying the Online Issuing CA Next, set up the Issuing CA server which will actually issue certificates to end entities in the lab. This server will be domain-joined (if using AD integration) and will obtain its CA certificate from the Root CA we just configured. Step 1: Prepare the Issuing CA Server Provision the server: Install Windows Server on a new machine (or VM) that will be the Issuing CA. Join this server to the Active Directory domain (e.g., Contoso.local). Being an enterprise CA, it needs domain membership to publish templates and integrate with AD security groups. Rename the server to something descriptive like ISSUINGCA for clarity. Assign a static IP and ensure it can communicate on the network. IIS for web enrollment (optional): If you plan to use the Web Enrollment or Certificate Enrollment Web Services, ensure IIS is installed. (The AD CS installation wizard can add it if you include those role services.) For this guide, we will include the Web Enrollment role so that the CertEnroll directory is set up for hosting certificate and CRL files. Step 2: Install AD CS Role on Issuing CA On the Issuing CA server, add the Active Directory Certificate Services role via Server Manager or PowerShell. This time, select both Certification Authority and Certification Authority Web Enrollment role services (Web Enrollment will set up the HTTP endpoints for certificate requests if needed). For example, using PowerShell: Install-WindowsFeature AD-Certificate, ADCS-Web-Enrollment -IncludeManagementTools After installation, launch the AD CS configuration wizard: Role Services: Choose Certification Authority (and Web Enrollment if prompted). Setup Type: Select Enterprise CA (since this CA will integrate with AD DS). CA Type: Select Subordinate CA (this indicates it will get its cert from an existing root CA). Private Key: Choose “Create a new private key” (we’ll generate a new key pair for this CA). Cryptography: If using an HSM here as well, select the HSM’s CSP/KSP for the issuing CA’s key. Otherwise, choose a strong key length (2048+ bits, SHA256 or better for hash). CA Name: Provide a name (e.g., “Contoso Issuing CA”). This name will appear as the Issuer on certificates it issues. Certificate Request: The wizard will ask how you want to get the subordinate CA’s certificate. Choose “Save a certificate request to file”. Specify a path, e.g., C:\CertRequest\issuingCA.req. The wizard will generate a request file that we need to take to the Root CA for signing. (Since our Root CA is offline, this file transfer might be via secure USB or a network share when the root is temporarily online.) CA Database: Choose locations or accept defaults for the certificate DB and logs. Finish the configuration wizard, which will complete pending because the CA doesn’t have a certificate yet. The AD CS service on this server won’t start until we import the issued cert from the root. Step 3: Integrate HSM on Issuing CA (Optional) If available, repeat the HSM setup on the Issuing CA: install HSM drivers, initialize it, and generate/secure the key for the subordinate CA on the HSM. Ensure you chose the HSM provider during the above configuration so that the issuing CA’s private key is stored in the HSM. Even though this CA is online, an HSM still greatly enhances security by protecting the private key from extraction. The issuing CA’s HSM may not require multiple custodians to activate (as it needs to run continuously), but should still be physically secured. Step 4: Obtain the Issuing CA’s Certificate from the Root CA Now we have a pending request (issuingCA.req) for the subordinate CA. To get its certificate: Transport the request to the Root CA: Copy the request file to the offline Root CA (via secure means – e.g., formatted new USB stick). Start up the Root CA (in a secure, offline setting) and open the Certification Authority console. Submit the request on Root CA: Right-click the Root CA in the CA console -> All Tasks -> Submit new request, and select the .req file. The request will appear in the Pending Requests on the root. Issue the subordinate CA certificate: Find the pending request (it will list the Issuing CA’s name). Right-click and choose All Tasks > Issue. The subordinate CA’s certificate is now issued by the Root CA. Export the issued certificate: Still on the Root CA, go to Issued Certificates, find the newly issued subordinate CA cert (you can identify it by the Request ID or by the name). Right-click it and choose Open or All Tasks > Export to get the certificate in a file form. If using the console’s built-in “Export” it might only allow binary; alternatively use the certutil command: certutil -dup <RequestID> .\ContosoIssuingCA.cer or simply open and copy to file. Save the certificate as issuingCA.cer. Also make sure you have a copy of the Root CA’s certificate (if not already done). Publish Root CA cert and CRL as needed: Before leaving the Root CA, you may also want to ensure the Root’s own certificate and latest CRL are available to the issuing CA and clients. If not already done in Step 5 of root deployment, export the Root CA cert (DER format) and copy the CRL file. You might use certutil -crl again if some time has passed since initial CRL. Now take the issuingCA.cer file (and root cert/CRL files) and move them back to the Issuing CA server. Step 5: Install the Issuing CA’s Certificate and Complete Configuration On the Issuing CA server (which is still waiting for its CA cert): Install the subordinate CA certificate: In Server Manager or the Certification Authority console on the Issuing CA, there should be an option to “Install CA Certificate” (if the AD CS configuration wizard is still open, it will prompt for the file; or otherwise, in the CA console right-click the CA name > All Tasks > Install CA Certificate). Provide the issuingCA.cer file obtained from the root. This will install the CA’s own certificate and start the CA service. The Issuing CA is now operational as a subordinate CA. Alternatively, use PowerShell: certutil -installcert C:\CertRequest\issuingCA.cer This installs the cert and associates it with the pending key. Trust the Root CA certificate: Because the Issuing CA is domain-joined, when you install the subordinate cert, it might automatically place the Root CA’s certificate in the Trusted Root Certification Authorities store on that server (and possibly publish it to AD). If not, you should manually install the Root CA’s certificate into the Trusted Root CA store on the Issuing CA machine (using the Certificates MMC or certutil -addstore -f Root rootCA.cer). This step prevents any “chain not trusted” warnings on the Issuing CA and ensures it trusts its parent. In an enterprise environment, you would also distribute the root certificate to all client machines (e.g., via Group Policy) so that they trust the whole chain. Import Root CRL: Copy the Root CA’s CRL (*.crl file) to the Issuing CA’s CRL distribution point location (e.g., C:\Windows\System32\CertSrv\CertEnroll\ if that’s the directory served by the web server). This matches the HTTP URL we configured on the root. Place the CRL file there and ensure it is accessible (the Issuing CA’s IIS might need to serve static .crl files; often, if Web Enrollment is installed, the CertEnroll folder is under C:\Inetpub\wwwroot\CertEnroll). At this point, the subordinate CA and any client hitting the HTTP URL can retrieve the root’s CRL. The subordinate CA is now fully established. It holds a certificate issued by the Root CA (forming a complete chain of trust), and it’s ready to issue end-entity certificates. Step 6: Configure Issuing CA Settings and Start Services Start the Certificate Services: If the CA service (CertSvc) isn’t started automatically, start or restart it. On PowerShell: Restart-Service certsvc The CA should show as running in the CA console with the name “Contoso Issuing CA” (or your chosen name). Configure Certificate Templates: Because this is an Enterprise CA, it can utilize certificate templates stored in Active Directory to simplify issuing common cert types (user auth, computer auth, web server SSL, etc.). By default, some templates (e.g., User, Computer) are available but not issued. In the Certification Authority console under Certificate Templates, you can choose which templates to issue (e.g., right-click > New > Certificate Template to Issue, then select templates like “User” or “Computer”). This lab guide doesn’t require specific templates but know that only Enterprise CAs can use templates. Templates define the policies and settings (cryptography, enrollment permissions, etc.) for issued certificates. Ensure you enable only the templates needed and configure their permissions appropriately (e.g., allow the appropriate groups to enroll). Set CRL publishing schedule: The Issuing CA will automatically publish its own CRL (for certificates it issues) at intervals. You can adjust the CRL and Delta CRL publication interval in the CA’s Properties > CRL Period. A common practice is a small base CRL period (e.g., 1 week or 2 weeks) for issuing CAs, because they may revoke user certs more frequently; and enable Delta CRLs (published daily) for timely revocation information. Make sure the CDP/AIA for the Issuing CA itself are properly configured too (the wizard usually sets LDAP and HTTP locations, but verify in the Extensions tab). In a lab, the default settings are fine. Web Enrollment (if installed): You can verify the web enrollment by browsing to http://<IssuingCA>/certsrv. This web UI allows browser-based certificate requests. It’s a legacy interface mostly, but for testing it can be used if your clients aren’t domain-joined or if you want a manual request method. In modern use, the Certificate Enrollment Web Service/Policy roles or auto-enrollment via Group Policy are preferred for remote and automated enrollment. At this stage, your PKI is operational: the Issuing CA trusts the offline Root CA and can issue certificates. The Root CA can be kept offline with confidence that the subordinate will handle all regular work. Validation and Testing of the PKI It’s important to verify that the PKI is configured correctly: Check CA status: On the Issuing CA, open the Certification Authority console and ensure no errors. Verify that the Issuing CA’s certificate shows OK (no red X). On the Root CA (offline most of the time), you can use the Pkiview.msc snap-in (Microsoft PKI Health Tool) on a domain-connected machine to check the health of the PKI. This tool will show if the CDPs/AIA are reachable and if certificates are properly published. Trust chain on clients: On a domain-joined client PC, the Root CA certificate should be present in the Trusted Root Certification Authorities store (if the Issuing CA was installed as Enterprise CA, it likely published the root cert to AD automatically; you can also distribute it via Group Policy or manually). The Issuing CA’s certificate should appear in the Intermediate Certification Authorities store. This establishes the chain of trust. If not, import the root cert into the domain’s Group Policy for Trusted Roots. A quick test: on a client, run certutil -config "ISSUINGCA\\Contoso Issuing CA" -ping to see if it can contact the CA (or use the Certification Authority MMC targeting the issuing CA). Enroll a test certificate: Try to enroll for a certificate from the Issuing CA. For instance, from a domain-joined client, use the Certificates MMC (in Current User or Computer context) and initiate a certificate request for a User or Computer certificate (depending on templates issued). If auto-enrollment is configured via Group Policy for a template, you can simply log on a client and see if it automatically receives a certificate. Alternatively, use the web enrollment page or certreq command to submit a request. The request should be approved and a certificate issued by "Contoso Issuing CA". After enrollment, inspect the issued certificate: it should chain up to "Contoso Root CA" without errors. Ensure that the certificate’s CDP points to the URL we set (and try to browse that URL to see the CRL file), and that the AIA points to the root cert location. Revocation test (optional): To test CRL behavior, you could revoke a test certificate on the Issuing CA (using the CA console) and publish a new CRL. On the client, after updating the CRL, the revoked certificate should show as revoked. For the Root CA, since it shouldn’t issue end-entity certs, you wouldn’t normally revoke anything except potentially the subordinate CA’s certificate (which would be a drastic action in case of compromise). By issuing a test certificate and validating the chain and revocation, you confirm that your two-tier PKI lab is functioning correctly. Maintaining the PKI: CRLs, Key Ceremonies, and Security Procedures Deploying the PKI is only the beginning. Proper maintenance and operational procedures are crucial to ensure the PKI remains secure and reliable over time. Periodic CRL Updates for the Offline Root: The Root CA’s CRL has a defined validity period (set during configuration, often 6 or 12 months for offline roots). Before the CRL expires, the Root CA must be brought online (in a secure environment) to issue a new CRL. It’s recommended to schedule CRL updates periodically (e.g., semi-annually) to prevent the CRL from expiring. An expired CRL can cause certificate chain validation to fail, potentially disrupting services. Typically, organizations set the offline root CRL validity so that publishing 1-2 times a year is sufficient. When the time comes: Start the Root CA (ensuring the system clock is correct). Run certutil -crl to issue a fresh CRL. Distribute the new CRL: copy it to the HTTP CDP location (overwrite the old file) and, if applicable, use certutil -dspublish -f RootCA.crl to update it in Active Directory. Verify that the new CRL’s next update date is extended appropriately (e.g., another 6 months out). Clients and the Issuing CA will automatically pick up the new CRL when checking for revocation. (The Issuing CA, if configured, might cache the root CRL and need a restart or certutil -setreg ca\CRLFlags +CRLF_REVCHECK_IGNORE_OFFLINE tweak if the root CRL expires unexpectedly. Keeping the schedule prevents such issues.) Issuing CA CRL and OCSP: The Issuing CA’s CRLs are published automatically as it is online. Ensure the IIS or file share hosting the CRL is accessible. Optionally, consider setting up an Online Responder (OCSP) for real-time status checking, especially if CRLs are large or you need faster revocation information. OCSP is another AD CS role service that can be configured on the issuing CA or another server to answer certificate status queries. This might be beyond a simple lab, but it’s worth mentioning for completeness. Key Ceremonies and Documentation: For production environments (and good practice even in labs), formalize the process of handling CA keys in a Key Ceremony. A key ceremony is a carefully controlled process for activities like generating the Root CA’s key pair, installing the CA, and signing subordinate certificates. It often involves multiple people to ensure no single person has unilateral control (principle of dual control) and to witness the process. Best practices for a Root CA key ceremony include: Advance Planning: Create a step-by-step script of the ceremony tasks. Include who will do what, what materials are needed (HSMs, installation media, backup devices, etc.), and the order of operations. Multiple trusted individuals present: Roles might include a Ceremony Administrator (leads the process), a Security Officer (responsible for HSM or key material handling), an Auditor (to observe and record), etc. This prevents any one person from manipulating the process and increases trust. Secure environment: Conduct the ceremony in a secure location (e.g., a locked room) free of recording devices or unauthorized personnel. Ensure the Root CA machine is isolated (no network), and ideally that BIOS/USB access controls are in place to prevent any malware. Generate keys with proper controls: If using an HSM, initialize and generate the key with the required number of key custodians each providing part of the activation material (e.g., smartcards or passphrases). Immediately back up the HSM partition or key to secure media (requiring the same custodians to restore). Sign subordinate CA certificate: As part of the ceremony, once the root key is ready, sign the subordinate’s request. This might also be a witnessed step. Document every action: Write down each command run, each key generated, serial numbers of devices used, and have all participants sign an acknowledgment of the outcomes. Also record the fingerprints of the generated Root CA certificate and any subordinate certificate to ensure they are exactly as expected. Secure storage: After the ceremony, store the Root CA machine (if it’s a laptop or VM) and HSM tokens in a tamper-evident bag or safe. The idea is to make it evident if someone tries to access the root outside of an authorized ceremony. While a full key ceremony might be overkill for a small lab, understanding these practices is important. Even in a lab, you can simulate some aspects (for learning), like documenting the procedure of taking the root online to sign the request and then locking it away. These practices greatly increase the trust in a production PKI by ensuring transparency and accountability for critical operations. Backup and Recovery Plans: Both CAs’ data should be regularly backed up: For the Root CA: since it’s rarely online, backup after any change. Typically, you’d back up the CA’s private key and certificate once (right after setup or any renewal). Store this securely offline (separate from the server itself). Also back up the CA database if it ever issues more than one cert (for root it might not issue many). For the Issuing CA: schedule automated backups of the CA database and private key. You can use the built-in certutil -backup or Windows Server Backup (which is aware of the AD CS database). Keep backups secure and test restoration procedures. Having a documented recovery procedure for the CA is crucial for continuity. Also consider backup of templates and any scripts. Maintain spare hardware or VMs in case you need to restore the CA on new hardware (especially for the root, having a procedure to restore on a new machine if the original is destroyed). Security maintenance: Apply OS updates to the CAs carefully. For the offline root, patch it offline if possible (offline servicing or connecting it briefly to a management network). For the issuing CA, treat it as a critical infrastructure server: limit its exposure (firewall it so only required services are reachable), monitor its event logs (enable auditing for Certificate Services events, which can log each issuance and revocation), and employ anti-malware tools with caution (whitelisting the CA processes to avoid interference). Also, periodically review the CA’s configuration and certificate templates to ensure they meet current security standards (for example, deprecate any weak cryptography or adjust validity periods if needed). By following these maintenance steps and best practices, your two-tier PKI will remain secure and trustworthy over time. Remember that PKI is not “set and forget” – it requires operational diligence, but the payoff is a robust trust infrastructure for your organization’s security. Additional AD CS Features and References Active Directory Certificate Services provides more capabilities than covered in this basic lab. Depending on your needs, you might explore: Certificate Templates: We touched on templates; they are a powerful feature on Enterprise CAs to enforce standardized certificate settings. Administrators can create custom templates for various use cases (SSL, S/MIME email, code signing) and control enrollment permissions. Understanding template versions and permissions is key for enterprise deployments. (Refer to Microsoft’s documentation on Certificate template concepts in Windows Server for details on how templates work and can be customized.) Web Services for Enrollment: In scenarios with remote or non-domain clients, AD CS offers the Certificate Enrollment Web Service (CES) and Certificate Enrollment Policy Web Service (CEP) role services. These allow clients to fetch enrollment policy information and request certificates over HTTP or HTTPS, even when not connected directly to the domain. They work with the certificate templates to enable similar auto-enrollment experiences over the web. See Microsoft’s guides on the Certificate Enrollment Web Service overview and Certificate Enrollment Policy Web Service overview for when to use these. Network Device Enrollment Service (NDES): This AD CS role service implements the Simple Certificate Enrollment Protocol (SCEP) to allow devices like routers, switches, and mobile devices to obtain certificates from the CA without domain credentials. NDES acts as a proxy (Registration Authority) between devices and the CA, using one-time passwords for authentication. If you need to issue certificates to network equipment or MDM-managed mobile devices, NDES is the solution. Microsoft Docs provide a Network Device Enrollment Service(NDES) overview and even details on using a policy module with NDES for advanced scenarios (like customizing how requests are processed or integrating with custom policies). Online Responders (OCSP): As mentioned, an Online Responder can be configured to answer revocation status queries more efficiently than CRLs, especially useful if your CRLs grow large or you have high-volume certificate validation (VPNs, etc.). AD CS’s Online Responder role service can be installed on a member server and configured with the OCSP Response Signing certificate from your Issuing CA. Monitoring and Auditing: Windows Servers have options to audit CA events. Enabling auditing can log events such as certificate issuance, revocation, or changes to the CA configuration. These logs are important in enterprise PKI to track who did what (for compliance and security forensics). Also, tools like the PKI Health Tool (pkiview.msc) and PowerShell cmdlets (like Get-CertificationAuthority, Get-CertificationAuthorityCertificate) can help monitor the health and configuration of your CAs. Conclusion By following this guide, you have set up a secure two-tier PKI environment consisting of an offline Root CA and an online Issuing CA. This design, which uses an offline root, is considered a security best practice for enterprise PKI deployments because it reduces the risk of your root key being compromised. With the offline Root CA acting as a hardened trust anchor and the enterprise Issuing CA handling day-to-day certificate issuance, your lab PKI can issue certificates for various purposes (HTTPS, code signing, user authentication, etc.) in a way that models real-world deployments. As you expand this lab or move to production, always remember that PKI security is as much about process as technology. Applying strict controls to protect CA keys, keeping software up to date, and monitoring your PKI’s health are all part of the journey. For further reading and official guidance, refer to these Microsoft documentation resources: 📖 AD CS PKI Design Considerations: PKI design considerations using Active Directory Certificate Services in Windows Server helps in planning a PKI deployment (number of CAs, hierarchy depth, naming, key lengths, validity periods, etc.). This is useful to read when adapting this lab design to a production environment. It also covers configuring CDP/AIA and why offline roots usually don’t need delta CRLs. 📖 AD CS Step-by-Step Guides: Microsoft’s Test Lab Guide Test Lab Guide: Deploying an AD CS Two-Tier PKI Hierarchy walk through a similar scenario.Authorization and Identity Governance Inside AI Agents
Designing Authorization‑Aware AI Agents Enforcing Microsoft Entra ID RBAC in Copilot Studio As AI agents move from experimentation to enterprise execution, authorization becomes the defining line between innovation and risk. AI agents are rapidly evolving from experimental assistants into enterprise operators—retrieving user data, triggering workflows, and invoking protected APIs. While many early implementations rely on prompt‑level instructions to control access, regulated enterprise environments require authorization to be enforced by identity systems, not language models. This article presents a production‑ready, identity‑first architecture for building authorization‑aware AI agents using Copilot Studio, Power Automate, Microsoft Entra ID, and Microsoft Graph, ensuring every agent action executes strictly within the requesting user’s permissions. Why Prompt‑Level Security Is Not Enough Large Language Models interpret intent—they do not enforce policy. Even the most carefully written prompts cannot: Validate Microsoft Entra ID group or role membership Reliably distinguish delegated user identity from application identity Enforce deterministic access decisions Produce auditable authorization outcomes Relying on prompts for authorization introduces silent security failures, over‑privileged access, and compliance gaps—particularly in Financial Services, Healthcare, and other regulated industries. Authorization is not a reasoning problem. It is an identity enforcement problem. Common Authorization Anti‑Patterns in AI Agents The following patterns frequently appear in early AI agent implementations and should be avoided in enterprise environments: Hard‑coded role or group checks embedded in prompts Trusting group names passed as plain‑text parameters Using application permissions for user‑initiated actions Skipping verification of the user’s Entra ID identity Lacking an auditable authorization decision point These approaches may work in demos, but they do not survive security reviews, compliance audits, or real‑world misuse scenarios. Authorization‑Aware Agent Architecture In an authorization‑aware design, the agent never decides access. Authorization is enforced externally, by identity‑aware workflows that sit outside the language model’s reasoning boundary. High‑Level Flow The Copilot Studio agent receives a user request The agent passes the User Principal Name (UPN) and intended action A Power Automate flow validates permissions using Microsoft Entra ID via Microsoft Graph Only authorized requests are allowed to proceed Unauthorized requests fail fast with a deterministic outcome Authorization‑aware Copilot Studio architecture enforces Entra ID RBAC before executing any business action. The agent orchestrates intent. Identity systems enforce access. Enforcing Entra ID RBAC with Microsoft Graph Power Automate acts as the authorization enforcement layer: Resolve user identity from the supplied UPN Retrieve group or role memberships using Microsoft Graph Normalize and compare memberships against approved RBAC groups Explicitly deny execution when authorization fails This keeps authorization logic: Centralized Deterministic Auditable Independent of the AI model Reference Implementation: Power Automate RBAC Enforcement Flow The following import‑ready Power Automate cloud flow demonstrates a secure RBAC enforcement pattern for Copilot Studio agents. It validates Microsoft Entra ID group membership before allowing any business action. Scenario Trigger: User‑initiated agent action Identity model: Delegated user identity Input: userUPN, requestedAction Outcome: Authorized or denied based on Entra ID RBAC { "$schema": "https://schema.management.azure.com/providers/Microsoft.Logic/schemas/2016-06-01/workflowdefinition.json#", "contentVersion": "1.0.0.0", "triggers": { "Copilot_Request": { "type": "Request", "kind": "Http", "inputs": { "schema": { "type": "object", "properties": { "userUPN": { "type": "string" }, "requestedAction": { "type": "string" } }, "required": [ "userUPN" ] } } } }, "actions": { "Get_User_Groups": { "type": "Http", "inputs": { "method": "GET", "uri": "https://graph.microsoft.com/v1.0/users/@{triggerBody()?['userUPN']}/memberOf?$select=displayName", "authentication": { "type": "ManagedServiceIdentity" } } }, "Normalize_Group_Names": { "type": "Select", "inputs": { "from": "@body('Get_User_Groups')?['value']", "select": { "groupName": "@toLower(item()?['displayName'])" } }, "runAfter": { "Get_User_Groups": [ "Succeeded" ] } }, "Check_Authorization": { "type": "Condition", "expression": "@contains(body('Normalize_Group_Names'), 'ai-authorized-users')", "runAfter": { "Normalize_Group_Names": [ "Succeeded" ] }, "actions": { "Authorized_Action": { "type": "Compose", "inputs": "User authorized via Entra ID RBAC" } }, "else": { "actions": { "Access_Denied": { "type": "Terminate", "inputs": { "status": "Failed", "message": "Access denied. User not authorized via Entra ID RBAC." } } } } } } } This pattern enforces authorization outside the agent, aligns with Zero Trust principles, and creates a clear audit boundary suitable for enterprise and regulated environments. Flow Diagram: Agent Integrated with RBAC Authorization Flow and Sample Prompt Execution: Delegated vs Application Permissions Scenario Recommended Permission Model User‑initiated agent actions Delegated permissions Background or system automation Application permissions Using delegated permissions ensures agent execution remains strictly within the requesting user’s identity boundary. Auditing and Compliance Benefits Deterministic and explainable authorization decisions Centralized enforcement aligned with identity governance Clear audit trails for security and compliance reviews Readiness for SOC, ISO, PCI, and FSI assessments Enterprise Security Takeaways Authorization belongs in Microsoft Entra ID, not prompts AI agents must respect enterprise identity boundaries Copilot Studio + Power Automate + Microsoft Graph enable secure‑by‑design AI agents By treating AI agents as first‑class enterprise actors and enforcing authorization at the identity layer, organizations can scale AI adoption with confidence, trust, and compliance.