openai
133 Topics
Productize, observe, version, and automate MCP servers in Azure API Management
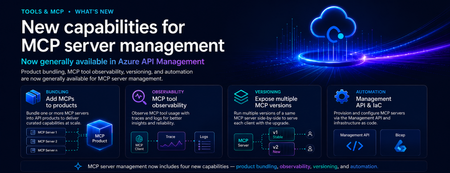
Introduction As organizations move from AI-assisted applications to agentic workflows, MCP servers are becoming a critical integration layer between agents, tools, APIs, data sources, and enterprise systems. Azure API Management already helps teams bring MCP servers under enterprise governance. But as MCP adoption scales, platform teams need more than basic exposure. They need a way to package MCP servers for the right consumers, understand tool usage in detail, manage changes safely, and automate configuration across environments. These are familiar API management challenges — and the same patterns that organizations already use for APIs can now be applied more deeply to MCP servers. We are excited to announce new generally available capabilities for MCP server management in Azure API Management: Add MCP servers to products to package and govern MCP capabilities for specific consumers MCP tool observability to trace tool usage, logs, errors, and payload context MCP server versioning to run multiple versions side by side and manage change safely Management API and Bicep support to automate MCP server configuration as part of CI/CD workflows Together, these capabilities extend MCP server management in Azure API Management and help make MCP servers first-class managed resources — productized, observable, versionable, and automatable. Why MCP server management matters MCP gives agents a standard way to connect with tools and external capabilities. That standardization is powerful, but it also introduces a new operational surface for enterprises. Without a management layer, teams can quickly run into questions such as: Which MCP servers are approved for use? Who can access each server? How do we expose MCP servers to different developer or agent audiences? How do we monitor tool calls, latency, errors, and cost? How do we run preview and production versions side by side? How do we automate MCP server configuration across environments? These are not just developer experience questions. They are enterprise governance questions. With Azure API Management, MCP servers can now be managed using the same core patterns organizations already use for APIs: products, subscriptions, policies, observability, versioning, and automation. What’s new 1. Add MCP servers to products Azure API Management products are a proven way to package APIs for consumption. With this release, you can now add one or more MCP servers to APIM products as well. This makes it easier to expose MCP capabilities to specific consumers, teams, applications, or agent experiences using familiar product-based governance. For example, a platform team can create a product for internal agents that includes approved MCP servers such as: Customer profile lookup Order status retrieval Knowledge base search Ticket creation Workflow automation tools By adding MCP servers to products, teams can use familiar controls such as subscriptions, quotas, approval workflows, and access management to govern how MCP capabilities are consumed. Why it matters: MCP servers are no longer isolated endpoints. They can be bundled, governed, and delivered as secure, consumable products. 2. MCP tool observability As agents use MCP servers to discover and invoke tools, teams need more than basic traffic visibility. They need end-to-end trace context for each agent-to-tool interaction. With MCP observability in Azure API Management, teams can inspect key MCP-specific details, including: Operation context: whether the request was a tools/list or tools/call operation Session context: the MCP session ID through gen_ai.conversation.id Client context: MCP client name and version Protocol context: MCP protocol name and version Server context: MCP server name and version Access context: authentication type and API type Tool context: tool name and tool type for tool invocation traces Error context: error type and error message when a call fails Payload context: tool invocation arguments and results when payload logging is enabled This is especially important for agentic workflows, where a single user request may trigger multiple tool calls across different systems. With APIM, MCP traffic can be traced, inspected, and monitored using the same operational practices teams already use across their API estate. Why it matters: MCP servers are not just accessible through APIM — they are observable. Platform teams can trace tool calls, inspect errors, and understand MCP usage with the same operational discipline they expect from managed APIs. 3. Expose multiple MCP versions Enterprise teams need safe ways to evolve MCP servers over time. With MCP server versioning in Azure API Management, you can expose multiple versions of the same MCP server side by side. This allows teams to run a stable GA version while introducing a preview or next version for early adopters. For example: v1 can serve the majority of production traffic. v2 can be exposed to a subset of consumers for testing. Teams can monitor adoption, errors, latency, and behavior. Once the new version is validated, v2 can be promoted with confidence. This pattern is especially useful when MCP tools evolve, schemas change, new capabilities are added, or teams want to validate agent behavior before rolling changes out broadly. Why it matters: MCP servers can now follow a safer lifecycle model: preview, validate, route, promote, and retire. 4. Management API and Infrastructure as Code MCP server management also needs to work at enterprise scale. With Management API and Infrastructure as Code support, teams can provision and configure MCP servers programmatically through Azure API Management APIs and automation pipelines. This allows platform teams to define MCP server resources as part of repeatable deployment workflows using tools such as Bicep, Terraform, ARM, REST APIs, and CI/CD pipelines. Teams can automate configuration for: MCP server endpoints Runtime and transport settings Authentication configuration Metadata and ownership Versioning Product association Policies Environment promotion This is critical for organizations that need consistent MCP governance across development, test, staging, and production environments. Why it matters: MCP server management can now be automated, reviewed, deployed, and governed like the rest of your API platform. How these capabilities work together Individually, each capability solves an important operational need. Together, they create a complete management model for MCP servers in Azure API Management. A platform team can: Register or expose MCP servers through Azure API Management. Package them into products for specific consumers. Apply access controls, subscriptions, quotas, and policies. Observe tool-level usage, latency, errors, traces, and cost. Run multiple versions side by side. Promote changes safely. Automate deployment through APIs and Infrastructure as Code. This brings the full API management playbook to MCP. Instead of treating MCP servers as unmanaged agent extensions, organizations can operate them as governed enterprise resources. Example scenario Imagine a company building internal copilots for customer support, sales, and operations. Each copilot needs access to different tools: Customer lookup Order history Case management Knowledge search Refund workflows Escalation workflows With MCP and Azure API Management, the platform team can expose these capabilities as MCP servers and organize them into products. The customer support copilot can subscribe to the support product. The sales copilot can subscribe to the sales product. Early adopters can be routed to a preview version of a tool. Operations teams can monitor usage, errors, latency, traces, and cost. Platform teams can automate the entire setup across environments. The result is a more governed and scalable way to bring MCP-based tools into enterprise agent workflows. Getting started To get started with MCP server management in Azure API Management: Create or identify an MCP server you want to expose through Azure API Management. Add the MCP server as a managed resource in APIM. Add the MCP server to an APIM product. Configure access, subscriptions, quotas, and approval workflows. Enable observability to monitor tool-level usage and traces. Use versioning to manage preview and production versions. Use the Management API or Infrastructure as Code to automate configuration. Conclusion MCP is quickly becoming an important standard for connecting agents to tools and enterprise capabilities. But for MCP to succeed in production, organizations need more than connectivity. They need governance, lifecycle management, observability, and automation. With these new MCP server management capabilities in Azure API Management, platform teams can manage MCP servers using the same trusted patterns they already use for APIs. MCP servers are now first-class APIM resources — productized, observable, versionable, and automatable. We are excited to see how customers use these capabilities to build the next generation of governed, enterprise-ready agentic applications.1.1KViews1like0CommentsNew AI gateway capabilities in Azure API Management
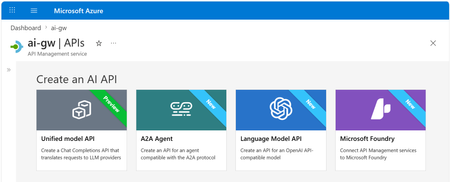
Multi-model, multi-protocol AI applications are quickly becoming the norm. Teams are mixing OpenAI, Anthropic, and Vertex AI models, exposing tools through MCP, and wiring agents together with A2A. As that surface grows, so does the work of keeping it secure, observable, and consistent. Our ongoing strategy for the AI gateway capabilities in Azure API Management centers on that problem: providing one place to manage models, MCP tools, and agents, no matter which provider or protocol is behind them. The updates below are the latest steps in that direction. Unified Model API (preview) The headline change in this release: the Unified Model API lets clients speak one API format — OpenAI Chat Completions — while API Management transforms requests to the backend provider, whether that's a model using OpenAI Chat Completions or Anthropic Messages API. By centralizing model access behind a single API layer, you can: Standardize on a single API format for clients, independently from the formats used by backend models. Unify observability, security, and governance with policies that apply across model providers. Configure failover across model providers. Decouple client-facing model names from backend model names using aliases. Learn more about the unified model API. Model aliases Model aliases give clients a stable, provider-neutral name to use when calling a model. By assigning an alias like gpt or claude-sonnet, you decouple the client-facing model name from the actual backend deployment. That makes a few common operations a lot easier: Upgrading a model. Update the alias target to point at a new version — no client code changes required. A/B tests. Shift traffic between backends behind the same alias using API Management's load balancing capabilities. Vendor swaps. Replace one provider with another without touching application code. Model discovery Developers can discover available models by calling the /models endpoint of the Unified Model API. API Management returns the list of model aliases, so apps and tools can adapt to what the platform team has published — without out-of-band documentation. Anthropic and Vertex AI models (GA) AI gateway policies and observability now work with Anthropic and Google Vertex AI models, alongside the providers we already support. You can: Apply runtime policies such as content safety, token limits, and semantic caching to Anthropic and Vertex AI traffic. Collect logs, traces, and metrics for these models in the same place as the rest of your AI traffic. If you're running a multi-provider setup, you no longer need a separate governance story for each vendor. Learn more about AI gateway capabilities in API Management. Anthropic API operations in Microsoft Foundry import When you import a Microsoft Foundry resource as an API in Azure API Management, the import now creates operations for Anthropic APIs alongside the existing model APIs. In a few clicks, you can stand up an API that mediates traffic to Foundry models using either the OpenAI or Anthropic API format — no manual operation definitions needed — and then apply the same policies, security, and observability you use for the rest of your AI traffic. Learn more about Microsoft Foundry import. Token metrics for additional token types (preview) Token tracking used to stop at prompt, completion, and total tokens. Modern models add cached, reasoning, and thinking tokens, which can make up a significant share of token consumption, cost, and latency. API Management now logs metrics for these additional token types into Application Insights, across API formats (OpenAI Chat Completions, OpenAI Responses, and Anthropic Messages API) and providers (Microsoft Foundry, OpenAI, Amazon Bedrock, Google Vertex AI, and others). With richer signals, your cost dashboards, budget alerts, and capacity planning can actually reflect how today's models behave. Learn more about token metrics. Content safety for MCP and A2A (GA) The llm-content-safety policy now covers MCP and A2A traffic in addition to LLM traffic. That includes MCP tool-call arguments, MCP response text, and A2A payloads. A couple of related improvements: llm-content-safety can now be configured directly as an outbound policy. Two new attributes — window-size and window-overlap-size — let you tune how messages exceeding the Azure Content Safety limit of 10,000 characters are chunked and forwarded for validation, balancing detection sensitivity with Azure Content Safety call volume. The result is one consistent safety policy across LLM, MCP, and A2A flows instead of stitching together custom filters per protocol. Learn more about the content safety policy. A2A APIs (GA) Support for Agent-to-Agent (A2A) APIs in API Management is now generally available. Agent APIs can now be governed with the same policies, identity, and observability you use for the rest of your APIs. What you can do with A2A APIs in API Management: Mediate JSON-RPC runtime operations to your agent backend with full policy support — including the content safety improvements above. Expose and manage agent cards, automatically transformed by API Management to represent the managed agent API. Log traces to Application Insights using OpenTelemetry GenAI semantic conventions for deep correlation between API and agent execution traces. What's new in GA, on top of the preview: Available in classic tiers, in addition to v2 tiers — bring A2A governance to existing API Management resources without migrating tiers. Richer diagnostic logging for A2A APIs, giving more actionable telemetry for monitoring and troubleshooting agent traffic. Learn more about A2A support in API Management. Related: Bring Your Own Model in Foundry Agent Service (GA) Last month, Bring Your Own Model (BYOM) in Foundry Agent Service went GA. BYOM lets enterprise teams route Foundry agent model calls through their own infrastructure — typically for compliance, governance, or to reuse an existing model gateway. This pairs naturally with the AI gateway capabilities in Azure API Management. Put API Management in front of your models, apply the policies and observability described above, and have Foundry agents call through it — getting consistent governance for both your direct AI traffic and your agent workloads. Get started Together, these updates make Azure API Management a more complete AI gateway: consistent governance, security, and observability across models from various providers, MCP tools, and agent interactions. Some of these features are still rolling out. They will first become available in v2 tiers of API Management and in the AI release channel for classic tiers, then continue rolling out to the rest of classic tier resources over the following weeks. Get started with the unified model API or explore the AI gateway capabilities in API Management.1.6KViews0likes0CommentsMCP Test Console and Git Repository synch in Azure API Center
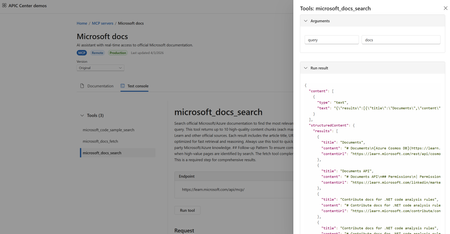
Why This Matters As organizations race to build AI-powered applications, the Model Context Protocol (MCP) has emerged as the standard way to connect AI agents with external tools and data sources. Managing these MCP servers at enterprise scale, however, has been a growing challenge — until now. AI agents are only as useful as the tools they can access. MCP servers expose those tools — from databases and internal APIs to third-party services — in a standardized way that any AI agent or model can consume. As your MCP ecosystem grows, so does the challenge of keeping track of what's available, what's working, and what your teams are actually using. Azure API Center already serves as a centralized registry for APIs across your organization. Now it extends that same governance model to MCP servers, complete with developer-friendly discovery, live testing, and automated synchronization from your source repositories. New Feature: MCP Test Console in the API Center Portal Developers can now test MCP server tools interactively without leaving the Azure portal. Once an MCP server is registered in your API Center inventory, the API Center portal — your organization's customizable developer portal — surfaces a dedicated test console on the server's Documentation tab. Developers simply select a tool, click Run tool, and immediately see the response. This means your teams can: Validate tools before connecting them to agents — no more building a test harness from scratch. Explore tool schemas interactively — the portal surfaces endpoint details and input/output schemas alongside the live console. Onboard faster — developers browsing your internal MCP registry can go from discovery to verified integration in minutes. The MCP server tiles in the portal provide a clear, browsable view of all registered servers. Each tile surfaces the server's endpoint URL, available tools, and installation instructions for Visual Studio Code — giving developers everything they need to get started in one place. Getting started: Set up your API Center portal, then navigate to any registered MCP server. On the Documentation tab, select a tool and click Run tool to open the test console. New Feature: Synch MCP Servers from a Git Repository Managing API assets shouldn't require manual registration every time something changes. With Git repository integration, Azure API Center can automatically sync assets — including MCP server definitions — directly from your source repository. How It Works When you connect a Git repository to your API Center: An environment is created in your API Center representing the repository as an asset source. API Center regularly synchronizes MCP servers from the repository into your inventory — no manual intervention required. Assets appear in your inventory on the Inventory > Assets page with a visual link indicator, making it easy to identify which assets are source-controlled. This is especially valuable for teams that maintain MCP server definitions, skill files, or OpenAPI specs in version control. As your repository evolves, your API Center inventory stays current automatically. Setting It Up Step 1: Secure your access credentials (for private repos) If your repository is private, store a personal access token (PAT) as a secret in Azure Key Vault. Your API Center instance uses a managed identity to retrieve this secret securely — you can configure the managed identity manually or let API Center handle it automatically during the integration setup. Step 2: Connect the repository In the Azure portal, go to your API Center and navigate to Platforms > Integrations > + New integration > From Git repository. You'll configure: Repository URL — including an optional branch and subfolder path (e.g., https://github.com/<org>/<repo>/tree/main/skills). Git provider — such as GitHub. Asset type configuration — API Center defaults to a skill asset type with the file pattern **/skill.md, but you can add additional asset types to match your repository structure. PAT reference — select the Key Vault secret containing your PAT, if applicable. Environment details — give the repository environment a friendly name, resource ID, type (e.g., Production), and lifecycle stage for synced assets. Step 3: Let the sync run Once created, the integration runs automatically. Your assets will appear in the Inventory > Assets view, linked to their source in the repository. Access Control for Private Repositories The integration uses Azure's managed identity framework to authenticate to Key Vault. Assign your API Center's managed identity the Key Vault Secrets User role on your Key Vault to grant the necessary read access. If you prefer, API Center can configure this automatically — just enable the Automatically configure managed identity and assign permissions option during integration setup. Bringing It Together: A Complete MCP Governance Story Together, these two features complete an end-to-end workflow for enterprise MCP governance: Register → Connect your Git repository and let API Center automatically synch your MCP servers and skills as they evolve. Discover → Developers and AI engineers browse the API Center portal to find the right MCP server for their agent, with full schema visibility and endpoint details. Test → The built-in test console lets developers validate tools interactively before committing to an integration. Govern → Use API Center's access management capabilities to control who can view and consume specific MCP servers across your organization. And if you're building MCP servers on Azure services, the registry integrates directly with Azure API Management, Azure Logic Apps, and Azure Functions — so your MCP ecosystem and your API ecosystem share a single source of truth. Get Started Register and discover MCP servers in Azure API Center Synchronize API assets from a Git repository Set up the API Center portal Explore MCP Center — Azure API Center's public MCP registryMore Control, Less Overhead: Custom Domain Upgrades in Azure API Management v2
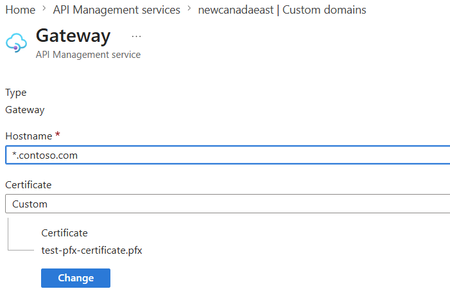
Multiple custom domains in Premium v2 Large organizations rarely expose APIs under a single domain. A global enterprise might need api.contoso.com for external partners, apis.hrportal.contoso.com for internal teams, and dev.europe.contoso.com for a regional developer portal — all at once. Until now, achieving this required spinning up separate API Management instances, adding cost and operational complexity. Azure API Management Premium v2 now supports multiple custom domains within a single instance — across gateway, developer portal, and management endpoints. This allows organizations to: Configure distinct hostnames for different endpoints and target audiences Align API experiences with business units, products, or regional brands Simplify domain-scoped networking and security policies Reduce the need for separate APIM instances created solely for domain separation For enterprises managing large, distributed API estates, this provides greater flexibility in how APIs and developer experiences are exposed — while maintaining centralized governance. Wildcard custom hostnames in Premium v2 and Standard v2 As API estates grow, managing individual certificates for every subdomain becomes a scaling problem fast. Each new surface — payments.api.contoso.com, inventory.api.contoso.com, orders.api.contoso.com — previously required its own hostname registration and certificate. Ten new API surfaces meant ten separate management tasks. Azure API Management Premium v2 and Standard v2 now support wildcard entries in custom hostnames. A single *.api.contoso.com entry paired with a single wildcard certificate covers all subdomains automatically — no per-subdomain configuration required. This helps teams: Simplify certificate and domain management at scale Accelerate onboarding of new API surfaces without repeated hostname setup Maintain consistent branded endpoints across dynamic subdomains Reduce operational overhead for rapidly growing API environments By extending this capability to both Premium v2 and Standard v2, Azure API Management makes flexible, scalable domain management accessible to more organizations without requiring higher-tier deployments. Both updates are generally available now. Learn more about Azure API Management v2 tiers and how they help organizations build scalable, enterprise-grade API platforms. Further reading: Configure a custom domain name for Azure API ManagementAzure API Center Introduces a Data Plane MCP Server for Enterprise-Wide API and AI Asset Discovery
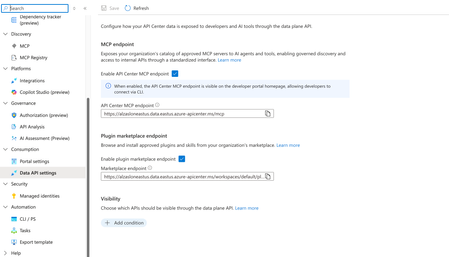
As organizations scale their adoption of MCP-based tooling and AI agents, one challenge keeps surfacing: developers spend too much time figuring out what APIs, tools, and AI assets exist — and then manually wiring up connections to each one. Today, we're excited to announce general availability of a new capability that changes that. What's new Azure API Center now provides a data plane MCP server — a unified enterprise discovery endpoint that gives agents and developer tools a single connection point to your organization's full catalog of registered MCP servers, tools, APIs, and AI assets. Instead of hunting across systems or hand-configuring integrations one by one, developers and agents can now connect once and immediately access everything that's been registered in your API Center. Why this matters The MCP ecosystem is growing fast. So is the number of enterprise APIs and AI assets that teams need to manage and consume. Without a central discovery mechanism, that growth creates friction — more manual configuration, more drift between what's available and what's actually reachable, and more integration complexity for every new agentic application. The Azure API Center data plane MCP server addresses this directly. With it, teams can: Give agents centralized access to enterprise APIs and AI assets without custom routing logic Eliminate manual configuration of connections to individual MCP servers Automatically surface newly registered MCP servers and tools without reconfiguration Simplify discovery and consumption across a rapidly growing enterprise catalog Built for how organizations actually operate Agentic applications don't just need APIs — they need to find the right APIs, trust that the catalog is current, and connect reliably at scale. By acting as a unified discovery endpoint, Azure API Center helps teams operationalize AI ecosystems with stronger discoverability, governance, and developer productivity, while meaningfully reducing integration complexity. This is especially valuable as enterprises move from experimenting with AI agents to deploying them in production workflows, where manual integration approaches don't scale. How to enable the data plane MCP server Turning on the MCP server takes just a few clicks in the Azure portal. Navigate to your API Center instance and open Data API settings under the Consumption section in the left-hand menu. From there, under MCP endpoint, toggle Enable API Center MCP endpoint to on. Once enabled, your MCP endpoint URL (in the form https://<your-instance>.data.<region>.azure-apicenter.ms/mcp) will appear and can be copied directly for use in agent configurations or developer tools. Note: When enabled, the MCP endpoint is also surfaced on the developer portal homepage, so developers can connect via CLI without needing to look up the URL separately. You can also enable the Plugin marketplace endpoint from the same settings page to let developers browse and install approved plugins and skills from your organization's marketplace. The Visibility section lets you control which APIs are exposed through the data plane — use Add condition to filter the catalog based on your governance requirements. Get started Learn more about Azure API Center and how organizations are building unified catalogs for APIs, MCP tools, agents, and AI assets.Find what you need, faster: Azure API Center now supports custom metadata filtering
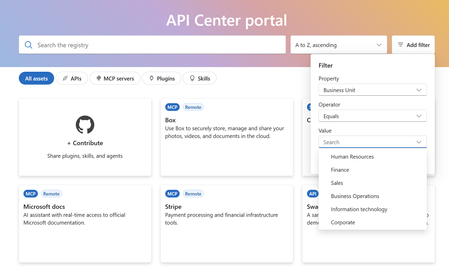
Enterprise API and AI catalogs have expanded dramatically. Where teams once managed dozens of APIs, they now govern hundreds — spanning business units, environments, compliance domains, and an ever-growing roster of AI assets. The catalog itself has become a discovery challenge. What's new Developers can now filter catalog assets using organization-defined metadata attributes. These aren't generic tags — they're the classifications your organization already uses: environments, business units, domains, compliance tiers, ownership groups, and more. Custom metadata filtering works across all major asset types in Azure API Center: APIs Skills Agents MCP tools Why it matters Discovery friction is a hidden tax on developer productivity. When a developer needs to find the right API for a project, every minute spent navigating inconsistent lists or applying manual filters is a minute not spent building. At scale, this compounds quickly. Custom metadata filtering addresses this directly by aligning the catalog's search experience with how your organization already thinks about its assets: Surface the right assets faster — filter by internal classifications and governance models instead of browsing overwhelming lists Improve discoverability at scale — no need to retag or reorganize existing assets to make them findable Align with your organizational taxonomy — filter by domain, environment, business unit, compliance requirement, or any custom attribute your teams already use Built for governed, AI-ready teams This update reinforces Azure API Center's role as the foundation for scalable, AI-ready discovery experiences — where governance and developer velocity move together, not against each other. By making enterprise catalogs easier to navigate, Azure API Center helps developers spend less time searching and more time building with governed APIs and AI assets. Get started Learn more about Azure API Center custom metadata filtering and how organizations are building scalable, AI-ready discovery experiences.GA: Azure API Center Now Supports Plugin Registration
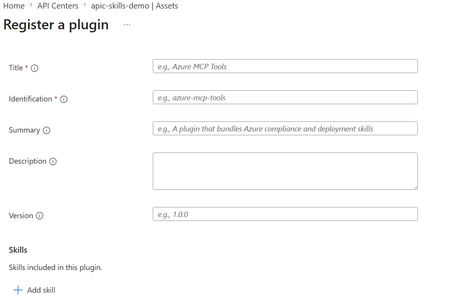
As organizations scale their AI and integration ecosystems, one challenge keeps surfacing: developers don't have a reliable, governed way to discover and reuse the plugins their teams have already built. Plugins end up siloed in individual repos, shared over Slack, or duplicated across teams — slowing down development and creating governance blind spots. What's new With this update, developers can register plugins directly into Azure API Center's enterprise catalog. Once registered, plugins are discoverable, governable, and consumable alongside the rest of an organization's API and AI portfolio — no more hunting across repositories or relying on word-of-mouth to find what's already been built. Why it matters Plugins are increasingly central to how AI-powered applications are built. Agents depend on them. Integrations are built on top of them. But without a governed home, even well-built plugins go undiscovered and get rebuilt from scratch. Plugin registration in Azure API Center helps organizations: Centralize plugin discovery within a governed catalog, so developers always know where to look Surface vetted plugins that teams can confidently find and reuse — reducing duplication and accelerating development Align plugins with source-controlled workflows, keeping development practices consistent across the catalog Reduce friction between building a plugin and enabling it for real-world integration One catalog for your entire AI ecosystem This update reflects a broader vision for Azure API Center: a single, unified catalog for everything an organization builds and consumes — APIs, plugins, agents, and AI assets. By bringing plugins into this experience, teams can operationalize reusable integration and AI capabilities at scale, with the governance and discoverability that enterprise development requires. Whether your teams are building copilot extensions, orchestration layers, or custom integrations, Azure API Center gives them a governed foundation to build on — and a shared place to discover what's already there. Learn more about Azure API Center and how organizations are building centralized catalogs for APIs, plugins, agents, and AI assets.Azure API Center now supports agent registration, agent assessment, and Git-based synchronization
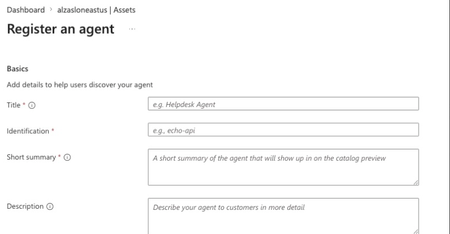
What's new Three capabilities are now generally available: Capability What it does Agent registration Register agents directly into the enterprise catalog for cross-team discovery and reuse. Agent assessment LLM-as-a-Judge framework scores agents across 6 criteria before catalog registration. Git synchronization Connect a repo and keep agent definitions automatically in sync with source control. Agent assessment — six weighted criteria, automatically enforced When assessment is enabled, every agent is scored on creation or update. Up to 8 criteria are supported; weights are fully configurable by platform teams. Criterion Weight What it evaluates capability-transparency 0.15 Documents tools, delegated capabilities, external systems, access levels, and capability boundaries. composition-resource-discipline 0.15 Named skill/sub-agent references, invoke guidance, no inline duplication, resource/token constraints. operational-protocol-quality 0.25 Structured workflow with named steps, decision points, failure modes, recovery paths, and pre-flight checks. output-contract 0.10 Specifies output format, mandatory sections, evidence requirements, confidence semantics, and dead-end handling. purpose-scope-clarity 0.15 Clear role identity, type (specialist/orchestrator), activation triggers, anti-triggers, and refusal behavior. safety-consent-architecture 0.20 Classifies risk, distinguishes idempotent vs approval-required actions, enumerates NEVER/ALWAYS rules, documents failure-mode safety. Git-based synchronization — connect once, stay in sync automatically Integrating a Git repository creates an environment in API Center representing the repo as an asset source. API Center polls for changes and reflects them in Inventory > Assets — linked assets display a provenance icon. Agent definitions live in source control and evolve continuously — yet keeping a catalog manually in sync with a codebase is slow, error-prone work that no platform team should have to do. Git-based synchronization connects Azure API Center directly to your repository, polling for changes and reflecting them in the inventory automatically so the catalog always represents the current state of your agents. Linked assets carry a provenance icon that traces them back to their source repository, giving developers immediate visibility into where an agent comes from and whether it is actively maintained. Because assessment gates run before any version is promoted from the repo into the catalog, only agents that meet your organization's quality criteria ever reach developers — enforcing governance at the point of commit, not as an afterthought. A single integration supports multiple asset types through configurable file patterns, so teams can sync agents, skills, and APIs from one repository with per-type control and no duplication. A2A agent sync from Azure API Management — publish once, discover everywhere Azure API Management → continuous sync → Azure API Center One-way · updates within minutes · includes API definitions, environments & deployments As teams publish more A2A agents through Azure API Management, manually registering each one into a discovery catalog creates friction that slows developer productivity and risks catalog staleness. Azure API Center now automatically synchronizes A2A agents — alongside APIs and MCP servers — published in an API Management instance, so every agent that reaches runtime is immediately visible in the centralized catalog without any additional registration step. The sync is continuous and one-way: when agents are created, updated, versioned, or deleted in API Management, those changes propagate to API Center within minutes, keeping the inventory accurate at all times. Each synchronized agent gets an associated environment and deployment record, giving developers the runtime context they need to discover and integrate the right agent with confidence. This closes the loop between runtime publishing and centralized governance, helping organizations operationalize agent ecosystems at scale without burdening platform teams with manual catalog maintenance. Why it matters By bringing agents into Azure API Center alongside APIs, plugins, skills, and MCP tools, organizations gain a single pane of glass for everything their AI applications depend on. Teams reduce duplication, improve reuse, and accelerate development — while maintaining the governance standards enterprise deployments require. Get started Azure API Center overview Set up Git-based synchronization Sync A2A agents from API ManagementSigning in to Microsoft Foundry from OpenClaw using Azure AD: a smoother way to bring your models in
This post is a quick update to walk through the new flow. If you read the previous one, think of this as the easier path I wish I had the first time round. If you have not seen the original, you can find it here: Integrating Microsoft Foundry with OpenClaw: Step by Step Model Configuration | Microsoft Community Hub Pre-requisite: You will need the Azure CLI (azure-cli) installed on your machine. The official install guide for Linux is here: https://learn.microsoft.com/en-us/cli/azure/install-azure-cli-linux?view=azure-cli-latest I am on Linux so I went the Homebrew route, which keeps things simple. The formula is here: https://formulae.brew.sh/formula/azure-cli Microsoft also has official docs covering the Homebrew/Linuxbrew install: https://learn.microsoft.com/en-us/cli/azure/install-azure-cli-macos?view=azure-cli-latest#install-with-homebrew Once Homebrew is ready, run this in your terminal: brew install azure-cli Why this matters: Before this update, every Foundry model you wanted to use in OpenClaw needed its own API key and endpoint pasted into the config. It worked, but it was tedious, and keys are easy to leak if you are copying them around. The Azure AD path solves both problems. You authenticate as yourself (or a service principal), OpenClaw asks Azure for the list of Foundry resources you have access to, and it brings the models in automatically. Signing in to Microsoft Foundry from OpenClaw via Azure AD A device-code OAuth handshake replaces the old static-API-key flow. OpenClaw delegates auth to the local Azure CLI; the CLI handles the browser-side sign-in, holds the resulting tokens, and refreshes them silently. OpenClaw then walks the Azure resource graph, subscriptions → Foundry resources → model deployments and registers each model into its own config. No API keys move through OpenClaw at any point. Sequence diagram of the OAuth 2.0 device-authorization flow as orchestrated by OpenClaw. Phases 1–3 establish identity (the developer authenticates once, in a real browser, against Azure AD). Phases 4–5 perform service discovery (OpenClaw walks the ARM resource hierarchy, subscriptions → Foundry accounts → model deployments and persists the result to a local provider config). After registration, every model call OpenClaw makes against Foundry reuses the same Azure-CLI-managed token cache: tokens refresh transparently, and access is gated by the Foundry resource's RBAC assignments rather than a static API key. Dashed lines denote return values; the teal line in step 7 marks the single token-issuance event the rest of the system pivots on. Walking through the new flow: Start with the command to onboard openclaw as if you were setting up OpenClaw for the first time: openclaw onboard Kick things off with the OpenClaw onboard command, the same one you would use when setting up OpenClaw for the first time. When it prompts you, choose update values. Next, you will be asked to configure your models. Scroll down a little and you will see Microsoft Foundry listed as a supported provider. Pick it. From here, you have two options. You can sign in with an API key, which is what I covered in the previous blog post, or you can sign in through Azure AD. The Azure AD path is easier and more secure, so that is the one we will use. OpenClaw will give you a URL and a device code. Copy the URL into your browser and use the code to complete the sign in. (This is where the az CLI from the pre-requisite section earns its keep.) If everything worked, you should see a success prompt similar to this: Once you are signed in, OpenClaw will ask you to pick the Azure subscription that your Microsoft Foundry resource lives in. Pick the subscription, then pick the Foundry resource where your models are deployed. And that is pretty much it. All the models you have deployed to that Foundry resource get pulled into OpenClaw automatically. Compared to the old way of pasting API keys and endpoints one by one, this is a huge time saver, and you do not have to babysit any keys. From here you can start using your Foundry-deployed models inside OpenClaw straight away: Wrapping up The Azure AD sign-in option in OpenClaw is one of those small updates that quietly removes a real pain point. If you have ever juggled multiple Foundry endpoints and rotated keys across them, you already know why. With this flow, you sign in once, your models show up, and you can get back to actually building. If you have not tried OpenClaw with Microsoft Foundry yet, this is a good time to give it a go. And if you were holding off because of the key management overhead, that excuse is gone now. References Previous post on integrating Microsoft Foundry with OpenClaw using API keys: Integrating Microsoft Foundry with OpenClaw: Step by Step Model Configuration | Microsoft Community Hub Install the Azure CLI on Linux: https://learn.microsoft.com/en-us/cli/azure/install-azure-cli-linux?view=azure-cli-latest Install the Azure CLI on macOS: https://learn.microsoft.com/en-us/cli/azure/install-azure-cli-macos?view=azure-cli-latest#install-with-homebrew Homebrew formula for azure-cli: https://formulae.brew.sh/formula/azure-cli275Views0likes0CommentsRun Javascript code on Agent Loop
We have recently introduced support for Code interpreters inside of Azure Logic Apps Agent Loop, extending the support we had for Python. When partnered with a LLM, this allow builders to express their goals or intents via natural language and obtain executable results. These capabilities become powerful in the areas of data analysis, visualizations, validations and transformations. Our first language supported for code interpreter is JavaScript, with other languages following later. Historically, customers have had concerns about an LLM performing data analysis, calculations and transformations due to context window exhaustion which can lead to hallucinations. Code interpreters help in this regard as they can perform this analysis without filling up context windows and providing more reliable results. You can see the code interpreter with JavaScript in action in this video from Kent Weare. After watching the video, you can deep dive in the details. How it works When Agent Loop evaluates code generated by an AI agent (for example, through a code interpreter), we run it inside a V8 isolate using the isolated‑vm library. V8 is the JavaScript engine that powers Node.js and Chrome—it’s what actually executes JavaScript code. An isolate is a lightweight, independent environment within V8, with its own memory and execution context. Running code inside an isolate gives us strong separation from the host runtime. Each execution has its own memory (“heap”) and cannot directly access the host’s memory, file system, or network. This helps ensure that agent-generated code stays contained and doesn’t interfere with the rest of the system. This approach is not intended to be a full security sandbox, and we don’t treat it as safe for fully untrusted code. However, it provides meaningful defense-in-depth: Memory usage is limited per isolate, preventing a single execution from consuming all available resources Execution can be bounded with timeouts, allowing us to terminate long-running or infinite loops Failures are isolated, so crashes in agent-generated code won’t bring down the runtime process In practice, this is about reducing blast radius. By isolating execution and enforcing limits, we make sure that code—regardless of whether it’s generated by a user or an AI agent—cannot disrupt the engine that runs it. Use case: Expense Validations To help illustrate, this capability, let’s take an accounts payable example built in Logic Apps Standard. Zava uses a 3 rd party expense application to capture employee expenses. The 3rd party expense application will export transactions in CSV format. Zava has some very specific business validations that need to execute before the expenses can be processed by the ERP. To solve this problem, we will build an agentic business process in Logic Apps that includes our new JavaScript code interpreter. Our code interpreter will be able to ingest and parse our CSV file and then apply our business validations for us. The outcome is a report that identifies both valid and invalid transactions. Prior to uploading to the ERP (Dataverse), we will route our request to a human in the loop process for their oversight. This allows for additional control as unwinding in an ERP is always a tedious task. Below, is a picture of our solution. Within it we can see both deterministic steps before and after our Agent action. Within our agent action, we have tools that will help our agent address our company objectives. These tools include calling a batch API to upload valid expense records to Dataverse. Another tool that will take care of uploading invalid records to a different table, our human in the loop action to seek approval from our human stakeholder and a tool that will help us obtain business knowledge from SharePoint. You might be asking, ok where does the code interpreter come in? Within our Agent action, we will discover a toggle that allows you to enable it. The code interpreter gets invoked based upon instruction in the model. Here is a subset of the prompt from this workflow that describes how to invoke the code interpreter. For example: ### Step 2 -- Parse and Validate The expense CSV data is available from the Get_file_content action. Use code interpreter to parse ALL rows from the CSV. For each row, normalize: Category: title case - Amount: decimal number - SubmittedDate: ISO 8601 format (e.g. "2026-01-05T00:00:00Z") - ReceiptAttached: convert "Yes"/"No" to true/false Then apply the business rules from Step 1 to classify every record as VALID or INVALID. You won’t see the code interpreter modelled as a tool within our agent action, but we see the execution outcome within our run history. In the following screenshot we can see this illustrated. Within our agent action, we can see that we are on our 4 th turn and we have executed the code interpreter action. In the code window, we can see the code that was generated for our us. This is the result of the LLM working together with the code interpreter to generate and execute this code. Note: In this scenario, we are dynamically generating this code at runtime. This allows for ultimate flexibility if we have different source inputs and we are relying upon the LLM and code interpreter to adapt to these fluid inputs. If we were interested in a more deterministic approach we can also pass pre-written code into this action where it can also execute. This will result in less flexibility, but more deterministic behavior. Running JavaScript code in Logic Apps Consumption Agent Loop Logic Apps Consumption has a slightly different architecture to Logic Apps Standard. In Logic Apps Standard, we offer dedicated compute and storage for customers which provides workload isolation across customers. When it comes to Logic Apps Consumption, we provide a multi-tenant offering allowing customers to take advantage of a lower price point due to shared resource utilization. In order to allow customer isolation, customers need to have an integration account attached to their consumption workflow. This will allow the code interpreter to run in isolated compute thus avoiding any potential disruptions to other customers. You can provision an Integration Account by searching for Integration Accounts at the top of the Azure portal. You can select any of the SKUs available, including the Free SKU for non-production/non-SLA scenarios. With an Integration Account created, we can associate this Integration Account with our consumption logic app by clicking on Settings – Integration Account.794Views0likes0Comments