mcp
65 TopicsUnleashing the Power of Model Context Protocol (MCP): A Game-Changer in AI Integration
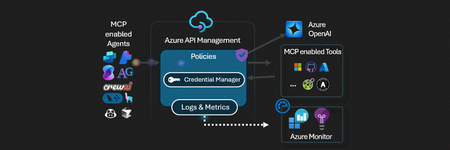
Artificial Intelligence is evolving rapidly, and one of the most pressing challenges is enabling AI models to interact effectively with external tools, data sources, and APIs. The Model Context Protocol (MCP) solves this problem by acting as a bridge between AI models and external services, creating a standardized communication framework that enhances tool integration, accessibility, and AI reasoning capabilities. What is Model Context Protocol (MCP)? MCP is a protocol designed to enable AI models, such as Azure OpenAI models, to interact seamlessly with external tools and services. Think of MCP as a universal USB-C connector for AI, allowing language models to fetch information, interact with APIs, and execute tasks beyond their built-in knowledge. Key Features of MCP Standardized Communication – MCP provides a structured way for AI models to interact with various tools. Tool Access & Expansion – AI assistants can now utilize external tools for real-time insights. Secure & Scalable – Enables safe and scalable integration with enterprise applications. Multi-Modal Integration – Supports STDIO, SSE (Server-Sent Events), and WebSocket communication methods. MCP Architecture & How It Works MCP follows a client-server architecture that allows AI models to interact with external tools efficiently. Here’s how it works: Components of MCP MCP Host – The AI model (e.g., Azure OpenAI GPT) requesting data or actions. MCP Client – An intermediary service that forwards the AI model's requests to MCP servers. MCP Server – Lightweight applications that expose specific capabilities (APIs, databases, files, etc.). Data Sources – Various backend systems, including local storage, cloud databases, and external APIs. Data Flow in MCP The AI model sends a request (e.g., "fetch user profile data"). The MCP client forwards the request to the appropriate MCP server. The MCP server retrieves the required data from a database or API. The response is sent back to the AI model via the MCP client. Integrating MCP with Azure OpenAI Services Microsoft has integrated MCP with Azure OpenAI Services, allowing GPT models to interact with external services and fetch live data. This means AI models are no longer limited to static knowledge but can access real-time information. Benefits of Azure OpenAI Services + MCP Integration ✔ Real-time Data Fetching – AI assistants can retrieve fresh information from APIs, databases, and internal systems. ✔ Contextual AI Responses – Enhances AI responses by providing accurate, up-to-date information. ✔ Enterprise-Ready – Secure and scalable for business applications, including finance, healthcare, and retail. Hands-On Tools for MCP Implementation To implement MCP effectively, Microsoft provides two powerful tools: Semantic Workbench and AI Gateway. Microsoft Semantic Workbench A development environment for prototyping AI-powered assistants and integrating MCP-based functionalities. Features: Build and test multi-agent AI assistants. Configure settings and interactions between AI models and external tools. Supports GitHub Codespaces for cloud-based development. Explore Semantic Workbench Workbench interface examples Microsoft AI Gateway A plug-and-play interface that allows developers to experiment with MCP using Azure API Management. Features: Credential Manager – Securely handle API credentials. Live Experimentation – Test AI model interactions with external tools. Pre-built Labs – Hands-on learning for developers. Explore AI Gateway Setting Up MCP with Azure OpenAI Services Step 1: Create a Virtual Environment First, create a virtual environment using Python: python -m venv .venv Activate the environment: # Windows venv\Scripts\activate # MacOS/Linux source .venv/bin/activate Step 2: Install Required Libraries Create a requirements.txt file and add the following dependencies: langchain-mcp-adapters langgraph langchain-openai Then, install the required libraries: pip install -r requirements.txt Step 3: Set Up OpenAI API Key Ensure you have your OpenAI API key set up: # Windows setx OPENAI_API_KEY "<your_api_key> # MacOS/Linux export OPENAI_API_KEY=<your_api_key> Building an MCP Server This server performs basic mathematical operations like addition and multiplication. Create the Server File First, create a new Python file: touch math_server.py Then, implement the server: from mcp.server.fastmcp import FastMCP # Initialize the server mcp = FastMCP("Math") MCP.tool() def add(a: int, b: int) -> int: return a + b MCP.tool() def multiply(a: int, b: int) -> int: return a * b if __name__ == "__main__": mcp.run(transport="stdio") Your MCP server is now ready to run. Building an MCP Client This client connects to the MCP server and interacts with it. Create the Client File First, create a new file: touch client.py Then, implement the client: import asyncio from mcp import ClientSession, StdioServerParameters from langchain_openai import ChatOpenAI from mcp.client.stdio import stdio_client # Define server parameters server_params = StdioServerParameters( command="python", args=["math_server.py"], ) # Define the model model = ChatOpenAI(model="gpt-4o") async def run_agent(): async with stdio_client(server_params) as (read, write): async with ClientSession(read, write) as session: await session.initialize() tools = await load_mcp_tools(session) agent = create_react_agent(model, tools) agent_response = await agent.ainvoke({"messages": "what's (4 + 6) x 14?"}) return agent_response["messages"][3].content if __name__ == "__main__": result = asyncio.run(run_agent()) print(result) Your client is now set up and ready to interact with the MCP server. Running the MCP Server and Client Step 1: Start the MCP Server Open a terminal and run: python math_server.py This starts the MCP server, making it available for client connections. Step 2: Run the MCP Client In another terminal, run: python client.py Expected Output 140 This means the AI agent correctly computed (4 + 6) x 14 using both the MCP server and GPT-4o. Conclusion Integrating MCP with Azure OpenAI Services enables AI applications to securely interact with external tools, enhancing functionality beyond text-based responses. With standardized communication and improved AI capabilities, developers can build smarter and more interactive AI-powered solutions. By following this guide, you can set up an MCP server and client, unlocking the full potential of AI with structured external interactions. Next Steps: Explore more MCP tools and integrations. Extend your MCP setup to work with additional APIs. Deploy your solution in a cloud environment for broader accessibility. For further details, visit the GitHub repository for MCP integration examples and best practices. MCP GitHub Repository MCP Documentation Semantic Workbench AI Gateway MCP Video Walkthrough MCP Blog MCP Github End to End Demo64KViews11likes6Comments
The Future of Agentic AI: Inside Microsoft Agent Framework 1.0
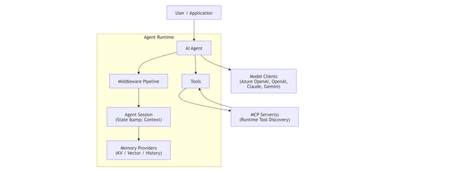
Agentic AI is rapidly moving beyond demos and chatbots toward long‑running, autonomous systems that reason, call tools, collaborate with other agents, and operate reliably in production. On April 3, 2026, Microsoft marked a major milestone with the General Availability (GA) release of Microsoft Agent Framework 1.0, a production‑ready, open‑source framework for building agents and multi‑agent workflows in.NET and Python. [techcommun...rosoft.com] In this post, we’ll deep‑dive into: What Microsoft Agent Framework actually is Its core architecture and design principles What’s new in version 1.0 How it differs from other agent frameworks When and how to use it—with real code examples What Is Microsoft Agent Framework? According to the official announcement, Microsoft Agent Framework is an open‑source SDK and runtime for building AI agents and multi‑agent workflows with strong enterprise foundations. Agent Framework provides two primary capability categories: 1. Agents Agents are long‑lived runtime components that: Use LLMs to interpret inputs Call tools and MCP servers Maintain session state Generate responses They are not just prompt wrappers, but stateful execution units. 2. Workflows Workflows are graph‑based orchestration engines that: Connect agents and functions Enforce execution order Support checkpointing and human‑in‑the‑loop scenarios This leads to a clean separation of responsibilities: Concern Handled By Reasoning & interpretation Agent Execution policy & control flow Workflow This separation is a foundational design decision. High‑Level Architecture From the official overview, Agent Framework is composed of several core building blocks: Model clients (chat completions & responses) Agent sessions (state & conversation management) Context providers (memory and retrieval) Middleware pipeline (interception, filtering, telemetry) MCP clients (tool discovery and invocation) Workflow engine (graph‑based orchestration) Conceptual Flow 🌟 What’s New in Version 1.0 Version 1.0 marks the transition from "Release Candidate" to "General Availability" (GA). Production-Ready Stability: Unlike the earlier experimental packages, 1.0 offers stable APIs, versioned releases, and a commitment to long-term support (LTS). A2A Protocol (Agent-to-Agent): A new structured messaging protocol that allows agents to communicate across different runtimes. For example, an agent built in Python can seamlessly coordinate with an agent running in a .NET environment. MCP (Model Context Protocol) Support: Full integration with the Model Context Protocol, enabling agents to dynamically discover and invoke external tools and data sources without manual integration code. Multi-Agent Orchestration Patterns: Stable implementations of complex patterns, including: Sequential: Linear handoffs between specialized agents. Group Chat: Collaborative reasoning where agents discuss and solve problems. Magentic-One: A sophisticated pattern for task-oriented reasoning and planning. Middleware Pipeline: The new middleware architecture lets you inject logic into the agent's execution loop without modifying the core prompts. This is essential for Responsible AI (RAI), allowing you to add content safety filters, logging, and compliance checks globally. DevUI Debugger: A browser-based local debugger that provides a real-time visual representation of agent message flows, tool calls, and state changes. Code Examples Creating a Simple Agent (C#) From Microsoft Learn : using Azure.AI.Projects; using Azure.Identity; using Microsoft.Agents.AI; AIAgent agent = new AIProjectClient( new Uri("https://your-foundry-service.services.ai.azure.com/api/projects/your-project"), new AzureCliCredential()) .AsAIAgent( model: "gpt-5.4-mini", instructions: "You are a friendly assistant. Keep your answers brief."); Console.WriteLine(await agent.RunAsync("What is the largest city in France?")); This shows: Provider‑agnostic model access Session‑aware agent execution Minimal setup for production agents Creating a Simple Agent (Python) from agent_framework.foundry import FoundryChatClient from azure.identity import AzureCliCredential client = FoundryChatClient( project_endpoint="https://your-foundry-service.services.ai.azure.com/api/projects/your-project", model="gpt-5.4-mini", credential=AzureCliCredential(), ) agent = client.as_agent( name="HelloAgent", instructions="You are a friendly assistant. Keep your answers brief.", ) result = await agent.run("What is the largest city in France?") print(result) The same agent abstraction applies across languages. When to Use Agents vs Workflows Microsoft provides clear guidance: Use an Agent when… Use a Workflow when… Task is open‑ended Steps are well‑defined Autonomous tool use is needed Execution order matters Single decision point Multiple agents/functions collaborate Key principle: If you can solve the task with deterministic code, do that instead of using an AI agent. 🔄 How It Differs from Other Frameworks Microsoft Agent Framework 1.0 distinguishes itself by focusing on "Enterprise Readiness" and "Interoperability." Feature Microsoft Agent Framework 1.0 Semantic Kernel / AutoGen LangChain / CrewAI Philosophy Unified, production-ready SDK. Research-focused or tool-specific. High-level, developer-friendly abstractions. Integration Deeply integrated with Microsoft Foundry and Azure. Varied; often requires more glue code. Generally cloud-agnostic. Interoperability Native A2A and MCP for cross-framework tasks. Limited to internal ecosystem. Uses proprietary connectors. Runtime Identical API parity for .NET and Python. Primarily Python-first (SK has C#). Primarily Python. Control Graph-based deterministic workflows. More non-deterministic/experimental. Mixture of role-based and agentic. 🛠️ Key Technical Components Agent Harness: The execution layer that provides agents with controlled access to the shell, file system, and messaging loops. Agent Skills: A portable, file-based or code-defined format for packaging domain expertise. Implementation Tip: If you are coming from Semantic Kernel, Microsoft provides migration assistants that analyze your existing code and generate step-by-step plans to upgrade to the new Agent Framework 1.0 standards. Microsoft Agent Framework Version 1.0 | Microsoft Agent Framework Agent Framework documentation 🎯 Summary Microsoft Agent Framework 1.0 is the "grown-up" version of AI orchestration. By standardizing the way agents talk to each other (A2A), discover tools (MCP), and process information (Middleware), Microsoft has provided a clear path for taking AI experiments into production. For more detailed guides, check out the official Microsoft Agent Framework DocumentationMicrosoft Agent Framework - .NET AI Community StandupLevel up your Python + AI skills with our complete series
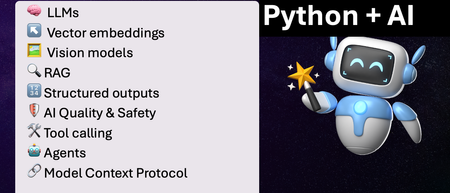
We've just wrapped up our live series on Python + AI, a comprehensive nine-part journey diving deep into how to use generative AI models from Python. The series introduced multiple types of models, including LLMs, embedding models, and vision models. We dug into popular techniques like RAG, tool calling, and structured outputs. We assessed AI quality and safety using automated evaluations and red-teaming. Finally, we developed AI agents using popular Python agents frameworks and explored the new Model Context Protocol (MCP). To help you apply what you've learned, all of our code examples work with GitHub Models, a service that provides free models to every GitHub account holder for experimentation and education. Even if you missed the live series, you can still access all the material using the links below! If you're an instructor, feel free to use the slides and code examples in your own classes. If you're a Spanish speaker, check out the Spanish version of the series. Python + AI: Large Language Models 📺 Watch recording In this session, we explore Large Language Models (LLMs), the models that power ChatGPT and GitHub Copilot. We use Python to interact with LLMs using popular packages like the OpenAI SDK and LangChain. We experiment with prompt engineering and few-shot examples to improve outputs. We also demonstrate how to build a full-stack app powered by LLMs and explain the importance of concurrency and streaming for user-facing AI apps. Slides for this session Code repository with examples: python-openai-demos Python + AI: Vector embeddings 📺 Watch recording In our second session, we dive into a different type of model: the vector embedding model. A vector embedding is a way to encode text or images as an array of floating-point numbers. Vector embeddings enable similarity search across many types of content. In this session, we explore different vector embedding models, such as the OpenAI text-embedding-3 series, through both visualizations and Python code. We compare distance metrics, use quantization to reduce vector size, and experiment with multimodal embedding models. Slides for this session Code repository with examples: vector-embedding-demos Python + AI: Retrieval Augmented Generation 📺 Watch recording In our third session, we explore one of the most popular techniques used with LLMs: Retrieval Augmented Generation. RAG is an approach that provides context to the LLM, enabling it to deliver well-grounded answers for a particular domain. The RAG approach works with many types of data sources, including CSVs, webpages, documents, and databases. In this session, we walk through RAG flows in Python, starting with a simple flow and culminating in a full-stack RAG application based on Azure AI Search. Slides for this session Code repository with examples: python-openai-demos Python + AI: Vision models 📺 Watch recording Our fourth session is all about vision models! Vision models are LLMs that can accept both text and images, such as GPT-4o and GPT-4o mini. You can use these models for image captioning, data extraction, question answering, classification, and more! We use Python to send images to vision models, build a basic chat-with-images app, and create a multimodal search engine. Slides for this session Code repository with examples: openai-chat-vision-quickstart Python + AI: Structured outputs 📺 Watch recording In our fifth session, we discover how to get LLMs to output structured responses that adhere to a schema. In Python, all you need to do is define a Pydantic BaseModel to get validated output that perfectly meets your needs. We focus on the structured outputs mode available in OpenAI models, but you can use similar techniques with other model providers. Our examples demonstrate the many ways you can use structured responses, such as entity extraction, classification, and agentic workflows. Slides for this session Code repository with examples: python-openai-demos Python + AI: Quality and safety 📺 Watch recording This session covers a crucial topic: how to use AI safely and how to evaluate the quality of AI outputs. There are multiple mitigation layers when working with LLMs: the model itself, a safety system on top, the prompting and context, and the application user experience. We focus on Azure tools that make it easier to deploy safe AI systems into production. We demonstrate how to configure the Azure AI Content Safety system when working with Azure AI models and how to handle errors in Python code. Then we use the Azure AI Evaluation SDK to evaluate the safety and quality of output from your LLM. Slides for this session Code repository with examples: ai-quality-safety-demos Python + AI: Tool calling 📺 Watch recording In the final part of the series, we focus on the technologies needed to build AI agents, starting with the foundation: tool calling (also known as function calling). We define tool call specifications using both JSON schema and Python function definitions, then send these definitions to the LLM. We demonstrate how to properly handle tool call responses from LLMs, enable parallel tool calling, and iterate over multiple tool calls. Understanding tool calling is absolutely essential before diving into agents, so don't skip over this foundational session. Slides for this session Code repository with examples: python-openai-demos Python + AI: Agents 📺 Watch recording In the penultimate session, we build AI agents! We use Python AI agent frameworks such as the new agent-framework from Microsoft and the popular LangGraph framework. Our agents start simple and then increase in complexity, demonstrating different architectures such as multiple tools, supervisor patterns, graphs, and human-in-the-loop workflows. Slides for this session Code repository with examples: python-ai-agent-frameworks-demos Python + AI: Model Context Protocol 📺 Watch recording In the final session, we dive into the hottest technology of 2025: MCP (Model Context Protocol). This open protocol makes it easy to extend AI agents and chatbots with custom functionality, making them more powerful and flexible. We demonstrate how to use the Python FastMCP SDK to build an MCP server running locally and consume that server from chatbots like GitHub Copilot. Then we build our own MCP client to consume the server. Finally, we discover how easy it is to connect AI agent frameworks like LangGraph and Microsoft agent-framework to MCP servers. With great power comes great responsibility, so we briefly discuss the security risks that come with MCP, both as a user and as a developer. Slides for this session Code repository with examples: python-mcp-demo11KViews6likes0CommentsKickstart Your AI Development with the Model Context Protocol (MCP) Course
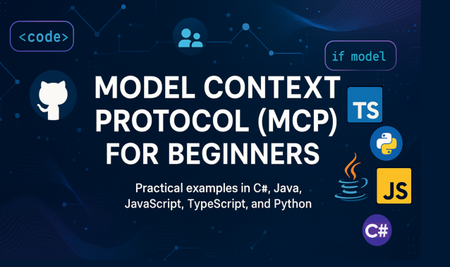
Model Context Protocol is an open standard that acts as a universal connector between AI models and the outside world. Think of MCP as “the USB-C of the AI world,” allowing AI systems to plug into APIs, databases, files, and other tools seamlessly. By adopting MCP, developers can create smarter, more useful AI applications that access up-to-date information and perform actions like a human developer would. To help developers learn this game-changing technology, Microsoft has created the “MCP for Beginners” course a free, open-source curriculum that guides you from the basics of MCP to building real-world AI integrations. Below, we’ll explore what MCP is, who this course is for, and how it empowers both beginners and intermediate developers to get started with MCP. What is MCP and Why Should Developers Care? Model Context Protocol (MCP) is a innovative framework designed to standardize interactions between AI models and client applications. In simpler terms, MCP is a communication bridge that lets your AI agent fetch live context from external sources (like APIs, documents, databases, or web services) and even take actions using tools. This means your AI apps are no longer limited to pre-trained knowledge they can dynamically retrieve data or execute commands, enabling far more powerful and context-aware behavior. Some key reasons MCP matters for developers: Seamless Integration of Tools & Data: MCP provides a unified way to connect AI to various data sources and tools, eliminating the need for ad-hoc, fragile integrations. Your AI agent can, for example, query a database or call a web API during a conversation all through a standardized protocol. Stay Up-to-Date: Because AI models can use MCP to access external information, they overcome the training data cutoff problem. They can fetch the latest facts, figures, or documents on demand, ensuring more accurate and timely responses. Industry Momentum: MCP is quickly gaining traction. Originally introduced by Microsoft and Anthropic in late 2024, it has since been adopted by major AI platforms (Replit, Sourcegraph, Hugging Face, and more) and spawned thousands of open-source connectors by early 2025. It’s an emerging standard – learning it now puts developers at the forefront of AI innovation. In short, MCP is transformative for AI development, and being proficient in it will help you build smarter AI solutions that can interact with the real world. The MCP for Beginners course is designed to make mastering this protocol accessible, with a structured learning path and hands-on examples. Introducing the MCP for Beginners Course “Model Context Protocol for Beginners” is an open-source, self-paced curriculum created by Microsoft to teach the concepts and fundamentals of MCP. Whether you’re completely new to MCP or have some experience, this course offers a comprehensive guide from the ground up. Key Features and Highlights: Structured Learning Path: The curriculum is organized as a multi-part guide (9 modules in total) that gradually builds your knowledge. It starts with the basics of MCP – What is MCP? Why does standardization matter? What are the use cases? – and then moves through core concepts, security considerations, getting started with coding, all the way to advanced topics and real-world case studies. This progression ensures you understand the “why” and “how” of MCP before tackling complex scenarios. Hands-On Coding Examples: This isn’t just theory – practical coding examples are a cornerstone of the course. You’ll find live code samples and mini-projects in multiple languages (C#, Java, JavaScript/TypeScript, and Python) for each concept. For instance, you’ll build a simple MCP-powered Calculator application as a project, exploring how to implement MCP clients and servers in your preferred language. By coding along, you cement your understanding and see MCP in action. Real-World Use Cases: The curriculum illustrates how MCP applies to real scenarios. It discusses practical use cases of MCP in AI pipelines (e.g. an AI agent pulling in documentation or database info on the fly) and includes case studies of early adopters. These examples help you connect what you learn to actual applications and solutions you might develop in your job. Broad Language Support: A unique aspect of this course is its multi-language approach – both in terms of programming and human languages. The content provides code implementations in several popular programming languages (so you can learn MCP in the context of C#, Java, Python, JavaScript, or TypeScript, as you prefer). In addition, the learning materials themselves are available in multiple human languages (English, plus translations like French, Spanish, German, Chinese, Japanese, Korean, Polish, etc.) to support learners worldwide. This inclusivity ensures that more developers can comfortably engage with the material. Up-to-Date and Open-Source: Being hosted on GitHub under MIT License, the curriculum is completely free to use and open for contributions. It’s maintained with the latest updates for example, automated workflows keep translations in sync so all language versions stay current. As MCP evolves, the course content can evolve with it. You can even join the community to suggest improvements or add content, making this a living learning resource. Official Resources & Community Support: The course links to official MCP documentation and specs for deeper reference, and it encourages learners to join thehttps;//aka.ms/ai/discord to discuss and get help. You won’t be learning alone; you can network with experts and peers, ask questions, and share progress. Microsoft’s open-source approach means you’re part of a community of practitioners from day one. Course Outline: (Modules at a Glance) Introduction to MCP: Overview of MCP, why standardization matters in AI, and the key benefits and use cases of using MCP. (Start here to understand the big picture.) Core Concepts: Deep dive into MCP’s architecture – understanding the client-server model, how requests and responses work, and the message schema. Learn the fundamental components that make up the protocol. Security in MCP: Identify potential security threats when building MCP-based systems and learn best practices to secure your AI integrations. Important for anyone planning to deploy MCP in production environments. Getting Started (Hands-On): Set up your environment and create your first MCP server and client. This module walks through basic implementation steps and shows how to integrate MCP with existing applications, so you get a service up and running that an AI agent can communicate with. MCP Calculator Project: A guided project where you build a simple MCP-powered application (a calculator) in the language of your choice. This hands-on exercise reinforces the concepts by implementing a real tool – you’ll see how an AI agent can use MCP to perform calculations via an external tool. Practical Implementation: Tips and techniques for using MCP SDKs across different languages. Covers debugging, testing, validation of MCP integrations, and how to design effective prompt workflows that leverage MCP’s capabilities. Advanced Topics: Going beyond the basics – explore multi-modal AI workflows (using MCP to handle not just text but other data types), scalability and performance tuning for MCP servers, and how MCP fits into larger enterprise architectures. This is where intermediate users can really deepen their expertise. Community Contributions: Learn how to contribute to the MCP ecosystem and the curriculum itself. This section shows you how to collaborate via GitHub, follow the project’s guidelines, and even extend the protocol with your own ideas. It underlines that MCP is a growing, community-driven standard. Insights from Early Adoption: Hear lessons learned from real-world MCP implementations. What challenges did early adopters face? What patterns and solutions worked best? Understanding these will prepare you to avoid pitfalls in your own projects. Best Practices and Case Studies: A roundup of do’s and don’ts when using MCP. This includes performance optimization techniques, designing fault-tolerant systems, and testing strategies. Plus, detailed case studies that walk through actual MCP solution architectures with diagrams and integration tips bringing everything you learned together in concrete examples. Who Should Take This Course? The MCP for Beginners course is geared towards developers if you build or work on AI-driven applications, this course is for you. The content specifically welcomes: Beginners in AI Integration: You might be a developer who's comfortable with languages like Python, C#, or Java but new to AI/LLMs or to MCP itself. This course will take you from zero knowledge of MCP to a level where you can build and deploy your own MCP-enabled services. You do not need prior experience with MCP or machine learning pipelines the introduction module will bring you up to speed on key concepts. (Basic programming skills and understanding of client-server or API concepts are the only prerequisites.) Intermediate Developers & AI Practitioners: If you have some experience building bots or AI features and want to enhance them with real-time data access, you’ll benefit greatly. The course’s later modules on advanced topics, security, and best practices are especially valuable for those looking to integrate MCP into existing projects or optimize their approach. Even if you've dabbled in MCP or a similar concept before, this curriculum will fill gaps in knowledge and provide structured insights that are hard to get from scattered documentation. AI Enthusiasts & Architects: Perhaps you’re an AI architect or tech lead exploring new frameworks for intelligent agents. This course serves as a comprehensive resource to evaluate MCP for your architecture. By walking through it, you’ll understand how MCP can fit into enterprise systems, what benefits it brings, and how to implement it in a maintainable way. It’s perfect for getting a broad yet detailed view of MCP’s capabilities before adopting it within a team. In essence, anyone interested in making AI applications more connected and powerful will find value here. From a solo hackathon coder to a professional solution architect, the material scales to your need. The course starts with fundamentals in an easy-to-grasp manner and then deepens into complex topics appealing to a wide range of skill levels. Prerequisites: The official prerequisites for the course are minimal: you should have basic knowledge of at least one programming language (C#, Java, or Python is recommended) and a general understanding of how client-server applications or APIs work. Familiarity with machine learning concepts is optional but can help. In short, if you can write simple programs and understand making API calls, you have everything you need to start learning MCP. Conclusion: Empower Your AI Projects with MCP The Model Context Protocol for Beginners course is more than just a tutorial – it’s a comprehensive journey that empowers you to build the next generation of AI applications. By demystifying MCP and equipping you with hands-on experience, this curriculum turns a seemingly complex concept into practical skills you can apply immediately. With MCP, you unlock capabilities like giving your AI agents real-time information access and the ability to use tools autonomously. That means as a developer, you can create solutions that are significantly more intelligent and useful. A chatbot that can search documents, a coding assistant that can consult APIs or run code, an AI service that seamlessly integrates with your database – all these become achievable when you know MCP. And thanks to this beginners-friendly course, you’ll be able to implement such features with confidence. Whether you are starting out in the AI development world or looking to sharpen your cutting-edge skills, the MCP for Beginners course has something for you. It condenses best practices, real-world lessons, and robust techniques into an accessible format. Learning MCP now will put you ahead of the curve, as this protocol rapidly becomes a cornerstone of AI integrations across the industry. So, are you ready to level up your AI development skills? Dive into the https://aka.ms/mcp-for-beginnerscourse and start building AI agents that can truly interact with the world around them. With the knowledge and experience gained, you’ll be prepared to create smarter, context-aware applications and be a part of the community driving AI innovation forward.11KViews4likes1CommentLearn how to build MCP servers with Python and Azure
We just concluded Python + MCP, a three-part livestream series where we: Built MCP servers in Python using FastMCP Deployed them into production on Azure (Container Apps and Functions) Added authentication, including Microsoft Entra as the OAuth provider All of the materials from our series are available for you to keep learning from, and linked below: Video recordings of each stream Powerpoint slides Open-source code samples complete with Azure infrastructure and 1-command deployment If you're an instructor, feel free to use the slides and code examples in your own classes. Spanish speaker? We've got you covered- check out the Spanish version of the series. 🙋🏽♂️Have follow up questions? Join our weekly office hours on Foundry Discord: Tuesdays @ 11AM PT → Python + AI Thursdays @ 8:30 AM PT → All things MCP Building MCP servers with FastMCP 📺 Watch YouTube recording In the intro session of our Python + MCP series, we dive into the hottest technology of 2025: MCP (Model Context Protocol). This open protocol makes it easy to extend AI agents and chatbots with custom functionality, making them more powerful and flexible. We demonstrate how to use the Python FastMCP SDK to build an MCP server running locally. Then we consume that server from chatbots like GitHub Copilot in VS Code, using it's tools, resources, and prompts. Finally, we discover how easy it is to connect AI agent frameworks like Langchain and Microsoft agent-framework to the MCP server. Slides for this session Code repository with examples: python-mcp-demos Deploying MCP servers to the cloud 📺 Watch YouTube recording In our second session of the Python + MCP series, we deploy MCP servers to the cloud! We walk through the process of containerizing a FastMCP server with Docker and deploying to Azure Container Apps. Then we instrument the MCP server with OpenTelemetry and observe the tool calls using Azure Application Insights and Logfire. Finally, we explore private networking options for MCP servers, using virtual networks that restrict external access to internal MCP tools and agents. Slides for this session Code repository with examples: python-mcp-demos Authentication for MCP servers 📺 Watch YouTube recording In our third session of the Python + MCP series, we explore the best ways to build authentication layers on top of your MCP servers. We start off simple, with an API key to gate access, and demonstrate a key-restricted FastMCP server deployed to Azure Functions. Then we move on to OAuth-based authentication for MCP servers that provide user-specific data. We dive deep into MCP authentication, which is built on top of OAuth2 but with additional requirements like PRM and DCR/CIMD, which can make it difficult to implement fully. We demonstrate the full MCP auth flow in the open-souce identity provider KeyCloak, and show how to use an OAuth proxy pattern to implement MCP auth on top of Microsoft Entra. Slides for this session Code repository with Container Apps examples: python-mcp-demos Code repository with Functions examples: python-mcp-demosBuilding MCP servers with Entra ID and pre-authorized clients
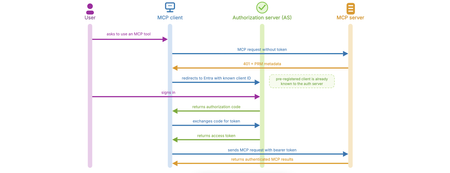
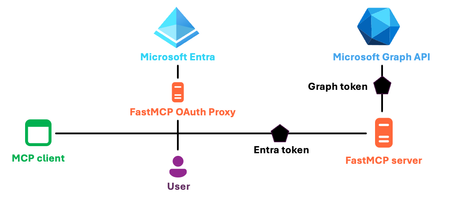
The Model Context Protocol (MCP) gives AI agents a standard way to call external tools, but things get more complicated when those tools need to know who the user is. In this post, I’ll show how to build an MCP server with the Python FastMCP package that authenticates users with Microsoft Entra ID when they connect from a pre-authorized client such as VS Code. If you need to build a server that works with any MCP clients, read my previous blog post. With Microsoft Entra as the authorization server, supporting arbitrary clients currently requires adding an OAuth proxy in front, which increases security risk. This post focuses on the simpler pre-authorized-client path instead. MCP auth Let’s start by digging into the MCP auth spec, since that explains both the shape of the flow and the constraints we run into with Entra. The MCP specification includes an authorization protocol based on OAuth 2.1, so an MCP client can send a request that includes a Bearer token from an authorization server, and the MCP server can validate that token. In OAuth 2.1 terms, the MCP client is acting as the OAuth client, the MCP server is the resource server, the signed-in user is the resource owner, and the authorization server issues an access token. In this case, Entra will be our authorization server. We can't necessarily use any OAuth-compatible authorization servers, as MCP auth requires more than just the core OAuth 2.1 functionality. In OAuth, the authorization server needs a relationship with the client. MCP auth describes three options: Pre-registration: the auth server has a pre-existing relationship and has the client ID in its database already CIMD (Client Identity Metadata Document): the MCP client sends the URL of its CIMD, a JSON document that describes its attributes, and the auth server bases its interactions on that information. DCR (Dynamic Client Registration): when the auth server sees a new client, it explicitly registers it and stores the client information in its own data. DCR is now considered a "legacy" path, as the hope is for CIMD to be the supported path in the future. For each MCP scenario - each combination of MCP server, MCP client, and authorization server - we need to determine which of those options are viable and optimal. Here's one way of thinking through it: VS Code supports all of MCP auth, so its MCP client includes both CIMD and DCR support. However, the Microsoft Entra authorization server does not support CIMD or DCR. That leaves us with only one official option: pre-registration. If we desperately need support for arbitrary clients, it is possible to put a CIMD/DCR proxy in front of Entra, as discussed in my previous blog post, but the Entra team discourages that approach due to increased security risks. When using pre-registration, the auth flow is relatively simple (but still complex, because hey, this is OAuth!): User asks to use auth-restricted MCP server MCP client makes a request to MCP server without a bearer token MCP server responds with an HTTP 401 and a pointer to its PRM (Protected Resource Metadata) document MCP client reads PRM to discover the authorization server and options MCP client redirects to authorization server, including its client ID User signs into authorization server Authorization server returns authorization code MCP client exchanges authorization code for access token Authorization server returns access token MCP client re-tries original request, but now with bearer token included MCP server validates bearer token and returns successfully Here's what that looks like: Now let's dig into the code for implementing MCP auth with the pre-registered VS Code client. Registering the MCP server with Entra Before the server can use Entra to authorize users, we need to register the server with Entra via an app registration. We can do registration using the Azure Portal, Azure CLI, Microsoft Graph SDK, or even Bicep. In this case, I use the Python MS Graph SDK as it allows me to specify everything programmatically. First, I create the Entra app registration, specifying the sign-in audience (single-tenant) and configuring the MCP server as a protected resource: scope_id = str(uuid.uuid4()) Application( display_name="Entra App for MCP server", sign_in_audience="AzureADMyOrg", api=ApiApplication( requested_access_token_version=2, oauth2_permission_scopes=[ PermissionScope( admin_consent_description="Allows access to the MCP server as the signed-in user.", admin_consent_display_name="Access MCP Server", id=scope_id, is_enabled=True, type="User", user_consent_description="Allow access to the MCP server on your behalf.", user_consent_display_name="Access MCP Server", value="user_impersonation") ], pre_authorized_applications=[ PreAuthorizedApplication( app_id=VSCODE_CLIENT_ID, delegated_permission_ids=[scope_id], )])) The api parameter is doing the heavy lifting, ensuring that other applications (like VS Code) can request permission to access the server on behalf of a user. Here's what each parameter does: requested_access_token_version=2: Entra ID has two token formats (v1.0 and v2.0). We need v2.0 because that's what FastMCP's token validator expects. oauth2_permission_scopes: This defines a permission called user_impersonation that MCP clients can request when connecting to your server. It's the server saying: "I accept tokens that let an MCP client act on behalf of a signed-in user." Without at least one scope defined, no MCP client can obtain a token for your server — Entra wouldn't know what permission to grant. The name user_impersonation is a convention (we could call it anything), but it clearly signals that the MCP client is accessing your server as the user, not as itself. pre_authorized_applications: This list tells Entra which client applications are pre-approved to request tokens for this server’s API without showing an extra consent prompt to the user. In this case, I list VS Code’s application ID and tie it to the user_impersonation scope, so VS Code can request a token for the MCP server as the signed-in user. Thanks to that configuration, when VS Code requests a token, it will request a token with the scope "api://{app_id}/user_impersonation" , and the FastMCP server will validate that incoming tokens contain that scope. Next, I create a Service Principal for that Entra app registration, which represents the Entra app in my tenant request_principal = ServicePrincipal(app_id=app.app_id, display_name=app.display_name) await graph_client.service_principals.post(request_principal) Securing credentials for Entra app registrations I also need a way for the server to prove that it can use that Entra app registration. There are three options: Client secret: Easiest to set up, but since it's a secret, it must be stored securely, protected carefully, and rotated regularly. Certificate: Stronger than a client secret and generally better suited for production, but it still requires certificate storage, renewal, and lifecycle management. Managed identity as Federated Identity Credential (MI-as-FIC): No stored secret, no certificate to manage, and usually the best choice when your app is hosted on Azure. No support for local development however. I wanted the best of both worlds: easy local development on my machine, but the most secure production story for deployment on Azure Container Apps. So I actually created two Entra app registrations, one for local with client secret, and one for production with managed identity. Here's how I set up the password for the local Entra app: password_credential = await graph_client.applications.by_application_id(app.id).add_password.post( AddPasswordPostRequestBody( password_credential=PasswordCredential(display_name="FastMCPSecret"))) It's a bit trickier to set up the MI-as-FIC, since we first need to provision the managed identity and associate that with our Azure Container Apps resource. I set all of that up in Bicep, and then after provisioning completes, I run this code to configure a FIC using the managed identity: fic = FederatedIdentityCredential( name="miAsFic", issuer=f"https://login.microsoftonline.com/{tenant_id}/v2.0", subject=managed_identity_principal_id, audiences=["api://AzureADTokenExchange"], ) await graph_client.applications.by_application_id( prod_app_id ).federated_identity_credentials.post(fic) Since I now have two Entra app registrations, I make sure that the environment variables in my local .env point to the secret-secured local Entra app registration, and the environment variables on my Azure Container App point to the FIC-secured prod Entra app registration. Granting admin consent This next step is only necessary if the MCP server uses the on-behalf-of (OBO) flow to exchange the incoming access token for a token to a downstream API, such as Microsoft Graph. In this case, my demo server uses OBO so it can query Microsoft Graph to check the signed-in user's group membership. The earlier code added VS Code as a pre-authorized application, but that only allows VS Code to obtain a token for the MCP server itself; it does not grant the MCP server permission to call Microsoft Graph on the user's behalf. Because the MCP sign-in flow in VS Code does not include a separate consent step for those downstream Graph scopes, I grant admin consent up front so the OBO exchange can succeed. This code grants the admin consent to the associated service principal for the Graph API resource and scopes: server_principal = await graph_client.service_principals_with_app_id(app.app_id).get() graph_principal = await graph_client.service_principals_with_app_id( "00000003-0000-0000-c000-000000000000" # Graph API ).get() await graph_client.oauth2_permission_grants.post( OAuth2PermissionGrant( client_id=server_principal.id, consent_type="AllPrincipals", resource_id=graph_principal.id, scope="User.Read email offline_access openid profile", ) ) If our MCP server needed to use an OBO flow with another resource server, we could request additional grants for those resources and scopes. Our Entra app registration is now ready for the MCP server, so let's move on to see the server code. Using FastMCP servers with Entra In our MCP server code, we configure FastMCP's RemoteAuthProvider based on the details from the Entra app registration process: from fastmcp.server.auth import RemoteAuthProvider from fastmcp.server.auth.providers.azure import AzureJWTVerifier verifier = AzureJWTVerifier( client_id=ENTRA_CLIENT_ID, tenant_id=AZURE_TENANT_ID, required_scopes=["user_impersonation"], ) auth = RemoteAuthProvider( token_verifier=verifier, authorization_servers=[f"https://login.microsoftonline.com/{AZURE_TENANT_ID}/v2.0"], base_url=base_url, ) Notice that we do not need to pass in a client secret at this point, even when using the local Entra app registration. FastMCP validates the tokens using Entra's public keys - no Entra app credentials needed. To make it easy for our MCP tools to access an identifier for the currently logged in user, we define a middleware that inspects the claims of the current token using FastMCP's get_access_token() and sets the "oid" (Entra object identifier) in the state: class UserAuthMiddleware(Middleware): def _get_user_id(self): token = get_access_token() if not (token and hasattr(token, "claims")): return None return token.claims.get("oid") async def on_call_tool(self, context: MiddlewareContext, call_next): user_id = self._get_user_id() if context.fastmcp_context is not None: await context.fastmcp_context.set_state("user_id", user_id) return await call_next(context) async def on_read_resource(self, context: MiddlewareContext, call_next): user_id = self._get_user_id() if context.fastmcp_context is not None: await context.fastmcp_context.set_state("user_id", user_id) return await call_next(context) When we initialize the FastMCP server, we set the auth provider and include that middleware: mcp = FastMCP("Expenses Tracker", auth=auth, middleware=[UserAuthMiddleware()]) Now, every request made to the MCP server will require authentication. The server will return a 401 if a valid token isn't provided, and that 401 will prompt the VS Code MCP client to kick off the MCP authorization flow. Inside each tool, we can grab the user id from the state, and use that to customize the response for the user, like to store or query items in a database. PleaseChooseNewDisplayName.tool async def add_user_expense( date: Annotated[date, "Date of the expense in YYYY-MM-DD format"], amount: Annotated[float, "Positive numeric amount of the expense"], description: Annotated[str, "Human-readable description of the expense"], ctx: Context, ): """Add a new expense to Cosmos DB.""" user_id = await ctx.get_state("user_id") if not user_id: return "Error: Authentication required (no user_id present)" expense_item = { "id": str(uuid.uuid4()), "user_id": user_id, "date": date.isoformat(), "amount": amount, "description": description } await cosmos_container.create_item(body=expense_item) Using OBO flow in FastMCP server Remember when we granted admin consent for the Entra app registration earlier? That means we can use an OBO flow inside the MCP server, to make calls to the Graph API on behalf of the signed-in user. To make it easier to exchange and validate tokens, we use the Python MSAL SDK and configure a ConfidentialClientApplication . When using the local secret-secured Entra app registration, this is all we need to set it up: from msal import ConfidentialClientApplication confidential_client = ConfidentialClientApplication( client_id=entra_client_id, client_credential=os.environ["ENTRA_DEV_CLIENT_SECRET"], authority=f"https://login.microsoftonline.com/{os.environ['AZURE_TENANT_ID']}", token_cache=TokenCache(), ) When using the production FIC-secured Entra app registration, we need a function that returns tokens for the managed identity: from msal import ManagedIdentityClient, TokenCache, UserAssignedManagedIdentity mi_client = ManagedIdentityClient( UserAssignedManagedIdentity(client_id=os.environ["AZURE_CLIENT_ID"]), http_client=requests.Session(), token_cache=TokenCache()) def _get_mi_assertion(): result = mi_client.acquire_token_for_client(resource="api://AzureADTokenExchange") if "access_token" not in result: raise RuntimeError(f"Failed to get MI assertion: {result.get('error_description', 'unknown error')}") return result["access_token"] confidential_client = ConfidentialClientApplication( client_id=entra_client_id, client_credential={"client_assertion": _get_mi_assertion}, authority=f"https://login.microsoftonline.com/{os.environ['AZURE_TENANT_ID']}", token_cache=TokenCache()) Inside any code that requires OBO, we ask MSAL to exchange the MCP access token for a Graph API access token: graph_resource_access_token = confidential_client.acquire_token_on_behalf_of( user_assertion=access_token.token, scopes=["https://graph.microsoft.com/.default"] ) graph_token = graph_resource_access_token["access_token"] Once we successfully acquire the token, we can use that token with the Graph API, for any operations permitted by the scopes in the admin consent granted earlier. For this example, we call the Graph API to check whether the logged in user is a member of a particular Entra group: client = httpx.AsyncClient() url = ("https://graph.microsoft.com/v1.0/me/transitiveMemberOf/microsoft.graph.group" f"?$filter=id eq '{group_id}'&$count=true") response = await client.get( url, headers={ "Authorization": f"Bearer {graph_token}", "ConsistencyLevel": "eventual", }) data = response.json() membership_count = data.get("@odata.count", 0) is_admin = membership_count > 0 FastMCP 3.0 now provides a way to restrict tool visibility based on authorization checks, so I wrapped the above code in a function and set it as the auth constraint for the admin tool: async def require_admin_group(ctx: AuthContext) -> bool: graph_token = exchange_for_graph_token(ctx.token.token) return await check_user_in_group(graph_token, admin_group_id) @mcp.tool(auth=require_admin_group) async def get_expense_stats(ctx: Context): """Get expense statistics. Only accessible to admins.""" ... FastMCP will run that function both when an MCP client requests the list of tools, to determine which tools can be seen by the current user, and again when a user tries to use that tool, for an added just-in-time security check. This is just one way to use an OBO flow however. You can use it directly inside tools, like to query for more details from the Graph API, upload documents to OneDrive/SharePoint/Notes, send emails, etc. All together now For the full code, check out the open source azure-cosmosdb-identity-aware-mcp-server repository. The most relevant files for the Entra authentication setup are: auth_init.py: Creates the Entra app registrations for production and local development, defines the delegated user_impersonation scope, pre-authorizes VS Code, creates the service principal, and grants admin consent for the Microsoft Graph scopes used in the OBO flow. auth_postprovision.py: Adds the federated identity credential (FIC) after deployment so the container app's managed identity can act as the production Entra app without storing a client secret. main.py: Implements the MCP server using FastMCP's RemoteAuthProvider and AzureJWTVerifier for direct Entra authentication, plus OBO-based Microsoft Graph calls for admin group membership checks. As always, please let me know if you have further questions or ideas for other Entra integrations. Acknowledgements: Thank you to Matt Gotteiner for his guidance in implementing the OBO flow and review of the blog post.
Orchestrating Multi-Agent Intelligence: MCP-Driven Patterns in Agent Framework
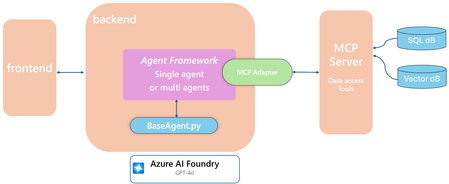
Building reliable AI systems requires modular, stateful coordination and deterministic workflows that enable agents to collaborate seamlessly. The Microsoft Agent Framework provides these foundations, with memory, tracing, and orchestration built in. This implementation demonstrates four multi-agentic patterns — Single Agent, Handoff, Reflection, and Magentic Orchestration — showcasing different interaction models and collaboration strategies. From lightweight domain routing to collaborative planning and self-reflection, these patterns highlight the framework’s flexibility. At the core is Model Context Protocol (MCP), connecting agents, tools, and memory through a shared context interface. Persistent session state, conversation thread history, and checkpoint support are handled via Cosmos DB when configured, with an in-memory dictionary as a default fallback. This setup enables dynamic pattern swapping, performance comparison, and traceable multi-agent interactions — all within a unified, modular runtime. Business Scenario: Contoso Customer Support Chatbot Contoso’s chatbot handles multi-domain customer inquiries like billing anomalies, promotion eligibility, account locks, and data usage questions. These require combining structured data (billing, CRM, security logs, promotions) with unstructured policy documents processed via vector embeddings. Using MCP, the system orchestrates tool calls to fetch real-time structured data and relevant policy content, ensuring policy-aligned, auditable responses without exposing raw databases. This enables the assistant to explain anomalies, recommend actions, confirm eligibility, guide account recovery, and surface risk indicators—reducing handle time and improving first-contact resolution while supporting richer multi-agent reasoning. Architecture & Core Concepts The Contoso chatbot leverages the Microsoft Agent Framework to deliver a modular, stateful, and workflow-driven architecture. At its core, the system consists of: Base Agent: All agent patterns—single agent, reflection, handoff and magentic orchestration—inherit from a common base class, ensuring consistent interfaces for message handling, tool invocation, and state management. Backend: A FastAPI backend manages session routing, agent execution, and workflow orchestration. Frontend: A React-based UI (or Streamlit alternative) streams responses in real-time and visualizes agent reasoning and tool calls. Modular Runtime and Pattern Swapping One of the most powerful aspects of this implementation is its modular runtime design. Each agentic pattern—Single, Reflection, Handoff, and Magnetic—plugs into a shared execution pipeline defined by the base agent and MCP integration. By simply updating the .env configuration (e.g., agent_module=handoff), developers can swap in and out entire coordination strategies without touching the backend, frontend, or memory layers. This makes it easy to compare agent styles side by side, benchmark reasoning behaviors, and experiment with orchestration logic—all while maintaining a consistent, deterministic runtime. The same MCP connectors, FastAPI backend, and Cosmos/in-memory state management work seamlessly across every pattern, enabling rapid iteration and reliable evaluation. # Dynamic agent pattern loading agent_module_path = os.getenv("AGENT_MODULE") agent_module = __import__(agent_module_path, fromlist=["Agent"]) Agent = getattr(agent_module, "Agent") # Common MCP setup across all patterns async def _create_tools(self, headers: Dict[str, str]) -> List[MCPStreamableHTTPTool] | None: if not self.mcp_server_uri: return None return [MCPStreamableHTTPTool( name="mcp-streamable", url=self.mcp_server_uri, headers=headers, timeout=30, request_timeout=30, )] Memory & State Management State management is critical for multi-turn conversations and cross-agent workflows. The system supports two out-of-the-box options: Persistent Storage (Cosmos DB) Acts as the durable, enterprise-ready backend. Stores serialized conversation threads and workflow checkpoints keyed by tenant and session ID. Ensures data durability and auditability across restarts. In-Memory Session Store Default fallback when Cosmos DB credentials are not configured. Maintains ephemeral state per session for fast prototyping or lightweight use cases. All patterns leverage the same thread-based state abstraction, enabling: Session isolation: Each user session maintains its own state and history. Checkpointing: Multi-agent workflows can snapshot shared and executor-local state at any point, supporting pause/resume and fault recovery. Model Context Protocol (MCP): Acts as the connector between agents and tools, standardizing how data is fetched and results are returned to agents, whether querying structured databases or unstructured knowledge sources. Core Principles Across all patterns, the framework emphasizes: Modularity: Components are interchangeable—agents, tools, and state stores can be swapped without disrupting the system. Stateful Coordination: Multi-agent workflows coordinate through shared and local state, enabling complex reasoning without losing context. Deterministic Workflows: While agents operate autonomously, the workflow layer ensures predictable, auditable execution of multi-agent tasks. Unified Execution: From single-agent Q&A to complex Magentic orchestrations, every agent follows the same execution lifecycle and integrates seamlessly with MCP and the state store. Multi-Agent Patterns: Workflow and Coordination With the architecture and core concepts established, we can now explore the agentic patterns implemented in the Contoso chatbot. Each pattern builds on the base agent and MCP integration but differs in how agents orchestrate tasks and communicate with one another to handle multi-domain customer queries. In the sections that follow, we take a deeper dive into each pattern’s workflow and examine the under-the-hood communication flows between agents: Single Agent – A simple, single-domain agent handling straightforward queries. Reflection Agent – Allows agents to introspect and refine their outputs. Handoff Pattern – Routes conversations intelligently to specialized agents across domains. Magentic Orchestration – Coordinates multiple specialist agents for complex, parallel tasks. For each pattern, the focus will be on how agents communicate and coordinate, showing the practical orchestration mechanisms in action. Single Intelligent Agent The Single Agent Pattern represents the simplest orchestration style within the framework. Here, a single autonomous agent handles all reasoning, decision-making, and tool interactions directly — without delegation or multi-agent coordination. When a user submits a request, the single agent processes the query using all tools, memory, and data sources available through the Model Context Protocol (MCP). It performs retrieval, reasoning, and response composition in a single, cohesive loop. Communication Flow: User Input → Agent: The user submits a question or command. Agent → MCP Tools: The agent invokes one or more tools (e.g., vector retrieval, structured queries, or API calls) to gather relevant context and data. Agent → User: The agent synthesizes the tool outputs, applies reasoning, and generates the final response to the user. Session Memory: Throughout the exchange, the agent stores conversation history and extracted entities in the configured memory store (in-memory or Cosmos DB). Key Communication Principles: Single Responsibility: One agent performs both reasoning and action, ensuring fast response times and simpler state management. Direct Tool Invocation: The agent has direct access to all registered tools through MCP, enabling flexible retrieval and action chaining. Stateful Execution: The session memory preserves dialogue context, allowing the agent to maintain continuity across user turns. Deterministic Behavior: The workflow is fully predictable — input, reasoning, tool call, and output occur in a linear sequence. Reflection pattern The Reflection Pattern introduces a lightweight, two-agent communication loop designed to improve the quality and reliability of responses through structured self-review. In this setup, a Primary Agent first generates an initial response to the user’s query. This draft is then passed to a Reviewer Agent, whose role is to critique and refine the response—identifying gaps, inaccuracies, or missed context. Finally, the Primary Agent incorporates this feedback and produces a polished final answer for the user. This process introduces one round of reflection and improvement without adding excessive latency, balancing quality with responsiveness. Communication Flow: User Input → Primary Agent: The user submits a query. Primary Agent → Reviewer Agent: The primary generates an initial draft and passes it to the reviewer. Reviewer Agent → Primary Agent: The reviewer provides feedback or suggested improvements. Primary Agent → User: The primary revises its response and sends the refined version back to the user. Key Communication Principles: Two-Stage Dialogue: Structured interaction between Primary and Reviewer ensures each output undergoes quality assurance. Focused Review: The Reviewer doesn’t recreate answers—it critiques and enhances, reducing redundancy. Stateful Context: Both agents operate over the same shared memory, ensuring consistency between draft and revision. Deterministic Flow: A single reflection round guarantees predictable latency while still improving answer quality. Transparent Traceability: Each step—initial draft, feedback, and final output—is logged, allowing developers to audit reasoning or assess quality improvements over time. In practice, this pattern enables the system to reason about its own output before responding, yielding clearer, more accurate, and policy-aligned answers without requiring multiple independent retries. Handoff Pattern When a user request arrives, the system first routes it through an Intent Classifier (or triage agent) to determine which domain specialist should handle the conversation. Once identified, control is handed off directly to that Specialist Agent, which uses its own tools, domain knowledge, and state context to respond. This specialist continues to handle the user interaction as long as the conversation stays within its domain. If the user’s intent shifts — for example, moving from billing to security — the conversation is routed back to the Intent Classifier, which re-assigns it to the correct specialist agent. This pattern reduces latency and maintains continuity by minimizing unnecessary routing. Each handoff is tracked through the shared state store, ensuring seamless context carry-over and full traceability of decisions. Key Communication Principles: Dynamic Routing: The Intent Classifier routes user input to the right specialist domain. Domain Persistence: The specialist remains active while the user stays within its domain. Context Continuity: Conversation history and entities persist across agents through the shared state store. Traceable Handoffs: Every routing decision is logged for observability and auditability. Low Latency: Responses are faster since domain-appropriate agents handle queries directly. In practice, this means a user could begin a conversation about billing, continue seamlessly, and only be re-routed when switching topics — without losing any conversational context or history. Magentic Pattern The Magentic Pattern is designed for open-ended, multi-faceted tasks that require multiple agents to collaborate. It introduces a Manager (Planner) Agent, which interprets the user’s goal, breaks it into subtasks, and orchestrates multiple Specialist Agents to execute those subtasks. The Manager creates and maintains a Task Ledger, which tracks the status, dependencies, and results of each specialist’s work. As specialists perform their tool calls or reasoning, the Manager monitors their progress, gathers intermediate outputs, and can dynamically re-plan, dispatch additional tasks, or adjust the overall workflow. When all subtasks are complete, the Manager synthesizes the combined results into a coherent final response for the user. Key Communication Principles: Centralized Orchestration: The Manager coordinates all agent interactions and workflow logic. Parallel and Sequential Execution: Specialists can work simultaneously or in sequence based on task dependencies. Task Ledger: Acts as a transparent record of all task assignments, updates, and completions. Dynamic Re-planning: The Manager can modify or extend workflows in real time based on intermediate findings. Shared Memory: All agents access the same state store for consistent context and result sharing. Unified Output: The Manager consolidates results into one response, ensuring coherence across multi-agent reasoning. In practice, Magentic orchestration enables complex reasoning where the system might combine insights from multiple agents — e.g., billing, product, and security — and present a unified recommendation or resolution to the user. Choosing the Right Agent for Your Use Case Selecting the appropriate agent pattern hinges on the complexity of the task and the level of coordination required. As use cases evolve from straightforward queries to intricate, multi-step processes, the need for specialized orchestration increases. Below is a decision matrix to guide your choice: Feature / Requirement Single Agent Reflection Agent Handoff Pattern Magentic Orchestration Handles simple, domain-bound tasks ✔ ✔ ✖ ✖ Supports review / quality assurance ✖ ✔ ✖ ✔ Multi-domain routing ✖ ✖ ✔ ✔ Open-ended / complex workflows ✖ ✖ ✖ ✔ Parallel agent collaboration ✖ ✖ ✖ ✔ Direct tool access ✔ ✔ ✔ ✔ Low latency / fast response ✔ ✔ ✔ ✖ Easy to implement / low orchestration ✔ ✔ ✖ ✖ Dive Deeper: Explore, Build, and Innovate We've explored various agent patterns, from Single Agent to Magentic Orchestration, each tailored to different use cases and complexities. To see these patterns in action, we invite you to explore our Github repo. Clone the repo, experiment with the examples, and adapt them to your own scenarios. Additionally, beyond the patterns discussed here, the repository also features a Human-in-the-Loop (HITL) workflow designed for fraud detection. This workflow integrates human oversight into AI decision-making, ensuring higher accuracy and reliability. For an in-depth look at this approach, we recommend reading our detailed blog post: Building Human-in-the-loop AI Workflows with Microsoft Agent Framework | Microsoft Community Hub Engage with these resources, and start building intelligent, reliable, and scalable AI systems today! This repository and content is developed and maintained by James Nguyen, Nicole Serafino, Kranthi Kumar Manchikanti, Heena Ugale, and Tim Sullivan.Swagger Auto-Generation on MCP Server
Would you like to generate a swagger.json directly on an MCP server on-the-fly? In many use cases, using remote MCP servers is not uncommon. In particular, if you're using Azure API Management (APIM), Azure API Center (APIC) or Copilot Studio in Power Platform, integrating with remote MCP servers is inevitable.GitHub Copilot Vibe Coding Workshop
Many of us do the vibe coding these days, and GitHub Copilot (GHCP) takes the key role of the vibe coding. You might simply enter prompts to GHCP like "Build a frontend app for a marketplace of camping gear" or even simpler ones like "Give me an app for camping gear marketplace". This surely works. GHCP delivers an app for you. However, the deliverable might be different from what you initially expected. This happens because GHCP fills in uncertainties with its own imagination unless we provide clear and detailed prompts. Let's recall the basics of product lifecycle management (PLM). You're a product owner or product manager about to launch a new product or develop a new business to sell values to your prospective customers. Where would you start from? Yes, it's the fist step to perform market analysis – whether your idea is feasible or not, whether the market is profitable or not, and so on. Then, based on this analysis, you would generate a product requirements document (PRD). The PRD describes what the product or service should be look like, how it should work, what it should deliver. In addition to that, the doc should also contain user stories and acceptance criteria. The user stories define what the app should expect, how it should behave, and what it should return. The acceptance criteria defines how you test the app to accept as a final deliverable. So, is a PRD is important for vibe coding? YES, IT IS! As stated earlier, GHCP tries really hard to fill some missing parts with its full of imagination. Therefore, the more context you provide to GHCP, the better GHCP works more accurately. That's how you get more accurate results from the vibe coding. But how do you actually practise this type of vibe coding? Introducing GitHub Copilot Vibe Coding Workshop I'm more than happy to introduce this GitHub Copilot Vibe Coding Workshop, a resource available for everyone to use. It's based on a typical app development scenario – building a web application that consists of a frontend UI and backend API with database transaction. This workshop has six steps: Analyse a PRD and generate an OpenAPI document from it. Build a FastAPI app in Python based on the OpenAPI doc. Build a React app in JavaScript based on the OpenAPI doc. Migrate the FastAPI app to Spring Boot app in Java. Migrate the React app to Blazor app in .NET. Containerise both the Spring app and the Blazor app, and orchestrate them. This workshop is self-paced so you can complete it in your spare time. It's also designed to run on GitHub Codespaces, since not everyone has all the required development environment set up locally. Throughout this workshop, you'll learn: How to activate GHCP Agent Mode on VS Code, How to customise your GHCP to get the better result, and How to integrate MCP servers for vibe coding. Do you prefer a language other than English? No problem! This workshop provides materials in seven different languages including English, Chinese (Simplified), French, Japanese, Korean, Portuguese and Spanish so you can choose your preferred language to complete the workshop. It's your time for vibe coding! Now it's your turn to try this GitHub Copilot Vibe Coding Workshop on your own, or together with your friends and colleagues. If you have any questions about this workshop, please create an issue in the repository! Want to know more about GitHub Copilot? GitHub Copilot in VS Code GitHub Copilot Agent Mode GitHub Copilot Customisation MCP Server Support in VS CodeUsing on-behalf-of flow for Entra-based MCP servers
In December, we presented a series about MCP, culminating in a session about adding authentication to MCP servers. I demoed a Python MCP server that uses Microsoft Entra for authentication, requiring users to first login to the Microsoft tenant before they could use a tool. Many developers asked how they could take the Entra integration further, like to check the user's group membership or query their OneDrive. That requires using an "on-behalf-of" flow, where the MCP server uses the user's Entra identity to call another API, like the Microsoft Graph API. In this blog post, I will explain how to use Entra with OBO flow in a Python FastMCP server. How MCP servers can use Entra authentication The MCP authorization specification is based on OAuth2, with some additional features tacked on top. Every MCP client is actually an OAuth2 client, and each MCP server is an OAuth2 resource server: MCP auth adds these features to help clients determine how to authorize a server: Protected resource metadata (PRM): Implemented on the MCP server, provides details about the authorization server and method Authorization server metadata: Implemented on the authorization server, gives URLs for OAuth2 endpoints Additionally, to allow MCP servers to work with arbitrary MCP clients, MCP auth supports either of these client registration methods: Dynamic Client Registration (DCR): Implemented on the authorization server, it can register new MCP clients as OAuth2 clients, even if it hasn't seen them before. Client ID Metadata Documents (CIMD): An alternative to DCR, this requires both the MCP client to make a CIMD document available on a server, and requires the authorization server to fetch the CIMD document for details about the client. Microsoft Entra does support authorization server metadata, but it does not support either DCR or CIMD. That's actually fine if you are building an MCP server that's only going to be used with pre-authorized clients, like if the server will only be used with VS Code or with a specific internal MCP client. But, if you are building an MCP server that can be used with arbitrary MCP clients, then either DCR or CIMD is required. So what do we do? Fortunately, the FastMCP SDK implements DCR on top of Entra using an OAuth proxy pattern. FastMCP acts as the authorization server, intercepting requests and forwarding to Entra when needed, and storing OAuth client information in a designated database (like in-memory or Cosmos DB). ⚠️ Warning: This proxy approach is intended only for development and testing scenarios. For production deployments, Microsoft recommends using pre‑registered client applications where client identifiers and permissions are explicitly created, reviewed, and approved on a per-app basis. Let's walk through the steps to set that up. Registering the server with Entra Before the server can use Entra to authorize users, we need to register the server with Entra via an app registration. We can do registration using the Azure Portal, Azure CLI, Microsoft Graph SDK, or even Bicep. In this demo, I use the Python MS Graph SDK as it allows me to specify everything programmatically. First, I create the Entra app registration, specifying the sign-in audience (single-tenant), redirect URIs (including local MCP server, deployed MCP server, and VS Code redirect URIs), and the scopes for the exposed API. request_app = Application( display_name="FastMCP Server App", sign_in_audience="AzureADMyOrg", # Single tenant web=WebApplication( redirect_uris=[ "http://localhost:8000/auth/callback", "https://vscode.dev/redirect", "http://127.0.0.1:33418", "https://deployedurl.com/auth/callback" ], ), api=ApiApplication( oauth2_permission_scopes=[ PermissionScope( id=uuid.UUID("{" + str(uuid.uuid4()) + "}"), admin_consent_display_name="Access FastMCP Server", admin_consent_description="Allows access to the FastMCP server as the signed-in user.", user_consent_display_name="Access FastMCP Server", user_consent_description="Allow access to the FastMCP server on your behalf", is_enabled=True, value="mcp-access", type="User", )], requested_access_token_version=2, # Required by FastMCP ) ) app = await graph_client.applications.post(request_app) await graph_client.applications.by_application_id(app.id).patch( Application(identifier_uris=[f"api://{app.app_id}"])) Thanks to that configuration, when an MCP client like VS Code requests an OAuth2 token, it will request a token with the scope "api://{app.app_id}/mcp-access", and the FastMCP server will validate that incoming tokens contain that scope. Next, I create a Service Principal for that Entra app registration, which represents the Entra app in my tenant request_principal = ServicePrincipal(app_id=app.app_id, display_name=app.display_name) await graph_client.service_principals.post(request_principal) I need a way for the server to prove that it can use that Entra app registration, so I register a secret: password_credential = await graph_client.applications.by_application_id(app.id).add_password.post( AddPasswordPostRequestBody( password_credential=PasswordCredential(display_name="FastMCPSecret"))) Ideally, I would like to move away from secrets, as Entra now has support for using federated identity credentials for Entra app registrations instead, but that form of credential isn't supported yet in the FastMCP SDK. If you choose to use a secret, make sure that you store the secret securely. Granting admin consent This next step is only necessary when our MCP server wants to use an OBO flow to exchange access tokens for other resource server tokens (Graph API tokens, in this case). For the OBO flow to work, the Entra app registration needs permission to call the Graph API on behalf of users. If we controlled the client, we could force it to request the required scopes as part of the initial login dialog. However, since we are configuring this server to work with arbitrary MCP clients, we don't have that option. Instead, we grant admin consent to the Entra app for the necessary scopes, such that no Graph API consent dialog is needed. This code grants admin consent to the associated service principal for the Graph API resource and scopes: server_principal = await graph_client.service_principals_with_app_id(app.app_id).get() grant = GrantDefinition( principal_id=server_principal.id, resource_app_id="00000003-0000-0000-c000-000000000000", # Graph API scopes=["User.Read", "email", "offline_access", "openid", "profile"], target_label="server application") resource_principal = await graph_client.service_principals_with_app_id(grant.resource_app_id).get() desired_scope = grant.scope_string() await graph_client.oauth2_permission_grants.post( OAuth2PermissionGrant( client_id=grant.principal_id, consent_type="AllPrincipals", resource_id=resource_principal.id, scope=desired_scope)) If our MCP server needed to use an OBO flow with another resource server, we could request additional grants for those resources and scopes. Our Entra app registration is now ready for the MCP server, so let's move on to see the server code. Using FastMCP servers with Entra In our MCP server code, we configure FastMCP's built in AzureProvider based off the details from the Entra app registration process: auth = AzureProvider( client_id=os.environ["ENTRA_PROXY_AZURE_CLIENT_ID"], client_secret=os.environ["ENTRA_PROXY_AZURE_CLIENT_SECRET"], tenant_id=os.environ["AZURE_TENANT_ID"], base_url=entra_base_url, # MCP server URL required_scopes=["mcp-access"], client_storage=oauth_client_store, # in-memory or Cosmos DB ) To make it easy for our MCP tools to access an identifier for the currently logged in user, we define a middleware that inspects the claims of the current token using FastMCP's get_access_token() and sets the "oid" (Entra object identifier) in the state: class UserAuthMiddleware(Middleware): def _get_user_id(self): token = get_access_token() if not (token and hasattr(token, "claims")): return None return token.claims.get("oid") async def on_call_tool(self, context: MiddlewareContext, call_next): user_id = self._get_user_id() if context.fastmcp_context is not None: context.fastmcp_context.set_state("user_id", user_id) return await call_next(context) async def on_read_resource(self, context: MiddlewareContext, call_next): user_id = self._get_user_id() if context.fastmcp_context is not None: context.fastmcp_context.set_state("user_id", user_id) return await call_next(context) When we initialize the FastMCP server, we set the auth provider and include that middleware: mcp = FastMCP("Expenses Tracker", auth=auth, middleware=[UserAuthMiddleware()]) Now, every request made to the MCP server will require authentication. The server will return a 401 if a valid token isn't provided, and that 401 will prompt the MCP client to kick off the MCP authorization flow. Inside each tool, we can grab the user id from the state, and use that to customize the response for the user, like to store or query items in a database. .tool async def add_user_expense( date: Annotated[date, "Date of the expense in YYYY-MM-DD format"], amount: Annotated[float, "Positive numeric amount of the expense"], description: Annotated[str, "Human-readable description of the expense"], ctx: Context, ): """Add a new expense to Cosmos DB.""" user_id = ctx.get_state("user_id") if not user_id: return "Error: Authentication required (no user_id present)" expense_item = { "id": str(uuid.uuid4()), "user_id": user_id, "date": date.isoformat(), "amount": amount, "description": description } await cosmos_container.create_item(body=expense_item) Using OBO flow in FastMCP server Now we can move on to using an OBO flow inside an MCP tool, to access the Graph API on behalf of the user. To make it easy to exchange Entra tokens for Graph tokens, we use the Python MSAL SDK, configuring a ConfidentialClientApplication based on our Entra app registration details: confidential_client = ConfidentialClientApplication( client_id=os.environ["ENTRA_PROXY_AZURE_CLIENT_ID"], client_credential=os.environ["ENTRA_PROXY_AZURE_CLIENT_SECRET"], authority=f"https://login.microsoftonline.com/{os.environ['AZURE_TENANT_ID']}", token_cache=TokenCache(), ) Inside the tool that requires OBO, we ask MSAL to exchange the MCP access token for a Graph API access token: access_token = get_access_token() graph_resource_access_token = confidential_client.acquire_token_on_behalf_of( user_assertion=access_token.token, scopes=["https://graph.microsoft.com/.default"] ) graph_token = graph_resource_access_token["access_token"] Once we successfully acquire the token, we can use that token with the Graph API, for any operations permitted by the scopes in the admin consent granted earlier. For this example, we call the Graph API to check whether the logged in user is a member of a particular Entra group, and restrict tool usage if not: async with httpx.AsyncClient() as client: url = ("https://graph.microsoft.com/v1.0/me/transitiveMemberOf/microsoft.graph.group" f"?$filter=id eq '{group_id}'&$count=true") response = await client.get( url, headers={ "Authorization": f"Bearer {graph_token}", "ConsistencyLevel": "eventual", }) data = response.json() membership_count = data.get("@odata.count", 0) You could imagine many other ways to use an OBO flow however, like to query for more details from the Graph API, upload documents to OneDrive/SharePoint/Notes, send emails, and more! All together now For the full code, check out the open source python-mcp-demos repository, and follow the deployment steps for Entra. The most relevant code files are: auth_init.py: Creates the Entra app registration, service principal, client secret, and grants admin consent for OBO flow. auth_update.py: Updates the app registration's redirect URIs after deployment, adding the deployed server URL. auth_entra_mcp.py: The MCP server itself, configured with FastMCP's AzureProvider and tools that use OBO for group membership checks. I want to reiterate once more that the OAuth proxy approach is intended only for development and testing scenarios. For production deployments, Microsoft recommends using pre‑registered client applications where client identifiers and permissions are explicitly created, reviewed, and approved on a per-app basis. I hope that in the future, Entra will formally support MCP authorization via the CIMD protocol, so that we can build MCP servers with Entra auth that work with MCP clients in a fully secure and production-ready way. As always, please let us know if you have further questions or ideas for other Entra integrations. Acknowledgements: Thank you to Matt Gotteiner for his guidance in implementing the OBO flow and review of the blog post.