managedidentity
2 TopicsGetting Started with Azure SQL Data Sync Using User-Assigned Managed Identity (UAMI)
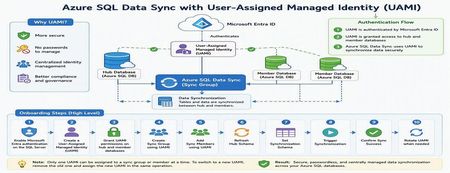
Azure SQL Data Sync is a powerful service that enables data synchronization across multiple Azure SQL Databases. Traditionally, Data Sync relied on SQL Authentication, requiring administrators to manage usernames and passwords for both hub and member databases. With the introduction of User-Assigned Managed Identity (UAMI) support, Azure SQL Data Sync now provides a more secure and modern authentication model built on Microsoft Entra ID. This enhancement reduces credential management overhead, eliminates password storage concerns, and helps organizations strengthen their security posture. In this article, we'll explore how to onboard Azure SQL Data Sync with UAMI, configure the required permissions, create synchronization components, and review best practices for long-term management. Why Use UAMI with Azure SQL Data Sync? User-Assigned Managed Identity offers several advantages over traditional SQL authentication: Eliminates password storage and rotation requirements Reduces credential exposure risks Integrates with Microsoft Entra ID authentication Supports centralized identity management Improves compliance and security posture Simplifies operational maintenance Whether you're deploying a new synchronization topology or modernizing an existing Data Sync environment, UAMI provides a secure cloud-native alternative to password-based authentication. Architecture Overview A typical UAMI-enabled Azure SQL Data Sync deployment looks like this: Authentication Method: Microsoft Entra ID via User-Assigned Managed Identity The same managed identity can be used by Data Sync to authenticate against all participating databases. Prerequisites Before configuring Azure SQL Data Sync with UAMI, ensure the following prerequisites are completed: 1. Enable Microsoft Entra Authentication The Azure SQL Server hosting both Hub and Member databases must have Microsoft Entra authentication enabled and an Entra administrator configured. 2. Create a User-Assigned Managed Identity Create a UAMI within Azure and collect the following information: Managed Identity Name Client ID Resource ID These values will be required during configuration. 3. Install the Required PowerShell Module UAMI support requires the Azure SQL preview PowerShell module: Install-Module Az.Sql -RequiredVersion 6.6.0-preview ` -AllowPrerelease ` -Force ` -AllowClobber Or a later version that includes Data Sync UAMI support. Phase 1: Configure Database Access Before Data Sync can use a managed identity, the identity must be granted access to all databases participating in synchronization. Connect to each Hub and Member database using a Microsoft Entra administrator account and create a user for the managed identity. Example: DECLARE @MSIname SYSNAME = '<UAMI_NAME>'; DECLARE @dbName SYSNAME = DB_NAME(); DECLARE @clientId UNIQUEIDENTIFIER = '<CLIENT_ID>'; -- Create User -- Grant db_datareader -- Grant db_datawriter -- Grant CONTROL permissions The UAMI must be created and granted permissions on every database participating in synchronization. Phase 2: Create the Sync Group After permissions are configured, create the Sync Group using UAMI authentication. Example PowerShell: New-AzSqlSyncGroup ` -ResourceGroupName $resourceGroup ` -ServerName $serverName ` -DatabaseName $hubDatabase ` -Name $syncGroup ` -HubDatabaseAuthenticationType UserAssigned ` -ResourceId $identityResourceId Key Parameters Parameter Description HubDatabaseAuthenticationType Authentication method for Hub Database UserAssigned Enables UAMI authentication ResourceId Full ARM Resource ID of the UAMI Phase 3: Add Sync Members Once the Sync Group is created, add member databases and specify UAMI authentication. Example: New-AzSqlSyncMember ` -ResourceGroupName $resourceGroup ` -ServerName $serverName ` -DatabaseName $hubDatabase ` -SyncGroupName $syncGroup ` -Name $memberName ` -MemberDatabaseAuthenticationType UserAssigned ` -ResourceId $identityResourceId At this stage, both Hub and Member databases are configured to authenticate using the managed identity. Phase 4: Configure Synchronization Refresh Hub Schema Refresh the schema metadata before selecting tables for synchronization. Update-AzSqlSyncSchema ` -ResourceGroupName $resourceGroup ` -ServerName $serverName ` -DatabaseName $hubDatabase ` -SyncGroupName $syncGroup Configure the Synchronization Schema Data Sync requires an explicit schema definition specifying which tables and columns will participate in synchronization. Example schema: { "Tables": [ { "QuotedName": "[dbo].[contacts]", "Columns": [ { "QuotedName": "[id]" }, { "QuotedName": "[name]" } ] } ] } Apply the schema: Update-AzSqlSyncGroup ` -ResourceGroupName $resourceGroup ` -ServerName $serverName ` -DatabaseName $hubDatabase ` -Name $syncGroup ` -HubDatabaseAuthenticationType UserAssigned ` -ResourceId $identityResourceId ` -SchemaFile "C:\schema.json" Trigger Synchronization After configuration is complete, trigger the initial synchronization. Start-AzSqlSyncGroupSync ` -ResourceGroupName $resourceGroup ` -ServerName $serverName ` -DatabaseName $hubDatabase ` -SyncGroupName $syncGroup Phase 5: Rotating UAMIs Over time, organizations may need to replace an existing managed identity. UAMI_v1 → UAMI_v2 Only one UAMI can be assigned to a Sync Group or Sync Member at a time. To rotate identities: Grant required database permissions to the new UAMI. Remove the current UAMI. Assign the new UAMI in the same operation. Update Sync Group Update-AzSqlSyncGroup ` -HubDatabaseAuthenticationType UserAssigned ` -ResourceId $newUamiResourceId ` -RemoveIdentityResourceId $oldUamiResourceId Update Sync Member Update-AzSqlSyncMember ` -MemberDatabaseAuthenticationType UserAssigned ` -ResourceId $newUamiResourceId ` -RemoveIdentityResourceId $oldUamiResourceId Common Pitfalls During implementation, the following issues are commonly encountered: Pitfall #1: Missing Entra Administrator If the SQL Server does not have an Entra administrator configured, UAMI authentication will fail. Pitfall #2: Missing Database Permissions The managed identity must be created and granted permissions in every participating database. Pitfall #3: Multiple UAMIs Assigned Azure SQL Data Sync supports only one UAMI per Sync Group or Sync Member at a time. Pitfall #4: Identity Included During PATCH Updates When updating schemas through REST APIs, avoid re-submitting the identity block if the managed identity is already assigned. This may result in a DataSyncMultipleIdentities error. Validation Checklist Before moving to production, verify the following: Microsoft Entra administrator configured UAMI created successfully UAMI user created in all Hub and Member databases Required permissions granted Sync Group configured with UserAssigned authentication Sync Members configured with UserAssigned authentication Schema refreshed successfully Synchronization schema applied Initial synchronization completed successfully Data synchronized correctly between Hub and Member databases Best Practices For secure and scalable deployments: Prefer UAMI over SQL Authentication for new deployments. Use dedicated managed identities for Data Sync workloads. Follow least-privilege access principles where possible. Test configuration changes in non-production environments first. Maintain documentation for identity ownership and rotation procedures. Monitor synchronization health after identity updates. Standardize naming conventions for managed identities. References The following Microsoft resources provide additional details for implementing Azure SQL Data Sync with User-Assigned Managed Identities: 1. Configure Microsoft Entra Authentication for Azure SQL Database Configure an Entra administrator for Azure SQL Database, which is a prerequisite for UAMI-based authentication. https://learn.microsoft.com/azure/azure-sql/database/authentication-aad-configure 2. Manage User-Assigned Managed Identities Learn how to create and manage User-Assigned Managed Identities in Azure. Managed identities eliminate the need to manage credentials in code and can be reused across multiple Azure resources. Manage user-assigned managed identities using the Azure portal explains the process and prerequisites. [Manage use...soft Learn | Learn.Microsoft.com] 3. Connect to Azure SQL Using Microsoft Entra Authentication Configure and validate Entra-based connectivity for Azure SQL Database before granting permissions to the managed identity. https://learn.microsoft.com/azure/azure-sql/database/authentication-microsoft-entra-connect-to-azure-sql 4. Azure SQL Data Sync PowerShell Documentation Review PowerShell cmdlets used to create Sync Groups, Sync Members, refresh schemas, and trigger synchronization. 5. Azure SQL REST API Documentation Use REST APIs for automation and Infrastructure-as-Code deployment scenarios involving Azure SQL Data Sync. Conclusion User-Assigned Managed Identity support represents a significant security enhancement for Azure SQL Data Sync. By eliminating dependency on stored credentials and leveraging Microsoft Entra authentication, organizations can improve security, simplify operations, and reduce administrative overhead. Whether you're building a new synchronization topology or migrating from SQL Authentication, UAMI provides a modern, scalable, and cloud-native authentication model for Azure SQL Data Sync. As cloud environments continue to adopt identity-first security practices, implementing UAMI for Azure SQL Data Sync is an important step toward a more secure and manageable data platform.758Views0likes0CommentsStrengthening Azure File Sync security with Managed Identities
Hello Folks, As IT pros, we’re always looking for ways to reduce complexity and improve security in our infrastructure. One area that’s often overlooked is how our services authenticate with each other. Especially when it comes to Azure File Sync. In this post, I’ll walk you through how Managed Identities can simplify and secure your Azure File Sync deployments, based on my recent conversation with Grace Kim, Program Manager on the Azure Files and File Sync team. Why Managed Identities Matter Traditionally, Azure File Sync servers authenticate to the Storage Sync service using server certificates or shared access keys. While functional, these methods introduce operational overhead and potential security risks. Certificates expire, keys get misplaced, and rotating credentials can be a pain. Managed Identities solve this by allowing your server to authenticate securely without storing or managing credentials. Once enabled, the server uses its identity to access Azure resources, and permissions are managed through Azure Role-Based Access Control (RBAC). Using Azure File Sync with Managed Identities provides significant security enhancements and simpler credential management for enterprises. Instead of relying on storage account keys or SAS tokens, Azure File Sync authenticates using a system-assigned Managed Identity from Microsoft Entra ID (Azure AD). This keyless approach greatly improves security by removing long-lived secrets and reducing the attack surface. Access can be controlled via fine-grained Azure role-based access control (RBAC) rather than a broadly privileged key, enforcing least-privileged permissions on file shares. I believe that Azure AD RBAC is far more secure than managing storage account keys or SAS credentials. The result is a secure-by-default setup that minimizes the risk of credential leaks while streamlining authentication management. Managed Identities also improve integration with other Azure services and support enterprise-scale deployments. Because authentication is unified under Azure AD, Azure File Sync’s components (the Storage Sync Service and each registered server) seamlessly obtain tokens to access Azure Files and the sync service without any embedded secrets. This design fits into common Azure security frameworks and encourages consistent identity and access policies across services. In practice, the File Sync managed identity can be granted appropriate Azure roles to interact with related services (for example, allowing Azure Backup or Azure Monitor to access file share data) without sharing separate credentials. At scale, organizations benefit from easier administration. New servers can be onboarded by simply enabling a managed identity (on an Azure VM or an Azure Arc–connected server) and assigning the proper role, avoiding complex key management for each endpoint. Azure’s logging and monitoring tools also recognize these identities, so actions taken by Azure File Sync are transparently auditable in Azure AD activity logs and storage access logs. Given these advantages, new Azure File Sync deployments now enable Managed Identity by default, underscoring a shift toward identity-based security as the standard practice for enterprise file synchronization. This approach ensures that large, distributed file sync environments remain secure, manageable, and well-integrated with the rest of the Azure ecosystem. How It Works When you enable Managed Identity on your Azure VM or Arc-enabled server, Azure automatically provisions an identity for that server. This identity is then used by the Storage Sync service to authenticate and communicate securely. Here’s what happens under the hood: The server receives a system-assigned Managed Identity. Azure File Sync uses this identity to access the storage account. No certificates or access keys are required. Permissions are controlled via RBAC, allowing fine-grained access control. Enabling Managed Identity: Two Scenarios Azure VM If your server is an Azure VM: Go to the VM settings in the Azure portal. Enable System Assigned Managed Identity. Install Azure File Sync. Register the server with the Storage Sync service. Enable Managed Identity in the Storage Sync blade. Once enabled, Azure handles the identity provisioning and permissions setup in the background. Non-Azure VM (Arc-enabled) If your server is on-prem or in another cloud: First, make the server Arc-enabled. Enable System Assigned Managed Identity via Azure Arc. Follow the same steps as above to install and register Azure File Sync. This approach brings parity to hybrid environments, allowing you to use Managed Identities even outside Azure. Next Steps If you’re managing Azure File Sync in your environment, I highly recommend transitioning to Managed Identities. It’s a cleaner, more secure approach that aligns with modern identity practices. ✅ Resources 📚 https://learn.microsoft.com/azure/storage/files/storage-sync-files-planning 🔐 https://learn.microsoft.com/azure/active-directory/managed-identities-azure-resources/overview ⚙️ https://learn.microsoft.com/azure/azure-arc/servers/overview 🎯 https://learn.microsoft.com/azure/role-based-access-control/overview 🛠️ Action Items Audit your current Azure File Sync deployments. Identify servers using certificates or access keys. Enable Managed Identity on eligible servers. Use RBAC to assign appropriate permissions. Let me know how your transition to Managed Identities goes. If you run into any snags or have questions, drop a comment. Cheers! Pierre700Views0likes0Comments