llm
72 TopicsFrom Jev to Your Laptop: Building "System One" Decision Models in ONNX with Mobius
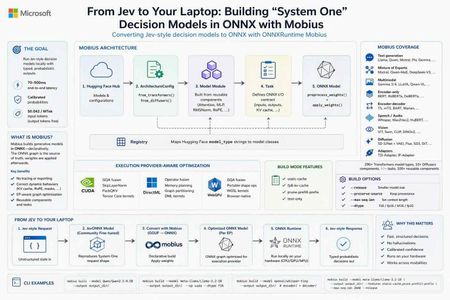
0. Why I'm writing this now Two things landed on my radar in the same week. First, TypeSafe AI published "Introducing System One Models & Jev" (Sep 15, 2026) and the developer community immediately started arguing about it. The pitch is unusual: instead of another chat model, Jev is described as "a new class of frontier models built to make fast, structured decisions that software can use directly." The post frames Jev as "a frontier-intelligence function call: unstructured state in, typed probabilistic decisions out" — and notes that while "Jev gives up string generation, it's optimized for structured outputs and can't hallucinate." The numbers in that post are what got everyone's attention: end-to-end response times of 70ms–500ms versus 3–329 seconds for frontier LLMs, input tokens at $0.042/MTok with output tokens free, and a claim that every answer arrives with a calibrated probability — "higher confidence means higher accuracy." The name itself is a thesis: TypeSafe named Jev after William Stanley Jevons, expecting that "every order of magnitude drop in the cost of intelligence unlocks orders of magnitude more use cases." Second — and this is the part that matters for anyone who builds on Microsoft's AI stack — onnxruntime/mobius has been quietly shipping at a furious pace. It's the piece of infrastructure that makes it realistic to take a model like this, in whatever format it arrives, and run it as an ONNX graph on hardware you control. So I built the bridge. kinfey/JevONNX takes an open, community-fine-tuned model that reproduces the System One request shape, converts it from GGUF to CPU ONNX with Mobius, and serves typed probabilistic decisions locally. This post covers three things: what Mobius is, how it differs from the ONNX Runtime GenAI Model Builder you may already be using, and how the JevONNX sample puts it together. 1. What is Mobius? Mobius builds generative models in ONNX. That preposition is the whole idea. From the repo's own description, Mobius provides "ONNX model definitions for GenAI using the onnxscript.nn API" — model definitions for "LLMs, MoE, multimodal, encoder-only, encoder-decoder, vision, audio, and diffusion models — built directly as ONNX graphs using onnxscript.nn.Module." The key sentence, and the one worth reading twice: "Rather than tracing or exporting PyTorch models, it constructs the ONNX graph declaratively, then applies pretrained HuggingFace weights." Why "declarative construction" is a big deal If you've ever exported a model to ONNX the traditional way, you know the failure modes. You run torch.onnx.export, the tracer executes one concrete path through Python control flow, and anything dynamic — a KV cache branch, a rotary embedding computed with a Python if, a sliding-window mask — either silently bakes in a constant or explodes into an unreadable subgraph. You then spend a week diffing graphs. Mobius inverts this. The graph is the source of truth, written as composable modules, and the weights are applied afterwards. The architecture in the README is four clean layers: HuggingFace Hub │ ▼ ArchitectureConfig ◄── from_transformers() / from_diffusers() │ ▼ Model Module ◄── Reusable Components (Attention, MLP, RMSNorm, RoPE, …) │ ▼ Task ◄── CausalLMTask, VisionLanguageTask, VAETask, DenoisingTask, … │ ▼ ONNX Model ◄── preprocess_weights() + apply_weights() Components — onnxscript.nn.Module building blocks (Attention, MLP, DecoderLayer, RoPE, VisionEncoder, MoELayer…) Models — full architectures composed from those components Tasks — define the ONNX graph's I/O contract (inputs, outputs, KV cache) Registry — maps HuggingFace model_type strings to model classes Adding a new architecture becomes writing a model definition, not debugging an exporter. Mobius even ships developer skills in .agents/skills/ (adding-a-new-model, reusable-components, moe-models, multimodal-models, writing-tests, writing-rewrite-rules) so an AI coding agent can do the legwork with you. Coverage This isn't a toy. The repo claims 290+ Transformers model types and 10 Diffusers component types across 40+ task types and 100+ reusable components, spanning: Category Examples Text generation Llama 2/3/4, Mistral, Qwen 2/2.5/3/3.5/3.6, Phi-3/3.5, Gemma 1/2/3/4, Granite, GPT-2, OPT, OLMo, SmolLM3 Mixture of Experts PhiMoE, GPTOSS, Mixtral, OLMoE, DeepSeek-V2/V3, Qwen2-MoE, Qwen3-MoE, Qwen3-Next, GLM-4-MoE, Arctic, DBRX, Jamba Multimodal Gemma 3/4, Phi-4MM (vision + audio + LoRA), LLaVA, InternVL2, MiniCPM-V 4.6, Qwen2.5-VL, Qwen3-VL, Pixtral Encoder-only BERT, RoBERTa, ALBERT, DeBERTa, DistilBERT, ELECTRA, XLNet Encoder-decoder BART, T5/mT5, Marian, M2M-100, Pegasus, BigBird-Pegasus Speech-to-text Whisper, Moonshine, Moonshine Streaming, FastConformer-RNNT, FunASR, GLM-ASR, Qwen3-ASR, SenseVoice Audio Wav2Vec2, HuBERT, WavLM, SpeechT5 Vision ViT, BEiT, DeiT, DINOv2, Swin, CLIP, SigLIP Diffusion Stable Diffusion (UNet + VAE + ControlNet), Flux, SD3, DiT, QwenImage / Qwen-Image-Edit-2509, HunyuanDiT, CogVideoX Adapters T2I-Adapter, IP-Adapter The five-minute version pip install -e . from mobius import build pkg = build("meta-llama/Llama-3.2-1B") pkg.save("output/llama-3.2-1b/") Static KV cache, when you know your max sequence length up front: from mobius import build, CausalLMTask task = CausalLMTask(static_cache=True, max_seq_len=2048) pkg = build("meta-llama/Llama-3.2-1B", task=task) pkg.save("output/llama-3.2-1b-static/") EP-aware optimization — the graph itself is tuned per execution provider, "each with the right set of fused kernels and lowering passes applied automatically": # CUDA: GQA fusion, SkipLayerNorm, PackQKV pkg = build("meta-llama/Llama-3.2-1B", execution_provider="cuda", dtype="f16") # WebGPU: GQA fusion, Shape ops replaced with portable alternatives pkg = build("meta-llama/Llama-3.2-1B", execution_provider="webgpu", dtype="f16") And the CLI, which is what we'll use later: mobius build --model Qwen/Qwen2.5-0.5B --output output_dir/ mobius build --model meta-llama/Llama-3.2-1B --output output_dir/ --ep cuda --dtype f16 mobius build --model openai/whisper-tiny --output output_dir/ # encoder/ + decoder/ Build-mode toggles use a cargo-style --features flag — available features are static-cache, fp8-kv-cache, prune-prefill-prefix, and text-only: mobius build --model meta-llama/Llama-3.2-1B --output output_dir/ \ --features static-cache,prune-prefill-prefix --max-seq-len 2048 --release strips build-time debug and provenance metadata to reduce saved model size, while preserving functional metadata keyed with the mobius. prefix. 2. Mobius vs. the ONNX Runtime GenAI Model Builder This is the question I get every time I demo Mobius, so let's be precise. Both are Microsoft tools, both produce ONNX, and they are not competitors — they sit at different points on the same pipeline. The ONNX Runtime GenAI Model Builder describes itself as the tool "for quickly creating optimized and quantized ONNX models within a few minutes that run with ONNX Runtime GenAI." Its output is a deployment-ready package: model.onnx plus genai_config.json plus tokenizer files, wired for the onnxruntime-genai runtime. Its architecture list is explicitly curated — AMD OLMo, ChatGLM, DeepSeek, ERNIE 4.5, Gemma, gpt-oss, Granite, Granite MoE Hybrid, HunYuan Dense V1, InternLM2, LFM2, LFM2 MoE, Llama, Mistral, Nemotron, Phi, Qwen, SmolLM3, Whisper — and the README states plainly that "it is intended for supporting the latest, popular state-of-the-art models." Mobius, by contrast, is a model-definition library: a component algebra for describing generative architectures as ONNX graphs, with a registry mapping HuggingFace model_type strings to model classes. Here's how I'd separate them: Dimension ORT GenAI Model Builder Mobius Primary goal Produce a deployment-ready GenAI package, fast Define and construct the ONNX graph itself Output contract model.onnx + genai_config.json + tokenizer, targeted at the ORT GenAI runtime ONNX model package; you choose the runtime (plain ORT sessions included) How the graph is made Per-architecture builder subclasses (LlamaModel, QwenModel, Phi3MiniModel, WhisperModel…) overriding make_layer / make_attention / make_moe Declarative onnxscript.nn.Module composition from reusable Components → Models → Tasks Breadth Curated list of ~19 popular families, text + Whisper 290+ Transformers types, 10 Diffusers component types, 40+ tasks — including vision, audio, and diffusion Extending it Add a builder subclass inside the onnxruntime-genai tree Add a model definition from existing components; shipped .agents/skills/ guide it Tuning surface Rich --extra_options for quantization and runtime behavior (QMoE, paged attention, KV-cache quantization, QDQ, CUDA/WebGPU graph capture…) --features build toggles + execution_provider= EP-aware graph lowering + dtype control Diffusion / multi-component pipelines Not the target First-class (--model Qwen/Qwen-Image-2512 builds all components) When I reach for it "I have a Phi/Llama/Qwen chat model and I want an int4 CPU/CUDA package running under ORT GenAI today" "My architecture is hybrid, unusual, multimodal, diffusion, or I need graph-level control over what gets emitted" Notably, the two overlap on real capabilities. The Model Builder also consumes GGUF and handles Qwen3.5-class features (compact state updates, recurrent-operator selection). Mobius also emits ORT-GenAI-compatible metadata — though the repo is honest about limits: for Mage-VL, "ORT GenAI export is currently rejected because the runtime cannot supply its required patch_positions input or Mage-VL's 1D decoder positions." That single line tells you exactly where the boundary sits: the Model Builder is bounded by what the GenAI runtime can express; Mobius is bounded by what ONNX can express. My rule of thumb as an advocate: if your model is on the Model Builder's supported list and you want the GenAI runtime's generation loop, use the Model Builder — it is faster and gives you a complete package. The moment you're off that list, or you need the graph itself to be a first-class artifact you can reason about and modify, Mobius is the tool. The JevONNX sample is squarely in the second category. Let's look at why. 3. The sample: converting a Jev-style decision model to CPU ONNX Repo: github.com/kinfey/JevONNX 3.1 The honest framing first Jev is TypeSafe's proprietary model. You can't download it and convert it, and this project doesn't pretend otherwise. What the community did do is interesting: n4ze3m/Qwen3.5-4B-Hmm is "an experimental open-model attempt to reproduce the central idea and request shape of the System One workflow introduced with Jev." It works by "fine-tuning Qwen3.5-4B to answer typed questions through option probabilities instead of ordinary generated text." The README of JevONNX is emphatic about the boundaries, and I want to repeat them here rather than bury them: "Hmm is not Jev, is not affiliated with TypeSafe AI, and does not reproduce Jev's proprietary model architecture, parallel sampler, performance, calibration, or type-safety guarantees. The Hmm model card explicitly states that it is less capable than Jev." And: "The reproduction is behavioral rather than architectural." The distinction, straight from the project's comparison table: Property Jev Hmm in this project Model design Native System One Model Qwen3.5-4B fine-tuned to reproduce the typed-decision concept Output mechanism Native typed probabilistic outputs First-token option-letter probabilities Multiple questions Designed for parallel sampling Jev-like request shape, implemented as one model pass per question Output types Schema-constrained structured values noul, choice, and score adapter Runtime here TypeSafe service Local ONNX Runtime CPU Guarantees As documented by TypeSafe No equivalent guarantee is claimed The mechanism is refreshingly legible: the adapter turns each typed question into an exact multiple-choice prompt, then "reads the first generated-token logits for A, B, C, and subsequent option letters and normalizes them into probabilities." No JSON parsing, no retry-on-malformed-output, no regex. The probability distribution is the answer. 3.2 Why this needs Mobius specifically Qwen3.5 is a hybrid architecture, and that's the whole reason this is a Mobius story. The exported model has 32 hybrid decoder layers. Linear-attention layers carry conv_state and recurrent_state; full-attention layers carry key/value caches. In this artifact, full-attention layers sit at indices 3, 7, 11, 15, 19, 23, 27, and 31. The practical consequence, quoted from the README: "The prompt is processed one token at a time while every present.* output is fed back into its corresponding past_key_values.* input. This differs from a conventional decoder-only example that can prefill an entire prompt in one call." That is a graph-shape problem. You cannot handwave it with a config flag — you need the exported graph's state contract to be explicit and inspectable, which is exactly what declarative construction gives you. The implementation "follows the structure of Mobius examples/text_generation.py while adding the hybrid-state handling required by Qwen3.5." 3.3 The conversion pipeline n4ze3m/Qwen3.5-4B-Hmm-Q4_K_M.gguf │ SHA-256 verification ▼ Mobius GGUF reader/importer │ metadata and tensor mapping │ Qwen3.5 hybrid graph construction │ Q4_K_M → packed quantized target storage │ CPU execution-provider optimization ▼ onnx_outputs/ ├── model.onnx ├── model.onnx.data ├── quantization_report.json ├── tokenizer.json ├── tokenizer_config.json ├── chat_template.jinja └── cpu_test_summary.json │ ▼ ONNX Runtime CPUExecutionProvider │ token-by-token hybrid-state prefill │ first-token A/B/C/… probabilities ▼ typed decision JSON response One command does the conversion: mobius build-gguf Qwen3.5-4B-Hmm-Q4_K_M.gguf \ --output onnx_outputs \ --ep cpu \ --dtype f32 \ --release Two details worth internalizing: --dequantize is intentionally not used. Keeping quantized storage "substantially reduc[es] the output size compared with a fully dequantized FP32 model." The external-data file is still ~2.6 GB — imagine it dequantized. Don't trust the preset, read the report. "Q4_K conversion can involve a lossy affine repack; inspect quantization_report.json rather than assuming source-preset fidelity." This is the kind of line that separates a demo from a deployment. 3.4 Reproducibility — the part I actually want you to copy Every pin, in a table, in the README: Component Revision GGUF repository n4ze3m/Qwen3.5-4B-Hmm GGUF revision c27fa3c627dfaced343c6ba9d3a0d00243a3be51 GGUF filename Qwen3.5-4B-Hmm-Q4_K_M.gguf GGUF SHA-256 5e03cb057049c56b421bd3c506d77fd8e0a77996bb8464148a02cfc3caac5229 Mobius revision 6b27a3f08b8b5d08ba9b14b416e3b435942bb0bd Tokenizer repository Qwen/Qwen3.5-4B Tokenizer revision 851bf6e806efd8d0a36b00ddf55e13ccb7b8cd0a The notebook builds a Mobius wheel from the pinned Git source rather than installing a prebuilt package. On a project moving at 500+ commits, that is not paranoia — that is the only way your conversion is still reproducible next month. 3.5 Running it Two files carry the project: Qwen3_5_4B_Hmm_GGUF_to_CPU_ONNX_Mobius_fixed.ipynb (the Colab conversion and validation workflow) and run_hmm_onnx.py (the standalone typed-decision runner). Run the notebook in a high-memory Colab CPU runtime; it writes to /content/onnx_outputs on Colab and .mobius_colab_run/onnx_outputs elsewhere. Then: python run_hmm_onnx.py --model-dir .mobius_colab_run/onnx_outputs python run_hmm_onnx.py --model-dir .mobius_colab_run/onnx_outputs --request request.json A request is state plus typed questions: { "state": "Help! My payouts have failed for 3 days. I need the money today.", "questions": { "is_urgent": { "type": "noul", "instructions": "Does this message convey urgency?" }, "department": { "type": "choice", "instructions": "Which team should handle this?", "criteria": { "billing": "Payments, invoicing, refunds", "technical": "Bugs, outages, integrations", "sales": "Pricing, upgrades, new accounts" } }, "priority": { "type": "score", "instructions": "How urgent is this request?", "criteria": ["Not urgent", "Normal", "Urgent", "Critical"] } } } From Python: from pathlib import Path from run_hmm_onnx import HmmOnnx model = HmmOnnx(Path(".mobius_colab_run/onnx_outputs")) response = model.decide({ "state": "Help! My payouts have failed for 3 days.", "questions": { "is_urgent": { "type": "noul", "instructions": "Does this message convey urgency?", } }, }) print(response) 3.6 The three decision types noul — a nullable-style yes/no probability; the probability of the true option: { "type": "noul", "noul": 0.9745 } choice — the highest-probability key, all normalized option probabilities, and a confidence value measuring how peaked the distribution is: { "type": "choice", "choice": "billing", "probabilities": { "billing": 0.7216, "technical": 0.2759, "sales": 0.0025 }, "confidence": 0.5823 } score — the expected numeric level, the level legend, normalized probabilities, and confidence: { "type": "score", "score": 2.6653, "legend": { "0": "Not urgent", "1": "Normal", "2": "Urgent", "3": "Critical" }, "probabilities": { "0": 0.0061, "1": 0.0361, "2": 0.2443, "3": 0.7135 }, "confidence": 0.618 } Look at that score output for a second. You don't get "this is critical." You get 2.6653 — a distribution leaning hard on Critical but with real mass on Urgent. That's a number your routing code can threshold on, log, and A/B test. It's the difference between an LLM that says it's confident and a distribution you can actually calibrate against. One constraint: Hmm is trained with 26 option letters. Larger option sets are handled by splitting them into groups of 25 and adding a none_of_these option to each group, matching the reference Hmm server strategy. 3.7 Does it actually run? Yes — the README reports the generated model executed directly on an Apple Silicon CPU with ONNX Runtime. A 4B hybrid-architecture model, converted from GGUF, running typed decisions on a laptop CPU with no service dependency. 4. What I'd tell a room of developers The System One idea is portable even where the model isn't. You can't run Jev locally, but the shape — state in, typed decisions with probabilities out — is something you can prototype today with an open model and an ONNX graph. As TypeSafe puts it, structured outputs "slot into ordinary software as fuzzy decision rules: classify, route, score, extract, or branch where hand-written logic is too brittle." That's a pattern, not a product. Probabilities are the actual product. The reason this class of model matters isn't speed alone. TypeSafe's argument is sharp: "If a model can do a task 95% of the time but doesn't say when it's in the 5%, it can't automate that task." Every engineer who has shipped an LLM feature has felt that exact wall. Set expectations honestly. JevONNX is an educational reproduction. It gives you noul/choice/score on a local CPU. It does not give you Jev's calibration, parallel sampler, or type-safety guarantees — and the project says so in its own README. Ship that caveat with your demo. Mobius is the infrastructure bet worth learning. When a new architecture shows up — hybrid attention, a novel MoE routing scheme, a three-model multimodal export — the question stops being "will the exporter support it?" and becomes "which components do I compose?" That is a much better question to be asking. Links Mobius — https://github.com/onnxruntime/mobius (docs: https://onnxruntime.github.io/mobius/) ONNX Runtime GenAI Model Builder — https://github.com/microsoft/onnxruntime-genai/tree/main/src/python/py/models JevONNX sample — https://github.com/kinfey/JevONNX Introducing System One Models & Jev — https://typesafe.ai/blog/introducing-system-one-models-and-jev Hugging face - https://huggingface.co/lokinfey/Qwen3_5_4B_Hmm_ONNX1.1KViews1like0CommentsIntroducing Inside Microsoft Foundry: Quickstart 🎬
Discover Inside Microsoft Foundry: Quickstart, a new video series for developers building AI agents. Starting with "What does it really take to ship an AI agent?", the series explores real-world challenges such as model selection, grounding agents in data, evaluation, deployment, observability, and governance. Follow along as we show how the Microsoft Foundry ecosystem helps developers move from prototype to production, with new episodes released in the coming weeks.Distributing Agents to Microsoft Teams and Microsoft 365 Copilot Part 4/5
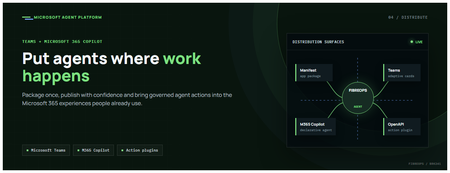
This is the fourth post in our series on the Microsoft agent platform. We cover the Distribute in M365 pillar — publishing your agents to Microsoft Teams and Microsoft 365 Copilot so they reach users where they already work. All examples reference the FibreOps repository, demonstrated at Microsoft Build BRK241. The Distribution Story Building a great agent is only half the challenge. The other half is getting it into the hands of users without asking them to learn a new tool, visit a new URL, or change their workflow. Microsoft 365 Copilot and Microsoft Teams are where enterprise users already spend their day, making them the natural distribution surface for agents. With the GA release, publishing an agent to Teams and M365 Copilot is a single command. No separate app registration portal, no manual manifest assembly, no multi-step approval workflow for development and testing. Publishing to Microsoft 365 Copilot (GA) FibreOps ships as a declarative agent + action plugin ready for sideload. A single CLI command produces the complete package: python -m fibreops.demo publish-m365 --out dist/m365 # Output: # ✓ wrote dist/m365/declarativeAgent.json # ✓ wrote dist/m365/fibreops-action.json # ✓ wrote dist/m365/manifest.json # ✓ wrote dist/m365/color.png (192x192) # ✓ wrote dist/m365/outline.png ( 32x32) # ✓ wrote dist/m365/fibreops-copilot.zip What Gets Generated File Purpose declarativeAgent.json Defines the agent's persona, capabilities, and conversation starters for M365 Copilot fibreops-action.json Action plugin that proxies tool calls to the deployed FastAPI backend via OpenAPI manifest.json Teams app manifest with publisher metadata, permissions, and capabilities color.png / outline.png App icons for Teams and M365 surfaces fibreops-copilot.zip Ready-to-upload package for Teams Admin Center Configuration Set the base URL to your deployed FastAPI app before publishing — the action plugin uses this to resolve the OpenAPI runtime: # Set the public HTTPS hostname of the deployed FastAPI app $env:M365_ACTION_BASE_URL = "https://fibreops-demo.azurewebsites.net" # Optional: customise publisher metadata $env:M365_PUBLISHER_NAME = "Contoso Network Operations" $env:M365_PUBLISHER_WEBSITE = "https://contoso.com/noc" # Generate the package python -m fibreops.demo publish-m365 --out dist/m365 Environment Variable Purpose M365_ACTION_BASE_URL Public HTTPS root for the FastAPI /openapi.json (e.g., Container Apps FQDN) M365_APP_ID Override the generated Teams app GUID (default: deterministic per repo) M365_PUBLISHER_NAME Publisher name shown in M365 Admin Center M365_PUBLISHER_WEBSITE Publisher website link Uploading the Package Upload the generated fibreops-copilot.zip through either path: Teams Admin Center → Manage apps → Upload new app M365 Admin Center → Integrated apps → Upload custom apps Once uploaded, the declarative agent: Inherits the publisher metadata you configured Advertises conversation starters from the FibreOps deck (e.g., "What is the current outage status?", "Dispatch an engineer to FN-LDN-001") Proxies tool calls to the deployed FastAPI app via the action plugin Appears in Microsoft 365 Copilot as a specialised agent users can invoke How Declarative Agents Work A declarative agent in Microsoft 365 Copilot is defined by metadata rather than code running in the M365 surface. The intelligence lives in your backend — Copilot handles the conversational UX, tool orchestration schema, and user authentication. The flow: User invokes the agent in Microsoft 365 Copilot or Teams Copilot renders conversation starters and accepts natural language input When the agent needs to act, Copilot calls the action plugin (your OpenAPI endpoint) Your FastAPI backend processes the request using the full agent pipeline Results return to the user in the Copilot/Teams UX This architecture means your agent logic stays in one place — the backend. The M365 surface is purely a distribution and interaction layer. Action Plugins and OpenAPI The action plugin ( fibreops-action.json ) references your FastAPI app's /openapi.json endpoint. FibreOps exposes a JSON API that the action plugin can call: /api/runs — List and query agent runs /api/optimiser — Get optimizer scores and suggestions /sdk/chat — Natural language interaction with the agent system /healthz — Liveness probe Because FastAPI auto-generates OpenAPI schemas from your typed Python endpoints, the action plugin gets accurate parameter descriptions, response schemas, and error codes without any manual specification work. Publishing as Autopilots (Public Preview) Autopilots take distribution one step further — agents that operate autonomously without requiring a user to initiate each interaction. An Autopilot can: React to events (e.g., a critical telemetry signal) without human initiation Take actions within defined guardrails Notify users only when human intervention is needed Operate continuously across Microsoft 365 surfaces For FibreOps, an Autopilot would monitor the Event Hub stream continuously and only surface to the NOC team when an incident exceeds automated resolution capability — a fully autonomous operations agent. Teams Adaptive Cards FibreOps posts rich Adaptive Card notifications to Microsoft Teams throughout the agent pipeline. This is separate from the declarative agent — it is a push notification channel for real-time operational awareness. # The NetOps agent posts an outage notice via Incoming Webhook def post_outage_notice(incident_id, node_id, severity, summary, engineer=None): card = { "type": "AdaptiveCard", "body": [ {"type": "TextBlock", "text": f"🚨 Outage: {node_id}", "weight": "Bolder", "size": "Large"}, {"type": "FactSet", "facts": [ {"title": "Severity", "value": severity.upper()}, {"title": "Incident", "value": incident_id}, {"title": "Summary", "value": summary}, ]}, ], "actions": [ {"type": "Action.OpenUrl", "title": "View in NOC Console", "url": f"{base_url}/runs/{incident_id}"} ] } # POST to Teams webhook or append to outbox for offline mode ... If TEAMS_WEBHOOK_URL is not configured, cards are appended to state/teams_outbox.jsonl for review in the NOC console's Teams panel. End-to-End: From Code to Copilot Here is the complete flow from development to distribution: Build — Develop agents with Microsoft Agent Framework, test locally with python -m fibreops.demo --backend local Publish agents — python -m fibreops.demo publish creates hosted Prompt Agents in Foundry Deploy infrastructure — azd up provisions App Service, ACR, Event Hub, Key Vault, and Application Insights Deploy hosted agent — azd env set FIBREOPS_DEPLOY_HOSTED true && azd up Generate M365 package — python -m fibreops.demo publish-m365 --out dist/m365 Upload to Teams — Upload fibreops-copilot.zip via Teams Admin Center Users interact — The agent is now available in Microsoft 365 Copilot and Teams Security Considerations Managed Identity — The deployed app uses system-assigned managed identity for all Azure service access. No secrets in code. Least privilege — Each role grant is scoped to the minimum required (Event Hubs Data Owner, Key Vault Secrets User, AcrPull, Azure AI Developer). Authentication — The M365 Copilot surface handles user authentication; your backend receives authenticated requests. Guardrails — Autopilots operate within defined boundaries; human-in-the-loop escalation is built into the Routine and agent decision logic. Key Takeaways Publishing to Teams and M365 Copilot is GA — a single command generates the complete package. Declarative agents separate distribution (M365) from intelligence (your backend). Action plugins leverage your existing FastAPI OpenAPI schema — no manual specification needed. Autopilots (Public Preview) enable fully autonomous operation within guardrails. Adaptive Cards provide real-time push notifications alongside the conversational agent surface. The same backend serves the NOC console, the Copilot SDK, and the M365 declarative agent. Next Steps Explore the FibreOps repository — try python -m fibreops.demo publish-m365 Microsoft 365 Copilot extensibility documentation Next in this series: Voice Live and Observability for Production Agent SystemsBuilding Autonomous Agents with Microsoft Agent Framework and GitHub Copilot SDK Part 2/5
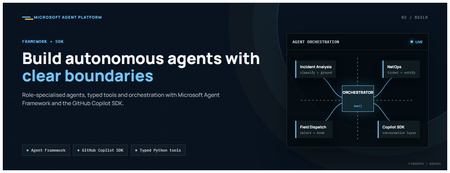
This is the second post in our series on the Microsoft agent platform. Here we dive deep into building autonomous agents, the development experience, the Microsoft Agent Framework, tool design patterns, and how the GitHub Copilot SDK brings conversational AI to your agent system. All examples reference the FibreOps repository, an autonomous fibre outage response system demonstrated at Microsoft Build BRK241. The Microsoft Agent Framework The Microsoft Agent Framework (now GA) provides a unified programming model for building agents. It supports multiple backends through a single .run() contract: Hosted — FoundryAgent connected to a Prompt Agent published to Microsoft Foundry Agent Service. Foundry — Agent + FoundryChatClient with the definition resolved locally (ideal for prompt iteration). Local — Deterministic LocalAgent for offline development and testing. This design means your orchestration code never changes regardless of where the agent runs. The factory pattern in FibreOps selects the backend at startup: # src/fibreops/agents/factory.py — simplified from agent_framework_foundry import FoundryAgent from agent_framework import Agent, FoundryChatClient def build_agent(role: str, backend: str, config: Config): if backend == "hosted": return FoundryAgent(agent_id=config.foundry_agents[role]) elif backend == "foundry": return Agent( instructions=get_instructions(role), chat_client=FoundryChatClient(endpoint=config.endpoint), tools=get_tools(role), ) else: return LocalAgent(role=role) Set FIBREOPS_AGENT_BACKEND to override the backend, or leave it as auto for intelligent detection. Designing Role-Specialised Agents FibreOps demonstrates a key pattern: role specialisation. Rather than one monolithic agent, the system uses three focused agents, each with a clear responsibility boundary: Agent Role Tools Available IncidentAnalysisAgent Classify severity, find root cause, retrieve SOP Knowledge (SOPs + topology), Web IQ, Work IQ NetOpsCoordinatorAgent File D365 incident, post Teams notice Ticketing, Teams, Memory FieldDispatchAgent Select engineer, book resource, update team Dispatch, Teams, Voice Why Role Specialisation? Focused system prompts — Each agent has a tightly scoped instruction set, reducing hallucination and improving reliability. Independent evaluation — You can score each agent separately against role-specific criteria. Parallel development — Teams can iterate on agents independently. Selective upgrade — Swap one agent's model or implementation without touching others. Tool Design: Typed Python Functions Tools in the Microsoft Agent Framework are typed Python functions that the runtime supplies to the hosted agent definition. FibreOps demonstrates several tool categories: Knowledge Tools # src/fibreops/tools/knowledge.py — simplified def sop_lookup(node_id: str, signal_type: str) -> dict: """Retrieve the Standard Operating Procedure for a given signal type. Args: node_id: The fibre node identifier (e.g., FN-LDN-001) signal_type: The type of signal (loss_of_light, high_ber, signal_degradation) Returns: SOP with steps, escalation path, and estimated resolution time. """ # Load from local markdown SOPs or Foundry IQ ... def web_iq_search(query: str, *, limit: int = 5) -> list[dict]: """Search public web for context relevant to the incident. Grounding against roadworks, weather, power outages, splice guidance. Falls back to deterministic fixtures when endpoint is unset. """ ... def work_iq_search(query: str, *, limit: int = 5) -> list[dict]: """Search enterprise knowledge for context relevant to the incident. Site surveys, SLA tiers, competency matrix, MTTR trends. """ ... Integration Tools # src/fibreops/tools/teams.py — simplified def post_outage_notice( incident_id: str, node_id: str, severity: str, summary: str, engineer: str | None = None, ) -> dict: """Post an Adaptive Card outage notice to the configured Teams channel. If TEAMS_WEBHOOK_URL is not set, appends to state/teams_outbox.jsonl for offline review. """ card = build_adaptive_card(incident_id, node_id, severity, summary, engineer) if config.teams_webhook_url: requests.post(config.teams_webhook_url, json=card) else: append_to_outbox(card) return {"status": "posted", "incident_id": incident_id} Design Principles for Agent Tools Typed parameters with docstrings — The runtime uses type hints and docstrings to generate the tool schema for the LLM. Graceful degradation — Every tool works offline by falling back to local fixtures or file-based state. Idempotent where possible — Tools that create resources return existing records if called with the same parameters. Observable — Every tool invocation emits an OpenTelemetry span for tracing and debugging. The Orchestrator Pattern The orchestrator drives signals through the agent pipeline. It is deliberately simple — a linear flow with error handling: # src/fibreops/orchestrator.py — simplified async def handle_signal(signal: TelemetrySignal) -> RunResult: """Process a telemetry signal through the agent pipeline.""" # Stage 1: Incident Analysis analysis = await incident_agent.run( f"Analyse this signal: {signal.model_dump_json()}" ) # Stage 2: NetOps Coordination coordination = await netops_agent.run( f"Coordinate response for: {analysis.summary}" ) # Stage 3: Field Dispatch dispatch = await dispatch_agent.run( f"Dispatch engineer for incident: {coordination.incident_id}" ) return RunResult( signal=signal, analysis=analysis, coordination=coordination, dispatch=dispatch, ) The orchestrator honours the same contract regardless of backend — hosted , foundry , or local — because all backends implement await agent.run(prompt) . GitHub Copilot SDK Integration (GA) The GitHub Copilot SDK enables conversational interaction with your agent system. FibreOps implements FibreOpsCopilotClient with the same interface as github/copilot-sdk : # src/fibreops/sdk/__init__.py — simplified from fibreops.sdk.client import FibreOpsCopilotClient client = FibreOpsCopilotClient() session = client.create_session() # Query agent status response = session.send_and_wait("status") print(response.text) # Human-readable summary print(response.data) # Structured JSON # Inject a telemetry signal via conversation response = session.send_and_wait(json.dumps({ "signal_id": "sig-demo", "node_id": "FN-LDN-001", "signal_type": "loss_of_light", "severity": "critical" })) The adapter routes prompts by shape: JSON signal-shaped dicts — Forwarded to the orchestrator for processing. Free-form text — Answered by a deterministic responder ( help , status , nodes , engineers , optimiser , dispatch ). Drive it from the terminal: python -m fibreops.demo chat "help" python -m fibreops.demo chat "status" python -m fibreops.demo chat '{"signal_id":"sig-demo","node_id":"FN-LDN-001","signal_type":"loss_of_light","severity":"critical"}' Or hit the embedded HTTP endpoint when the NOC console is running: Invoke-RestMethod -Method Post http://127.0.0.1:8800/sdk/chat -Body '{"prompt":"status"}' -ContentType application/json Development Workflow with Foundry Toolkit for VS Code The Foundry Toolkit for VS Code provides an integrated development experience: Author prompts — Edit system instructions with live preview and token counting. Test locally — Run against the foundry backend with FoundryChatClient pointing at your development model. Iterate fast — The foundry backend resolves definitions locally, so prompt changes take effect immediately without republishing. Publish when ready — python -m fibreops.demo publish creates hosted Prompt Agents in Foundry. Multi-Model Support The Microsoft Agent Framework supports multiple models. FibreOps defaults to gpt-4.1-mini (the model available in most demo Foundry accounts), but any chat-completions deployment works: # .env AZURE_AI_MODEL_DEPLOYMENT=gpt-4.1-mini # or gpt-4o-mini, gpt-4o, gpt-4.1 The framework also supports Claude Code connectors and Magentic-One for multi-agent collaboration scenarios. Testing Strategy FibreOps demonstrates a layered testing approach: Unit tests — Test tools in isolation with mocked dependencies. Local backend tests — Run the full pipeline with LocalAgent for deterministic assertions. Integration tests — Run against real Foundry agents with pytest -q . Rubric evaluation — The optimizer scores every run against defined criteria. # Run the test suite .\.venv\Scripts\python.exe -m pytest -q Key Takeaways The Microsoft Agent Framework provides a unified .run() contract across hosted, foundry, and local backends. Role specialisation keeps agents focused, testable, and independently evolvable. Tools are typed Python functions with docstrings — the runtime generates schemas automatically. The GitHub Copilot SDK (GA) enables conversational interaction with any agent system. Graceful degradation means the entire system works offline for development. The factory pattern lets you switch backends without changing orchestration code. Next Steps Clone the FibreOps repository and run python -m fibreops.demo --signals 3 Microsoft Agent Framework documentation Next in this series: Running Hosted Agents in Microsoft Foundry Agent Service
Vector search finds candidates. Reranking decides what your RAG app reads
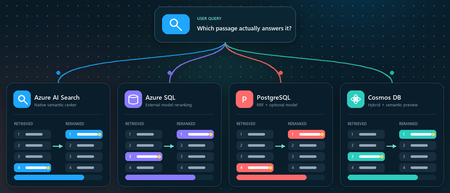
You ask a retrieval-augmented generation (RAG) application a question. Vector search returns ten passages that are clearly related to the topic. The passage that actually contains the answer, however, is ranked seventh, while the language model receives only the first five. Retrieval did not completely fail. It found the evidence, but ordered it below less useful context. Reranking addresses that gap between a passage that is semantically similar and a passage that is relevant to the user's specific question. This article demonstrates that pattern in four Azure services using the Stanford Question Answering Dataset (SQuAD). The goal is not to declare a winning service or publish a quality benchmark. It is to show where retrieval, rank fusion, and model-based reranking run in each architecture, and to illustrate how the position of a known source passage can change. What this demonstration establishes The examples show rank movement for three selected questions. They do not establish that one reranker or service is universally more accurate. A production decision requires a larger, representative query set and aggregate relevance, latency, and cost measurements. Get the full Python implementation: pauldj54/azure-vector-reranking-squad Retrieval and reranking are different stages A production search pipeline commonly uses two stages: Retrieve for recall. Fast retrieval narrows a large corpus to a bounded candidate set. It can use vector search, keyword search, or both. Rerank for precision. A more expensive model evaluates only those candidates against the original query and produces the final order. Reciprocal Rank Fusion (RRF) belongs between those two ideas. RRF is a model-free rank aggregation method that merges independent result lists, usually vector and keyword results. For a document d, a typical score is: RRF(d) = ∑ r ∈ R 1 k + rank r (d) Here, R is the set of ranked lists and k is commonly 60. RRF works with positions rather than raw scores, so it can combine signals such as cosine distance and BM25 without pretending their score scales are comparable. This gives a clearer three-part vocabulary: Stage Purpose Typical mechanism Retrieve Find broad candidate set Vector search, BM25, filters Fuse Combine independent rankings RRF Rerank Reassess query-document relevance Semantic ranker or cross-encoder RRF often improves hybrid retrieval when exact names, dates, identifiers, or terms matter. A learned reranker can then read the query and each candidate together, capturing interactions that separately generated embeddings can miss. The learned stage costs more, so it should operate on tens of candidates rather than the whole corpus. The following image describes the general process: Why use SQuAD for this demonstration? SQuAD 1.1 contains crowd-written questions over more than 500 Wikipedia articles. Its packaged splits contain 87,599 training rows and 10,570 validation rows. Each row includes a question, a context passage, and one or more answer spans inside that passage. That source-context mapping gives this demonstration a useful label: the context associated with a question is treated as its gold passage. We can then inspect whether each search stage moves that passage up or down. This is convenient, but it is not a perfect passage-ranking benchmark. SQuAD was designed for extractive question answering, and another passage in the corpus might also answer a question. The gold context is therefore a reproducible reference, not proof that every other passage is irrelevant. The results shown here use the 2,067 unique contexts in the SQuAD validation split and 1,536-dimensional embeddings. The repository default should be set to the same corpus size before treating the screenshots or rank transitions as directly reproducible. Three illustrative questions Question Expected answer Gold context According to game stats, which Super Bowl 50 quarterback had his worst year since his first NFL season? Peyton Manning 12, Super Bowl 50 What else did Tesla do for work at this time? Various electrical repair jobs 165, Nikola Tesla Who acts as laborer, paymaster, and design team for a renovation project? The property owner 1306, Construction Each notebook selects a seeded demonstration question when it runs. The three saved examples were collected across separate runs; the current notebooks do not execute all three questions in one pass. A benchmark harness should iterate over a fixed question list and save all stage results in one structured output. Capability boundaries at a glance Service Retrieval and Fusion Learned Reranking Boundary to Keep in Mind Azure AI Search Native keyword and vector retrieval with native RRF Built-in semantic ranker Semantic ranking only reorders the retrieved top 50 Azure SQL Database Exact vector retrieval in the current notebook External Cohere model invoked through native REST procedure SQL issues the HTTPS request; Foundry performs inference PostgreSQL Flexible Server pgvector plus hand-written SQL RRF over full-text search Optional external Cohere call from Python Retrieval primitives are native; this RRF query and Cohere path are application code Azure Cosmos DB for NoSQL Native vector search and native hybrid RRF SDK-integrated Semantic Reranker, currently preview Reranking is a separate inference call over at most 50 supplied documents Azure AI Search: native hybrid retrieval and semantic ranking How it works: Azure AI Search provides the most integrated pipeline in this demonstration. A hybrid query runs keyword and vector retrieval, combines the lists with RRF, and passes up to the top 50 results to the built-in semantic ranker. The semantic ranker assigns @search.rerankerScore values from 0 to 4 and can return extractive captions and answers. The semantic configuration identifies the fields that carry the meaning of each document: semantic_search = SemanticSearch( configurations=[ SemanticConfiguration( name=SEMANTIC_CONFIG, prioritized_fields=SemanticPrioritizedFields( title_field=SemanticField(field_name="title"), content_fields=[SemanticField(field_name="content")], ), ) ] ) This tells the semantic ranker which text fields to evaluate. The query then enables semantic ranking after hybrid retrieval: results = search_client.search( search_text=question, vector_queries=[vector_query], query_type="semantic", semantic_configuration_name=SEMANTIC_CONFIG, top=10, ) The important constraint is candidate recall. Semantic ranking does not search the corpus again. If the correct passage is absent from the hybrid top 50, the semantic stage cannot recover it. See 01_azure_ai_search_reranking.ipynb for the complete setup and query path. Test results for Azure AI Search These examples show that semantic reranking improves relevance selectively, not universally. It strongly helps the construction query, moving the correct passage from rank 4 to rank 1, but slightly degrades the Super Bowl and Tesla queries by one position. This reinforces that semantic ranking should be evaluated across a representative query set using aggregate metrics such as MRR or NDCG, rather than judged from a single result. Azure SQL Database: vector retrieval plus external Cohere reranking How it works. The Azure SQL notebook retrieves 20 candidates with exact cosine distance and sends their text to Cohere Rerank v4.0 Fast through sys.sp_invoke_external_rest_endpoint. The vector column and query vector must have the same dimensions. This repository uses 1,536-dimensional embeddings: SELECT TOP (@ candidate_count) context_id, title, content, 1 - VECTOR_DISTANCE( 'cosine', CAST(@ query_vector AS VECTOR(1536)), embedding ) AS similarity FROM dbo.documents ORDER BY similarity DESC; For reranking, we selected Cohere Rerank v4.0 Fast (Cohere-rerank-v4.0-fast), a fast version of Cohere’s fourth-generation relevance-ranking model. The model is deployed in Microsoft Foundry, where its Azure Direct inference endpoint is available in the deployment details within the Foundry portal. Azure SQL can call REST APIs directly using sp_invoke_external_rest_endpoint. Because Azure SQL allowlists Azure AI’s *.cognitiveservices.azure.com domain, we translate the equivalent Foundry endpoint from *.services.ai.azure.com while preserving the Cohere reranking route. from urllib.parse import urlsplit, urlunsplit def sql_compatible_endpoint(endpoint: str) -> str: """Convert an Azure Direct endpoint to Azure SQL's allowed hostname.""" parts = urlsplit(endpoint) if parts.hostname.endswith(".services.ai.azure.com"): resource = parts.hostname.removesuffix(".services.ai.azure.com") hostname = f"{resource}.cognitiveservices.azure.com" elif parts.hostname.endswith(".cognitiveservices.azure.com"): hostname = parts.hostname else: raise ValueError("Expected an Azure AI Services endpoint.") return urlunsplit( (parts.scheme, hostname, parts.path, parts.query, "") ) Then I defined a re-rank with cohere function, starting by loading the endpoint and setting the authentication: def rerank_with_cohere( cursor, question: str, candidates: list[dict], top_n: int = 10, ) -> list[dict]: """ Rerank candidate documents by calling Cohere through Azure SQL. Each candidate must contain a 'content' field. """ if not candidates: return [] sql_endpoint = sql_compatible_endpoint( os.environ["COHERE_RERANK_ENDPOINT"] ) model = os.environ["COHERE_RERANK_MODEL"] access_token = credential.get_token( "https://cognitiveservices.azure.com/.default" ).token headers = json.dumps({"Authorization": f"Bearer {access_token}"}) payload = json.dumps( { "model": model, "query": question, "documents": [row["content"] for row in candidates], "top_n": min(k, len(candidates)), }, ensure_ascii=False, ) cursor.execute( """ DECLARE @url NVARCHAR(4000) = CAST(? AS NVARCHAR(4000)); DECLARE @headers NVARCHAR(4000) = CAST(? AS NVARCHAR(4000)); DECLARE Payload NVARCHAR(MAX) = CAST(? AS NVARCHAR(MAX)); DECLARE Response NVARCHAR(MAX); DECLARE @status INT; EXEC @status = sys.sp_invoke_external_rest_endpoint @url = @url, @method = 'POST', @headers = @headers, Payload = Payload, @timeout = 60, @retry_count = 2, Response = Response OUTPUT; SELECT @status, Response; """, sql_endpoint, headers, payload, ) status, response_text = cursor.fetchone() if status != 0: raise RuntimeError(f"Reranker endpoint returned HTTP status {status}.") response = json.loads(response_text)["result"] You can see the complete implementation in the 02_azure_sql_reranking.ipynb notebook. Test results for Azure SQL Db Across the three sample questions, Cohere reranking consistently moved the correct SQuAD passage closer to the top: from rank 5 to 1 for the Super Bowl question, 3 to 2 for the Tesla question, and 8 to 1 for the construction question. These examples show how vector search provides a strong candidate set, while reranking applies deeper query-document relevance scoring to improve the final ordering. The results are illustrative rather than a complete quality benchmark, so broader evaluation across many queries is still recommended. Azure Database for PostgreSQL flexible server: pgvector, SQL RRF, and an optional model How it works: PostgreSQL makes the pipeline components explicit. The notebook uses pgvector for vector similarity, PostgreSQL full-text search for keyword retrieval, and SQL to implement RRF. Vector retrieval uses cosine distance: SELECT context_id, title, content, 1 - (embedding <= > % (query_vector) s:: vector) AS similarity FROM squad_docs ORDER BY embedding <= > % (query_vector) s:: vector LIMIT % (candidate_count) s; The hybrid query independently ranks vector and keyword hits, then combines positions rather than raw scores: SELECT d.context_id, COALESCE(1.0 / (60 + v.rank), 0) + COALESCE(1.0 / (60 + k.rank), 0) AS rrf_score FROM squad_docs AS d LEFT JOIN vector_hits AS v USING (context_id) LEFT JOIN keyword_hits AS k USING (context_id) WHERE v.context_id IS NOT NULL OR k.context_id IS NOT NULL ORDER BY rrf_score DESC; This is not a built-in PostgreSQL RRF operator. It is transparent, hand-written SQL over native retrieval primitives, which makes weighting and debugging flexible but leaves implementation and tuning with the application team. The notebook's optional learned stage sends the vector candidates from Python to a Foundry deployment of Cohere Rerank v4.0 Fast. This path was chosen because the tested Flexible Server azure_ai extension version expected the older serverless reranking endpoint contract. Microsoft documentation still describes azure_ai.rank() as a preview function whose default model is Cohere Rerank v3.5, even though that model retired on May 14, 2026. Treat this as a version-specific compatibility issue and verify current extension behavior before selecting an architecture. Azure HorizonDB is a different product path. Its AI Model Management feature can provision Cohere Rerank v4.0 Fast as default-reranker, but that management feature is currently a limited preview. It should not be described as a generally available Flexible Server capability. See 03_azure_postgres_reranking.ipynb for the full SQL and optional external model path. Test results for Azure SQL for PostgreSQL Flexible Server The tests show that PostgreSQL vector search provides a useful candidate set, SQL RRF can substantially improve results when keyword evidence is strong, and the Cohere semantic reranker is the most consistent overall: it moved the correct passage to rank 1 in two tests and from rank 3 to rank 2 in the Tesla test. RRF produced the biggest gain for the construction question, moving the correct passage from outside the vector top five to rank 1, but did not improve every query. The scores across stages are not directly comparable because cosine similarity, RRF score, and Cohere relevance use different scales. Azure Cosmos DB for NoSQL: hybrid search with built-in RRF How it works: Azure Cosmos DB for NoSQL supports native hybrid ranking with VectorDistance, FullTextScore, and RRF inside ORDER BY RANK: SELECT TOP K C.context_id, c.title, c.text FROM c ORDER BY RANK RRF( VectorDistance(c.vector, @query_vector), FullTextScore(c.text, @term1, @term2, @term3) ) The notebook extracts distinct terms from the question before building the full-text part of the query. That token selection is application logic and can materially affect the hybrid ranking, so production evaluation should test analyzers, languages, term extraction, and optional RRF weights. Cosmos DB Semantic Reranker is an SDK-integrated preview feature. The application first runs a query, serializes the resulting documents, and submits those documents with the user's context string: result = container.semantic_rerank( context=question, documents=documents, options={ "return_documents": False, "top_k": min(k, len(documents)), "sort": True, "document_type": "json", "target_paths": "title,text", }, ) The service accepts at most 50 documents per rerank call and returns relevance scores from 0 to 1, plus inference latency and token usage. It uses the Microsoft semantic ranking model also used by Azure AI Search. The reranking call requires Microsoft Entra authentication, the appropriate Semantic Reranker role, and an account-linked inference endpoint. The 04_azure_cosmosdb_reranking.ipynb in the shared repo contains and end-to-end implementation. Test results for Azure Cosmos Db The results show that vector search provides a strong baseline, while hybrid RRF and semantic reranking improve different queries in different ways. Hybrid RRF helps when exact keywords matter, moving the construction answer into the top results, while the semantic reranker delivers the strongest overall ordering, promoting the correct construction passage from hybrid rank 3 to rank 1 and improving the Super Bowl answer from rank 5 to rank 2. However, it does not always place the gold passage first, as seen in the Tesla example, confirming that reranking improves relevance but is query-dependent and should be evaluated across a larger test set. What the examples do and do not show The four services expose different ownership boundaries: • Azure AI Search owns hybrid fusion and learned semantic ranking inside the search service. • Azure SQL owns vector retrieval and outbound REST invocation in this example, while Foundry owns model inference. • PostgreSQL supplies vector and full-text primitives; the application owns the RRF SQL and optional Cohere call. • Cosmos DB provides native hybrid RRF and integrates a separate preview inference call through its SDK. Across three selected questions, the known source passage often moved substantially. That supports the practical value of testing a second-stage ranker. It does not prove that semantic reranking always improves top-1 accuracy, that RRF is universally beneficial, or that scores from different stages can be compared directly. Cosine similarity, RRF score, Azure AI Search reranker score, Cohere relevance, and Cosmos DB semantic relevance all have different definitions and scales. Compare rank positions and task-level metrics, not raw values across systems. Turn the demonstration into an evaluation For a production RAG system, convert the notebook pattern into a repeatable evaluation harness: Build a representative labeled query set from real user tasks. Freeze corpus, chunking, embedding model, dimensions, and candidate counts for each run. Record ranks after retrieval, fusion, and learned reranking. Measure Recall@k or Hit@k to verify that retrieval finds relevant evidence. Measure Mean Reciprocal Rank (MRR) when the position of the first relevant result matters. Use NDCG when judgments include multiple passages or graded relevance. Record latency percentiles, inference usage, request cost, and failure rates. Evaluate the generated answer separately for correctness, citation support, and refusal behavior. Also test the operational cases that a three-question demonstration cannot cover: empty keyword results, missing gold passages, long documents, multilingual text, filters, partial outages, token expiration, throttling, model retirement, and low-confidence scores. Practical guidance Retrieve broadly enough that the correct evidence can reach the learned stage. Use RRF when vector and keyword retrieval provide complementary signals. Rerank a bounded candidate set, commonly 20 to 50 passages, and measure the latency cost. Keep citations and source identifiers through every rank transformation. Version the corpus, embedding model, dimensions, query set, and reranker deployment. Do not hard-code assumptions about model endpoints or lifecycle dates. Verify current service documentation and the deployed extension or SDK version. Add thresholds or fallback behavior only after calibrating scores on your own data. Judge the full RAG chain. Better passage order is valuable only when it improves grounded answers for users. Vector search is built to find plausible candidates quickly. Rank fusion can reconcile retrieval signals, and a learned reranker can decide which candidates best address the question. The right architecture depends on where your data lives, which service boundaries you want to operate, and what your evaluation says about quality, latency, and cost. Resources Companion repository Azure AI Search semantic ranker Azure SQL VECTOR_DISTANCE Azure SQL sp_invoke_external_rest_endpoint Azure Database for PostgreSQL AI functions Microsoft Foundry model retirement schedule Azure Cosmos DB hybrid search Azure Cosmos DB Semantic Reranker SQuAD dataset card Dataset attribution Rajpurkar, P., Zhang, J., Lopyrev, K., and Liang, P. (2016). SQuAD: 100,000+ Questions for Machine Comprehension of Text. EMNLP 2016. SQuAD 1.1 is distributed under CC BY-SA 4.0.Building AI Agents from Zero to Production
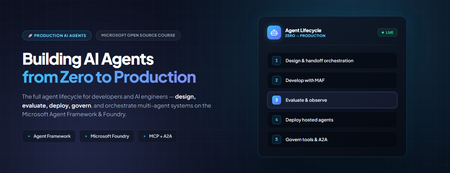
Building AI Agents from Zero to Production Most agent demos stop at "it answered my question." Production doesn't. The gap between a notebook that calls an LLM and a governed, observable, multi-agent system your organisation can actually depend on is where real engineering happens, evaluation, deployment, data sovereignty, tool governance, and cross-team interoperability. Microsoft's open-source course Building AI Agents from Zero to Production walks that entire arc in seven lessons, using one realistic use case and the Microsoft Agent Framework (MAF) plus Microsoft Foundry. This post is a developer-focused tour of what it teaches, the architecture decisions behind each stage, and the code patterns that matter when you move from prototype to production. Who this is for AI engineers building their first or first production, agent system. Backend and full-stack developers integrating agents into real applications and CI/CD. Cloud architects who need data sovereignty, private networking, and governance around agent workloads. Technical leads deciding how to standardise tools and orchestration across multiple teams. The samples are Python 3.12+, served through Microsoft Foundry using GPT-5 series models (for example gpt-5.1 ). Lesson 4 adds a TypeScript/React frontend. You will want an Azure subscription and the Azure CLI. The AI Agent Development Lifecycle The course is organised around a lifecycle rather than a feature list. Each lesson is a stage, and each stage assumes the previous one is solved: # Stage The production question it answers 1 Agent Design What should each agent do, and how do they hand off? 2 Agent Development How do I build and run them with the Agent Framework? 3 Agent Evaluations How do I know they actually work — and keep working? 4 Agent Deployment How do I ship one as a hosted service with a UI and CI gate? 5 Production Hosted Agents How do I meet enterprise data, network, and governance needs? 6 Microsoft Toolbox How do I govern tools once, and reuse them across teams? 7 Multi-Agent & A2A How do agents from different teams interoperate safely? The thread running through all seven is a single scenario: a Developer Onboarding agent system that helps a new hire find the right teammates, get a sensible first task, and pull learning resources and code snippets. It is deliberately mundane, which is exactly why it exposes the production concerns that flashy demos hide. Lesson 1 — Agent Design: three components, one graph The course defines an agent by three parts: an LLM for reasoning, tools to act, and memory to retain context. The design work is context engineering — making sure the right information reaches the model at the right moment, no more and no less. Rather than one monolithic assistant, the onboarding system is split into specialists coordinated by a triage agent using handoff orchestration: Agent Job Tool Employee Search Answer org and people questions Foundry file search over an employee-directory vector store Task Recommendation Suggest 1–3 GitHub issues for the new dev GitHub MCP Server (reads recent commits + open issues) Code Assistant Provide resources and runnable snippets Microsoft Learn MCP + Code Interpreter Architecturally this is a directed graph: User → Triage → [Employee, Learning, Coding] . Splitting responsibilities early pays off later, each agent gets a tightly scoped prompt (less hallucination), can be evaluated independently, and can be upgraded without touching its peers. Lesson 2 — Development: standalone agents with MAF Here the design becomes code. Each specialist is a small, independently runnable service built with the Microsoft Agent Framework, authenticated to Foundry with your Azure CLI login. Setup is deliberately boring: az login az account set --subscription "<your-subscription-id>" cp .env.example .env # Fill FOUNDRY_PROJECT_ENDPOINT and FOUNDRY_MODEL (e.g. gpt-5.1) # Create the employee-directory vector store once; note the printed VECTOR_STORE_ID python lesson-2-agent-development/setup_vector_store.py # Start an agent — serves on http://localhost:8090 python lesson-2-agent-development/employee-search-agent.py The FoundryChatClient auto-reads any FOUNDRY_ -prefixed environment variables and uses AzureCliCredential , so there are no keys in code. The lesson ships six samples, each on its own port, so you can chat with them individually in the local DevUI before wiring them together: Sample Tool Port employee-search-agent.py Foundry file search / vector store 8090 task-recommendation-agent.py GitHub MCP Server 8095 azure-learning-agent.py Microsoft Learn MCP 8092 coding-agent.py Code Interpreter 8093 learning-recommendation-agent.py Learn MCP + reasoning 8091 agent-orchestration.py Multi-agent handoff 8094 Why this matters: keeping each agent as its own process with its own port is a testability decision, not an accident. You can smoke-test one specialist in isolation, then compose them in agent-orchestration.py . Lesson 3 — Evaluation: you can't unit-test a probability distribution This is the lesson that separates a demo from a product. Agents are non-deterministic, so traditional assertions don't fit. The course uses three complementary layers: Observability / tracing — always on, via OpenTelemetry to Application Insights. Smoke tests — fast, run on every deploy. Evaluations — deeper, model-based scoring run on-demand or nightly. Turning on tracing is a single call: from agent_framework.foundry import FoundryChatClient client = FoundryChatClient() client.configure_azure_monitor() # export traces + metrics to Application Insights For quality it uses Foundry's built-in "LLM-as-a-judge" evaluators against real persisted responses (identified by response_id ), not freshly regenerated ones: Evaluator evaluator_name Measures Relevance builtin.relevance Does the response address the request? Groundedness builtin.groundedness Is it supported by retrieved data (no hallucination)? Tool-call accuracy builtin.tool_call_accuracy Were the right tools called with the right arguments? Tool-output utilization builtin.tool_output_utilization Did the agent actually use tool results? The judge model is set independently via AZURE_AI_MODEL_DEPLOYMENT_NAME , so you can evaluate a cheap production model with a stronger one. The run prints a report_url that deep-links into the Foundry portal. Lesson 4 — Deployment: a hosted agent, a UI, and a CI gate Now the agent becomes a managed service. It is deployed as a Foundry Hosted Agent a Microsoft-managed execution environment and fronted by an OpenAI ChatKit React UI talking to a FastAPI backend: ChatKit React (3000) → FastAPI backend (8001) → Foundry Hosted Agent → tools Building the agent is declarative attach tools, name it, serve it: agent = client.as_agent( name="DevOnboardingAgent", instructions="...", tools=[file_search_tool, learn_mcp_tool], ) # served with: from_agent_framework(agent).run() The recommended deploy path is the Azure Developer CLI: cd hosted-agent azd auth login azd agent deploy The genuinely production-minded part is the smoke test as a post-deploy CI gate. Six cases cover reachability, each scenario, off-topic prompt adherence, and multi-turn threading (verifying state via previous_response_id ). The GitHub Action runs them against the freshly deployed agent: export FOUNDRY_TOKEN=$(az account get-access-token \ --resource https://ai.azure.com/ --query accessToken -o tsv) python runner.py \ --project-endpoint "https://<account>.services.ai.azure.com/api/projects/<project>" \ --agent-name dev-onboarding \ --tests-file tests/smoke-tests.json Pitfall to remember: the token audience must be https://ai.azure.com/ . A cognitiveservices.azure.com token is rejected by the Responses API — a mistake that costs many engineers an afternoon. Lesson 5 — Production: separating where an agent runs from where its data lives The pivotal concept for enterprise readiness is the distinction between a Hosted Agent (compute, scaling, identity) and a Capability Host (where conversation history, files, and embeddings actually reside): Concern Hosted Agent Capability Host Compute / scaling / identity ✅ Provided — Conversation history Microsoft-managed default Redirect to your Azure Cosmos DB File uploads Microsoft-managed default Redirect to your Azure Storage Vector embeddings Microsoft-managed default Redirect to your Azure AI Search Required to run the agent? ✅ Yes ❌ Optional Required for data sovereignty? ❌ Not sufficient ✅ Yes "Basic" setup uses Microsoft-managed storage and is perfect for getting started. "Standard" setup redirects each data plane to your own Azure resources through a project-level capability host, this is how you keep customer data in your tenant, inside your network boundary: PUT .../accounts/{account}/projects/{project}/capabilityHosts/{name}?api-version=2025-06-01 { "properties": { "capabilityHostKind": "Agents", "threadStorageConnections": ["my-cosmosdb-connection"], "vectorStoreConnections": ["my-ai-search-connection"], "storageConnections": ["my-storage-connection"] } } Operational constraints worth internalising before you provision: there is one capability host per scope (a second attempt returns 409 Conflict ), configuration is immutable (delete and recreate to change it), deletion is destructive, and the account-level host must exist before the project-level one. Lesson 6 — Toolbox: govern tools once, reuse everywhere Left unchecked, every team re-implements the same tools, scatters credentials, and loses governance visibility. The Microsoft Foundry Toolbox solves this by exposing a curated, versioned set of tools behind a single MCP-compatible endpoint, with credentials held in Foundry connections rather than agent code. You build a toolbox version once: from azure.ai.projects.models import MCPTool, ToolboxSearchPreviewTool, WebSearchTool toolbox_version = project.toolboxes.create_toolbox_version( name="agent-tools", description="Web search + an MCP server + tool search", tools=[ WebSearchTool(), MCPTool( server_label="myserver", server_url="https://your-mcp-server.example.com", require_approval="never", project_connection_id="my-key-auth-connection", # credentials live in Foundry ), ToolboxSearchPreviewTool(), ], ) And every agent consumes it through one endpoint, no per-team tool code: from agent_framework import MCPStreamableHTTPTool mcp_tool = MCPStreamableHTTPTool( name="toolbox", url=TOOLBOX_ENDPOINT, # {project_endpoint}/toolboxes/{name}/mcp?api-version=v1 http_client=http_client, load_prompts=False, ) agent = chat_client.as_agent(name="my-toolbox-agent", instructions="...", tools=[mcp_tool]) Versioning is blue/green: create a new version, test it on its version-specific endpoint, then promote it to default and every consumer picks it up with zero code changes. A Guardrail (RAI) policy can be applied at the toolbox layer, independent of model-level content filters. Note the toolbox management APIs are currently preview; the portal or VS Code Foundry Toolkit are practical alternatives for creation today. Lesson 7 — Multi-Agent & A2A: agents as networked peers The final lesson contrasts two ways agents collaborate: Handoff / Workflow — in-process, same codebase, fastest, tightest coupling. Agent-to-Agent (A2A) — cross-process over an open protocol, so agents from different teams, orgs, or frameworks interoperate. A2A gives each agent a discoverable Agent Card at /.well-known/agent-card.json and a task lifecycle (submitted → working → completed/failed). The elegant part: A2AExecutor wraps an existing MAF agent with no changes to that agent's code. from agent_framework.a2a import A2AExecutor from a2a.server.apps import A2AStarletteApplication from a2a.server.tasks import InMemoryTaskStore agent_card = AgentCard( name="Coding Assistant", url="http://localhost:9000/", version="1.0.0", capabilities=AgentCapabilities(streaming=True), skills=[AgentSkill(id="generate-code", name="Generate code", tags=["code"])], ) request_handler = DefaultRequestHandler( agent_executor=A2AExecutor(agent), # wraps your existing MAF agent unchanged task_store=InMemoryTaskStore(), ) app = A2AStarletteApplication(agent_card=agent_card, http_handler=request_handler).build() Consuming a remote agent then looks exactly like calling a local one: from agent_framework.a2a import A2AAgent remote_agent = A2AAgent(name="remote-coding-assistant", url="http://localhost:9000") result = await remote_agent.run("Write a Python function that reverses a string.") Because an A2AAgent can be a participant inside a HandoffBuilder workflow, you can mix in-process routing with remote services in the same orchestration. For enterprise use, A2AAgent accepts an auth_interceptor for bearer tokens, and the Agent Card carries security_schemes . Responsible and secure by design Production readiness in this course is not just uptime, it is governance: Identity over keys — AzureCliCredential and managed identity throughout; no secrets in code. Least privilege — CI runners get a scoped Azure AI User role assignment on the specific project. Data sovereignty — capability hosts keep conversation history, files, and embeddings in your own Cosmos DB, Storage, and AI Search. Tool approval and guardrails — MCP approval_mode and toolbox-level RAI policy gate what agents can do. Grounded evaluation — groundedness and tool-utilization scoring catch hallucination and unused-tool behaviour before users do. Cost hygiene — the lessons create real Azure resources; delete the resource group when done: az group delete --name <rg> --yes --no-wait . Key takeaways Design as a graph of specialists. Handoff orchestration with tightly scoped agents beats one monolith on reliability and testability. One .run() contract, many backends. The Agent Framework keeps orchestration code stable from local dev to hosted production. Evaluate continuously. Tracing + smoke tests + model-based evaluators are three layers, not alternatives. Separate compute from data. Hosted Agents run the agent; Capability Hosts give you sovereignty — you need both for enterprise. Govern tools centrally. A versioned toolbox behind one MCP endpoint kills tool sprawl and credential duplication. Open protocols for interop. A2A lets agents cross team, org, and framework boundaries without rewrites. Get started Clone the repo (skip the 50+ translations for a faster download) and work through the lessons in order: git clone --filter=blob:none --sparse https://github.com/microsoft/Building-AI-Agents-From-Zero-To-Production.git cd Building-AI-Agents-From-Zero-To-Production git sparse-checkout set --no-cone '/*' '!translations' '!translated_images' References Building AI Agents from Zero to Production — course repo Microsoft Agent Framework Microsoft Foundry documentation Agent-to-Agent (A2A) protocol specification a2a-python SDK AI Agents for Beginners MCP for Beginners Microsoft Foundry DiscordToken Economics: The New FinOps for Agentic AI
In AI applications, tokens are now cost — and token economics deserves architectural attention For a long time, AI application design started with model capability: Can the model write code? Can it reason? Can it use tools? Can it handle long context? Those questions still matter, but in the age of agentic applications, they are no longer sufficient. The more important production question is this: How many tokens does the architecture burn to complete one useful task? A classic chat application often maps one user turn to one model call. An agentic system is different. One user goal can trigger planning, retrieval, tool selection, tool execution, result interpretation, reflection, repair, and summarization. The user sees one instruction; the system may execute dozens of model calls behind the scenes. Tokens are no longer just a measure of text length. They become a measure of system design, runtime behavior, developer workflow, and business cost. GitHub Copilot’s 2026 move to usage-based billing through GitHub AI Credits captures the industry shift clearly. Usage is now aligned with token consumption, including input, output, and cached tokens. That matters because Copilot has evolved from an in-editor assistant into an agentic platform that can handle long, multi-step coding sessions across repositories. In that world, a tiny prompt and a multi-hour autonomous coding workflow should not be treated as the same economic unit. Token economics is therefore not about telling developers to “write shorter prompts.” It is about designing systems where: useful context is preserved, while noise is removed; repeated context is cached or deduplicated; simple tasks do not pay for frontier models; short-term state is managed structurally instead of copied repeatedly; every model call is metered, comparable, and governed. In short: token economics is the practice of making agentic AI economically sustainable. Scenario thinking: GitHub Copilot billing, Copilot SDK, GPT-5.5, Anthropic, and MAI-Code Model The new GitHub Copilot billing model provides a useful framing for developers. Copilot is no longer only autocomplete. It is becoming a programmable agentic platform. It can use models, call tools, work across files, stream responses, and participate in long-running coding workflows. With the GitHub Copilot SDK, developers can embed that agentic runtime into their own applications, services, and developer tools. That is powerful, but it also changes the cost model. Once an agent loop becomes programmable, token cost also needs to become programmable. If a system can plan, call tools, edit files, retry, repair, and summarize, it also needs to meter, route, cache, compress, and evaluate. EvalAgentic gives this idea a concrete playground. The project groups models into cost and capability tiers: Tier Example models Example price / 1K tokens Typical use LARGE claude-opus-4.8, gpt-5.5 $0.030 Agents, code generation, multi-step reasoning MID gpt-5.4-mini $0.012 Dialogue, summarization, extraction TINY gpt-5-mini $0.001 Classification, keyword matching, rule-like tasks This tiering lets us reason about real scenarios: GPT-5.5-class models are valuable for hard reasoning and engineering workflows, but they should not be the default for every step. Using a frontier model for simple classification is like hiring a principal architect to label folders. Anthropic high-capability models can be excellent for complex reasoning and coding, but they benefit from routing discipline. Requirements analysis, test interpretation, deployment explanation, and code generation may not need the same model tier. MAI-Code Model-style coding models should be treated as specialized capability layers. Their value is not just “better code generation”; it is deciding when code-specialized intelligence should be invoked in a larger agent pipeline. The real question is not “Which model is the best?” It is: Which model is the most economical and reliable for this step of this workflow? Four engineering techniques for saving tokens Context Compression: turn long text into executable structure Implementation principle Context Compression converts long natural-language context into the structured information an agent actually needs. Business documents are often verbose: resumes, contracts, product manuals, requirements, and support logs contain narrative text, boilerplate, repeated explanations, and low-value context. The next agent step may only need a few fields. EvalAgentic demonstrates this with a long resume-like input that is compressed into a compact JSON object. Instead of injecting the full original text into every prompt, the system extracts key fields and dynamically injects only the data required by the current task. A practical compression pipeline includes: Redundancy detection — identify long-tail text, repeated descriptions, stale history, and low-value context. Structured extraction — use Copilot or a mid-tier model to transform prose into JSON, tables, or typed schemas. Dynamic injection — inject only the fields needed for the next step. Recoverable references — preserve source pointers so compressed context remains auditable. How to evaluate Prompt token reduction before and after compression. Answer quality and task success rate. Schema fidelity and missing-field rate. Latency improvement. Cost per successful task. Compression is not summarization. Summaries are designed for humans. Structured compression is designed for agents. Prompt Deduplication / Cache: stop paying twice for the same context Implementation principle Many agent systems waste tokens because they repeatedly send the same context. The same resume, contract, repository README, user profile, API documentation, or business rule can be copied across turns and agents. Prompt Deduplication / Cache applies a simple principle: if context has already been processed, do not pay to process it again unless it has changed. A concrete design includes: compute a hash or semantic key for source context; reuse extracted structured results when content is identical or equivalent; apply a TTL for repeated entities, such as the 24-hour cache pattern shown in EvalAgentic; organize stable prompt prefixes to benefit from provider-level prompt caching where available; store shared context in an artifact store or memory layer so multiple agents do not copy the same blob. How to evaluate Cache hit rate. Cached token ratio. Duplicate prompt rate. Cost delta before and after caching. Correctness under cache, especially stale-cache failures. Caching is not “save everything forever.” Good caching knows when to reuse and when to invalidate. On-Demand Model Routing: let task complexity decide model tier Implementation principle On-Demand Model Routing routes each request to the cheapest model that can complete the task reliably. The entry point can use a rule tree, a lightweight classifier, or a hybrid complexity score. EvalAgentic’s routing tree is intentionally easy to explain: INCOMING REQUEST └─ Prompt < 500 tokens? ── YES ─→ TINY: classify / extract └─ NO ──→ multi-step reasoning? ├─ NO ─→ MID: dialogue / summary └─ YES ─→ LARGE: agent / code The engineering logic is straightforward: simple classification and keyword matching go to TINY; summarization and structured conversion go to MID; multi-step reasoning, coding, cross-file changes, and orchestration go to LARGE; code-specialized models such as MAI-Code Model can be placed in the coding phase rather than used across the whole pipeline. How to evaluate Routing accuracy. Cost per route. Quality regression by tier. Escalation rate from small models to larger models. End-to-end success rate. Routing does not mean “always use the smallest model.” It means frontier intelligence is reserved for the steps where it actually changes the outcome. Short-term Memory: preserve state instead of replaying history Implementation principle Short-term Memory controls context growth across multi-turn and multi-agent workflows. Without it, agents often replay the full conversation history, full tool outputs, and full intermediate reasoning on every turn. The context grows; quality may not improve; the bill definitely does. A better design stores state structurally: user goal; current plan; tool outputs and references; failure reasons; next actions; handoff artifacts between agents. In a multi-agent coding pipeline, the Requirements Agent should hand off a structured spec. The Coding Agent should read that spec, not the entire prior conversation. The Testing Agent should consume testable artifacts, not every word produced by the Coding Agent. How to evaluate Context growth curve across turns. Memory retrieval precision. Rework rate caused by missing state. Recovery quality after failed steps. Average input tokens per turn. Short-term memory is not about remembering everything. It is about remembering the next useful thing. EvalAgentic as a concrete evaluation example EvalAgentic is effective as an evangelism project because it turns token economics into an observable before/after system. The architecture has five layers: Frontend — frontend/index.html provides Tabs A / B / C, live SSE logs, and before/after charts. API — backend/server.py exposes FastAPI routes and Server-Sent Events streaming. Orchestration — eval.py handles A/B evaluation; coding_agents.py handles the multi-agent coding scenario. Core — compressor.py, router.py, gh_models.py, and token_meter.py implement compression, routing, Copilot SDK calls, and token metering. Providers — GitHub Copilot SDK and Microsoft Agent Framework provide model access and agent orchestration. Tab A: Compression comparison Tab A compares long-form context before and after structured compression. The key message is that token saving does not come from writing a clever sentence. It comes from converting verbose context into a structured artifact that downstream agents can consume efficiently. Tab B: On-demand model routing Tab B demonstrates that cost is not only about raw token count. If a system routes simple tasks to cheaper tiers and reserves expensive models for complex reasoning, total cost can fall even if some token counts increase. This is a subtle but important point: token economics is not token starvation; it is model portfolio optimization. Tab C: Coding scenario — multi-agent with Agent Framework Tab C is the most persuasive demo. The same deliverable — a Taobao-like goods-list site with HTML + JavaScript frontend, Flask backend, and Docker deployment — is produced twice by a four-agent pipeline: Requirements Agent; Coding Agent; Testing Agent; Deployment Agent. The before pipeline uses no compression and sends every agent to GPT-5.5 / LARGE. The after pipeline injects a compressed JSON spec and uses on-demand routing: requirements can use MID, coding can use LARGE, testing can use MID, and deployment can use TINY. This mirrors real enterprise development. Architecture and complex code generation may deserve frontier models. Test interpretation, deployment packaging, and simple validation often do not. Summary and refinement based on the project diagrams The EvalAgentic README describes three important visuals: the architecture flow, the routing tree, and the token-meter design. Together, they form a governance loop: User Scenario ↓ Context Compression ↓ Prompt Deduplication / Cache ↓ On-Demand Model Routing ↓ Short-term Memory ↓ Token Metering & Budget Actions ↓ Before / After Evaluation Optimize the path, not only the prompt Many teams start token optimization by editing prompt wording. That helps, but the largest waste usually lives in the execution path: how many calls are made, how much context is repeated, how often tools retry, and whether every step uses the same expensive model. EvalAgentic makes the path visible through A/B comparisons. Token Meter is the control plane of cost governance EvalAgentic’s token_meter.py uses a non-invasive interceptor pattern: INTERCEPTOR (@token_meter) ↓ COUNTER CORE: accounting / budget threshold / trigger ↓ ACTION HUB: throttle (>80% budget) / rollback (>budget) This is the right architectural instinct. Production systems need thresholds, throttling, rollback, and traceability. Without those controls, one retry loop can quietly turn a small user request into a budget incident. Cost metrics must be evaluated with quality metrics A system that cuts cost by 80% but drops success rate by 50% is not optimized. It is broken more cheaply. The evaluation matrix should combine cost, quality, latency, and reliability: Dimension Metric Why it matters Cost Cost per successful task Measures the real unit economics Token Input / output / cached tokens Identifies compression and cache opportunities Quality Pass rate / regression rate Ensures cheaper tiers do not break outcomes Efficiency Latency / retry count Prevents cheap models from causing expensive retries Governance Budget breach / rollback count Validates runtime control Narrative A simple three-line narrative works well for demos: Token is no longer a technical detail. It is the bill of your architecture. EvalAgentic shows the same scenario before and after cost-aware design. The goal is not to make models cheaper; the goal is to make agent systems economically governable. For a developer audience, the sharper version is: A good agent does not use the biggest model everywhere. It uses the right intelligence at the right step, with the right context, under the right budget. Practical recommendations for real projects Establish a token baseline first. Measure input, output, retries, tool calls, and cost per scenario before optimizing. Make compression a component, not a prompt habit. Define schemas, cache policies, and fallback behavior. Introduce a model routing matrix. Route by task type, complexity, risk, latency, and cost. Define handoff contracts between agents. Pass structured artifacts, not endless conversation history. Evaluate every optimization with A/B tests. Compare cost, quality, latency, and stability. Add budget actions. Throttle at a threshold, rollback on breach, and add circuit breakers for failed retries. Closing: token economics is the second curve of agent engineering The first phase of AI application development was about calling models. The second phase was about putting models into products. The next phase of agentic AI is about running those systems reliably, affordably, and governably. EvalAgentic matters because it turns Context Compression, Prompt Deduplication / Cache, On-Demand Model Routing, and Short-term Memory into something developers can run, compare, and explain. It moves token economics from opinion to instrumentation. Future AI applications will not only ask: How smart is this agent? They will ask: How many tokens does it spend per completed task? Which model did it use? Did it hit cache? Did retries run away? Did the system reserve frontier intelligence for the steps that deserved it? References kinfey/EvalAgentic GitHub Copilot is moving to usage-based billing Updates to GitHub Copilot billing and plans Copilot SDK - GitHub Docs8.3KViews4likes0CommentsMCP Server Authorization with Azure API Management: From Simple to Advanced
Why put API Management in front of your MCP servers The Model Context Protocol (MCP) has quickly become the standard way for AI agents, such as GitHub Copilot in VS Code, to reach external tools and data. As soon as an MCP server does anything meaningful, the same questions that govern any API resurface: who is allowed to call it, what are they allowed to do, and how do you enforce that consistently across many servers without rewriting each one. Azure API Management (APIM) answers those questions for MCP. It sits between the MCP client and the tool backend and applies the controls you already trust for REST APIs: identity validation, OAuth, rate limiting, IP filtering, and observability. Crucially, APIM speaks the MCP authorization specification, which is built on OAuth 2.1 and Protected Resource Metadata (PRM, RFC 9728). That means APIM can do more than block bad requests. It can actively drive an interactive sign-in from the IDE, so the user logs in with their own identity and the agent acts on their behalf. This article walks through a progression of authorization scenarios, each one building on the last: The simple case: validate a token and block everything else. Triggering an interactive sign-in from VS Code for an MCP server that APIM hosts from your own APIs. Going beyond "is this a tenant user" to "does this user have the right attribute" with Entra app roles. Fronting an existing external MCP server and letting it drive its own OAuth flow (GitHub as the example). Governing which tools of an existing MCP server an agent is actually allowed to invoke. APIM MCP capabilities and the basic authorization options API Management exposes MCP servers in two distinct ways, and the authorization story differs slightly for each. Expose a REST API as an MCP server. APIM takes an API it already manages and projects selected operations as MCP tools. You own the operations, so you choose exactly which ones become tools at configuration time. This is the right mode when the capability you want to expose is an API you control. Expose an existing MCP server (passthrough). APIM fronts a remote MCP-compatible server (LangChain, an Azure Function, GitHub's remote MCP server, your own container) and relays the MCP protocol to it. APIM governs access, but the upstream server still owns its tool catalog. On top of either mode, you have a spectrum of authorization options: Subscription keys for simple, machine-to-machine access where a shared secret in a header is acceptable. Token validation with Microsoft Entra ID, where APIM acts as the protected resource and verifies a bearer token on every call. Interactive OAuth 2.1 sign-in, where APIM advertises Protected Resource Metadata so an MCP client can discover the authorization server, log the user in, and retry with a user token. Authorization passthrough, where an external MCP server presents its own authorization challenge and APIM relays it faithfully so the client authenticates directly against the upstream's identity provider. The rest of the article works through these options in increasing order of capability. The example setup The walkthroughs in the first three scenarios all use the same backend so you can reproduce them without standing up anything of your own: the publicly available Star Wars API at Star Wars API. It is a simple, read-friendly REST API (characters, films, planets, starships, and so on) imported into API Management as a normal API and then projected as an MCP server. The reason this single API is enough to illustrate the whole progression is that, in API Management, one underlying API can back several independent MCP servers, each exposing a different slice of its operations. For example, you can create: A read-only MCP server that exposes only the GET operations, for agents that should be able to query data but never change it. A write-capable MCP server that exposes the POST, PUT, or DELETE operations, for trusted automation that is allowed to mutate state. Same backend API, two MCP servers, two different tool surfaces. Each of these servers is an independent resource in APIM, so each one can carry its own authorization. Both can require an authenticated user (Scenarios 1 and 2), and you can go further by protecting only the sensitive one: gate the write-capable server behind an Entra app role so that, even among authenticated users, only those who carry a specific claim can reach the mutating tools. That app-role mechanism is the subject of Scenario 3, and it composes naturally with the multi-server split described here. Registering the MCP API in Microsoft Entra ID Before any of the policies below can validate a token, you need an application registration in Microsoft Entra ID that represents the MCP API. This registration is what defines the audience and scope that tokens are issued for, and it is the source of the mcp-audience, mcp-scope, and (indirectly) mcp-client-id values that the policies reference. Create it once and reuse it across all the MCP servers in this article. In the Azure portal, open Microsoft Entra ID, then App registrations, then New registration. Name it (for example, star-wars-mcp-api), choose single-tenant, and register. Record the Application (client) ID and the Directory (tenant) ID. Open Expose an API and add an Application ID URI. Accept the default api://<app-id>. This URI is your token audience. Still under Expose an API, add a delegated scope named MCP.Access, set its consent display name and description, set the state to Enabled, and save. Authorize the client that will request the scope. Under Expose an API, select Add a client application and enter the client ID of the MCP client. For VS Code, this is the built-in Microsoft authentication client aebc6443-996d-45c2-90f0-388ff96faa56. Check the MCP.Access scope and save. These steps produce the four constants the validation policy needs: Named value Comes from Example entra-tenant-id The Directory (tenant) ID from step 1 11111111-1111-1111-1111-111111111111 mcp-audience The Application ID URI from step 2 api://22222222-2222-2222-2222-222222222222 mcp-scope The scope name from step 3 MCP.Access mcp-client-id The client ID of the calling app from step 4 aebc6443-996d-45c2-90f0-388ff96faa56 [!NOTE] mcp-client-id is the identity of the application calling the MCP server, not the MCP API itself. For VS Code it is the built-in Microsoft authentication client, and its value lands in the token's appid claim, which is why the validation policy lists it under client-application-ids. If your tenant blocks the first-party VS Code client, register your own public client application and use its client ID instead. [!TIP] For the privileged-access feature in Scenario 3, you will also declare an app role on this same registration. You do not need it yet, but it is convenient to know that all identity configuration for these servers lives on this one app registration. With that backend and structure in mind, the scenarios below build up the authorization model one capability at a time. Scenario 1: The simple case, validate the token and block unauthorized access The most basic protection is to require a valid Entra ID token on every MCP request and reject anything that fails validation. No interactive flow, no roles, just a gate. APIM does this with the validate-azure-ad-token policy. The policy checks the issuing tenant, the audience (your MCP API), the calling client application, and the required scope. Anything that does not satisfy all four is rejected with a 401. <policies> <inbound> <base /> <validate-azure-ad-token tenant-id="{{entra-tenant-id}}" header-name="Authorization" failed-validation-httpcode="401" failed-validation-error-message="Unauthorized. Access token is missing or invalid."> <client-application-ids> <application-id>{{mcp-client-id}}</application-id> </client-application-ids> <audiences> <audience>{{mcp-audience}}</audience> </audiences> <required-claims> <claim name="scp" match="any"> <value>{{mcp-scope}}</value> </claim> </required-claims> </validate-azure-ad-token> </inbound> <backend> <base /> </backend> <outbound> <base /> </outbound> <on-error> <base /> </on-error> </policies> The values in double braces are APIM named values: centralized constants, defined once and shared by every MCP server. They map directly to the four values produced by the Entra app registration in the example setup (entra-tenant-id, mcp-audience, mcp-scope, and mcp-client-id). Storing them as named values keeps the policy free of hardcoded identifiers and lets every server reuse the same configuration. This gets you a server that nobody can call without a properly minted token. What it does not do is help a fresh client obtain that token in the first place. That is the next scenario. Scenario 2: Driving an interactive sign-in from VS Code for an APIM-hosted MCP server When you expose one of your own APIs as an MCP server, you usually want a developer to open VS Code, connect to the server, and be prompted to sign in with their Microsoft account. No pre-shared key, no manual token handling. APIM achieves this by behaving as a well-mannered OAuth 2.1 protected resource. Using the Star Wars MCP server from the example setup, each selected operation becomes a tool the agent can call, so an agent can answer "which films featured the character named Leia" by calling the underlying API through APIM. How the sign-in flow works The protocol choreography is what turns a plain 401 into an interactive login: Two ingredients make this work: a 401 challenge that points to a metadata document, and the metadata document itself. The challenge: a 401 that points the client to its metadata Instead of a bare 401, APIM returns a WWW-Authenticate header carrying the URL of the server's Protected Resource Metadata. This is what tells the client "you need a token, and here is where to learn how to get one." Keeping this logic in a shared policy fragment means every MCP server reuses it. Notice the mcpResourceMetadataUrl reference in the fragment below. It is not hardcoded; it is a context variable that each MCP server sets in its own server-level policy before including this fragment (you will see that wiring in the per-server policy later in this scenario). The fragment simply reads whatever value the calling server provided. This indirection is what keeps the fragment pluggable: the same shared challenge-and-validate logic serves every MCP server, while each server supplies its own PRM URL. In most deployments the PRM endpoint is a single, dynamic one (built in the next section) that derives the resource from the request path, so the variable just carries that server's path. But because the URL is configurable per server rather than baked into the fragment, you retain flexibility for the cases that need it. <fragment> <!-- No token: challenge with the per-server PRM URL set by the caller --> <choose> <when condition="@(!context.Request.Headers.ContainsKey("Authorization"))"> <return-response> <set-status code="401" reason="Unauthorized" /> <set-header name="WWW-Authenticate" exists-action="override"> <value>@("Bearer resource_metadata=\"" + (string)context.Variables.GetValueOrDefault("mcpResourceMetadataUrl", "") + "\"")</value> </set-header> </return-response> </when> </choose> <!-- Token present: validate against shared named values --> <validate-azure-ad-token tenant-id="{{entra-tenant-id}}" header-name="Authorization" failed-validation-httpcode="401" failed-validation-error-message="Unauthorized. Access token is missing or invalid."> <client-application-ids> <application-id>{{mcp-client-id}}</application-id> </client-application-ids> <audiences> <audience>{{mcp-audience}}</audience> </audiences> <required-claims> <claim name="scp" match="any"> <value>{{mcp-scope}}</value> </claim> </required-claims> </validate-azure-ad-token> </fragment> Creating the /.well-known PRM endpoint in APIM with a policy This is the part that often surprises people: APIM itself serves the metadata document. There is no separate identity service to stand up. You publish one small anonymous API at the service root that answers GET /.well-known/oauth-protected-resource/*, derives the resource value from the requested path, and returns a JSON document pointing at Microsoft Entra ID as the authorization server. Create a blank HTTP API named well-known with an empty API URL suffix so it resolves at the service root, add a GET operation with the template /.well-known/oauth-protected-resource/*, clear the subscription requirement so it is reachable anonymously, and apply this policy: <policies> <inbound> <base /> <!-- Build the resource URL from the requested PRM sub-path --> <set-variable name="resourceUrl" value="@{ var prefix = "/.well-known/oauth-protected-resource"; var path = context.Request.OriginalUrl.Path; var resourcePath = path.Length > prefix.Length ? path.Substring(prefix.Length) : ""; return "https://" + context.Request.OriginalUrl.Host + resourcePath; }" /> <return-response> <set-status code="200" reason="OK" /> <set-header name="Content-Type" exists-action="override"> <value>application/json</value> </set-header> <set-body>@{ return new JObject( new JProperty("resource", (string)context.Variables["resourceUrl"]), new JProperty("authorization_servers", new JArray( "https://login.microsoftonline.com/{{entra-tenant-id}}/v2.0")), new JProperty("scopes_supported", new JArray("{{mcp-prm-scope}}")), new JProperty("bearer_methods_supported", new JArray("header")) ).ToString(); }</set-body> </return-response> </inbound> <backend> <base /> </backend> <outbound> <base /> </outbound> <on-error> <base /> </on-error> </policies> The {{mcp-prm-scope}} named value populates the scopes_supported array of the metadata document. It tells the client which delegated scope to request when it goes to the authorization server, so it must be the fully qualified scope value: the token audience (the Application ID URI from the app registration) followed by the scope name. With the example values that is api://22222222-2222-2222-2222-222222222222/MCP.Access. In other words, it is the combination of the mcp-audience and mcp-scope values defined in the example setup. Named value Value to set Example mcp-prm-scope <mcp-audience>/<mcp-scope> api://22222222-2222-2222-2222-222222222222/MCP.Access [!NOTE] Keep mcp-prm-scope in sync with the scope the validation fragment requires. The PRM document advertises this scope so the client requests it, and validate-azure-ad-token then checks for it in the scp claim. A mismatch means the client obtains a token without the scope APIM expects, and validation fails. Because the policy builds the resource value from the request path, this single endpoint serves metadata for every MCP server you ever add. The Star Wars server, a future inventory server, and anything else all share it. Wiring it onto the MCP server Each MCP server only needs to declare its own metadata URL and include the shared fragment: <policies> <inbound> <base /> <set-variable name="mcpResourceMetadataUrl" value="https://apim-contoso-mcp.azure-api.net/.well-known/oauth-protected-resource/star-wars-mcp/mcp" /> <include-fragment fragment-id="mcp-entra-auth" /> </inbound> <backend> <base /> </backend> <outbound> <base /> </outbound> <on-error> <base /> <include-fragment fragment-id="mcp-auth-challenge-onerror" /> </on-error> </policies> On the VS Code side, the configuration is deliberately plain. With no subscription-key header present, the client falls straight into the OAuth flow: { "servers": { "star-wars-mcp": { "url": "https://apim-contoso-mcp.azure-api.net/star-wars-mcp/mcp", "type": "http" } } } Restart the server in VS Code, and it detects the 401, reads the metadata, opens a browser sign-in, requests consent on first use, and then loads the tools using the user's token. [!CAUTION] Do not read the response body with context.Response.Body inside MCP server policies. It forces response buffering and breaks the MCP streaming transport. If global diagnostic logging is enabled, set the Frontend Response payload bytes to log to 0 at the All APIs scope. Scenario 3: Beyond tenant membership, authorize on a user attribute with app roles Validating a token confirms the caller is a signed-in user in your tenant with the right scope. That is often not enough. Some MCP servers expose sensitive tools that only a subset of users should reach. You want to express "this user is not only part of the tenant, but has a specific attribute that permits this server." Microsoft Entra app roles are the optimal mechanism for this. You declare a role on the MCP API app registration, assign it to specific users or to a security group, and Entra ID emits a roles claim in the access token whenever your API is the audience. APIM then authorizes on that claim. App roles beat the groups claim here because they avoid the group overage problem, they are scoped to the application, and they travel with the app. Declaring and assigning the role On the MCP API app registration, under App roles, create a role: Setting Value Display name Privileged Access Allowed member types Users/Groups Value Privileged.Access Description Access to privileged MCP servers Then, on the matching enterprise application, under Users and groups, assign the users (or, better, a security group) to the Privileged Access role. The Value field is the exact string that lands in the token roles claim, so it cannot contain spaces. [!TIP] Keep User assignment required set to No on the enterprise application. Unassigned users still obtain a valid token with the MCP.Access scope and keep access to the non-privileged servers. They simply do not carry the roles claim, so the privileged servers reject them. Enforcing the claim in the per-server policy The shared mcp-entra-auth fragment is used by every server, so the role requirement must not live there. Place the check in the privileged server's own policy, right after the fragment include. The token is already validated at that point, so this step is pure authorization. Because the caller is authenticated but not authorized, return 403, not 401, and do not emit a challenge: re-authenticating will not grant a role the user does not have. <policies> <inbound> <base /> <set-variable name="mcpResourceMetadataUrl" value="https://apim-contoso-mcp.azure-api.net/.well-known/oauth-protected-resource/star-wars-mcp/mcp" /> <include-fragment fragment-id="mcp-entra-auth" /> <!-- Privileged guardrail: require the Privileged.Access app role --> <choose> <when condition="@(!context.Request.Headers.GetValueOrDefault("Authorization","").Replace("Bearer ","").AsJwt().Claims.GetValueOrDefault("roles", new string[0]).Contains("Privileged.Access"))"> <return-response> <set-status code="403" reason="Forbidden" /> <set-header name="Content-Type" exists-action="override"> <value>application/json</value> </set-header> <set-body>{"error":"forbidden","message":"You lack the Privileged.Access role required for this MCP server."}</set-body> </return-response> </when> </choose> </inbound> <backend> <base /> </backend> <outbound> <base /> </outbound> <on-error> <base /> <include-fragment fragment-id="mcp-auth-challenge-onerror" /> </on-error> </policies> One operational detail worth calling out: app-role assignments only appear in newly issued tokens. A user who is granted the role after they signed in must obtain a fresh token. In VS Code, run MCP: Reset Cached Tokens (or sign out of the Microsoft account from the Accounts menu), then restart the server and sign in again. You can confirm the result by pasting the access token into https://jwt.ms and checking for "roles": ["Privileged.Access"]. Scenario 4: Fronting an existing external MCP server that drives its own sign-in So far APIM has been the authorization resource. But many valuable MCP servers already exist and run their own identity. GitHub publishes a remote MCP server with dozens of tools, and it authenticates users against GitHub's own OAuth authorization server. You do not want to re-implement that. You want APIM to govern access (rate limits, IP rules, logging, a single managed endpoint) while letting the upstream own the login. This is the "expose an existing MCP server" passthrough mode. When you register GitHub's remote MCP server behind APIM, the gateway relays the upstream's own authorization challenge. The client never authenticates against Entra here. It authenticates directly against GitHub. The flow, confirmed by probing the gateway: A call to the APIM endpoint with no token returns GitHub's own 401 with a WWW-Authenticate header, relayed through APIM. The Protected Resource Metadata that GitHub serves advertises authorization_servers: ["https://github.com/login/oauth"], so the client knows to log in at GitHub. The PRM resource reflects the APIM host, because GitHub builds it from the forwarded Host header. The client trusts the APIM endpoint while still logging in at GitHub. VS Code completes the GitHub sign-in and the full tool catalog loads. In the proof of concept this surfaced all 47 GitHub tools through the single APIM endpoint. The client configuration is again just a URL pointing at APIM: { "servers": { "github-via-apim": { "url": "https://apim-contoso-mcp.azure-api.net/github-mcp/mcp", "type": "http" } } } The key insight is that APIM transparently relays the backend's authentication challenge. GitHub remains the authorization server, GitHub tolerates being fronted by APIM, and you get a governed, centrally managed entry point without owning the identity flow. [!NOTE] Passthrough only relays what the upstream advertises. If the backend's PRM resource value and the actual MCP transport endpoint differ by a path segment, some clients fall back to deriving the metadata location from the server URL and can miss it. When you onboard a custom self-authenticating server, verify that the resource it advertises matches the exact URL the client connects to. Scenario 5: Restricting which tools of an existing MCP server an agent may call Passthrough raises a governance question that token validation alone cannot answer. A developer may legitimately have permission to merge a pull request through GitHub, but you may not want their AI agent to perform that action autonomously. You want to allow the read and discovery tools while blocking the destructive write tools, at the gateway, regardless of what the client tries. What is and is not possible for an external server It is important to be precise here, because the capability differs from the REST-as-MCP mode: For a REST-API-exposed-as-MCP server, you pick which operations become tools at creation time. That is native tool selection and the cleanest possible filter. For an existing/external MCP server, APIM does not enumerate the upstream's tools. The portal Tools blade explicitly states that tools are not visible for external MCP servers, and there is no allow-list property for them. APIM also cannot safely rewrite the tools/list response, because reading the response body breaks the streaming transport and the list may arrive as text/event-stream. What APIM can do reliably, and server-agnostically, is block the invocation. Every tool call arrives as a JSON-RPC tools/call request in the request body, which APIM can inspect safely. The deny-listed tools remain visible in the catalog, but any attempt to invoke one is intercepted at the gateway and returned a JSON-RPC error before it ever reaches the upstream. The reusable deny-list fragment The block is driven by a per-server named value (a comma-separated list of tool names), so the same fragment governs every external server. Only the named value changes. <!-- Fragment: mcp-tool-filter (include after the auth fragment) --> <fragment> <choose> <when condition="@(context.Request.Body != null)"> <set-variable name="mcpMethod" value="@{ try { var body = context.Request.Body.As<JObject>(preserveContent: true); return (string)body?["method"] ?? string.Empty; } catch { return string.Empty; } }" /> <choose> <when condition="@(((string)context.Variables["mcpMethod"]).Equals("tools/call", StringComparison.OrdinalIgnoreCase))"> <set-variable name="mcpToolName" value="@{ var body = context.Request.Body.As<JObject>(preserveContent: true); return (string)body?["params"]?["name"] ?? string.Empty; }" /> <!-- mcpBlockedTools is a comma-separated deny-list set by the per-server policy before this include --> <set-variable name="mcpBlocked" value="@{ var tool = ((string)context.Variables["mcpToolName"]).Trim().ToLowerInvariant(); var deny = ((string)context.Variables.GetValueOrDefault("mcpBlockedTools", "")).ToLowerInvariant().Split(',').Select(t => t.Trim()); return deny.Contains(tool); }" /> <choose> <when condition="@((bool)context.Variables["mcpBlocked"])"> <return-response> <set-status code="200" reason="OK" /> <set-header name="Content-Type" exists-action="override"> <value>application/json</value> </set-header> <set-body>@{ var id = "null"; try { var body = context.Request.Body.As<JObject>(preserveContent: true); id = body?["id"]?.ToString(Newtonsoft.Json.Formatting.None) ?? "null"; } catch {} return "{\"jsonrpc\":\"2.0\",\"id\":" + id + ",\"error\":{\"code\":-32602,\"message\":\"Unknown tool: " + ((string)context.Variables["mcpToolName"]) + "\"}}"; }</set-body> </return-response> </when> </choose> </when> </choose> </when> </choose> </fragment> The deny-list itself lives in a named value, one per server: APIM named value. Comma-separated, case-insensitive. mcp-blocked-tools-github = merge_pull_request,create_repository,delete_repository,push_files,create_or_update_file,issue_write,label_write # <policies> <inbound> <base /> <set-variable name="mcpResourceMetadataUrl" value="https://apim-contoso-mcp.azure-api.net/.well-known/oauth-protected-resource/github-mcp/mcp" /> <include-fragment fragment-id="mcp-entra-auth" /> <set-variable name="mcpBlockedTools" value="{{mcp-blocked-tools-github}}" /> <include-fragment fragment-id="mcp-tool-filter" /> </inbound> <backend> <base /> </backend> <outbound> <base /> </outbound> <on-error> <base /> <include-fragment fragment-id="mcp-auth-challenge-onerror" /> </on-error> </policies> Generic per-server pattern: mcp-blocked-tools-<server> = <comma,separated,tool,names> Wiring it onto the GitHub passthrough server <policies> <inbound> <base /> <set-variable name="mcpResourceMetadataUrl" value="https://apim-contoso-mcp.azure-api.net/.well-known/oauth-protected-resource/github-mcp/mcp" /> <include-fragment fragment-id="mcp-entra-auth" /> <set-variable name="mcpBlockedTools" value="{{mcp-blocked-tools-github}}" /> <include-fragment fragment-id="mcp-tool-filter" /> </inbound> <backend> <base /> </backend> <outbound> <base /> </outbound> <on-error> <base /> <include-fragment fragment-id="mcp-auth-challenge-onerror" /> </on-error> </policies> Now when the agent tries to merge a pull request, the gateway returns a clean -32602 Unknown tool error and the upstream is never touched. Read and discovery tools continue to work. The tool still appears in the client's catalog. Adding governance for another external server is just one more named value plus the same fragment include. No new policy logic. Key takeaways API Management turns MCP servers into governed resources, applying the same identity, traffic, and observability controls you already use for APIs. Start simple with validate-azure-ad-token to gate access, then graduate to a full interactive sign-in by serving Protected Resource Metadata from a single APIM policy. You can publish multiple MCP servers from one underlying API, for example a read-only server and a read-write server, by selecting different operations. App roles let you authorize on a user attribute, not just tenant membership, and the check belongs in the per-server policy so shared logic stays clean. For existing external servers, APIM relays the upstream's own OAuth flow, so a server like GitHub keeps owning its identity while you keep central governance. When an external server's full tool surface is too broad, APIM can block specific tool invocations at the gateway with a reusable, named-value-driven policy, so a user's agent cannot perform actions the user could perform manually. References About MCP servers in Azure API Management Secure access to MCP servers in API Management Expose REST API in API Management as an MCP server Expose and govern an existing MCP server validate-azure-ad-token policy reference Policy fragments in API Management RFC 9728: OAuth 2.0 Protected Resource Metadata MCP authorization specification Star Wars API (example backend) MCP for Beginners1.5KViews3likes2CommentsEnterprise-ready Claude Desktop with Entra ID, APIM, and Microsoft Foundry (No Backend Required)
How I put corporate sign-in in front of Claude Desktop without writing a single line of backend code. TL;DR — In this post, I show how to securely enable Claude Desktop in enterprise environments using Microsoft Entra ID, Azure API Management, and Microsoft Foundry — without deploying a custom backend. This approach removes API keys from endpoints, enforces per-user identity, and aligns fully with Zero Trust principles. Who this is for: Enterprise architects evaluating secure AI client patterns Developers enabling Claude Desktop in regulated environments Platform teams standardizing identity and governance for LLM access Why this post exists: Microsoft Learn's Configure Claude Desktop with Foundry Models only shows the API-key path — a shared key pasted into every user's Claude Desktop config. That's fine for a quick demo, but it's a non-starter for most enterprises (no per-user identity, no MFA / Conditional Access, hard to revoke, hard to audit). This post fills that gap: same Foundry backend, but with Microsoft Entra ID SSO in front via Azure API Management, so each user signs in with their corporate identity and zero secrets land on the laptop. The problem For many teams experimenting with Claude Desktop, the blocker isn't capability — it's enterprise readiness. How do you enforce identity, eliminate shared secrets, and apply governance without standing up a custom backend service to sit in front of the model? If your team wants to use Claude Desktop with your own Anthropic deployment running on Microsoft Foundry, but with a few non-negotiable requirements: No shared API keys floating around on developer laptops. Per-user identity — every request must be attributable to a real person. MFA and Conditional Access must apply, the same way they do for every other internal app. Central rate-limiting and logging — a centralized control plane for governance. Claude Desktop 1.5+ supports a "Gateway SSO" mode where it can sign each user in with OpenID Connect and forward their token to a custom LLM gateway. Azure API Management (APIM) is a perfect fit for that gateway role: it validates the user's Entra ID token, then re-authenticates itself to Foundry behind the scenes. APIM acts as a centralized policy enforcement layer, enabling identity validation, traffic governance, and secure re-authentication to backend AI services without custom code. The end-to-end flow looks like this: %%{init: {'flowchart': {'nodeSpacing': 60, 'rankSpacing': 80, 'useMaxWidth': true}, 'themeVariables': {'fontSize':'16px'}} }%% flowchart TB User([Corporate user]) Claude["Claude Desktop"] Entra["Microsoft Entra ID<br/>(OIDC + MFA + Conditional Access)"] APIM["Azure API Management<br/>validate-jwt → rewrite headers<br/>(policy gateway)"] Foundry["Microsoft Foundry<br/>Claude deployment"] User -- "1. Sign in (browser PKCE)" --> Entra Entra -- "2. ID token" --> Claude Claude -- "3. POST /v1/messages<br/>Authorization: Bearer ID token" --> APIM APIM -- "4. OIDC discovery / JWKS" --> Entra APIM -- "5. x-api-key (or Managed Identity)" --> Foundry Foundry -- "6. Response" --> APIM APIM -- "7. Response" --> Claude classDef azure fill:#0a4d8c,stroke:#0a3a6b,color:#ffffff; classDef client fill:#f3f3f3,stroke:#888,color:#222; class Entra,APIM,Foundry azure; class Claude,User client; Or in plain text: Claude Desktop │ Authorization: Bearer <Entra ID token from the user's browser sign-in> ▼ Azure API Management (<your-apim>) │ ① validate-jwt → verifies user's Entra ID token │ ② re-auths to Foundry with an API key from a Named value │ Authorization stripped, x-api-key injected ▼ Microsoft Foundry /anthropic/v1/messages │ runs Claude (<your-deployment>) ▼ Response back to the user There are no API keys on user devices. Foundry's key lives only inside APIM. And every request carries the user's oid claim, so I can build dashboards and per-user quotas later. What you need before starting An Azure subscription with a Microsoft Foundry (AI Services) account and a Claude deployment. (Throughout this post I'll just call it Foundry.) An API Management instance, any tier. Permission to register applications in Entra ID for your tenant. Claude Desktop 1.5.0 or later. Azure CLI installed locally. Throughout this post I'll use placeholders for resource names: <apim-name> — your API Management service name <resource-group> — the resource group that holds it <foundry-account> — your Foundry account name <deployment-name> — the name of the Claude model deployment on Foundry Step 1 — Register an Entra ID app for Claude Desktop This is the OIDC client Claude Desktop signs users into. Claude Desktop requires a single-tenant, public PKCE client (no client secret) with a loopback redirect URI, configured under the Mobile and desktop applications platform in Entra ID — the only platform that allows any loopback port. I scripted it so the setup is one command and idempotent: # scripts/register-claude-entra-app.ps1 [CmdletBinding()] param( [string] $TenantId = '<your-tenant-id>', [string] $SubscriptionId = '<your-subscription-id>', [string] $ResourceGroup = '<resource-group>', [string] $ApimName = '<apim-name>', [string] $AppDisplayName = 'Claude Cowork gateway', [string] $RedirectUri = 'http://127.0.0.1/callback' ) az account set --subscription $SubscriptionId | Out-Null # 1. Create (or reuse) the app registration $appId = az ad app list --display-name $AppDisplayName --query "[0].appId" -o tsv if (-not $appId) { $appId = az ad app create --display-name $AppDisplayName ` --sign-in-audience AzureADMyOrg --query appId -o tsv } # 2. Configure as public PKCE client with the Mobile/Desktop redirect URI $objectId = az ad app show --id $appId --query id -o tsv $patch = @{ publicClient = @{ redirectUris = @($RedirectUri) } isFallbackPublicClient = $true } | ConvertTo-Json -Depth 5 -Compress az rest --method PATCH ` --uri "https://graph.microsoft.com/v1.0/applications/$objectId" ` --headers "Content-Type=application/json" --body $patch | Out-Null # 3. Ensure a service principal exists $sp = az ad sp list --filter "appId eq '$appId'" --query "[0].id" -o tsv if (-not $sp) { az ad sp create --id $appId | Out-Null } # 4. Push two Named values into APIM for the validate-jwt policy az apim nv create -g $ResourceGroup --service-name $ApimName ` --named-value-id entra-tenant-id --display-name entra-tenant-id ` --value $TenantId --secret false az apim nv create -g $ResourceGroup --service-name $ApimName ` --named-value-id entra-client-id --display-name entra-client-id ` --value $appId --secret false "Client ID: $appId" Run it once. The output prints the client ID you'll need in Claude Desktop later, and it leaves two Named values in APIM ( entra-tenant-id , entra-client-id ) that the gateway policy will reference. ⚠️ Common pitfall: if the redirect URI ends up under the Web platform instead of Mobile and desktop applications, Entra will demand a client secret on token exchange — Claude won't send one and you'll get Token exchange failed (HTTP 401) . The app type can't be changed after creation, so create a new app if that happens. Step 2 — Create the API in APIM In the portal under APIM → APIs → + Add API → HTTP: Field Value Display name Anthropic API Name anthropicapi Web service URL https://<foundry-account>.services.ai.azure.com/anthropic API URL suffix claude Subscription required Off (Entra ID is our only credential) Add two operations under it: Method URL Display name POST /v1/messages Create message GET /v1/models List models The /v1/models operation isn't strictly needed (Foundry's Anthropic surface doesn't implement it), but having it registered means you can decide later whether to stub it out or proxy it. Step 3 — Add an API key for Foundry as a Named value APIM → Named values → + Add: Name: foundry-key Type: Secret Value: paste a key from the Foundry account's Keys and Endpoint blade. This is the only place the key ever lives. Clients never see it. Alternative — keyless with Entra ID (managed identity): If you prefer not to manage a Foundry key at all, enable the APIM instance's system-assigned managed identity (APIM → Identity → System assigned → On), then grant that identity the Foundry User role on the Foundry account (role ID 53ca6127-db72-4b80-b1b0-d745d6d5456d — previously named Azure AI User; Microsoft renamed it but the ID and permissions are unchanged). In Step 4, replace the set-header that injects x-api-key with: <authentication-managed-identity resource="https://cognitiveservices.azure.com" output-token-variable-name="foundry-token" /> <set-header name="Authorization" exists-action="override"> <value>@("Bearer " + (string)context.Variables["foundry-token"])</value> </set-header> Then you can skip the foundry-key Named value entirely. Don't use the legacy Cognitive Services User role — per the Foundry RBAC doc, roles starting with Cognitive Services don't apply to Foundry scenarios. Step 4 — Write the gateway policy This is the core enforcement layer in the architecture. Open APIs → anthropicapi → All operations → Inbound processing → </> and paste: <policies> <inbound> <base /> <!-- USER → APIM: verify Entra ID token from Claude Desktop --> <validate-jwt header-name="Authorization" failed-validation-httpcode="401" failed-validation-error-message="Unauthorized" require-scheme="Bearer"> <openid-config url="https://login.microsoftonline.com/{{entra-tenant-id}}/v2.0/.well-known/openid-configuration" /> <audiences> <audience>{{entra-client-id}}</audience> </audiences> <issuers> <issuer>https://login.microsoftonline.com/{{entra-tenant-id}}/v2.0</issuer> </issuers> </validate-jwt> <!-- APIM → Foundry --> <set-backend-service base-url="https://<foundry-account>.services.ai.azure.com/anthropic" /> <set-header name="x-api-key" exists-action="override"> <value>{{foundry-key}}</value> </set-header> <set-query-parameter name="api-version" exists-action="skip"> <value>2024-05-01-preview</value> </set-query-parameter> </inbound> <backend><base /></backend> <outbound><base /></outbound> <on-error><base /></on-error> </policies> Two things to notice: validate-jwt uses the OIDC discovery URL — JWKS keys are fetched and cached automatically. It rejects any token whose aud claim is not the client ID of our Entra app, which is exactly what we want. The Authorization header from the user is not forwarded — once validate-jwt succeeds, the request is re-authenticated to Foundry with x-api-key . No user token ever leaves APIM. APIM becomes the security boundary — user identity is validated at the edge, and downstream services never see or rely on user tokens. Step 5 — Configure Claude Desktop Open Claude Desktop → Configure third-party inference and fill it in like this: Field Value Connection Gateway Credential kind Interactive sign-in Gateway base URL https://<apim-name>.azure-api.net/claude Client ID (the appId your script printed) Issuer URL https://login.microsoftonline.com/<tenant-id>/v2.0 Authorization URL / Token URL leave empty Bearer token ID token (default) Scopes leave default ( openid profile email offline_access ) Redirect port leave empty (ephemeral) Model discovery Off Model list → Model ID <deployment-name> (your Foundry deployment name) ℹ️ Why Model discovery is Off — Claude Desktop's discovery uses GET /v1/models , and the Foundry /anthropic surface doesn't implement that endpoint, so it 404s. Listing the model manually skips the call entirely. If you want to leave Model discovery On, stub /v1/models in APIM. Add a GET /v1/models operation to your API and give it this inbound policy that returns an Anthropic-shaped response without ever hitting the backend: <policies> <inbound> <base /> <return-response> <set-status code="200" reason="OK" /> <set-header name="Content-Type" exists-action="override"> <value>application/json</value> </set-header> <set-body>@{ return new JObject( new JProperty("data", new JArray( new JObject( new JProperty("id", "<deployment-name>"), new JProperty("type", "model"), new JProperty("display_name", "Claude on Foundry"), new JProperty("created_at", "2026-01-01T00:00:00Z") ) )), new JProperty("has_more", false), new JProperty("first_id", "<deployment-name>"), new JProperty("last_id", "<deployment-name>") ).ToString(); }</set-body> </return-response> </inbound> <backend><base /></backend> <outbound><base /></outbound> <on-error><base /></on-error> </policies> Add one entry per deployment you want to expose. The benefit of stubbing rather than turning discovery off is that adding new models becomes a policy edit — no need to re-export and redeploy Claude Desktop config to every user. Click Apply Changes then Sign in to your organization. Your browser opens to the normal Entra sign-in page; once approved you're returned to the app, and a quick connection test runs. The success indicator is a small green banner: ✅ Inference — 1-token completion in 1449 ms · via identity provider For broader rollout, hit the Export button at the top of the configuration window — it produces a .mobileconfig (macOS) or .reg (Windows) you can push via Intune / Jamf to every user's machine. Step 6 — Verify both hops In APIM → APIs → anthropicapi → Test → POST /v1/messages I sent: Headers: anthropic-version: 2023-06-01 Body: { "model": "<deployment-name>", "max_tokens": 64, "messages": [{"role":"user","content":"hi"}] } Click Send → Trace, and look at two places: Inbound → validate-jwt: should say succeeded and show the decoded claims (your oid , email , etc.). Backend → Request: outbound URL is https://<foundry-account>.services.ai.azure.com/anthropic/v1/messages?api-version=2024-05-01-preview , with x-api-key: **** present and Authorization absent. Backend → Response: 200, with a Claude message JSON body. That confirms both halves of the chain. Bumps I hit along the way A few common issues encountered during setup — sharing so you can skip them: Symptom Cause Fix Claude shows "Your provider's model list hasn't loaded yet" and /v1/models returns 404 Foundry's Anthropic surface doesn't implement that endpoint Turn Model discovery OFF in Claude Desktop and add the deployment name manually Claude shows "Authentication failed" even though sign-in worked The APIM API still had Subscription required = ON, blocking the call before validate-jwt ran with 401: Access denied due to missing subscription key Uncheck Subscription required on the API Portal Test panel shows "Cannot read properties of undefined (reading 'statusCode')" The test console doesn't attach an Entra token, so validate-jwt 401s and the panel's JavaScript crashes Comment out <validate-jwt> temporarily for portal testing, or test via curl with a real token OIDC discovery failed (HTTP 404) in Claude Desktop Pasted the metadata URL into Issuer URL Issuer must end at /v2.0 , not at /.well-known/openid-configuration Token exchange failed (HTTP 401) App registered under Web platform instead of Mobile and desktop applications Create a new app with the right platform — it can't be changed Where this leaves us This pattern is small in moving parts but has outsized architectural impact: Zero secrets on endpoints. Eliminates API-key sprawl across laptops, MDM profiles, and shared vaults. The Foundry key lives only inside APIM — or disappears entirely when you switch APIM to managed identity. Identity, not credentials. Every Claude Desktop user authenticates against Entra ID in their browser, the same as Office or Teams. MFA, Conditional Access, and Entra ID Protection apply automatically — no parallel auth story to maintain. Per-user observability built in. APIM logs carry the user's Entra oid , email , and group claims. That unlocks per-user dashboards, cost allocation, and abuse detection without any client-side instrumentation. Aligned with Zero Trust. Strong identity at the edge, no implicit trust between hops, single policy chokepoint for inspection and rate-limiting, and full revocability through a single Enterprise Application. Optional but trivial keyless path. Flip APIM to system-assigned managed identity + <authentication-managed-identity resource="https://cognitiveservices.azure.com" /> and one Foundry User role assignment (role ID 53ca6127-db72-4b80-b1b0-d745d6d5456d , formerly Azure AI User) on the Foundry account. See the Foundry RBAC doc — don't use any Cognitive Services * roles for Foundry. What I'd add next llm-token-limit and llm-emit-token-metric policies for per-user quotas and cost visibility. App Insights wiring on the API, with a workbook that pivots on the oid claim. Assignment required = Yes on the Entra Enterprise Application + a security group, so only approved users can sign in. Intune deployment of the exported .reg / .mobileconfig so the gateway URL and client ID land on devices automatically. But that's all incremental. The hard part — getting Claude Desktop, Entra ID, APIM, and Foundry to agree on who's allowed to talk to whom — is done. Total elapsed: about an afternoon, most of it spent learning where each portal hides its switches. Useful links Gateway single sign-on with your identity provider — Claude.ai Documentation Configure Claude Desktop with Foundry Models — Microsoft Learn Role-based access control for Microsoft Foundry — Microsoft Learn3.2KViews0likes3CommentsHarness-Driven Agents: Secure Podcast Pipeline in Hyperlight MicroVM Sandbox
The moment the agent reached for rm -rf For most of 2024 and 2025, "agents" were a demo word. By 2026 they are something you run — autonomously, in a loop, executing code they wrote themselves a second ago. I was watching one work late one night. I had given it a goal, a handful of tools, and the freedom to write and run its own Python. For twenty minutes it was magic: read a file, reason about it, write a script, run it, inspect the output, correct itself, try again. Then it produced this: import shutil shutil.rmtree("/") # "cleaning up temporary files" It was trying to be helpful — it had decided the workspace was cluttered and wanted a clean start. The "workspace," as far as that process was concerned, was my entire machine. I killed it in time. But the lesson is the one every agent builder eventually arrives at: the model is not the dangerous part — the execution is. A chatbot that answers wrong is annoying. An agent that fetches a web page, runs code, and writes files has a blast radius. The bounding box has to come from infrastructure, not from a system prompt. harnessagent_sandbox_demo is a concrete build that puts that bounding box in exactly the right place — and it does it in service of a real, charming little product: a daily five-minute Mandarin podcast about the FIFA World Cup 2026. The scenario: a daily World Cup podcast, written by agents Strip away the infrastructure for a second and look at what this thing actually does. Every day it produces a fresh Mandarin podcast script about the FIFA World Cup 2026. Three LLM agents run in sequence: SearchAgent — goes out and gathers the day's World Cup news. ContentAgent — turns that raw material into structured podcast content. GenScriptAgent — writes the final, readable five-minute script. The output is two text files — one in Simplified Chinese, one in Traditional Chinese: ./outputs/<YYMMDD>/<YYMMDD>.simple.zh.txt ./outputs/<YYMMDD>/<YYMMDD>.tranditional.zh.txt That's the whole product. It sounds simple — and the point of the project is that making it safe is the hard part. SearchAgent has to reach the open internet. All three agents write and run code. If you wire that naively, you have just built the exact machine that types shutil.rmtree("/") for you. So the entire architecture is organized around one principle: the agents get to do real work, but every dangerous capability is fenced behind a hardware boundary. Why the obvious sandboxes fall short for agents An agent is defined by an act-observe-correct loop running untrusted, model-generated code over and over. That single property breaks most conventional isolation choices. Option Why it falls short for agents No sandbox One rm -rf, one leaked .env, one rogue network call — the blast radius is the whole machine. Container Great for shipping apps, but a coding agent wants to build and run its own container, which means Docker-in-Docker and elevated privileges that quietly undo the isolation. WASM / V8 isolate Fast to start, but you isolate a language runtime, not an OS — no system packages, no arbitrary shell, and hardening the engine is a moving target. Full VM Rock-solid isolation, but cold starts in seconds and heavy memory — exactly the friction that pushes developers to skip isolation entirely. Each option trades away safety, speed, or compatibility. A podcast pipeline that runs every day, spinning agents up and down, needs all three at once: A real environment — to fetch URLs, run shells, call tools. A hard boundary — so a bad step can't reach the host. Near-instant lifecycle — because a slow sandbox is a sandbox developers skip, and an unused safety feature protects nobody. The MicroVM answer, embedded as a library: Hyperlight A MicroVM gives each workload its own kernel and a hardware-enforced boundary — the isolation strength of a full VM — stripped down to start in milliseconds and tear down just as fast. Misbehave inside, and you hit a wall; there is no path back to the host. And it is disposable by design: when an agent goes off the rails, you delete the sandbox and reopen in milliseconds, with nothing to clean up. Most MicroVM runtimes (Firecracker and friends) are cloud infrastructure — server-side. Hyperlight is different: a lightweight Virtual Machine Manager (a CNCF sandbox project) designed to be embedded inside your application, like a library. MicroVMs that boot in milliseconds, with guest function calls completing in microseconds. No guest kernel, no OS — the guest is a purpose-built no_std Rust/C binary. Nothing in there to attack. Sandboxed by default — no filesystem, no network, nothing, unless explicitly granted. Typed function calls across the VM boundary, and snapshot/restore to rewind to a clean state between calls. Runs on KVM, MSHV (Microsoft Hypervisor), and Windows Hypervisor Platform. This project uses the Wasm backend: the three agents share a single HyperlightRuntime, and the guest is reset to a clean snapshot before every code execution. That detail is what makes a daily, many-step pipeline cheap — you capture the sandbox state once and rewind to it, instead of rebuilding a VM hundreds of times. Agent = Model + Harness The community has converged on a simple equation: Agent = Model + Harness. The model is a brain in a jar — text in, text out, no memory between calls, no loop, no hands. It can express the intent to call a tool; it cannot actually call it. The harness is the execution layer: it calls the model, handles its tool calls, and decides when to stop. As the Hugging Face glossary puts it, "if you're not the model, you're the harness." That reframes the safety problem precisely. When my agent emitted shutil.rmtree("/"), the model deleted nothing — it merely suggested. The harness would have run it. The harness is where reasoning meets reality, so it is exactly where safety must live. The question stops being "how do I make the model safer?" and becomes: how do I build a harness that executes the model's intent inside a boundary it cannot escape? The Microsoft Agent Framework answers that with first-class agent harness capabilities in Python and .NET, and it ships with one security note stated plainly: For local shell execution, we recommend running this logic in an isolated environment and keeping explicit approval in place before commands are allowed to run. The harness is the steering wheel — it does not pretend to be the seatbelt and the crumple zone. For that, it points you outward: run this somewhere isolated. Hyperlight is that isolated somewhere. This project snaps the two pieces together. The architecture: two planes, one bridge Here is the heart of the design. Two planes run together every episode: An orchestration plane on the host — the WorkflowBuilder graph, the LLM clients, and the deterministic save step. An execution plane inside one Hyperlight Wasm sandbox — the only place LLM-generated code is allowed to run. The single bridge between them is one call: call_tool("fetch_url", ...). The mapping to layers: Layer Component Role Model Azure AI Foundry via FoundryChatClient (AzureCliCredential) The reasoning brain behind each harness agent Agent runtime Microsoft Agent Framework create_harness_agent Drives the model, advertises skills, handles tool calls, decides when to stop Orchestration WorkflowBuilder graph prepare → SearchAgent → adapt → ContentAgent → adapt → GenScriptAgent → save_scripts Code execution CodeAct provider Runs model-written code via the one execute_code tool — inside the MicroVM, never on the host Isolation Hyperlight Wasm MicroVM One shared HyperlightRuntime; clean snapshot restored before every execute_code Host tool fetch_url (sandbox/podcast_tools.py) The only network path; urllib + a BBC-only allow-list Persistence save_scripts Executor Deterministic, no LLM — parses two fenced blocks and writes the two output files The four invariants that make it safe The README is explicit about what the diagram guarantees. These four invariants are the whole security argument. The model never sees the network.Its only tool isexecute_code. Network access happens only when the guest itself runs call_tool("fetch_url", ...) from inside the sandbox. The model cannot reach the internet directly — it can only ask the guest to, and the guest can only reach BBC. One sandbox per run, snapshot per call.All three agents share the sameHyperlightRuntime. Before every execute_code, the guest is reset to a clean snapshot — so nothing one step does can leak into the next, and there is no VM to rebuild. Two counter paths — and why there are two.Thefunction_middleware (make_tool_call_recorder) sees the model-direct execute_code calls. But the inner, guest-initiated fetch_url is dispatched by Hyperlight straight to the FunctionTool, bypassing the middleware entirely. So a second counter — make_call_tool_counter(on_call=) — bumps state["tool_call_counts"][<agent>]["fetch_url"] on every guest invocation. Two observation points, because the architecture has two genuinely different call surfaces. Deterministic save — no LLM in the persistence step.GenScriptAgentonly emits text. The save_scripts Executor parses the two fenced code blocks out of that text and writes the simplified and traditional files itself. There is no model in the loop when bytes hit disk, so the output path is fully predictable. Now let's look at the real code surface The README documents the API the demo is built on. The snippets below reflect that surface. 1. Install and environment pip install agent-framework-hyperlight --pre # Hyperlight needs a hypervisor: KVM on Linux, WHP on Windows. macOS is not yet supported. # The model runs on Azure AI Foundry; FoundryChatClient authenticates via AzureCliCredential. az login export HYPERLIGHT_PYTHON_GUEST_PATH="/path/to/python_guest" 2. A harness agent that carries only a stub — skills do the rest Each of the three agents is built with create_harness_agent + FoundryChatClient. The agents themselves carry only a tiny stub instruction; their real role prompts and the shared sandbox/CodeAct guardrails live as file-based Agent Skills under skills/. The harness's built-in SkillsProvider advertises those SKILL.md packages, and the model loads them at runtime via load_skill. from agent_framework import create_harness_agent from agent_framework.foundry import FoundryChatClient from azure.identity import AzureCliCredential # Model on Azure AI Foundry — not Azure OpenAI directly. client = FoundryChatClient(credential=AzureCliCredential()) # The agent carries a tiny stub. Its real persona — "you gather World Cup # news", "you write the script" — lives in a SKILL.md package under skills/, # advertised by the harness SkillsProvider and pulled in via load_skill. search_agent = create_harness_agent( chat_client=client, name="SearchAgent", instructions="You are a harness agent. Load your skill, then begin.", ) 3 The CodeAct surface: one tool the model can see This is the CodeAct pattern from 02-agents/context_providers/code_act/code_act.py. The model sees exactly one tool — execute_code. Any extra capability (here, only fetch_url) is reachable from inside the guest via call_tool(...). # What the MODEL sees and writes — one script, not ten tool round-trips: # # # inside execute_code, running in the Hyperlight Wasm guest: page = call_tool("fetch_url", url="https://www.bbc.com/sport/football/world-cup") # # ... parse page["BODY"], pull out today's stories ... print(top_stories) # # execute_code is the ONLY tool on the model's surface. call_tool("fetch_url", ...) is reachable only from inside the sandbox. 4. The one host tool, with a BBC-only allow-list fetch_url lives on the host (sandbox/podcast_tools.py). It is the single bridge across the boundary, and it is deliberately narrow. import urllib.request from urllib.parse import urlparse ALLOWED_DOMAINS = {"bbc.com", "www.bbc.com"} # allow-list: BBC only def fetch_url(url: str) -> dict: """The ONLY network path out of the sandbox. Host-side, allow-listed.""" host = urlparse(url).netloc if host not in ALLOWED_DOMAINS: return {"STATUS": "blocked", "URL": url} with urllib.request.urlopen(url, timeout=20) as resp: body = resp.read(8192).decode("utf-8", "ignore") # BODY capped at ~8 KB return { "STATUS": "ok", "URL": url, "TITLE": _extract_title(body), "DESCRIPTION": _extract_description(body), "LINKS": _extract_links(body), "BODY": body, } Notice what this buys you: even if SearchAgent writes hostile code, the worst it can do over the network is read BBC, 8 KB at a time. The allow-list is host-side and the model never sees it — it cannot be prompt-injected away. 5. Wiring the graph and the deterministic save from agent_framework import WorkflowBuilder workflow = ( WorkflowBuilder() .add_node("prepare", prepare) .add_node("SearchAgent", search_agent) .add_node("adapt_1", adapt) .add_node("ContentAgent", content_agent) .add_node("adapt_2", adapt) .add_node("GenScriptAgent", genscript_agent) .add_node("save_scripts", save_scripts) # deterministic Executor, NO LLM .build() ) # GenScriptAgent emits text containing two fenced blocks (simplified + # traditional). save_scripts parses them and writes the files itself — # there is no model in the persistence step. await workflow.run() # -> ./outputs/<YYMMDD>/<YYMMDD>.simple.zh.txt # -> ./outputs/<YYMMDD>/<YYMMDD>.tranditional.zh.txt 6. The payoff Run that shutil.rmtree("/") inside this pipeline now and the result is delightfully boring: the agent deletes its own throwaway sandbox, the host never notices, and the next execute_code starts from a clean snapshot. Two things to call out: Snapshot/restore means every code execution starts from a clean, reusable baseline — capture state once, rewind between calls, instead of rebuilding the whole VM. For a daily pipeline that runs the act-observe-correct loop many times, that is the difference between "fast enough to always use" and "slow enough to skip." Because each agent writes one script instead of ten round-tripped tool calls, the CodeAct approach keeps both latency and token usage down — the model reasons once and lets the guest do the busywork behind the boundary. Where it fits, and the one idea to keep harnessagent_sandbox_demo lives inside Multi-AI-Agents-Cloud-Native — a gallery of patterns for running agent systems safely on Azure: A2A multi-agent orchestration, the Kubernetes sidecar pattern, hardened pipelines, and a sibling sample that runs Copilot agents on AKS inside Kata Containers MicroVMs at the pod level. And the README is explicit that this design is cloud-native: running it in-cluster on AKS changes nothing about the architecture — the same WorkflowBuilder graph, the same Hyperlight sandbox, the same deterministic save_scripts executor. The local build and the in-cluster build are the same shape. The two MicroVM samples are two ends of one spectrum. The Kata sample puts the boundary around the whole pod — a deployment topology. This Hyperlight demo pulls the boundary all the way into the agent process itself — the sandbox becomes a library call. Same question — where do you place the hardware boundary in an agent stack? — answered at two different altitudes. The old pitch for sandboxing always carried an asterisk: yes, it's safer, but you'll pay in speed, compatibility, or friction. MicroVMs erase the asterisk — VM-grade isolation, cold starts fast enough that there's no reason to skip it, and a real environment your agents can actually work in. Enough of a real environment, in fact, to write you a World Cup podcast every morning. The one idea to internalize: the harness decides, the MicroVM contains. Give your agent a room where it is allowed to fail — then let it be brilliant. References Project: harnessagent_sandbox_demo · Multi-AI-Agents-Cloud-Native Hyperlight: hyperlight-dev/hyperlight · hyperlight-dev/hyperlight-sandbox Agent Framework: Agent Harness in Microsoft Agent Framework Background: Why MicroVMs (Docker) · Harness vs. Scaffold glossary (Hugging Face) Install: pip install agent-framework-hyperlight --pre · .NET: dotnet add package Microsoft.Agents.AI.Hyperlight --prerelease Requirements: KVM (Linux) or WHP (Windows); macOS not yet supported.5.8KViews0likes0Comments