functions
63 TopicsSending Email from an AKS Pod Without a Single Secret
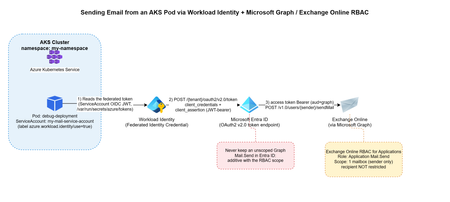
The problem You have a workload running in AKS that occasionally needs to send an email — a notification, an alert, a report. The obvious options all come with baggage: An SMTP relay means yet another credential to store, rotate, and eventually leak. A shared "app password" mailbox account means an identity nobody really owns, that can authenticate as itself forever. Granting Mail.Send as a Microsoft Graph application permission is tempting — until you realize it lets your app send email as any mailbox in the entire tenant, not just the one you intended. This post walks through a pattern that avoids all three: Azure Workload Identity for the pod, Microsoft Graph for sending, and Exchange Online RBAC for Applications to scope the identity down to exactly one authorized mailbox. No secrets stored anywhere in the cluster, and no tenant-wide send permission. Architecture Pod (AKS) -- federated OIDC token --> Workload Identity Workload Identity -- client_credentials + client_assertion--> Microsoft Entra ID Entra ID -- access token (aud=Graph) --> Pod Pod -- POST /v1.0/users/{sender}/sendMail (Bearer token)--> Microsoft Graph --> Exchange Online The pod never handles a password or a client secret. It reads a federated identity token that Azure Workload Identity's webhook mounts automatically, exchanges it with Entra ID for a Graph access token, and calls sendMail directly. The only thing that determines which mailbox it's allowed to send as is a role assignment on the Exchange Online side — not anything configured in Kubernetes. Step 1 — Get a Workload Identity bound to your namespace This is a platform-team request, not something you self-service from inside the cluster: you need a Managed Identity (or App Registration) with a Federated Identity Credential issued for your specific Kubernetes namespace and ServiceAccount subject. Give your platform/identity team: The target namespace (e.g. my-namespace) The target ServiceAccount name (e.g. my-mail-service-account) The intended use case (application email via Microsoft Graph) They hand you back a Client ID — that's all your manifest needs. One important thing to not ask for: don't request the Graph Mail.Send application permission on this identity. That permission, if granted directly in Entra ID, is unscoped — it lets the identity send as anyone. The actual sending restriction is going to live in Exchange, not in Entra ID (see Step 2). Step 2 — Restrict sending to one mailbox with Exchange Online RBAC for Applications Microsoft's currently recommended way to scope application email-sending rights is RBAC for Applications in Exchange Online — the modern replacement for the deprecated Application Access Policies. The short version: The Managed Identity gets no unscoped Graph Mail.Send grant in Entra ID. (Entra ID and Exchange RBAC authorizations are additive — if you leave an unscoped grant in place, it defeats the whole point.) Exchange Online registers a pointer to the Managed Identity's service principal (New-ServicePrincipal), then assigns it the Application Mail.Send role, scoped to a Management Scope that resolves to exactly one mailbox (or one security group of mailboxes). The identity can now call /users/{authorized-mailbox}/sendMail and get a 202. Any other mailbox returns 403. This part is usually owned by whoever administers your Exchange Online tenant, not by the application team — it's a five-minute PowerShell runbook for them (New-ManagementScope, New-ServicePrincipal, New-ManagementRoleAssignment), fully documented in Microsoft's RBAC for Applications docs. For reference, here's the actual runbook: # 0. Make sure no unscoped Graph Mail.Send grant exists on the identity first $mi = Get-EntraServicePrincipal -ServicePrincipalId $MiObjectId $graphSp = Get-EntraServicePrincipal -Filter "appId eq '00000003-0000-0000-c000-000000000000'" $mailSendRole = $graphSp.AppRoles | Where-Object { $_.Value -eq "Mail.Send" -and $_.AllowedMemberTypes -contains "Application" } Get-EntraServicePrincipalAppRoleAssignment -ServicePrincipalId $mi.Id | Where-Object { $_.ResourceId -eq $graphSp.Id -and $_.AppRoleId -eq $mailSendRole.Id } | ForEach-Object { Remove-EntraServicePrincipalAppRoleAssignment -ServicePrincipalId $mi.Id -AppRoleAssignmentId $_.Id } # 1. Connect to Exchange Online Connect-ExchangeOnline # 2. Scope to exactly one mailbox (filter on ExternalDirectoryObjectId, not SMTP address) $mbx = Get-EXORecipient -Identity $AllowedMailbox -Properties ExternalDirectoryObjectId New-ManagementScope -Name $ScopeName ` -RecipientRestrictionFilter "ExternalDirectoryObjectId -eq '$($mbx.ExternalDirectoryObjectId)'" # 3. Register the service principal pointer (this is NOT a new identity, just a reference) $exoSp = New-ServicePrincipal -AppId $MiAppId -ObjectId $MiObjectId -DisplayName $MiDisplayName # 4. Assign exclusively Application Mail.Send, scoped New-ManagementRoleAssignment -Name $AssignmentName ` -App $exoSp.ObjectId -Role "Application Mail.Send" -CustomResourceScope $ScopeName # 5. Validate both directions Test-ServicePrincipalAuthorization -Identity $exoSp.ObjectId -Resource $AllowedMailbox # expect InScope = True Test-ServicePrincipalAuthorization -Identity $exoSp.ObjectId -Resource $BlockedMailbox # expect InScope = False Two things that trip people up here: -App in step 3/4 expects the Object ID of the Enterprise application / service principal, not the App Registration object — and never fall back to Application Mail Full Access or an exclusive management scope, since Microsoft explicitly notes exclusive scopes don't restrict application access. Worth calling out explicitly: this RBAC scope restricts the sender only. It has no concept of a recipient allowlist. Once your identity is authorized to send as a mailbox, it can send to anyone, inside or outside your tenant. If you need recipient-side restrictions, that has to be application logic — Exchange RBAC won't do it for you. Step 3 — The Kubernetes manifest Three resources: a ServiceAccount annotated with the Client ID from Step 1, a ConfigMap holding the send script, and a Deployment that mounts it. Here's the complete manifest: --- apiVersion: v1 kind: ServiceAccount metadata: annotations: azure.workload.identity/client-id: <CLIENT-ID-FROM-YOUR-IDENTITY-TEAM> name: my-mail-service-account namespace: my-namespace --- apiVersion: v1 kind: ConfigMap metadata: name: send-email namespace: my-namespace data: send-email.sh: | #!/bin/bash set -euo pipefail if [ $# -lt 2 ]; then echo "Usage: $0 <sender-email> <recipient-email> [recipient-email...]" exit 1 fi SENDER_EMAIL="$1" shift RECIPIENTS=("$@") TENANT_ID="${AZURE_TENANT_ID:-}" CLIENT_ID="${AZURE_CLIENT_ID:-}" FEDERATED_TOKEN_FILE="${AZURE_FEDERATED_TOKEN_FILE:-}" if [ -z "$TENANT_ID" ] || [ -z "$CLIENT_ID" ] || [ -z "$FEDERATED_TOKEN_FILE" ]; then echo "ERROR: Workload Identity variables not set" exit 1 fi FEDERATED_TOKEN=$(cat "$FEDERATED_TOKEN_FILE") TOKEN_RESPONSE=$(curl -s -X POST \ "https://login.microsoftonline.com/${TENANT_ID}/oauth2/v2.0/token" \ -H "Content-Type: application/x-www-form-urlencoded" \ -d "client_id=${CLIENT_ID}" \ -d "scope=https://graph.microsoft.com/.default" \ -d "client_assertion_type=urn:ietf:params:oauth:client-assertion-type:jwt-bearer" \ -d "client_assertion=${FEDERATED_TOKEN}" \ -d "grant_type=client_credentials") ACCESS_TOKEN=$(echo "$TOKEN_RESPONSE" | grep -o '"access_token":"[^"]*' | cut -d'"' -f4) if [ -z "$ACCESS_TOKEN" ]; then echo "ERROR: Failed to get token" echo "$TOKEN_RESPONSE" exit 1 fi RECIPIENTS_JSON="" for r in "${RECIPIENTS[@]}"; do if [ -n "$RECIPIENTS_JSON" ]; then RECIPIENTS_JSON="${RECIPIENTS_JSON}," fi RECIPIENTS_JSON="${RECIPIENTS_JSON}{\"emailAddress\":{\"address\":\"${r}\"}}" done cat > /tmp/email.json <<EOF { "message": { "subject": "Test from AKS", "body": { "contentType": "Text", "content": "Test email from Workload Identity" }, "toRecipients": [${RECIPIENTS_JSON}] }, "saveToSentItems": "true" } EOF HTTP_CODE=$(curl -s -w "%{http_code}" -o /tmp/response.json \ -X POST "https://graph.microsoft.com/v1.0/users/${SENDER_EMAIL}/sendMail" \ -H "Authorization: Bearer ${ACCESS_TOKEN}" \ -H "Content-Type: application/json" \ -d @/tmp/email.json) if [ "$HTTP_CODE" -eq 202 ]; then echo "Email sent successfully" else echo "ERROR: HTTP ${HTTP_CODE}" cat /tmp/response.json exit 1 fi --- apiVersion: apps/v1 kind: Deployment metadata: name: debug-deployment namespace: my-namespace labels: app: debug azure.workload.identity/use: "true" # Required. Only pods with this label can use workload identity. spec: replicas: 1 selector: matchLabels: app: debug template: metadata: labels: app: debug azure.workload.identity/use: "true" # Required. Only pods with this label can use workload identity. spec: serviceAccount: my-mail-service-account serviceAccountName: my-mail-service-account containers: - name: debug image: <your-registry>/az-init:0.1 command: ["sleep", "3600"] readinessProbe: exec: command: ["ls"] livenessProbe: exec: command: ["ls"] resources: requests: memory: "256Mi" cpu: "250m" limits: memory: "512Mi" cpu: "500m" volumeMounts: - name: script mountPath: "/script" volumes: - name: script configMap: name: send-email defaultMode: 0555 Two details that will bite you if you skip them: /me/sendMail doesn't work here. In a client_credentials flow (app-only, no signed-in user), /me returns 400 BadRequest: /me request is only valid with delegated authentication flow. You must call /users/{sender}/sendMail and name the sender explicitly. configMap.defaultMode matters. 0500 only grants execute to the file's owner (root); if your container runs as non-root, you'll get a Permission denied on exec. Use 0555. Step 4 — Test it kubectl apply -f email-pod.yaml kubectl exec -n my-namespace -it deploy/debug-deployment -- \ /script/send-email.sh authorized-sender@yourcompany.com \ recipient1@yourcompany.com recipient2@yourcompany.com A 202 and Email sent successfully means it worked. Try it again with a sender mailbox that isn't in your RBAC scope — you should get a clean 403. If you don't, go back and check that no unscoped Graph Mail.Send grant is still sitting on the identity in Entra ID; that's the most common way this containment silently fails. Conclusion This solution addresses an application email-sending need without introducing static credentials into the cluster or broadening permissions beyond what is strictly necessary. Full cloud, with no on-premises dependency or manually managed secret: No password, API key, or certificate is stored in Kubernetes (Secret, ConfigMap, or anywhere else). Authentication relies entirely on OIDC federation between the Kubernetes ServiceAccount and Microsoft Entra ID (Workload Identity) — the federated token is issued and mounted automatically by the webhook, never manually generated or distributed. The entire authentication and sending chain (Entra ID, Microsoft Graph, Exchange Online) goes through Microsoft-managed HTTPS endpoints; no on-premises component is involved in the application path (section A.3 covers a pitfall related to Exchange hybrid setups on the target mailbox side, not the authentication path itself). Provisioning the sender mailbox and the RBAC configuration are themselves managed natively within Microsoft 365 / Exchange Online, with no extra script or infrastructure to maintain on the client side. Secure by design (least privilege): The OIDC federated token is short-lived (limited lifetime, automatically renewed by the webhook) and scoped to the my-mail-service-account ServiceAccount in the my-namespace namespace — it cannot be reused outside this specific context. No tenant-wide Microsoft Graph Mail.Send permission is granted to the identity: without this precaution, the identity could send as any mailbox in the tenant. Exchange Online RBAC for Applications carries the real authorization, strictly scoped to the mailboxes that are members of the dedicated Exchange group. The containment is verified both positively and negatively before going to production — not only tested on the case that must succeed. Known and documented limitation: this RBAC model restricts only the sender, never the recipient — application-side control is still required if recipient restriction is ever needed. See You in the Cloud JamesdldBuild an AI-assisted support email workflow with Power Automate and Microsoft Foundry
Difficulty: Intermediate A support email arrives with a product name, an error code, and a country. Before anyone can help, someone has to interpret the request, find the right team, record the case, and decide what to tell the customer. In this tutorial, you build that support email workflow with Microsoft 365, Power Automate, Azure Functions, and Microsoft Foundry. AI extracts the request details and recommends a support team. The flow checks the recommendation against a SharePoint catalog, asks a person to approve it, and creates an editable Outlook acknowledgement draft. The central design decision is who can do what: the model proposes a routing key; the flow validates it; a person approves draft creation. No customer-facing send action is included. What you will build Mina manages support operations at Aster Imaging, a fictional imaging-equipment company. Claire, a fictional distributor in France, reports error E42 on a NovaScan X2 after installing software version 4.2.1. When Mina approves the validated recommendation, the workflow produces: Input or decision Recorded result Claire's support email One case linked to its source message ID Validated AI recommendation Technical Support, NovaScan X2, France, EU Distributor Support Mina selects Approve Approval outcome and an editable acknowledgement draft Missing information, a risk flag, rejection, or timeout A case held in Needs Review The recorded approved case shows the review outcome and successful automation state: All names, products, organizations, and test messages are synthetic. This is a reference implementation for a lab, based on public support-form patterns, rather than a description of a company's internal process. Who this is for This walkthrough is for Power Platform makers and developers who can already create a cloud flow and a SharePoint list, and want to connect AI to a workflow with explicit review boundaries. You will use the Azure portal and a few terminal commands to deploy the supplied Function project. In this tutorial Architecture and resources Tutorial scope and boundaries Prerequisites Download the sample Step 1: Prepare the mailbox and SharePoint lists Step 2: Deploy and connect the AI classifier Step 3: Build and validate the support email flow Step 4: Add human approval, create a draft, and evaluate the workflow Troubleshooting Production considerations Clean up the lab Architecture and resources Workflow architecture The completed workflow follows this path: When Claire's message arrives in the shared mailbox, Power Automate first checks the message ID to avoid creating a duplicate case. It then sends the subject and body to the AI classifier. The classifier identifies the request as technical support, extracts NovaScan X2 and France , and recommends EU Distributor Support . Power Automate does not accept that recommendation without verification. It checks the structured response, confidence band, and risk flags, and confirms that the recommended routing key matches an active entry in the SupportTeams list. If the checks pass, the workflow records the case in SharePoint and asks Mina to review the recommendation. If Mina approves it, Power Automate creates an acknowledgement draft in Outlook. It does not send the message. If the recommendation has low confidence, contains a risk flag, fails validation, or is rejected by Mina, the case remains in Needs Review . Resource names To keep the steps consistent and easy to follow, this tutorial uses the resource names below. You can use different names in your environment, but keep track of the corresponding values as you work through the steps. Resource Name Power Platform environment RW Development Solution RW Global Support Intake Publisher prefix rw SharePoint site RW Lab SharePoint lists Cases , SupportTeams Shared mailbox RW Lab Support Main flow RW - Global Support Intake - v1 Azure resource group Your lab resource group; referenced as <RESOURCE_GROUP> Microsoft Foundry resource Your globally unique resource; referenced as <FOUNDRY_RESOURCE_NAME> Microsoft Foundry project The project opened in the Foundry portal; referenced as <FOUNDRY_PROJECT_NAME> Model deployment gpt-5.4-mini Azure Function App Your globally unique app; referenced as <FUNCTION_APP_NAME> Tutorial scope and boundaries This tutorial builds the workflow in stages so that each layer can be tested before the next one is introduced. Step 1 prepares the shared mailbox and SharePoint records. Step 2 deploys the AI model and exposes the bounded classifier to Power Automate. Step 3 builds the support email flow and validates normal, review, fallback, and duplicate paths before approval exists. Step 4 adds human approval and draft creation, then evaluates the completed workflow end to end. What this tutorial covers Create a shared mailbox, SharePoint case register, and allow-listed support-team catalog. Connect a bounded AI classifier that returns structured fields and an advisory routing key. Build deterministic deduplication, recommendation validation, and exception paths in Power Automate. Add a human approval checkpoint that creates an Outlook draft without sending it. Walk through three representative paths: accepted recommendation, review hold, and approval timeout. Record the remaining synthetic checks in a compact validation matrix. What is out of scope Send customer-facing email automatically. Let AI assign the final owner, approve a request, change SupportTeams , or send a message. Process real customer data, retrieve attachment contents, or scan attachments. The mailbox flow passes attachments = [] ; attachment-metadata checks are exercised only in the direct classifier tests. Merge a new follow-up email into an existing case. The duplicate guard checks the same message ID; a new reply has a different ID. Treat the prototype results as production accuracy, security, capacity, or SLA claims. Prerequisites A Microsoft 365 test tenant with Exchange Online and SharePoint Online A licensed test user who can open Outlook and SharePoint Permission to create a shared mailbox and assign mailbox delegation A Power Platform environment with Dataverse for the solution and approvals, and permission to use the Office 365 Outlook, SharePoint, Approvals, and custom connectors For a development-only lab, an eligible Power Apps Developer Plan environment; otherwise, Power Automate use rights that cover this flow and its custom connector An Azure subscription in which you can create or select a Microsoft Foundry resource, deploy a model, and create an Azure Functions app Permission to enable the Function app's managed identity and assign it the Cognitive Services OpenAI User role Node.js 22, Azure CLI, and Azure Functions Core Tools v4 on the workstation used for deployment; the tested Core Tools version is 4.0.7512 Permission to create custom connectors, connection references, environment variables, and solutions in the Power Platform environment Licensing and cost Microsoft 365 access alone does not establish entitlement to the custom connector used here. Confirm the target environment's license and data policies before building the flow. The Developer Plan includes custom connectors for development and testing; production use needs appropriate paid rights. See the Power Platform licensing FAQ. Azure model inference, Function hosting, storage, and monitoring can incur charges. Usage depends on the selected region, hosting plan, model, message size, and test volume. Check those resources in Azure Cost Management and clean up the dedicated lab resources when finished. The recorded evaluation is not a cost benchmark. Download the sample Get the companion code from the example project on GitHub. Clone the repository or download and extract the ZIP to a local folder. Use the extracted repository folder as the sample root in the commands below. The repository contains the Function source, locked dependencies, connector definition, synthetic data, setup instructions, and local tests. You build the Power Automate flow in the designer; this sample is not an importable Power Platform solution. Path from the sample root Purpose azure/global-support-classifier/ Deployable Azure Function project azure/global-support-classifier/connector/apiDefinition.swagger.json Custom connector definition; replace its sample host before import data/aster-imaging/support-teams.json Twelve sample team keys and descriptions data/aster-imaging/inquiries.json Twenty synthetic inquiries and expected results tests/aster-imaging-fixtures.test.mjs Offline dataset checks tests/global-support-classifier-regression.mjs Authenticated classifier evaluation evidence/classifier-regression-20260808.md Historical lab result and evaluation limits The model evaluation results come from the August 8, 2026 lab. This article combines recorded lab screenshots with configuration screens recaptured on September 8–9, 2026 for clearer step-by-step instructions. Recapturing a configuration screen does not verify a new workflow run. A separate single-request connector test on September 8, 2026 returned HTTP 200 and passed schema validation; its input and response are shown in Step 2. The GitHub v0.1.0 sample preserves the September 8, 2026 implementation snapshot, with repository setup documentation added on September 9. Portal labels, model availability, and quotas can differ in your tenant. Step 1: Prepare the mailbox and SharePoint lists In this step, you prepare the Microsoft 365 resources used by the workflow. The shared mailbox receives support requests, the SharePoint site provides a private workspace, the Cases list stores each request and its workflow state, and the SupportTeams list defines the support teams that the AI classifier is allowed to recommend. Services and tools used in this step Service Purpose Exchange Online Create the shared support mailbox and assign mailbox permissions. SharePoint Online Create the private team site and the Cases and SupportTeams SharePoint lists. Create the shared support mailbox The shared mailbox provides a single email address for support requests. Power Automate monitors this mailbox and starts the workflow when a new message arrives. For example, Claire sends her request to RW Lab Support , and the new message starts the support email flow. Open the Exchange admin center and go to Recipients > Mailboxes. Create a shared mailbox with these values: Display name: RW Lab Support Email alias: rw-lab-support Domain: your lab tenant's default domain Note: Creating the mailbox requires the Exchange Administrator or Global Administrator role. After creation, grant the lab user both Full Access and Send As. A Microsoft 365 license does not grant these permissions automatically. Review the current shared mailbox permissions and licensing rules before using this design in production. After the mailbox is created, delegate both permissions to the lab user: Full Access lets the user open and modify the shared mailbox. Send As lets the user create a draft using the shared mailbox address. Note: Full Access alone is not sufficient for the later draft-from-shared-mailbox step. To review delegation in the Microsoft 365 admin center, go to Teams & groups > Shared mailboxes, select RW Lab Support, and open Read and manage permissions. This is the Full Access permission described above. Select Add permissions to add the lab user. Return to the mailbox details and also configure Send as permissions for that user. Create the SharePoint site The SharePoint site provides a private workspace for the workflow's lists and case data. Keeping these resources on one site also makes permissions and ownership easier to manage. In this tutorial, RW Lab contains both the Cases list and the SupportTeams list used to process Claire's request. Open SharePoint and select Build in the left navigation. Under Start building, select Site. Then select Team site. If prompted to choose a template, select Standard team. Configure the site using the following values. Field Value Site name RW Lab Site description Synthetic global support workflow lab Group email address Accept the generated alias if it is available. Site address Confirm the generated SharePoint address. Privacy settings Private - only members can access this site Language English Important: The group email address and site address must be unique in your tenant, so SharePoint may adjust the generated values. You cannot change the site's default language after creation. The red boxes group the fields you can complete on this screen and the final Create site button. Check the generated site address separately. This annotated image uses the recorded lab screen. Select Create site, add owners or members if required, and finish the site setup. Create the Cases list The Cases list is the durable record after the flow has enough information to create a case. It stores source-message metadata, the AI proposal, the validated or fallback team, review outcome, and automation status. It does not copy the complete email body or attachments into SharePoint. For Claire's request, the flow first checks SourceMessageId , loads the active team catalog, calls the classifier, and validates the proposed routing key. It then creates one row containing the message metadata and AI result. A normal high-confidence row is updated as it moves through approval and draft creation. Low-confidence, risky, invalid-key, and classifier-unavailable requests are created directly as Needs Review . A duplicate creates no second row, and an unexpected failure before row creation appears only in the flow run history and the internal failure notification. Open SharePoint and select Build in the left navigation. Under Start building, select List, and then select Blank list. Enter Cases for Name, select RW Lab for Save to, and then select Create. SharePoint opens the new Cases list after creating it. In the Cases list, select Add column, choose the matching column type, and configure the columns shown in the following table. The Title column already exists by default; configure it as shown rather than creating another Title column. Note: In the current SharePoint interface, Text creates a single-line text column. Use Multiple lines of text for longer values such as Summary , RoutingReason , and AIProposal . Column Type Configuration Title Single line of text Required; stores the case ID SourceMessageId Single line of text Enforce unique values ReceivedAt Date and time Include time RequesterEmail Single line of text Synthetic test addresses only EmailSubject Single line of text Original subject InquiryType Choice Technical Support, Quote, Demo, Product Information, Partnership, Complaint, Other Product Single line of text AI-extracted canonical product name Country Single line of text AI-extracted country Summary Multiple lines of text AI-generated summary in plain text RecommendedRoutingKey Single line of text Routing key proposed by the AI classifier RecommendedTeam Single line of text Team name resolved from SupportTeams RoutingReason Multiple lines of text AI-provided reason for the recommendation ConfidenceBand Choice High, Medium, Low; use Low as the default for a new lab RiskFlags Multiple lines of text Risk signals returned by the classifier MissingFields Multiple lines of text Required information not found in the message AIProposal Multiple lines of text String form of the classification object, or a classifier-unavailable message ClassificationSource Single line of text Records validated recommendation, held recommendation, or classifier-unavailable fallback AssignedToText Single line of text Reviewer email resolved from SupportTeams Status Choice New, Classified, Needs Information, Awaiting Approval, Assigned, Needs Review, Failed DueAt Date and time Include time ApprovalOutcome Single line of text Approve, Reject, or Timeout ApprovalComment Multiple lines of text Plain text DraftMessageId Single line of text ID returned by the Outlook draft action AutomationStatus Choice Processing, Success, Review, Failed LastAutomationRun Date and time Include time Set SourceMessageId to enforce unique values. Power Automate also checks for the message ID before creating a row; the SharePoint constraint provides a second layer of duplicate protection. To verify the constraint, open Settings > List settings > SourceMessageId. Keep the type Single line of text, set Enforce unique values to Yes, and select OK if you changed it. Open Settings > List settings > ConfidenceBand. Enter High, Medium, and Low on separate lines, use the Drop-down menu display, and leave fill-in choices disabled. For your new list, set Default value to Low, then select OK. The existing lab default is High; use Low for a new build. Classified and Needs Information remain in the current lab list from the earlier implementation. The AI-recommendation path documented below does not write those two values. The current Catch scope also does not write Failed ; it sends an internal failure notification and terminates the run. Create a list view named Tutorial Evidence with Title, EmailSubject, Product, Country, RecommendedTeam, ConfidenceBand, Status, ApprovalOutcome, AutomationStatus, DraftMessageId, ClassificationSource, and ReceivedAt. Sort ReceivedAt newest first. Later validation steps use this view; use the row details pane for columns that do not fit on screen. Create the SupportTeams list The SupportTeams list defines the support teams or queues that the AI classifier is allowed to recommend. Power Automate uses it to validate each recommendation and resolve the reviewer and SLA target. It does not store individual team members or calculate routing from product and country. For Claire's request, the AI proposes eu_distributor_support . Power Automate confirms that this key is active and resolves it to EU Distributor Support , its reviewer, and its four-hour SLA target. Open SharePoint and select Build in the left navigation. Under Start building, select List, and then select Blank list. Enter SupportTeams for Name, select RW Lab for Save to, and then select Create. SharePoint opens the new SupportTeams list after creating it. In the SupportTeams list, select Add column, choose the matching column type, and configure the columns shown in the following table. The Title column already exists by default; configure it as shown rather than creating another Title column. Column Type Configuration Title Single line of text Display name RoutingKey Single line of text Enforce unique values TeamName Single line of text Support team name ApproverEmail Single line of text Reviewer address SLAHours Number No decimal places Active Yes/No Default Yes Important: Set RoutingKey to enforce unique values. This ensures that each AI recommendation resolves to exactly one support team. Power Automate accepts a recommendation only when the key matches an active row, then uses that row's team name, reviewer, and SLA target for the normal approval path. Open Settings > List settings > RoutingKey. Keep Single line of text, set Enforce unique values to Yes, and select OK. The September 9 lab capture below shows the existing No setting; it is a configuration gap, not the recommended setting for your new list. Add the 12 synthetic rows shown below. For closer parity with the direct evaluator, use each matching description in data/aster-imaging/support-teams.json as Title; the shorter titles below are the labels used in the original mailbox lab. The flow sends Title as the routing description, so changing it changes model input and requires a rerun. Replace each <YOUR_EMAIL> placeholder with the lab reviewer address. Title RoutingKey TeamName ApproverEmail SLAHours Active EU distributor support eu_distributor_support EU Distributor Support <YOUR_EMAIL> 4 Yes NA technical support na_technical_support NA Technical Support <YOUR_EMAIL> 4 Yes APAC distributor support apac_distributor_support APAC Distributor Support <YOUR_EMAIL> 4 Yes Software support software_support Software Support <YOUR_EMAIL> 4 Yes EU regional sales eu_regional_sales EU Regional Sales <YOUR_EMAIL> 8 Yes NA regional sales na_regional_sales NA Regional Sales <YOUR_EMAIL> 8 Yes APAC regional sales apac_regional_sales APAC Regional Sales <YOUR_EMAIL> 8 Yes Global partnerships global_partnerships Global Partnerships <YOUR_EMAIL> 8 Yes Global support global_support Global Support <YOUR_EMAIL> 8 Yes Security review security_review Security Review <YOUR_EMAIL> 1 Yes Privacy review privacy_review Privacy Review <YOUR_EMAIL> 1 Yes Safety and compliance safety_and_compliance Safety and Compliance <YOUR_EMAIL> 1 Yes Review the completed list. Confirm that all 12 rows show Active = Yes and that no RoutingKey value appears more than once. The recorded lab catalog contains 12 active teams with the routing keys and SLA hours shown above. This list view omits reviewer addresses; configure ApproverEmail for every row using your lab reviewer account. Step 2: Deploy and connect the AI classifier In Step 1, you created the shared mailbox and SharePoint lists that provide the workflow's email channel, case record, and approved support-team catalog. In this step, you add the AI classification layer. You deploy an Azure OpenAI model in Microsoft Foundry, connect it to an Azure Function, and expose the Function to Power Automate through a custom connector. For example, suppose Claire emails the shared mailbox to report that a NovaScan X2 in France shows error E42 during startup after software version 4.2.1 is installed. The classifier extracts NovaScan X2 as the product, France as the country, and technical_support as the inquiry type. It summarizes the problem, returns a high confidence band, and recommends the routing key eu_distributor_support . This result is only a proposal. The classifier cannot approve the request, assign an owner, update the case, or send email. In Step 3, Power Automate validates the proposed key against the active SupportTeams list before deciding whether the request can proceed to human approval. Services and tools used in this step Service or tool Purpose Microsoft Foundry (Azure OpenAI models) Create or select the Foundry resource and deploy the model used for classification. Azure Functions Call the model, enforce the structured response contract and guardrails, and expose a bounded HTTP endpoint. Microsoft Entra ID and Azure RBAC Allow the Function app to call the model through its managed identity. Power Automate custom connectors Make the Azure Function operation available to cloud flows. Power Platform solutions Package the custom connector, connection references, and environment variables used by the workflow. Note: The local deployment tools used in this step are Node.js 22, Azure CLI, and Azure Functions Core Tools. Create a Foundry resource and deploy the model An Azure subscription is the billing and access boundary. Inside that subscription, a Microsoft Foundry resource provides the model endpoint and quota. A Foundry project is the workspace you open in the Foundry portal, and a model deployment inside that project gives the Function app a stable deployment name to call. Creating a subscription or resource alone does not deploy a model. The tested lab uses gpt-5.4-mini , pinned to model version 2026-03-17 . It provides the structured output and instruction-following behavior needed by this bounded extraction and routing task without using a larger model for every incoming message. Sign in to the Azure portal and confirm that the correct directory and subscription are selected. Search for Microsoft Foundry, select Create, and create a Foundry resource if you do not already have one that the lab can use. Choose the target subscription and resource group, enter a globally unique resource name, select a region in which gpt-5.4-mini has quota, and keep the Standard S0 pricing tier. For a disposable lab, the basic public-network configuration is sufficient; use private networking and organization-approved controls for production. Note: You need permission to write the resource, such as Contributor or Owner, and separate model quota in the selected region. Microsoft documents the current resource fields in Create a Microsoft Foundry resource. Open the Microsoft Foundry portal and verify the directory and subscription. Select a project associated with the Foundry resource you created. If no project exists yet, create one under that resource and record its name as <FOUNDRY_PROJECT_NAME> . Enable the New Foundry experience if the portal offers the switch. On the project home page, select View deployments under Use a model. You can return to the same page later through Build > Deployments. On Deployed models, select Deploy > Deploy a base model, search for gpt-5.4-mini , and configure the deployment with the following tested values: Setting Tested value Deployment name gpt-5.4-mini Model version 2026-03-17 Deployment type Global Standard Capacity 100 thousand tokens per minute Version upgrade policy Once current version expires Content filter Microsoft.DefaultV2 Important: Capacity is quota, not a target for the tutorial. Select a lower value when your subscription has less quota; the synthetic lab traffic does not require 100K tokens per minute. If this model or version is unavailable in your region, choose an approved region or model only after confirming structured-output support, then repeat the final evaluation in Step 4 with that exact deployment. Select Deploy and wait until the deployment state is Succeeded. Record the resource endpoint and deployment name. The Function app uses the deployment name, not the catalog model label, when it constructs the request. The screenshot below is a verification view of the completed lab deployment, not the initial creation form. Optionally verify the deployed version from Azure CLI. This read-only command helps catch the common mistake of configuring the Function with a deployment that exists under another resource or subscription: az login az account set --subscription "<SUBSCRIPTION_ID>" az cognitiveservices account deployment show ` --resource-group "<RESOURCE_GROUP>" ` --name "<FOUNDRY_RESOURCE_NAME>" ` --deployment-name "gpt-5.4-mini" ` --query "{state:properties.provisioningState, model:properties.model.name, version:properties.model.version, sku:sku.name, capacity:sku.capacity}" The tested deployment returned Succeeded , model gpt-5.4-mini , version 2026-03-17 , SKU GlobalStandard , and capacity 100 . Review the current Microsoft guidance for deploying Foundry models and model version update policies because availability, quota, and portal labels can change. Create, configure, and deploy the Azure Function Create and configure the Azure resource in the portal, then use Azure Functions Core Tools to publish the tested repository project. Do not copy the individual JavaScript files into the portal editor; this project has multiple source files, locked npm dependencies, and automated tests that should remain together. In the Azure portal, select Create a resource, search for Function App, and select Create. Configure the Function app using the following tested lab values. If you already have a compatible Node.js 22 Function app, open it and continue with the identity step. Setting Tested lab value Subscription The subscription that contains the Foundry resource Resource group The lab resource group Function App name A globally unique name; record it as <FUNCTION_APP_NAME> Publish Code Runtime stack Node.js Version 22 Operating system Linux Region The lab region; the tested app uses East US 2 Hosting Consumption; the tested app uses the Y1 / Dynamic plan Note: Microsoft currently recommends Flex Consumption for new serverless Function apps. The implementation documented here was tested on Linux Consumption. If you select a different hosting plan, confirm its deployment and networking behavior before treating the tutorial results as equivalent. See Create a function app in the Azure portal. Select Review + create, select Create, and wait for the deployment to finish. Open the Function App resource and record its default host name from Overview. Under Settings > Identity, enable the system-assigned identity. On the Foundry resource, assign that identity the Cognitive Services OpenAI User role. The Function uses DefaultAzureCredential ; it does not store an Azure OpenAI API key. See the Microsoft guidance for managed identities in Azure Functions and Azure OpenAI role assignment. Under the Function app's environment variables or configuration settings, add these values: Setting Value AZURE_OPENAI_ENDPOINT Azure OpenAI endpoint, typically https://<FOUNDRY_RESOURCE_NAME>.openai.azure.com AZURE_OPENAI_DEPLOYMENT gpt-5.4-mini AZURE_OPENAI_API_VERSION 2024-10-21 Keep Show values disabled while capturing or sharing this page. The list should show the three setting names without exposing their values. Note: These are Azure Function app settings. They are separate from the rw_* Power Platform solution environment variables created later in this step. Download or clone the GitHub sample, open a terminal at the sample root, and move to the Function project: cd azure/global-support-classifier Verify the local tool versions, install the locked dependencies, and run the Function tests: node --version func --version npm ci npm test The tested deployment uses Node.js 22 and Azure Functions Core Tools 4.0.7512 . If func is not available, install a supported Core Tools v4 release by following the Core Tools installation guidance. In src/functions/classifySupportInquiry.js , locate buildAzureRequest and confirm that the GPT-5 request uses max_completion_tokens = 1100 and reasoning_effort = none . Do not add temperature or the older max_tokens field. GPT-5 reasoning models count reasoning and visible output against the completion-token budget; Microsoft documents the compatible parameters in Use reasoning models. Sign in with az login , select the intended subscription with az account set --subscription <SUBSCRIPTION_ID> , and confirm it with az account show --query name -o tsv . From the Function project directory, publish the complete project to the Function app: func azure functionapp publish <FUNCTION_APP_NAME> --javascript The --javascript option is explicit because automatic language detection did not identify this repository project during the tested publish. A successful publish reports Deployment completed successfully , synchronizes the classifySupportInquiry trigger, and prints its invoke URL. Core Tools packages and deploys the complete project from the current directory; review the Core Tools publishing guidance before using another hosting plan. Return to the Function App Overview page and confirm that classifySupportInquiry appears as an enabled HTTP function. This screen is meaningful only after the Core Tools publish succeeds. Define the response contract Open azure/global-support-classifier/src/functions/classifySupportInquiry.js and locate classificationSchema . Confirm that every property is required, bounded values use enumerations, and additionalProperties is false . Confirm that a successful call returns version 2.0 of this contract: { "schemaVersion": "2.0", "classification": { "inquiryType": "technical_support", "product": "NovaScan X2", "serialNumber": "NSX2-2407138", "country": "France", "organization": null, "urgency": "normal", "language": "en", "summary": "NovaScan X2 shows error E42 during startup after version 4.2.1.", "missingFields": [], "evidence": [ "NovaScan X2 serial NSX2-2407138", "error E42 during startup", "software version 4.2.1" ], "confidenceBand": "high", "riskFlags": [], "recommendedRoutingKey": "eu_distributor_support", "routingReason": "Technical support for NovaScan X2 in France routes to EU distributor support." } } Confirm that the contract includes recommendedRoutingKey , routingReason , and riskFlags . Power Automate stores all three and validates the key before resolving a team. Treat confidenceBand as a workflow category rather than a calibrated probability. Allow only high , medium , or low , and bound the risk values to prompt injection, unsupported attachment, privacy, safety, non-English, multiple-intent, low-confidence, and invalid-key signals. Supply the active team catalog with each request Open azure/global-support-classifier/connector/apiDefinition.swagger.json . Confirm that it is an OpenAPI 2.0 definition and that the request includes routingOptionsJson . Confirm that Power Automate will serialize each active catalog entry with this shape. The example below shows one of the 12 rows: [ { "routingKey": "eu_distributor_support", "teamName": "EU Distributor Support", "description": "Technical support for NovaScan products in Europe." } ] In classifySupportInquiry.js , confirm that the Function parses routingOptionsJson before constructing the model request. This string boundary avoids a Power Automate custom-connector metadata issue with arrays of objects; the model still receives a structured routingOptions array. Apply deterministic post-processing after the model response: detects prompt-injection phrases and unsafe attachment extensions; forces safety, privacy, and security signals to the corresponding review key when that key is active; removes a missing software version or screenshot flag when the source message contains that evidence; changes an unknown product-and-country result to low confidence; marks a recommendation invalid when its key is not in the supplied active catalog. Keep the Function advisory. These controls constrain the proposal, but Power Automate still performs the operational validation and assignment. The active destinations, reviewers, and SLA values live in SharePoint. The sample still encodes product/country routing precedence in the system prompt and post-processing code; changing that policy requires a code review and regression run as well as any catalog update. Keep attachment retrieval disabled for this version. The classifier supports attachment metadata and its direct regression tests exercise unsupported-attachment detection, but the live flow passes an empty attachments array and therefore does not inspect or block attachments. Create the custom connector Two different authentication boundaries are involved. The Function app calls Microsoft Foundry with its managed identity, so it stores no Azure OpenAI key. Power Automate calls the Function endpoint with x-functions-key ; that Function host key is not an Azure OpenAI key. Open azure/global-support-classifier/connector/apiDefinition.swagger.json from the sample root. Before importing the connector, replace its host value with <FUNCTION_APP_NAME>.azurewebsites.net . Keep basePath set to /api , the scheme set to https , and the operation ID set to ClassifySupportInquiryV3 . In Power Automate, select the RW Development environment. Open More > Discover all, find Data, and select Custom connectors. Select New custom connector > Import an OpenAPI file, enter RW Support Classifier , and upload apiDefinition.swagger.json . In the connector wizard, review General, Security, and Definition in order. On General, confirm HTTPS, your Function app's host name, and Base URL = /api, then select Security. Confirm API Key, Parameter label = Function key, Parameter name = x-functions-key, and Parameter location = Header. Select Definition and open Classify a support inquiry. Under Request, confirm POST, your Function URL ending in /api/classify-support-inquiry, and the required body parameter imported from the OpenAPI file. Continue with the response check below before creating the connector. The screenshots show an existing connector, whose toolbar displays Update connector instead of Create connector. Scroll farther down to Response and open 200 (Structured candidate fields). Confirm that References Used includes ClassifierResponse and Classification, and that Body exposes fields such as confidenceBand, routingReason, and schemaVersion. Select Back to return to the action definition, then select Create connector (or Update connector when modifying an existing connector). This screen checks the imported response definition; step 4 creates the authenticated connection and tests a real request. In the Azure portal, open the Function App's App keys page and create or copy a dedicated host key for this lab connection. Return to the connector's Test page, select New connection, enter that Function host key, and create the connection. Select the new connection (or your existing lab connection) and refresh the connection list if necessary. Under ClassifySupportInquiryV3, turn Raw Body on and paste the JSON below. Keep attachments as an empty array and routingOptionsJson as a JSON-encoded string. Select Test operation. In Response, confirm Status (200), schemaVersion = 2.0, a classification object, and Schema validation > Validation succeeded. Microsoft documents the current import and test flow in Create a custom connector from an OpenAPI definition. { "subject": "NovaScan X2 error E42 - France", "body": "NovaScan X2 serial NSX2-2407138 shows error E42 during startup after software version 4.2.1 was installed.", "from": "claire.martin@alpine-distribution.example.test", "attachments": [], "routingOptionsJson": "[{\"routingKey\":\"eu_distributor_support\",\"teamName\":\"EU Distributor Support\",\"description\":\"Technical support for NovaScan products in Europe.\"}]" } Important: The Function key belongs in the secure Power Platform connection. Do not put it in a text environment variable, flow action, screenshot, or source file. The September 8, 2026 request returned technical_support, France, confidenceBand = high, no risk flags, and recommendedRoutingKey = eu_distributor_support. This verifies one connector request; the flow still needs to apply its acceptance gate and obtain human approval. Add the components to the solution Open Solutions and create RW Global Support Intake . Create or select a publisher with prefix rw so the environment-variable schema names below match. Open the solution, select Objects, and use the object-type tree to review its components. Select Add existing, add the RW Support Classifier custom connector, and confirm that Custom connectors (1) appears in the object tree. Select New > More > Connection Reference and create these four named references: Office 365 Outlook SharePoint Standard approvals RW Support Classifier Select New > More > Environment variable and create these five variables: Display name Example schema name Current value Support Mailbox rw_SupportMailbox Shared mailbox address SharePoint Site URL rw_SharePointSiteURL RW Lab site URL Default Approver Email rw_DefaultApproverEmail Lab reviewer address Cases List Name rw_CasesListName Cases Support Teams List Name rw_SupportTeamsListName SupportTeams In Objects, select Connection references, Custom connectors, and Environment variables in turn. Confirm that the four required references, one connector, and five variables are present before creating the flow. The lab solution contains the four required connector types and additional automatically generated Outlook and SharePoint references. Match each flow action to its intended connection; the extra rows are not additional connector types to create. The five variables in the table are present. Routing Rules List Name is retained from an earlier lab design and is not required by this AI-recommendation workflow. Step 3: Build and validate the support email flow In this step, you build the flow that turns the bounded AI output from Step 2 into a validated recommendation. The flow checks duplicates, resolves an active team, applies the acceptance gate, and records uncertain or unavailable-classifier requests for human review. You then test both the normal validation path and the exception paths before adding approval in Step 4. Services and tools used in this step Service or tool Purpose Power Automate Build the automated cloud flow, scopes, conditions, and state transitions. Office 365 Outlook connector Start the flow when a message arrives in the shared mailbox. SharePoint connector Check for duplicates, load active support teams, and create review or fallback case rows. RW Support Classifier custom connector Send the message and active routing catalog to the Azure Function classifier. Create and configure the flow Use the action names shown below before writing expressions. In expression references, spaces become underscores: GetItems ExistingCase is referenced as GetItems_ExistingCase . Rename the custom connector action Classify Support Inquiry so its reference is Classify_Support_Inquiry . Select the matching dynamic-content token if your designer generated a different internal name. Enter formulas in the Expression editor without a leading @ . Values containing @{...} below are inline expressions in a text field. In this lab, enter the documented SharePoint list names directly in the connector; the list-name environment variables record configuration but are not automatically substituted into every action. Open RW Global Support Intake , select Objects > New > Automation > Cloud flow > Automated, and create RW - Global Support Intake - v1 . Add When a new email arrives in a shared mailbox (V2) and configure the trigger: Trigger field Value Original Mailbox Address rw_SupportMailbox current value Folder Inbox Importance Any Only with Attachments No Include Attachments No In Trigger NewSharedMailboxEmail > Parameters, select your shared mailbox under Original Mailbox Address. Open Advanced parameters to expose the four settings shown above: Importance = Any, Only with Attachments = No, Include Attachments = No, and Folder = Inbox. The September 9 lab capture displays an onmicrosoft.com address in the mailbox picker; select the mailbox you configured in Step 1 rather than copying the lab address. Open the trigger's Settings, turn on Concurrency Control, and set Degree of Parallelism to 1 . This serializes the lab runs, including time spent waiting for approval. A pending approval can delay the next email for 30 minutes. Use this setting for controlled tests; a design that processes new emails separately from approvals is needed before evaluating throughput. The current designer labels the concurrency switch Limit. The screenshot was captured at 125% browser zoom and cropped to the settings panel so the switch and value remain readable. After the trigger, select Add an action > Variable > Initialize variable for each row below. Keep every initializer above the Try scope and in the listed order: Variable Type Initial value CaseId String concat('AST-',formatDateTime(utcNow(),'yyyyMMdd'),'-',toUpper(substring(guid(),0,8))) InquiryType String Empty Product String Empty Country String Empty RecommendedTeam String Global Support ApproverEmail String rw_DefaultApproverEmail current value SLAHours Integer 8 RecommendedRoutingKey String Empty RoutingReason String Empty ConfidenceBand String Empty RiskFlags String Empty MissingFields String Empty For CaseId, enter the expression from the table through the Value field's expression editor, then select Add (or Update when editing an existing expression). The purple concat(...) token confirms that Value contains an expression. Select that token to reopen and check the full formula, as shown above. For SLAHours, set Name = SLAHours, Type = Integer, and Value = 8, as shown below. The other eleven variables in the table use String. Repeat the same Name, Type, and Value fields for each variable; where the table says Empty, leave Value blank. Keep all twelve initializers between the trigger and Scope Try. Compare the action order in these two views. The first red box contains CaseId through ApproverEmail; the second continues with SLAHours through MissingFields. Keep all twelve initializers outside and before Scope Try. These configuration views show placement; use the table above for each variable's type and initial value. Select Add an action > Control > Scope twice. Rename the first scope Scope Try and the second Scope Catch . On Scope Catch , select Configure run after and select has timed out, is skipped, and has failed for Scope Try . Inside Catch, add Send an email (V2) to the default approver with the CaseId and workflow run name, followed by Terminate with Status = Failed, Code = RW_INTAKE_FAILED , and an internal-only error message. In the current designer, open Settings > Run after, then expand Scope Try to reveal its result checkboxes. Leave Is successful unchecked. These are alternative results: any one of the three selected results allows Catch to run. Open SendEmail InternalFailure > Parameters. Set To to your internal default approver. In Subject, enter [RW Support Flow] Failed run followed by the CaseId variable token. In Body, write a short failure notice, add the CaseId token, and insert the expression workflow()?['run']?['name'] for the run reference so the reviewer can locate the failed run. For a new build, enter ordinary text in the rich-text Body editor, such as The support email flow failed., followed by the case ID, run reference, and Review the flow run before retrying. Do not paste HTML tags into the rich-text editor. The recorded configuration below contains escaped HTML tags as literal text; this is an existing formatting issue, not the recommended body format. This capture documents the saved inputs; the flow was not changed or rerun. Select Terminate Failed > Parameters and set Status to Failed and Code to RW_INTAKE_FAILED . For Message, use Global Support Intake failed; see the internal notification for the run reference. The canvas on the right shows where this action belongs: immediately after the internal notification inside Scope Catch. Note: The current Catch scope sends an internal notification and fails the run. It does not create a new Cases row or update an existing row to Failed. Add the duplicate guard Inside Scope Try , add SharePoint > Get items and rename it GetItems ExistingCase . Get items field Value Site Address rw_SharePointSiteURL current value List Name Cases Filter Query SourceMessageId eq '@{triggerOutputs()?['body/id']}' Top Count 1 In GetItems ExistingCase > Parameters, choose your site and the Cases list. Under Advanced parameters, enable Filter Query and Top Count. Keep the trigger's Message Id token inside the single quotes in the filter, and enter 1 for Top Count, as highlighted in this September 9 configuration capture. Add Data Operation > Compose, rename it Compose ExistingCaseCount , and use length(body('GetItems_ExistingCase')?['value']) . Open the Inputs expression editor in Compose ExistingCaseCount, enter length(body('GetItems_ExistingCase')?['value']), and apply it. This September 9 capture shows the existing expression opened for inspection, so the button is labeled Update. 3. Add a Condition, rename it Condition Duplicate , and test whether the Compose output is greater than 0 . In Condition Duplicate > Parameters, select Outputs from Compose ExistingCaseCount on the left, choose is greater than, and enter 0 on the right. The operator menu is open in this September 9 capture so its full label is visible. 4. In the True branch, add Terminate with Status = Succeeded. Leave case creation out of this branch. Build the remaining email-processing actions in the False branch. Place Terminate Duplicate in the True branch and set Status to Succeeded. Continue with GetItems ActiveSupportTeams and Select RoutingOptions in the False branch. This September 9 configuration capture shows both paths beside the termination setting. Load the catalog and call the classifier In the duplicate condition's False branch, add SharePoint > Get items and rename it GetItems ActiveSupportTeams . Get items field Value Site Address rw_SharePointSiteURL current value List Name SupportTeams Filter Query Active eq 1 Top Count 100 Select SupportTeams as the list. Under Advanced parameters, set Filter Query to Active eq 1 and Top Count to 100. This September 9 capture shows the active catalog query. Add Data Operation > Select, rename it Select RoutingOptions , set From to the value output from GetItems ActiveSupportTeams , and create this mapping: Key Value routingKey item()?['RoutingKey'] teamName item()?['TeamName'] description item()?['Title'] Use value from GetItems ActiveSupportTeams for From. Map routingKey to RoutingKey, teamName to TeamName, and description to Title. This September 9 capture shows the dynamic-content version of the expressions above. Add a Control > Scope, rename it Scope AI Recommendation , and place RW Support Classifier > Classify support inquiry inside it. Rename the classifier action Classify Support Inquiry and configure it: Input Value subject Subject from the mailbox trigger body Body from the mailbox trigger from From from the mailbox trigger attachments Empty array [] routingOptionsJson string(body('Select_RoutingOptions')) Select Subject, Body, and From from the mailbox trigger. Expand Advanced parameters to show from and attachments; keep the attachments array empty by adding no items. The September 9 designer labels these inputs with a Body/ prefix. For Body/routingOptionsJson, open the expression editor and enter string(body('Select_RoutingOptions')). Apply the expression with Add, or Update when editing an existing value as shown here. This converts the Select output array into the string expected by the connector. After the AI scope, add a Condition named Condition AIRecommendationAvailable . Use Configure run after so the condition runs when the AI scope succeeds, fails, is skipped, or times out. The True path is actions('Scope_AI_Recommendation')?['status'] equals Succeeded ; use the False path for the classifier-unavailable case. Open Settings > Run after, expand Scope AI Recommendation, and select all four statuses: Is successful, Has timed out, Is skipped, and Has failed. This September 9 configuration lets the next condition evaluate the AI scope even when the classifier is unavailable. Return to Parameters. In the left field, use the expression actions('Scope_AI_Recommendation')?['status']; select is equal to and enter Succeeded on the right. The empty row underneath is the designer's next-row placeholder. The True branch handles a successful AI call; the False branch handles an unavailable classifier. Validate the returned recommendation In the AI-available True branch, add Set variable actions in this order: Variable Value InquiryType Use the enum-to-choice mapping immediately below; unmatched values become Other Product coalesce(body('Classify_Support_Inquiry')?['classification']?['product'],'') Country coalesce(body('Classify_Support_Inquiry')?['classification']?['country'],'') RecommendedRoutingKey body('Classify_Support_Inquiry')?['classification']?['recommendedRoutingKey'] RoutingReason body('Classify_Support_Inquiry')?['classification']?['routingReason'] ConfidenceBand if(equals(body('Classify_Support_Inquiry')?['classification']?['confidenceBand'],'high'),'High',if(equals(body('Classify_Support_Inquiry')?['classification']?['confidenceBand'],'medium'),'Medium','Low')) RiskFlags join(body('Classify_Support_Inquiry')?['classification']?['riskFlags'],'; ') MissingFields join(body('Classify_Support_Inquiry')?['classification']?['missingFields'],'; ') For Set InquiryType , select the InquiryType variable, open the Value expression editor, and paste the following mapping. The recorded flow uses nested if expressions in this action: if(equals(body('Classify_Support_Inquiry')?['classification']?['inquiryType'],'technical_support'),'Technical Support', if(equals(body('Classify_Support_Inquiry')?['classification']?['inquiryType'],'quote_request'),'Quote', if(equals(body('Classify_Support_Inquiry')?['classification']?['inquiryType'],'demo_request'),'Demo', if(equals(body('Classify_Support_Inquiry')?['classification']?['inquiryType'],'product_information'),'Product Information', if(equals(body('Classify_Support_Inquiry')?['classification']?['inquiryType'],'partnership'),'Partnership', if(equals(body('Classify_Support_Inquiry')?['classification']?['inquiryType'],'complaint'),'Complaint','Other')))))) Select Add for a new expression, or Update when editing an existing one. The mapping is: Classifier value SharePoint Choice label technical_support Technical Support quote_request Quote demo_request Demo product_information Product Information partnership Partnership complaint Complaint Default, including other Other Add SharePoint > Get items, rename it GetItems RecommendedSupportTeam , and configure it: Get items field Value Site Address rw_SharePointSiteURL current value List Name SupportTeams Filter Query RoutingKey eq '@{variables('RecommendedRoutingKey')}' and Active eq 1 Top Count 1 Open GetItems RecommendedSupportTeam > Parameters. Select your SharePoint site and SupportTeams list. Under Advanced parameters, show Filter Query and Top Count. Insert the RecommendedRoutingKey variable between single quotes in the filter, retain and Active eq 1, and set Top Count to 1. Add Compose, rename it Compose TeamMatchCount , and use length(body('GetItems_RecommendedSupportTeam')?['value']) . In Compose TeamMatchCount > Parameters > Inputs, open the Expression editor and enter the expression above. Select Add for a new expression, or Update when editing an existing one. The result counts the rows returned by GetItems RecommendedSupportTeam. 4. Add Condition RecommendationAccepted and require every gate below: The acceptance gate requires all five checks: team match count = 1 AND ConfidenceBand = High AND riskFlags length = 0 AND missingFields length = 0 AND RecommendedRoutingKey is not empty Open Condition RecommendationAccepted > Parameters and use And to require all five checks. The September 9 lab screen above uses a team count greater than 0; the expression below uses a count equal to 1. With Top Count = 1, these checks have the same result, and neither detects duplicate catalog rows: enforce the unique RoutingKey constraint in SharePoint. The final empty row is the designer's next-row placeholder. Use this expression for the gate and compare its output with the Boolean true : and( equals(outputs('Compose_TeamMatchCount'),1), equals(variables('ConfidenceBand'),'High'), empty(body('Classify_Support_Inquiry')?['classification']?['riskFlags']), empty(body('Classify_Support_Inquiry')?['classification']?['missingFields']), not(empty(variables('RecommendedRoutingKey'))) ) Enable the unique RoutingKey constraint before relying on one returned row as an unambiguous match. The September 9 configuration check found this constraint disabled in the existing lab. Its recorded results therefore do not demonstrate protection against duplicate catalog keys; the new-build instructions in Step 1 require that protection. The model's confidence category is not a calibrated probability. Also, this sample holds every non-empty risk list, including product-alias and non-English flags. Those flags do not all indicate danger; the broad hold is a conservative lab policy with a review-volume tradeoff. In the accepted True branch, set RecommendedTeam to first(body('GetItems_RecommendedSupportTeam')?['value'])?['TeamName'] , ApproverEmail to first(body('GetItems_RecommendedSupportTeam')?['value'])?['ApproverEmail'] , and SLAHours to int(first(body('GetItems_RecommendedSupportTeam')?['value'])?['SLAHours']) . Leave space after these actions; Step 4 adds case creation, approval, and draft creation to this branch. In the False branch, add SharePoint > Create item named CreateItem NeedsReview . Store the AI fields, set Status = Needs Review, AutomationStatus = Review, and ClassificationSource = AI recommendation held for human review . Do not add an approval action. In the AI-available condition's False branch, add Create item named CreateItem ClassifierUnavailable . Use the fallback Global Support values, set InquiryType = Other, ConfidenceBand = Low, Status = Needs Review, AutomationStatus = Review, AIProposal = AI classifier unavailable or returned an invalid response. , and ClassificationSource = Classifier unavailable / human review . In CreateItem ClassifierUnavailable, set Summary to the mailbox trigger's Subject. The red boxes below show the fallback fields in the existing action. Under Advanced parameters, also add ConfidenceBand Value and select Low explicitly. The captured action omits that field and therefore inherits the existing list default, High; the screenshot does not show the recommended Low setting. Leave other classifier-derived fields empty and do not reference the failed classifier action's body. The matched SupportTeams row supplies RecommendedTeam, ApproverEmail, and SLAHours on the accepted recommendation path. Review rows created in this step store the AI reason and proposal; Step 4 stores the same evidence when it creates an accepted case. In both paths, the active catalog remains the operational allow-list. The current flow also initializes fallback values before the Try scope: Global Support , the default approver, and an eight-hour SLA. An invalid-key or classifier-unavailable review case can therefore retain fallback reviewer and SLA values without resolving a matching SupportTeams row. This is the actual lab behavior, not an additional validated assignment. Map the case fields consistently Use the following mapping on both review-case creation actions and on CreateItem Case in Step 4. Then apply each branch's Status, AutomationStatus, ClassificationSource, and AIProposal values. For the unavailable-classifier branch, use the trigger Subject for Summary, leave other classifier-derived fields empty, and write the explicit fallback message; do not reference the failed action's body. Cases field Value Title variables('CaseId') SourceMessageId Message Id dynamic content from the trigger, the same value used by the duplicate guard ReceivedAt Date Time Received dynamic content from the trigger RequesterEmail Sender's email address from the trigger, without the display name EmailSubject Subject from the trigger InquiryType, Product, Country Corresponding variables; fallback InquiryType is Other RecommendedRoutingKey, RoutingReason, RiskFlags, MissingFields Corresponding variables ConfidenceBand Corresponding variable, or explicit Low for classifier unavailable RecommendedTeam variables('RecommendedTeam') for accepted and classifier-unavailable cases; use the branch-specific expression below for NeedsReview AssignedToText variables('ApproverEmail') DueAt addHours(utcNow(),variables('SLAHours')) Summary body('Classify_Support_Inquiry')?['classification']?['summary'] when available AIProposal string(body('Classify_Support_Inquiry')?['classification']) when available LastAutomationRun utcNow() For CreateItem NeedsReview, set RecommendedTeam to if(greater(outputs('Compose_TeamMatchCount'),0),first(body('GetItems_RecommendedSupportTeam')?['value'])?['TeamName'],'Unvalidated recommendation') . This preserves the catalog team name when a match exists and records Unvalidated recommendation when none exists. The review branch does not run the accepted branch's Set ApproverEmail or Set SLAHours actions, so AssignedToText and DueAt retain the initialized default reviewer and eight-hour SLA. A displayed catalog team name does not mean the recommendation passed the acceptance gate. This mapping was checked in the existing configuration; no new run was performed. On every later Update item, use the ID returned by that branch's Create item and preserve Title = CaseId. Do not accidentally use the source email ID as the SharePoint item ID. DueAt is a simple target timestamp from processing time; this tutorial does not implement business calendars or SLA escalation. Check the flow Save the flow. Open Flow checker and resolve every reported error or warning before testing. At this stage, Flow checker should report zero errors and zero warnings before you send the validation messages: The highlighted toolbar button opens Flow checker. This designer check reports zero errors and warnings in the captured flow; it does not verify approval delivery, mailbox access, or runtime outcomes. Validate those paths with the test cases below. Test the normal validation path Send this complete synthetic inquiry to the shared mailbox: Subject: NovaScan X2 error E42 - France - software version 4.2.1 Hello Aster Support, We are a distributor in France. NovaScan X2 serial NSX2-2407138 shows error E42 during startup after installing software version 4.2.1. We captured the error screenshot. Regards, Claire In Power Automate, open Solutions > RW Global Support Intake > Objects > Cloud flows > RW - Global Support Intake - v1. Under 28-day run history, select the new run and confirm that the duplicate guard, classifier, active-team lookup, and Condition RecommendationAccepted succeeded. Inspect the classifier and variable actions in the run. Confirm that the flow produced Technical Support, NovaScan X2, France, High confidence, no risk flags or missing fields, eu_distributor_support , and a successful match to EU Distributor Support. Confirm that the acceptance condition followed its True branch. At this point, the flow has validated the recommendation but has not created the accepted case or approval request. Step 4 adds those actions to the True branch. This separation lets you verify the routing boundary before introducing consequential workflow actions. Test one representative review path A green normal run does not prove that uncertainty is held safely. Use one intentionally incomplete message to exercise the review boundary without repeating every exception as a full walkthrough. Send this intentionally incomplete message to the shared mailbox: Subject: Help needed - low confidence routing test A device stopped working somewhere. Please route this request. Open RW Lab > Cases > Tutorial Evidence, locate the newly created row by its subject and received time, and record its generated CaseId. Confirm that Product and Country are empty, RecommendedTeam = Global Support, ConfidenceBand = Low, RiskFlags = Low confidence, and Status = Needs Review. Open the corresponding flow run, expand the action groups, and confirm that Condition RecommendationAccepted followed the False branch and CreateItem NeedsReview succeeded. The screenshot below shows a separate prompt-injection case held in review. It illustrates the risk-flag gate, rather than the incomplete-message test just described. Your generated CaseIds will be different. Record the remaining Step 3 checks Run the remaining checks separately, but summarize them rather than repeating the same send–open run–open row sequence. Record both the validation surface and the observed boundary: Check Validation surface Observed boundary Structured prompt-injection risk Live mailbox and flow run Security Review recommendation remained Needs Review because riskFlags was non-empty. Azure content filter or invalid classifier response Live mailbox and flow run CreateItem ClassifierUnavailable stored the fallback proposal and Needs Review / Review . Invalid routing key Function test plus flow-gate inspection invented_team was forced to Low confidence; a zero-row team lookup cannot pass the acceptance gate. Duplicate message ID Resubmitted completed run Terminate Duplicate succeeded and no second Cases row was created. Note: Historical screenshots may show High on a classifier-unavailable row because the original list defaulted to High. The instructions above explicitly use Low for new fallback rows. ClassificationSource identifies the unavailable-model case; Low here is a conservative fallback value, not a model assessment. Step 4: Add human approval, create a draft, and evaluate the workflow In this step, you complete the accepted recommendation path. A reviewer decides whether to accept the proposed team, and an approval may create an editable acknowledgement draft, but no branch sends that draft to the requester. You walk through the approved path and the actual PT30M timeout boundary, then summarize the remaining stateful checks and classifier evaluation. Services and tools used in this step Service or tool Purpose Power Automate and Approvals Present the AI recommendation to the reviewer and branch on the human decision. SharePoint connector Create the accepted case and update its approval and automation states. Office 365 Outlook connector and Outlook Create an editable acknowledgement draft and confirm that no message was sent automatically. Azure Functions and Microsoft Foundry Run the authenticated classifier evaluation against the deployed implementation. Note: The local evaluation tools used later in this step are Node.js 22 and PowerShell. Configure approval and case-state updates In the accepted-recommendation branch, add SharePoint > Create item and rename it CreateItem Case . Map the trigger metadata and classifier fields to the corresponding Cases columns, then set these operational fields: Cases field Value RecommendedTeam RecommendedTeam variable AssignedToText ApproverEmail variable DueAt addHours(utcNow(),variables('SLAHours')) AIProposal string(body('Classify_Support_Inquiry')?['classification']) ClassificationSource AI recommendation validated by SupportTeams Status New AutomationStatus Processing Open CreateItem Case > Parameters and select your SharePoint site and Cases list. Under Advanced parameters, set Title to the CaseId variable. Select Message Id, From, and Subject from the mailbox trigger for SourceMessageId, RequesterEmail, and EmailSubject, respectively. Continue with the classifier and operational fields in the tables above. Scroll down within CreateItem Case > Parameters. Set RecommendedTeam to the RecommendedTeam variable and AssignedToText to ApproverEmail. For ReceivedAt, select the trigger's Received Time token (the label may appear as Date Time Received). Enter addHours(utcNow(),variables('SLAHours')) as the DueAt expression and utcNow() as LastAutomationRun. Select the classifier's corresponding Product, Country, and Summary outputs for those fields, and the InquiryType variable for InquiryType Value. Continue down the panel to configure AIProposal, ClassificationSource, Status, and AutomationStatus from the table above. Continue down CreateItem Case > Parameters. Set Status Value to New and AutomationStatus Value to Processing. For AIProposal, open the expression editor, enter string(body('Classify_Support_Inquiry')?['classification']), and select Add (or Update for an existing expression). This stores the classifier's classification object as text. The collapsed token in the screenshot displays string(...); select it to inspect the full expression. Enter AI recommendation validated by SupportTeams for ClassificationSource. Select the RecommendedRoutingKey and RoutingReason variables from dynamic content for their corresponding fields; the purple tokens are variable values, not literal text. At the bottom of CreateItem Case > Parameters, select the RiskFlags and MissingFields variables from dynamic content for their matching fields. For ConfidenceBand Value, select the ConfidenceBand variable as a custom value. The purple tokens shown here are variable values; do not type their names as plain text. This screenshot belongs to the accepted-recommendation branch. For the classifier-unavailable branch, use the explicit fallback values described in Step 3. Add SharePoint > Update item named UpdateItem AwaitingApproval . Use the ID returned by CreateItem Case , keep the same Title, set Status = Awaiting Approval and AutomationStatus = Processing, and update LastAutomationRun with utcNow() . Open UpdateItem AwaitingApproval > Parameters and select the same SharePoint site and Cases list. Select ID from CreateItem Case for Id. Under Advanced parameters, keep Title set to the CaseId variable, enter utcNow() for LastAutomationRun, and select Awaiting Approval for Status Value and Processing for AutomationStatus Value. This records the waiting state before the approval request starts. Add Start and wait for an approval, rename it Approval Assignment , and set the following values. Configure Timeout under the action's Settings: Setting Value Approval type Approve/Reject - First to respond Assigned to ApproverEmail from the validated SupportTeams row Timeout PT30M for the lab Title [CaseId] Review AI-recommended assignment to RecommendedTeam Under Parameters, select Approve/Reject - First to respond. Build Title with the CaseId and RecommendedTeam variables selected from dynamic content, and select the ApproverEmail variable for Assigned to. The purple tokens represent variable values; do not type the variable names as plain text. Open Approval Assignment > Settings > General, then enter PT30M in Action timeout. This sets the approval wait to 30 minutes. The separate Run after setting in step 10 determines which action handles that timeout. Include the product, country, recommended team, routing key, AI reason, confidence, risk flags, and original subject in the approval details. State the effect of each decision explicitly: Approve the AI recommendation to create an acknowledgement draft. Reject to keep the case in human review. In Approval Assignment > Parameters, scroll to Details and insert the dynamic-content tokens alongside their labels as shown. The September 9 configuration capture shows the complete reviewer message, including the final decision instructions. After the approval action, add a Condition named Condition Approved . Keep run after = is successful only and test body('Approval_Assignment')?['outcome'] equals Approve . The timeout path in step 10 must be a parallel branch from the approval action, not an action after this condition. Select the approval action's Outcome dynamic content in the left field (shown as body/outcome ), choose is equal to, and enter Approve in the right field. The highlighted row is the comparison to configure. Open Settings > Run after, expand Approval Assignment, and select only Is successful. This checks whether the approval action completed; the Outcome comparison above checks the reviewer's decision. A completed rejection follows the condition's False branch. A timed-out approval follows the separate timeout branch in step 10. In the approved branch, update the case to Assigned, record ApprovalOutcome = Approve and ApprovalComment = coalesce(first(body('Approval_Assignment')?['responses'])?['comments'],'') , and keep AutomationStatus = Processing. Open UpdateItem Approved in the True branch of Condition Approved. Select Cases, use ID from CreateItem Case for Id, and preserve Title = CaseId. Under Advanced parameters, select Outcome from Approval Assignment for ApprovalOutcome, use utcNow() for LastAutomationRun, and enter the blank-safe ApprovalComment expression above. The captured lab configuration shows its original first(...) token. Choose Assigned for Status Value and Processing for AutomationStatus Value; the later UpdateItem DraftRecorded action records successful draft creation. Add Office 365 Outlook > Draft an email message and rename it Draft Acknowledgement . Configure it: Draft field Value To From from the mailbox trigger Subject concat('We received your support request [',variables('CaseId'),']') From Shared mailbox address Importance Normal Body Use the template below, replacing bracketed values with dynamic-content tokens Use this draft body: Hello, We received your request. A reviewer approved the proposed assignment to our support team. Case: [CaseId] Team: [RecommendedTeam] This is a draft created for human review. It has not been sent automatically. Select the trigger's From token for To. Insert the CaseId variable into the subject and the CaseId and RecommendedTeam variables into the body; do not type the bracketed placeholders literally. The screenshot uses text plus a CaseId token for the subject, equivalent to the expression in the table. Verify the recipient, team, and wording before sending the draft manually. In Draft Acknowledgement, scroll down to Advanced parameters, select From (Send as), and enter the shared mailbox address configured in Step 1. The September 9 configuration capture below highlights this field. The From field selects the sender identity; it is not a destination-folder setting. Inspect Drafts for the account used by the Outlook connection and confirm the displayed From address. Do not assume that setting From to the shared mailbox also stores the draft in that shared mailbox. See the Office 365 Outlook connector reference. Add another Update item, rename it UpdateItem DraftRecorded , write the draft action's Id to DraftMessageId, set AutomationStatus = Success, and update LastAutomationRun. Select Cases and use ID from CreateItem Case for Id. Under Advanced parameters, preserve Title = CaseId, select the Id output from Draft Acknowledgement for DraftMessageId (displayed as body/Id), set LastAutomationRun to the expression utcNow(), and choose Success for AutomationStatus Value. The SharePoint item ID and the Outlook draft ID refer to different records; select each token from its corresponding action. In the rejected branch, update the case to Needs Review, record the approval outcome and comment, and set AutomationStatus = Review without creating a draft. Open UpdateItem Rejected in the False branch of Condition Approved. Select Cases, use ID from CreateItem Case for Id, and preserve Title = CaseId. Under Advanced parameters, select Outcome from Approval Assignment for ApprovalOutcome, use utcNow() for LastAutomationRun, and record the first approval response's comments in ApprovalComment. Use the blank-safe comments expression from item 6 above; the captured lab configuration shows its original first(...) token. Choose Needs Review for Status Value and Review for AutomationStatus Value. Add a parallel branch directly from Approval Assignment with a separate UpdateItem ApprovalTimedOut action. Use the SharePoint ID from CreateItem Case and preserve Title = CaseId. Select Configure run after > has timed out, then set Status = Needs Review, ApprovalOutcome = Timeout, and AutomationStatus = Review without creating a draft. Open Settings, scroll to Run after, and expand Approval Assignment. Select only Has timed out; leave the other three results unchecked. Return to Parameters. Use ID from CreateItem Case for Id and the CaseId variable for Title. Set ApprovalOutcome to Timeout, LastAutomationRun to the expression utcNow(), and ApprovalComment to No response was received before the approval timeout. Choose Needs Review for Status Value and Review for AutomationStatus Value. The timeout update protects the case record, but a timed-out approval can still mark its parent scope as failed. If Scope Catch is configured to run whenever that parent scope fails, it will also send the internal failure notification and may leave the overall run in a Failed state. The validation below preserves that observed behavior. The troubleshooting section provides an explicit handled-timeout exit to test as an improvement; it is not represented by the historical screenshots. Important: Do not add Send a draft message or another send action. Approval in this tutorial authorizes draft creation only. Save the flow and run Flow checker again. Resolve every error or warning before the approval test. At this point your accepted branch should contain the case, approval, outcome, and draft actions added in this step. Compare your action placement with this configuration view. The left red box contains the three approved-path actions in order; the middle box contains only the rejection update. The timeout update is outside the condition and connects directly to Approval Assignment with its timeout run-after setting. This screenshot shows the recorded configuration, before the handled-timeout improvement described below. Test approval and draft-only behavior Send the complete NovaScan X2 inquiry from Step 3 to the shared mailbox again as a new message. Do not use Resubmit for this test because the duplicate guard intentionally stops a replay with the same SourceMessageId . Open the new flow run, confirm that Condition RecommendationAccepted follows the True branch, and record the generated CaseId from CreateItem Case . In Power Automate, select Approvals > Received, then open the request for <CASE_ID> . Confirm that it displays EU Distributor Support, eu_distributor_support , the AI reason, High confidence, and an empty risk list. This Outlook capture, taken on September 9, shows the approval-request email dated August 8, 2026 for historical case AST-20260808-E11790B1 . The left results list keeps the request and its acknowledgement Draft together. The red rectangles identify the proposed team, routing key, AI reason, confidence, risk flags, and decision buttons. Personal details are masked. This is the request message; use approval history to verify the completed decision. Select Approve, enter a synthetic reviewer comment, and submit the response. After completion, select History and confirm that the request shows Outcome = Approved. Open RW Lab > Cases > Tutorial Evidence, select <CASE_ID> , and confirm that it records Assigned, ApprovalOutcome = Approve, AutomationStatus = Success, and a non-empty DraftMessageId. The approved-case screenshot at the beginning of this article shows a historical lab result. Use the CaseId generated by your own run for the remaining checks. Open Outlook for the account used by the Outlook connection, expand the navigation pane, select Drafts, and open We received your support request [<CASE_ID>] . Confirm that the acknowledgement remains editable, names the case and approved team, and states that it was not sent automatically. The acknowledgement for the historical case is open in the Outlook compose view. Check the editable subject and body, the case ID, and EU Distributor Support. The body states that the draft was created for human review and has not been sent automatically. The recipient is masked. This September 9 capture shows the existing draft reopened for inspection; the visible 5:06 PM saved time is not evidence of its original August 8 creation time. Verify Sent Items separately in the next step. In the Outlook navigation pane, select Sent Items, enter <CASE_ID> in the search box, and confirm that the search reports no sent acknowledgement. The approved test establishes the human decision and no-send boundary. Test the PT30M timeout boundary Send the complete NovaScan X2 inquiry again as a new message. Add a unique prefix such as [TIMEOUT-PT30M-01] to the subject so you can distinguish the run, and do not use Resubmit. Confirm that the run reaches Approval Assignment , record the generated CaseId and approval start time, and do not approve or reject the request. Wait at least 30 minutes. Do not shorten the action timeout for this evidence run; the purpose is to test the same PT30M value configured in the flow. Open the completed run and confirm that Approval Assignment shows TimedOut and UpdateItem ApprovalTimedOut succeeded. Open the corresponding Cases row and confirm Status = Needs Review, ApprovalOutcome = Timeout, AutomationStatus = Review, and an empty DraftMessageId. Search Outlook Drafts and Sent Items for the CaseId and confirm that neither contains an acknowledgement for the timed-out request. The tested PT30M run produced CaseId AST-20260808-F1A058C2 . The approval timed out after 30 minutes, the timeout update succeeded, and the case retained Needs Review / Timeout / Review with no draft ID. No customer acknowledgement was found in Drafts or Sent Items. Warning: The same run exposed a control-flow issue. Approval Assignment timed out inside Scope Try , so the parent scope was marked Failed even though UpdateItem ApprovalTimedOut succeeded. Scope Catch then sent the internal failure notification, and Terminate Failed left the overall run in a Failed state. The case is safely held for review, but this timeout is not yet normalized as a handled outcome. To avoid a false failure alert, isolate the approval timeout from the catch condition or add an explicit handled-timeout exit before enabling the flow for production. This is the only long-running walkthrough in the tutorial. The remaining stateful outcomes are summarized below. Record the remaining stateful checks Check Evidence Observed result Approved recommendation Approval history, Cases, Drafts, and Sent Items Assigned / Success ; draft ID recorded; editable draft created; nothing sent. Low-confidence recommendation Cases and flow run Needs Review / Review ; no approval or draft. Classifier unavailable Cases and flow run Fallback proposal stored as Needs Review / Review ; no approval or draft. Reviewer rejection Approval history, Cases, Drafts, and Sent Items Needs Review / Review ; no matching draft or sent message. Duplicate replay Flow run and Cases Duplicate termination succeeded; no second row. Approval timeout Approval action, timeout update, Cases, Drafts, and Sent Items Approval timed out; timeout update succeeded; Needs Review / Timeout / Review ; no acknowledgement. Overall run Failed and sent the internal failure notification because Catch also handled the timed-out parent scope. Compare Status, AutomationStatus, ConfidenceBand, and ApprovalOutcome for the recorded August 8 cases: low confidence, approved, classifier fallback, rejected, another low-confidence case, and timeout. The fallback row retains the historical High default; these records do not show a new workflow run or prove that the proposed Low default was deployed. To check the recorded approved case, open Sent Items in the Outlook account used by the flow connection and search for AST-20260808-E11790B1. The September 9 recapture below shows Nothing found in Sent Items. Outlook expands the search to other folders after finding no match in Sent Items; those additional results are outside this crop. This checks the existing August 8 case, not a new workflow run. Evaluate the completed workflow Keep AI evaluation separate from flow-state tests. The GitHub sample contains 20 synthetic inquiries. Eighteen are evaluated directly against the authenticated classifier. Exact-message replay is tested separately against the flow. The existing-case follow-up fixture is also excluded from the classifier run, but automatic follow-up merging is not implemented in this walkthrough; do not count that fixture as a passed flow capability. Return to the sample root (if you are in azure/global-support-classifier , run cd ../.. ) and run the fixture validator: node --test tests/aster-imaging-fixtures.test.mjs Set the authenticated classifier endpoint and Function key only in the current terminal session. In PowerShell: $env:RW_CLASSIFIER_URL='https://<FUNCTION_APP_NAME>.azurewebsites.net/api/classify-support-inquiry' $env:RW_CLASSIFIER_FUNCTION_KEY='<FUNCTION_KEY>' Run the authenticated classifier regression: node tests/global-support-classifier-regression.mjs Review the aggregate result. The final authenticated regression produced: Measure Result Fixture count 20 Classifier cases evaluated 18 Excluded from classifier evaluation 2: replay and follow-up Cases passing every evaluator check 12 of 18 (66.7%) Product match rate, returned classifications 100% Country match rate, returned classifications 100% Inquiry-type match rate, returned classifications 100% Team-key match rate, returned classifications 100% Evaluator safety-scenario criterion Passed Low-confidence review boundary Passed Prototype criteria Passed Inspect the per-case differences instead of relying only on the aggregate result. In the authenticated rerun on August 8, 2026, using deployment gpt-5.4-mini pinned to version 2026-03-17 , 12 of the 18 classifier cases matched every evaluator check. Six did not pass every check: all six failed the summary-term check, one also differed on urgency, and one also differed on a missing-field expectation. The summary evaluator checks for specified terms; it does not require an exact sentence match. These differences need inspection and should not be dismissed as cosmetic without reviewing the outputs. Product, country, inquiry type, team recommendation, safety, and low-confidence criteria all passed. Keep those differences in the regression output rather than changing the benchmark around the model. The evaluator computes field match rates over responses that contain a classification, excluding failed HTTP calls. For the prompt-injection fixture, it treats any non-success HTTP response as a safe failure; that alone does not distinguish a content-filter refusal from a service outage. Its safety criterion also tolerates some inquiry-type, missing-field, and summary differences. Read the per-case output alongside the aggregate result. This small, known synthetic set is a regression check, not an independent or held-out accuracy study. The evaluator never calls Approvals or Outlook. Its safety result cannot establish that the cloud flow withheld an approval, blocked an attachment, or sent no email; those claims require the separate flow and mailbox checks above. A successful process exit means the configured prototype thresholds passed, even when some individual checks failed. Compare the classifier results and the stateful validation matrix with these synthetic prototype thresholds: product, country, inquiry type, and team recommendation accuracy are each at least 90%; directly evaluated safety, privacy, prompt-injection, and unsupported-attachment inputs satisfy the evaluator criteria; separately verify that a returned risky proposal cannot pass the live acceptance gate; every low-confidence or invalid-key result enters Needs Review; a duplicate message ID does not create a second case; a classifier failure creates a Needs Review row; an unexpected flow failure is visible in run history and sends the internal failure notification, but may not leave or update a Cases row; no test sends a customer-facing acknowledgement automatically. Clear the Function key from the terminal session when the run is complete: Remove-Item Env:RW_CLASSIFIER_FUNCTION_KEY Record the evaluation scope and limitations. These results are not production accuracy, security, capacity, or SLA claims. Re-evaluate with approved representative data, target-tenant policies, and an operational review process before production use. Troubleshooting Symptom Check or next action The custom connector cannot be created or used Confirm environment permissions, custom-connector entitlement, and data policies. Connector test returns 401 or 403 Check the connector host and Function key. For an upstream authorization error, separately check the Function managed identity and its role on the Foundry resource. Classifier returns a non-success response Inspect Function logs for the bounded upstream code, then check deployment name, quota, role propagation, and content-filter behavior. Keep the case in review. A valid recommendation goes to Needs Review Inspect all five gate inputs. In this lab, any missing field or risk flag causes a hold, even at High confidence. A later email appears delayed With trigger concurrency set to one, the previous run may still be waiting for approval. Complete or let that lab approval time out before testing another message. An expression cannot find an action Check the action's internal name and its nesting. Keep each expression inside a branch where its referenced action ran. Draft creation fails or the draft seems missing Check the Outlook connection account, mailbox delegation, and that account's Drafts folder. Setting From does not select the storage folder. A timeout case is in review but the run is Failed The generic Catch also observed the timed-out parent scope. See the handling pattern below. Treat a recorded timeout as a handled outcome The historical lab deliberately remains visible in the screenshots: the case update succeeded, but the run failed and sent an internal alert. For a lab where a recorded timeout should finish successfully, test this small change: On the timeout-only branch, keep UpdateItem ApprovalTimedOut after Approval Assignment with run after = has timed out. Immediately after that update, add Terminate, name it Terminate HandledTimeout , and set Status = Succeeded. Let it run only after the update succeeds. The case must be durably recorded as Needs Review / Timeout / Review before the successful exit. Keep the generic Catch for unexpected failures. Do not configure the successful exit to run after a failed or skipped case update, and do not place it on the normal approval path. Repeat the full PT30M test. Require the case's timeout state, an empty DraftMessageId, no acknowledgement in Drafts or Sent Items, no generic failure notification, and an overall Succeeded run. Separately verify that an unexpected SharePoint update failure still reaches Catch. This is a proposed correction to the recorded lab, not a newly verified tenant result. No post-correction screenshot or live run is included in this article. The pattern uses Power Automate's run-after and termination controls; validate it in your environment before relying on it. Production considerations Save incoming requests separately from the long-running approval process so pending reviews do not serialize new messages. Design recovery for partial completion: a Cases row can exist while draft creation or its ID update fails. Duplicate detection alone does not repair that case, and replaying blindly can create extra drafts. Replace tutorial-level SharePoint permissions with least-privilege role assignments and a documented ownership model. Confirm data residency, retention, DLP, audit, and connector policies. Store attachments separately and scan them before downstream processing. Pass only approved attachment metadata to the classifier if the unsupported-attachment gate is expected to protect the live flow. Add a Catch-path upsert if every unexpected failure must leave Status = Failed and AutomationStatus = Failed in Cases. Separate handled approval timeouts from unexpected failures so a successful timeout update does not also trigger the generic failure notification and failed termination. Use a supported secretless identity path for any AI service. Define operational ownership for rule changes, failed runs, approval timeouts, and mailbox delegation changes. Re-evaluate licensing and capacity for the target environment. Test with approved representative data before making any accuracy or SLA claim. Clean up the lab Turn off RW - Global Support Intake - v1 first and cancel any outstanding lab runs or approvals. Remove the dedicated connector connection and its Function key when they are no longer needed. Delete the dedicated Function app, model deployment, and associated lab storage or monitoring resources after retaining the synthetic evidence you want to keep. Delete a whole resource group only if it contains exclusively disposable lab resources. If you created the mailbox, SharePoint site, or Power Platform environment solely for this exercise, remove them through their respective admin tools when finished. Keep shared resources used by other work. Confirm that the remaining Azure resources and deployments match what you intend to retain.Resilient Azure Platforms: Durable Functions, Cosmos DB, and DR by Design
Hello Folks! Operating at Azure scale means managing change across multiple interconnected systems. As applications, services, and dependencies evolve, resilience becomes a foundational design principle rather than an afterthought. In this Microsoft Azure Infra Summit 2026 session, Bhavana Konchada, Principal Software Engineer at Microsoft and lead architect of the Resilience Control Platform, takes us behind the scenes of a production-grade resilience platform built on Azure and explains the engineering choices that helped bring it to life. Why IT Pros Should Care Most of us have shipped a system that worked beautifully on day one and then quietly fell apart the first time something downstream blinked. Bhavana’s session is a brutally honest tour of the decisions you make early that determine whether your platform survives reality. Here’s what you walk away with: A pragmatic blueprint for service boundaries that you can actually operate at 2 a.m. Concrete Durable Functions patterns (Monitor, continue-as-new, idempotency) that keep long-running workflows healthy. A Cosmos DB partitioning strategy grounded in real access patterns, not gut feel. A multi-region, fail-and-continue mindset (instead of fail-and-recover) that holds up when a region disappears. Real lessons from production, including the “non-deterministic orchestration” outages nobody warns you about. In short, if you build, run, or modernize platforms on Azure, this session reshapes how you think about reliability. What DR by Design Actually Means, a Technical Overview Bhavana frames the Resilience Control Platform as five chapters: architecture and service boundaries, orchestration with Durable Functions, the Cosmos DB data layer, identity across multiple user realms, and the resilience playbook itself. The platform has four moving parts: A portal where operators define and monitor scenarios. An orchestration engine that executes long-running workflows. Cosmos DB as a shared persistence layer. Downstream infrastructure APIs the engine acts on. The big “DR by Design” idea is that resiliency isn’t bolted on later. It’s a property of every choice from boundaries upward. As Bhavana puts it, you stop designing for “fail and recover” and start designing for “fail and continue.” Users don’t know (or care) which region runs their workflow; they just need it to run reliably, consistently, and without interruption. How It Works, Under the Hood Bhavana’s team made several deliberate design moves worth borrowing. Arm’s-length service boundaries. Version one had the portal and orchestration engine tightly coupled with shared dependency injection and a shared database context. It felt clean until they tried to operate it. Now the two services talk over REST contracts, each with its own dependencies. Yes, that means a bit of duplicated code. What they gained, independent deployments, isolated failures, and clear ownership, more than paid for it. The right runtime for the workload. The portal is a session-driven web app, so it lives on App Service. The orchestration engine bursts on demand and runs workflows for minutes (sometimes hours), so it’s built on Durable Functions. Forcing both into one model would have looked simpler on paper and been worse in practice. Accept Fast, Process Asynchronously. Clicking Execute returns a 202 immediately. The orchestrator does the heavy lifting in the background and updates status in Cosmos DB. The portal just reflects progress. Users never wait on long workflows. Durable Functions patterns that actually scale. Three lessons stood out: The Monitor pattern replaces busy polling with durable timers. The orchestrator wakes up, checks status, and goes back to sleep without holding compute. Orchestrators are state machines, not scripts. Calling DateTime.UtcNow inside an orchestrator produces non-deterministic replay and random production failures. The fix is to use the orchestration context for time and IDs. Continue-as-new keeps replay history bounded. Long-running orchestrations otherwise spend more time replaying history than doing real work. Cosmos DB designed around access, not org charts. Partitioning by tenant feels logical and creates hotspots the moment one tenant gets busy. The team partitions by entity (each plan owns its partition) and uses hierarchical keys combining plan ID and execution ID. They also lean on TTL for data lifecycle so completed records expire automatically, no cleanup jobs required. Identity as an execution boundary. Corporate users authenticate through Microsoft Entra with OpenID Connect. Operations users come in through a federated WS-Federation system. Instead of forking the app, the team built home realm discovery at the front door, normalized everything into a single identity model behind it, and added custom middleware in the Azure Functions isolated worker model to extract, validate, enrich, and fail-fast on every token. Authorization is config-driven so every endpoint gets the same treatment. Multi-region from day one. The full stack (portal, engine, APIs, supporting services) runs in parallel across regions, fronted by Azure Front Door as the global entry point. Health probes drive automatic regional failover with no human in the loop. Cosmos DB single-write with automatic failover. Multi-write looks attractive on a slide and introduces real conflict-resolution complexity. The team chose one primary write region plus a replica with automatic failover. The Cosmos SDK detects region unavailability and routes requests to the promoted region without application code changes. Idempotency from day zero. Once you have retries (and Front Door, the SDK, and your clients all retry), every operation has to be safe to run more than once. Client-provided IDs, Cosmos conflict detection (a 409 means “already succeeded”), and idempotent orchestration events make sure the same outcome lands no matter how many times a signal arrives. Real-World Value, Use Cases, ROI, Scenarios What does this buy you in practice? Scenario validation under stress without compromising production. The platform is built to proactively validate and govern system behavior at scale. Long-running workflows that survive everything. Host restarts, transient downstream errors, regional failovers, none of them lose work in flight. Predictable cost. Durable timers and continue-as-new mean you stop paying for compute that’s only waiting. Operability at scale. Independent services, clean contracts, and centralized identity all mean a smaller cognitive load when something breaks at 2 a.m. Honest tradeoffs. Single-write Cosmos loses theoretical write latency in the second region and gains predictable behavior, no conflict ambiguity, and far easier debugging during failovers. That’s usually the right trade. In short, the platform behaves the same on a quiet Tuesday and during a regional outage. That’s the whole point. Getting Started You don’t need to build the Resilience Control Platform tomorrow. You can start applying these patterns this week. Map your service boundaries honestly. If two services share a DI container or database context, decouple them behind a REST contract. Pick runtimes by workload, not by consistency. Interactive UI on App Service; long-running orchestrations on Durable Functions. Adopt the 202-Accepted pattern for anything that could take more than a couple of seconds. Audit your Durable orchestrators for DateTime.UtcNow, Guid.NewGuid, and direct HTTP calls. Move them into activities, use the orchestration context for time and IDs, and apply continue-as-new on long loops. Revisit your Cosmos partition keys against actual access patterns and enable TTL for transient data. Stand up a second region behind Azure Front Door, enable Cosmos DB automatic failover, and make every write operation idempotent with client-provided IDs. Resources Reliability design principles, Azure Well-Architected Framework Durable Orchestrations overview Azure Durable Functions documentation Azure Functions documentation Hierarchical partition keys in Azure Cosmos DB Azure Cosmos DB documentation Azure Front Door documentation Microsoft Entra ID documentation Keep Learning at the Summit Catch the full Microsoft Azure Infra Summit 2026 session playlist here Cheers! Pierre Roman465Views0likes0CommentsAzure Function App — Queue-Based Architecture for Long-Running Sync Jobs
The Problem: HTTP Triggers and Long-Running Jobs Don't Mix Here's a situation you've probably run into: you have a job that needs to loop over dozens of Azure resources, call APIs, and do real work. You wrap it in an HTTP-triggered Azure Function so it can be called on demand. It works great and after a few minutes, the caller gets a 504 Gateway Timeout. The 230-second limit is enforced by Azure Front Door / the platform load balancer. It cannot be overridden by app settings or host configuration. Any HTTP trigger that runs longer than ~3.5 minutes will timeout for the caller. In our case, the job iterates over 30+ Azure subscriptions — for each one it switches context, lists resources, and triggers image imports. Total runtime: anywhere from 2 to 10 minutes depending on how many ACRs need updating. Way over the limit. The Solution: Decouple Request from Execution via a Queue The fix is clean once you see it: the HTTP trigger shouldn't do the work — it should just accept the work and hand it off. That's what a queue is for. The flow splits into two independent phases: Request phase — The HTTP trigger validates the caller (JWT + app role check), packages the job parameters into a queue message, and returns 202 Accepted. This takes under 3 seconds. Execution phase — A Queue Trigger picks up the message and runs the actual sync. No HTTP connection involved, so there's no timeout. On a Dedicated (P-series) plan, execution time is unlimited. Approach What the caller gets Result HTTP trigger → run sync inline Waits for the full job to complete 504 TIMEOUT after 230 seconds HTTP trigger → Queue → Queue Trigger 202 Accepted immediately NO TIMEOUT job runs as long as needed 🤸♀️There's an added bonus - Reliability in Azure Queue Storage: Azure Storage Queues give you automatic retry out of the box. If the job crashes halfway through, the message becomes visible again after a visibility timeout and the Queue Trigger picks it up for a retry — up to 5 attempts before the message is moved to the poison queue. No retry logic to write 🤸♀️. Locking Down the Endpoint Since the HTTP trigger is the public entry point, it needs solid auth. We layer two things: ⭐Use EasyAuth for the "is this a real Entra ID token?" check, and a custom App Role for the "is this person allowed to trigger syncs?" check. These are independent concerns and should stay that way. Layer What it does How EasyAuth (Entra ID) Rejects requests without a valid Entra ID Bearer token — before your code even runs Configured at the Function App level via the Authentication blade App Role check Validates that the token contains the SyncJob.Execute role — only assigned users/SPs can trigger the job Decoded in the function code from the JWT roles claim Managed Identity Authenticates the Function App to Azure APIs (no credentials in code) Connect-AzAccount -Identity — identity assigned via RBAC One gotcha worth knowing: when using v2 tokens (which is the default with modern App Registrations), the aud claim in the token is the raw App ID GUID — not the api:// prefixed URI. You need to explicitly add both forms to your allowedAudiences in EasyAuth, otherwise valid tokens get rejected. APP_ID="<your-app-id>" TENANT_ID="<your-tenant-id>" FUNCTION_APP_URL="https://<your-function-app>.azurewebsites.net" # Interactive login (device code flow — works from any terminal) az login --tenant "${TENANT_ID}" \ --scope "api://${APP_ID}/.default" \ --use-device-code TOKEN=$(az account get-access-token \ --scope "api://${APP_ID}/.default" \ --query accessToken -o tsv) # Trigger the sync — returns 202 immediately curl -s -X POST "${FUNCTION_APP_URL}/api/SyncContainerRegistryHttpTrigger" \ -H "Authorization: Bearer ${TOKEN}" \ -H "Content-Type: application/json" Passing Parameters Through the Queue One nice property of this pattern: the queue message is just JSON, so you can pass whatever parameters the job needs. In our case, we pass a subscriptionFilter wildcard so callers can target a subset of subscriptions without touching any code. The parameter travels the full chain: HTTP body → queue message → Queue Trigger → PowerShell script parameter. Here's how each step handles it. Step 1 — HTTP Trigger reads the body and enqueues the message using the Push-OutputBinding output binding. Azure Functions wires the binding to the queue automatically — no SDK call needed: param($Request, $TriggerMetadata) # ... decode the JWT, check role assignment $queuePayload = @{ triggeredBy = $decoded.Payload.upn ?? $decoded.Payload.oid triggeredAt = (Get-Date -Format 'o') subscriptionFilter = if ($body.subscriptionFilter) { $body.subscriptionFilter } else { "*" } } | ConvertTo-Json -Compress Push-OutputBinding -Name QueueMessage -Value $queuePayload Push-OutputBinding -Name Response -Value ([HttpResponseContext]@{ StatusCode = [System.Net.HttpStatusCode]::Accepted Body = @{ message = "Sync job queued. Check Azure Monitor logs for execution status." } }) ⭐Push-OutputBinding is how Azure Functions PowerShell workers write to output bindings (queues, blobs, HTTP responses…). The binding name QueueMessage maps to the queue defined in function.json — the runtime handles serialisation and delivery. Step 2 — Queue Trigger passes the filter to the script as a named parameter: param($QueueItem, $TriggerMetadata) Write-Host "Triggered SyncContainerRegistry via Storage Queue. Payload: $QueueItem" $subscriptionFilter = if ($QueueItem.subscriptionFilter) { $QueueItem.subscriptionFilter } else { "*" } $SubscriptionFilter = $subscriptionFilter . "$PSScriptRoot/../SyncContainerRegistry/run.ps1" Step 3 — Long running job with the filter as parameter: param($Timer) if (-not $SubscriptionFilter) { $SubscriptionFilter = "*" } $subscriptions = Get-AzSubscription | Where-Object { $_.Name -like $SubscriptionFilter } foreach ($subscription in $subscriptions) { Set-AzContext -SubscriptionId $subscription.Id | Out-Null # ... do the work } Targeting a subset of subscriptions # Sync all subscriptions (default — omit the body) curl -s -X POST "${FUNCTION_APP_URL}/api/SyncContainerRegistryHttpTrigger" \ -H "Authorization: Bearer ${TOKEN}" \ -H "Content-Type: application/json" # Sync only subscriptions matching a pattern curl -s -X POST "${FUNCTION_APP_URL}/api/SyncContainerRegistryHttpTrigger" \ -H "Authorization: Bearer ${TOKEN}" \ -H "Content-Type: application/json" \ -d '{"subscriptionFilter": "*project-alpha*"}' ⭐PowerShell's -like operator uses * as a wildcard anywhere in the string. The pattern *project-alpha* matches sub-mycompany-project-alpha-prd, sub-mycompany-project-alpha-dev, etc. A pattern without a leading * only matches from the start of the string — keep this in mind when naming subscriptions. Pushing a Message Directly via PowerShell You can also push a message straight to the queue without going through the HTTP trigger — useful for testing, scripting, or bypassing the auth layer in a controlled environment. Connect-AzAccount # or -Identity for a Managed Identity context $storageAccount = "<your-storage-account>" $queueName = "sync-job-queue" # Build the payload — same shape the HTTP trigger produces $payload = @{ triggeredBy = $env:USERNAME triggeredAt = (Get-Date -Format 'o') subscriptionFilter = "*project-alpha*" # or "*" for all } | ConvertTo-Json -Compress # Get a queue client via the connected account (no key needed) $ctx = New-AzStorageContext -StorageAccountName $storageAccount -UseConnectedAccount $queue = Get-AzStorageQueue -Name $queueName -Context $ctx $queue.QueueClient.SendMessage($payload) ⭐ -UseConnectedAccount authenticates via the current Connect-AzAccount session — no storage key required, as long as your identity has the Storage Queue Data Message Sender role on the storage account. The Queue Message The HTTP trigger packages the caller identity and filter into a simple JSON payload before enqueuing. The Queue Trigger reads it back as a deserialised PowerShell object — no manual JSON parsing needed. { "triggeredBy": "user@company.com", "triggeredAt": "2026-06-01T11:03:55.570+02:00", "subscriptionFilter": "*project-alpha*" } Design Decisions at a Glance Decision Choice Why Async execution Azure Storage Queue HTTP trigger has a hard 230s timeout. The sync job takes 2–10 minutes. The queue decouples acceptance from execution — and gives us retry for free. Authentication EasyAuth + App Role No credentials in code. Access is controlled via Entra ID app roles — revocable per user without touching infrastructure. Azure identity Managed Identity No secrets to rotate or store. The Function App authenticates to Azure APIs using its platform-assigned identity. Job parameter Wildcard filter via queue payload Lets callers target any subscription subset without code changes. The filter travels through the queue — the Queue Trigger just passes it along. Hosting plan Dedicated (P-series) Consumption plan caps function execution at 10 minutes. A Dedicated plan has no execution time limit — essential when the job can run longer. See you in the Cloud JamesdldEnhancing Data Security and Digital Trust in the Cloud using Azure Services.
Enhancing Data Security and Digital Trust in the Cloud by Implementing Client-Side Encryption (CSE) using Azure Apps, Azure Storage and Azure Key Vault. Think of Client-Side Encryption (CSE) as a strategy that has proven to be most effective in augmenting data security and modern precursor to traditional approaches. CSE can provide superior protection for your data, particularly if an authentication and authorization account is compromised.3.2KViews0likes0CommentsAzure Database for MySQL triggers for Azure Functions (Public Preview)
Developers can now accelerate development time and focus only on the core business logic of their applications, for developing event-driven applications with Azure Database for MySQL as the backend data store. We are excited to announce that you can now invoke an Azure Function based on changes to an Azure Database for MySQL table. This new capability is made possible through the Azure Database for MySQL triggers for Azure Functions, now available in public preview. Azure Database for MySQL triggers The Azure Database for MySQL trigger uses change tracking functionality to monitor a MySQL table for changes and trigger a function when a row is created or updated enabling customers to build highly-scalable event-driven applications. Similar to the Azure Database for MySQL Input and Output bindings for Azure Functions, a connection string for the MySQL database is stored in the application settings of the Azure Function to trigger the function when a change is detected on the tables. Note: In public preview, Azure Database for MySQL triggers for Azure Functions are available only for dedicated and premium plan of Azure Functions To enable change tracking on an existing Azure Database for MySQL table to use trigger bindings for an Azure Function, it is necessary to alter the table structure, for example, enabling change tracking on an employees data table: ALTER TABLE employees ADD COLUMN az_func_updated_at TIMESTAMP DEFAULT CURRENT_TIMESTAMP ON UPDATE CURRENT_TIMESTAMP; Azure Database for MySQL trigger uses the 'az_func_updated_at' and column's data to monitor the table for any changes on which change tracking is enabled. Changes are then processed in the order that they were made, with the oldest changes being processed first. Important: If changes to multiple rows are made at once, then the exact order they're sent to the function is determined on the ascending order of the az_func_updated_at and the primary key columns. If multiple changes are made to a row in-between an iteration, then only the latest changes for that particular rows are considered. The following example demonstrates a C# function that is triggered when changes occur in the employees table. The MySQL trigger uses attributes for the table name and the connection string. using System.Collections.Generic; using Microsoft.Azure.WebJobs; using Microsoft.Azure.WebJobs.Extensions.MySql; using Microsoft.Extensions.Logging; namespace EmployeeSample.Function { public static class EmployeesTrigger { [FunctionName(nameof(EmployeesTrigger))] public static void Run( [MySqlTrigger("Employees", "MySqlConnectionString")] IReadOnlyList<MySqlChange<Employee>> changes, ILogger logger) { foreach (MySqlChange<Employee> change in changes) { Employee employee= change. Item; logger.LogInformation($"Change operation: {change.Operation}"); logger.LogInformation($"EmployeeId: {employee.employeeId}, FirstName: {employee.FirstName}, LastName: {employee.LastName}, Company: {employee. Company}, Department: {employee. Department}, Role: {employee. Role}"); } } } } Join the preview and share your feedback! We are eager for you to try out the new Azure Database for MySQL triggers for Azure Functions and build highly scalable event-driven and serverless applications. For more information refer https://aka.ms/mysqltriggers about using MySQL triggers for all the supported programming frameworks with detailed step-by-step instructions If you have any feedback or questions about the information provided above, please leave a comment below or email us at AskAzureDBforMySQL@service.microsoft.com. Thank you!Ignite 2025: Advancing Azure Database for MySQL with Powerful New Capabilities
At Ignite 2025, we’re introducing a wave of powerful new capabilities for Azure Database for MySQL, designed to help organizations modernize, scale, and innovate faster than ever before. From enhanced high availability and seamless serverless integrations to AI-powered insights and greater flexibility for developers, these advancements reflect our commitment to delivering a resilient, intelligent data platform. Join us as we unveil what’s next for MySQL on Azure - and discover how industry leaders are already building the future with confidence. Enhanced Failover Performance with Dedicated SLB for High-Availability Servers We’re excited to announce the General Availability of Dedicated Standard Load Balancer (SLB) for HA-enabled servers in Azure Database for MySQL. This enhancement introduces a dedicated SLB to High Availability configurations for servers created with public access or private link. By managing the MySQL data traffic path, SLB eliminates the need for DNS updates during failover, significantly reducing failover time. Previously, failover relied on DNS changes, which caused delays due to DNS TTL (30 seconds) and client-side DNS caching. What’s new with GA: The FQDN consistently resolves to the SLB IP address before and after failover. Load-balancing rules automatically route traffic to the active node. Removes DNS cache dependency, delivering faster failovers. Note: This feature is not supported for servers using private access with VNet integration. Learn more Build serverless, event-driven apps at scale – now GA with Trigger Bindings for Azure Functions We’re excited to announce the General Availability of Azure Database for MySQL Trigger bindings for Azure Functions, completing the full suite of Input, Output, and Trigger capabilities. This feature lets you build real-time, event-driven applications by automatically invoking Azure Functions when MySQL table rows are created or updated - eliminating custom polling and boilerplate code. With native support across multiple languages, developers can now deliver responsive, serverless solutions that scale effortlessly and accelerate innovation. Learn more Enable AI agents to query Azure Database for MySQL using Azure MCP Server We’re excited to announce that Azure MCP Server now supports Azure Database for MySQL, enabling AI agents to query and manage MySQL data using natural language through the open Model Context Protocol (MCP). Instead of writing SQL, you can simply ask questions like “Show the number of new users signed up in the last week in appdb.users grouped by day.”, all secured with Microsoft Entra authentication for enterprise-grade security. This integration delivers a unified, secure interface for building intelligent, context-aware workflows across Azure services - accelerating insights and automation. Learn more Greater networking flexibility with Custom Port Support Custom port support for Azure Database for MySQL is now generally available, giving organizations the flexibility to configure a custom port (between 25001 and 26000) during new server creation. This enhancement streamlines integration with legacy applications, supports strict network security policies, and helps avoid port conflicts in complex environments. Supported across all network configurations - including public access, private access, and Private Link - custom port provisioning ensures every new MySQL server can be tailored to your needs. The managed experience remains seamless, with all administrative capabilities and integrations working as before. Learn more Streamline migrations and compatibility with Lower Case Table Names support Azure Database for MySQL now supports configuring lower_case_table_names server parameter during initial server creation for MySQL 8.0 and above, ensuring seamless alignment with your organization’s naming conventions. This setting is automatically inherited for restores and replicas, and cannot be modified. Key Benefits: Simplifies migrations by aligning naming conventions and reducing complexity. Enhances compatibility with legacy systems that depend on case-insensitive table names. Minimizes support dependency, enabling faster and smoother onboarding. Learn more Unlock New Capabilities with Private Preview Features at Ignite 2025 We’re excited to announce that you can now explore two powerful capabilities in early access - Reader Endpoint for seamless read scaling and Server Rename for greater flexibility in server management. Scale reads effortlessly with Reader Endpoint (Private Preview) We’re excited to announce that the Reader Endpoint feature for Azure Database for MySQL is now ready for private preview. Reader Endpoint provides a dedicated read-only endpoint for read replicas, enabling automatic connection-based load balancing of read-only traffic across multiple replicas. This simplifies application architecture by offering a single endpoint for read operations, improving scalability and fault tolerance. Azure Database for MySQL supports up to 10 read replicas per primary server. By routing read-only traffic through the reader endpoint, application teams can efficiently manage connections and optimize performance without handling individual replica endpoints. Reader endpoints continuously monitor the health of replicas and automatically exclude any replica that exceeds the configured replication lag threshold or becomes unavailable. To enroll in the preview, please submit your details using this form. Limitations During Private Preview: Only performance-based routing is supported in this preview. Certain settings such as routing method and the option to attach new replicas to the reader endpoint can only be configured at creation time. Only one reader endpoint can be created per replica group. Including the primary server as a fallback for read traffic when no replicas are available is not supported in this preview. Get flexibility in server management with Server Rename (Private Preview) We’re excited to announce the Private Preview of Server Rename for Azure Database for MySQL. This feature lets you update the name of an existing MySQL server without recreating it, migrating data, or disrupting applications - making it easier to adopt clear, consistent naming. It provides a near zero-downtime path to a new hostname of the server. To enroll in the preview, please submit your details using this form. Limitations During Private Preview: Primary server with read replicas: Renaming a primary server that has read replicas keeps replication healthy. However, the SHOW SLAVE STATUS output on the replicas will still display the old primary server's name. This is a display inconsistency only and does not affect replication. Renaming is currently unsupported for servers using Customer Managed Key (CMK) encryption or Microsoft Entra Authentication (Entra Id). Real-World Success: Azure Database for MySQL Powers Resilient Applications at Scale Factorial Factorial, a leading HR software provider, uses Azure Database for MySQL alongside Azure Kubernetes Service to deliver secure, scalable HR solutions for thousands of businesses worldwide. By leveraging Azure Database for MySQL’s reliability and seamless integration with cloud-native technologies, Factorial ensures high availability and rapid innovation for its customers. Learn more YES (Youth Employment Service) South Africa’s largest youth employment initiative, YES, operates at national scale by leveraging Azure Database for MySQL to deliver a resilient, centralized platform for real-time job matching, learning management, and career services - connecting thousands of young people and employers, and helping nearly 45 percent of participants secure permanent roles within six months. Learn more Nasdaq At Ignite 2025, Nasdaq will showcase how it uses Azure Database for MySQL - alongside Azure Database for PostgreSQL and other Azure products - to power a secure, resilient architecture that safeguards confidential data while unlocking new agentic AI capabilities. Learn more These examples demonstrate that Azure Database for MySQL is trusted by industry leaders to build resilient, scalable applications - empowering organizations to innovate and grow with confidence. We Value Your Feedback Azure Database for MySQL is built for scale, resilience, and performance - ready to support your most demanding workloads. With every update, we’re focused on simplifying development, migration, and management so you can build with confidence. Explore the latest features and enhancements to see how Azure Database for MySQL meets your data needs today and in the future. We welcome your feedback and invite you to share your experiences or suggestions at AskAzureDBforMySQL@service.microsoft.com Stay up to date by visiting What's new in Azure Database for MySQL, and follow us on YouTube | LinkedIn | X for ongoing updates. Thank you for choosing Azure Database for MySQL!743Views2likes0CommentsServerless MCP Agent with LangChain.js v1 — Burgers, Tools, and Traces 🍔
AI agents that can actually do stuff (not just chat) are the fun part nowadays, but wiring them cleanly into real APIs, keeping things observable, and shipping them to the cloud can get... messy. So we built a fresh end‑to‑end sample to show how to do it right with the brand new LangChain.js v1 and Model Context Protocol (MCP). In case you missed it, MCP is a recent open standard that makes it easy for LLM agents to consume tools and APIs, and LangChain.js, a great framework for building GenAI apps and agents, has first-class support for it. You can quickly get up speed with the MCP for Beginners course and AI Agents for Beginners course. This new sample gives you: A LangChain.js v1 agent that streams its result, along reasoning + tool steps An MCP server exposing real tools (burger menu + ordering) from a business API A web interface with authentication, sessions history, and a debug panel (for developers) A production-ready multi-service architecture Serverless deployment on Azure in one command ( azd up ) Yes, it’s a burger ordering system. Who doesn't like burgers? Grab your favorite beverage ☕, and let’s dive in for a quick tour! TL;DR key takeaways New sample: full-stack Node.js AI agent using LangChain.js v1 + MCP tools Architecture: web app → agent API → MCP server → burger API Runs locally with a single npm start , deploys with azd up Uses streaming (NDJSON) with intermediate tool + LLM steps surfaced to the UI Ready to fork, extend, and plug into your own domain / tools What will you learn here? What this sample is about and its high-level architecture What LangChain.js v1 brings to the table for agents How to deploy and run the sample How MCP tools can expose real-world APIs Reference links for everything we use GitHub repo LangChain.js docs Model Context Protocol Azure Developer CLI MCP Inspector Use case You want an AI assistant that can take a natural language request like “Order two spicy burgers and show me my pending orders” and: Understand intent (query menu, then place order) Call the right MCP tools in sequence, calling in turn the necessary APIs Stream progress (LLM tokens + tool steps) Return a clean final answer Swap “burgers” for “inventory”, “bookings”, “support tickets”, or “IoT devices” and you’ve got a reusable pattern! Sample overview Before we play a bit with the sample, let's have a look at the main services implemented here: Service Role Tech Agent Web App ( agent-webapp ) Chat UI + streaming + session history Azure Static Web Apps, Lit web components Agent API ( agent-api ) LangChain.js v1 agent orchestration + auth + history Azure Functions, Node.js Burger MCP Server ( burger-mcp ) Exposes burger API as tools over MCP (Streamable HTTP + SSE) Azure Functions, Express, MCP SDK Burger API ( burger-api ) Business logic: burgers, toppings, orders lifecycle Azure Functions, Cosmos DB Here's a simplified view of how they interact: There are also other supporting components like databases and storage not shown here for clarity. For this quickstart we'll only interact with the Agent Web App and the Burger MCP Server, as they are the main stars of the show here. LangChain.js v1 agent features The recent release of LangChain.js v1 is a huge milestone for the JavaScript AI community! It marks a significant shift from experimental tools to a production-ready framework. The new version doubles down on what’s needed to build robust AI applications, with a strong focus on agents. This includes first-class support for streaming not just the final output, but also intermediate steps like tool calls and agent reasoning. This makes building transparent and interactive agent experiences (like the one in this sample) much more straightforward. Quickstart Requirements GitHub account Azure account (free signup, or if you're a student, get free credits here) Azure Developer CLI Deploy and run the sample We'll use GitHub Codespaces for a quick zero-install setup here, but if you prefer to run it locally, check the README. Click on the following link or open it in a new tab to launch a Codespace: Create Codespace This will open a VS Code environment in your browser with the repo already cloned and all the tools installed and ready to go. Provision and deploy to Azure Open a terminal and run these commands: # Install dependencies npm install # Login to Azure azd auth login # Provision and deploy all resources azd up Follow the prompts to select your Azure subscription and region. If you're unsure of which one to pick, choose East US 2 . The deployment will take about 15 minutes the first time, to create all the necessary resources (Functions, Static Web Apps, Cosmos DB, AI Models). If you're curious about what happens under the hood, you can take a look at the main.bicep file in the infra folder, which defines the infrastructure as code for this sample. Test the MCP server While the deployment is running, you can run the MCP server and API locally (even in Codespaces) to see how it works. Open another terminal and run: npm start This will start all services locally, including the Burger API and the MCP server, which will be available at http://localhost:3000/mcp . This may take a few seconds, wait until you see this message in the terminal: 🚀 All services ready 🚀 When these services are running without Azure resources provisioned, they will use in-memory data instead of Cosmos DB so you can experiment freely with the API and MCP server, though the agent won't be functional as it requires a LLM resource. MCP tools The MCP server exposes the following tools, which the agent can use to interact with the burger ordering system: Tool Name Description get_burgers Get a list of all burgers in the menu get_burger_by_id Get a specific burger by its ID get_toppings Get a list of all toppings in the menu get_topping_by_id Get a specific topping by its ID get_topping_categories Get a list of all topping categories get_orders Get a list of all orders in the system get_order_by_id Get a specific order by its ID place_order Place a new order with burgers (requires userId , optional nickname ) delete_order_by_id Cancel an order if it has not yet been started (status must be pending , requires userId ) You can test these tools using the MCP Inspector. Open another terminal and run: npx -y @modelcontextprotocol/inspector Then open the URL printed in the terminal in your browser and connect using these settings: Transport: Streamable HTTP URL: http://localhost:3000/mcp Connection Type: Via Proxy (should be default) Click on Connect, then try listing the tools first, and run get_burgers tool to get the menu info. Test the Agent Web App After the deployment is completed, you can run the command npm run env to print the URLs of the deployed services. Open the Agent Web App URL in your browser (it should look like https://<your-web-app>.azurestaticapps.net ). You'll first be greeted by an authentication page, you can sign in either with your GitHub or Microsoft account and then you should be able to access the chat interface. From there, you can start asking any question or use one of the suggested prompts, for example try asking: Recommend me an extra spicy burger . As the agent processes your request, you'll see the response streaming in real-time, along with the intermediate steps and tool calls. Once the response is complete, you can also unfold the debug panel to see the full reasoning chain and the tools that were invoked: Tip: Our agent service also sends detailed tracing data using OpenTelemetry. You can explore these either in Azure Monitor for the deployed service, or locally using an OpenTelemetry collector. We'll cover this in more detail in a future post. Wrap it up Congratulations, you just finished spinning up a full-stack serverless AI agent using LangChain.js v1, MCP tools, and Azure’s serverless platform. Now it's your turn to dive in the code and extend it for your use cases! 😎 And don't forget to azd down once you're done to avoid any unwanted costs. Going further This was just a quick introduction to this sample, and you can expect more in-depth posts and tutorials soon. Since we're in the era of AI agents, we've also made sure that this sample can be explored and extended easily with code agents like GitHub Copilot. We even built a custom chat mode to help you discover and understand the codebase faster! Check out the Copilot setup guide in the repo to get started. You can quickly get up speed with the MCP for Beginners course and AI Agents for Beginners course. If you like this sample, don't forget to star the repo ⭐️! You can also join us in the Azure AI community Discord to chat and ask any questions. Happy coding and burger ordering! 🍔
HOW TO: "If cell contains specific text display the immediate next word after it"
I have an excel file with each individual cell filled with data as it follows: Alejandro - GREEN Daniel - RED Sebastian - BLUE What I have been trying to do is to use a formula to extract the upper case value thats after the "-" immediate to the specific name of the person. At the moment I have the formula: =IF(COUNTIF(F3:F20,"*"&"Daniel"&"*"),"Yes","No") Which would simply return "Yes" if the cell contains the name Daniel, what I dont know how to do is to replace the "Yes" for a formula that would give me the "RED" in return. I know the formulas Left, Mid and Right are probably the way to go but since the separating character appears 3 times in a single cell (it being "-" I THINK) I have no idea how to stablish to use only the one after the specific name, and return only the very first word next to it (RED in case of Daniel). For this I have the formula =MID(M26,FIND("-",M26)+2,3) Which would give me GRE (3 characters only, dont know how to make it dynamic length) and would only return the very first entry as opposed to it being the one after the specific name, kinda close but no luck yet :/ Is this even possible? Edit: I attach my original file, I didnt before because the formula get so convoluted with other stuff I tried to keep it simple, basically its the formula on column O where i would replace the ":D" with the formula that im asking about.7.9KViews1like12CommentsStrategic Solutions for Seamless Integration of Third-Party SaaS
Modern systems must be modular and interoperable by design. Integration is no longer a feature, it’s a requirement. Developers are expected to build architectures that connect easily with third-party platforms, but too often, core systems are designed in isolation. This disconnect creates friction for downstream teams and slows delivery. At Microsoft, SaaS platforms like SAP SuccessFactors and Eightfold support Talent Acquisition by handling functions such as requisition tracking, application workflows, and interview coordination. These tools help reduce costs and free up engineering focus for high-priority areas like Azure and AI. The real challenge is integrating them with internal systems such as Demand Planning, Offer Management, and Employee Central. This blog post outlines a strategy centered around two foundational components: an Integration and Orchestration Layer, and a Messaging Platform. Together, these enable real-time communication, consistent data models, and scalable integration. While Talent Acquisition is the use case here, the architectural patterns apply broadly across domains. Whether you're embedding AI pipelines, managing edge deployments, or building platform services, thoughtful integration needs to be built into the foundation, not bolted on later.