foundry local
29 TopicsBuilding a Fully Local Maintenance Assistant with Microsoft Foundry Local
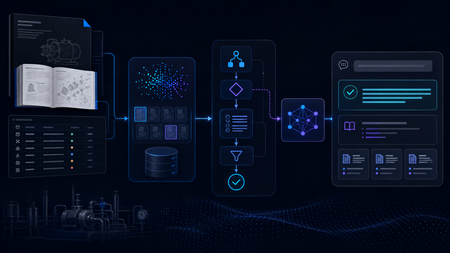
Building the Local RAG System The system was designed as a fully local RAG pipeline, with both retrieval and model inference running on the same machine. The knowledge base came from two equipment manuals covering pump and motor operation, maintenance, and troubleshooting. Rather than treating every page as plain text, I kept different types of information in forms that matched their structure, including paragraphs, Q&A entries, tables, procedures, and fault–cause–remedy troubleshooting records. The final corpus contained 165 retrievable records. Each record was embedded locally with all-MiniLM-L6-v2 and stored in ChromaDB. At query time, the system retrieved the most relevant manual records and passed the selected evidence to Phi-4-mini, a small language model (SLM) running through Microsoft Foundry Local, for grounded response generation. Once the required models and resources were installed, the full retrieval and inference workflow could run on the local machine without depending on cloud inference. I began with a simple Single-Agent RAG baseline. For each query, the system retrieved relevant manual evidence and used a single Phi-4-mini call to generate a grounded response. That gave me a clear reference point before I started adding separate model-driven stages for query understanding, retrieval, and reasoning. The Experiment That Changed the Architecture The next version split the workflow into three roles: Query Understanding, Retrieval, and Reasoning. All three reused the same local Phi-4-mini model through Microsoft Foundry Local, but with different prompts and responsibilities. I expected this separation to give the system more control over how queries were interpreted and how evidence moved through the pipeline. In practice, the extra stages added a noticeable cost, so I profiled the pipeline to see where the time was going. The stage timings showed where the delay was coming from: Query Understanding: 15.469 s Evidence Selection: 11.557 s Reasoning: 8.251 s Vector search: 0.002 s Vector search was only a tiny part of the total time. Most of the latency came from the stages that repeatedly called the local model. The bottleneck was repeated model inference, not vector search. I therefore started looking for decisions that could be handled reliably without another SLM call. The end-to-end numbers matched the profile. The Single-Agent baseline averaged 23.1 seconds per query, compared with 33.0 seconds for the Initial Multi-Agent system, without a consistent improvement in answer quality. That shifted the focus of the project from making the pipeline more agentic to deciding where model reasoning was actually useful, and where simpler deterministic control would be enough. A Deterministic-First Hybrid Design The Hybrid redesign kept the same local retrieval stack and Phi-4-mini setup, but changed when the model was asked to make decisions. Clear, bounded routing decisions were handled deterministically first. Depending on the query, the system could proceed to retrieval, request clarification when required information was missing, or stop requests that depended on information outside the manuals. Phi-4-mini was used for query analysis only when these rules could not make a reliable decision. In the 12-case final evaluation, Phi-4-mini was needed for query analysis in only three cases. The remaining routing decisions were handled deterministically. The Hybrid pipeline also handled clearly multi-part requests differently. Instead of relying on a single retrieval query, the system could identify separate information needs and search them alongside the original request. For example, a two-part pump question could be handled like this: Multi-part Query │ ▼ "What should I check before starting the B114N pump, and what should I inspect if it fails to prime?" │ ▼ Deterministic Decomposition │ ┌──────────────────┼──────────────────┐ ▼ ▼ ▼ Original Query Pre-start Checks Failure-to-prime Search Search Search │ │ │ └──────────────────┼──────────────────┘ ▼ Combine Ranked Results │ ▼ Retain Component Provenance │ ▼ Candidate Evidence The decomposition was deliberately conservative. It handled clear structures such as multiple questions, comparisons, or lists of requested facts, and did not split a query simply because it contained a comma or the word “and.” Once candidate evidence had been retrieved, clear matches could be selected without another model call, while Phi-4-mini was used when the candidates required additional judgement. Candidate Evidence │ ▼ Can deterministic rules select the evidence? / \ Yes No │ │ ▼ ▼ Deterministic Selection Phi-4-mini Evidence Selection │ │ └───────┬────────┘ ▼ Selected Evidence │ ▼ Evidence Guard │ ┌────────────────┼────────────────┐ ▼ ▼ ▼ Sufficient More evidence Insufficient coverage already in the evidence │ candidate pool │ ▼ │ ▼ Response ▼ Stop Generation Retain additional evidence │ ▼ Re-check coverage │ └──────► Evidence Guard The Evidence Guard checked whether the selected records covered the information requested by the user. Supporting evidence already present in the retrieved candidate set could be added before checking coverage again. When the available evidence was still insufficient, the pipeline stopped instead of asking the model to fill the gap. The guard never triggered a new retrieval or SLM call. The final response stage used the model selectively as well. Some bounded cases, including clarification, out-of-scope requests, insufficient evidence, and selected structured answers, could be handled without another model call. When synthesis was still needed, Phi-4-mini generated a grounded response from the selected evidence, while citation formatting remained deterministic. What Changed? I evaluated the three architectures on the same frozen 12-case test set, using answer quality and end-to-end latency as the main comparison points. The Final Hybrid system produced the lowest average latency while maintaining answer quality at roughly the same level as the Single-Agent baseline. Architecture Quality score Mean latency Single-Agent RAG 7.00 / 10 22.709 s Initial Multi-Agent 6.50 / 10 33.454 s Final Hybrid 7.08 / 10 16.905 s The Initial Multi-Agent design was the slowest of the three and did not produce a consistent quality improvement over the simpler baseline. The Hybrid redesign reversed that trend: average latency fell to 16.9 seconds while the overall quality score remained comparable to the baseline. For this prototype, adding more model-driven stages was therefore less useful than being selective about where model reasoning was actually needed. The call counts show the same change. Across the 12 final cases, the Hybrid system made 12 stage-level SLM calls: three during query analysis, four during evidence selection, and five during reasoning. A pipeline that invoked the SLM at all three stages for every query would require 36 stage-level calls over the same 12 cases. This was only a small 12-case evaluation, so I would not treat it as a final measure of system performance. What it did show was that cutting unnecessary SLM calls made the local pipeline faster without hurting the quality score in this test. From Pipeline to Local Application I connected the Final Hybrid backend to a lightweight PySide6 desktop interface. The application lets a user enter a maintenance question, view the generated answer, and inspect the supporting manual sources. What I Learned The biggest lesson from the project was that adding more model-driven stages did not automatically make the system better. The Initial Multi-Agent design gave each stage a clearer role, but the extra SLM calls increased latency without consistently improving answer quality. I also found that good retrieval alone was not enough. The system still needed to decide whether the retrieved evidence actually covered the user’s request and whether another model call was necessary. This is where deterministic routing, evidence checks, and model reasoning worked well together. By the end of the project, the question was no longer how many agents to add, but where an SLM call was actually useful. In this system, the best result came from combining simple deterministic control with model reasoning only where it was needed. What Comes Next The next step would be to test the system on a larger and more varied set of maintenance questions, including more unseen cases and feedback from engineers. I would also like to compare different local models and hardware configurations to see how response quality, latency, and resource use change in practice. Beyond that, the same approach could be applied to a larger maintenance knowledge base or adapted to other equipment domains. One question I would like to explore further is whether the deterministic-first design still works as well when the corpus, query types, and deployment conditions become more varied. Resources Foundry Local documentation Get started with Foundry Local Foundry Local architecture overview349Views0likes0Comments
One agent, three runtimes: porting a CSA agent to Microsoft Scout and Foundry Local
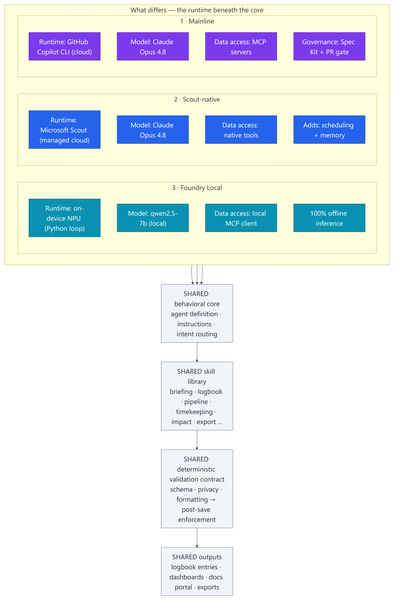
Most of my posts here are about Azure infrastructure lessons from customer engagements. This one is a little different — it's a real‑world engineering lesson from something I built to run my own practice. In my role as a Senior Cloud Solution Architect (CSA), I'm part of a grass-roots organic development team for an internal persona‑driven productivity agent called CSA‑Sherpa. It runs my daily rhythm: a morning briefing, a running logbook of wins and blockers, pipeline and timekeeping summaries, and reporting/exports. It started life in the GitHub Copilot CLI. But over the last few months two things changed the ground under it: Microsoft Scout arrived as a managed cloud agent with native tooling, scheduling, and memory; and Foundry Local made it realistic to run a capable model entirely on‑device on a Copilot+ PC's NPU — no cloud round‑trip at all. That raised a question I think a lot of people building agents will eventually ask: If I designed the framework well, can I change how the model runs without rewriting the agent? To find out, I stood the same agent up in three runtimes, then wrote a whitepaper and a comparison deck measuring what actually changed. This post explains: How one shared, deterministic core made three very different runtimes comparable What the three ports — Copilot CLI, Scout‑native, and Foundry Local (on‑device NPU) — actually took What the analysis showed, and a simple decision framework for which runtime to use when The part that stayed the same: a deterministic core The whole exercise only works because all three implementations load the same behavioral core: Agent definition — persona, behavioral rules, intent routing, workflow dispatch Instructions — conventions, session bootstrap, change‑management rules Skill library — one procedure file per workflow (morning briefing, logbook, pipeline, timekeeping, impact, ops, export…) A deterministic validation contract — schema, formatting, and privacy validators plus a post‑save enforcement chain That last point is the whole thesis: reliability belongs in code, not in the prompt. Rather than asking the model to "remember" to validate its output, a real gate (a validation step → a post‑save enforcement chain → index regeneration) enforces it every single run. This wasn't my idea in a vacuum — it follows the enterprise prompt‑engineering principles Kathiravan Thangavelu lays out in his article Prompt Engineering for Enterprise AI: Why Reliability Matters: keep deterministic logic in code, prefer schema‑driven / structured output over prompt‑enforced formatting, and replace "before you answer, verify that…" mental checklists with real machine validation. My validation gate is that principle in practice. And because that contract is identical across all three runtimes, I'm comparing three ways to execute one product — not three different products. The deterministic payoff: faster and cheaper Retrofitting those principles into the agent — moving work out of the model and into deterministic scripts — is the single change that paid off the most, on two axes at once: Faster. Letting code (not the model) gather and aggregate history cut the average model round‑trips per workflow from ~8.7 to ~5.5 — roughly a third fewer turns. Fewer turns means less waiting on generation and less back‑and‑forth to finish a task. Cheaper. The same change cut usage‑based cost ~24% — and, more importantly, held it flat as the logbook grew to hundreds of entries, because scripts carry the history the model used to re‑read every run. That's the quiet lesson: the reliability work I did for correctness turned out to be the same work that made the agent quicker and less expensive. Determinism isn't a tax on speed — here it bought all three. The work: three repositories, three runtimes Everything below the core — runtime, data access, governance, file layout — is where the effort went. 1 · Mainline — Copilot CLI + MCP. The upstream, most feature‑complete build. Runs as a primary agent in the GitHub Copilot CLI on Claude Opus 4.8; data services are discovered through MCP. It carries the heaviest governance: a Spec Kit layer (spec‑driven‑development agents, a constitution + templates, and 50+ per‑feature spec artifacts gated at PR time) plus an add‑on framework. The richest architecture — and the most complex to operate. 2 · Scout‑native. A thin wrapper loads the exact same core onto Microsoft Scout — again on Claude Opus 4.8 — but data access is re‑platformed onto Scout's native tooling instead of MCP subprocesses. No broker to configure; native tools negotiate their own auth. It adds two things the CLI can't do as cleanly: ✅ Scheduled automations — my morning briefing fires automatically on weekday mornings ✅ Cross‑session memory in place of hand‑off files The deterministic finalize gate stays fully intact. 3 · Foundry Local — on‑device NPU. The genuine outlier and the most involved port: a Python re‑implementation that runs the model — qwen2.5‑7b, an open ~7‑billion‑parameter model — 100% locally on the device's NPU (a Snapdragon X Elite Copilot+ PC) via Foundry Local's OpenAI‑compatible server. The agent loop, an MCP client, skill loading, and a distinct finalize pipeline all had to be rebuilt outside the CLI. The model never leaves the machine; only data connectors reach out when connected. The trade‑offs are real — modest throughput and a fixed context window — but so is the payoff: offline, private, near‑zero marginal cost. The effort This wasn't a weekend spike. Across the three code bases (plus a clean isolation clone I kept as an A/B baseline): ~340–380 commits per repository, three versions maintained in parallel 17 skills in each cloud build; 18 in the Foundry port ~37 scripts in the streamlined Scout build, up to ~97 in the governed Mainline build A Spec Kit governance layer with 50+ feature specs on Mainline A four‑part cost study and two written deliverables: an architecture whitepaper and a 20‑slide comparison deck The analysis and reporting The whitepaper and deck do two jobs. First, they document each runtime as a layered diagram — runtime, core, skills, scripting/validation, external services — so the differences are visible at a glance. Second, they convert the architecture fork into economics: a study that measured the actual token footprints of each repo and priced runs across billing models and hardware. The four dimensions: per‑skill cost, optimized‑vs‑out‑of‑the‑box, Copilot CLI vs Scout, and cloud vs local NPU. By the numbers The study priced measured token footprints at frontier‑model rates (treat the dollars as ±30% — the relative conclusions are far more robust than the absolute figures): Per skill: roughly $0.6–$1.4 per run usage‑based — or a single flat "premium request" under request‑based billing The determinism dividend: optimized, script‑driven skills cut model round‑trips ~8.7 → ~5.5 and usage‑based cost ~24% — and held cost flat as the logbook grew Scout vs CLI: Scout ran ~37% cheaper across a five‑command session and consumed none of the premium‑request allowance Cloud vs local: on‑device NPU inference came in 50–3,400× cheaper in cash than cloud — at the cost of throughput, context, and first‑pass reliability A full active day (~4 runs) landed around a few dollars usage‑based The headline isn't any single figure — it's the shape: cloud cents buy first‑pass reliability, on‑device near‑zero cost trades your time, and determinism makes either one cheaper and steadier. What held up The core is portable. The same agent, skills, and validation gate ran under all three runtimes. Good separation of concerns paid off. Determinism pays three ways — faster, cheaper, and more reliable (detailed above). It was the highest‑leverage change I made. Managed cloud wins the day job. Scout is the best daily driver: reliability gate intact, lower setup friction, scheduling + memory, and cheaper across a multi‑command session because it caches the bootstrap. On‑device is strategic — but reliability is the tax. Local NPU inference is dramatically cheaper in cash. We ran an in‑depth test pass across every function and closed the gaps it surfaced — yet the smaller model that makes Foundry Local possible still hallucinates and drops instructions often enough on the first pass to matter. Each re‑run is nearly free in dollars, but it costs real time to catch and correct. The winning pattern is hybrid. Draft and triage locally for ~nothing; escalate the correctness‑critical steps to cloud Opus 4.8, paying only where it buys first‑pass reliability. Three runtimes, side by side Figure: Three runtimes, one shared core. Only the top rows — runtime, model, data access, and governance — differ; the behavioral core, skill library, validation gate, and outputs are identical across all three. Capability Mainline (Copilot CLI) Scout‑native Foundry Local (NPU) Runtime Copilot CLI (cloud) Scout (cloud, managed) On‑device NPU Model Claude Opus 4.8 Claude Opus 4.8 qwen2.5‑7b (open, ~7B) Data access MCP Native tools MCP via local client Governance Spec Kit + PR gate Behavioral rules Behavioral rules Scheduling + memory ❌ ✅ ❌ Runs fully offline ❌ ❌ ✅ Marginal cost / run cloud per‑token cloud per‑token (cheaper/session) ≈ free Best for Framework development Daily production Offline / privacy / bulk When to use each Daily CSA workflows → Scout‑native. Managed, cheaper across a session, reliable, and it doesn't burn your Copilot request allowance. Building or versioning the framework → Mainline. Spec Kit governance and the add‑on system earn their keep here. Offline, air‑gapped, or sensitive data → Foundry Local. 100% on‑device inference. Bulk / high‑volume / non‑critical → Foundry Local. Zero marginal cost. Must be right on the first pass → Cloud Opus 4.8. The cents are worth it. Mixed, cost‑sensitive workload → Hybrid. Local draft → cloud escalate. Closing Thoughts The most useful reframe from this work: the three architectures aren't competitors — they're a portfolio. A managed cloud daily‑driver (Scout), a governed development platform (Mainline), and a sovereign on‑device runtime (Foundry Local). The job is to match the runtime to the task, not to crown one winner. And the same lesson that applies to Azure infrastructure applies to agents: build reliability into the system, not into good intentions. Because CSA‑Sherpa keeps its guarantees in code, I could change the entire execution model underneath it — cloud CLI, managed cloud, on‑device NPU — and the agent still behaved the same way. That portability is the dividend of a deterministic design. These workflows are genuinely complex, and that's exactly where the small model shows its limits: even after closing the gaps our testing surfaced, it still hallucinates and drops instructions often enough on the first pass to be a real cost. That's the honest trade‑off — near‑zero dollars, paid back in review‑and‑retry time — and it's why my recommendation lands on hybrid: let the small model draft where it's cheap and low‑risk, and escalate anything that has to be right the first time to cloud Opus 4.8. I use the agent in Microsoft Scout daily, as part of my personal production process. I did use AI to help draft and format this post — fittingly, the very agent it describes. The architecture, the analysis, and the conclusions are my own. Thanks for reading.472Views1like1CommentYour Entire Agentic AI Workflow, Now Inside VS Code: New Course Available
If you build with AI, you know the tax: jumping between a browser portal to pick a model, a terminal to run it, a separate playground to test a prompt, and finally your editor to write the code. Every context switch is a small drain on focus—and it adds up. What if the whole loop lived in the one tool you never leave? That's the promise of the Foundry Toolkit for Visual Studio Code, and it's exactly what our new VS Code Learn: Foundry Toolkit video series is here to show youKVStream: Smarter Memory Management for On-Device Language Model Inference
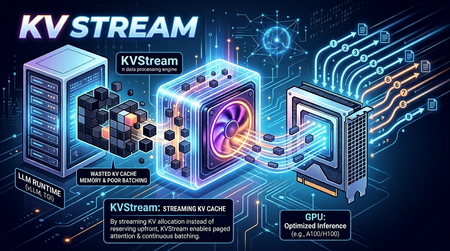
On-Device LLMs Are Starved for Memory Intelligence The shift toward on-device language model inference is accelerating. Platforms like Microsoft's Foundry Local, Ollama, and llama.cpp now make it possible to run capable models such as Phi-3-mini and Llama 3 entirely on local hardware, no cloud dependency, no data leaving the device. This is a meaningful leap for privacy-sensitive applications, offline scenarios, and latency-critical workloads. But on-device/edge inference surfaces a class of performance problems that cloud-based serving largely abstracts away. Memory is the bottleneck. When a language model generates text, it builds a Key-Value (KV) cache a memory structure that stores intermediate attention states so it doesn't have to recompute them for every new token. On a cloud server with hundreds of gigabytes of HBM (Hardware Bandwidth Memory), wasting KV cache memory is a rounding error. On a developer workstation or a GPU/NPU-equipped edge device, it is the difference between a usable system and a stalled one. The typical on-device runtime allocates KV cache memory statically and per-sequence. This creates three concrete problems: Fragmentation and over-reservation. A model has no way of knowing in advance how long a response will be. So, runtimes allocate a worst-case maximum context window of memory for every request even if the actual response is short. The result is a fragmented memory pool where most of the reserved space sits idle while queued requests wait for a slot to open. Research confirms the scale of this waste: production settings with variable-length or concurrent requests typically discard 60–80% of KV memory under monolithic static allocation; paged designs reduce this to under 5%. No batching across requests. Most local runtimes process one request at a time. If you fire four concurrent questions at Foundry Local or Ollama without a batching layer, they queue sequentially. Throughput scales linearly with latency instead of benefiting from the parallel processing the underlying hardware supports. Continuous batching the technique of admitting new sequences mid-generation rather than waiting for the whole batch to drain has been shown to yield up to 36.9× throughput improvement in the original Orca study, with production deployments regularly achieving 2–5× over static batching. Redundant computation. Real-world applications consistently include a shared system prompt instructions that tell the model how to behave. With a RAG pipeline or a chat assistant, the same few hundred tokens get prefilled on every single request, burning compute and TTFT (time-to-first-token) unnecessarily. External prefix caching layers addressing this problem have demonstrated up to 15× throughput improvement on multi-round workloads. These are not hypothetical inefficiencies. In practice, they translate to sluggish multi-turn conversation, poor throughput when multiple users or agent loops share the same local model, and wasted hardware potential on capable machines that could be doing much more. Crucially, while some of the cloud-scale inference engines embed these techniques internally, there is no equivalent orchestration layer for on-device runtimes a gap that enterprise deployments and the research community are now actively calling. Introducing KVStream: A Middleware Layer for Local LLM Runtimes KVStream is a lightweight Python middleware that sits between the application and any local LLM runtime, adding production-grade memory management and scheduling without requiring you to modify the backend or the client. The design principle is deliberate: KVStream is not a new inference engine. It does not replace Foundry Local or any other runtime. Instead, it solves the orchestration layer that on-device runtimes currently leave unaddressed the gap between a single model server and an application that expects the reliability and throughput of a managed serving system. KVStream exposes a fully OpenAI-compatible API on http://localhost:8080/v1. Any existing client the openai Python SDK, LangChain, httpx, or a curl command connects to it without modification. The backend continues to run unchanged. Architecture KVStream is composed of four cooperating subsystems. Understanding how they interact clarifies why the gains are meaningful and composable. 1.Paged KV-Cache Allocator: Inspired by the paged attention mechanism, KVStream manages KV cache memory as a pool of fixed-size pages (or blocks), each holding a configurable number of token states (default: 16 tokens per block). Rather than reserving a contiguous worst-case buffer per sequence, the allocator assigns pages on demand and reclaims them when a sequence finishes. Each sequence owns a logical page table, a mapping from logical page indices to physical block slots. Pages can be shared across sequences (enabling prefix deduplication) and migrated between GPU and CPU (enabling pre-emption). For Foundry Local and Ollama, this operates in soft-inject mode, the page table controls admission and logical accounting, while the actual KV tensors stay inside the backend. For llama.cpp, which exposes a /slots API for saving and restoring raw KV state, KVStream can operate in hard-inject mode, it manages a real tensor pool and performs zero re-compute cache reuse by physically restoring KV state between requests. 2.Continuous Batching Scheduler: The scheduler merges multiple queued sequences into a single batched forward pass, up to a configurable max_batch_size. Critically, it uses continuous batching new sequences can be admitted mid-generation, filling slots vacated by completed requests rather than waiting for the entire batch to finish. Two scheduling priorities are supported: fcfs (first-come, first-served): straightforward FIFO, best for fairness. sjf (shortest-job-first): minimizes average TTFT by prioritizing requests with shorter expected output lengths. When GPU page blocks are exhausted and a new sequence must be admitted, the scheduler applies a preemption policy: swap: the lowest-priority active sequence's pages are migrated to CPU RAM. The sequence resumes when GPU blocks become available again. recompute: pages are freed and the sequence is re-queued from scratch, lower memory overhead, higher latency for the preempted request. 3.Prefix Cache: The prefix cache deduplicates the KV computation for any shared token prefix across requests like system prompts, few-shot examples, RAG preambles, or any stable instruction block. The mechanism works in three steps: After a request completes its prefill phase, KVStream hashes the prompt tokens in block-aligned chunks and stores the canonical block table for that prefix. On a subsequent request whose prompt starts with the same prefix, the new sequence forks the canonical block table via copy-on-write, no re-computation occurs. Entries expire after a configurable TTL (default: 1 hour), or can be evicted manually. The practical consequence: in any application with a stable system prompt, only the first request pays the prefill cost for that prompt. Every subsequent request skips it entirely, reducing TTFT in proportion to the length of the shared prefix. 3.OpenAI-Compatible Proxy KVStream wraps all of the above behind a standard /v1/chat/completions interface. It handles both streaming (SSE) and non-streaming responses, translates between the OpenAI request format and the backend's native API, and serves a /health, /status, and /metrics endpoint for observability. The /status endpoint returns live scheduler and memory state: { "scheduler": { "waiting": 2, "running": 8, "swapped": 0, "gpu_blocks_free": 184, "gpu_utilization": 0.281 }, "prefix_cache": { "cached_prefixes": 3, "total_prefix_hits": 12, "cached_tokens": 768 } } A Prometheus-compatible /metrics endpoint is also available, with a pre-configured Grafana dashboard included in the Docker Compose stack. Getting Started with Foundry Local: Microsoft's Foundry Local is the primary integration target for KVStream. Foundry Local provides a high-quality on-device inference runtime with strong model support (Phi-3-mini, Phi-3.5, and others), NPU acceleration, and direct integration with the Windows AI platform. KVStream's Foundry backend adds continuous batching and prefix caching on top of that foundation without any changes to the Foundry runtime itself. Installation: pip install kvstream Start the KVStream Proxy: # 1. Start Foundry Local (if not already running) foundrylocal serve # 2. Start KVStream in front of it kvstream serve --backend foundry --model phi-3-mini --port 8080 KVStream's Foundry backend includes auto-discovery, if Foundry Local assigns an ephemeral OS port (which it typically does), KVStream scans localhost to locate the active service automatically, so you do not need to hardcode the backend port. Connect your existing client — unchanged: from openai import OpenAI client = OpenAI( base_url="http://localhost:8080/v1", api_key="not-required", ) response = client.chat.completions.create( model="phi-3-mini", messages=[ {"role": "system", "content": "You are a helpful assistant."}, {"role": "user", "content": "Explain paged attention in simple terms."}, ], max_tokens=512, ) print(response.choices[0].message.content) Any client that speaks the OpenAI protocol like LangChain, httpx, or a raw HTTP call, connects here without modification. Maximize prefix cache hits: Put the system prompt first; KVStream caches it after the first request and skips its computation for every subsequent one. import asyncio from openai import AsyncOpenAI client = AsyncOpenAI(base_url="http://localhost:8080/v1", api_key="not-required") SYSTEM = "You are an expert assistant specialized in on-device AI." async def ask(question: str) -> str: r = await client.chat.completions.create( model="phi-3-mini", messages=[ {"role": "system", "content": SYSTEM}, # cached after first call {"role": "user", "content": question}, ], max_tokens=256, ) return r.choices[0].message.content async def main(): questions = [ "What is NPU acceleration?", "How does Phi-3-mini differ from larger models?", "What is token streaming?", ] # KVStream batches these automatically; system prompt computed once answers = await asyncio.gather(*[ask(q) for q in questions]) for q, a in zip(questions, answers): print(f"Q: {q}\nA: {a}\n") asyncio.run(main()) Tuning memory for hardware: The single most impactful configuration knob is the GPU block pool size. For soft-inject mode (Foundry Local, Ollama), this controls admission concurrency, not actual VRAM allocation by KVStream. A practical starting table is as follows, Device VRAM / RAM num_gpu_blocks Suitable models (E.g.,) 4 GB 64 phi-3-mini 8 GB 128 llama3-8b, mistral-7b 16 GB 256 llama3-8b (q8) 24 GB 512 llama3-70b (q4), mixtral Via YAML configuration: # kvstream.yaml backend: type: foundry model: phi-3-mini memory: num_gpu_blocks: 128 num_cpu_blocks: 256 block_size: 16 scheduler: max_batch_size: 8 preemption_policy: swap priority: fcfs prefix_cache: enabled: true ttl_seconds: 3600 min_match_tokens: 16 Benchmarking KVStream ships with a built-in benchmarking command: kvstream bench \ --url http://localhost:8080 \ --model phi-3-mini \ --concurrency 8 \ --prompt-len 128 \ --output-len 64 \ --total-requests 100 Example output: ┌──────────────────────────┐ │ KVStream Benchmark │ ├──────────────┬───────────┤ │ Requests │ 100 │ │ Concurrency │ 8 │ │ Errors │ 0 │ │ Throughput │ 12.4 req/s│ │ p50 │ 612 ms │ │ p99 │ 1840 ms │ └──────────────┴───────────┘ KVStream covers the most common local inference runtimes today Foundry Local, Ollama, llama.cpp, and LM Studio through a single, consistent interface. If you are building on Foundry Local and running into the throughput or memory fragmentation issues described here, KVStream is designed to slot in with a single command and zero changes to your application code. pip install kvstream kvstream serve --backend foundry --model phi-3-mini The full integration guide, configuration reference, and Docker deployment instructions are available in the KVStream Documentation on Github. We are always looking to improve! If you want to help make KVStream even better, check out our Contributing Guide to get started on your first pull request.411Views0likes1CommentHybrid AI Agents in Python: Routing Between Foundry Local and Microsoft Foundry
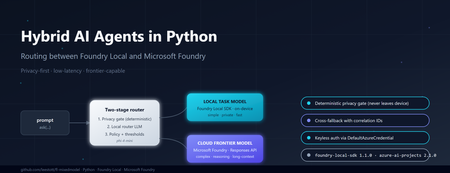
Why hybrid, and why now If you build AI features today, you are caught between three forces. Users want low latency and strong privacy. Product teams want frontier reasoning capability. Finance teams want predictable cost. No single model satisfies all three. Run everything on a small on-device model and you bottleneck on complex questions. Send everything to a frontier cloud model and you pay for trivial requests, leak sensitive data across a network boundary, and add hundreds of milliseconds of latency to greetings. The pragmatic answer is hybrid inference: a lightweight local model classifies every request first, simple or sensitive ones stay on the device, and only the genuinely hard or frontier-capability requests escalate to the cloud. Microsoft now ships both halves of that pattern as supported Python SDKs — foundry-local-sdk for on-device inference and azure-ai-projects for Microsoft Foundry cloud models. This post walks through a working reference implementation that combines them behind a single ask() call. The full source is at github.com/leestott/fl-mixedmodel. It is Python-only, secretless by design, and ships with a Gradio diagnostics UI, a CLI demo mode, and a full pytest suite. The contract: one schema, two paths The most important architectural decision is that callers never know which path served a request. Every response, local or cloud, returns the same dataclass: class InferencePath(str, Enum): LOCAL = "local" CLOUD = "cloud" LOCAL_FALLBACK = "local_fallback" # cloud attempted, fell back to local CLOUD_FALLBACK = "cloud_fallback" # local attempted, fell back to cloud @dataclass class AgentResponse: answer: str path: InferencePath model: str reason: str confidence: float latency_ms: float correlation_id: str prompt_tokens: Optional[int] = None completion_tokens: Optional[int] = None fallback: bool = False fallback_reason: Optional[str] = None metadata: dict = field(default_factory=dict) This is what makes the design honest. The router can change, the cloud model can be swapped from gpt-4o to gpt-5.4 , fallback policies can flip — and the calling code never breaks. The four InferencePath values give you full observability without leaking implementation details into the API surface. Architecture in one diagram ┌─────────────┐ prompt ┌──────────────────────────┐ │ caller │ ──────────► │ HybridAgentService │ └─────────────┘ │ .ask(prompt) │ └────────────┬─────────────┘ │ ┌────────────▼─────────────┐ │ RoutingPolicy │ │ 1. Heuristic gate │ │ 2. Local router LLM │ │ 3. Hard policy gates │ └─────┬─────────────┬──────┘ │ │ LOCAL ◄┘ └► CLOUD │ │ ┌──────────▼──┐ ┌──────▼───────┐ │ Foundry │ │ Microsoft │ │ Local SDK │ │ Foundry │ │ (phi-4-mini)│ │ (gpt-5.4) │ └─────────────┘ └──────────────┘ Best practice: the two-stage router pattern Before walking through the implementation, it is worth stating the design pattern explicitly, because it is the part that generalises beyond this specific repo. The cleanest design for hybrid inference is a two-stage router. Stage 1 — local router. A small local model performs intent and complexity classification first. It does not answer the question; it decides where the question should go. Stage 2 — route the answer. If the prompt is simple, private, latency-sensitive, or clearly within local capability, route to a local task model on the device. If the prompt is complex, needs deeper reasoning, a larger context window, or a capability unavailable locally, escalate to a cloud frontier model in Microsoft Foundry. Microsoft's current guidance for the cloud side is to use the Responses API and choose one of two control modes: Pass a specific deployment name (for example gpt-5.4 ) when you want deterministic control over which model serves the request, which is the right choice for regulated workloads, repeatable evaluations, or cost ceilings. Pass model-router as the deployment when you want Microsoft Foundry to automatically select the best available cloud model for each request. This is a sensible default for general-purpose agents where you would rather let the platform optimise the model choice as new ones are released. The reference repo exposes both as environment variables so you can switch without code changes: # .env.example FOUNDRY_CLOUD_MODEL_DEPLOYMENT=gpt-5.4 # deterministic FOUNDRY_CLOUD_ROUTER_DEPLOYMENT=model-router # auto-select Best practice: pin the right SDK versions Two SDKs do the heavy lifting and both have had recent breaking changes, so version discipline matters. Local development — foundry-local-sdk . The current public guidance is to use the Foundry Local SDK package foundry-local-sdk , which provides model discovery, download, cache, load, unload, chat completions, embeddings, audio transcription, and an optional built-in web service. Use version 1.1.0, released on 5 May 2026. Earlier versions used an OpenAI-compatible client surface that has since been replaced by the FoundryLocalManager → load_model → get_chat_client → complete_chat chain shown above. Pin it explicitly: # requirements.txt foundry-local-sdk>=1.1.0 Cloud orchestration and agents — azure-ai-projects . For cloud-side orchestration, Microsoft's current Python guidance is to use azure-ai-projects , which the docs describe as part of the Microsoft Foundry SDK and as the entry point for agents, deployments, connections, datasets, evaluations, and an OpenAI-compatible client returned by get_openai_client() . The current PyPI listing shows azure-ai-projects 2.1.0. Pin it explicitly: # requirements.txt azure-ai-projects>=2.1.0 azure-identity>=1.17.0 If you find yourself reading old samples that import azure.ai.inference as the cloud entry point, or that initialise Foundry Local through a raw openai.OpenAI(base_url=...) client, you are looking at pre-2026 patterns. The current shape is what the reference repo uses: FoundryLocalManager.initialize(Configuration(...)) for the device and AIProjectClient(...).get_openai_client() for the cloud. Stage 1: a deterministic privacy gate Before any model touches a prompt, a deterministic heuristic classifier scans for sensitive patterns — passwords, API keys, SSN/NHS numbers, PII signals, explicit "do not share" flags. If the heuristic returns PrivacyClass.RESTRICTED , the prompt is forced local. The router LLM is not called. The cloud provider is not called. The decision is auditable from a single regex pass. # app/routing/policy.py def decide(self, prompt: str, correlation_id: str = "") -> RoutingDecision: hint, privacy, complexity, h_reason = self._heuristic.classify(prompt) # Hard gate: restricted content never leaves the device if privacy == PrivacyClass.RESTRICTED: return self._make_decision( target=RouteTarget.LOCAL, confidence=1.0, reason=f"Policy hard-gate: {h_reason}", privacy=privacy, complexity=complexity, deterministic=True, correlation_id=correlation_id, ) # Hard gate: very high complexity always goes to cloud if complexity == ComplexityBand.VERY_HIGH: return self._make_decision( target=RouteTarget.CLOUD, confidence=1.0, reason="Policy hard-gate: very_high complexity requires frontier model", ... ) This is the most important responsible-AI control in the whole system. If your privacy review depends on an LLM correctly classifying every prompt, you do not have a privacy control — you have a probability distribution. Deterministic gates first, model judgement second. Stage 2: a local LLM as the router For everything that passes the privacy gate, a small local model classifies whether the prompt needs frontier capability. This is the bit that surprises most engineers: you can do useful routing with a 4B parameter model running on a laptop CPU. The router does not need to answer the question. It only needs to classify it. The reference implementation uses phi-4-mini via Foundry Local. Initialising it is two lines: # app/providers/local_provider.py (excerpt) from foundry_local import FoundryLocalManager from foundry_local.models import Configuration self._manager = FoundryLocalManager.initialize( Configuration(app_name="hybrid-agent") ) self._router_model = self._manager.load_model(self._config.local_router_alias) self._chat_client = self._router_model.get_chat_client() response = self._chat_client.complete_chat( messages=[ {"role": "system", "content": ROUTER_SYSTEM_PROMPT}, {"role": "user", "content": prompt}, ], ) The router prompt asks for a strict JSON response: { "target": "local|cloud", "confidence": 0.0-1.0, "complexity": "low|medium|high|very_high", "reason": "..." } . The application parses it, applies the confidence threshold from config (default 0.6), and falls back to the heuristic decision if the router LLM is unsure or its JSON is malformed. The router never blocks the answer path — that is a deliberate reliability choice. Cloud inference via Microsoft Foundry When the policy returns RouteTarget.CLOUD , the request goes through AIProjectClient , which gives you an openai.OpenAI -compatible client wired to your Foundry project with DefaultAzureCredential . No API keys. No secrets in .env . # app/providers/cloud_provider.py (excerpt) from azure.ai.projects import AIProjectClient from azure.identity import DefaultAzureCredential self._project = AIProjectClient( endpoint=self._config.foundry_project_endpoint, credential=DefaultAzureCredential(), ) self._openai_client = self._project.get_openai_client() response = self._openai_client.chat.completions.create( model=self._config.foundry_cloud_model_deployment, # e.g. "gpt-5.4" messages=messages, max_completion_tokens=max_tokens, ) A subtle gotcha worth flagging: gpt-5 and o-series deployments reject the legacy max_tokens parameter and require max_completion_tokens . They also reject custom temperature values. The reference repo handles this by trying the new parameter first and falling back to the legacy one only when the API returns the specific unsupported parameter error. That keeps the same code working against older deployments without forking the provider. Graceful degradation: the fallback paths Hybrid systems fail in interesting ways. The cloud can be down. The local model can throw because the GPU ran out of memory. A reasoning model can return an empty completion. The service handles all of these by attempting the alternative path and labelling the response so observability stays honest: Cloud route fails → local fallback. The response carries path=LOCAL_FALLBACK , fallback=true , and a populated fallback_reason . The user gets an answer instead of an error. Local route fails → cloud fallback, but only if privacy class is not RESTRICTED. A sensitive prompt that the local model could not handle never leaks to the cloud as a fallback. It returns a clear error instead. This is the second hard gate in the system. Both fail. A structured error response with a correlation ID, never a stack trace. That last rule — fallback respects privacy class — is the kind of decision that is easy to skip and impossible to bolt on later. Encode it once in the service layer and your privacy reviewers will thank you. What it looks like in practice The diagnostics panel in the Gradio UI shows the routing decision live: path, model, confidence, latency, privacy class, complexity band, and the full JSON response. Five canonical scenarios shake out the entire decision tree: "hello" → path=local, confidence=1.0, complexity=low . Heuristic only. No router LLM call. ~3 seconds end-to-end with phi-4-mini cached. "explain transformer self-attention in depth with maths" → path=cloud, model=gpt-5.4, complexity=high . Router LLM classifies, hard gate confirms. "my password is hunter2, suggest a stronger one" → path=local, privacy=restricted, deterministic=true . Privacy gate fires before any model sees it. "summarise this 8 KB document" with cloud unavailable → path=cloud_fallback (local handles it, response is labelled). Complex prompt with local model error → path=local_fallback , fallback_reason populated. You can reproduce all five without any models installed by running python -m app.main --demo . The demo mode swaps the providers for deterministic stubs so you can validate the routing logic and the response schema in under a second on any machine. Operational lessons learned Some things the reference implementation only gets right because it got them wrong first: Pick a non-reasoning model for the router. Reasoning-tuned local models (Phi-4-reasoning, o-style) wrap their output in <think> blocks and blow your JSON parser. phi-4-mini is faster and more reliable for classification. Cache the local model. First load can take 30–60 seconds while Foundry Local downloads weights. Initialise the service once at process startup, not per request. Use correlation IDs everywhere. The service attaches one per request and the structured JSON logger emits it on every event. When you are debugging a fallback path across two model providers, this is the difference between five minutes and five hours. Run the privacy heuristic on every fallback path too. A naive implementation might route locally, fail, and then send the same sensitive prompt to the cloud as a "graceful" fallback. That is not graceful, it is a data leak. Keep configuration in .env and out of code. Privacy mode, fallback toggles, confidence threshold, model aliases — all environment-driven. The config.py module is the only place that reads them. Responsible AI in a hybrid topology Hybrid does not make responsible AI harder, but it does make it different. Three controls earn their keep: Data residency by default. The local path keeps prompts and answers on the device. For RESTRICTED content this is mandatory; for everything else it is a free latency and cost win. Auditability. Every routing decision is logged with the deterministic reason, the heuristic class, the router LLM output, the confidence, and the correlation ID. You can answer "why did this prompt go to the cloud?" months later. Keyless auth. DefaultAzureCredential means there is no API key to leak, rotate, or commit by accident. The repo's .gitignore , SECURITY.md , and pre-push checklist enforce this end-to-end. Try it Five minutes, no Azure account needed for the demo: git clone https://github.com/leestott/fl-mixedmodel.git cd fl-mixedmodel python -m venv .venv .venv\Scripts\activate # Windows # source .venv/bin/activate # macOS / Linux pip install -r requirements.txt python -m app.main --demo # all five scenarios, no models required To run with real models, install Foundry Local, copy .env.example to .env , set your FOUNDRY_PROJECT_ENDPOINT , then: az login python -m app.main --ui --port 7860 Where to go next Repository: github.com/leestott/fl-mixedmodel — full source, tests, specification, screenshots. Foundry Local SDK: pypi.org/project/foundry-local-sdk and the Foundry Local docs. Azure AI Projects SDK: pypi.org/project/azure-ai-projects and the Microsoft Foundry docs. Azure Identity: DefaultAzureCredential reference. Phi-4-mini: Phi-4-mini on Hugging Face. Key takeaways The best-practice pattern is a two-stage router: local model classifies first, then either a local task model or a Microsoft Foundry cloud model answers. For cloud control, use the Responses API with either a named deployment (deterministic) or model-router (auto-select). Pin foundry-local-sdk >= 1.1.0 (5 May 2026) and azure-ai-projects >= 2.1.0 . The 2026 SDK surfaces are not backwards-compatible with pre-2026 samples. Hybrid inference is a routing problem, not a model problem. A small local model is enough to classify the request. Deterministic privacy gates beat probabilistic ones. Code the rules; let the LLM judge only what is left. Return the same response schema from every path. Label fallbacks honestly. Carry a correlation ID everywhere. Keep auth keyless with DefaultAzureCredential and your .env out of git. Test the routing decisions, not just the model outputs. Demo mode and a strong pytest suite pay back every time you swap a model. Hybrid AI is not a compromise between local and cloud. It is the supervisor pattern applied to inference — fast and private where you can be, frontier where you have to be, observable everywhere. The hard part is the contract, not the models.554Views1like0CommentsIf You're Building AI on Azure, ECS 2026 is Where You Need to Be
Let me be direct: there's a lot of noise in the conference calendar. Generic cloud events. Vendor showcases dressed up as technical content. Sessions that look great on paper but leave you with nothing you can actually ship on Monday. ECS 2026 isn't that. As someone who will be on stage at Cologne this May, I can tell you the European Collaboration Summit combined with the European AI & Cloud Summit and European Biz Apps Summit is one of the few events I've seen where engineers leave with real, production-applicable knowledge. Three days. Three summits. 3,000+ attendees. One of the largest Microsoft-focused events in Europe, and it keeps getting better. If you're building AI systems on Azure, designing cloud-native architectures, or trying to figure out how to take your AI experiments to production — this is where the conversation is happening. What ECS 2026 Actually Is ECS 2026 runs May 5–7 at Confex in Cologne, Germany. It brings together three co-located summits under one roof: European Collaboration Summit — Microsoft 365, Teams, Copilot, and governance European AI & Cloud Summit — Azure architecture, AI agents, cloud security, responsible AI European BizApps Summit — Power Platform, Microsoft Fabric, Dynamics For Azure engineers and AI developers, the European AI & Cloud Summit is your primary destination. But don't ignore the overlap, some of the most interesting AI conversations happen at the intersection of collaboration tooling and cloud infrastructure. The scale matters here: 3,000+ attendees, 100+ sessions, multiple deep-dive tracks, and a speaker lineup that includes Microsoft executives, Regional Directors, and MVPs who have built, broken, and rebuilt production systems. The Azure + AI Track - What's Actually On the Agenda The AI & Cloud Summit agenda is built around real technical depth. Not "intro to AI" content, actual architecture decisions, patterns that work, and lessons from things that didn't. Here's what you can expect: AI Agents and Agentic Systems This is where the energy is right now, and ECS is leaning in. Expect sessions covering how to design agent workflows, chain reasoning steps, handle memory and state, and integrate with Azure AI services. Marco Casalaina, VP of Products for Azure AI at Microsoft, is speaking if you want to understand the direction of the Azure AI platform from the people building it, this is a direct line. Azure Architecture at Scale Cloud-native patterns, microservices, containers, and the architectural decisions that determine whether your system holds up under real load. These sessions go beyond theory you'll hear from engineers who've shipped these designs at enterprise scale. Observability, DevOps, and Production AI Getting AI to production is harder than the demos suggest. Sessions here cover monitoring AI systems, integrating LLMs into CI/CD pipelines, and building the operational practices that keep AI in production reliable and governable. Cloud Security and Compliance Security isn't optional when you're putting AI in front of users or connecting it to enterprise data. Tracks cover identity, access patterns, responsible AI governance, and how to design systems that satisfy compliance requirements without becoming unmaintainable. Pre-Conference Deep Dives One underrated part of ECS: the pre-conference workshops. These are extended, hands-on sessions typically 3–6 hours that let you go deep on a single topic with an expert. Think of them as intensive short courses where you can actually work through the material, not just watch slides. If you're newer to a particular area of Azure AI, or you want to build fluency in a specific pattern before the main conference sessions, these are worth the early travel. The Speaker Quality Is Different Here The ECS speaker roster includes Microsoft executives, Microsoft MVPs, and Regional Directors, people who have real accountability for the products and patterns they're presenting. You'll hear from over 20 Microsoft speakers: Marco Casalaina — VP of Products, Azure AI at Microsoft Adam Harmetz — VP of Product at Microsoft, Enterprise Agent And dozens of MVPs and Regional Directors who are in the field every day, solving the same problems you are. These aren't keynote-only speakers — they're in the session rooms, at the hallway track, available for real conversations. The Hallway Track Is Not a Cliché I know "networking" sounds like a corporate afterthought. At ECS it genuinely isn't. When you put 3,000 practitioners, engineers, architects, DevOps leads, security specialists in one venue for three days, the conversations between sessions are often more valuable than the sessions themselves. You get candid answers to "how are you actually handling X in production?" that you won't find in documentation. The European Microsoft community is tight-knit and collaborative. ECS is where that community concentrates. Why This Matters Right Now We're in a period where AI development is moving fast but the engineering discipline around it is still maturing. Most teams are figuring out: How to move from AI prototype to production system How to instrument and observe AI behaviour reliably How to design agent systems that don't become unmaintainable How to satisfy security and compliance requirements in AI-integrated architectures ECS 2026 is one of the few places where you can get direct answers to these questions from people who've solved them — not theoretically, but in production, on Azure, in the last 12 months. If you go, you'll come back with practical patterns you can apply immediately. That's the bar I hold events to. ECS consistently clears it. Register and Explore the Agenda Register for ECS 2026: ecs.events Explore the AI & Cloud Summit agenda: cloudsummit.eu/en/agenda Dates: May 5–7, 2026 | Location: Confex, Cologne, Germany Early registration is worth it the pre-conference workshops fill up. And if you're coming, find me, I'll be the one talking too much about AI agents and Azure deployments. See you in Cologne.oBeaver — A Beaver That Runs LLMs on Your Machine 🦫
Hi there! I'm the creator of oBeaver. This project started from a pretty simple desire: I wanted to run large language models on my own computer. No data sent to the cloud. No API keys. No per-call charges. I'm guessing you've had the same thought. There are already great tools out there — Ollama being the most prominent. But in my day-to-day work, I spend a lot of time in the ONNX ecosystem — the cross-platform reach of ONNX Runtime, its native NPU support, the turnkey experience of Microsoft Foundry Local. It kept nagging at me: the ONNX ecosystem deserves a more complete local inference toolkit. That's how oBeaver was born. Here are the links if you want to jump straight in: GitHub: https://github.com/microsoft/obeaver Docs: https://microsoft.github.io/obeaver Up and Running in Three Minutes Getting started with oBeaver is dead simple. You need Python 3.12+, then it's clone, install, chat: git clone https://github.com/microsoft/obeaver.git cd obeaver pip install -e . # Initialize the model directory (auto-creates ort/, foundrylocal/, cache_dir/ sub-folders) obeaver init # Make sure everything looks good obeaver check If you're on macOS or Windows, install Foundry Local and you're one command away from chatting with a model: obeaver run phi-4-mini The first run downloads the model automatically — give it a minute. After that, it's instant. On Linux, or if you want to use models from Hugging Face, the ORT engine has you covered: # Convert Qwen3-0.6B from Hugging Face to ONNX format obeaver convert Qwen/Qwen3-0.6B # Run it with the ORT engine obeaver run --engine ort ./models/ort/Qwen3-0.6B_ONNX_INT4_CPU Want to turn your model into an HTTP service? One line: obeaver serve Phi-4-mini Then point any OpenAI-compatible client at it — just change one base_url and your existing code works as-is: from openai import OpenAI client = OpenAI(base_url="http://127.0.0.1:18000/v1", api_key="unused") response = client.chat.completions.create( model="Phi-4-mini", messages=[{"role": "user", "content": "What is the capital of France?"}], stream=True, ) for chunk in response: print(chunk.choices[0].delta.content or "", end="", flush=True) LangChain, LlamaIndex, Microsoft Agent Framework, CrewAI — anything that speaks the OpenAI protocol plugs right in. This was a non-negotiable design principle from day one: local inference shouldn't be an island; it should fit seamlessly into your existing dev workflow. "Why Not Just Use Ollama?" I get this question a lot, and it deserves a straight answer. Ollama is a fantastic project. It pioneered the "one command to run a model" experience and made local LLM inference accessible to everyone. If all you need is a quick way to chat with a model locally, Ollama is still a wonderful choice. oBeaver itself draws heavy inspiration from it. But Ollama and oBeaver take different technical paths. Ollama is built on llama.cpp and uses the GGUF model format. oBeaver is built on ONNX Runtime and uses the ONNX model format. Behind these two formats are two very different philosophies. GGUF: Grab and Go GGUF's strength is ultimate portability. One file bundles everything — weights, tokenizer, metadata. Hugging Face is packed with pre-quantized GGUF models ready to download and run. Quantization options are rich (Q2_K through Q8_0), and the community is incredibly active. For individual developers, this "grab and go" experience is hard to beat. ONNX: Convert Once, Accelerate Everywhere ONNX shines in a different dimension. As a cross-platform industrial standard, ONNX Runtime has something called Execution Providers — the same ONNX model, without any changes, can run on CPU, GPU, and even NPU. This matters more than it might seem at first glance. With chips like Intel Core Ultra, Qualcomm Snapdragon X, and Apple Neural Engine becoming mainstream, NPUs are quickly becoming standard hardware in AI PCs. ONNX Runtime already supports NPU acceleration natively, while the GGUF ecosystem doesn't have this capability yet. This means ONNX naturally adapts to a far wider range of devices — from servers to laptops, from desktops to edge devices, even phones and IoT endpoints. The ONNX model you run on CPU today can be accelerated on an NPU-equipped machine tomorrow — no re-conversion, no code changes, just switch the Execution Provider. ONNX does have a higher barrier to entry — models need to be converted first. But oBeaver's built-in obeaver convert command, powered by Microsoft's Olive toolkit, reduces that to a single line. Another project worth mentioning is oMLX, which also explores local inference in the ONNX ecosystem, but focuses specifically on Apple Silicon. oBeaver aims to be more comprehensive — spanning macOS, Windows, and Linux, covering text chat, embeddings, and vision-language scenarios. Here's a quick comparison of all three: Ollama oMLX oBeaver Model format GGUF ONNX ONNX Inference backend llama.cpp ONNX Runtime Foundry Local + ORT GenAI Platforms macOS/Linux/Windows macOS macOS/Windows/Linux NPU acceleration ❌ ❌ ✅ Embedding models ✅ ✅ ✅ VL models ✅ ✅ ✅ Function Calling ✅ ✅ ✅ Docker deployment ✅ ✅ ✅ I'm not saying oBeaver is better than Ollama. They serve different needs. But if your work involves the ONNX ecosystem, NPU acceleration, or a combination of embedding and multimodal capabilities, oBeaver offers a path that Ollama doesn't currently cover. Why a "Dual Engine"? This is oBeaver's most distinctive design decision, and the one I spent the most time thinking about. oBeaver has two inference engines under the hood: Foundry Local and ONNX Runtime GenAI (ORT). Why not just pick one? Because reality is messier than ideals. Foundry Local is Microsoft's local inference runtime, and the experience is lovely — pass a catalog alias like Phi-4-mini, and it auto-downloads, loads, and runs the model with smart hardware scheduling (NPU > GPU > CPU). But it has two clear limitations: first, the model catalog is still small, mostly centered around Microsoft's Phi family; second, it only supports macOS and Windows — Linux users are left out. ONNX Runtime GenAI fills exactly those gaps. It supports macOS, Windows, and Linux — all three platforms. And with obeaver convert, you can transform almost any model on Hugging Face into ONNX format, giving you a much wider model selection. Right now, oBeaver can already run models from Phi, Qwen, Gemma, GLM, and other SLM families through the ORT engine. On top of that, the ORT engine powers capabilities that Foundry Local simply can't do: Embedding models — The ORT engine includes a dedicated embedding engine supporting Qwen3-Embedding and EmbeddingGemma, perfect for local RAG pipelines: # Start the embedding service obeaver serve-embed ./models/Qwen3-Embedding-0.6B from openai import OpenAI client = OpenAI(base_url="http://127.0.0.1:18001/v1", api_key="unused") response = client.embeddings.create( model="Qwen3-Embedding-0.6B", input=["Hello, world!", "Embeddings are useful."], ) for item in response.data: print(f"index={item.index} dim={len(item.embedding)}") Vision-Language models (VL) — When the ORT engine detects vision.onnx in a model directory, it automatically switches to VL mode. Currently supported: Qwen-2.5-VL-3B and Qwen-3-VL-2B. You can send images alongside text for multimodal understanding: obeaver serve ./models/Qwen3-VL-2B-Instruct_VL_ONNX_INT4_CPU Converting a VL model is just one command too: obeaver convert Qwen/Qwen2.5-VL-3B-Instruct --type vl So the dual engine isn't redundancy — it's the optimal choice given reality: Foundry Local covers only macOS/Windows; ORT GenAI covers all platforms. Foundry Local has fewer models but zero friction; ORT GenAI has more models and more flexibility. oBeaver automatically picks the right engine for your platform and task — Foundry Local by default on macOS/Windows, ORT on Linux, auto-switching to ORT for embedding or VL workloads. You can always override with --engine ort. In short: Foundry Local handles the "just works" path, ORT handles the "I need more" path. Together, they give oBeaver an answer for every platform and every scenario. Cloud-Native? Of Course oBeaver isn't just a local toy. Deployment was baked into the design from the start. The architecture is cleanly layered: CLI (Typer) → FastAPI Server → pluggable inference engines. We ship a Docker image supporting both linux/amd64 and linux/arm64 (Apple Silicon included): # Build the image docker buildx build --platform=linux/amd64 \ -f docker/Dockerfile.cpu -t obeaver-cpu . # Start the API server docker run -d --rm -p 18000:18000 \ -v /path/to/models:/models \ obeaver-cpu serve -m /models -E ort --host 0.0.0.0 --port 18000 Local dev, CI/CD pipelines, headless servers, Kubernetes clusters — it all works. Combined with the OpenAI-compatible API, you can develop against oBeaver locally and switch to a cloud endpoint in production by changing a single URL. Not a single line of application code needs to change. Not Just a CLI — There's a Dashboard Too So far everything I've shown has been terminal commands. But sometimes you just want a visual interface — especially when you're evaluating models, comparing performance, or showing a demo. oBeaver ships with a built-in web dashboard. One command to launch: obeaver dashboard # Foundry Local engine (macOS/Windows) obeaver dashboard -e ort # ORT engine (scans local ONNX models) Open http://127.0.0.1:1573/ and you'll see something like this: It's a real-time monitoring and chat interface rolled into one. Here's what you get: Model Selector — Switch between your cached models on the fly. If a model supports NPU acceleration, it's marked with a ⚡ badge. With Foundry Local, you'll see the models from your local catalog: With the ORT engine, it scans your model directory for all available ONNX models: Chat + Live Benchmarking — Send messages and get streaming responses, with real-time performance stats right in the interface — TTFT (Time to First Token), tokens per second, total token count. This makes it incredibly easy to benchmark different models side by side: System Monitoring — Real-time memory gauges for CPU, GPU, NPU, and process memory. A system info bar shows the current model, engine type, platform, and health status at a glance. Inference Parameters — Adjust temperature, top-p, top-k, and max tokens with built-in presets, all without restarting the server. VL Mode — When you load a Vision-Language model in the ORT dashboard, the interface automatically switches to a dedicated VL mode where you can provide an image URL alongside your text prompt: And more — Conversation history with save/load, system prompt configuration, live server logs showing every request with method/path/status/timing, and export to JSON or Markdown. The dashboard isn't a separate product — it's just obeaver dashboard. Everything runs locally, nothing phones home. It's particularly useful when you want to quickly evaluate how a model performs on your hardware before committing to it in your application. Being Honest: CPU Only for Now oBeaver is currently in Tech Preview, and I want to be upfront about this — it only supports CPU inference right now. This is a deliberate, stage-by-stage choice. We wanted to make sure the entire toolchain — model conversion, inference, API serving, Docker deployment — is rock solid on CPU first. Almost every machine has a CPU; it's the best baseline for validating the complete workflow. But GPU and NPU support are coming soon. They're at the very top of the roadmap. ONNX Runtime already ships mature CUDA (GPU) and QNN/OpenVINO (NPU) Execution Providers. Foundry Local already has NPU > GPU > CPU auto-scheduling built in. What oBeaver needs to do is integrate these into its engine selection logic and model conversion pipeline — and that work is actively underway. Ultimately, one of the key reasons oBeaver chose the ONNX path is the NPU future. The AI PC era is arriving, and when NPUs become standard hardware, ONNX will be the ecosystem most ready for it. Acknowledgements oBeaver is inspired by and builds upon the ideas from the following excellent projects: Project Description Ollama Run large language models locally with a simple CLI OMLX Run large language models on Apple Silicon, ONNX-based vLLM High-throughput and memory-efficient inference engine for LLMs Foundry Local Microsoft's local model inference runtime with NPU/GPU/CPU acceleration ONNX Runtime GenAI Generative AI extensions for ONNX Runtime Olive Microsoft's model optimization toolkit for ONNX Runtime I Need Your Feedback That's the tour. But oBeaver is still in its early days, and there's so much room to improve. As the creator of this project, what I fear most isn't criticism — it's silence. So I genuinely hope you'll give it a try and let me know what you think: Which models do you most want to run? How urgent is GPU / NPU acceleration for your use case? What do you think of the dual-engine design — does it add value, or does it add complexity? In your real-world projects, what's the biggest pain point with local inference? What else does the Docker story need? Helm Charts? Compose files? GitHub Issues, PRs, or just reaching out on social media — any form of feedback is deeply appreciated. The name oBeaver comes from the beaver — nature's most remarkable engineer. Beavers build dams stick by stick, creating the environment they need to thrive. I hope oBeaver can help you do the same: build your local AI infrastructure, one piece at a time, on your own hardware. Build local. Dam the cloud. 🦫 GitHub: https://github.com/microsoft/obeaver Docs: https://microsoft.github.io/obeaver If you find oBeaver useful, a ⭐ on GitHub means the world to us!Build a Fully Offline AI App with Foundry Local and CAG
A hands-on guide to building an on-device AI support agent using Context-Augmented Generation, JavaScript, and Foundry Local. You have probably heard the AI pitch: "just call our API." But what happens when your application needs to work without an internet connection? Perhaps your users are field engineers standing next to a pipeline in the middle of nowhere, or your organisation has strict data privacy requirements, or you simply want to build something that works without a cloud bill. This post walks you through how to build a fully offline, on-device AI application using Foundry Local and a pattern called Context-Augmented Generation (CAG). By the end, you will have a clear understanding of what CAG is, how it compares to RAG, and the practical steps to build your own solution. The finished application: a browser-based AI support agent that runs entirely on your machine. What Is Context-Augmented Generation? Context-Augmented Generation (CAG) is a pattern for making AI models useful with your own domain-specific content. Instead of hoping the model "knows" the answer from its training data, you pre-load your entire knowledge base into the model's context window at startup. Every query the model handles has access to all of your documents, all of the time. The flow is straightforward: Load your documents into memory when the application starts. Inject the most relevant documents into the prompt alongside the user's question. Generate a response grounded in your content. There is no retrieval pipeline, no vector database, and no embedding model. Your documents are read from disc, held in memory, and selected per query using simple keyword scoring. The model generates answers grounded in your content rather than relying on what it learnt during training. CAG vs RAG: Understanding the Trade-offs If you have explored AI application patterns before, you have likely encountered Retrieval-Augmented Generation (RAG). Both CAG and RAG solve the same core problem: grounding an AI model's answers in your own content. They take different approaches, and each has genuine strengths and limitations. CAG (Context-Augmented Generation) How it works: All documents are loaded at startup. The most relevant ones are selected per query using keyword scoring and injected into the prompt. Strengths: Drastically simpler architecture with no vector database, no embeddings, and no retrieval pipeline Works fully offline with no external services Minimal dependencies (just two npm packages in this sample) Near-instant document selection with no embedding latency Easy to set up, debug, and reason about Limitations: Constrained by the model's context window size Best suited to small, curated document sets (tens of documents, not thousands) Keyword scoring is less precise than semantic similarity for ambiguous queries Adding documents requires an application restart RAG (Retrieval-Augmented Generation) How it works: Documents are chunked, embedded into vectors, and stored in a database. At query time, the most semantically similar chunks are retrieved and injected into the prompt. Strengths: Scales to thousands or millions of documents Semantic search finds relevant content even when the user's wording differs from the source material Documents can be added or updated dynamically without restarting Fine-grained retrieval (chunk-level) can be more token-efficient for large collections Limitations: More complex architecture: requires an embedding model, a vector database, and a chunking strategy Retrieval quality depends heavily on chunking, embedding model choice, and tuning Additional latency from the embedding and search steps More dependencies and infrastructure to manage Want to compare these patterns hands-on? There is a RAG-based implementation of the same gas field scenario using vector search and embeddings. Clone both repositories, run them side by side, and see how the architectures differ in practice. When Should You Choose Which? Consideration Choose CAG Choose RAG Document count Tens of documents Hundreds or thousands Offline requirement Essential Optional (can run locally too) Setup complexity Minimal Moderate to high Document updates Infrequent (restart to reload) Frequent or dynamic Query precision Good for keyword-matchable content Better for semantically diverse queries Infrastructure None beyond the runtime Vector database, embedding model For the sample application in this post (20 gas engineering procedure documents on a local machine), CAG is the clear winner. If your use case grows to hundreds of documents or requires real-time ingestion, RAG becomes the better choice. Both patterns can run offline using Foundry Local. Foundry Local: Your On-Device AI Runtime Foundry Local is a lightweight runtime from Microsoft that downloads, manages, and serves language models entirely on your device. No cloud account, no API keys, no outbound network calls (after the initial model download). In this sample, your application is responsible for deciding which model to use, and it does that through the foundry-local-sdk . The app creates a FoundryLocalManager , asks the SDK for the local model catalogue, and then runs a small selection policy from src/modelSelector.js . That policy looks at the machine's available RAM, filters out models that are too large, ranks the remaining chat models by preference, and then returns the best fit for that device. Why does it work this way? Because shipping one fixed model would either exclude lower-spec machines or underuse more capable ones. A 14B model may be perfectly reasonable on a 32 GB workstation, but the same choice would be slow or unusable on an 8 GB laptop. By selecting at runtime, the same codebase can run across a wider range of developer machines without manual tuning. What makes it particularly useful for developers: No GPU required — runs on CPU or NPU, making it accessible on standard laptops and desktops Native SDK bindings — in-process inference via the foundry-local-sdk npm package, with no HTTP round-trips to a local server Automatic model management — downloads, caches, and loads models automatically Dynamic model selection — the SDK can evaluate your device's available RAM and pick the best model from the catalogue Real-time progress callbacks — ideal for building loading UIs that show download and initialisation progress The integration code is refreshingly minimal. Here is the core pattern: import { FoundryLocalManager } from "foundry-local-sdk"; // Create a manager and get the model catalogue const manager = FoundryLocalManager.create({ appName: "my-app" }); // Auto-select the best model for this device based on available RAM const models = await manager.catalog.getModels(); const model = selectBestModel(models); // Download if not cached, then load into memory if (!model.isCached) { await model.download((progress) => { console.log(`Download: ${progress.toFixed(0)}%`); }); } await model.load(); // Create a chat client for direct in-process inference const chatClient = model.createChatClient(); const response = await chatClient.completeChat([ { role: "system", content: "You are a helpful assistant." }, { role: "user", content: "How do I detect a gas leak?" } ]); That is it. No server configuration, no authentication tokens, no cloud provisioning. The model runs in the same process as your application. The download step matters for a simple reason: offline inference only works once the model files exist locally. The SDK checks whether the chosen model is already cached on the machine. If it is not, the application asks Foundry Local to download it once, store it locally, and then load it into memory. After that first run, the cached model can be reused, which is why subsequent launches are much faster and can operate without any network dependency. Put another way, there are two cooperating pieces here. Your application chooses which model is appropriate for the device and the scenario. Foundry Local and its SDK handle the mechanics of making that model available locally, caching it, loading it, and exposing a chat client for inference. That separation keeps the application logic clear whilst letting the runtime handle the heavy lifting. The Technology Stack The sample application is deliberately simple. No frameworks, no build steps, no Docker: Layer Technology Purpose AI Model Foundry Local + auto-selected model Runs locally via native SDK bindings; best model chosen for your device Back end Node.js + Express Lightweight HTTP server, everyone knows it Context Markdown files pre-loaded at startup No vector database, no embeddings, no retrieval step Front end Single HTML file with inline CSS No build step, mobile-responsive, field-ready The total dependency footprint is two npm packages: express and foundry-local-sdk . Architecture Overview The four-layer architecture, all running on a single machine. The system has four layers, all running in a single process on your device: Client layer: a single HTML file served by Express, with quick-action buttons and a responsive chat interface Server layer: Express.js starts immediately and serves the UI plus an SSE status endpoint; API routes handle chat (streaming and non-streaming), context listing, and health checks CAG engine: loads all domain documents at startup, selects the most relevant ones per query using keyword scoring, and injects them into the prompt AI layer: Foundry Local runs the auto-selected model on CPU/NPU via native SDK bindings (in-process inference, no HTTP round-trips) Building the Solution Step by Step Prerequisites You need two things installed on your machine: Node.js 20 or later: download from nodejs.org Foundry Local: Microsoft's on-device AI runtime: winget install Microsoft.FoundryLocal Foundry Local will automatically select and download the best model for your device the first time you run the application. You can override this by setting the FOUNDRY_MODEL environment variable to a specific model alias. Getting the Code Running # Clone the repository git clone https://github.com/leestott/local-cag.git cd local-cag # Install dependencies npm install # Start the server npm start Open http://127.0.0.1:3000 in your browser. You will see a loading overlay with a progress bar whilst the model downloads (first run only) and loads into memory. Once the model is ready, the overlay fades away and you can start chatting. Desktop view Mobile view How the CAG Pipeline Works Let us trace what happens when a user asks: "How do I detect a gas leak?" The query flow from browser to model and back. 1 Server starts and loads documents When you run npm start , the Express server starts on port 3000. All .md files in the docs/ folder are read, parsed (with optional YAML front-matter for title, category, and ID), and grouped by category. A document index is built listing all available topics. 2 Model is selected and loaded The model selector evaluates your system's available RAM and picks the best model from the Foundry Local catalogue. If the model is not already cached, it downloads it (with progress streamed to the browser via SSE). The model is then loaded into memory for in-process inference. 3 User sends a question The question arrives at the Express server. The chat engine selects the top 3 most relevant documents using keyword scoring. 4 Prompt is constructed The engine builds a messages array containing: the system prompt (with safety-first instructions), the document index (so the model knows all available topics), the 3 selected documents (approximately 6,000 characters), the conversation history, and the user's question. 5 Model generates a grounded response The prompt is sent to the locally loaded model via the Foundry Local SDK's native bindings. The response streams back token by token through Server-Sent Events to the browser. A response with safety warnings and step-by-step guidance The sources panel shows which documents were used Key Code Walkthrough Loading Documents (the Context Module) The context module reads all markdown files from the docs/ folder at startup. Each document can have optional YAML front-matter for metadata: // src/context.js export function loadDocuments() { const files = fs.readdirSync(config.docsDir) .filter(f => f.endsWith(".md")) .sort(); const docs = []; for (const file of files) { const raw = fs.readFileSync(path.join(config.docsDir, file), "utf-8"); const { meta, body } = parseFrontMatter(raw); docs.push({ id: meta.id || path.basename(file, ".md"), title: meta.title || file, category: meta.category || "General", content: body.trim(), }); } return docs; } There is no chunking, no vector computation, and no database. The documents are held in memory as plain text. Dynamic Model Selection Rather than hard-coding a model, the application evaluates your system at runtime: // src/modelSelector.js const totalRamMb = os.totalmem() / (1024 * 1024); const budgetMb = totalRamMb * 0.6; // Use up to 60% of system RAM // Filter to models that fit, rank by quality, boost cached models const candidates = allModels.filter(m => m.task === "chat-completion" && m.fileSizeMb <= budgetMb ); // Returns the best model: e.g. phi-4 on a 32 GB machine, // or phi-3.5-mini on a laptop with 8 GB RAM This means the same application runs on a powerful workstation (selecting a 14B parameter model) or a constrained laptop (selecting a 3.8B model), with no code changes required. This is worth calling out because it is one of the most practical parts of the sample. Developers do not have to decide up front which single model every user should run. The application makes that decision at startup based on the hardware budget you set, then asks Foundry Local to fetch the model if it is missing. The result is a smoother first-run experience and fewer support headaches when the same app is used on mixed hardware. The System Prompt For safety-critical domains, the system prompt is engineered to prioritise safety, prevent hallucination, and enforce structured responses: // src/prompts.js export const SYSTEM_PROMPT = `You are a local, offline support agent for gas field inspection and maintenance engineers. Behaviour Rules: - Always prioritise safety. If a procedure involves risk, explicitly call it out. - Do not hallucinate procedures, measurements, or tolerances. - If the answer is not in the provided context, say: "This information is not available in the local knowledge base." Response Format: - Summary (1-2 lines) - Safety Warnings (if applicable) - Step-by-step Guidance - Reference (document name + section)`; This pattern is transferable to any safety-critical domain: medical devices, electrical work, aviation maintenance, or chemical handling. Adapting This for Your Own Domain The sample project is designed to be forked and adapted. Here is how to make it yours in three steps: 1. Replace the documents Delete the gas engineering documents in docs/ and add your own markdown files. The context module handles any markdown content with optional YAML front-matter: --- title: Troubleshooting Widget Errors category: Support id: KB-001 --- # Troubleshooting Widget Errors ...your content here... 2. Edit the system prompt Open src/prompts.js and rewrite the system prompt for your domain. Keep the structure (summary, safety, steps, reference) and update the language to match your users' expectations. 3. Override the model (optional) By default the application auto-selects the best model. To force a specific model: # See available models foundry model list # Force a smaller, faster model FOUNDRY_MODEL=phi-3.5-mini npm start # Or a larger, higher-quality model FOUNDRY_MODEL=phi-4 npm start Smaller models give faster responses on constrained devices. Larger models give better quality. The auto-selector picks the largest model that fits within 60% of your system RAM. Building a Field-Ready UI The front end is a single HTML file with inline CSS. No React, no build tooling, no bundler. This keeps the project accessible to beginners and easy to deploy. Design decisions that matter for field use: Dark, high-contrast theme with 18px base font size for readability in bright sunlight Large touch targets (minimum 48px) for operation with gloves or PPE Quick-action buttons for common questions, so engineers do not need to type on a phone Responsive layout that works from 320px to 1920px+ screen widths Streaming responses via SSE, so the user sees tokens arriving in real time The mobile chat experience, optimised for field use. Visual Startup Progress with SSE A standout feature of this application is the loading experience. When the user opens the browser, they see a progress overlay showing exactly what the application is doing: Loading domain documents Initialising the Foundry Local SDK Selecting the best model for the device Downloading the model (with a percentage progress bar, first run only) Loading the model into memory This works because the Express server starts before the model finishes loading. The browser connects immediately and receives real-time status updates via Server-Sent Events. Chat endpoints return 503 whilst the model is loading, so the UI cannot send queries prematurely. // Server-side: broadcast status to all connected browsers function broadcastStatus(state) { initState = state; const payload = `data: ${JSON.stringify(state)}\n\n`; for (const client of statusClients) { client.write(payload); } } // During initialisation: broadcastStatus({ stage: "downloading", message: "Downloading phi-4...", progress: 42 }); This pattern is worth adopting in any application where model loading takes more than a few seconds. Users should never stare at a blank screen wondering whether something is broken. Testing The project includes unit tests using the built-in Node.js test runner, with no extra test framework needed: # Run all tests npm test Tests cover configuration, server endpoints, and document loading. Use them as a starting point when you adapt the project for your own domain. Ideas for Extending the Project Once you have the basics running, there are plenty of directions to explore: Conversation memory: persist chat history across sessions using local storage or a lightweight database Hybrid CAG + RAG: add a vector retrieval step for larger document collections that exceed the context window Multi-modal support: add image-based queries (photographing a fault code, for example) PWA packaging: make it installable as a standalone offline application on mobile devices Custom model fine-tuning: fine-tune a model on your domain data for even better answers Ready to Build Your Own? Clone the CAG sample, swap in your own documents, and have an offline AI agent running in minutes. Or compare it with the RAG approach to see which pattern suits your use case best. Get the CAG Sample Get the RAG Sample Summary Building a local AI application does not require a PhD in machine learning or a cloud budget. With Foundry Local, Node.js, and a set of domain documents, you can create a fully offline, mobile-responsive AI agent that answers questions grounded in your own content. The key takeaways: CAG is ideal for small, curated document sets where simplicity and offline capability matter most. No vector database, no embeddings, no retrieval pipeline. RAG scales further when you have hundreds or thousands of documents, or need semantic search for ambiguous queries. See the local-rag sample to compare. Foundry Local makes on-device AI accessible: native SDK bindings, in-process inference, automatic model selection, and no GPU required. The architecture is transferable. Replace the gas engineering documents with your own content, update the system prompt, and you have a domain-specific AI agent for any field. Start simple, iterate outwards. Begin with CAG and a handful of documents. If your needs outgrow the context window, graduate to RAG. Both patterns can run entirely offline. Clone the repository, swap in your own documents, and start building. The best way to learn is to get your hands on the code. This project is open source under the MIT licence. It is a scenario sample for learning and experimentation, not production medical or safety advice. local-cag on GitHub · local-rag on GitHub · Foundry Local1.1KViews2likes0CommentsBuilding Your First Local RAG Application with Foundry Local
A developer's guide to building an offline, mobile-responsive AI support agent using Retrieval-Augmented Generation, the Foundry Local SDK, and JavaScript. Imagine you are a gas field engineer standing beside a pipeline in a remote location. There is no Wi-Fi, no mobile signal, and you need a safety procedure right now. What do you do? This is the exact problem that inspired this project: a fully offline RAG-powered support agent that runs entirely on your machine. No cloud. No API keys. No outbound network calls. Just a local language model, a local vector store, and your own documents, all accessible from a browser on any device. In this post, you will learn how it works, how to build your own, and the key architectural decisions behind it. If you have ever wanted to build an AI application that runs locally and answers questions grounded in your own data, this is the place to start. The finished application: a browser-based AI support agent that runs entirely on your machine. What Is Retrieval-Augmented Generation? Retrieval-Augmented Generation (RAG) is a pattern that makes AI models genuinely useful for domain-specific tasks. Rather than hoping the model "knows" the answer from its training data, you: Retrieve relevant chunks from your own documents using a vector store Augment the model's prompt with those chunks as context Generate a response grounded in your actual data The result is fewer hallucinations, traceable answers with source attribution, and an AI that works with your content rather than relying on general knowledge. If you are building internal tools, customer support bots, field manuals, or knowledge bases, RAG is the pattern you want. RAG vs CAG: Understanding the Trade-offs If you have explored AI application patterns before, you have likely encountered Context-Augmented Generation (CAG). Both RAG and CAG solve the same core problem: grounding an AI model's answers in your own content. They take different approaches, and each has genuine strengths and limitations. RAG (Retrieval-Augmented Generation) How it works: Documents are split into chunks, vectorised, and stored in a database. At query time, the most relevant chunks are retrieved and injected into the prompt. Strengths: Scales to thousands or millions of documents Fine-grained retrieval at chunk level with source attribution Documents can be added or updated dynamically without restarting Token-efficient: only relevant chunks are sent to the model Supports runtime document upload via the web UI Limitations: More complex architecture: requires a vector store and chunking strategy Retrieval quality depends on chunking parameters and scoring method May miss relevant content if the retrieval step does not surface it CAG (Context-Augmented Generation) How it works: All documents are loaded at startup. The most relevant ones are selected per query using keyword scoring and injected into the prompt. Strengths: Drastically simpler architecture with no vector database or embeddings All information is always available to the model Minimal dependencies and easy to set up Near-instant document selection Limitations: Constrained by the model's context window size Best suited to small, curated document sets (tens of documents) Adding documents requires an application restart Want to compare these patterns hands-on? There is a CAG-based implementation of the same gas field scenario using whole-document context injection. Clone both repositories, run them side by side, and see how the architectures differ in practice. When Should You Choose Which? Consideration Choose RAG Choose CAG Document count Hundreds or thousands Tens of documents Document updates Frequent or dynamic (runtime upload) Infrequent (restart to reload) Source attribution Per-chunk with relevance scores Per-document Setup complexity Moderate (ingestion step required) Minimal Query precision Better for large or diverse collections Good for keyword-matchable content Infrastructure SQLite vector store (single file) None beyond the runtime For the sample application in this post (20 gas engineering procedure documents with runtime upload), RAG is the clear winner. If your document set is small and static, CAG may be simpler. Both patterns run fully offline using Foundry Local. Foundry Local: Your On-Device AI Runtime Foundry Local is a lightweight runtime from Microsoft that downloads, manages, and serves language models entirely on your device. No cloud account, no API keys, no outbound network calls (after the initial model download). What makes it particularly useful for developers: No GPU required: runs on CPU or NPU, making it accessible on standard laptops and desktops Native SDK bindings: in-process inference via the foundry-local-sdk npm package, with no HTTP round-trips to a local server Automatic model management: downloads, caches, and loads models automatically Hardware-optimised variant selection: the SDK picks the best variant for your hardware (GPU, NPU, or CPU) Real-time progress callbacks: ideal for building loading UIs that show download and initialisation progress The integration code is refreshingly minimal: import { FoundryLocalManager } from "foundry-local-sdk"; // Create a manager and discover models via the catalogue const manager = FoundryLocalManager.create({ appName: "gas-field-local-rag" }); const model = await manager.catalog.getModel("phi-3.5-mini"); // Download if not cached, then load into memory if (!model.isCached) { await model.download((progress) => { console.log(`Download: ${Math.round(progress * 100)}%`); }); } await model.load(); // Create a chat client for direct in-process inference const chatClient = model.createChatClient(); const response = await chatClient.completeChat([ { role: "system", content: "You are a helpful assistant." }, { role: "user", content: "How do I detect a gas leak?" } ]); That is it. No server configuration, no authentication tokens, no cloud provisioning. The model runs in the same process as your application. The Technology Stack The sample application is deliberately simple. No frameworks, no build steps, no Docker: Layer Technology Purpose AI Model Foundry Local + Phi-3.5 Mini Runs locally via native SDK bindings, no GPU required Back end Node.js + Express Lightweight HTTP server, everyone knows it Vector Store SQLite (via better-sqlite3 ) Zero infrastructure, single file on disc Retrieval TF-IDF + cosine similarity No embedding model required, fully offline Front end Single HTML file with inline CSS No build step, mobile-responsive, field-ready The total dependency footprint is three npm packages: express , foundry-local-sdk , and better-sqlite3 . Architecture Overview The five-layer architecture, all running on a single machine. The system has five layers, all running on a single machine: Client layer: a single HTML file served by Express, with quick-action buttons and a responsive chat interface Server layer: Express.js starts immediately and serves the UI plus SSE status and chat endpoints RAG pipeline: the chat engine orchestrates retrieval and generation; the chunker handles TF-IDF vectorisation; the prompts module provides safety-first system instructions Data layer: SQLite stores document chunks and their TF-IDF vectors; documents live as .md files in the docs/ folder AI layer: Foundry Local runs Phi-3.5 Mini on CPU or NPU via native SDK bindings Building the Solution Step by Step Prerequisites You need two things installed on your machine: Node.js 20 or later: download from nodejs.org Foundry Local: Microsoft's on-device AI runtime: winget install Microsoft.FoundryLocal The SDK will automatically download the Phi-3.5 Mini model (approximately 2 GB) the first time you run the application. Getting the Code Running # Clone the repository git clone https://github.com/leestott/local-rag.git cd local-rag # Install dependencies npm install # Ingest the 20 gas engineering documents into the vector store npm run ingest # Start the server npm start Open http://127.0.0.1:3000 in your browser. You will see the status indicator whilst the model loads. Once the model is ready, the status changes to "Offline Ready" and you can start chatting. Desktop view Mobile view How the RAG Pipeline Works Let us trace what happens when a user asks: "How do I detect a gas leak?" The query flow from browser to model and back. 1 Documents are ingested and indexed When you run npm run ingest , every .md file in the docs/ folder is read, parsed (with optional YAML front-matter for title, category, and ID), split into overlapping chunks of approximately 200 tokens, and stored in SQLite with TF-IDF vectors. 2 Model is loaded via the SDK The Foundry Local SDK discovers the model in the local catalogue and loads it into memory. If the model is not already cached, it downloads it first (with progress streamed to the browser via SSE). 3 User sends a question The question arrives at the Express server. The chat engine converts it into a TF-IDF vector, uses an inverted index to find candidate chunks, and scores them using cosine similarity. The top 3 chunks are returned in under 1 ms. 4 Prompt is constructed The engine builds a messages array containing: the system prompt (with safety-first instructions), the retrieved chunks as context, the conversation history, and the user's question. 5 Model generates a grounded response The prompt is sent to the locally loaded model via the Foundry Local SDK's native chat client. The response streams back token by token through Server-Sent Events to the browser. Source references with relevance scores are included. A response with safety warnings and step-by-step guidance The sources panel shows which chunks were used and their relevance Key Code Walkthrough The Vector Store (TF-IDF + SQLite) The vector store uses SQLite to persist document chunks alongside their TF-IDF vectors. At query time, an inverted index finds candidate chunks that share terms with the query, then cosine similarity ranks them: // src/vectorStore.js search(query, topK = 5) { const queryTf = termFrequency(query); this._ensureCache(); // Build in-memory cache on first access // Use inverted index to find candidates sharing at least one term const candidateIndices = new Set(); for (const term of queryTf.keys()) { const indices = this._invertedIndex.get(term); if (indices) { for (const idx of indices) candidateIndices.add(idx); } } // Score only candidates, not all rows const scored = []; for (const idx of candidateIndices) { const row = this._rowCache[idx]; const score = cosineSimilarity(queryTf, row.tf); if (score > 0) scored.push({ ...row, score }); } scored.sort((a, b) => b.score - a.score); return scored.slice(0, topK); } The inverted index, in-memory row cache, and prepared SQL statements bring retrieval time to sub-millisecond for typical query loads. Why TF-IDF Instead of Embeddings? Most RAG tutorials use embedding models for retrieval. This project uses TF-IDF because: Fully offline: no embedding model to download or run Zero latency: vectorisation is instantaneous (it is just maths on word frequencies) Good enough: for 20 domain-specific documents, TF-IDF retrieves the right chunks reliably Transparent: you can inspect the vocabulary and weights, unlike neural embeddings For larger collections or when semantic similarity matters more than keyword overlap, you would swap in an embedding model. For this use case, TF-IDF keeps the stack simple and dependency-free. The System Prompt For safety-critical domains, the system prompt is engineered to prioritise safety, prevent hallucination, and enforce structured responses: // src/prompts.js export const SYSTEM_PROMPT = `You are a local, offline support agent for gas field inspection and maintenance engineers. Behaviour Rules: - Always prioritise safety. If a procedure involves risk, explicitly call it out. - Do not hallucinate procedures, measurements, or tolerances. - If the answer is not in the provided context, say: "This information is not available in the local knowledge base." Response Format: - Summary (1-2 lines) - Safety Warnings (if applicable) - Step-by-step Guidance - Reference (document name + section)`; This pattern is transferable to any safety-critical domain: medical devices, electrical work, aviation maintenance, or chemical handling. Runtime Document Upload Unlike the CAG approach, RAG supports adding documents without restarting the server. Click the upload button to add new .md or .txt files. They are chunked, vectorised, and indexed immediately. The upload modal with the complete list of indexed documents. Adapting This for Your Own Domain The sample project is designed to be forked and adapted. Here is how to make it yours in four steps: 1. Replace the documents Delete the gas engineering documents in docs/ and add your own markdown files. The ingestion pipeline handles any markdown content with optional YAML front-matter: --- title: Troubleshooting Widget Errors category: Support id: KB-001 --- # Troubleshooting Widget Errors ...your content here... 2. Edit the system prompt Open src/prompts.js and rewrite the system prompt for your domain. Keep the structure (summary, safety, steps, reference) and update the language to match your users' expectations. 3. Tune the retrieval In src/config.js : chunkSize: 200 : smaller chunks give more precise retrieval, less context per chunk chunkOverlap: 25 : prevents information falling between chunks topK: 3 : how many chunks to retrieve per query (more gives more context but slower generation) 4. Swap the model Change config.model in src/config.js to any model available in the Foundry Local catalogue. Smaller models give faster responses on constrained devices; larger models give better quality. Building a Field-Ready UI The front end is a single HTML file with inline CSS. No React, no build tooling, no bundler. This keeps the project accessible to beginners and easy to deploy. Design decisions that matter for field use: Dark, high-contrast theme with 18px base font size for readability in bright sunlight Large touch targets (minimum 44px) for operation with gloves or PPE Quick-action buttons that wrap on mobile so all options are visible without scrolling Responsive layout that works from 320px to 1920px+ screen widths Streaming responses via SSE, so the user sees tokens arriving in real time The mobile chat experience, optimised for field use. Testing The project includes unit tests using the built-in Node.js test runner, with no extra test framework needed: # Run all tests npm test Tests cover the chunker, vector store, configuration, and server endpoints. Use them as a starting point when you adapt the project for your own domain. Ideas for Extending the Project Once you have the basics running, there are plenty of directions to explore: Embedding-based retrieval: use a local embedding model for better semantic matching on diverse queries Conversation memory: persist chat history across sessions using local storage or a lightweight database Multi-modal support: add image-based queries (photographing a fault code, for example) PWA packaging: make it installable as a standalone offline application on mobile devices Hybrid retrieval: combine TF-IDF keyword search with semantic embeddings for best results Try the CAG approach: compare with the local-cag sample to see which pattern suits your use case Ready to Build Your Own? Clone the RAG sample, swap in your own documents, and have an offline AI agent running in minutes. Or compare it with the CAG approach to see which pattern suits your use case best. Get the RAG Sample Get the CAG Sample Summary Building a local RAG application does not require a PhD in machine learning or a cloud budget. With Foundry Local, Node.js, and SQLite, you can create a fully offline, mobile-responsive AI agent that answers questions grounded in your own documents. The key takeaways: RAG is ideal for scalable, dynamic document sets where you need fine-grained retrieval with source attribution. Documents can be added at runtime without restarting. CAG is simpler when you have a small, stable set of documents that fit in the context window. See the local-cag sample to compare. Foundry Local makes on-device AI accessible: native SDK bindings, in-process inference, automatic model selection, and no GPU required. TF-IDF + SQLite is a viable vector store for small-to-medium collections, with sub-millisecond retrieval thanks to inverted indexing and in-memory caching. Start simple, iterate outwards. Begin with RAG and a handful of documents. If your needs are simpler, try CAG. Both patterns run entirely offline. Clone the repository, swap in your own documents, and start building. The best way to learn is to get your hands on the code. This project is open source under the MIT licence. It is a scenario sample for learning and experimentation, not production medical or safety advice. local-rag on GitHub · local-cag on GitHub · Foundry LocalGetting Started with Foundry Local: A Student Guide to the Microsoft Foundry Local Lab
If you want to start building AI applications on your own machine, the Microsoft Foundry Local Lab is one of the most useful places to begin. It is a practical workshop that takes you from first-time setup through to agents, retrieval, evaluation, speech transcription, tool calling, and a browser-based interface. The material is hands-on, cross-language, and designed to show how modern AI apps can run locally rather than depending on a cloud service for every step. This blog post is aimed at students, self-taught developers, and anyone learning how AI applications are put together in practice. Instead of treating large language models as a black box, the lab shows you how to install and manage local models, connect to them with code, structure tasks into workflows, and test whether the results are actually good enough. If you have been looking for a learning path that feels more like building real software and less like copying isolated snippets, this workshop is a strong starting point. What Is Foundry Local? Foundry Local is a local runtime for downloading, managing, and serving AI models on your own hardware. It exposes an OpenAI-compatible interface, which means you can work with familiar SDK patterns while keeping execution on your device. For learners, that matters for three reasons. First, it lowers the barrier to experimentation because you can run projects without setting up a cloud account for every test. Second, it helps you understand the moving parts behind AI applications, including model lifecycle, local inference, and application architecture. Third, it encourages privacy-aware development because the examples are designed to keep data on the machine wherever possible. The Foundry Local Lab uses that local-first approach to teach the full journey from simple prompts to multi-agent systems. It includes examples in Python, JavaScript, and C#, so you can follow the language that fits your course, your existing skills, or the platform you want to build on. Why This Lab Works Well for Learners A lot of AI tutorials stop at the moment a model replies to a prompt. That is useful for a first demo, but it does not teach you how to build a proper application. The Foundry Local Lab goes further. It is organised as a sequence of parts, each one adding a new idea and giving you working code to explore. You do not just ask a model to respond. You learn how to manage the service, choose a language SDK, construct retrieval pipelines, build agents, evaluate outputs, and expose the result through a usable interface. That sequence is especially helpful for students because the parts build on each other. Early labs focus on confidence and setup. Middle labs focus on architecture and patterns. Later labs move into more advanced ideas that are common in real projects, such as tool calling, evaluation, and custom model packaging. By the end, you have seen not just what a local AI app looks like, but how its different layers fit together. Before You Start The workshop expects a reasonably modern machine and at least one programming language environment. The core prerequisites are straightforward: install Foundry Local, clone the repository, and choose whether you want to work in Python, JavaScript, or C#. You do not need to master all three. In fact, most learners will get more value by picking one language first, completing the full path in that language, and only then comparing how the same patterns look elsewhere. If you are new to AI development, do not be put off by the number of parts. The early sections are accessible, and the later ones become much easier once you have completed the foundations. Think of the lab as a structured course rather than a single tutorial. What You Learn in Each Lab https://github.com/microsoft-foundry/foundry-local-lab Part 1: Getting Started with Foundry Local The first part introduces the basics of Foundry Local and gets you up and running. You learn how to install the CLI, inspect the model catalogue, download a model, and run it locally. This part also introduces practical details such as model aliases and dynamic service ports, which are small but important pieces of real development work. For students, the value of this part is confidence. You prove that local inference works on your machine, you see how the service behaves, and you learn the operational basics before writing any application code. By the end of Part 1, you should understand what Foundry Local does, how to start it, and how local model serving fits into an application workflow. Part 2: Foundry Local SDK Deep Dive Once the CLI makes sense, the workshop moves into the SDK. This part explains why application developers often use the SDK instead of relying only on terminal commands. You learn how to manage the service programmatically, browse available models, control model download and loading, and understand model metadata such as aliases and hardware-aware selection. This is where learners start to move from using a tool to building with a platform. You begin to see the difference between running a model manually and integrating it into software. By the end of this section, you should understand the API surface you will use in your own projects and know how to bootstrap the SDK in Python, JavaScript, or C#. Part 3: SDKs and APIs Part 3 turns the SDK concepts into a working chat application. You connect code to the local inference server and use the OpenAI-compatible API for streaming chat completions. The lab includes examples in all three supported languages, which makes it especially useful if you are comparing ecosystems or learning how the same idea is expressed through different syntax and libraries. The key learning outcome here is not just that you can get a response from a model. It is that you understand the boundary between your application and the local model service. You learn how messages are structured, how streaming works, and how to write the sort of integration code that becomes the foundation for every later lab. Part 4: Retrieval-Augmented Generation This is where the workshop starts to feel like modern AI engineering rather than basic prompting. In the retrieval-augmented generation lab, you build a simple RAG pipeline that grounds answers in supplied data. You work with an in-memory knowledge base, apply retrieval logic, score matches, and compose prompts that include grounded context. For learners, this part is important because it demonstrates a core truth of AI app development: a model on its own is often not enough. Useful applications usually need access to documents, notes, or structured information. By the end of Part 4, you understand why retrieval matters, how to pass retrieved context into a prompt, and how a pipeline can make answers more relevant and reliable. Part 5: Building AI Agents Part 5 introduces the concept of an agent. Instead of a one-off prompt and response, you begin to define behaviour through system instructions, roles, and conversation state. The lab uses the ChatAgent pattern and the Microsoft Agent Framework to show how an agent can maintain a purpose, respond with a persona, and return structured output such as JSON. This part helps learners understand the difference between a raw model call and a reusable application component. You learn how to design instructions that shape behaviour, how multi-turn interaction differs from single prompts, and why structured output matters when an AI component has to work inside a broader system. Part 6: Multi-Agent Workflows Once a single agent makes sense, the workshop expands the idea into a multi-agent workflow. The example pipeline uses roles such as researcher, writer, and editor, with outputs passed from one stage to the next. You explore sequential orchestration, shared configuration, and feedback loops between specialised components. For students, this lab is a very clear introduction to decomposition. Instead of asking one model to do everything at once, you break a task into smaller responsibilities. That pattern is useful well beyond AI. By the end of Part 6, you should understand why teams build multi-agent systems, how hand-offs are structured, and what trade-offs appear when more components are added to a workflow. Part 7: Zava Creative Writer Capstone Application The Zava Creative Writer is the capstone project that brings the earlier ideas together into a more production-style application. It uses multiple specialised agents, structured JSON hand-offs, product catalogue search, streaming output, and evaluation-style feedback loops. Rather than showing an isolated feature, this part shows how separate patterns combine into a complete system. This is one of the most valuable parts of the workshop for learner developers because it narrows the gap between tutorial code and real application design. You can see how orchestration, agent roles, and practical interfaces fit together. By the end of Part 7, you should be able to recognise the architecture of a serious local AI app and understand how the earlier labs support it. Part 8: Evaluation-Led Development Many beginner AI projects stop once the output looks good once or twice. This lab teaches a much stronger habit: evaluation-led development. You work with golden datasets, rule-based checks, and LLM-as-judge scoring to compare prompt or agent variants systematically. The goal is to move from anecdotal testing to repeatable assessment. This matters enormously for students because evaluation is one of the clearest differences between a classroom demo and dependable software. By the end of Part 8, you should understand how to define success criteria, compare outputs at scale, and use evidence rather than intuition when improving an AI component. Part 9: Voice Transcription with Whisper Part 9 broadens the workshop beyond text generation by introducing speech-to-text with Whisper running locally. You use the Foundry Local SDK to download and load the model, then transcribe local audio files through the compatible API surface. The emphasis is on privacy-first processing, with audio kept on-device. This section is a useful reminder that local AI development is not limited to chatbots. Learners see how a different modality fits into the same ecosystem and how local execution supports sensitive workloads. By the end of this lab, you should understand the transcription flow, the relevant client methods, and how speech features can be integrated into broader applications. Part 10: Using Custom or Hugging Face Models After learning the standard path, the workshop shows how to work with custom or Hugging Face models. This includes compiling models into optimised ONNX format with ONNX Runtime GenAI, choosing hardware-specific options, applying quantisation strategies, creating configuration files, and adding compiled models to the Foundry Local cache. For learner developers, this part opens the door to model engineering rather than simple model consumption. You begin to understand that model choice, optimisation, and packaging affect performance and usability. By the end of Part 10, you should have a clearer picture of how models move from an external source into a runnable local setup and why deployment format matters. Part 11: Tool Calling with Local Models Tool calling is one of the most practical patterns in current AI development, and this lab covers it directly. You define tool schemas, allow the model to request function calls, handle the multi-turn interaction loop, execute the tools locally, and return results back to the model. The examples include practical scenarios such as weather and population tools. This lab teaches learners how to move beyond generation into action. A model is no longer limited to producing text. It can decide when external data or a function is needed and incorporate that result into a useful answer. By the end of Part 11, you should understand the tool-calling flow and how AI systems connect reasoning with deterministic software behaviour. Part 12: Building a Web UI for the Zava Creative Writer Part 12 adds a browser-based front end to the capstone application. You learn how to serve a shared interface from Python, JavaScript, or C#, stream updates to the browser, consume NDJSON with the Fetch API and ReadableStream, and show live agent status as content is produced in real time. This part is especially good for students who want to build portfolio projects. It turns backend orchestration into something visible and interactive. By the end of Part 12, you should understand how to connect a local AI backend to a web interface and how streaming changes the user experience compared with waiting for one final response. Part 13: Workshop Complete The final part is a summary and extension point. It reviews what you have built across the previous sections and suggests ways to continue. Although it is not a new technical lab in the same way as the earlier parts, it plays an important role in learning. It helps you consolidate the architecture, the terminology, and the development patterns you have encountered. For learners, reflection matters. By the end of Part 13, you should be able to describe the full stack of a local AI application, from model management to user interface, and identify which area you want to deepen next. What Students Gain from the Full Workshop Taken together, these labs do more than teach Foundry Local itself. They teach how AI applications are built. You learn operational basics such as model setup and service management. You learn application integration through SDKs and APIs. You learn system design through RAG, agents, multi-agent orchestration, and web interfaces. You learn engineering discipline through evaluation. You also see how text, speech, custom models, and tool calling all fit into one local-first development workflow. That breadth makes the workshop useful in several settings. A student can use it as a self-study path. A lecturer can use it as source material for practical sessions. A learner developer can use it to build portfolio pieces and to understand which AI patterns are worth learning next. Because the repository includes Python, JavaScript, and C#, it also works well for comparing how architectural ideas transfer across languages. How to Approach the Lab as a Beginner If you are starting from scratch, the best route is simple. Complete Parts 1 to 3 in your preferred language first. That gives you the essential setup and integration skills. Then move into Parts 4 to 6 to understand how AI application patterns are composed. After that, use Parts 7 and 8 to learn how larger systems and evaluation fit together. Finally, explore Parts 9 to 12 based on your interests, whether that is speech, tooling, model customisation, or front-end work. It is also worth keeping notes as you go. Record what each part adds to your understanding, what code files matter, and what assumptions each example makes. That habit will help you move from following the labs to adapting the patterns in your own projects. Final Thoughts The Microsoft Foundry Local Lab is a strong introduction to local AI development because it treats learners like developers rather than spectators. You install, run, connect, orchestrate, evaluate, and present working systems. That makes it far more valuable than a short demo that only proves a model can answer a question. If you are a student or learner developer who wants to understand how AI applications are really built, this lab gives you a clear path. Start with the basics, pick one language, and work through the parts in order. By the time you finish, you will not just have used Foundry Local. You will have a practical foundation for building local AI applications with far more confidence and much better judgement.825Views0likes0Comments