compliance
381 Topics
Where Does My Microsoft Entra ID Data Reside? Understanding Azure Regions and Data Residency
Hello everyone! Zoheb Shaikh here again. I’m a Senior Cloud Solution Architect with Microsoft, based in Doha, Qatar. It’s been almost three years since my last blog, and I’m happy to be back sharing another interesting customer conversation. This time, we’ll explore what the new Saudi Azure region really means for Microsoft Entra ID and data residency. I was recently having a conversation with a customer about Microsoft’s announcement of the Saudi Arabia East Azure region, which is expected to become available in November 2026. Naturally, there was a lot of excitement around it. We started discussing what this means for workloads, applications, data, resiliency and, of course, data residency. And then came a very simple question. “Great. So once the Saudi Azure region is available, our Microsoft Entra ID will also be in Saudi, right?” It is actually a very good question. And I think this is something we are going to hear more often as local Azure regions become available across different countries. My answer was: “Not exactly. Azure region availability and Microsoft Entra ID data residency are two different things.” And that started an interesting conversation. “But Entra runs on Azure, right?” Yes, But this is where we need to understand the difference between a workload that we deploy into Azure and a cloud service that Microsoft operates for us. Think about a normal Azure workload, you want to deploy a VM > Azure asks you: Where do you want to deploy it? Saudi Arabia East, UAE North, UK South, West Europe. You select the region based on your requirements. The same concept applies to many other supported Azure services. With the new Saudi Arabia East region, customers will be able to access supported Microsoft cloud and AI services and host eligible workloads and data locally in the Kingdom. Microsoft has announced that the region will also include three Availability Zones. That is the Azure region conversation But Microsoft Entra ID is different. You don’t create your Microsoft Entra tenant and then say: “Deploy my Entra tenant into Saudi Arabia East.” That is not how the service is designed. So how does Microsoft Entra actually work? This is where the architecture becomes interesting. Microsoft Entra ID is designed as a geographically distributed identity service. When an Entra tenant is created in the public cloud, the country or region selected during tenant creation is mapped by Microsoft Entra to a geo-location and a scale unit. Microsoft’s documentation currently lists geo-locations such as EMEA, North America, Asia/Pacific, Japan, Australia and Worldwide. The tenant location isn’t simply determined by where you later deploy your Azure VMs or applications. I explained it to the customer like this. If you deploy an application into Azure, you are largely deciding: “Where should my workload run?” For Microsoft Entra, Microsoft is managing a global identity platform and deciding: “How do we keep identity available, resilient and responsive while respecting the service’s data-residency architecture?” They are two very different design problems. Then the customer asked the next obvious question “Why does Entra need to work this way?” And this is probably my favourite part of the discussion. Imagine your company’s entire authentication service was dependent on one datacenter. Your users are signing in, Your applications are authenticating, Microsoft 365 depends on identity, Azure depends on identity. Thousands of applications may depend on the same identity platform and now imagine that datacenter has a problem. Identity is one of those services where availability really matters, this is one of reasons Microsoft Entra uses a distributed architecture. Microsoft’s published architecture describes a directory partition as having a primary replica and multiple secondary replicas. The primary replica handles writes, Before a write is acknowledged as successful, Microsoft Entra replicates that write to a secondary replica in another datacenter. Reads work differently, Directory reads, including authentication requests, can be serviced by secondary replicas that are geographically distributed. Microsoft routes these requests so that they can be serviced from datacenters close to customers. Now the architecture starts making more sense. It isn’t distributed randomly, It is distributed because the identity platform needs to provide things such as: availability, resiliency, performance and data durability. “So when I authenticate, am I always talking to where my directory data is stored?” Not necessarily in the way we traditionally think about it. This was another useful part of our conversation. Microsoft documents the Microsoft Entra authentication service itself as stateless. The directory data required for authentication resides in the Microsoft Entra Core Store. When users authenticate, Microsoft can route them to an authentication service instance in the geographically nearest datacenter that forms part of the applicable Microsoft Entra logical region. This is an important concept. The place from which a service responds to you and the place where the underlying authoritative data is managed do not always have to be the same thing. That is quite normal in large cloud services. And then came the real question: “Where is my data?” This is where I normally slow the conversation down a little. Because there are actually a few different questions hiding inside that one question. The customer might be asking: Where does my application data reside? Or Where does my Microsoft Entra directory data reside? Or Where is my authentication request being processed? Or perhaps the actual concern is Do I meet a specific regulatory requirement? These questions sound similar. But technically, they are not the same. For Microsoft Entra ID, Microsoft’s public documentation says the country/region selected during tenant creation is mapped to a Microsoft Entra geo-location and a scale unit. Microsoft Entra Core Store data is then managed according to that geo-location, considering areas such as performance, usability, residency and other requirements. That is why simply saying: “I have an Azure datacenter in my country, therefore every Microsoft cloud service must now store its data there” would be an oversimplification. There is actually an interesting Saudi-specific detail here At this point the conversation usually gets a little more interesting. Microsoft’s public documentation explains that Microsoft Entra directory location is determined when the tenant is originally created. Changing the country code later doesn’t move the directory data location. There is also some historical behaviour worth understanding. Microsoft documents that several country codes — including Saudi Arabia, UAE, Qatar, Bahrain, Kuwait and Oman — were mapped to the Asia region until 2013 and later mapped to Europe. As a result, tenants from those countries created before July 2013 can be provisioned differently from tenants created afterward. Why do I like this example? Because it makes one thing very clear: You shouldn’t determine your Microsoft Entra data location simply by looking at where your Azure workloads are deployed today but tenant provisioning history matters as well. “Okay, but is distributed data less secure?” This is another place where two conversations sometimes get mixed together. Data residency and security are related, but they are not the same thing. Data residency generally talks about where data is geographically stored. Security talks about how that data and the service around it are protected. Microsoft documents several protections around the Entra service. For example, Microsoft Entra directory data is signed and encrypted while it is being transferred between datacenters within a scale unit, and customer-facing web services use TLS. Microsoft also documents tenant-isolation controls around the Entra Core Store. Microsoft Entra also uses geographically distributed replicas, automated routing, monitoring and failover as part of its service architecture. So I wouldn’t look at a distributed architecture and conclude: “The data isn’t sitting in my local Azure region, therefore it is less secure.” That isn’t the right comparison. But I also wouldn’t say: “The service is secure, therefore data residency doesn’t matter.” That isn’t correct either. Security and regulatory residency are two different conversations This is probably the most important takeaway from the whole discussion. Imagine a customer tells me: “Our concern is security.” Then we should discuss the security architecture, tenant isolation, encryption, authentication controls, privileged access, service resilience and the controls Microsoft has put around the service. But imagine the customer says: “Our regulator specifically requires this category of data to be stored within Saudi Arabia.” That becomes a data-residency and compliance conversation. The right thing to do in that situation is not to make an assumption based on the availability of a local Azure region. Instead, check the official Microsoft documentation for the specific service and the specific data type involved. Microsoft’s Trust Center provides service-specific information for Microsoft Azure, Microsoft 365, Microsoft Entra ID, Intune, Defender and other cloud services. This is important because not every Microsoft cloud service follows exactly the same data-storage architecture. Back to the Saudi Azure region, So after all of this, we came back to where our conversation started. What does Saudi Arabia East actually change? A lot. Microsoft has announced that Saudi Arabia East will allow government and private-sector organizations to access supported Microsoft cloud and AI services and host eligible workloads and data locally in the Kingdom. The region will contain three Availability Zones, providing another important building block for organizations designing resilient local architectures. For customers running Azure applications, data platforms, infrastructure and AI workloads, this is a very significant development. But does that automatically mean an existing Microsoft Entra tenant moves into the Saudi Arabia East Azure region? No, And that shouldn’t really be surprising once we understand how Microsoft Entra is designed. The easiest way I explain it By the end of the conversation, I normally reduce everything into two simple questions. Azure Region is “Where do I want to deploy my workload?” For eligible Azure services, Saudi Arabia East gives customers another local option. Microsoft Entra ID “How does Microsoft’s identity service manage and protect my directory data?” That involves Microsoft Entra geo-locations, scale units, replicas and a geographically distributed service architecture. And then there is a third question which is equally important: Data residency “What does Microsoft commit to regarding the storage of my specific data for this specific cloud service?” That answer should always come from the relevant service documentation rather than from assumptions about where the nearest Azure datacenter happens to be. One last thought I actually think conversations like this are healthy. When customers ask “Where is my data?”, we shouldn’t try to answer the question with one sentence. Because modern cloud architecture doesn’t always work like the datacenter architecture we grew up with. An Azure region. A Microsoft Entra geography. A scale unit. A service endpoint. A replica. A data-residency commitment. They can all be part of the same cloud architecture, but they don’t necessarily mean the same thing. The Saudi Arabia East region is a major step forward for customers wanting to run Azure workloads locally in the Kingdom. And at the same time, it gives us a great opportunity to have a deeper conversation about how global cloud services such as Microsoft Entra ID are actually built. My conversation with the customer started with: “So Entra will now also be in Saudi, right?” By the end, the question had changed to something much better: “What is our actual data-residency requirement, and how does Microsoft Entra meet it?” And I think that is the right conversation to have. References Microsoft announces Saudi Arabia East datacenter region https://news.microsoft.com/source/emea/2026/08/microsoft-announces-saudi-arabia-east-datacenter-region-will-be-available-in-november-2026/ Microsoft Entra ID and data residency https://learn.microsoft.com/en-us/entra/fundamentals/data-residency Microsoft Entra architecture https://learn.microsoft.com/en-us/entra/architecture/architecture Customer data storage and processing for European customers in Microsoft Entra ID https://learn.microsoft.com/en-us/entra/fundamentals/data-storage-eu Microsoft Entra data protection considerations https://learn.microsoft.com/en-us/entra/fundamentals/data-protection-considerations Microsoft Trust Center – Data location https://www.microsoft.com/en-us/trust-center/privacy/data-location I hope this blog helped clarify the difference between Azure regions and Microsoft Entra ID data residency. These are the kinds of interesting customer conversations that I enjoy sharing, and I hope to continue writing more regularly. As always, feel free to share your thoughts, questions or experiences in the comments. I'd love to hear your views! Thanks for reading, and until next time! Zoheb Shaikh Senior Cloud Solution Architect | Microsoft Doha, QatarWindows 11, version 26H2 security baseline
Update: The Windows 11, version 26H2 security baseline has been updated to reflect the general availability of Administrator protection. An updated v2 package is now available, and organizations should review and test the existing Administrator protection configuration as appropriate for their environment. You can download the baseline package from the Microsoft Security Compliance Toolkit, test the recommended configurations in your environment, and customize / implement them as appropriate. Summary of Changes This release includes several changes since the Security baseline for Windows 11, version 25H2 to further strengthen enterprise security and align the baseline with current platform capabilities and industry standards. Security Policy Change Summary Printer\Configure Windows Ready Print driver ranking Configured as “Enabled” to reduce reliance on third-party print drivers in the stack, narrowing the overall print driver attack surface. Internet Explorer\Internet Control Panel\Advanced Page\Turn off encryption support Updated from TLS 1.1 and TLS 1.2 to TLS 1.2 and TLS 1.3 to align with current security standards. User Account Control: Configure type of Admin Approval Mode (updated) Configured as “Admin Approval Mode with Administrator protection” to enable Administrator protection. User Account Control: Behavior of the elevation prompt for administrators running with Administrator protection (updated) Configured as “Prompt for credentials on the secure desktop” to require credential verification for administrative elevation. Windows Ready Print driver ranking Configure Windows Ready Print driver ranking" is the newly added setting under Administrative Templates\Printers to control whether Windows prefers the modern inbox IPP class driver over third-party OEM drivers when installing new printers. We recommend enabling this policy to reduce reliance on third-party print drivers in the stack, narrowing the overall print driver attack surface. Note that driver ranking applies when printers are installed via a connection method that supports IPP, such as USB or network multicast discovery. In those cases, if the printer supports IPP, Windows will install using the class driver even if a vendor V3/V4 driver is available. If the printer doesn't support IPP, or is installed directly as a TCP/IP printer, there's no change in behavior. Encryption Support We have updated the policy "Turn off encryption support" to allow only TLS 1.2 and TLS 1.3. Previous baseline releases permitted TLS 1.1 and TLS 1.2; however, TLS 1.1 is now considered obsolete and is no longer recommended for enterprise environments. This change aligns the security baseline with modern cryptographic standards while maintaining compatibility with widely deployed services that support current TLS versions. Administrator Protection (update) Administrator protection is now generally available. Organizations can enable it through Microsoft Intune or Group Policy. Important: Organizations should review and test their existing configuration and adjust these settings as appropriate for their environment. The security baselines for Windows 11, versions 24H2, 25H2, and 26H2 include settings that enable Administrator protection. The following policies are part of the security baseline: User Account Control: Configure type of Admin Approval Mode User Account Control: Behavior of the elevation prompt for administrators running with Administrator protection An updated v2 package has been published for Windows 11, version 26H2, to reflect this change. Please let us know your thoughts by commenting on this post or through the Security Baseline Community.Security Review for Microsoft Edge version 152
We have reviewed the new settings in Microsoft Edge version 152 and determined that there are no additional security settings that require enforcement. The Microsoft Edge version 151 security baseline continues to be our recommended configuration which can be downloaded from the Microsoft Security Compliance Toolkit. Microsoft Edge version 152 introduced 4 new Computer and User settings; we have included a spreadsheet listing the new settings to make it easier for you to find. Starting with version 152 Microsoft Edge is moving to a more frequent release cycle. To better align with the needs of the enterprise customers, the Microsoft Edge security baseline is expected to align with the Extended Stable Channel, which provides major feature updates on an eight-week cadence while continuing to receive security and quality updates between releases. This approach provides organizations with additional time to evaluate and deploy feature changes while ensuring security protections remain current. Why the change? Security baselines are intended to provide guidance for managing security relevant configuration settings, not to track every feature introduced in a browser release. With the move to a two-week release cadence, publishing baseline updates for every release would increase operational overhead while providing limited security benefit. The Extended Stable cadence offers a more practical balance for enterprise customers by allowing additional time for testing and evaluation, while continuing to receive security and critical fixes between major feature releases. By aligning with Extended Stable, we can update the baselines less frequently and focus on publishing them earlier in the release cycle, giving IT administrators more time to review and plan for upcoming changes. Our goal is to make security baseline adoption more predictable and easier to manage while continuing to provide timely security guidance. As a friendly reminder, all available settings for Microsoft Edge are documented here, and all available settings for Microsoft Edge Update are documented here. Please continue to give us feedback through the Security Baselines Discussion site or this post.1.8KViews0likes6Comments
Feature Request: Extend Security Copilot inclusion (M365 E5) to M365 A5 Education tenants
Background At Ignite 2025, Microsoft announced that Security Copilot is included for all Microsoft 365 E5 customers, with a phased rollout starting November 18, 2025. This is a significant step forward for security operations. The gap Microsoft 365 A5 for Education is the academic equivalent of E5 — it includes the same core security stack: Microsoft Defender, Entra, Intune, and Purview. However, the Security Copilot inclusion explicitly covers only commercial E5 customers. There is no public roadmap or timeline for extending this benefit to A5 education tenants. Why this matters Education institutions face the same cybersecurity threats as commercial organizations — often with fewer dedicated security resources. The A5 license was positioned as the premium security offering for education. Excluding it from Security Copilot inclusion creates an inequity between commercial and education customers holding functionally equivalent license tiers. Request We would like Microsoft to: Confirm whether Security Copilot inclusion will be extended to M365 A5 Education tenants If yes, provide an indicative timeline If no, clarify the rationale and what alternative paths exist for education customers Are other EDU admins in the same situation? Would appreciate any upvotes or comments to help raise visibility with the product team.1.5KViews16likes4CommentsFrom “No” to “Now”: A 7-Layer Strategy for Enterprise AI Safety
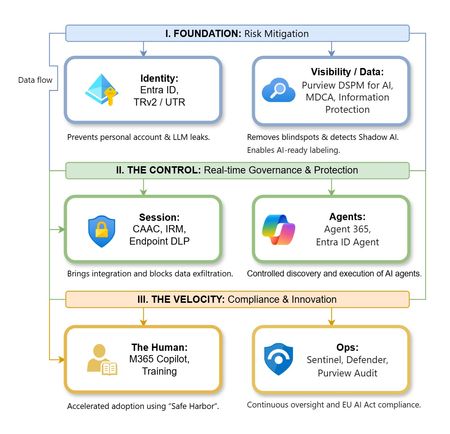
The “block” posture on Generative AI has failed. In a global enterprise, banning these tools doesn't stop usage; it simply pushes intellectual property into unmanaged channels and creates a massive visibility gap in corporate telemetry. The priority has now shifted from stopping AI to hardening the environment so that innovation can run at velocity without compromising data sovereignty. Traditional security perimeters are ineffective against the “slow bleed” of AI leakage - where data moves through prompts, clipboards, and autonomous agents rather than bulk file transfers. To secure this environment, a 7-layer defense-in-depth model is required to treat the conversation itself as the new perimeter. 1. Identity: The Only Verifiable Perimeter Identity is the primary control plane. Access to AI services must be treated with the same rigor as administrative access to core infrastructure. The strategy centers on enforcing device-bound Conditional Access, where access is strictly contingent on device health. To solve the "Account Leak" problem, the deployment of Tenant Restrictions v2 (TRv2) is essential to prevent users from signing into personal tenants using corporate-managed devices. For enhanced coverage, Universal Tenant Restrictions (UTR) via Global Secure Access (GSA) allows for consistent enforcement at the cloud edge. While TRv2 authentication-plane is GA, data-plane protection is GA for the Microsoft 365 admin center and remains in preview for other workloads such as SharePoint and Teams. 2. Eliminating the Visibility Gap (Shadow AI) You can’t secure what you can't see. Microsoft Defender for Cloud Apps (MDCA) serves to discover and govern the enterprise AI footprint, while Purview DSPM for AI (formerly AI Hub) monitors Copilot and third-party interactions. By categorizing tools using MDCA risk scores and compliance attributes, organizations can apply automated sanctioning decisions and enforce session controls for high-risk endpoints. 3. Data Hygiene: Hardening the “Work IQ” AI acts as a mirror of internal permissions. In a "flat" environment, AI acts like a search engine for your over-shared data. Hardening the foundation requires automated sensitivity labeling in Purview Information Protection. Identifying PII and proprietary code before assigning AI licenses ensures that labels travel with the data, preventing labeled content from being exfiltrated via prompts or unauthorized sharing. 4. Session Governance: Solving the “Clipboard Leak” The most common leak in 2025 is not a file upload; it’s a simple copy-paste action or a USB transfer. Deploying Conditional Access App Control (CAAC) via MDCA session policies allows sanctioned apps to function while specifically blocking cut/copy/paste. This is complemented by Endpoint DLP, which extends governance to the physical device level, preventing sensitive data from being moved to unmanaged USB storage or printers during an AI-assisted workflow. Purview Information Protection with IRM rounds this out by enforcing encryption and usage rights on the files themselves. When a user tries to print a "Do Not Print" document, Purview triggers an alert that flows into Microsoft Sentinel. This gives the SOC visibility into actual policy violations instead of them having to hunt through generic activity logs. 5. The “Agentic” Era: Agent 365 & Sharing Controls Now that we're moving from "Chat" to "Agents", Agent 365 and Entra Agent ID provide the necessary identity and control plane for autonomous entities. A quick tip: in large-scale tenants, default settings often present a governance risk. A critical first step is navigating to the Microsoft 365 admin center (Copilot > Agents) to disable the default “Anyone in organization” sharing option. Restricting agent creation and sharing to a validated security group is essential to prevent unvetted agent sprawl and ensure that only compliant agents are discoverable. 6. The Human Layer: “Safe Harbors” over Bans Security fails when it creates more friction than the risk it seeks to mitigate. Instead of an outright ban, investment in AI skilling-teaching users context minimization (redacting specifics before interacting with a model) - is the better path. Providing a sanctioned, enterprise-grade "Safe Harbor" like M365 Copilot offers a superior tool that naturally cuts down the use of Shadow AI. 7. Continuous Ops: Monitoring & Regulatory Audit Security is not a “set and forget” project, particularly with the EU AI Act on the horizon. Correlating AI interactions and DLP alerts in Microsoft Sentinel using Purview Audit (specifically the CopilotInteraction logs) data allows for real-time responses. Automated SOAR playbooks can then trigger protective actions - such as revoking an Agent ID - if an entity attempts to access sensitive HR or financial data. Final Thoughts Securing AI at scale is an architectural shift. By layering Identity, Session Governance, and Agentic Identity, AI moves from being a fragmented risk to a governed tool that actually works for the modern workplace.Security baseline for Microsoft Edge version 151
We are pleased to announce the enterprise-ready release of the security baseline for Microsoft Edge version 151! We have reviewed the settings in Microsoft Edge version 151 and updated our guidance with six new recommendations. We have also identified one additional setting that organizations should consider evaluating in their environments. A new Microsoft Edge security baseline package was just released to the Download Center. You can download the new package from the Security Compliance Toolkit. Enable Process Isolation (added) We are enforcing ‘Enable Process Isolation’ to help protect Microsoft Edge from unauthorized access, modification, and tampering by other applications running on the device. This setting strengthens browser process integrity and helps safeguard sensitive data used by Microsoft Edge. Organizations that encounter compatibility issues with software that depends on browser process injection should treat such configurations as exceptions requiring explicit risk acceptance and compatibility validation. Enable renderer in app container (added) We are enforcing the default and enabling ‘Enable renderer in app container’ to strengthen Microsoft Edge’s browser isolation protections by ensuring renderer processes run within the additional restrictions provided by AppContainer. This helps reduce the impact of browser-based attacks and limits the ability of exploited renderer processes to interact with system resources. Organizations that require this setting to be disabled due to incompatible software should treat such configurations as exceptions that require explicit risk acceptance. Enable the network service sandbox (added) We are enforcing the default and enabling ‘Enable the network service sandbox’ to ensure Microsoft Edge network-facing processes operate within sandbox isolation boundaries that help reduce the impact of exploitation and limit access to system resources. Because disabling the network service sandbox weakens a core browser security protection, organizations should treat any requirement to disable this setting as an exception scenario requiring explicit risk acceptance and compatibility validation. Configure browser process code integrity guard (added) We are enabling ‘Configure browser process code integrity guard setting’ with a value of ‘Enable code integrity guard enforcement in the browser process’. The setting strengthens protections against unauthorized code injection into Microsoft Edge browser processes. Some enterprise applications, extensions, accessibility tools, or security products may still rely on legacy injection techniques and require compatibility validation. We encourage organizations to fully test this setting in their environments and work with vendors to identify or remediate incompatible software. Enable Application Bound Encryption (added) We are enabling ‘Enable Application Bound Encryption’ to strengthen protections for browser-stored credentials, authentication tokens, and other sensitive data by binding encryption more closely to the browser process. This helps reduce the risk of unauthorized access to protected browser data by malware or other untrusted software. Because disabling this setting weakens an important protection boundary, organizations should treat any requirement to disable the feature as an exception requiring explicit risk review. Enhance the security state in Microsoft Edge (added) We are enabling ‘Enhance the security state in Microsoft Edge’ and configuring the setting to Balanced to provide additional protection against modern web-based attacks while maintaining compatibility for most enterprise users. In Balanced mode, Microsoft Edge applies additional mitigations such as disabling just-in-time (JIT) JavaScript compilation and enabling added operating system protections on processes used to load sites that users do not frequently visit, helping reduce the risk of memory-related vulnerabilities. Because these protections can introduce compatibility issues for some applications or workflows, organizations should validate critical business sites and applications during their normal testing process prior to broad deployment and configure exceptions as needed. Additional details can be found here. Configure Automatic HTTPS (worth considering) We previously released a blog discussing a new feature called Automatic HTTPS. This setting can automatically switch your connections to websites from HTTP to HTTPS on sites that are highly likely to support the more secure protocol. This option helps ensure that users' network traffic is more secure and less susceptible to SSL stripping attacks. The best part, the end user doesn’t get prompted, it just works! This new feature has two configuration options: Navigations delivered over HTTP are switched to HTTPS’ (UpgradeCapableDomains) and ‘All navigation delivered over HTTP are switched to HTTPS’ (AlwaysUpgrade). There are trade-offs for each configuration: the UpgradeCapableDomains option only upgrades to HTTPS if Microsoft believes the site is likely to work over HTTPS, and this setting is unavailable if you’ve disabled the ComponentUpdatesEnabled policy. The more secure AlwaysUpgrade option unconditionally updates all HTTP requests to HTTPS, which will result in a user-visible error page if the target site does not support HTTPS. We encourage organizations to consider implementing and testing Automatic HTTPS within their environment. Collectively, these changes continue our focus on strengthening browser isolation, sandboxing, process integrity, and protection of sensitive browser data while balancing enterprise compatibility requirements. Microsoft Edge version 151 introduced 4 new computer and user settings. We have included a spreadsheet listing the new settings in the release to make it easier for you to find them. As a friendly reminder, all available settings for Microsoft Edge are documented here, and all available settings for Microsoft Edge Update are documented here. Please continue to give us feedback through the Security Baseline Community or in comments on this post.2.1KViews0likes6CommentsTeams Private Channels: Group-Based Compliance Model & Purview eDiscovery Considerations
Microsoft Teams Private Channels are undergoing an architectural change that will affect how your organisations uses Microsoft Purview eDiscovery to hold and discovery these messages going forward. In essence, copies of private channel messages will now be stored in the M365 Group mailbox, aligning their storage with how standard and shared channels work today. This shift, due to roll out from early October 2025 to December 2025, brings new benefits (like greatly expanded channel limits and meeting support) and has the potential to impact your Purview eDiscovery searches and legal holds workflows. In this blog post, we’ll break down what’s changing, what remains the same, and provide you with the information you need to review your own eDiscovery processes when working with private channel messages. What’s Changing? Private channel conversation history is moving to a group-based model. Historically, when users posted in a private channel, copies of those messages were stored in each member of the private channel’s Exchange Online mailbox (in a hidden folder). This meant that Microsoft Purview eDiscovery search and hold actions for private channel content had to be scoped to the member’s mailbox, which added complexity. Under the new model rolling out in late 2025, each private channel will get its own dedicated channel mailbox linked to the parent Teams’ M365 group mailbox. In other words, private channel messages will be stored similarly to shared channel messages; where the parent Teams’ M365 group mailbox is targeted in eDiscovery searches and holds, instead of targeting the mailboxes of all members of the private channel. Targeting the parent Teams’ M365 Group mailbox in a search or a hold will extend to all dedicated channel mailboxes for shared and private channels within the team as well as including any standard channels. After the transition, any new messages in a private channel will see the message copy being stored in the channel’s group mailbox, not in users’ mailboxes. Why the change? This aligns the retention and collection of private channel messages to standard and shared channel messages. Instead of having to include separate data sources depending on the type of Teams channel, eDiscovery practitioners can simply target the Team’s M365 Group mailbox and cover all its channel, no matter it’s type. This update will introduce major improvements to private channels themselves. This includes raising the limits on private channels and members, and enabling features that were previously missing: Maximum private channels per team: increasing from 30 to 1000. Maximum members in a private channel: increasing from 250 to 5000. Meeting scheduling in private channels: previously not supported, now allowed under the new model. The table below summarizes the old vs new model for Teams private channel messages: Aspect Before (User Mailbox Model) After (Group Mailbox Model) Message Storage Messages copied into each private channel member’s Exchange Online mailbox. Messages are stored in a channel mailbox associated with the parent Teams’ M365 group mailbox. eDiscovery Search Had to search private channel member’s mailboxes to find channel messages. Search the parent M365 group mailbox for new private channel messages and user mailboxes for any messages that were not migrated to the group mailbox. Legal Hold Placement Apply hold on private channel member’s mailbox to preserve messages. Apply hold on the parent M365 group mailbox. Existing holds may need to include both the M365 group mailbox and members mailboxes to cover new messages and messages that were not migrated to the group mailbox. Things to know about the changes During the migration of Teams private channel messages to the new group-based model, the process will transfer the latest version of each message from the private channel member’s mailbox to the private channel’s dedicated channel mailbox. However, it’s important to note that this process does not include the migration of held message versions; specifically, any messages that were edited or deleted prior to the migration. These held messages, due to a legal hold or retention policy, will remain in the individual user mailboxes where they were originally stored. As such, eDiscovery practitioners should consider, based on their need, including the user mailboxes in their search and hold scopes. Legal Holds for Private Channel Content Before the migration, if you needed to preserve a private channel’s messages, you placed a hold on the mailboxes of each member of the private channel. This ensured each user’s copy of the channel messages was held by the hold. Often, eDiscovery practitioners would also place a hold on the M365 group mailbox to also hold the messages from standard and shared channels After the migration, this workflow changes: you will instead place a hold on the parent Team’s M365 group mailbox that corresponds to the private channel. Before migration: It is recommended to update any existing hold that are intended to preserve private channel messages so that it includes the parent Team’s M365 group mailbox in addition to the private channel members’ mailboxes. This ensures continuity as any new messages (once the channel migrates) will be stored in the group mailbox. After migration: For any new eDiscovery hold involving a private channel, simply add the parent Teams’ M365 group mailbox to the hold. As previously discussed eDiscovery practitioners should consider, based on need, if the hold also needs to include the private channel members mailboxes due to non-migrated content. Any private channel messages currently held in the user mailbox will continue to be preserved by the existing hold, but to hold any future messages sent post migration will require a hold placed on the group mailbox. eDiscovery Search and Collection Performing searches related to private channel messages will change after the migration: Before Migration: To collect private channel messages, you targeted the private channel member’s mailbox as a data source in the search. After migration: The private channel messages will be stored in a channel mailbox associated with the parent Team’s M365 group mailbox. That means you include the Team’s M365 group mailbox as a data source in your search. As previously discussed eDiscovery practitioners should consider, based on need, if the search also needs to include the private channel members mailboxes due to non-migrated content. What Isn’t Changing? It’s important to emphasize that only Teams private channel messages are changing in this rollout. Other content locations in Teams remain as they were, so your existing eDiscovery processes remain unchanged: Standard channel messages: These are been stored in the Teams M365 group mailbox. You will continue to place holds on the Team’s M365 group mailbox for standard channel content and target it in searches to do collections. Shared channel messages: Shared channels messages are stored in a channel mailbox linked to the M365 group mailbox for the Team. You continue to place holds and undertake searches by targeting the M365 group mailbox for the Team that contains the shared channel. Teams chats (1:1 or group chats): Teams chats are stored in each user’s Exchange Online mailbox. For eDiscovery, you will continue to search individual user mailboxes for chats and place holds on user mailboxes to preserve chat content. Files and SharePoint data: Any file shared in teams message or uploaded to a SharePoint site associated with a channel remains as it is today. In conclusion For more information regarding timelines, refer to the to the Microsoft Teams blog post “New enhancements in Private Channels in Microsoft Teams unlock their full potential” as well as checking for updates via the Message Center Post MC1134737.Authorization and Governance for AI Agents: Runtime Authorization Beyond Identity at Scale
Designing Authorization‑Aware AI Agents at Scale Enforcing Runtime RBAC + ABAC with Approval Injection (JIT) Microsoft Entra Agent Identity enables organizations to govern and manage AI agent identities in Copilot Studio, improving visibility and identity-level control. However, as enterprises deploy multiple autonomous AI agents, identity and OAuth permissions alone cannot answer a more critical question: “Should this action be executed now, by this agent, for this user, under the current business and regulatory context?” This post introduces a reusable Authorization Fabric—combining a Policy Enforcement Point (PEP) and Policy Decision Point (PDP)—implemented as a Microsoft Entra‑protected endpoint using Azure Functions/App Service authentication. Every AI agent (Copilot Studio or AI Foundry/Semantic Kernel) calls this fabric before tool execution, receiving a deterministic runtime decision: ALLOW / DENY / REQUIRE_APPROVAL / MASK Who this is for Anyone building AI agents (Copilot Studio, AI Foundry/Semantic Kernel) that call tools, workflows, or APIs Organizations scaling to multiple agents and needing consistent runtime controls Teams operating in regulated or security‑sensitive environments, where decisions must be deterministic and auditable Why a V2? Identity is necessary—runtime authorization is missing Entra Agent Identity (preview) integrates Copilot Studio agents with Microsoft Entra so that newly created agents automatically get an Entra agent identity, manageable in the Entra admin center, and identity activity is logged in Entra. That solves who the agent is and improves identity governance visibility. But multi-agent deployments introduce a new risk class: Autonomous execution sprawl — many agents, operating with delegated privileges, invoking the same backends independently. OAuth and API permissions answer “can the agent call this API?” They do not answer “should the agent execute this action under business policy, compliance constraints, data boundaries, and approval thresholds?” This is where a runtime authorization decision plane becomes essential. The pattern: Microsoft Entra‑Protected Authorization Fabric (PEP + PDP) Instead of embedding RBAC logic independently inside every agent, use a shared fabric: PEP (Policy Enforcement Point): Gatekeeper invoked before any tool/action PDP (Policy Decision Point): Evaluates RBAC + ABAC + approval policies Decision output: ALLOW / DENY / REQUIRE_APPROVAL / MASK This Authorization Fabric functions as a shared enterprise control plane, decoupling authorization logic from individual agents and enforcing policies consistently across all autonomous execution paths. Architecture (POC reference architecture) Use a single runtime decision plane that sits between agents and tools. What’s important here Every agent (Copilot Studio or AI Foundry/SK) calls the Authorization Fabric API first The fabric is a protected endpoint (Microsoft Entra‑protected endpoint required) Tools (Graph/ERP/CRM/custom APIs) are invoked only after an ALLOW decision (or approval) Trust boundaries enforced by this architecture Agents never call business tools directly without a prior authorization decision The Authorization Fabric validates caller identity via Microsoft Entra Authorization decisions are centralized, consistent, and auditable Approval workflows act as a runtime “break-glass” control for high-impact actions This ensures identity, intent, and execution are independently enforced, rather than implicitly trusted. Runtime flow (Decision → Approval → Execution) Here is the runtime sequence as a simple flow (you can keep your Mermaid diagram too). ```mermaid flowchart TD START(["START"]) --> S1["[1] User Request"] S1 --> S2["[2] Agent Extracts Intent\n(action, resource, attributes)"] S2 --> S3["[3] Call /authorize\n(Entra protected)"] S3 --> S4 subgraph S4["[4] PDP Evaluation"] ABAC["ABAC: Tenant · Region · Data Sensitivity"] RBAC["RBAC: Entitlement Check"] Threshold["Approval Threshold"] ABAC --> RBAC --> Threshold end S4 --> Decision{"[5] Decision?"} Decision -->|"ALLOW"| Exec["Execute Tool / API"] Decision -->|"MASK"| Masked["Execute with Masked Data"] Decision -->|"DENY"| Block["Block Request"] Decision -->|"REQUIRE_APPROVAL"| Approve{"[6] Approval Flow"} Approve -->|"Approved"| Exec Approve -->|"Rejected"| Block Exec --> Audit["[7] Audit & Telemetry"] Masked --> Audit Block --> Audit Audit --> ENDNODE(["END"]) style START fill:#4A90D9,stroke:#333,color:#fff style ENDNODE fill:#4A90D9,stroke:#333,color:#fff style S1 fill:#5B5FC7,stroke:#333,color:#fff style S2 fill:#5B5FC7,stroke:#333,color:#fff style S3 fill:#E8A838,stroke:#333,color:#fff style S4 fill:#FFF3E0,stroke:#E8A838,stroke-width:2px style ABAC fill:#FCE4B2,stroke:#999 style RBAC fill:#FCE4B2,stroke:#999 style Threshold fill:#FCE4B2,stroke:#999 style Decision fill:#fff,stroke:#333 style Exec fill:#2ECC71,stroke:#333,color:#fff style Masked fill:#27AE60,stroke:#333,color:#fff style Block fill:#C0392B,stroke:#333,color:#fff style Approve fill:#F39C12,stroke:#333,color:#fff style Audit fill:#3498DB,stroke:#333,color:#fff ``` Design principle: No tool execution occurs until the Authorization Fabric returns ALLOW or REQUIRE_APPROVAL is satisfied via an approval workflow. Where Power Automate fits (important for readers) In most Copilot Studio implementations, Agents calls Power Automate (agent flows), is the practical integration layer that calls enterprise services and APIs. Copilot Studio supports “agent flows” as a way to extend agent capabilities with low-code workflows. For this pattern, Power Automate typically: acquires/uses the right identity context for the call (depending on your tenant setup), and calls the /authorize endpoint of the Authorization Fabric, returns the decision payload to the agent for branching. Copilot Studio also supports calling REST endpoints directly using the HTTP Request node, including passing headers such as Authorization: Bearer <token>. Protected endpoint only: Securing the Authorization Fabric with Microsoft Entra For this V2 pattern, the Authorization Fabric must be protected using Microsoft Entra‑protected endpoint on Azure Functions/App Service (built‑in auth). Microsoft Learn provides the configuration guidance for enabling Microsoft Entra as the authentication provider for Azure App Service / Azure Functions. Step 1 — Create the Authorization Fabric API (Azure Function) Expose an authorization endpoint: HTTP Step 2 — Enable Microsoft Entra‑protected endpoint on the Function App In Azure Portal: Function App → Authentication Add identity provider → Microsoft Choose Workforce configuration (enterprise tenant) Set Require authentication for all requests This ensures the Authorization Fabric is not callable without a valid Entra token. Step 3 — Optional hardening (recommended) Depending on enterprise posture, layer: IP restrictions / Private endpoints APIM in front of the Function for rate limiting, request normalization, centralized logging (For a POC, keep it minimal—add hardening incrementally.) Externalizing policy (so governance scales) To make this pattern reusable across multiple agents, policies should not be hardcoded inside each agent. Instead, store policy definitions in a central policy store such as Cosmos DB (or equivalent configuration store), and have the PDP load/evaluate policies at runtime. Why this matters: Policy changes apply across all agents instantly (no agent republish) Central governance + versioning + rollback becomes possible Audit and reporting become consistent across environments (For the POC, a single JSON document per policy pack in Cosmos DB is sufficient. For production, add versioning and staged rollout.) Store one PolicyPack JSON document per environment (dev/test/prod). Include version, effectiveFrom, priority for safe rollout/rollback. Minimal decision contract (standard request / response) To keep the fabric reusable across agents, standardize the request payload. Request payload (example) Decision response (deterministic) Example scenario (1 minute to understand) Scenario: A user asks a Finance agent to create a Purchase Order for 70,000. Even if the user has API permission and the agent can technically call the ERP API, runtime policy should return: REQUIRE_APPROVAL (threshold exceeded) trigger an approval workflow execute only after approval is granted This is the difference between API access and authorized business execution. Sample Policy Model (RBAC + ABAC + Approval) This POC policy model intentionally stays simple while demonstrating both coarse and fine-grained governance. 1) Coarse‑grained RBAC (roles → actions) FinanceAnalyst CreatePO up to 50,000 ViewVendor FinanceManager CreatePO up to 100,000 and/or approve higher spend 2) Fine‑grained ABAC (conditions at runtime) ABAC evaluates context such as region, classification, tenant boundary, and risk: 3) Approval injection (Agent‑level JIT execution) For higher-risk/high-impact actions, the fabric returns REQUIRE_APPROVAL rather than hard deny (when appropriate): How policies should be evaluated (deterministic order) To ensure predictable and auditable behavior, evaluate in a deterministic order: Tenant isolation & residency (ABAC hard deny first) Classification rules (deny or mask) RBAC entitlement validation Threshold/risk evaluation Approval injection (JIT step-up) This prevents approval workflows from bypassing foundational security boundaries such as tenant isolation or data sovereignty. Copilot Studio integration (enforcing runtime authorization) Copilot Studio can call external REST APIs using the HTTP Request node, including passing headers such as Authorization: Bearer <token> and binding response schema for branching logic. Copilot Studio also supports using flows with agents (“agent flows”) to extend capabilities and orchestrate actions. Option A (Recommended): Copilot Studio → Agent Flow (Power Automate) → Authorization Fabric Why: Flows are a practical place to handle token acquisition patterns, approval orchestration, and standardized logging. Topic flow: Extract user intent + parameters Call an agent flow that: calls /authorize returns decision payload Branch in the topic: If ALLOW → proceed to tool call If REQUIRE_APPROVAL → trigger approval flow; proceed only if approved If DENY → stop and explain policy reason Important: Tool execution must never be reachable through an alternate topic path that bypasses the authorization check. Option B: Direct HTTP Request node to Authorization Fabric Use the Send HTTP request node to call the authorization endpoint and branch using the response schema. This approach is clean, but token acquisition and secure secretless authentication are often simpler when handled via a managed integration layer (flow + connector). AI Foundry / Semantic Kernel integration (tool invocation gate) For Foundry/SK agents, the integration point is before tool execution. Semantic Kernel supports Azure AI agent patterns and tool integration, making it a natural place to enforce a pre-tool authorization check. Pseudo-pattern: Agent extracts intent + context Calls Authorization Fabric Enforces decision Executes tool only when allowed (or after approval) Telemetry & audit (what Security Architects will ask for) Even the best policy engine is incomplete without audit trails. At minimum, log: agentId, userUPN, action, resource decision + reason + policyIds approval outcome (if any) correlationId for downstream tool execution Why it matters: you now have a defensible answer to: “Why did an autonomous agent execute this action?” Security signal bonus: Denials, unusual approval rates, and repeated policy mismatches can also indicate prompt injection attempts, mis-scoped agents, or governance drift. What this enables (and why it scales) With a shared Authorization Fabric: Avoid duplicating authorization logic across agents Standardize decisions across Copilot Studio + Foundry agents Update governance once (policy change) and apply everywhere Make autonomy safer without blocking productivity Closing: Identity gets you who. Runtime authorization gets you whether/when/how. Copilot Studio can automatically create Entra agent identities (preview), improving identity governance and visibility for agents. But safe autonomy requires a runtime decision plane. Securing that plane as an Entra-protected endpoint is foundational for enterprise deployments. In enterprise environments, autonomous execution without runtime authorization is equivalent to privileged access without PIM—powerful, fast, and operationally risky.Security Review for Microsoft Edge version 150
We have reviewed the new settings in Microsoft Edge version 150 and determined that there are no additional security settings that require enforcement. The Microsoft Edge version 139 security baseline continues to be our recommended configuration which can be downloaded from the Microsoft Security Compliance Toolkit. Microsoft Edge version 150 introduced 8 new Computer and User settings; we have included a spreadsheet listing the new settings to make it easier for you to find. As a friendly reminder, all available settings for Microsoft Edge are documented here, and all available settings for Microsoft Edge Update are documented here. Please continue to give us feedback through the Security Baselines Discussion site or this post.Sensitivity Auto-labelling via Document Property
Why is this needed? Sensitivity labels are generally relevant within an organisation only. If a file is labelled within one environment and then moved to another environment, sensitivity label content markings may be visible, but by default, the applied sensitivity label will not be understood. This can lead to scenarios where information that has been generated externally is not adequately protected. My favourite analogy for these scenarios is to consider the parallels between receiving sensitive information and unpacking groceries. When unpacking groceries, you might sit your grocery bag on a counter or on the floor next to the pantry. You’ll likely then unpack each item, take a look at it and then decide where to place it. Without looking at an item to determine its correct location, you might place it in the wrong location. Porridge might be safe from the kids on the bottom shelf. If you place items that need to be protected, such as chocolate, on the bottom shelf, it’s not likely to last very long. So, I affectionately refer to information that hasn’t been evaluated as ‘porridge’, as until it has been checked, it will end up on the bottom shelf of the pantry where it is quite accessible. Label-based security controls, such as Data Loss Prevention (DLP) policies using conditions of ‘content contains sensitivity label’ will not apply to these items. To ensure the security of any contained sensitive information, we should look for potential clues to its sensitivity and then utilize these clues to ensure that the contained information is adequately protected - We take a closer look at the ‘porridge’, determine whether it’s an item that needs protection and if so, move it to a higher shelf in the pantry so that it’s out of reach for the kids. Effective use of Purview revolves around the use of ‘know your data’ strategies. We should be using as many methods as possible to try to determine the sensitivity of items. This can include the use of Sensitive Information Types (SITs) containing keyword or pattern-based classifiers, trainable classifiers, Exact Data Match, Document fingerprinting, etc. Matching items via SITs present in the items content can be problematic due to false positives. Keywords like ‘Sensitive’ or ‘Protected’ may be mentioned out of context, such as when referring to a classification or an environment. When classifications have been stamped via a property, it allows us to match via context rather than content. We don’t need to guess at an item’s sensitivity if another system has already established what the item’s classification is. These methods are much less prone to false positives. Why isn’t everyone doing this? Document properties are often not considered in Purview deployments. SharePoint metadata management seems to be a dying artform and most compliance or security resources completing Purview configurations don’t have this skill set. There’s also a lack of understanding of the relevance of checking for item properties. Microsoft haven’t helped as the documentation in this space is somewhat lacking and needs to be unpicked via some aligning DLP guidance (Create a DLP policy to protect documents with FCI or other properties). Many of these configurations will also be tied to regional requirements. Document properties being used by systems where I’m from, in Australia, will likely be very different to those used in other parts of the world. In the following sections, we’ll take a look at applicable use cases and walk through how to enable these configurations. Scenarios for use Labelling via document property isn’t for everyone. If your organisation is new to classification or you don’t have external partners that you collaborate with at higher sensitivity levels, then this likely isn’t for you. For those that collaborate heavily and have a shared classification framework, as is often seen across government, this is a must! This approach will also be highly relevant to multi-tenant organisations or conglomerates where information is regularly shared between environments. The following scenarios are examples of where this configuration will be relevant: 1. Migrating from 3 rd party classification tools If an item has been previously stamped by a 3 rd party classification tool, then evaluating its applied document properties will provide a clear picture of its security classification. These properties can then be used in service-based auto-labelling policies to effectively transition items from 3 rd party tools to Microsoft Purview sensitivity labels. As labels are applied to items, they will be brought into scope of label-based controls. 2. Detecting data spill Data spill is a term that is used to define situations where information that is of a higher than permitted security classification land in an environment. Consider a Microsoft 365 tenant that is approved for the storage of Official information but Top Secret files are uploaded to it. Document properties that align with higher than permitted classifications provide us with an almost guaranteed method of identifying spilled items. Pairing this document property with an auto-labelling policy allows for the application of encryption to lock unauthorized users out of the items. Tools like Content Explorer and eDiscovery can then be used to easily perform cleanup activities. If using document properties and auto-labelling for this purpose, keep in mind that you’ll need to create sensitivity labels for higher than permitted classifications in order to catch spilled items. These labels won’t impact usability as you won’t publish them to users. You will, however, need to publish them to a single user or break glass account so that they’re not ignored by auto-labelling. 3. Blocking access by AI tools If your organization was concerned about items with certain properties applied being accessed by generative AI tools, such as Copilot, you could use Auto-labelling to apply a sensitivity label that restricts EXTRACT permissions. You can find some information on this at Microsoft 365 Copilot data protection architecture | Microsoft Learn. This should be relevant for spilled data, but might also be useful in situations where there are certain records that have been marked via properties and which should not be Copilot accessible. 4. External Microsoft Purview Configurations Sensitivity labels are relevant internally only. A label, in its raw form, is essentially a piece of metadata with an ID (or GUID) that we stamp on pieces of information. These GUIDs are understood by your tenant only. If an item marked with a GUID shows up in another Microsoft 365 tenant, the GUID won’t correspond with any of that tenant’s labels or label-based controls. The art in Microsoft Purview lies in interpreting the sensitivity of items based on content markings and other identifiers, so that data security can be maintained. Document properties applied by Purview, such as ClassificationContentMarkingHeaderText are not relevant to a specific tenant, which makes them portable. We can use these properties to help maintain classifications as items move between environments. 5. Utilizing metadata applied by Records Management solutions Some EDRMS, Records or Content Management solutions will apply properties to items. If an item has been previously managed and then stamped with properties, potentially including a security classification, via one of these systems, we could use this information to inform sensitivity label application. 6. 3 rd party classification tools used externally Even if your organisation hasn’t been using 3rd party classification tools, you should consider that partner organisations, such as other Government departments, might be. Evaluating the properties applied by external organisations to items that you receive will allow you to extend protections to these items. If classification tools like Janus or Titus are used in your geography/industry, then you may want to consider checking for their properties. Regarding the use of auto-classification tools Some organisations, particularly those in Government, will have organisational policies that prevent the use of automatic classification capabilities. These policies are intended to ensure that each item is assessed by an actual person for risk of disclosure rather than via an automated service that could be prone to error. However, when auto-labelling is used to interpret and honour existing classifications, we are lowering rather than raising the risk profile. If the item’s existing classification (applied via property) is ignored, the item will be treated as porridge and is likely to be at risk. If auto-labelling is able to identify a high-risk item and apply the relevant label, it will then be within scope of Purview’s data security controls, including label-based DLP, groups and sites data out of place alerting, and potentially even item encryption. The outcome is that, through the use of auto-labelling, we are able to significantly reduce risk of inappropriate or unintended disclosure. Configuration Process Setting up document property-based auto-labelling is fairly straightforward. We need to setup a managed property and then utilize it an auto-labelling policy. Below, I've split this process into 6 steps: Step 1 – Prepare your files In order to make use of document properties, an item with the properties applied will first need to be indexed by SharePoint. SharePoint will record the properties as ‘crawled properties’, which we’ll then need to convert into ‘managed properties’ to make them useful. If you already have items with the relevant properties stored in SharePoint, then they are likely already indexed. If not, you’ll need to upload or create an item or items with the properties applied. For testing, you’ll want to create a file with each property/value combination so that you can confirm that your auto-labelling policies are all working correctly. This could require quite a few files depending on the number of properties you’re looking for. To kick off your crawled property generation though, you could create or upload a single file with the correct properties applied. For example: In the above, I’ve created properties for ClassificationContentMarkingHeaderText and ClassificationContentMarkingFooterText, which you’ll often see applied by Purview when an item has a sensitivity label content marking applied to it. I’ve also included properties to help identify items classified via JanusSeal, Titus and Objective. Step 2 – Index the files After creating or uploading your file, we then need SharePoint to index it. This should happen fairly quickly depending on the size of your environment. I'd expect to wait sometime between 10 minutes and 24 hrs. If you're not in a hurry, then I'd recommend just checking back the next day. You'll know when this has been completed when you head into SharePoint Admin > Search > Managed Search Schema > Crawled Properties and can find your newly indexed properties: Step 3 – Configure managed properties Next, the properties need to be configured as managed properties. To do this, go to SharePoint Admin > More features > Search > Managed Search Schema > Managed Properties. Create a new managed property and give it a name. Note that there are some character restrictions in naming, but you should be able to get it close to your document property name. Set the property’s type to text, select queryable and retrievable. Under ‘mappings to crawled properties’, choose add mapping, search for and select the property indexed from the file property. Note that the crawled property will have the same name as your document property, so there’s no need to browse through all of them: Repeat this so that you have a managed property for each document property that you want to look for. Step 4 – Configure Auto-labelling policies Next up, create some auto-labelling policies. You’ll need one for each label that you want to apply, not one per property as you can check multiple properties within the one auto-labelling policy. - From within Purview, head to Information Protection > Policies > Auto-labelling policies. - Create a new policy using the custom policy template. - Give your policy an appropriate name (e.g. Label PROTECTED via property). - Select the label that you want to apply (e.g. PROTECTED). - Select SharePoint based services (SharePoint and OneDrive). - Name your auto-labelling rules appropriately (e.g. SPO – Contains PROTECTED property) - Enter your conditions as a long string with property and value separated via a colon and multiple entries separated with a comma. For example: ClassificationContentMarkingHeaderText:PROTECTED,ClassificationContentMarkingFooterText:PROTECTED,Objective-Classification:PROTECTED,PMDisplay:PROTECTED,TitusSEC:PROTECTED Note that the properties that you are referencing are the Managed Property rather than the document property. This will be relevant if your managed property ended up having a different name due to character restrictions. After pasting in your string into the UI, the resultant rule should look something like this: When done, you can either leave your policy in simulation mode or save it and then turn it on from the auto-labelling policies screen. Just be aware of any potential impacts, such as accidently locking users out by automatically deploying a label with encryption configuration. You can reduce any potential impact by targeting your auto-labelling policy at a site or set of sites initially and then expanding its scope after testing. Step 5 - Test Testing your configuration will be as easy as uploading or creating a set of files with the relevant document properties in place. Once uploaded, you’ll need to give SharePoint some time to index the items and then the auto-labelling policy some time to apply sensitivity labels to them. To confirm label application, you can head to the document library where your test files are located and enable the sensitivity column. Files that have been auto-labelled will have their label listed: You could also check for auto-labelling activity in Purview via Activity explorer: Step 6 – Expand into DLP If you’ve spent the time setting up managed properties, then you really should consider capitalizing on them in your DLP configurations. DLP policy conditions can be configured in the same manner that we configured Auto-labelling in Step 3 above. The document property also gives us an anchor for DLP conditions that is independent of an item’s sensitivity label. You may wish to consider the following: DLP policies blocking external sharing of items with certain properties applied. This might be handy for situations where auto-labelling hasn’t yet labelled an item. DLP policies blocking the external sharing of items where the applied sensitivity label doesn’t match the applied document property. This could provide an indication of risky label downgrade. You could extend such policies into Insider Risk Management (IRM) by creating IRM policies that are aligned with the above DLP policies. This will allow for document properties to be considered in user risk calculation, which can inform controls like Adaptive Protection. Here's an example of a policy from the DLP rule summary screen that shows conditions of item contains a label or one of our configured document properties: Thanks for reading and I hope this article has been of use. If you have any questions or feedback, please feel free to reach out.4.7KViews9likes9Comments