certificates
97 Topics
Two-tier AD Certificate Services error importing cert into SubCA
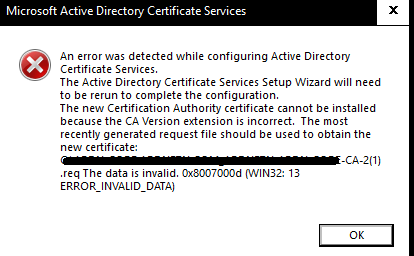
Hello, I'm new here, but excited about being able to hob nob with all you in furthering our IT goals. I'm setting up my root and Subordinate CA and I'm importing my rootCA issued, subCA certificate into the subCA. I get I get the same error when the subCA automatically exports its cert req to the root Ca and when I do it manually. I also get this error whether i'm using X.509 or p7b files. what's unusual about this error is that it seems to be referencing a .req file with a '(1)' added to the end of the title. Original .req did not have the '(1)'. any assistance I can get from the community would be appreciated.94Views0likes1Comment
Azure Key Vault Replication: Why Paired Regions Alone Don’t Guarantee Business Continuity
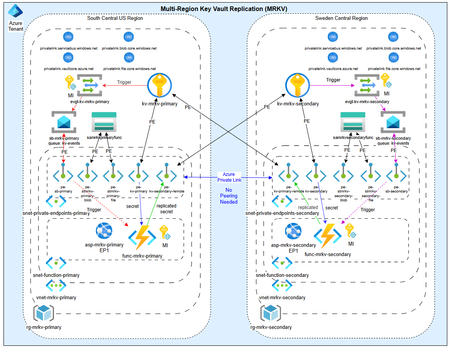
As customers modernize toward multi‑region architectures in Azure, one question comes up repeatedly: “If my region goes down, will Azure Key Vault continue to work without disruption?” The short answer: it depends on what you mean by “work.” Azure Key Vault provides strong durability and availability guarantees, but those guarantees are often misunderstood—especially when customers assume paired‑region replication equals full disaster recovery. In reality, Azure Key Vault replication is designed for survivability, not uninterrupted write access or customer‑controlled failover. This post explains: How Azure Key Vault replication actually works (per Microsoft Learn) Why paired‑region failover does not equal business continuity Two reference architectures that implement true multi‑region Key Vault availability, with Terraform How Azure Key Vault Replication Works (Per Microsoft Learn) Azure Key Vault includes multiple layers of Microsoft‑managed redundancy. In‑Region and Zone Resiliency Vault contents are replicated within the region. In regions that support availability zones, Key Vault is zone‑resilient by default. This protects against localized hardware or zone failures. Paired‑Region Replication If a Key Vault is deployed in a region with an Azure‑defined paired region, its contents are asynchronously replicated to that paired region. This replication is automatic and cannot be configured, observed, or tested by customers. Microsoft‑Managed Regional Failover If Microsoft declares a full regional outage, requests are automatically routed to the paired region. After failover, the vault operates in read‑only mode: ✅ Read secrets, keys, and certificates ✅ Perform cryptographic operations ❌ Create, update, rotate, or delete secrets, keys, or certificates This is a critical distinction. Paired‑region replication preserves access — not operational continuity. Why Paired‑Region Replication Is Not Business Continuity From a reliability and DR perspective, several limitations matter: Failover is Microsoft‑initiated, not customer‑controlled No write operations during regional failover No secret rotation or certificate renewal No way to test DR Accidental deletions replicate No point‑in‑time recovery without backups Microsoft Learn explicitly states that critical workloads may require custom multi‑region strategies beyond built‑in replication. For many customers, this means Azure Key Vault becomes a single‑region dependency in an otherwise multi‑region application design. The Multi‑Region Key Vault Pattern The two GitHub repositories below implement a common architectural shift: Multiple independent Key Vaults deployed in separate regions, with customer‑controlled replication and failover. Instead of relying on invisible platform replication, the vaults become first‑class, region‑scoped resources, aligned with application failover. Solution 1: Private, Locked‑Down Multi‑Region Key Vault Replication Repository: 👉 https://github.com/jclem2000/KeyVault-MultiRegion-Replication-Private Architecture Highlights Independent Key Vault per region Private Endpoints only No public network exposure Terraform‑based deployment Controlled replication using Event Based synchronization What This Enables ✅ Full read/write access during regional outages ✅ Continued secret rotation and certificate renewal ✅ Customer‑defined failover and RTO ✅ DR testing and validation ✅ Strong alignment with zero‑trust and regulated environments Trade‑offs Higher operational complexity Requires automation and application awareness of multiple vaults Solution 2: Low‑Cost Public Multi‑Region Key Vault Replication Repository: 👉 https://github.com/jclem2000/KeyVault-MultiRegion-Replication-Public Architecture Highlights Independent Key Vault per region Public endpoints Minimal networking dependencies Terraform‑based Controlled replication using Event Based synchronization Optimized for simplicity and cost What This Enables ✅ Full read/write availability in any region ✅ Clear and testable DR posture ✅ Lower cost than private endpoint designs ✅ Suitable for many non‑regulated workloads Trade‑offs Public exposure (mitigated via firewall rules, RBAC, and conditional access) Not appropriate for all compliance requirements Requires automation and application awareness of multiple vaults Azure Native Replication vs Customer‑Managed Multi‑Region Vaults Capability Azure Paired Region Multi‑Region Vaults Read access during outage ✅ ✅ Write access during outage ❌ ✅ Secret rotation during outage ❌ ✅ Customer‑controlled failover ❌ ✅ DR testing ❌ ✅ Isolation from accidental deletion ❌ ✅ Predictable RTO ❌ ✅ Azure Key Vault’s native replication optimizes for platform durability. The multi‑region pattern optimizes for application continuity. When to Use Each Approach Paired‑Region Replication Is Often Enough When: Secrets are mostly static Read‑only access during outages is acceptable RTO is flexible You prefer Microsoft‑managed recovery Multi‑Region Vaults Are Recommended When: Secrets or certificates rotate frequently Applications must remain writable during outages Deterministic failover is required DR testing is mandatory Regulatory or operational isolation is needed Closing Thoughts Azure Key Vault behaves exactly as documented on Microsoft Learn—but it’s important to be clear about what those guarantees mean. Paired‑region replication protects your data, not your ability to operate. If your application is designed to survive a regional outage, Key Vault must follow the same multi‑region design principles as the application itself. The reference architectures above show how to extend Azure’s native durability model into true operational resilience, without waiting for a platform‑level failover decision.616Views0likes1CommentIntune PKCS Certificate not showing in Monitor > Certificates
When working with Intune to deploy PKCS Certificates from an On Prem Enterprise CA, we are not seeing the certificates issued to iOS/iPadOS devices within the Certificate Report. Windows issued certificates are showing fine however. We can confirm that the Certificate profile shows successful and the device actually has a certificate under Settings > General > VPN and Device Management > Management Profile > More Details. Is there something that I missed to be able to see the issued certs in monitor or is there something wrong with the reporting. Of note, we also see the iOS/iPadOS certificates in the succeeded folder on the certificate connector but no the Windows ones. Event Viewer also shows that the certificate was successfully issued and sent to Intune.97Views0likes0Comments
Lost access to your Root CA in your 2-Tier PKI? Don’t worry, Use Cross Signing to Recover!
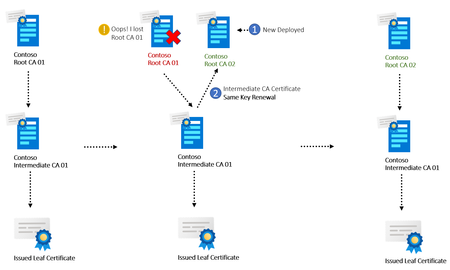
Hello, this is Byron from the Microsoft Directory Services Support team. Today, I’d like to share information about an alternative recovery approach for Public Key Infrastructure (PKI) environments. Consider a scenario where the Root Certification Authority (CA) is permanently lost—for example, due to accidental deletion of the Root CA virtual machine, or the system entering an unrecoverable no-boot state without a valid backup. In some cases, there may be no backup of the Root CA’s private key or database, leaving no traditional path to restoration. In such cases, the supported and recommended recovery method is to rebuild the PKI hierarchy from scratch. However, for extremely rare and critical situations where this is not feasible, there is an alternate recovery method that may allow partial restoration and continuity. This approach is intended only as a last resort, and should only be considered when no supported recovery options remain. While not a replacement for proper backup and disaster recovery practices, this fallback method may help reduce downtime and effort in extreme cases. How If it is a two-tier PKI, and the Intermediate CA Server is the one issuing certificates to the environment, and we still have access to the Intermediate CA Certificate with private key, we can build another Root CA, and “link” the Intermediate CA Server to the new Root CA. The steps are simple, just renew the Intermediate CA server with “Same Key pair” with this new Root CA. A high-level diagram below: In fact, this is like the Concept of “Cross Signing”; the newly issued Intermediate CA Certificate could be considered as a “Cross Certificate” as well. Cross Signing is typically used to make one PKI hierarchy chains up through another hierarchy, even when originally it was not configured that way. This technique is designed for a leaf certificate to build a different certificate verification chain, in case one of the chains fails, allowing certification verification to succeed. Cross signing is also used by public CA companies to start their business which we will discuss more in a later section. Here are detailed steps on how to do this: On the Intermediate CA Server. Open the Certification Authority Management Console. Right click on the CA Name node -> All Tasks -> Renew CA Certificate. Renew Intermediate CA server with “Same Key pair” to create the Certificate renewal request file: Submit the certificate request file (.req) on the newly Deployed Root CA Server, issue it, and go to: Issued Certificates node-> Right click on issued Certificate -> All Taks -> Export Binary Data… -> Save as .cer file. Copy this .cer file to the Intermediate CA. On the Intermediate CA Server. Install the newly issued Intermediate CA certificate issued by the new Root CA. The existing issued Leaf Certificates verification should continue to work and chain up to the new Root CA. We can use command Certutil -urlfetch -verify c:\certificate.cer > certificate.txt to export the certificate verification and chain build information. Previous Chain: Leaf certificate: 5700000006d907d38be599e05a000000000006 Issuer: CN=ContosoRootCA01,DC=contoso,DC=com (Previous corrupted Root CA) Current Chain: Leaf certificate: 5700000006d907d38be599e05a000000000006 Issuer: CN=ContosoRootCA02,DC=contoso,DC=com (New built Root CA) How and Why So exactly what is “Cross Signing”? Let’s see the following story (I found this story online): A long time ago (maybe not that long 😊), there was a Certification Authority company called LetsEncrypt. When they started their business, they generated their own 'ISRG' Root CA Certificate (ISRG Root X1). However, it takes time for the industry to accept new Root Certification Authorities. They could not wait that long to start their business, as this might have taken years. They deployed an Intermediate CAs first (LetsEncrypt X3 and LetsEncrypt X4) and used a popular public Certification Authority (DST Root X3) to sign those Intermediate CA Certificates. This allowed them to start their business immediately and issue Leaf Certificates to customers without waiting for the world to accept their own Root CA. So, the Certificate Chain back then was DST Root X3 --> LetsEncrypt X3 / LetsEncrypt X4 --> Leaf Certificate. After 5 years of hard work, the market accepted their Root CA (DST Root X3) and added it to all kinds of products’ Trusted Root. They signed their Intermediate CA certificates with their own Root CA. Now, another chain is available: ISRG Root X1 --> LetsEncrypt X3 / LetsEncrypt X4 --> Leaf Certificate. How come the same Intermediate CA can be chained up to different Root CAs? The magic trick is the Intermediate CA Certificate kept the “Same Asymmetric Key Pair” when it got signed by both DST Root X3 and ISRG Root X1. As you can see from the above screenshots, the issuer is different, and they are two different intermediate CA certificates, but the trick here is the Same Key Pair, even though they were signed by different Root CA’s, aka “Cross Signing”. Another key point here is not all Certificate Chains rely on the AIA path. Another common Certificate chain build method is Key match using AKI/SKI and PKCS#7 which means the server side sends both Leaf Certificate along with Intermediate CA to the client for verification, Client does not need to build chain to Intermediate using AIA. You can refer to this document for more information about this story: https://scotthelme.co.uk/cross-signing-alternate-trust-paths-how-they-work/ There is another “Cross Sign” method targeting the Root CA Certificate itself. The concept is a little bit different: Using one Root CA Certificate to sign another Root CA Certificate. What is the usage scenario? Why do we need this? Scenario 1 Here is a story: In a large corporation, deploying Root CA certificate to all devices might be challenging. It could be time-consuming and might take a lot of administrative effort. Therefore, during the time periods when large corporations renew their Root CAs, they must find a way for newly issued Certificates under the renewed Root CA start to work as soon as possible. The idea is to sign the new Root CA certificate using the old Root CA Certificate, so the chain could be: leaf Certificate --> Intermediate CA -> New Root CA (Signed by Old Root CA)--> Old Root CA. Because devices should trust Old Root CA already, the new Leaf Certificate works immediately after renewal without waiting for new Root CA Deployed to all devices. Scenario 2 Another scenario is once the New Root CA is deployed to the environment, the company wants to remove the old Root CA certificate from the Devices’ trusted Store for company policy reasons. How can the existing Certificate continue to work if they are not yet expired and issued by old Root CA Certificate? The solution is also Cross Certificate: Create a CA Certificate with old CA key pair but signed by the new Root CA Certificate. The chain build would be below: Existing Issued Leaf Certificate --> Intermediate CA --> Old CA Certificate (cross signed by new Root CA) --> New Root CA. In fact, Active Directory Certificate Service supports this and will generate Cross Certificates by default when renewing a Root CA with a new key. Remember that when we renew the Root CA, there will be two additional CRT files called XXXXX (0-1).crt and XXXXX(1-0).crt. These certificates(.crt) are Cross CA Certificate’s. (0-1) is the New Root CA Certificate signed by Old Root CA Certificate. (1-0) is the old Root CA Certificate signed by new Root CA Certificate. They are used for the above Scenario 1 and Scenario 2 As you can see, the Root CA Certificate has an AKI (Authority Key Identifier), which means it was signed by a CA and an SKI (Subject Key Identifier) that matches it. Of course, in Active Directory, we rarely see the deployment of the Cross Certificate, because for Windows devices, the Active Directory is sufficient to quickly deploy new Root CA Certificate to Windows domain members. Summary The common method to perform PKI disaster recovery when the CA private key and database cannot be restored involves rebuilding the entire PKI Hierarchy PKI from scratch, and replacing every single certificate used by applications and servers. While the common method mentioned above is still valid, the “Cross Signing” method illustrated in this blog offers an alternative quick method to recover our PKI Hierarchy. This could potentially save us from spending a lot of disaster recovery time & administrative effort 😊.5.2KViews7likes1Comment
First Issuance manual, with automated renewals
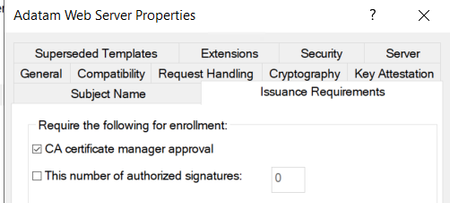
Hey all Rob Greene again. Seems like I have been on this PKI kick lately, and today is not going to be any different. Occasionally, I will get a customer who must get certificates issued for things like Web sites, and they must have custom Subject Alternative Name (SAN) DNS values on the issued certificate. They hate that their web server admins must submit the request, and then as Certificate Authority Managers, they must look in the Certification Authorities database and review the Pending Requests table. Some background The first question that they ask is if there is a way to not require them (the CA Manager) to approve the request as this slows down the process of getting the certificate issued. From a technical perspective most of you would know that the answer is YES, you can configure the certificate template to automatically issue. However, this is NOT a good thing to do, and is seen as a Microsoft CA vulnerability; if you have a CA audit happen you might fail the audit because you allowed this. This specific vulnerability is considered the ESC1 vulnerability. ESC1 wants either an Enrollment Agent to cross sign the certificate request, a CA Manager to review the request, or both to validate the information in the Subject Alternative Name (SAN), when the certificate template’s Subject Name tab is set to “Supply in the request”, before allowing the certificate to be issued. This is recommended since the submitter is allowed to enter unvalidated information in the SAN, unlike when the certificate templates Subject Name tab is configured for “Build from this Active Directory information”. How to protect the template against ESC1? Given this background information, you should already be thinking to yourself, “Rob is not going to tell me to break anything security wise.”, and you would be correct. Rather, I am going to tell you that any certificate template that you have configured for “Supply in the request”, should at a minimum be configured to require CA Manager approval. Then for something like the certificate template that Network Device Enrollment Services (NDES) uses for its certificate, I would advise you to use the Enrollment Agent configuration. The Exchange Enrollment Agent (Offline request) template has the Enhanced Key Usage (EKU) of “Certificate Request Agent”, and this is the certificate NDES uses to sign the Certificate Service Request (CSR) that the SCEP client sends to the NDES Server. Of course, I am just giving some good examples of real-world certificate templates that you are going to be using within the environment. The last part is that the security permissions SHOULD be locked down as to who can enroll for each of these certificate templates. Specifically, enrollment for the two Certificate templates needed by the NDES services, it should be the CA Manager NDES Admin and the NDES Server. The Exchange Enrollment Agent (Offline request) and CEP Encryption certificate templates should be locked down as to who can request enrollments. Just like the custom Adatam Web Server certificate template, only IIS (Internet Information Services) Admins, and IIS Web Servers should have access to this template to be able to enroll with it. So what can you do for me here? Let’s first discuss the scenario that I am going to cover in the blog. Although I would love to cover all the possible uses that all you lovely internetz users might have for certificate enrollment, this blog will have to end at some point. The Scenario IIS Admins are tired of remembering to go to all their web servers and request new certificates for them before they expire. The CA Manager is also tired of the IIS Admins always sending emails nagging that they need their certificate enrollment requests issued. Then always having to go to the Certification Authority snap-in to approve/issue the same certificates over and over each year because of rules that web server certificates can only be valid for 398 days. See (https://thehackernews.com/2020/09/ssl-tls-certificate-validity-398.html) What is the solution? Side bar: If you want to modify the settings of any default certificate template, it is best to duplicate the original certificate template and then make changes to it. This is recommended so that you always have the default templates available in case you must create a new template in the future that is based off the original template. If the original template is modified two to three years down the line, you may not remember what was changed so that it could be changed back to the original template configuration. As far as naming goes, we would recommend that you put your company name or initials in the template name and keep the original template name after that. In this blog you will see the template used is called Adatam Web Server. This is a customized template based off the Web Server template. Keep in mind that this can be done for any certificate template that has the Subject Name tab configured for “Supply in the request”, this not limited to just web server certificates. I am in, so what’s next As you can imagine, there are several things that need to be configured to get this working: A Security group needs to be created for Users who are going to request the certificate via the Local Computer Certificate enrollment wizard based on the certificate template. A security group needs to be created for the computer accounts that need the certificate issued based on the security template. Certificate template needs to be created. Certificate template changes need to be made to support this enrollment method. Certificate template Permissions need to be configured. Group Policy setting for Computer Certificate Autoenrollment Security groups need to be created. The first two steps should be self-explanatory as to how to create groups and set up the group scopes. We are not going to cover group creation in this blog. I do want to point out one thing that happens often: Most Administrators seem to remember that if you add a user to a group, the user needs to log off and back on before the group can be added to their tokens. When adding a computer account to a new group it also needs to log off and back on before the group membership can be added to its token. Typically, the log off and back on for a computer will be a computer reboot; that needs to happen after the new group membership is added to its token. Certificate Template creation and changes The base template that you use to duplicate can of course be anything you would like, but in our example, we are just going to duplicate the good’ol faithful Web Server certificate template. Launch the Certificate Template snapin: CertTmpl.msc Find the certificate template named: Web Server Right click on the Web Server template and select Duplicate Template. The Compatibility tab, set the values as you wish. NOTE: Stay away from using anything higher than Windows Server 2012 R2/Windows 8.1 for your templates if you are using CEP and CES as these two web services have problems seeing templates with compatibility higher than this. The General tab, type in a descriptive name for the new certificate name you are configuring. The Request Handling tab, set the values that make sense for your template. NOTE: It might make sense to set the checkbox “Renew with the same key”. The Cryptography tab, you may want to modify the Minimum key size value and select the Provider Category and Providers that makes sense for the certificate templates use. NOTE: I would strongly suggest NOT setting Use alternate signature format on the template either. This is a proprietary format that many applications will not understand. This check box will only be available when you are using a Key Storage Provider (KSP) provider type. The Issuance Requirements tab is where the heavy lifting is happening. Check the box “CA certificate manager approval”. Select the radio option “Valid existing certificate” under the Require the following for reenrollment section toward the bottom of the dialog box. The Security tab is where the security groups that were created for the server admins and the servers themselves need to be configured on the template. You would add both security groups, and they only need the Allow Enroll permissions. Neither group should have the Autoenroll permission defined on it. When done setting the other options for the template, click the OK button. Setup the computer certificate autoenrollment group policy Next, we are not going to cover how to create a Group Policy Object, and things like GPO ordering, etc. We are going to discuss just the policy settings that are important for the discussion of this blog. Launch Group Policy Management Console: GPMC.msc Either create a new Group Policy or modify an existing one. Navigate to: Computer Configuration\Policies\Windows Settings\Security Settings\Local Policies\Public Key Policies. Double click on the policy setting “Certificate Services Client - Auto-Enrollment”. Enable the policy, and check the two boxes: Renew expired certificates, update pending certificates, and remove revoked certificates. Update certificates that use certificate templates. NOTE: To learn more about these two settings I would recommend going over to Vadims blog. He does a great job of explaining what each of these do: https://www.sysadmins.lv/blog-en/certificate-autoenrollment-in-windows-server-2016-part-3.aspx Click the OK button on the dialog box. Close the Group Policy Management Editor. Link the Group Policy object to what seems appropriate within your Active Directory structure. Trying to test this feature, but it seems like the renewal does not work. Of course, with any of these things, you should always test things before relying on the solution in a production environment. I do want to caution you about setting up a test environment and then setting up the certificate for a short issuance period as this tends not to work out well for most customers, and they eventually end up calling stating that autoenrollment is not working. There are few things to keep in mind about certificate automatic enrollment / automatic renewal process. The first thing to remember is that certificate auto enrollment / renewal only happens on the following triggers: At User logon, or computer boot, for the corresponding security context. Every 8 hours after user logon, or computer boot. This means that after the user or computer has been logged in or turned on for 8 hours then the auto enrollment code will happen again for the security context in question. To trigger auto-enrollment to run manually you have two options. Run GPUpdate /Force. Part of the function that this does is it causes an autoenrollment cycle to happen. This can be a bit much especially if you are applying a lot of user and computer group policy. This will trigger both computer and user autoenrollment to run. Use one of the two CertUtil command lines based on which security context you want enrollment to run against. For computer: CertUtil -Pulse For User: CertUtil -User -Pulse Certificate renewal WILL NOT happen until 90% of the Certificate lifetime has expired. Trying to use the template setting “Renewal period” does not change this fact. Auto enrollment / renewal attempt MUST happen while the certificate is still valid, and after the start of the 10% certificate lifetime left and the expiration time of the certificate. (MUST NOT BE EXPIRED). Like being unable to re-animate something that is already dead, you cannot renew a certificate that has already expired. The math that needs to be done is: (CertLifeTimeInDays * 24) * .10 The value from the above MUST be larger than 8 hours. Let's do some math Here is an example: Set up a certificate that is valid for two days for testing and we will run through the exercise here: Find out how many hours the certificate is valid for: 2*24 = 48 Hrs. Figure out what 10% of certificate lifetime in hours is: 48 *.10 = 4.8 Hrs. This shows us that for one of these certificates to be renewed, the process that runs only every 8 hours would have to run within this 4.8 Hrs. window. This is going to tell us that sometimes you would get lucky with a certificate renewal attempt being done, but more than likely MOST of the time you would fail to renew the certificate because it would expire before the auto enrollment cycle happens. Another example is a certificate that is valid for 4 days. Let us run through the exercise here. Find out how many hours the certificate is valid for: 4*24 = 96 Hrs. Figure out what 90% of certificate lifetime in hours is: 96 *.10 = 9.6 Hrs. This shows us that for at a 10% lifetime left it is still valid for over 8 hours. This certificate would always get at least one auto enrollment cycle to be run to renew the certificate. Assuming you don’t have anything else wrong, the renewal would happen successfully. This is the minimum lifetime that any certificate testing should be set to. Test, test, and more testing! Well, now you got your test lab, issuing short lived certificates and getting them automatically renewed, but… Now you are noticing that your application is not using the new certificate. Unfortunately, there are going to be some applications for which the automatic renewal might not work out well in your organization. However, the certificate could still be renewed manually by your IIS admins, and it would still not require the CA manager to be involved in the renewal process. The key thing is your IIS Admins would need to go through the manual certificate renewal process BEFORE the current certificate expires, as it is used to cross sign the renewal request. UPDATE 5/30/2024: After release of the blog it was brought to my attention of two different things to consider. First unknown to me (as I am not an IIS support engineer) apparently there is a setting within the IIS Management console to help with updating the site binding configuration so that this automatic renewal behavior would work. This feature is called Certificate Rebind and was new in IIS 8.5. https://learn.microsoft.com/en-us/iis/get-started/whats-new-in-iis-85/certificate-rebind-in-iis85 Second, we recently has a case were the customer had several websites running on an IIS Web Server. These websites all used unique certificates and were all generated manually using the same certificate template. When one of the certificates were ready to be renewed, they found that all website certificates were archived, and only one of the website certificates were automatically renewed. This would be by design behavior. The only thing that we could really recommend in this situation is to use one certificate for all websites and make sure that all the websites DNS names were added to the certificates Subject Alternative Name (SAN) field. Failure to do this will result in going through the entire manual issuance of the certificate all over again. And, going through the CA Manager approval process as well, since this would be a new certificate request. Hopefully, you found some good nuggets of information about how to lockdown certificate templates to protect against ESC1 vulnerabilities and what some of those less often used tabs do. And of course, how the certificate renewal process works, especially around shot lived certificates. Rob “I coulda been a Welder” Greene Extra credit for those who can figure out where the saying came from.14KViews6likes14Comments
AVD SSO with Internal Certificates?
I am helping another team set up AVD SSO and I noticed that its using a self-signed certificate. I've been searching around for information on using an internal CA for the certificate since it is trusted and also available to use. Does any one have any documentation or information I can be pointed to regarding using the internal CA for the certificates instead of the self-signed ones? Just to note, we do not want to use ADFS at all on this setup. I did see some articles about setting up SSO with ADFS and that wouldnt apply to me. thanks in advance! Chris775Views0likes1Comment
Strange root certificate on all websites
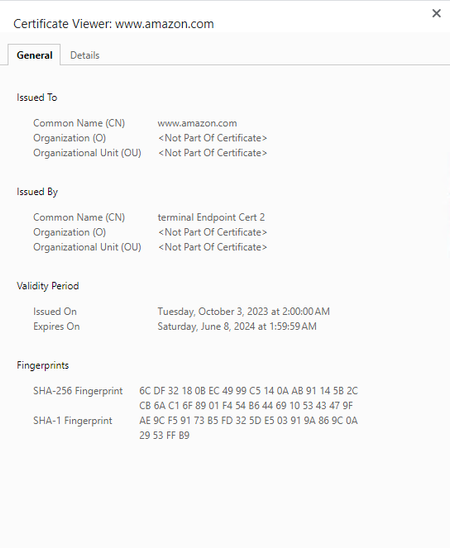
Hello, I have inherited administration Windows Server 2019 which serves as terminal server. Few days ago I noticed some strange certificate, which is stated as certificate issuer on almost all websites. You can see certificate details and certificate hierarchy for site amazon.sk. When I open amazon website on my computer, the certificate issuer is "DigiCert Global Root G2". However, there are some exceptions such as google.com which has the correct "GTS Root R1" certificate issuer. I have also found this strange certificate in certificate manager under trusted root certification authorities. When I disable this certificate the warning "Your connection is not private" appears on all site using this certificate. I have not encountered something like this before and I didn't find any relevant posts on internet. I suppose that this certificate was created by former admin of this server but I am also concerned whether it isn't some security breach. Do anyone have a clue what can cause this weird problem? Thank you in advance.2KViews0likes2CommentsLooking for assistance with NPS cert based Wifi for Macs and PCs
So we have a somewhat unique situation that I am trying to figure out any solution that works.. We are currently using Meraki hardware for our wireless system and we have a directive from management to work to integrate out various systems so that we can deploy a company-wide wireless network(s) that used cert based authentication instead of the current username/password that times out every couple weeks. For further context, we have windows based servers with a local AD domain synced to Office 365. We are also using one of our DCs as a CA, but it is not being used for anything. We have several NPS servers setup and we can get our windows, domain joined machines to work fairly well on the Meraki System. The problem comes in with our Mac users. Our AD domain was setup moons ago when using a .int TLD for the domain name along with other best practice issues that would be too disruptive to properly fix. As of now, we can't get our Mac machines to properly authenticate or trust the Wi-Fi networks when we use the NPS profiles/certs. We did recently get invested in a PKI system through digicert that we are currently using for our Client VPN and have been trying to use auto-enrolled certs from that, but similarly to no avail. The final nail in the coffin is that we are under a budget crunch, so investing in something like JumpCloud or some other online hosted RADIUS service is not happening anytime soon. I have looked at the documentation for Setting up 802.1x and we can do user authentication fairly well, but we have been instructed to get machine/certificate based authentication working. Long story short, what I am hoping to find is an article or video or something that discusses setting up windows NPS to interact with Meraki SSIDs so that both domain joined PCs and non-domain joined Macs can use one or more SSIDs to do cert based authentication.4.5KViews0likes2Comments