azure sql db
111 TopicsLessons Learned #558: What an Execution Plan XML Can Tell Us in Azure SQL Database
During a performance investigation in Azure SQL Database, we requested the execution plan to understand what the query was doing. While reviewing the evidence, the customer asked a broader question: when you open the XML of an execution plan, what do you usually look for? It was a useful question. The graphical plan helps us follow the flow of data, but the XML contains details about parameters, statistics, warnings and execution that can explain why the query behaved as it did. I do not read every attribute. I start with a few checks that help connect the customer symptom to the work performed by the query. In this article, I will walk through those checks: the type of plan, parameter values, estimated versus actual rows and statistics, missing indexes and implicit conversions, and reasons for a serial plan. The XML fragments below are simplified examples that use invented values or are adapted from examples discussed in previous articles in the Lessons Learned troubleshooting series. First check whether the plan contains execution evidence Plan What we can inspect Estimated plan Optimizer choices and estimates; the query has not executed Actual plan Plan plus available counters and warnings from that execution Cached or Query Store plan Compiled plan; normally no operator actuals for the incident For the checks involving actual rows, I request an actual execution plan. In SSMS, use Include Actual Execution Plan, or capture it using SET STATISTICS XML. Choose one method. The latter executes the query and returns its plan. The account needs the permissions to run the statement and SHOWPLAN permission. SET STATISTICS IO ON; SET STATISTICS TIME ON; SET STATISTICS XML ON; -- Execute the SELECT being investigated here. SET STATISTICS XML OFF; SET STATISTICS TIME OFF; SET STATISTICS IO OFF; Save the plan as a .sqlplan file and keep the Messages output. Record when it was captured, the parameters and the reported symptom. An execution captured later may not represent the incident. Review query literals, parameter values and object names before sharing the file. Check the right statement and its parameters A procedure or batch may contain several statements. I locate the relevant StmtSimple and its QueryPlan before interpreting a warning. StatementId and operator NodeId help keep the observations attached to the correct statement and operator; NodeId is not a stable identifier across different compilations. Next, I look at ParameterList. When available, it shows both the value used when the plan was compiled and the value used during the captured execution. <ParameterList> <ColumnReference Column="@CustomerId" ParameterDataType="int" ParameterCompiledValue="(42)" ParameterRuntimeValue="(900)" /> </ParameterList> Here, the plan was compiled with CustomerId 42 and executed with CustomerId 900. If one customer has a few orders and another has thousands, I would compare their data distribution and actual plans. Different values are a reason to investigate parameter sensitivity; they do not prove that plan reuse caused the problem. A missing runtime value means this capture did not provide it. It does not mean the runtime value was the same as the compiled value. Also, eligible queries can intentionally use different plan variants through Parameter Sensitive Plan optimization. Make the comparison match the application If the query is slow in the application but fast in SSMS, I compare the SQL text, parameter types and values, database context and session options. StatementSetOptions records options associated with compilation. <StatementSetOptions ARITHABORT="true" ANSI_WARNINGS="true" ANSI_NULLS="true" QUOTED_IDENTIFIER="true" ANSI_PADDING="true" CONCAT_NULL_YIELDS_NULL="true" NUMERIC_ROUNDABORT="false" /> A difference in context can help explain why the application and SSMS use different cached plans. I capture both rather than assuming that a fast SSMS execution represents the application. The difference itself still needs to be connected to the measured performance. Compare estimated and actual rows then inspect statistics I follow the rows through the plan and look for the first useful difference between what the optimizer expected and what the operator actually processed. <RelOp NodeId="3" PhysicalOp="Index Seek" LogicalOp="Index Seek" EstimateRows="100"> <RunTimeInformation> <RunTimeCountersPerThread Thread="0" ActualRows="20000" ActualRowsRead="80000" ActualExecutions="1" /> </RunTimeInformation> <!-- Access details omitted --> </RelOp> In this single-execution example, the operator estimated 100 rows and returned 20,000: a 200-fold underestimate. It also read 80,000 rows. I would ask why the estimate was inaccurate, and why the operator read substantially more rows than it returned. These are separate questions. For repeated or parallel operators, account for executions and threads before comparing totals. Do not add the rows from every operator to calculate the query result size. The next question is often whether the statistics were out of date. OptimizerStatsUsage identifies statistics consulted during compilation, where that information is exposed. <OptimizerStatsUsage> <StatisticsInfo Schema="[PlanXmlLab]" Table="[Orders]" Statistics="[IX_Orders_CustomerId]" LastUpdate="2026-10-10T07:00:00" SamplingPercent="20" ModificationCount="15000" /> </OptimizerStatsUsage> I check the relevant statistics object, its LastUpdate, SamplingPercent and ModificationCount together. An old timestamp or a low sampling percentage alone does not prove that it caused the estimate. Updated statistics cannot explain every discrepancy; parameter values, predicates and data distribution also matter. The XML describes the statistics consulted at compilation. To check their current state, I use sys.dm_db_stats_properties, as shown next. A subsequent update does not rewrite the evidence in an already saved plan. Check when the statistics were last updated -- Run in the affected database and set the actual table name. SELECT st.name AS statistics_name, sp.last_updated, sp.rows, sp.rows_sampled, sp.modification_counter FROM sys.stats AS st OUTER APPLY sys.dm_db_stats_properties( st.object_id, st.stats_id) AS sp WHERE st.object_id = OBJECT_ID(N'PlanXmlLab.Orders'); last_updated identifies the latest statistics update; rows and rows_sampled describe the population and sample at that update. modification_counter counts modifications to the leading statistics column since the update. Metadata visibility and permissions can affect the output. Compare this information with the same statistics object in the plan. Timestamps alone do not tell us whether the update was automatic or manual. If an update is justified, validate it in a controlled comparison using the same query and representative parameters, and capture a newly compiled plan. Read the access path alongside the row counts An Index Seek can still read many rows. I inspect SeekPredicates, any residual Predicate and ActualRowsRead where available. A broad seek range followed by filtering can explain why the rows read greatly exceed the rows returned. Likewise, a Key Lookup may be inexpensive once but expensive when repeated for thousands of rows. A scan can be the right choice when a large part of the table qualifies. The operator name is a starting point; the amount of work tells us more. For the customer, the useful explanation is concrete: this operator returned many more rows than expected, these were the statistics used, and this is the next comparison that will help establish why. That is more informative than recommending a statistics update from the timestamp alone. Read missing indexes and conversion warnings as clues Missing-index messages are easy to notice. I inspect the suggestion, but I also check whether it fits the query and the existing indexes. <MissingIndexes> <MissingIndexGroup Impact="85.0"> <MissingIndex Schema="[PlanXmlLab]" Table="[Orders]"> <ColumnGroup Usage="EQUALITY"> <Column Name="[CustomerId]" ColumnId="2" /> </ColumnGroup> <ColumnGroup Usage="INCLUDE"> <Column Name="[Amount]" ColumnId="3" /> </ColumnGroup> </MissingIndex> </MissingIndexGroup> </MissingIndexes> This example suggests a key on CustomerId with Amount included for coverage. EQUALITY and INEQUALITY describe predicate columns, while INCLUDE describes covering columns. The suggestion does not settle every detail of index design. Impact is an estimated reduction in optimizer cost. A value of 85 does not promise an 85% reduction in elapsed time. The XML may contain more suggestions than the graphical plan displays. Review existing indexes and write overhead, then measure the candidate change. Check which side of the predicate is converted <Warnings> <PlanAffectingConvert ConvertIssue="Seek Plan" Expression="CONVERT_IMPLICIT(nvarchar(50),[dbo].[Customers].[Code],0)" /> </Warnings> In this separate example, I would inspect the Code column type and the application parameter declaration. A varchar column compared with an nvarchar parameter can introduce a conversion on the column side because nvarchar has higher type precedence. The warning identifies something that may affect the plan, not a measured root cause. Whether a conversion prevents an efficient seek depends on the types, collation and expression. Test an appropriate parameter declaration while preserving required character semantics, and compare results, reads and CPU. A conversion in the projection is different from one in a search predicate. Look for an explicit reason when the plan is serial Customers sometimes ask why a query does not run in parallel when the database has multiple vCores. I look for NonParallelPlanReason in QueryPlan before assuming that more resources or a higher MAXDOP will change the result. <QueryPlan DegreeOfParallelism="0" NonParallelPlanReason="TSQLUserDefinedFunctionsNotParallelizable"> <!-- Other properties omitted --> </QueryPlan> Reason What I inspect next MaxDOPSetToOne Effective MAXDOP setting or query hint TSQLUserDefinedFunctionsNotParallelizable Scalar UDF and its inlining behavior NonParallelizableIntrinsicFunction The specific intrinsic function referenced A serial plan can be appropriate. The attribute can identify a restriction, but its absence does not fully explain the optimizer decision. Scalar UDF inlining can remove a restriction without guaranteeing parallel execution. DegreeOfParallelism="1" does not demonstrate parallel work. In Azure SQL Database, check database-scoped MAXDOP and query hints. More vCores do not override every restriction or guarantee selection of a parallel plan. Lessons learned The answer to the customer was a reading process: identify the statement and capture type, inspect parameters, compare estimated and actual work, and investigate the relevant statistics and warnings. Each observation should help us ask a better question and select a useful test. For a before-and-after comparison, preserve the query, parameters, data and relevant settings. Compare returned results, logical reads, CPU and duration. A plan describes one compilation or execution; Query Store can help establish whether the behavior changed over time. A short checklist Confirm that the plan belongs to the affected statement and execution. Check parameter values and the application context. Compare estimated and actual rows, accounting for repeated work. Inspect compilation statistics and their current update metadata. Review missing indexes, implicit conversions and serial-plan reasons. Validate the explanation with a measured comparison.Azure SQL Data Sync Retirement: Migration Insights and Modern Alternatives
What started as a routine customer discussion quickly evolved into a strategic modernization conversation. A service that had quietly synchronized business-critical data for years was approaching retirement, prompting an important question: What should organizations do next? Every service retirement is an opportunity to reassess architecture, reduce technical debt, and build for the future. When a Retirement Notification Becomes a Business Conversation Recently, while working with a customer, we reviewed their Azure SQL Database architecture and discovered a critical dependency on SQL Data Sync For years, the service had reliably synchronized data across multiple databases, enabling applications, reporting workloads, and distributed business processes. Like many organizations, the customer viewed Data Sync as infrastructure that simply worked in the background. However, the discussion took a different turn when we reviewed Microsoft's retirement announcement: Azure SQL Data Sync will be retired on September 30, 2027. What initially appeared to be a migration challenge quickly became an opportunity to modernize the customer's data movement architecture and align with Microsoft's future investments in data integration, analytics, and cloud-native services. Understanding SQL Data Sync Azure SQL Data Sync was designed to synchronize selected data between Azure SQL Databases and, in some cases, between Azure and on-premises databases. Organizations have commonly used Data Sync for: Hybrid data synchronization Distributed application architectures Globally distributed applications Bi-directional data synchronization While the service has served customers well, organizations should begin evaluating alternative solutions now to ensure sufficient planning, testing, and adoption time before retirement. Because both databases were already in Azure, the discussion quickly moved toward identifying strategic alternatives. Customer's Setup This particular customer had a simple, familiar layout: one Azure SQL Database feeding another, both fully in Azure, connected by SQL Data Sync. No on-premises leg, no complicated topology — just two cloud databases that needed to stay aligned. Their requirements were equally straightforward, and honestly, the kind every team asks for: Reliable, dependable synchronization Low operational overhead — nobody wanted a new system to babysit Something with a real future, not another service on a retirement countdown Room to scale as data volumes grow An Azure-native fit, not a bolt-on third-party tool Because both databases already lived in Azure, the conversation moved quickly toward the platform's own native tooling — starting with the option that ended up being the strongest fit. Option 1: Azure Data Factory (Recommended Strategy) For customers running Azure SQL Database to Azure SQL Database synchronization, Azure Data Factory (ADF) emerged as the strongest strategic recommendation. Why ADF? Azure Data Factory provides: Fully managed Azure-native data movement Enterprise-grade monitoring Flexible orchestration Scalability from development through production environments Long-term Microsoft investment and support The migration pattern we typically recommend looks like: Phase1 :Initial Full Load Before anything can stay in sync, both sides need to start from the same place. Phase 1 is a one-time bulk copy: Azure Data Factory reads everything from the source database and writes it into the target, establishing a clean baseline. Phase2 :Incremental Synchronization Once both databases match, you don't need to keep copying everything — just what's changed. This is where Change Tracking (CT) or Change Data Capture (CDC) comes in: SQL Server-native features that flag which rows were inserted, updated, or deleted since the last run. ADF's incremental pipeline reads only those deltas and applies them downstream, on whatever schedule the business needs — minutes, hours, or daily. Phase 3: Scheduling and Monitoring Once both phases are live, ADF takes over the operational side: scheduling pipeline runs, monitoring their health, retrying failures automatically, and alerting your team when something needs attention. That's a level of visibility SQL Data Sync's built-in sync groups never really offered ADF handles: Scheduling Pipeline execution Monitoring Retry mechanisms Alerting This model often delivers greater visibility and operational control than traditional SQL Data Sync implementations. When You Don't Need Synchronization — You Need a Copy Partway through the engagement, one question reframed the whole discussion: do we actually need two-way synchronization, or do we just need a readable copy of the database somewhere else? That distinction matters more than it sounds, and it points to three other options worth knowing. Option 1: Active Geo-Replication If the goal is disaster recovery, serving read traffic closer to users, or keeping the business running through a regional outage, Active Geo-Replication is usually a better fit than rebuilding sync logic from scratch. It gives you a continuously updated, readable secondary — not a bi-directional sync target. Best fit Disaster recovery scenarios Read-intensive applications Global user distribution Secondary readable databases Less ideal for Complex data transformations Bi-directional updates Option 2: Database Copies and Read Replicas Some organizations do not require continuous synchronization at all. In those cases: Read Replicas Database Copy Good Use Cases Reporting databases Analytics environments Refreshable staging systems Read-only workloads This approach significantly reduces architectural complexity while still meeting many business requirements. Option 3: Microsoft Fabric Mirrored Databases As Microsoft Fabric adoption grows, another interesting alternative is Fabric Mirrored Databases. This option is particularly attractive for organizations already investing in: Microsoft Fabric OneLake Real-time analytics AI and data platform modernization Benefits include: Near real-time data availability Simplified analytics architecture Integration with Fabric workloads Reduced data silos For customers modernizing both operational and analytical platforms, this can be an excellent opportunity to rethink data architecture beyond simple synchronization. Option 4: Azure Functions for Event-Driven Synchronization Not every customer requires a large orchestration platform. For lightweight or application-specific synchronization logic, Azure Functions may offer a more agile approach. Example Use Cases Event-driven updates Custom business rules Microservices architectures Low-volume synchronization requirements The tradeoff is that customers assume additional development and operational responsibilities Lessons Learned from the Customer Engagement This engagement reinforced several important lessons: Don't Wait Until 2027 Although retirement is over a year away, large organizations often require significant planning, testing, governance approvals, and deployment cycles. Starting early reduces risk. There Is No Universal Replacement The right solution depends on: Latency requirements Read versus write workloads Synchronization direction Operational complexity DR requirements Budget limitation Different use cases require different migration paths. 3. Migration Is an Opportunity Rather than simply replacing SQL Data Sync, organizations should evaluate: Data architecture modernization Observability improvements Operational simplification Fabric adoption opportunities Long-term cloud strategy Final Recommendations For most customers currently using Azure SQL Database → Azure SQL Database synchronization: Requirement Recommended Solution Ongoing synchronization Azure Data Factory + CDC/Change Tracking Read-only replica Active Geo-Replication Simple duplication Database Copy or Read Replica Analytics modernization Fabric Mirrored Databases Event-driven custom logic Azure Functions In my customer's use case, Azure Data Factory with incremental changes (CDC) emerged as the preferred strategic path because it was Azure-native, scalable, supported long-term, and aligned with Microsoft's future direction for data movement and integration. Closing Thoughts Technology retirements often create urgency, but they also create opportunity. retirement of SQL Data Sync is not merely a migration project. It is an opportunity to reassess data movement architecture, improve resiliency, reduce technical debt, and embrace modern Azure-native services. If your organization is currently using SQL Data Sync, now is the right time to inventory your sync groups, identify dependencies, and begin evaluating alternative architectures before September 30, 2027. References SQL Data Sync Retirement Migration Guide What is SQL Data Sync for Azure SQL Database? SQL Data Sync retirement: Migrate to alternative solutionsMigrate to Azure SQL Database, including Hyperscale, straight from Azure Arc (public preview)
The challenge Most organisations do not run in one place. Estates stretch across on-premises datacentres, hybrid deployments and the cloud, and every migration decision must balance application dependencies, operational requirements and a modernization roadmap that is already in motion. Mixed environments and legacy dependencies make that harder, and needing a different tool for assessment, migration, monitoring and management harder still. The result is more operational effort, inconsistency between teams, and modernization that moves slower than anyone wants. Azure Arc already solves the first half of that problem. It discovers and assesses SQL Server estates at scale, so you know which databases are ready to move. The second half has been the gap: once a database is identified as migration-ready, the path to Azure SQL Database runs outside Arc. You leave the experience you were working in, learn Azure Database Migration Service, configure a Self-hosted Integration Runtime, and juggle several tools to get one database across. That fragmentation costs time, and it is one of the reasons why assessments do not turn into migrations. What's new Azure Arc Database Migration now adds Azure SQL Database; including Hyperscale as a supported migration target, in public preview. You can migrate Arc enabled SQL Server databases to Azure SQL Database through a single, guided experience in the Azure portal. Behind that experience, the workflow integrates Azure Database Migration Service and streamlines Self-hosted Integration Runtime setup directly into the migration journey. You assess, configure, migrate, monitor and complete the migration without leaving Arc. This is a logical migration performed by DMS through the Self-hosted Integration Runtime, so there is no separate staging step for you to plan or maintain but it requires a planned downtime. Why Hyperscale For many teams, the database that most requires modernizing is also the largest one they run. Hyperscale is the Azure SQL Database service tier built for exactly that case: a fully managed platform designed to scale storage and compute independently as a workload grows, so a large SQL Server database can move to a managed service without being re-architected first. Making Hyperscale reachable from Arc matters because it removes a decision point from the middle of the journey. The databases Arc flags as migration-ready are often the ones whose size is used to rule out a managed destination; and now the assessment and the target sit in the same place. One portal, one operational model The principle has not changed: one portal for discovery, assessment and migration. The entire migration lifecycle is managed from a single tool in the Azure portal; assess readiness, select a target, configure settings, choose databases and tables to migrate, monitor progress and validate the results. Migrating to Azure SQL Database follows the same operational model already available for existing migration scenarios in Arc. The same migration dashboard, the same monitoring experience and the same guided workflow apply regardless of destination. That reduces the learning curve, keeps operational processes consistent, and lets your team choose the most appropriate Azure SQL platform for each database without changing migration methodology. How it works The flow starts where you already are, in the Database migration pane of your Arc-enabled SQL Server instance. Assess in Arc. Readiness assessments are generated automatically every weekend, and you can run one manually in a few minutes if you would rather not wait. SQL Server migration in Azure Arc is available by default for Arc-enabled SQL Server instances starting with SQL Server 2014 (12.x). Choose your target. Select Azure SQL Database, including the Hyperscale service tier, for the databases the assessment identified as ready. Set up DMS and SHIR, guided. The portal walks you through creating the Azure Database Migration Service resource and registering a Self-hosted Integration Runtime, inside the same workflow rather than as separate homework. Migrate. DMS performs a logical migration of your schema and data to the Azure SQL Database target through the integration runtime. Monitor and Completion. Track progress on the migration dashboard you already use, validate the results when the migration is completed. Microsoft Copilot is built into the Database migration pane to help you along the way. Why SHIR, and what it means for you The Self-hosted Integration Runtime secures bridge that it acts as the connectivity layer that enables Azure Database Migration Service to securely connect to the source SQL Server and the target Azure SQL Database for data movement. Azure DMS is a fully managed service for migrations to Azure data platforms and can be driven from the Azure portal, PowerShell or the Azure CLI — the runtime is simply how it gets to your source. In practice, setup is guided and one-time. You register the runtime once during the migration workflow, and subsequent migrations from the same environment reuse it. Nothing about how you operate your Arc-enabled instances changes. Learn more details in the technical documentation. Get started Trying the preview takes three things: an Arc-enabled SQL Server instance, a recent readiness assessment, and a target Azure SQL Database. In the Azure portal, open your Arc-enabled SQL Server instance, go to the Database migration pane, review the assessment results, and choose Azure SQL Database as your target. The portal takes it from there. Learn more: SQL Server migration in Azure Arc What is Azure Database Migration Service Create a Self-hosted Integration Runtime Step-by-step guidance for the new target We want your feedback For product feedback, feature requests, or migration pain points you'd like the team to track and act on, please share them through aka.ms/sqlfeedback under the Migration & Modernization category.441Views0likes0Comments
Automating Azure SQL DB index and statistics maintenance using Elastic Jobs.
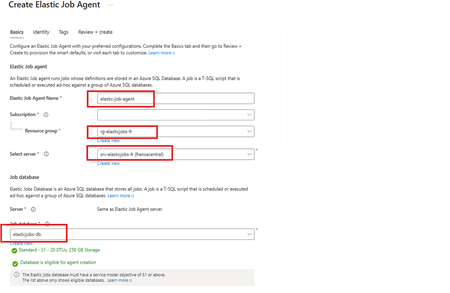
Using as a reference of this article. Automating Azure SQL DB index and statistics maintenance using Azure Automation | Microsoft Community Hub To provide complete solution to maintain you Azure SQL DB statistics and maintenance we provide our maintenance script here What's an elastic job? Create and schedule elastic jobs that periodically run against one or many Azure SQL databases. The jobs run Transact-SQL (T-SQL) queries and perform maintenance tasks. What's required? Create an empty Azure SQL Database with the S1 tier or higher. The Elastic Job Agent will use this database to store job information, job definitions, and other related data. The database must be created on the same Azure SQL Server as the Elastic Job Agent. During the Elastic Job Agent setup, this database is used as the job database. Microsoft Entra authentication with a user-assigned managed identity (UMI) (recommended). The elastic job must be able to log in to each target server or database. Create an elastic job agent. It’s a managed service that lets you run and schedule jobs across Azure SQL databases. Creating the Azure SQL database and UMI should be fairly straightforward, but I’ve included the code below in case you’d like to follow along. # This is sample code, so feel free to replace the names and location with the values that suit your environment. # Resource Group New-AzResourceGroup -Name "rg-elasticjobs-fr" -Location "FranceCentral" # Azure SQL Database - Elastic Jobs New-AzSqlServer -ResourceGroupName "rg-elasticjobs-fr" -ServerName "srv-elasticjobs-fr" -Location "FranceCentral" -ExternalAdminName "XXXXXXXXX@msft.com" -EnableActiveDirectoryOnlyAuthentication New-AzSqlDatabase -ResourceGroupName "rg-elasticjobs-fr" -ServerName "srv-elasticjobs-fr" -DatabaseName "elasticjobs-db" -Edition "Standard" -RequestedServiceObjectiveName "S1" # Azure SQL Database - Target New-AzSqlServer -ResourceGroupName "rg-elasticjobs-fr" -ServerName "srv-target-fr" -Location "FranceCentral" -ExternalAdminName "XXXXXXXXX@msft.com" -EnableActiveDirectoryOnlyAuthentication New-AzSqlDatabase -ResourceGroupName "rg-elasticjobs-fr" -ServerName "srv-target-fr" -DatabaseName "target-db" -Edition "Standard" -RequestedServiceObjectiveName "S0" -SampleName "AdventureWorksLT" # User Managed Identity New-AzUserAssignedIdentity -ResourceGroupName "rg-elasticjobs-fr" -Name "umi_fr_user" -Location "francecentral" In the search box at the top, type Elastic Job Agent, then select it and create a new Elastic Job Agent. On the identity tab, select the UMI and then click on Review + Create Now, let's create a target group (The set of servers, pools, and databases to run a job against.) and add targets for the jobs. Elastic Jobs Agent - Jobs - Target Groups - Create, once created, then click on the name, create again and add a Target Group Member. On each of the target databases, create the required objects for the maintenance script, create a contained user linked to the UMI, and grant the user the permissions needed to run the job scripts. Note: This is sample code. Please adjust the permissions based on your requirements and apply least privilege. Next, let’s schedule a job! For an Elastic Job that runs once every week, the ISO 8601 repeating interval is: P1W Add steps to each elastic job. A target group must be chosen for each job step. If you would like to see the current status of the jobs, head to Jobs, Job Executions. If further information is required, connect to the elasticjobs-db database and run the following query: SELECT TOP (10) * FROM jobs.job_executions WHERE lifecycle <> 'Succeeded' ORDER BY create_time DESC; References: Automation in Azure SQL overview - Azure SQL Database & Azure SQL Managed Instance & Azure Synapse Analytics | Microsoft Learn Elastic Jobs Overview - Azure SQL Database | Microsoft Learn Create, configure, and manage elastic jobs - Azure SQL Database | Microsoft Learn Disclaimer Please note that products and options presented in this article are subject to change. This article reflects for Azure SQL Database in September 2026. I hope this article was helpful for you, please feel free to share your feedback in the comments section.435Views1like1CommentLessons Learned #553: Before Troubleshooting SQL Server, Find Out Who Generated the Error
Recently, I reviewed a customer case where an application intermittently reported: com.microsoft.sqlserver.jdbc.SQLServerException: The statement did not return a result set. The issue occurred during a specific period and was no longer reproducible. Instead of starting troubleshooting from the database side, my first objective was to answer a simpler question: Who is actually generating this error: SQL Server Engine or the JDBC driver? Step 1 – Is this a SQL Server Engine error? A useful first check is sys.messages. SQL Server exposes its system-defined error messages through this catalog view, so I can search for the reported text: SELECT message_id, severity, text FROM sys.messages WHERE text LIKE '%did not return a result set%'; The sys.messages catalog view contains the system error messages available in SQL Server. If I find the error there, I have a good reason to continue investigating the SQL Server Engine error number, severity, conditions, and associated diagnostics. In this case, however, the message led me in another direction. An important caveat: not finding a message in sys.messages does not by itself prove that SQL Server or Azure SQL Database cannot be involved. Errors can also originate from drivers, operating systems, network libraries, gateways, application frameworks, or custom code. However, it is a very useful way to reduce the troubleshooting scope. Step 2 – Follow the component mentioned in the exception The exception class itself provided the next clue: com.microsoft.sqlserver.jdbc.SQLServerException. This pointed directly to the Microsoft JDBC Driver for SQL Server, so instead of continuing with database-side diagnostics, I decided to inspect the driver implementation. The driver is open source and its code is available in the Microsoft GitHub repository: microsoft/mssql-jdbc The Java source code is located under: src/main/java/com/microsoft/sqlserver/jdbc/. This directory contains the implementation of the JDBC driver, including connection handling, statements, prepared statements, result sets, exceptions, and resource messages. Step 3 – Search for the exact error text I searched the source code for: The statement did not return a result set. The message is defined in: src/main/java/com/microsoft/sqlserver/jdbc/SQLServerResource.java as: {"R_noResultset", "The statement did not return a result set."} This was already an important finding. The exact message is defined inside the JDBC driver. Step 4 – Search for R_noResultset The next step was to search for the resource identifier: R_noResultset This led to: src/main/java/com/microsoft/sqlserver/jdbc/SQLServerPreparedStatement.java where the driver contains the following logic: if (EXECUTE_QUERY == executeMethod && null == resultSet) { SQLServerException.makeFromDriverError( connection, this, SQLServerException.getErrString("R_noResultset"), null, true); } Now the meaning of the customer's error becomes much clearer. The application executed the statement using an operation equivalent to: executeQuery() but after processing the response: resultSet == null Therefore, the JDBC driver raises this exception when executeQuery() is used but, after processing the response, no ResultSet is available (resultSet == null). Step 5 – Now investigate the database execution Only at this point would I move deeper into the SQL execution. The question is no longer: Why did SQL Server fail? It becomes: Why did this execution not return the ResultSet that the JDBC application expected? For example: IF Condition = 1 BEGIN SELECT ... END One execution might produce: Condition = TRUE -> SELECT -> ResultSet -> executeQuery() succeeds while another could produce: Condition = FALSE -> No SELECT -> No ResultSet -> JDBC raises the exception This could also explain why the customer's issue was intermittent. At that stage I would investigate the stored procedure, parameters, conditional branches, DML operations, multiple result sets, and the application's use of executeQuery(), executeUpdate(), or execute(). The troubleshooting lesson The most useful part of this case was not only understanding this particular exception. It was the troubleshooting process: Customer error -> Who generated it? -> Search sys.messages -> Engine error? YES -> SQL Server troubleshooting NO / unclear -> Identify client component -> Search its source code -> Locate exact message -> Find where it is raised -> Understand the condition -> Return to SQL Server with a focused hypothesis When the client component is open source, its source code can become another diagnostic tool. Instead of collecting large amounts of database telemetry, we can first determine which component generated the error and why. One final consideration: always check the JDBC driver version used by the customer and, when possible, inspect the corresponding GitHub release or tag rather than relying exclusively on the current main branch. Sometimes a few lines of source code can significantly reduce hours of troubleshooting.317Views0likes0CommentsLessons Learned #539: Azure SQL DB Scale-Down from S3 to S2 Can Fail When Change Feed Is Enabled
Recently, I worked on a service request where a customer reported that an Azure SQL Database could not be scaled down from Standard S3 to Standard S2. The operation failed with the following message: "An unexpected error occurred while processing the request". During the troubleshooting process, we reviewed the database configuration to identify any setting that could prevent the scale-down operation. As part of that review, we executed the query select * from sys.databases and observed that the column is_change_feed_enabled had a value different from 0. This indicated that Change Feed was enabled on the database and, according to the current documentation, this setting is not supported when scaling down to Standard S0, S1, or S2 After disabling Change Feed by running EXEC sys.sp_change_feed_disable_db; we were able to complete the scale-down operation successfully.897Views0likes0CommentsLessons Learned #552:10 Lines in an SSMS MSAL Trace That Tell You Almost Everything You Need to Know
In one of our support cases, a customer reported higher-than-expected connection times when connecting from SQL Server Management Studio (SSMS) to Azure SQL Database using Microsoft Entra authentication. The behavior was also not completely consistent. Sometimes the connection required interaction with the account selection experience. Other times, subsequent connections were noticeably faster. At first, there were several possible areas to investigate: Was Azure SQL taking too long to authenticate the user? Was there a networking, proxy, or firewall issue? Was access to login.microsoftonline.com being delayed or denied? Was Microsoft Entra authentication itself taking the time? Was Conditional Access or MFA involved? Was SSMS using the expected Microsoft Entra account? Was the delay happening before or after the access token was obtained? The important question became: Where exactly was the connection time being spent? Instead of treating the SSMS connection as a single operation, I enabled verbose MSAL tracing in SSMS and started following the authentication process. SSMS exposes the MSAL Output Window Trace Level under Tools → Options → Azure Services. The same options page exposes the Microsoft Entra authority, Azure SQL Database service principal name, and Web Account Manager settings. The resulting trace was large—hundreds of lines. But while analyzing it, I realized something useful: I didn't need to understand every line in the MSAL trace. A small number of search strings were enough to reconstruct almost the entire authentication story. These are the 10 things I learned to look for. 1. CorrelationId — First, make sure I am following the same authentication request One of the first things I learned was not to read the trace only by timestamp. MSAL performs several related operations: GetAccounts. AcquireTokenSilent. ReadAccountById AcquireTokenInteractive Broker operations Token cache operations Some can happen almost at the same time, and they don't necessarily share the same correlation ID. For example, in one reproduction, the silent authentication attempt had one correlation ID, while the subsequent interactive request used another one. So my first search became: CorrelationId I learned not to calculate latency by simply subtracting two nearby timestamps. First I identify: Operation + CorrelationId + Start / End and only then interpret the timing. This becomes particularly valuable if the logs later need to be correlated with identity-service investigations. MSAL exposes the correlation ID specifically to piece together an authentication flow. 2. ApiId — Was SSMS trying silent or interactive authentication? My second search became: ApiId In the first connection attempt I found: ApiId - AcquireTokenSilent That immediately told me that SSMS was not initially trying to display an authentication UI. It first attempted to obtain the token silently. But later in the same reproduction I found: ApiId - AcquireTokenInteractive Now the flow was becoming clearer: SSMS ->AcquireTokenSilent -> Silent authentication cannot continue -> AcquireTokenInteractive This was my first important lesson from the case: An SSMS Microsoft Entra connection isn't necessarily interactive from the beginning. MSAL can first try silent authentication and only switch to an interactive mechanism if necessary. Microsoft documents MsalUiRequiredException precisely for situations in which a non-interactive acquisition cannot continue without user interaction—for example because sign-in, MFA, consent, or another requirement must be satisfied. 3. Authority — Where was the authentication request actually going? The next thing I wanted to know was whether the delay could be associated with reaching Microsoft Entra. I searched for: Authority - The trace showed: Authority - https://login.microsoftonline.com/<tenant-id>/ This single line gives us two very important pieces of information: https://login.microsoftonline.com/ -> Microsoft Entra tenant -> Identity authority That means that before blaming Azure SQL, I can establish which identity endpoint SSMS/MSAL is using. This is also where a frequently reported problem such as: "It looks like access to login.microsoftonline.com is denied." can be investigated much more precisely. If I see something such as: MsalServiceException StatusCode: 403 AADSTS.... then I need to inspect the Microsoft Entra response and its error code. If I see a DNS, TLS, proxy, connection timeout, or similar exception, the network path to the identity endpoint becomes much more relevant. Those are very different problems. MSAL distinguishes client/library errors (MsalClientException), token-provider/service responses (MsalServiceException), and scenarios requiring interaction (MsalUiRequiredException). Network failures that MSAL doesn't handle are propagated to the application. One thing I would not conclude from a 403 alone is: "The firewall is blocking login.microsoftonline.com." The ErrorCode, AADSTS code, StatusCode, and ResponseBody together are much more useful than the HTTP status alone. 4. Scopes — Which resource was SSMS requesting the token for? Another line that became essential was: Scopes - Our trace showed: Scopes - https://database.windows.net//.default This helped me separate two parts of the connection that are easy to mix together: Microsoft Entra Authority login.microsoftonline.com -> issues / obtains identity token Token requested for database.windows.net -> Azure SQL The Authority tells me where authentication is being performed. The scope tells me for which resource the token is being requested. SSMS documents https://database.windows.net/ as the Azure SQL Database service principal name used when obtaining a Microsoft Entra token. That gave me another troubleshooting rule: Don't treat a Microsoft Entra token acquisition problem and an Azure SQL authorization problem as the same thing. 5. LoginHint — What identity did SSMS suggest? The next search gave us one of the most interesting findings of the investigation: LoginHint In one reproduction we had: LoginHint provided: True and later: LoginHint - user@contoso.com In another reproduction, a different login hint was supplied, and MSAL eventually returned: MsalUiRequiredException ErrorCode: no_account_for_login_hint with the explanation that no account in the token cache matched that login hint. At first sight, it is tempting to interpret: no_account_for_login_hint as: Incorrect username But the other traces showed me that this interpretation is too simplistic. LoginHint is better understood as: "Try to locate or preselect this identity" It doesn't necessarily mean: "This is already the resolved MSAL account" . That distinction turned out to be very important. 6. Account provided and GetAllAccounts — LoginHint and Account are not the same thing This became perhaps my favorite finding from the investigation. I started searching for: GetAllAccounts and: Account provided In one trace we had: GetAllAccounts ... found 1 accounts but: LoginHint provided: True Account provided: false MSAL nevertheless ended with: no_account_for_login_hint This originally looked contradictory. There was an account in the cache, but MSAL said there was no account for the login hint. It isn't contradictory. What I learned was: An account exists ≠ An account matching this LoginHint exists Then I captured another scenario: LoginHint provided: False Account provided: Account username: user@contoso.com Now SSMS/MSAL wasn't trying to resolve a textual login hint. It already had a concrete account. I started thinking of the two cases like this: LoginHint -> "Try this identity" Account provided -> "Use this resolved identity" This distinction can be especially useful when investigating aliases, UPNs, multiple Windows accounts, cached identities, or cross-tenant accounts. The same error can also have another explanation Another reproduction made the lesson even clearer. This time the trace started with: GetAllAccounts ... found 0 accounts Found 0 RTs and 0 accounts SSMS attempted: LoginHint provided: True Account provided: false and again received: ErrorCode: no_account_for_login_hint But this time the UPN itself was valid. The cache simply contained no suitable account. So another important lesson was: Never diagnose no_account_for_login_hint from the error text alone. Check GetAllAccounts, LoginHint, and Account provided together. 7. ErrorCode, AADSTS, StatusCode — The error tells me where to investigate next At this point I realized that one of the fastest troubleshooting searches was simply: ErrorCode together with: AADSTS StatusCode ResponseBody MsalUiRequiredException MsalServiceException MsalClientException For example: MsalUiRequiredException ErrorCode: no_account_for_login_hint immediately tells me that I am still dealing with token acquisition/account resolution. I haven't reached the point where Azure SQL database permissions would explain this particular failure. This became my mental decision table: Evidence in the trace Where I would investigate first no_account_for_login_hint LoginHint / cached account / account resolution MsalUiRequiredException Why silent authentication requires interaction authentication_canceled Interactive UI / broker / user cancellation AADSTSxxxxx Microsoft Entra authentication or policy MsalServiceException Token provider/service response MsalClientException Client/library/device side DNS/TLS/proxy exception Connectivity to identity service Access token obtained successfully Move the investigation beyond token acquisition 8. Broker, WAM, authorization_type — Who was really authenticating me? This was another part that changed how I read SSMS authentication traces. I searched for: Broker WAM RuntimeBroker auth_flow authorization_type and found: Broker is configured followed by: Using Windows account picker and: Calling SignInInteractivelyAsync The telemetry then reported: auth_flow: Broker authorization_type: Interactive So the authentication path was more accurately represented as: SSMS -> MSAL -> Windows Web Account Manager -> Account / authentication broker -> Microsoft Entra WAM is a Windows component that MSAL can use as an authentication broker. It can integrate with accounts already known to Windows and provide SSO and account-selection capabilities. But another trace showed: authorization_type: WindowsIntegratedAuth during a silent acquisition. That taught me something else: The same SSMS connection target does not necessarily follow the same identity path every time. Account state, cache state, WAM, tenant, identity configuration, MFA, Conditional Access, and whether interaction is required can all affect the path. 9. AccessToken returned — This is the line that changes the investigation Eventually, I found the line that I consider one of the most useful in the entire trace: AccessToken returned: True In our successful authentication we also had: AccessToken Type: Bearer and later: === Token Acquisition finished successfully source: Broker This became a very useful troubleshooting boundary for me: Identity troubleshooting: Account LoginHint MSAL WAM MFA / CA Authority Token acquisition -> AccessToken returned: True -> Azure SQL Token validation Principal resolution Database authentication Authorization Permissions If the token has been successfully obtained, asking: "Why can't MSAL authenticate?" is probably no longer the most useful question. Now I want to know: "What happens when this token is presented to Azure SQL?" That doesn't prove that the complete SQL connection will succeed, but it gives us a very useful point at which to change troubleshooting direction. 10. DurationTotalInMs — Finally, I could see where the connection time was going This was the original reason for the support investigation. The customer reported high connection times. So eventually the most important searches became: DurationTotalInMs DurationInHttpInMs DurationInCacheInMs request_duration time_in_queue_ms Microsoft defines DurationTotalInMs as the total time spent by MSAL acquiring a token, including network and cache operations. DurationInHttpInMs represents time spent in HTTP calls made by MSAL to the identity provider, and DurationInCacheInMs measures cache activity. And now we finally had evidence from our reproduction. The first token acquisition reported: DurationTotalInMs: 2185 DurationInCacheInMs: 0 DurationInHttpInMs: 0 But the broker telemetry contained another very interesting metric: time_in_queue_ms: 2152 and request_duration: 2183 That changed the quality of the diagnosis completely. Instead of saying: "SSMS authentication seems to take around two seconds." I could say: The captured token acquisition took approximately 2.18 seconds, and approximately 2.15 seconds were represented as broker queue time in the MSAL/WAM telemetry. That is actionable evidence. Putting the 10 searches together By the end of the investigation, this became the sequence I would use when somebody sends me an SSMS MSAL trace: Search for What I want to know CorrelationId Am I following the same authentication operation? ApiId Silent or interactive token acquisition? Authority Which Microsoft Entra endpoint and tenant? Scopes Which resource is the token intended for? LoginHint Which identity did SSMS suggest? Account provided / GetAllAccounts Is an identity already resolved or cached? ErrorCode / AADSTS Why did the authentication step fail? Broker / WAM / authorization_type Which authentication mechanism actually handled the request? AccessToken returned / source: Was a usable token obtained, and from where? DurationTotalInMs and related metrics Where was the authentication time spent? With those ten searches, a trace containing hundreds of lines becomes much easier to read. Appendix – Sanitized MSAL Trace Sample The following extract is a sanitized and condensed version of the MSAL trace used in this investigation. User names, tenant IDs, correlation IDs, account identifiers, and other PII have been replaced with placeholders. The goal is to provide a practical sample where you can apply the 10 searches described in this article. First connection ==== GetAccounts started ==== GetAllAccounts ... found 0 accounts Found 0 RTs and 0 accounts in MSAL cache === AcquireTokenSilent Parameters === LoginHint provided: True Account provided: false Authority - https://login.microsoftonline.com/<tenant-id>/ Scopes - https://database.windows.net//.default ApiId - AcquireTokenSilent CorrelationId - <correlation-id-1> === Token Acquisition (SilentRequest) started === MsalUiRequiredException ErrorCode: no_account_for_login_hint No account was found in the token cache having this login hint. MSAL then moved to interactive authentication: === InteractiveParameters Data === LoginHint provided: True Prompt: select_account Authority - https://login.microsoftonline.com/<tenant-id>/ Scopes - https://database.windows.net//.default ApiId - AcquireTokenInteractive LoginHint - user@contoso.com CorrelationId - <correlation-id-2> Broker is configured Using Windows account picker Calling SignInInteractivelyAsync The broker successfully obtained the token: auth_flow: Broker authorization_type: Interactive time_in_queue_ms: 2152 request_duration: 2183 WAM response status success Successfully retrieved token AccessToken returned: True AccessToken Type: Bearer === Token Acquisition finished successfully === source: Broker DurationTotalInMs: 2185 DurationInCacheInMs: 0 DurationInHttpInMs: 0 Second connection A few seconds later, the account was already available: GetAllAccounts ... found 1 accounts Returning 1 accounts === AcquireTokenSilent Parameters === LoginHint provided: False Account provided: Account username: user@contoso.com Authority - https://login.microsoftonline.com/<tenant-id>/ Scopes - https://database.windows.net//.default ApiId - AcquireTokenSilent CorrelationId - <correlation-id-3> This time the broker completed the request silently: Acquiring token silently authorization_type: WindowsIntegratedAuth auth_flow: AT request_duration: 2 WAM response status success Successfully retrieved token AccessToken returned: True === Token Acquisition finished successfully === source: Broker DurationTotalInMs: 13 DurationInCacheInMs: 0 DurationInHttpInMs: 0 What changed? First connection No account → LoginHint → AcquireTokenSilent → no_account_for_login_hint → Interactive / WAM → Token → 2185 ms Second connection Resolved Account → AcquireTokenSilent → WAM → Token → 13 ms These extracts contain the main strings I now look for when reviewing an SSMS MSAL trace: CorrelationId ApiId Authority Scopes LoginHint Account provided / GetAllAccounts ErrorCode / AADSTS Broker / WAM AccessToken returned DurationTotalInMs397Views0likes0CommentsLessons Learned #540:Bulk Insert Throughput in Azure SQL Hyperscale with Partitioned Heap Tables
In this lesson learned, I would like to share an interesting scenario working on a service request where our customer was running a high-volume data load process in Azure SQL Database Hyperscale. The workload was based on a common pattern: Recreate a staging table. Load a large number of rows using bulk insert. The bulk insert showed unstable execution times and became the main area to investigate. The process was loading a very large number of rows into an Azure SQL Database Hyperscale database. The process used a staging table that was initially loaded as a heap. The main concern was the inconsistent execution time during the load process. Why Manually Adding Data Files Was Not the Right Direction In Azure SQL Database Hyperscale, the storage architecture is different from a traditional SQL Server deployment. The data layout and storage management are handled internally by the service. Because of this architecture, manually creating or pre-allocating multiple data files is not the same tuning option that we may consider in SQL Server on-premises or SQL Server running on Azure Virtual Machines. For this reason, the troubleshooting focus moved from manual file layout configuration to the actual workload pattern, waits, concurrency, batch size, and staging table design. What We Observed During the bulk insert phase, waits such as PAGELATCH_EX were observed. Since the staging table was loaded as a heap and the clustered primary key was created only after the bulk insert completed, OPTIMIZE_FOR_SEQUENTIAL_KEY was not directly applicable to the bulk insert phase. This changed the direction of the investigation. Instead of focusing on last-page insert contention on an existing clustered index, the analysis moved toward heap insert behavior, allocation contention, concurrency, batch size, and whether a different staging table design could help. First Recommendation: Start with Low-Impact Changes Before changing the table design, the first recommendation was to test the least intrusive changes: Reduce the number of concurrent bulk insert sessions. Increase the batch size, for example from 10,000 rows to 50,000 or 100,000 rows. Test TABLOCK on the dedicated heap staging table. The goal was to avoid assuming that more concurrency would always reduce the total execution time. In some high-volume load scenarios, excessive concurrency may increase contention and make the process less stable. The Interesting Design Option: Partitioned Heap Staging Table One of the most interesting design options was to evaluate a partitioned heap staging table. The idea is simple: instead of loading all rows into a non-partitioned heap staging table, the staging table can be created on the same partition scheme used by the target table, using the same partitioning column. This does not mean that a partitioned heap will always be faster. However, it can be a useful design option when: The bulk load phase is affected by allocation or latch contention. Concurrent load processes can naturally distribute rows across different partition ranges. The staging table is used only as an intermediate structure.Lessons Learned The main lessons from this scenario were: In Azure SQL Database Hyperscale, manually managing multiple data files is not the right tuning direction. PAGELATCH_EX during heap loading may point to concurrency or allocation-related contention. Reducing concurrency can sometimes improve total throughput. Larger batch sizes may provide better results than many small batches. TABLOCK on a dedicated heap staging table is a low-impact test worth evaluating. A partitioned heap staging table can be a valid second-phase design option when the load can be distributed across partition ranges. The best approach is to test small, measurable changes before introducing architectural redesigns. Final Thoughts A partitioned heap staging table can be a powerful option, but only when it is tested carefully and when the workload pattern can benefit from partition distribution.248Views0likes0CommentsLessons Learned #542: Reviewing Historical Azure SQL Database Storage Growth
This week I worked on a service request where our customer needed to understand how an Azure SQL Database had grown over time. This information can be useful for capacity planning, cost analysis, and performance reviews. There are several possible approaches, depending on whether we need to review recent historical data that is still available in Azure Monitor, or whether we need to start collecting long-term historical data from now on. In this lesson learned, I would like to summarize some of the options available. 1. Reviewing recent historical data using Azure Monitor metrics The first point to clarify is how Azure Monitor metrics retention works. Most Azure platform metrics are retained for up to 93 days. However, a single Azure Monitor Metrics chart can query no more than 30 days of data at a time. This means that, if the data is still within the Azure Monitor retention window, we might need to review the metric in 30-day intervals. For Azure SQL Database storage usage, the metric commonly used is Data space used 2. Exporting metrics to Log Analytics for long-term analysis If the requirement is to perform long-term analysis, I would like to recommended option is to enable Diagnostic Settings on the Azure SQL Database and send the metrics to a Log Analytics workspace. Azure SQL Database diagnostic telemetry can be exported to different destinations, including: Log Analytics workspace Storage Account Event Hubs Using Log Analytics provides a very flexible way to query, aggregate, and visualize the data by using KQL. Once the metrics are available in Log Analytics, we can calculate the monthly database growth. For example: AzureMetrics | where ResourceProvider =~ "MICROSOFT.SQL" | where ResourceId == "/SUBSCRIPTIONS/your subscription/RESOURCEGROUPS/yourresourcegroup/PROVIDERS/MICROSOFT.SQL/SERVERS/yourserver/DATABASES/yourdatabase" | where MetricName == "storage" | summarize arg_max(TimeGenerated, Average) by Month = startofmonth(TimeGenerated) | project Month, DataSpaceUsedGB = round(Average / 1024 / 1024 / 1024, 2) | order by Month asc This query takes the last available value for each month and converts the metric from bytes to GB. Depending on the analysis requirements, the query can be customized. 3. Creating a custom database space usage history process If we need more control, or if we want to collect more granular database-level information, another option is to create a custom process that periodically captures the current database space usage into a table. This approach can be useful when we want to keep the information inside the database itself and avoid depending on external telemetry storage for this specific requirement. For example, the following table can be used to store daily or weekly snapshots: CREATE TABLE dbo.DatabaseSpaceUsageHistory ( SnapshotTimeUtc datetime2(3) NOT NULL DEFAULT SYSUTCDATETIME(), DatabaseName sysname NOT NULL, DataAllocatedMB decimal(19,2) NULL, DataUsedMB decimal(19,2) NULL, DataUnusedMB decimal(19,2) NULL, LogAllocatedMB decimal(19,2) NULL ); --Example collection query: INSERT INTO dbo.DatabaseSpaceUsageHistory ( DatabaseName, DataAllocatedMB, DataUsedMB, DataUnusedMB, LogAllocatedMB ) SELECT DB_NAME() AS DatabaseName, SUM(CASE WHEN type_desc = 'ROWS' THEN size END) * 8.0 / 1024 AS DataAllocatedMB, SUM(CASE WHEN type_desc = 'ROWS' THEN FILEPROPERTY(name, 'SpaceUsed') END) * 8.0 / 1024 AS DataUsedMB, ( SUM(CASE WHEN type_desc = 'ROWS' THEN size END) - SUM(CASE WHEN type_desc = 'ROWS' THEN FILEPROPERTY(name, 'SpaceUsed') END) ) * 8.0 / 1024 AS DataUnusedMB, SUM(CASE WHEN type_desc = 'LOG' THEN size END) * 8.0 / 1024 AS LogAllocatedMB FROM sys.database_files; This process can be executed daily, weekly, or monthly using the automation method that best fits the environment. This approach provides more control over the data collected, the retention period, and the frequency of collection.240Views0likes0CommentsLessons Learned #543: Evaluating MultiSubnetFailover with Azure SQL Database
Last week, I worked on a support case in which the use of the MultiSubnetFailover connection-string feature was being considered for an application connecting to Azure SQL Database. The expectation was that enabling the following option could improve connection recovery during a database failover changing MultiSubnetFailover to True. This option is commonly associated with SQL Server high availability, and Azure SQL Database is also designed to remain available by moving databases between replicas when required. However, after reviewing the Azure SQL Database connectivity architecture and comparing the behavior with the property enabled and disabled, I did not observe a clear improvement. The property could be added to the connection string without generating an error, and the application was able to connect successfully with both configurations. What MultiSubnetFailover is designed for MultiSubnetFailover was introduced primarily for SQL Server high-availability configurations such as: Always On Availability Group listeners. SQL Server Failover Cluster Instance virtual network names. In a multi-subnet Availability Group, a listener name may resolve to multiple IP addresses located in different network subnets. Without MultiSubnetFailover=True, the application may try those addresses sequentially. If the first address is not currently active, the connection can be delayed while the attempt waits for a timeout. When the option is enabled, supported SQL client drivers can attempt connections to the listener addresses in parallel and use the first address that responds successfully. This can reduce connection time after an Availability Group failover because the SQL client is directly involved in selecting the reachable listener address. Why Azure SQL Database is different Azure SQL Database uses a different connectivity architecture. The application connects to a logical server endpoint: <server-name>.database.windows.net. The Azure SQL connectivity layer receives the connection and routes it to the infrastructure currently hosting the database. Depending on the configured connection policy, the Azure SQL gateway either proxies the connection or redirects the application to the appropriate database node. The important difference is that the SQL client does not receive a list containing the IP addresses of the Azure SQL Database primary and secondary replicas. The decision and the associated routing are managed by the Azure SQL Database platform. Although Azure SQL Database internally uses multiple replicas for high availability, this is not the same connectivity model as a SQL Server Availability Group listener that publishes multiple addresses through DNS. What about Failover Groups? Azure SQL Database Failover Groups provide a stable listener endpoint such as: <failover-group-name>.database.windows.net. Following a regional failover, the listener is updated so that it points to the logical server hosting the new primary databases. This process depends partly on DNS. The listener name remains the same, but its DNS target changes after the failover. This is still different from a SQL Server multi-subnet Availability Group listener. The Failover Group listener does not expose the addresses of the Azure SQL Database replicas to the SQL client. Therefore, MultiSubnetFailover=True cannot directly select the new primary replica. In this scenario, application recovery continues to depend on the service transition, DNS resolution, and retry behavior. The importance of retry logic One of the main lessons from this case was that retry logic is more relevant to Azure SQL Database resiliency than enabling MultiSubnetFailover. An application connecting to Azure SQL Database must expect occasional transient connectivity errors. These can occur during maintenance, scaling, failover, network interruptions, or temporary service conditions. An appropriate retry strategy should normally include: A limited number of retry attempts. A short delay before the first retry. Increasing delays between subsequent attempts. A maximum retry interval. Creation of a fresh SQL connection. For transactions, retry logic requires additional care. The application must determine whether the transaction was committed, rolled back, or left in an unknown state before repeating the complete operation.