azure openai
96 Topics
Building a Self-Updating RAG System: Handling Document Uploads, Updates and Deletions
The Hidden Challenge of Production RAG Imagine your organization has deployed an AI assistant to answer questions about employee policies. An employee asks, “How many days of annual leave am I entitled to?” The assistant responds confidently: “15 days.” There is just one problem. The company updated its policy last week. Employees are now entitled to 20 days. The updated PDF was uploaded successfully. The storage service is healthy. The search index is responding. The language model is generating answers without errors. Yet the answer is wrong. This is a different kind of production failure. Nothing appears to be broken at the infrastructure level. The failure lies in the relationship between the source document and the information the AI retrieves. Retrieval-Augmented Generation (RAG) systems depend on external knowledge to ground their responses. But that knowledge is not static. Policies change, contracts get revised, product documentation evolves, and outdated documents are removed. When the underlying documents change, the associated chunks, embeddings, metadata, and search-index entries must be managed accordingly. Otherwise, the system can continue generating plausible answers from information that is no longer valid. Building a RAG pipeline is a retrieval problem. Keeping it correct as data changes is a data lifecycle engineering problem. In this article, we will design a self-updating RAG system that handles document creation, updates, and deletion while addressing asynchronous processing, version consistency, failed jobs, and stale retrieval results. The goal is not simply to index documents automatically. It is to make sure that the right version of the right document is available to the right user when a query is executed. Understand the Problem Before Designing the Architecture A basic RAG pipeline is relatively straightforward: Load a document. Extract its text. Split the text into smaller chunks. Generate an embedding for each chunk. Store the chunks and embeddings in a searchable index. Retrieve relevant chunks when a user asks a question. Pass the retrieved context to a language model to generate an answer. This works well when the document collection is relatively static. The difficulty begins when the source data changes after indexing. Consider three common scenarios. Scenario A: A document is uploaded A new policy is added to the knowledge base. The system must process it and make its content searchable. Until indexing finishes, the document may not be available to the chatbot. Scenario B: A document is updated The original policy allows 15 days of annual leave. A revised policy allows 20 days. If the new version is indexed without correctly deactivating the old version, both versions may appear in search results. The language model may then select the wrong passage or combine conflicting information. Scenario C: A document is deleted An administrator removes a document from the application. However, deleting the original PDF from storage does not automatically delete the corresponding records from Azure AI Search. The content may remain searchable until its indexed chunks are removed. Azure AI Search document deletion itself can also take time to be reflected in index statistics. Microsoft Learn: Delete documents in Azure AI Search These scenarios reveal an important design principle: The source document, its metadata, the background processing jobs, and the search index must be treated as parts of one logical lifecycle—even though they are separate systems. We need a design that can handle failures between these systems without exposing outdated or unauthorized content. Design the System Around Clear Responsibilities Rather than making the upload API responsible for every operation, we can separate the system into a document management path, an asynchronous processing path, and a query path. The Proposed Architecture The design uses the following components: Component Responsibility Azure Blob Storage Stores the original document files Azure Cosmos DB Maintains document metadata, versions, and lifecycle state Azure Service Bus Queues ingestion and deletion jobs Background worker Extracts text, creates chunks, generates embeddings, and updates the index Microsoft Foundry Provides the models used for embedding generation and response generation Azure AI Search Stores searchable document chunks, metadata, and vectors FastAPI Exposes document management and chat APIs Microsoft Agent Framework Supports agentic query workflows when multi-step reasoning or tool use is required The background worker can be implemented as a separate Python service or another suitable compute component. It does not have to be part of the FastAPI process. Why separate these responsibilities? Suppose a user uploads a 100-page contract. The application may need to extract text, split thousands of characters into chunks, generate embeddings, and send multiple indexing requests. Performing all of that synchronously inside the upload request increases latency and makes the API vulnerable to timeouts. Instead, FastAPI accepts the request, persists the document and its metadata, and arranges for the work to be processed asynchronously. The worker performs the expensive operations independently. This allows ingestion to scale separately from query traffic and makes retries easier to manage. The query path remains separate: it retrieves eligible, relevant chunks and uses them to ground the model's response. Establish a source of truth Azure Cosmos DB should hold the authoritative lifecycle metadata in this design. Azure AI Search is the retrieval index, not the authority on whether a document is currently active. For example, a document record might look like this: { "id": "policy-123", "documentId": "policy-123", "currentVersion": 2, "indexedVersion": 1, "status": "PROCESSING", "blobPath": "policies/leave-policy.pdf" } Here, version 2 is the desired version, but version 1 is still the last successfully indexed version. The application must not assume that the latest upload has already become searchable simply because the metadata record has been updated. This distinction between the desired version and the indexed version is central to reliable lifecycle management. Implementing Document Uploads A reliable upload operation involves more than storing a file and sending a message to a queue. It must establish a durable record of the document, identify the version being processed, and ensure that background processing can be retried safely. Step 1: Accept and persist the document When a client uploads a document, FastAPI validates the request, checks the user's permissions, and stores the original file in Azure Blob Storage. The application then creates or updates the document metadata in Cosmos DB. At this stage, the document can be marked as PROCESSING until the ingestion pipeline completes. Step 2: Schedule background processing The system creates an ingestion job containing enough information for the worker to locate the source and determine exactly which version to process. For example: { "operationId": "op-789", "operation": "INGEST", "documentId": "policy-123", "documentVersion": 2, "blobPath": "policies/leave-policy-v2.pdf" } The worker should process the specified version rather than blindly reading whatever file happens to exist at a mutable storage path. For systems that overwrite the same blob path, use blob versioning, an immutable version-specific path, or another mechanism that ensures the worker reads the intended content. Step 3: Extract, chunk, and embed The worker downloads the appropriate document and extracts its text. The extracted text is divided into chunks. Each chunk should carry identifiers that connect it to its parent document and version. For example: { "id": "policy-123-v2-chunk-001", "documentId": "policy-123", "documentVersion": 2, "chunkNumber": 1, "content": "Employees are entitled to 20 days of annual leave." } The worker generates an embedding for each chunk and writes the chunk, its metadata, and its vector to Azure AI Search. The exact index schema depends on the retrieval strategy, embedding dimensions, filtering requirements, and whether hybrid search is used. Step 4: Mark the version as indexed After the worker confirms that all required indexing operations succeeded, it updates the document metadata to record the indexed version and processing status. For example: { "id": "policy-123", "currentVersion": 2, "indexedVersion": 2, "status": "ACTIVE" } This update must be conditional on the document still being at version 2. If a newer version has already been uploaded, the older job must not mark itself as the current version. Why idempotency matters Distributed systems can deliver the same job more than once. A worker may finish indexing but fail before acknowledging the queue message. The message can then be delivered again. If every attempt creates new chunk IDs, duplicate content may accumulate in the index. A practical solution is to derive chunk IDs deterministically from the document ID, version, and chunk identifier. Reprocessing the same version then targets the same index records instead of creating a new set each time. This does not eliminate every failure mode, but it makes repeated indexing much safer. Azure Service Bus supports duplicate detection for eligible tiers, but queue-level duplicate detection is not a substitute for idempotent worker logic. Microsoft Learn: Duplicate detection Updating Documents Without Serving Stale Content Document updates are the most interesting part of the lifecycle because they introduce a consistency problem. Imagine the current leave policy is version 1, allowing 15 days. An administrator uploads version 2, allowing 20 days. The worker starts processing version 2, but embedding generation takes time. Meanwhile, users continue querying the application. What should those users see? There are two common strategies. The right choice depends on whether the system prioritizes availability or strict freshness. Strategy A: Make the new version active after indexing succeeds In this approach, the existing active version remains available while the new version is processed. The workflow is: Create version 2 and mark it as processing. Extract text and generate embeddings for version 2. Index all required version 2 chunks. Verify indexing success. Atomically update the authoritative metadata to make version 2 active. Clean up version 1's indexed chunks asynchronously. This minimizes the time during which the document is unavailable. However, it means that version 1 can remain available while version 2 is being processed. That may be acceptable for some knowledge bases but inappropriate for policies that must become effective immediately. Strategy B: Disable the old version as soon as an update is accepted For high-sensitivity documents, the application can immediately mark the old version as ineligible for retrieval. It then processes the new version and activates it only after successful indexing. The trade-off is that the document may temporarily have no eligible version. The application should return a clear message or use an approved fallback rather than silently serving obsolete information. Prevent old jobs from overwriting new versions Consider this sequence: Version 2 starts processing. Version 3 is uploaded before version 2 finishes. Version 3 finishes indexing first. Version 2 finishes later and attempts to update the metadata. Without version checks, the late version 2 job could incorrectly reactivate stale content. The worker must therefore use conditional updates or optimistic concurrency checks against the authoritative document version. A job may complete its indexing work, but it must not activate its version unless it is still eligible to do so. Handle the lack of a cross-service transaction Cosmos DB and Azure AI Search do not participate in a single distributed transaction in this architecture. A metadata update can succeed while an indexing request fails. An indexing request can succeed while the subsequent metadata update fails. The system should account for these partial failures using: Explicit lifecycle states. Conditional version updates. Retryable and idempotent operations. Periodic reconciliation between metadata and indexed records. The important engineering principle is to make incomplete operations detectable and recoverable, rather than assuming every multi-step workflow succeeds atomically. Deleting Documents Safely Deletion requires special treatment because removing a document from the source does not automatically remove its indexed content. More importantly, waiting for physical index cleanup before preventing retrieval creates a window in which content that should no longer be available may still be returned. Step 1: Make the document ineligible for retrieval When an authorized deletion request arrives, the application updates the authoritative metadata to indicate that the document is being deleted or has been logically deleted. The retrieval path must check that status before using retrieved content. For sensitive documents, this check must happen before the content is added to the LLM context. Merely hiding a document in the user interface is insufficient. Step 2: Schedule physical cleanup The application enqueues a deletion job that identifies the document and all indexed records associated with it. The worker queries or otherwise identifies the corresponding chunk keys and deletes those records from Azure AI Search. The deletion operation should be idempotent. Retrying a deletion for an already-removed chunk should not cause the workflow to fail unnecessarily. Step 3: Verify cleanup The worker checks whether the targeted records have been removed and records the cleanup result. If an operation fails, the job should be retried according to a defined policy. Jobs that continue failing should be sent to a dead-letter queue for investigation and controlled recovery. Azure AI Search supports deleting indexed documents by their document keys. Its documentation also describes how to verify deletion and why index statistics may not update immediately. Microsoft Learn: Delete documents A simplified FastAPI deletion endpoint The following example illustrates the API boundary. The helper functions represent application-specific implementations. from fastapi import FastAPI, HTTPException app = FastAPI() @app.delete("/documents/{document_id}") async def delete_document(document_id: str): document = await get_document_metadata(document_id) if document is None: raise HTTPException( status_code=404, detail="Document not found" ) # Must enforce authorization and use a # concurrency-safe lifecycle transition. await mark_document_deleting(document_id) # The job must be published reliably. await enqueue_deletion_job( document_id=document_id, document_version=document["currentVersion"] ) return { "documentId": document_id, "status": "DELETING" } This is an illustrative example, not a complete production implementation. In particular, the metadata transition and message publication must be coordinated reliably. One approach is the transactional outbox pattern: write the lifecycle change and an outbox event in the same Cosmos DB transactional batch when the data model and partitioning allow it, then publish the event asynchronously. The publisher can retry without losing the intent to schedule cleanup. Deletion must also account for in-flight queries Suppose a query retrieves a document's chunks just before the deletion request is processed. The query might still hold those chunks in memory even after the document is marked deleted. For stricter deletion guarantees, the application needs a defined policy for in-flight requests, cache invalidation, and authorization checks immediately before content is sent to the model. If the requirement is that no response may contain content after a deletion takes effect, that guarantee must explicitly cover requests already in progress. Physical cleanup and retrieval eligibility are separate responsibilities. Both matter. Coordinate Lifecycle Changes Reliably Once ingestion and deletion run asynchronously, the queue becomes part of the system's correctness model. A production worker should not assume that each message is delivered exactly once or that messages for a particular document always finish in order. Design for at-least-once processing A practical worker lifecycle is: Receive a message using a lock-based delivery mode. Validate the document ID, version, and operation. Check whether the operation is still eligible to run. Perform idempotent indexing or deletion. Update lifecycle metadata conditionally. Acknowledge the message only after successful processing. If the worker fails before acknowledging the message, the message may be delivered again. That is expected behavior and should be handled by the design. Add retry and dead-letter policies Not all failures should be treated equally. Transient network errors or throttling may succeed after a delay. Invalid documents, unsupported file formats, and persistent schema mismatches may require manual investigation. The system should use bounded retries with appropriate backoff, record meaningful failure details, and route repeatedly failing messages to a dead-letter queue. Use reconciliation as a safety net Even with retries, the system needs a way to detect inconsistencies that escaped the normal workflow. A reconciliation job can compare authoritative metadata against indexed document versions and lifecycle states. It can identify cases such as: A document marked active whose current version is not fully indexed. Chunks belonging to an obsolete version. Search records for a logically deleted document. An operation that remained in a processing state beyond its expected duration. Reconciliation should repair only states it can safely determine. It should not reactivate a version simply because its chunks exist in the index. For applications using Azure Cosmos DB change feed, document metadata changes can also drive incremental background processing. The change feed captures inserts and updates in its standard latest-version mode; capturing deletions requires selecting and configuring an appropriate supported mode or using explicit lifecycle events. Microsoft Learn: Cosmos DB change feed Where Microsoft Agent Framework Fits A common mistake is to assume that every part of an agentic RAG application should be implemented as an AI agent. Document uploads, version transitions, embedding generation, and index deletion are predictable operations with explicit success and failure conditions. These are generally best implemented with conventional application logic and background workers. Microsoft Agent Framework becomes useful when the query itself requires multi-step reasoning, tool selection, or orchestration. For example, a user might ask: “Compare the current leave policy with the previous version and explain the changes that affect employees.” An agent could use approved tools to retrieve the current policy and the permitted historical version, compare the relevant passages, and generate an evidence-based explanation. The application must still control which documents and versions are eligible for retrieval. The agent should not independently decide whether a deleted document is authorized for use. This distinction is important: deterministic workflows protect data integrity; agentic workflows help solve tasks that benefit from reasoning and tool use. Microsoft Agent Framework provides both agent and workflow capabilities, allowing developers to choose an appropriate orchestration model for the task. Microsoft Agent Framework documentation Production Readiness: What Should We Measure? A pipeline that successfully indexes a document once is not necessarily production-ready. The system needs observable lifecycle states and measurable recovery behavior. Area What to validate Ingestion Can a failed upload or indexing job be retried safely? Idempotency Does processing the same document version twice create duplicate records? Version consistency Can a delayed job reactivate an older version? Deletion Can logically deleted content enter the LLM context? Authorization Are tenant and document-level permissions enforced during retrieval? Recovery Can reconciliation detect and repair partial failures? Observability Can operators identify stuck jobs, indexing failures, and cleanup delays? Performance How long does it take for an accepted update to become searchable? Useful operational metrics include ingestion success rate, queue age, indexing latency, retry counts, dead-letter queue depth, time spent in each lifecycle state, and deletion cleanup latency. Also test race conditions deliberately. Upload a new version while an earlier job is still running. Delete a document while a query is in flight. Simulate an indexing failure after metadata has been updated. Restart a worker after it has indexed content but before it acknowledges the message. These tests expose the problems that a happy-path demonstration will not reveal. Bringing It All Together Keeping a RAG system accurate is not simply a matter of re-running embeddings whenever a file changes. It requires a deliberate lifecycle design that connects source documents, versioned metadata, asynchronous processing, search-index operations, and retrieval-time authorization. Azure Blob Storage can preserve the source documents, Cosmos DB can track authoritative lifecycle state, Service Bus can distribute background work, and Azure AI Search can provide retrieval. Microsoft Foundry supplies the models, while Microsoft Agent Framework can support the parts of the application that genuinely benefit from agentic orchestration. The architecture becomes reliable when it assumes that failures will happen: messages may be repeated, jobs may finish out of order, index operations may partially succeed, and cleanup may take time. Version checks, idempotent operations, explicit lifecycle states, reliable event publication, and reconciliation turn those failure modes into manageable engineering problems. The objective is not merely to keep the index populated. It is to ensure that every answer is grounded in information that is current, eligible, and authorized for the user who asked the question. Further Reading Azure AI Search: Delete documents Azure Cosmos DB: Change feed Azure Service Bus: Duplicate detection Microsoft Agent Framework I'd be interested to hear from engineers building production RAG systems: how do you coordinate document updates and deletions across your source of truth and search index?136Views0likes0CommentsFrom Business Brief to Production Agent: Building in Three Stages, Not One
The problem with "AI can help my business" Every non-technical founder has heard some version of "you should put an AI agent on this." Far fewer have seen what it actually costs, in time and money, to find out whether that's true for their specific business — before committing to it. The honest answer is: it shouldn't cost much at all, if you build it in the right order. Most of the expensive AI project failures aren't failures of the model — they're failures of sequencing. Someone commits to real infrastructure, real hosting, and real integration work before anyone has confirmed the underlying idea even holds up. This post walks through a small, realistic project — an autonomous sales-development agent for a fictitious construction-tech company — built in three deliberate stages, each one cheap enough to abandon and each one answering a different question before the next stage spends any more money or time. The point isn't the specific agent. It's the order of operations: what to validate first, what to validate second, and what you only pay for once everything before it has already been proven. The Brief Hi, I'm looking for someone who can help me grow FieldForge, a SaaS platform specifically for general contractors, remodelers, and design-build companies. I'm not looking for generic lead lists. I need someone who can identify qualified construction companies, reach the owner/decision-maker, start conversations, and book demos that can turn into paying SaaS customers. Your experience with B2B lead generation and appointment setting looks relevant. I'd love to hear how you would approach generating qualified leads and growing a construction-focused SaaS. Translated into engineering terms, that's four capabilities: pull in new leads from a data feed (ingest_permits), decide whether each one is worth pursuing (qualify_lead), draft a personalized first-touch email for the ones that qualify (generate_pitch_email), and hand qualified leads off to an outbound sequence (dispatch_sequence). Nothing about that list requires committing to any infrastructure yet — which is exactly the point of Stage 1. Stage 1: Mock prototype — no AI, no backend, no cost The first stage has no real agent in it at all. It's a Vite + React console with the full intended UI — a strategy pane, a live-feed pane, a lead-dossier pane — wired to hand-written mock data and a fake setTimeout standing in for "the AI is thinking." No model calls, no cloud resources, no backend of any kind. It runs entirely in a browser tab: This is deliberately the cheapest possible way to answer the first real question: does this even make sense as a product, before a single token of inference is spent proving it? Is a 3-pane command console the right way to expose "an agent found and qualified these leads for you"? Is a permit-triggered pitch angle a good hook, or does it look contrived once it's actually on screen? Does a business owner look at this and understand what they're being offered? None of those questions need a real agent to answer — they need a UI a person can click through and react to. Running this stage costs essentially nothing beyond development time: no API calls, no cloud spend, nothing to tear down if the idea doesn't land. Where the AI pair programmer actually did the work. This entire stage — the layout, the state management, the mock data shapes, the interaction flow — was built by describing the product in plain language to an AI coding assistant (GitHub Copilot, Claude) and iterating on the generated code directly, rather than dragging components around in a low-code builder. That distinction matters more than it sounds like it should. A low-code prototype is fast to show, but it's still just a prototype — once a real agent needs to sit behind it, most of that first version gets rebuilt in real code anyway. A pro-code prototype, even a fake one, is a keepable asset: the exact same React components, the exact same UI shell, carry forward unchanged into Stage 2 and Stage 3. Nothing here gets rebuilt later — it gets connected to something real. What this stage proves, and what it deliberately doesn't. By the end of Stage 1, you know whether the product concept and the UX hold up — whether the thing you're describing to a non-technical stakeholder actually makes sense once it's on a screen in front of them. What it tells you nothing about: whether a real model can actually do the reasoning this UI is pretending to show. That's a completely different risk, and it's wrong to pay for cloud infrastructure to find out — it just needs a real agent, still running on a laptop: Stage 2: A real agent, still running on a laptop — the convincing part This is the stage that actually matters most, and it's also the cheapest place to find out if the whole idea works. The fakery gets ripped out and replaced with a genuine agent: a Microsoft Agent Framework Agent, backed by a real model deployment on Microsoft Foundry, given the same four tools from the brief — ingest_permits, qualify_lead, generate_pitch_email, dispatch_sequence — as real Python functions it can actually call. Its reasoning streams live into the same terminal-style pane the mock prototype already had, so nothing about the UI needs to change; only what's driving it does. Crucially, the frontend stays on a local dev server and the agent stays a local process on the same machine. There's no cloud hosting, no production auth, no deployment pipeline — the UI just talks to a locally running agent server over a simple streaming protocol. That's the deliberate design of this stage: the only thing worth testing here is whether the agent is actually good, and every question that matters — does it call tools in a sensible order, does it correctly decide which leads qualify, does its drafted email actually reflect the lead's specific trigger event rather than reading like a template — can be answered without touching a cloud resource. The qualify_lead tool is where this gets concrete: it's handed a target definition — commercial/residential remodelers in a specific revenue band, an active permit filing, still running manual/legacy tooling — and has to decide, per lead, whether it's a fit. You'll see this called an ICP (Ideal Customer Profile) constantly in sales and GTM circles right now, to the point of being a bit of a buzzword. Stripped of the jargon it's just this: a precise, written-down definition of a good-fit customer, specific enough that a model can apply it as consistently as a trained human rep would. The reason it matters isn't the term — it's that the agent's usefulness is bounded entirely by how precisely that definition is written, and this stage is exactly where you find out if yours is precise enough. This is also where model choice gets decided, cheaply. Swapping which Foundry model deployment sits behind the agent, or rewriting the system instructions, costs a restart and a few cents of inference — not a redeploy, not a new pipeline run. If gpt-4o isn't giving good enough qualification judgment, or the reasoning is inconsistent between runs, you find out here, in seconds per iteration, for the price of a handful of API calls. Compare that to discovering the same problem after cloud hosting, authentication, and a production pipeline are already built around it. That's why this stage — not Stage 1 — is the genuinely convincing one. Anyone can mock up a UI that looks like an agent found and qualified a lead. Stage 2 is where you can put a real, unscripted permit feed in front of a real model and watch it reason its way to a defensible qualify/reject decision and a genuinely personalized email, live, for the cost of a few model calls. That's the moment a skeptical stakeholder stops asking "does this actually work" and starts asking "when can we have it." What this stage proves, and what it deliberately doesn't. By the end of it, you know the agent itself is sound — right tools, right order, correct ICP logic, real personalization — for a cost barely above Stage 1's. What it hasn't touched: what happens when a real user hits this over the public internet, how auth works outside your own machine, whether the hosting model you eventually pick can actually serve this reliably. That's a different kind of work, and it starts now that there's finally something worth doing that work for. Stage 3: Quasi-production — translating a proven agent into a running service Stage 2 answers "does the agent work." Stage 3 answers a different question entirely: "can this be handed to someone who isn't on my laptop." That's not a continuation of Stage 2's work — it's a translation of it. The agent's logic, tools, and instructions don't change at all going into this stage; what changes is everything around them, as the same proven Agent gets repackaged into something that can actually run as a service instead of a local process. The agent itself deploys as a Foundry Hosted Agent via azd — no hand-written Dockerfile, no Container App config, no Bicep authored from scratch; Foundry's managed hosting owns the runtime, scaling, and session continuity (via previous_response_id chaining on the Responses protocol), and assigns the agent its own managed identity. The frontend and its API layer become an Azure Static Web App: the React build as static assets, plus a small same-origin Azure Function that reverse-proxies requests to the hosted agent. That proxy exists for a concrete reason — Foundry's hosted-agent endpoint has no CORS support, so a browser calling it directly would simply be refused; routing through a same-origin Function sidesteps that entirely, and keeps the real agent URL and credentials server-side instead of sitting in a public JS bundle. None of that is agent work. It's the operational work of turning a validated prototype into a real, addressable, network-reachable thing — the productionization step every agent eventually needs regardless of how it was built, and the part that's easy to underestimate if you haven't budgeted for it as its own phase. Framed plainly, this stage is where the project stops being "a demo that runs on my machine" and starts being "a small SaaS": something with a real URL, a real hosting bill, real auth, and a real deploy pipeline — everything that separates a working prototype from a thing you could actually put a customer in front of. To be clear about the boundary of "quasi": this is not a fully hardened production system. There's no custom domain, no persistent session store beyond what Foundry provides out of the box, and no load testing. What it is: proof that the exact agent validated in Stage 2 can be deployed, reached over a real network, and driven from a real hosted frontend without silently breaking — the last class of risk that only shows up once something leaves your own machine. What this stage proves, and what it deliberately doesn't. By the end of it, you know the whole pipeline holds together end to end, from a hosted UI through a same-origin proxy to a Foundry-managed agent and back, streaming, over a real deployment. What it doesn't prove: that it holds up under real production load, real customer data governance, or a real incident on-call rotation. Those are legitimate next questions — just not the ones this stage was built to answer, and not ones worth paying for before the first two questions were settled. The pattern, not just the project Line the three stages up and the shape becomes obvious: each one is deliberately the cheapest possible way to eliminate one specific class of risk before the next stage spends real money finding out the hard way. Stage 1 kills product/UX risk for the cost of dev time and zero infrastructure. Stage 2 kills agent-quality risk — the right tools, the right model, correct decisions — for the cost of a few model calls, and it's the stage that actually earns anyone's confidence that this is real. Stage 3 kills operational risk — real hosting, real network, real auth — by translating an already-proven agent into a running service, rather than building all of that around an agent nobody has validated yet. Collapse those stages — build the hosting and the agent and the UI all at once, betting everything up front — and you don't save time. You just move all three classes of failure into the same debugging session, at the point where they're most expensive to disentangle and hardest to tell apart. Staged this way, each phase is cheap enough to walk away from if it fails, and each one only gets built on top of a phase that already earned its place. There's a second half to this story that's deliberately not in this post: the data. Everything here ran on synthetic permit feeds and mock company data — a real deployment lives or dies on where its actual leads come from and how well they're structured for a model to reason over. That's its own story, and it gets a dedicated write-up of its own. Project reference Source code: https://github.com/olivierb123/lead-agent-demo Live demo: https://victorious-glacier-03340ff0f.3.azurestaticapps.net249Views0likes0CommentsVoice agents in Foundry Agent Service: architecture, trust boundaries, and real-audio latency
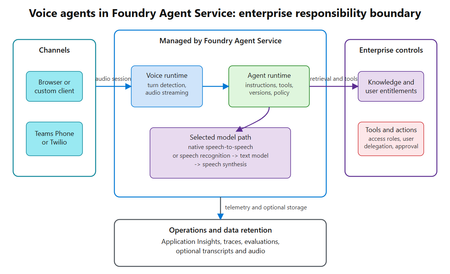
Assess where voice agents in Foundry Agent Service simplify the runtime, where enterprise trust boundaries remain, and what a 300-turn real-audio benchmark reveals about latency across six configurations.425Views0likes0CommentsHow to make AI responses faster on Microsoft Foundry: lessons from 2,040 measurements
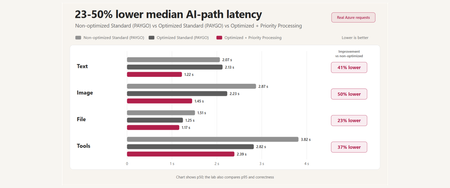
A reproducible Microsoft Foundry performance study covering prompt caching, multimodal input, tool orchestration, MCP lifecycle, Toolbox tool search, and Priority Processing - with correctness and reliability measured alongside latency.590Views0likes0CommentsChoosing a real-time voice architecture on Microsoft Foundry: three enterprise patterns
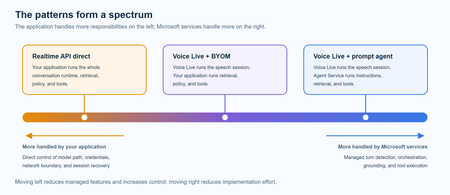
A practical comparison of three real-time voice architectures on Microsoft Foundry, including implementation tradeoffs and four enterprise release gates for residency, networking, retrieval authorization, and tool credentials.952Views2likes0CommentsModel Migration Process on Microsoft Foundry and Azure OpenAI
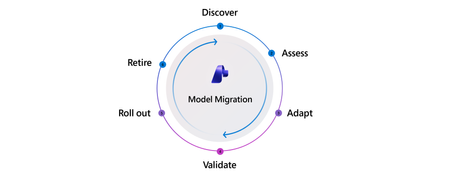
Every app built on an LLM will eventually move to a new model. The model you shipped may be retired, or a newer model may offer better quality, cost, or performance. Changing a model name in code from a retiring model such as gpt-4o to a newer one such as gpt-5.1 may take one line. That line hides a much larger migration. Model failures are often silent to the systems using the model and loud to users. Nothing crashes. Error rates stay flat. Every dashboard says the migration went fine. Meanwhile, responses change shape, summaries become longer and more hedged, JSON fields disappear, and tool calls fire in a different order. Users notice. Support queues grow. Downstream code that depended on the old behavior starts to break. A successful migration preserves the application's behavior or improves it in measurable ways. That requires a repeatable process to detect drift, adapt safely, and prove quality before broad rollout. The model migration process has six phases: Discover → Assess → Adapt → Validate → Roll out → Retire. This article explains what each phase looks like, which Microsoft Foundry tools support it today—including Azure OpenAI capabilities—and where teams still need to build around the platform. It then applies the process to a retail shopping assistant and points to additional resources in Go deeper at the end of this post! Why migrate now Every model has a retirement date. On Microsoft Foundry, generally available models typically ship with a retirement date about 18 months out, and older model families are actively replaced. For example, the model lifecycle and retirement schedule lists gpt-4o (2024-05-13) as retiring on October 1, 2026, with gpt-5.1 as its replacement. What happens at retirement depends on how you buy capacity: Standard, Global Standard, and Data Zone Standard (pay-as-you-go) deployments are auto-upgraded on a rolling, region-by-region schedule. You control the timing with versionUpgradeOption set to one of: OnceNewDefaultVersionAvailable, OnceCurrentVersionExpired, or NoAutoUpgrade. NoAutoUpgrade means the deployment stops working at retirement. Priority Processing follows the same path. Provisioned (PTU) deployments are not auto-upgraded. You migrate them yourself, either in-place (traffic moves over a 20–30 minute window with no downtime) or side-by-side (stand up the new deployment, test, shift traffic, delete the old one). Batch deployments follow the side-by-side path: deploy the new model, resubmit jobs, retire the old deployment. The developer problem is the same in every case: traffic eventually reaches a different model, but the platform cannot tell you whether the application still behaves as it did before. A responding endpoint does not prove that the app behaves correctly. A new model can change formatting, tone, tool-calling behavior, or JSON shape in ways that quietly break downstream code. When should I migrate? Start before the retirement date. Automatic upgrade handles the traffic transition for eligible deployments, but the team still owns behavioral validation. Provisioned deployments also require a manual migration. Microsoft typically makes a replacement available in Global Standard about 90 days before retirement, in provisioned regions about 30 days before retirement, and in standard regions about two weeks before retirement. That gives you time to evaluate the new model on your own terms. Retirement dates cannot be extended. You also do not need a deprecation notice to begin. If a newer model may improve quality, speed, or cost, run it through the process now. Waiting turns the switchover into a slow train wreck: responses drift, parsing becomes brittle, support tickets accumulate, and the team ends up debugging a model it did not choose on a date it did not pick. A deliberate migration makes the retirement date a formality and creates a process the team can reuse. Who this is for This process fits teams that own an LLM-powered feature inside a larger application and run migrations deliberately. It also applies to AI-native platform teams that centrally manage models for other application teams. The phases remain the same, though platform teams may run them faster and in parallel rather than in sequence. Fine-tuned workloads are out of scope here because they cannot be upgraded automatically, have separate training and deployment retirement schedules, and turn the Adapt phase into a distillation or retraining exercise rather than primarily prompt work. The six phases Phase Definition What success looks like Discover Learn that a model change is coming or needed. The team receives a timely, structured signal with the deprecation date, replacement model, and migration window. Assess Choose a target model and confirm that it is operationally available. The team understands the candidates and confirms capacity, region, and SKU before tuning starts. Adapt Replay the current workload on the new model, diagnose changes, and update prompts, parameters, tool definitions, output schemas, and calling code. The team runs side-by-side replay against real or representative traffic, can see the behavioral differences, and records every change. Validate Run the adapted workload against a quality rubric and decide whether it is safe to ship. The team has an evaluation suite that is affordable to run and trusted by application owners and reviewers. Roll out Promote the model through staged production exposure, monitor live behavior, and commit or roll back. Canary or weighted routing is in place, live quality is measured alongside latency and errors, and rollback remains possible. Retire Decommission the old deployment, free capacity, archive evaluation artifacts, and update internal documentation. The old SKU is gone, the deployment count falls, and the team carries what it learned into the next migration. Foundry tools at a glance Microsoft Foundry provide tools for each phase of the Model Migration Process. Phase Microsoft Foundry feature (including Azure OpenAI) Documentation Discover Model retirement schedule, lifecycle policy, Service Health alerts, and Models API lifecycleStatus Model retirement schedule Lifecycle policy Assess Model leaderboards and benchmarks for quality, safety, cost, throughput, and latency; trade-off charts; side-by-side comparison; suggested replacements Model leaderboards and benchmarks Side-by-side compare Adapt Prompt Optimizer in the Foundry Agent playground; agent optimization; simulator for synthetic data Prompt Optimizer Agent optimization Simulator Validate Azure AI Evaluation SDK with 30+ evaluators, LLM-as-judge, graders, and the portal evaluation wizard Azure AI Evaluation SDK Portal evaluation Roll out Automatic upgrade and versionUpgradeOption; provisioned in-place or side-by-side migration; continuous evaluation; Azure Monitor alerts Auto-upgrade with versionUpgradeOption Continuous evaluation Retire Models API to confirm 410 Gone; observability dashboard to track deployment count Models API Observability dashboard Breakdown of each phase 0. Prepare the test dataset Before starting the six phases, build a set of representative inputs, expected outputs, and agreed success criteria. This dataset gates the middle of the lifecycle: Adapt needs inputs for replay, and Validate needs ground truth and scoring criteria. Step 0 describes the workload rather than the candidate model, so it can begin during Discover, before the team selects a target. Build the dataset from captured production traffic or domain examples in .csv or .jsonl. If representative data is not available, use the simulator to generate synthetic inputs. Two practices determine whether this work pays off: Instrument capture before you need it. Production content capture is opt-in and never retroactive. Log prompts, responses, latency, and token counts now so the team has traffic to evaluate later. Freeze the dataset. Keep inputs, ground truths, and success criteria fixed throughout the migration. If they change, source and target results are no longer comparable. You also need an inventory of the model deployments your workload uses, including their deployment types (Standard, Provisioned, or Batch). For each source model, note its retirement date and suggested replacement from the Model retirement schedule. 1. Discover Discover begins when something forces the team to consider a model change: a deprecation notice, a new generally available model, a cost or latency problem, or a capability gap. The phase ends with a decision to begin migration or stay on the current model if it remains stable, performs well, and is not approaching retirement. Foundry tools. The model lifecycle and retirement schedule publishes retirement dates and suggested replacements. The Azure OpenAI model retirements documentation explains notification timing, including at least 60 days for generally available model retirements and at least 30 days for preview model retirements. It also explains how to configure Azure Service Health advisories and use the Models API for programmatic lifecycleStatus and deprecation checks. Those APIs provide the foundation for an internal discovery system. Where it breaks. Customers may learn about a retirement through email, a service health alert, or a production error. By the time the right team sees the signal, it may already be deep into the deprecation window and heading toward retirement. What your team provides. The schedule and Models API expose the data through a stable contract. Mature enterprises may add a thin notification layer that routes it to the right owners. 2. Assess The team chooses a candidate target model and confirms that it is usable: the correct region and SKU, enough quota, and availability alongside the current model so rollback remains possible. Assess also includes projecting monthly cost against historical traffic. Pricing structures change between model generations through reasoning tokens, cached input, structured-output overhead, and other factors. Those changes can move unit economics by 2x or more. For regulated workloads, compliance requirements such as BAA, FedRAMP, and regional Standard versus Global Standard availability may narrow the candidate list before quality testing begins. Foundry tools. Start with the replacement suggested in the retirement schedule, then build a shortlist with model benchmarks, which compare quality, safety, cost, throughput, and latency. Use trade-off charts such as quality versus cost and the side-by-side model comparison for up to three models. Compare context windows, feature support such as function calling, structured output, and vision, and available endpoints. Confirm SKU, region, quota, and upgrade mechanics in the model retirements documentation. Where it breaks. Teams face several plausible candidates, such as gpt-5.1, gpt-5.2, and a nano variant, without clear positioning between them. A selected model may be unavailable in the required region or SKU, a constraint that sometimes appears only after planning is underway. Historical traffic may also show that the new model costs substantially more, forcing an unplanned budget decision. What your team provides. Public benchmarks should filter the candidate list, not make the final decision. Confirm the shortlist against the team's own workload. Build the monthly cost view from token logs and current pricing. 3. Adapt Adapt is often the most time-consuming phase for embedded and product-facing workloads. Validate may take longer for regulated workloads. First, replay the existing workload on the new model without changing it. This isolates changes caused by the model. Diagnose shifts in verbosity, reasoning depth, structured-output adherence, tool-call shape, and latency. Then update the application until it recovers or improves on the previous behavior. Prompt editing is only one part of Adapt. A migration often changes four other surfaces: Parameters. temperature, top_p, max_tokens, and reasoning-effort controls may not map directly between generations. Some are unsupported by newer model families. Tool definitions. Argument names, descriptions, and required fields that reliably guided the old model may need clearer wording or tighter constraints. Output schemas. Structured-output behavior changes between models. A schema the old model followed loosely may need explicit constraints, or the new model may finally enforce it. Calling code. API and SDK differences, including Chat Completions versus Responses, streaming formats, and new or renamed request fields, can require code changes. Downstream parsers may also assume the old response shape. For agentic and workflow workloads, schema and tool-call changes can outweigh prompt changes. Foundry tools. Prompt Optimizer is available through the Optimize button below the system instructions field in the Agent playground. It restructures instructions, explains each change by paragraph, and supports iteration. For example, a team can add a constraint such as "keep the JSON schema exactly" and optimize again. It is a fast first pass for a prompt that would otherwise be rewritten by hand. For agent workloads, agent optimization tunes instructions, tools, and model selection together. Prompt Optimizer and agent optimization are available in Microsoft Foundry, not Azure OpenAI. When production data is unavailable, the simulator can generate synthetic and adversarial inputs. Where it breaks. Most migration time is spent in a manual diagnosis loop. Teams rerun prompts by hand, compare outputs by eye, and rarely record what changed or why. For agent builders, chat benchmarks may miss tool-call regressions such as extra fields, renamed arguments, or changed call sequences. Those problems appear only when the team replays real agent traces. Plan for three constraints: Start with the optimizers, then verify their output. They apply general practices in a single pass rather than fitting changes to the team's dataset. They tune instruction text, not tool definitions or output schemas. Copy the original prompt first because there is no version history, then evaluate the optimized prompt against the frozen dataset. Expect more manual work when moving between providers or model families. There is no "optimize for target model X" flow. Moving from one family to another, such as OpenAI to Claude, still requires deliberate prompt and schema translation. Record traffic before you need it. Replay is only as useful as the captured data. Existing traces are available as an evaluation source for agents today, while content capture is opt-in and never retroactive. Log prompts, responses, latency, and tokens now to prepare for the next Adapt phase. 4. Validate Run the adapted workload against a quality rubric on the frozen dataset. The rubric may combine rules, LLM-as-judge evaluation, human review, existing user-feedback signals, or a domain-specific scoring framework. Examples include a clinical summarization rubric for healthcare or a tool-call sequencing assertion for agents. Validation produces a pass-or-fail decision for production exposure. AI-native teams may run the same signal continuously on every commit rather than treating it as a one-time gate. The dataset is a dependency for both Adapt and Validate. Build and freeze it early, around Assess, even though its primary purpose belongs to this phase. Validation then has two touchpoints: Before Adapt, freeze the dataset and success criteria, then run the current model to establish the source baseline. After Adapt, run the target model against the same dataset and evaluators, compare it with the source baseline, and make the release decision. Prepare the evaluation runner early and apply the gate after Adapt. Both steps belong to Validate. Foundry tools. The Azure AI Evaluation SDK, installed with pip install azure-ai-evaluation, includes more than 30 evaluators. They cover grounding, relevance, retrieval, coherence, fluency, question answering, reference-based similarity, F1, BLEU, ROUGE, safety, agent behavior, and Azure OpenAI graders. Teams can also build custom LLM-as-judge evaluators for task-specific rubrics. The portal evaluation flow runs the same evaluators against model, agent, dataset, and trace targets. Run identical evaluators against source and target outputs on the frozen dataset so the results remain comparable. Measure the three dimensions used for sign-off: Quality: evaluator results Latency: leaderboard time to first token and throughput, plus operational latency from the workload Cost: (input tokens × input price) + (output tokens × output price) Where it breaks. Most teams do not have an evaluation suite. Teams that do often built it themselves and may not use platform evaluation tools. Regulated workloads add mandatory human review, which can become the bottleneck. For those teams, migrations often stall in Validate rather than Adapt. What your team provides. The evaluators are ready to run, but model workloads still require teams to curate a domain-relevant test set from production traffic. That is why Phase 0 pays for itself. 5. Roll out Promote the validated configuration in stages: non-production, then a canary or weighted percentage of production traffic, followed by broader exposure. Compare live latency, errors, and quality signals with the pre-migration baseline, then commit or roll back. Some workloads cannot expose a new model to customer traffic during testing, including flows involving protected health information or financial transactions. Use shadow or mirror mode instead: run the new model offline against production inputs and compare its outputs with the old model without affecting users. Foundry tools. Migration mechanics depend on the deployment SKU: Standard, Global Standard, and Data Zone Standard deployments upgrade automatically on a rolling schedule. Control timing with versionUpgradeOption: OnceNewDefaultVersionAvailable, OnceCurrentVersionExpired, or NoAutoUpgrade. Priority Processing follows the same path. Provisioned, Global Provisioned, and Data Zone Provisioned deployments migrate manually, either in place during a 20-to-30-minute Azure-managed traffic transition or through side-by-side deployments. Batch deployments migrate side by side. Deploy the new model, resubmit jobs, then retire the old deployment. Fine-tuned deployments do not upgrade automatically. They follow separate training and deployment retirement schedules, so plan retraining or distillation early. See the model retirements documentation for deployment-specific guidance. Use continuous evaluation to score a sample of production traffic in the Foundry Observability dashboard. Connect evaluation results to traces for root-cause analysis and configure Azure Monitor alerts for quality regressions. Where it breaks. Offline evaluation can miss production quality and latency regressions. Rollback decisions may also be forced by deprecation deadlines rather than evidence. What your team provides. Teams implement weighted routing between deployments in their application or gateway layer. They must also choose how long to keep the old deployment warm for rollback. Embedded copilot teams often target about 30 days. Design both mechanisms once and reuse them for future migrations. 6. Retire Retire is easy to forget. Decommission the old deployment, free its capacity, archive evaluation artifacts, update internal documentation, and communicate the change to downstream owners. That may include customer-facing documentation, marketing pages, support runbooks, and audit logs. Regulated workloads may need to retain artifacts for years. Retirement is also a governance step. Foundry tools. Use the Models API to confirm that the old version is retired through lifecycleStatus or 410 Gone. Use the observability dashboard to confirm that the active deployment count falls. Add useful production traces to the golden dataset so the next migration starts with better evidence. Where it breaks. Teams skip the phase. Zombie deployments accumulate, leaving teams with structural debris from migrations they never finished. What your team provides. The observability dashboard shows deployment count, but the team must decide which deployments still carry traffic. Create an explicit retirement ticket rather than relying on someone to remember. Embedded copilot teams also need to update public claims such as "powered by gpt-4o" after the model changes. Worked example: Zava's Shopping Assistant migrates from gpt-4o mini to gpt-5.x Zava is a fictional retailer used as a stand-in for a real customer story. The example reflects patterns observed in customer-facing embedded AI workloads. Zava's Shopping Assistant is one of the company's largest LLM workloads. It has two LLM stages: Per-review insight extraction identifies sentiment, attribute mentions, and defect signals across thousands of product reviews. Product-level summaries present those findings to shoppers on the product page. Together, the two stages account for a meaningful share of Zava's token volume. Discover Zava's central AI Platform team made gpt-5.x models available internally and notified feature teams. The Shopping Assistant team learned about the models through that channel and received a target migration window before gpt-4o mini's deprecation. Zava has an internal discovery layer built on the retirement schedule and Models API. Microsoft provides the underlying data, while Zava routes the signal to application owners. Assess The team compared gpt-5.4 nano, which offered lower latency and cost, with gpt-5.1 and gpt-5.2 using leaderboard trade-off charts. Selection remained difficult because of the rapid release cadence, unclear positioning between variants, and the lack of a behavioral benchmark for product question-and-answer workloads. Capacity planning required coordination with the AI Platform team. Both gpt-4o mini and the gpt-5.x candidate needed to remain available in the same regions so the team could roll back. Adapt The team ran its existing Shopping Assistant prompts against gpt-5.4 nano using a sanitized traffic sample. Customer queries were scrubbed of personally identifiable information before replay. The behavioral comparison found three problems: Summaries used more hedged language and sometimes contradicted the underlying review evidence, creating a shopper-trust risk. Insight counts varied across runs. The model sometimes extracted substantially more or fewer attribute mentions than gpt-4o mini, affecting downstream filtering. Latency varied more than expected on the synchronous product-page path. Prompt Optimizer helped restructure the summary prompt, but the team still diagnosed the differences manually. It built its own replay system and behavioral comparison on top of captured traffic. Reengineering took weeks and extended beyond prompts: parameters and downstream parsing for the insight-extraction output also changed. Validate The team scored outputs with Zava's Product Answer Quality (PAQ) rubric. Its nine criteria cover factual grounding, attribute accuracy, tone, and refusal behavior for questions outside the catalog. Zava implemented the rubric as custom evaluators in the Azure AI Evaluation SDK. Initial evaluations used unchanged prompts to isolate model behavior. The team reran them after each prompt change. Zava's QA team also completed a manual review, which the company requires for every new model used in a customer-facing workflow. The per-review insight extraction stage still has no automated evaluation, a gap the team has accepted for now. Roll out The validated configuration moved to non-production and then through staged exposure: employees first, followed by a small percentage of shoppers. The canary exposed latency regressions that offline evaluation had missed. The team rolled back the latency-sensitive synchronous product-page path while keeping the offline pregeneration path on the new model. Retire Retirement is not complete. The gpt-4o mini deployment remains warm for rollback. The team must resolve the synchronous-path latency regression before retiring it, which sends that code path back to Adapt. This split state is common. Retire can lag Roll out by weeks or months, and the old deployment remains visible in deployment-sprawl data. Lessons from the example Adapt consumed most of the schedule. Replay tooling, behavioral comparison, and prompt reengineering are the clearest opportunities for Microsoft to shorten migrations. Validate worked because Zava had invested in it. Most customers do not have an equivalent to PAQ. Making domain-specific evaluations cheaper to build would improve confidence in this phase. The migration is partially live and partially rolled back. The process must support split-state workloads rather than assuming a binary switch from old model to new. How to use this process The six phases can serve as a checklist and an interview script for teams creating or auditing a migration process. Documentation and process: Lead with the six phases. Most teams recognize them immediately. Investment priorities: Start with Adapt and Validate. Across customer stories, those phases consume the most time and confidence. Interviews and postmortems: For each phase, ask whether it happens, who owns it, which tool the team uses, where it failed last time, and what evidence would increase confidence. Metrics: Discover and Retire are the easiest phases to instrument through measures such as announcement reach and active deployment count. Adapt and Validate require purpose-built telemetry that most teams do not yet have. Go deeper Two companion resources turn the process into concrete implementation steps: Microsoft Learn guide: This article follows the six phases through identifying affected deployments, preparing a test dataset, adapting prompts, evaluating source and target models, and rolling out by deployment type. Foundry Models Accelerator: This community toolkit includes a deployment-inventory scanner, a feasibility and assessment playbook, code and API migration audit scripts, an A/B evaluation runner with golden datasets, and rollout guidance. It follows the same six-phase process. The Foundry Models Accelerator is a community-built toolkit provided as-is under the MIT License. It falls outside Microsoft Support. Always verify model availability and retirement dates against official documentation. Additionally, check out the Foundry Forgebook which hosts a plethora of recipes that walk through the required code changes to migrate from different source to target models, even across model families. The goal of a model migration is to change the model without changing your application’s behavior, or to change it measurably for the better. Lead with the six phases, invest first in Adapt and Validate phases, and treat the Retire phase as a governance step.967Views0likes0CommentsAdding a Fallback Model to Hermes with Microsoft Foundry
So the plan was simple. Leave the Bedrock configuration untouched, then wire Microsoft Foundry in behind it as a fallback, so Hermes always has somewhere else to go when the primary provider is not responding. A few other reasons pushed me towards Foundry in particular: Redundancy that does not need me. If Bedrock is throttled or out of quota, I want Hermes to fail over on its own rather than waiting for me to notice. A catalogue I already pay for. Foundry puts the latest GPT models next to open-weight and partner models in one place, so I can pick a model that suits the task instead of settling for whatever a single provider happens to offer. Enterprise controls out of the box. Region pinning, private networking, content filters and per-deployment quota all sit in the same portal, which makes the setup far easier to defend to a security reviewer. Learning the mechanics before I need them. Working out how Hermes handles a provider chain is much nicer on a quiet Tuesday than during a live outage. Here is the short version, if you are deciding whether to read on. Time: about thirty minutes if nothing goes wrong. Cost: pay-as-you-go tokens only, and none at all while the fallback sits idle. Result: an assistant that keeps answering when your primary provider stops. Before you start, you will need three things: a machine with Hermes already installed and a working primary provider configured, an Azure subscription with access to Microsoft Foundry in a region you can actually deploy into, and enough quota in that region to create a deployment. One thing that made this easy to justify: Foundry deployments bill per token on the standard pay-as-you-go tier. A fallback provider that never gets invoked costs nothing beyond the requests it actually serves, so the insurance is close to free until the day you need it. Chat surface (CLI, messaging) → Hermes Gateway → Primary Amazon Bedrock → Fallback Microsoft Foundry Figure 1: Where the fallback sits. Every request goes through the Hermes gateway to the primary provider; only when that provider is unavailable does the chain continue to Microsoft Foundry. Part 1: Deploying a Model on Microsoft Foundry The first half of this job happens entirely inside the Microsoft Foundry portal and has nothing to do with Hermes yet. All you are really doing here is making sure your Azure subscription can serve a model, and that you hold an endpoint and key Hermes can authenticate with later. 1. Deploy model in Foundry → 2. Copy endpoint + key → 3. hermes fallback add → 4. Authenticate → 5. Select models, test Figure 2: The whole setup in five moves. The first two happen in the Microsoft Foundry portal (orange); the rest happen on the Hermes machine (blue). Go to Microsoft Foundry > Build > Models > Deploy > Deploy a base model. You can deploy a fine-tuned model instead if you already have one, which works just as well with Hermes. Check the region shown at the top of the portal before you commit, because both model availability and deployment quota differ from one region to the next. Then deploy the model you have selected: In this case I deployed gpt-5.6-sol, which is the model Hermes will fall back to. The choice was deliberate rather than exciting. My primary model on Bedrock is a general-purpose chat model, and a fallback is only useful if the answers it gives feel like a continuation of the same conversation rather than a different assistant wearing the same name. The gpt-5.6-sol deployment matches that behaviour closely, it was available in the region I wanted to pin, and the quota I was granted comfortably covers a day of normal use. If a fallback surprises you the first time it fires, it is the wrong fallback. Once the deployment finishes, open it and take note of two values: the target endpoint URI and the API key. Copy both somewhere safe now, because you will be pasting them into Hermes in the next part. If your organisation rotates keys on a schedule, use a key with the longest life you are allowed, since a fallback secured with a credential that expires quietly stops being a fallback. What to copy Where it lives in the portal Where Hermes asks for it Target endpoint URI Deployment > Endpoint > Target URI "Endpoint" prompt in hermes fallback add API key Deployment > Endpoint > Key "API key" prompt, or choose Entra ID instead Deployment name Deployment > Details > Name Shown in the model list Hermes returns Region Top of the portal, next to the resource Must match the region you deployed into Figure 3: Everything Hermes will ask for, and where to find each value before you leave the portal. Part 2: Adding Foundry to Hermes as a Fallback With the Foundry side sorted, everything from here happens in the Hermes CLI. One thing worth knowing before you start: this is the fallback command, not the primary model command, so your existing Bedrock configuration is left completely alone. Nothing in this section can break what is already working, which makes it a good one to try on a live setup. Run the Hermes fallback command: When Hermes asks which provider to add, choose Azure Foundry. The picker still carries the old name; it is the same service that the portal now calls Microsoft Foundry. Paste the target endpoint URI from your deployment, then authenticate with the API key you copied earlier. Hermes also offers Microsoft Entra ID at this prompt, which is the better option if your organisation would rather not have a static key sitting on the machine. If authentication fails here, check the endpoint before you start suspecting the key. In my experience the endpoint is wrong far more often than the credential is, usually because the deployment name at the end of the URI does not match the deployment you actually created. Once authentication succeeds, Hermes lists the deployments your Foundry resource exposes and asks which ones you want to use. You can select more than one, and the order is not cosmetic: Hermes walks down the chain from top to bottom whenever the provider above is unavailable. Treat that list as a priority order, not a shopping basket. What happens to the primary What Hermes does What you see in the chat Responds normally Routes every request to the primary and never touches the chain Nothing. The fallback stays idle Throttled or out of quota Retries the next provider down the chain on the same request A reply, served by the fallback model Endpoint unreachable Keeps failing over on each new request until the primary recovers Slightly different tone and latency, but a working assistant Every provider fails Returns the error rather than hanging An error worth chasing with hermes status Figure 4: The chain in practice. The fallback only earns its keep in the middle two rows, which is exactly why it is easy to forget you configured it. Part 3: Promoting Foundry to the Primary Model At this stage Foundry is sitting in the back seat as a backup. I wanted to reverse the arrangement and make Foundry the primary while Bedrock slides down into the fallback slot, partly because I preferred keeping day-to-day traffic inside my Azure subscription, and partly because I wanted proof the chain works in both directions. Before promotion After promotion Primary: Amazon Bedrock → Primary: Microsoft Foundry Fallback: Microsoft Foundry → Fallback: Amazon Bedrock Figure 5: The promotion, in effect. Nothing is added or removed; the two providers simply trade places in the chain. There is no dedicated "promote" command in Hermes, so the manual route is a short sequence of steps rather than a single instruction: Select the fallback provider/model as the new primary: hermes model Remove the now-duplicate model from the fallback chain: hermes fallback remove Optionally add the old primary model as a fallback: hermes fallback add Restart the messaging gateway: hermes gateway restart Verify the result: hermes status / hermes fallback list That sequence works, and it is good to know what is happening underneath. But since I already had a working provider configured, I would rather just ask Hermes to rearrange itself. This is the part I genuinely enjoy about the tool: the configuration is something you can talk to, not only something you type commands at. Prompt: Okay now please make the model I configured on Microsoft Foundry into the main model, and make the Bedrock one the fallback model! Hermes rewrites the provider chain on its own and confirms the swap once it is done, which is a great deal less error-prone than running the five commands by hand. Part 4: Testing the Switch Configuration you have not tested is just an assumption with extra steps, so the next thing is to confirm Hermes really is talking to Foundry. Type /model when running Hermes to bring up the model picker. You will be prompted to select a provider first. Pick the Microsoft Foundry entry, then choose the specific deployment from the list underneath it. The active model should switch straight away. Send it a plain "Hello" to check that the deployment actually responds, rather than just looking correct in the menu. Appearing in a dropdown and serving a request are two very different things. A second test is worth the thirty seconds it costs: run hermes status to confirm which provider is live, then hermes fallback list to confirm the chain is ordered the way you intended. The picker tells you what you selected; those two commands tell you what Hermes will actually do at three in the morning. Part 5: The Obstacle, and What It Actually Taught Me Every walkthrough has the part the author quietly leaves out. Here is mine: the wrinkle was not the model, it was capacity. My first attempt deployed into the region closest to me out of habit, and the portal turned it down because there was no capacity left for that model at the tier I asked for. The model was clearly listed in the catalogue; being listed and being deployable in your region, on your subscription, at your quota, are three separate questions. Redeploying in a different region fixed it in a couple of minutes, but it meant the endpoint URI changed, which in turn meant the value I had already pasted into Hermes was stale. Re-running hermes fallback add against the new endpoint sorted it out. The lesson is cheap enough to hand over for free: check quota and regional capacity for your specific subscription before you design a walkthrough, a demo or a production fallback around one deployment. In the Foundry portal, Management then Quota shows exactly what you have been granted per region and per model family, which is the only list that matters. Symptom Likely cause Fix Deployment rejected in the portal No capacity for that model at the tier you asked for, in that region Deploy in another region, or drop to a smaller tier Hermes rejects the credential Endpoint URI does not match the deployment you created Re-copy the target URI from the deployment, not the resource Provider authenticates but lists nothing Key belongs to a different Foundry resource Check you are in the right resource, then re-run hermes fallback add Fallback never fires Chain ordered the wrong way round hermes fallback list, then reorder Figure 6: The four things that went wrong, or nearly did, and what fixed each one. There is a silver lining worth stating plainly. Because the fallback chain was already in place, a deployment that refused to come up did not take the assistant down with it. That is precisely the scenario this whole exercise was meant to cover, and it turned up on day one without me having to simulate it. Command Cheat Sheet Everything used in this walkthrough, collected in one place: hermes fallback add: attach a provider to the fallback chain hermes fallback remove: drop a provider from the chain hermes fallback list: show the chain in priority order hermes model: set the primary model hermes gateway restart: restart the messaging gateway after a change hermes status: confirm which provider is currently live /model: switch models from inside a running session Conclusion Adding Microsoft Foundry as a fallback behind my existing Bedrock setup took an afternoon, and most of that was spent recovering from a regional capacity limit I should have checked first. The work itself is small: deploy a model, copy the endpoint and key, run hermes fallback add, authenticate, pick your deployments. The payoff is that Hermes no longer depends on one provider staying healthy. Three things are worth carrying away from this: Check quota, not just the catalogue. The Foundry catalogue shows what Microsoft offers. It does not show what your subscription and region can actually deploy today. Confirm that first, before you build anything on top of a specific deployment. Order your fallback chain deliberately. Hermes works down the list from top to bottom, so the sequence you choose during setup is the failover policy you are going to live with. Put the model you actually trust at the top. Treat the endpoint as part of the credential. Redeploying in a new region changes the endpoint URI, and a fallback pointed at an endpoint that no longer exists is not a fallback. Re-run the setup whenever the deployment moves. The switch from Bedrock primary to Foundry primary also proved the chain runs in both directions, which is the real point. Provider redundancy is only useful if you have watched it work. Next on my list is deliberately breaking the primary provider to confirm the failover triggers on its own, without me typing a single command. If you run this against a different model, region or provider pairing, I would genuinely like to know how it went, particularly if your quota experience was better than mine. Drop it in the comments.399Views0likes0Comments
Making Azure AI Foundry Agents Explainable — Knowledge Graphs + Source Attribution
90% of Azure AI demos work on stage — most never ship. The gap is architecture, not the model. I wrote up a field guide on taking Azure AI Foundry agents from POC to production, with knowledge graphs (GraphRAG) doing the grounding and source attribution. What the post covers Grounding with a knowledge graph — multi-hop retrieval + inline citations so every answer is traceable to a source (critical for regulated/medical use cases). Externalized state — keeping agent memory and session state outside the model. Identity at the boundary — Entra ID / RBAC instead of trusting the prompt. Observability & compliance — tracing, evaluation, and auditability. The stack — Azure AI Foundry + Model Context Protocol (MCP) + Azure Functions (Flex Consumption) + Azure OpenAI, from a real build (VeritasGraph medical MCP server). 📖 Full write-up: https://bibinprathap.com/blog/azure-ai-proof-of-concept-to-production ▶️ 6-min walkthrough: https://youtu.be/z-CPS5WUvyw?si=fmpo1RN28Bh9KbIb Questions for the community How are you grounding Foundry agents today — vector RAG, GraphRAG, or hybrid? Anyone combining knowledge graphs with MCP tools in Foundry? What worked / broke? For regulated domains, how are you handling source attribution and audit trails? Curious to compare notes — happy to share more detail on the GraphRAG retrieval design if useful.337Views0likes0CommentsModel router updates: new regions, a refreshed model pool, and understanding the hill climb
Across Microsoft, "hill climbing" has become shorthand for how real AI progress happens: not in one dramatic leap, but through a disciplined loop. Microsoft AI defines the hill climb as an organization that continuously improves, cycle after cycle, through more compute, better data, and sharper evaluation. Reinforcement fine-tuning in Foundry defines it as improving the deployable model package one measured step at a time across quality, latency, and cost. Different altitudes, same premise: progress is not a one-shot decision. It's a loop. For most teams, the decision of what model to use when is made manually or with custom routing tools. A developer picks a model based on benchmarks, familiarity, or the last launch that made headlines, ships it, and revisits the choice only when something breaks. In an ecosystem where the frontier moves monthly, that decision goes stale fast. Model router in Foundry Models brings the hill climb to the selection layer. What's new: a bigger pool, in more places This release expands where teams can deploy model router, broaden the supported model pool, and delivers updates through a stable endpoint. Together, these changes help teams run production workloads in more locations, match a wider range of tasks to suitable models, and adopt supported updates without changing the application integration. A refreshed model pool. The supported model list now includes Anthropic Claude Opus 4.8 — a high-capability model built for complex reasoning and long-form generation, for scenarios that demand depth, structure, and quality — and the GPT-5.6 family. Just as importantly, the pool is pruned: gpt-5-chat, gpt-5.2-chat, gpt-5.3-chat, Deepseek-V3.1 have been removed from the model router as models reach the end of their lifecycle and are deprecated in Foundry. New region availability. The model router is now available in 28 regions for global standard and 21 data zone regions. For many organizations, inference requests must stay within specific geographic boundaries for regulatory, governance, or customer-trust reasons — and intelligent routing shouldn't force a compromise on that. Find the full list of regions here. The most important detail is what you don't have to do: these updates occur automatically*. The endpoint remains stable as the supported model pool is refreshed, so teams do not need to redeploy the model router to receive the update. Applications can continue using the same integration while the model router evaluates requests against the current supported pool. Teams should continue monitoring routing traces and application outcomes to confirm that quality, cost, latency, and governance requirements are met. *Models from Anthropic still need to be deployed separately before they can be routed to through the model router. Interested in hearing more about what's new to the model router? Tune in for the next episode of Model Mondays with Sanjeev Jagtap and Lee Stott, where they talk all things model router from evaluations to hill climbing. Sign up here to watch live or view the replay: Model Mondays - Spotlight On Model router in Microsoft Foundry | Microsoft Reactor The selection-layer hill climb At the selection layer, a step is a routing decision. Each one is a micro-optimization against your objective, and each one is instrumented: every response from the model router includes a model field showing which underlying model was selected, so the climb leaves a complete, auditable trail. Model router supports three parts of the optimization loop: A/B testing to compare two router configurations to understand quality, cost, and latency tradeoffs; model decomposition to use routing results to decompose a single-model application into a multi-model or multi-agent design, and continuous routing to keep the router in production for continuous per-request selection. Each pattern turns model choice into a measured, repeatable process rather than a fixed decision. 1. A/B Testing Question: Which model or routing strategy should I use in production? A/B testing helps teams compare candidate models, model families, or router configurations against the same workload. Representative traffic is sent to competing deployments, and teams compare quality, cost, latency, and governance outcomes. The goal is to understand tradeoffs and identify the model or routing strategy that best meets workload requirements before promoting it to production. 2. Model Decomposition Question: What work is my application actually doing? Model decomposition uses model router as a diagnostic tool. By deploying the model router against a representative workload and examining routing telemetry, teams can see how requests naturally separate into different task classes. Simple retrieval, classification, and summarization requests may route to smaller models, while reasoning, planning, and agentic workflows may require more capable models. The goal is not to choose a winner, but to understand the structure of the workload and uncover opportunities for optimization, specialization, or architectural improvements. 3. Route continuously Question: Why choose a single model at all? Route continuously is the pattern model router was designed for but is not limited to. Rather than treating model selection as a one-time decision, teams leave the model router in production and allow the best-fit model to be selected for each request. As the supported model pool, regional availability, and platform capabilities evolve, teams can continue using the same endpoint while evaluating whether updates improve workload outcomes. Model selection becomes an ongoing optimization process rather than a project that must be repeated every time the model landscape changes. Together, these patterns illustrate a broader shift: the model router is more than a model. It is a tool for the optimization loop itself, helping teams evaluate tradeoffs, understand workload behavior, test hypotheses, and continuously refine model selection as requirements evolve. Whether used to compare candidate models, decompose applications into specialized tasks, or automate per-request routing in production, model router turns model selection into an observable, measurable, and repeatable process. As the model landscape continues to change, that optimization loop becomes a durable advantage. Getting Started Ready to start your own hill climb? Whether you're exploring the model router for the first time, evaluating routing strategies against your workload, or building a long-term optimization practice, these resources can help you move from experimentation to production with Microsoft Foundry. What's new in model router? Sign up for the next Model Mondays episode for a deep dive into new features, optimization patterns, and the latest model router updates. How do I build agents with model router? Check out the Model Router Agents Lab and build agent experiences with routing, retrieval, web search, tool calling, and multi-agent patterns. How do I evaluate model router? Compare model router against baseline models using your own prompts, then review quality, cost, latency, and routing decisions with the Auto Evaluation Toolkit. How do I optimize model router for my workload? Start your hill-climbing journey with the Model Mastery workshop, where you'll test one optimization lever at a time and measure how each change impacts workload outcomes. How do I build a model router optimization playbook? Explore the Model Releases repository to track new capabilities, understand the optimization question behind each release, and try focused notebooks that demonstrate one optimization lever at a time.2.9KViews2likes0CommentsIntroducing GPT-transcribe and GPT-live-transcribe in Microsoft Foundry
A transcription model hears “account number 8-4-7-2” but returns “account number eighty-four seventy-two.” A single error can break a downstream automation workflow. Developers building voice applications need transcription models that can handle real-world audio conditions, natural speech patterns, and business-critical details, including codes, dates, addresses, account numbers, mixed-language conversations, specialized terminology, and quiet or low-volume speech. GPT-transcribe and GPT-live-transcribe do just that and are available in Microsoft Foundry today. Two updates to the audio model family designed to improve automatic speech recognition across asynchronous transcription and live streaming scenarios. Built for More Accurate Transcription in Real-World Audio GPT-transcribe is the highest accuracy ASR model from Open AI, designed for asynchronous speech-to-text transcription of completed audio files and batch workloads. It accepts audio input and returns text output, making it a strong fit for workflows that process recorded, uploaded, or submitted audio, including meeting recordings, voicemails, and media files. GPT-live-transcribe is designed for low-latency streaming transcription through the Realtime API. It supports real-time audio input and text output, helping developers build live experiences where speech needs to be transcribed continuously as audio arrives. This model also introduces “tunable latency” where developers can adjust the latency/accuracy trade-off for streaming. It is a strong fit for live captions, voice assistants, contact center workflows, accessibility experiences, field service applications, real-time intake, and monitoring systems. Together, these models give developers transcription options in Microsoft Foundry for stored audio and live voice interactions. Their text output can support downstream workflows such as search, summarization, routing, analytics, automation, and quality review. What’s New in Both Models The features of the new transcription models focus on improving transcription quality in real-world audio environments where speech can be brief, noisy, accented, quiet, domain-specific, or mixed across languages. Key capabilities include: Background noise: Helps isolate speech in noisy environments so transcription quality can remain more reliable when audio conditions are not controlled. Short utterances: Improves recognition of brief commands, confirmations, interruptions, and clipped speech that can be difficult to capture accurately. Alphanumeric perception: Strengthens transcription of IDs, codes, phone numbers, dates, addresses, account numbers, and mixed letter-number sequences. Domain terminology understanding: Improves recognition of specialized vocabulary used in product, workflow, industry, and business-process contexts. Codemix: Improves understanding when speakers switch between languages within a conversation or utterance. Context awareness: Uses topic hints and past conversation context to improve transcription accuracy and help maintain consistency. Accent robustness: Improves handling of regional accents, non-native accents, dialects, and varied speaking styles. Whispering: Improves recognition of quiet or low-volume speech, including whispered commands and private dictation. Live captioning and accessibility experiences: Generate real-time captions for meetings, events, media experiences, and assistive applications. Contact center and voice workflows: Capture spoken details as conversations happen, supporting routing, quality review, summarization, and downstream automation. Monitoring, analytics, and compliance workflows: Provide text visibility into ongoing spoken input so teams can analyze, review, and act on conversation data. Also Available: GPT-realtime-2.1 and GPT-realtime-mini-2.1 gpt-realtime-2.1 and gpt-realtime-mini-2.1 are also available in Microsoft Foundry for developers building speech-to-speech applications. Unlike GPT-transcribe and GPT-live-transcribe, which return text, these models accept audio and generate audio for low-latency conversational experiences over the Realtime API. gpt-realtime-2.1 focuses on interaction quality and robustness, while gpt-realtime-mini-2.1 provides a smaller, faster, and more cost-efficient option for high-volume deployments. Together with GPT-transcribe and GPT-live-transcribe, these realtime audio updates give developers more flexibility to build voice applications that need both accurate transcription and responsive spoken interaction, whether the experience is centered on capturing speech as text, responding with audio, or combining both patterns in a single workflow. Use Cases by Model GPT-transcribe Use GPT-transcribe when the application needs accurate text transcripts from recorded, uploaded, or submitted audio. It is a strong fit for meeting and call transcription, media transcription, customer support intake, voicemail and message processing, quality review, compliance workflows, and domain-specific transcription where short utterances, structured alphanumeric details, specialized terminology, accents, background noise, code-mixed speech, or quiet audio can affect downstream accuracy. GPT-live-transcribe Use GPT-live-transcribe when the application needs live streaming transcription with low latency. It is designed for real-time captions, accessibility experiences, contact center transcription, voice-enabled workflows, live monitoring, operational dashboards, and agent-assist scenarios where spoken input needs to become text continuously as the interaction unfolds. Pricing The following pricing example shows Global Standard rates by model and modality. Rates for GPT-realtime-2.1 and GPT-realtime-mini-2.1 are listed per 1 million tokens. GPT-transcribe and GPT-live-transcribe are listed per audio hour. Model Deployment Modality Input Cached Input Output GPT-realtime-2.1 Global Standard Audio $32.00 $0.40 $64.00 Text $4.00 $0.40 $24.00 Image $5.00 $0.50 -- GPT-realtime-mini-2.1 Global Standard Audio $10.00 $0.30 $20.00 Text $0.60 $0.06 $2.40 Image $0.80 $0.08 -- GPT-live-transcribe Global Standard Audio -- -- $1.02/hour GPT-transcribe Global Standard Audio -- -- $0.27/hour Getting Started Choose GPT-transcribe when your application processes complete audio files asynchronously, or GPT-live-transcribe when it needs text continuously as speech arrives. Try the models in Microsoft Foundry, then use the resources below to explore the Realtime API, follow the audio quickstart, compare available models, and review Azure OpenAI in Foundry Models documentation. For asynchronous transcription, submit a complete audio file to GPT-transcribe and process the returned transcript after the request completes. This pattern works well for recordings, voicemails, and uploaded media. For streaming transcription, open a Realtime API session with GPT-live-transcribe, send audio as it is captured, and handle incremental transcript events. This pattern supports live captioning and agent-assist experiences that need text during an active interaction. Refer to the linked quickstart and Realtime API documentation for current SDK setup, authentication, request schemas, and supported audio formats. Explore Microsoft Learn documentation to learn more: Use GPT Realtime API for speech and audio with Azure OpenAI in Foundry Models GPT Realtime audio quickstart Azure OpenAI in Foundry Models overview3.7KViews0likes0Comments