analytics
26 Topics
Building Microsoft Sentinel Connectors in Minutes with the Sentinel Connector Builder Agent
Overview We previously announced the public preview of the Microsoft Sentinel connector builder agent via VS code extension, that helps developers build Microsoft Sentinel codeless connectors faster with low-code and AI-assisted prompts. This post walks through a hands-on lab using a mock Network Log API to demonstrate how the Sentinel connector builder agent simplifies building Codeless Connector Framework (CCF) pull connectors. Instead of manually creating ingestion infrastructure and configuration files, you’ll use a guided, conversational workflow in VS Code to generate connector artifacts, test them against a live API, and deploy them into Microsoft Sentinel. The lab focuses on the end-to-end experience ranging from API setup to validated connector deployment so you can see how quickly a working integration can be produced. For additional guidance beyond this lab, refer to our MS Learn documentation. The Lab Environment This lab is built around a mock Network Log API hosted as an Azure Function App. The purpose of the lab environment is to give us a live API that we can use to build, validate, and test the Sentinel CCF connector builder agent against end to end. The API exposes 50 synthetic network activity records that look and behave like a real product data source, including web traffic, DNS requests, blocked remote access attempts, malware command-and-control blocks, VPN activity, and other common network events. That makes it a useful stand-in for the type of telemetry many teams want to onboard into Microsoft Sentinel. The API is intentionally shaped like the kind of source a customer might expose for telemetry retrieval. It uses API key authentication through the X-API-Key header, returns paginated results through a nextLink model, and provides a predictable response structure that the builder agent can map into a pull connector configuration. The repo contains everything needed for the walkthrough. There is an ARM template to deploy the Function App, reference documentation for the API, and a sample connector package showing the generated polling config, table schema, DCR, and connector definition. The end goal of the lab is straightforward: use the builder agent to generate a CCF pull connector that ingests this API into the custom NetworkLogAPIGetNetworkLogs_CL table in Sentinel. Prerequisites Before starting, make sure you have the following: Azure subscription -- with Contributor access on a resource group (for deploying the Function App) and Microsoft Sentinel Contributor access on a Sentinel-enabled workspace (for deploying the connector) Microsoft Sentinel workspace -- an existing Log Analytics workspace with Sentinel enabled. See Onboard Microsoft Sentinel to a Log Analytics workspace for more information. Azure CLI -- See How to install the Azure CLI for more information. VS Code with the Microsoft Sentinel for Visual Studio Code extension installed. GitHub Copilot -- with access to premium models. The connector builder agent requires Claude Sonnet 4.5 or 4.6, which uses Copilot premium model credits. Lab Repository -- Once the aforementioned prerequisites are met, you can access the lab repository here: Azure-Sentinel/Tools/CCF-Connector-Builder-Agent-Accelerator at master · Azure/Azure-Sentinel Deploying the Mock API The full CLI commands for this section are available in the repo. For a simpler option, you can use GitHub Copilot to handle the deployment. Enter this prompt: Follow the deployment instructions in Sentinel-CCF-Pull-Connector-Builder-Agent-Accelerator/agent-instructions.md. Let’s deploy the Network Log API and build a CCF pull connector. At a high level, the setup is four steps: clone the repo, create a resource group, ensure you have a Sentinel-enabled workspace, and deploy the Function App using the included ARM template. The template takes two parameters: an ApiKey of your choice (the secret the CCF connector will use to authenticate) and your Log Analytics workspace resource ID for Application Insights. Deployment takes about two to three minutes and outputs the FunctionAppName and endpoint URLs you will need later. Once deployed, verify the API is live: curl -s -H "X-API-Key: <your-api-key>" \ "https://<functionappname>.azurewebsites.net/api/GetNetworkLogs?page=1&pageSize=3" </functionappname></your-api-key> You should see a response like this: The API also exposes an /api/RefreshData endpoint that regenerates the 50 sample records with fresh timestamps. This is useful later in the walkthrough when you want to produce new events and trigger an immediate ingestion cycle without waiting for the next polling interval: curl -s -X POST -H "X-API-Key: <your-api-key>" \ "https://<functionappname>.azurewebsites.net/api/RefreshData" </functionappname></your-api-key> Building the Connector with the Sentinel Connector Builder Agent With the Microsoft Sentinel extension installed and GitHub Copilot running in agent mode, open a Copilot chat and enter a single prompt pointing at the API documentation file: That is the entire invocation. The agent takes it from there. It works through a structured seven-step sequence: preparation, polling config, table schema, DCR, connector definition, package validation, and summary. The agent produces four files in a sentinel-connectors/NetworkLogAPI_CCF/ output folder: NetworkLogAPI_PollingConfig.json – This is the API poller configuration. The agent reads the documentation and correctly identifies the GET /api/GetNetworkLogs endpoint, configures API Key authentication via the X-API-Key header, sets up NextPageUrl pagination using $.metadata.nextLink with a $.metadata.hasNextPage stop condition, and wires up the since query parameter for incremental delta pulls using the timestamp field. The RefreshData endpoint is correctly excluded, which the agent recognizes as a maintenance operation, not a security data stream. NetworkLogAPI_Table.json – This is the custom Log Analytics table schema for NetworkLogAPIGetNetworkLogs_CL . All 20 fields from the API response are mapped to the correct column types, with timestamp promoted to TimeGenerated as the standard Sentinel time column. NetworkLogAPI_DCR.json – This is the Data Collection Rule. This defines the stream declaration, the workspace destination, and the KQL transform that maps the raw snake_case API fields ( sourceIp , destinationIp , threatIndicator , etc.) to their PascalCase table columns. NetworkLogAPI_ConnectorDefinition.json – This is the connector UI configuration. This drives what the connector page looks like in Microsoft Sentinel: the title, description, prerequisite instructions, the BaseUrl and ApiKey input fields, sample KQL queries, and the connectivity status logic. The only point where the agent paused for input was to propose a connector description and ask for confirmation before writing it to the file. Everything else such as endpoint selection, auth type, pagination pattern, schema mapping, KQL transform, cross-file consistency was selected autonomously. To put that in perspective: without the agent, a developer building this connector from scratch would need to manually author four JSON files, understand the CCF schema for polling configs, DCRs, and connector definitions, write the KQL transform by hand, and validate that every cross-file reference lines up correctly. The agent compresses that work, typically hours of reading documentation, trial-and-error, and portal debugging, into a single prompt. Testing the Connector Before deploying anything to a Sentinel workspace, the Microsoft Sentinel connector builder agent lets you validate the generated polling config against the live API directly from your editor. Right-click the sentinel-connectors/NetworkLogAPI_CCF folder, select Microsoft Sentinel → Test Connector (Preview), and a Configuration Variables panel opens asking for the two template variables from the polling config: BaseUrl and apiKey . For other API patterns, there may be additional and different inputs. For example, apiKey input could be swapped with clientID and secret if the API supports OAUTH. Enter the Function App base URL and your API key, and the test runner connects immediately. The panel shows a live polling session. Poll #1 returns HTTP 200 with 50 events, and a countdown timer shows when the next poll will fire. Switching to the Events tab displays the ingested records in a tabular view with columns for timestamp , severity , action , bytesIn , bytesOut , category , and the rest of the mapped fields fresh from the API. Additionally, there are tabs for Headers, Payload, and Response, which can be useful for verifying that your pollerconfig.json configuration provides the expected request to your api with a working response. Data Extracted: The Test Connector feature can be used to visualize the response data in a table format to verify that data will land in a Sentinel table based on your configuration. Request from Poller: The Test Connector feature can be used to validate the request and response headers that will go out to the API based on the generated poller configuration. Request Response: The Test Connector feature shows you the live response from the API with respect to the request going to the API based on the poller configuration. This is a meaningful pre-flight check. It confirms that auth is working, the $.data events path resolves correctly, pagination is functional, and the polling interval fires as configured all before a single file is deployed to Azure. The most common connector configuration issues (wrong base URL, incorrect header name, mismatched JSON path) surface here in seconds rather than after a failed deployment and a 20-minute wait for Sentinel to attempt its first ingestion cycle. It is also the fastest way to troubleshoot if something goes wrong after deployment, far quicker than pushing changes to Azure and waiting for the connector to poll again. Deploying and Enabling the Connector With the connector tested and passing, deployment is the same right-click menu: right-click the sentinel-connectors/NetworkLogAPI_CCF folder, select Microsoft Sentinel → Deploy Connector (Preview). If you are not already signed in to Azure, the extension will prompt you to authenticate. The agent will also provide a clickbox in the chat window to invoke a connector deployment. Right Click Deploy Connector: UI Prompt Based Deploy Method: Once signed in, a workspace picker lists all available Log Analytics workspaces across your subscriptions. Select the one with Sentinel enabled and click Deploy. The extension deploys all four files to the workspace in the correct order: table schema first, then DCR, polling config, and connector definition. Once deployed, navigate to your Sentinel workspace via https://security.microsoft.com, go to Data Connectors, and find the Network Log API connector. The connector page shows the description, prerequisite notes, and the two credential fields generated by the agent: API Base URL and API Key. Enter your Function App base URL and API key and click Connect. The status updates to show the connector is connected and the deployment succeeded. Note: Data will appear in the workspace within 5 to 30 minutes depending on the polling interval. Run this query in Log Analytics to confirm ingestion. Note that the agent derives the table name from the vendor name and endpoint, so yours may differ slightly from the example below. Check the agent's summary output or the NetworkLogAPI_Table.json file for the exact name: NetworkLogAPIGetNetworkLogs_CL | sort by TimeGenerated desc | take 10 If you want to generate a fresh batch of events immediately rather than waiting for the next polling cycle, use the RefreshData endpoint to reset the sample records with new timestamps: curl -s -X POST -H "X-API-Key: " \ "https://.azurewebsites.net/api/RefreshData" Next Steps If you want to go further: Try it with your own API. The lab repo includes documentation on adapting the polling config, schema, and KQL transform to a real data source. Review the CCF connector schema documentation to understand the full range of supported configurations: pagination patterns, auth types, incremental pull strategies, and delta filter expressions. Explore the Microsoft Sentinel content hub to see how published connectors are structured and what the certification requirements look like for production submissions. Conclusion Following these steps, you saw how a working Sentinel connector can be generated, tested, and deployed in minutes rather than requiring days of manual configuration and infrastructure setup. If you are an ISV building a Sentinel integration and want hands-on support, Microsoft’s App Assure program is available to help. We partner with ISVs on connector development, validation, and deployment and provide guidance through implementation, testing, and readiness for production. You can get started by reaching out through our intake form. See our other Sentinel connector feature’s hands-on labs Building a CCF Nested API Pull Connector: A Technical Lab Walkthrough932Views0likes0CommentsAccelerate Agent Development: Hacks for Building with Microsoft Sentinel data lake
As a Senior Product Manager | Developer Architect on the App Assure team working to bring Microsoft Sentinel and Security Copilot solutions to market, I interact with many ISVs building agents on Microsoft Sentinel data lake for the first time. I’ve written this article to walk you through one possible approach for agent development – the process I use when building sample agents internally at Microsoft. If you have questions about this, or other methods for building your agent, App Assure offers guidance through our Sentinel Advisory Service. Throughout this post, I include screenshots and examples from Gigamon’s Security Posture Insight Agent. This article assumes you have: An existing SaaS or security product with accessible telemetry. A small ISV team (2–3 engineers + 1 PM). Focus on a single high value scenario for the first agent. The Composite Application Model (What You Are Building) When I begin designing an agent, I think end-to-end, from data ingestion requirements through agentic logic, following the Composite application model. The Composite Application Model consists of five layers: Data Sources – Your product’s raw security, audit, or operational data. Ingestion – Getting that data into Microsoft Sentinel. Sentinel data lake & Microsoft Graph – Normalization, storage, and correlation. Agent – Reasoning logic that queries data and produces outcomes. End User – Security Copilot or SaaS experiences that invoke the agent. This separation allows for evolving data ingestion and agent logic simultaneously. It also helps avoid downstream surprises that require going back and rearchitecting the entire solution. Optional Prerequisite You are enrolled in the ISV Success Program, so you can earn Azure Credits to provision Security Compute Units (SCUs) for Security Copilot Agents. Phase 1: Data Ingestion Design & Implementation Choose Your Ingestion Strategy The first choice I face when designing an agent is how the data is going to flow into my Sentinel workspace. Below I document two primary methods for ingestion. Option A: Codeless Connector Framework (CCF) This is the best option for ISVs with REST APIs. To build a CCF solution, reference our documentation for getting started. Option B: CCF Push (Public Preview) In this instance, an ISV pushes events directly to Sentinel via a CCF Push connector. Our MS Learn documentation is a great place to get started using this method. Additional Note: In the event you find that CCF does not support your needs, reach out to App Assure so we can capture your requirements for future consideration. Azure Functions remains an option if you’ve documented your CCF feature needs. Phase 2: Onboard to Microsoft Sentinel data lake Once my data is flowing into Sentinel, I onboard a single Sentinel workspace to data lake. This is a one-time action and cannot be repeated for additional workspaces. Onboarding Steps Go to the Defender portal. Follow the Sentinel Data lake onboarding instructions. Validate that tables are visible in the lake. See Running KQL Queries in data lake for additional information. Phase 3: Build and Test the Agent in Microsoft Foundry Once my data is successfully ingested into data lake, I begin the agent development process. There are multiple ways to build agents depending on your needs and tooling preferences. For this example, I chose Microsoft Foundry because it fit my needs for real-time logging, cost efficiency, and greater control. 1. Create a Microsoft Foundry Instance Foundry is used as a tool for your development environment. Reference our QuickStart guide for setting up your Foundry instance. Required Permissions: Security Reader (Entra or Subscription) Azure AI Developer at the resource group After setup, click Create Agent. 2. Design the Agent A strong first agent: Solves one narrow security problem. Has deterministic outputs. Uses explicit instructions, not vague prompts. Example agent responsibilities: To query Sentinel data lake (Sentinel data exploration tool). To summarize recent incidents. To correlate ISVs specific signals with Sentinel alerts and other ISV tables (Sentinel data exploration tool). 3. Implement Agent Instructions Well-designed agent instructions should include: Role definition ("You are a security investigation agent…"). Data sources it can access. Step by step reasoning rules. Output format expectations. Sample Instructions can be found here: Agent Instructions 4. Configure the Microsoft Model Context Protocol (MCP) tooling for your agent For your agent to query, summarize and correlate all the data your connector has sent to data lake, take the following steps: Select Tools, and under Catalog, type Sentinel, and then select Microsoft Sentinel Data Exploration. For more information about the data exploration tool collection in MCP server, see our documentation. I always test repeatedly with real data until outputs are consistent. For more information on testing and validating the agent, please reference our documentation. Phase 4: Migrate the Agent to Security Copilot Once the agent works in Foundry, I migrate it to Security Copilot. To do this: Copy the full instruction set from Foundry Provision a SCU for your Security Copilot workspace. For instructions, please reference this documentation. Make note of this process as you will be charged per hour per SCU Once you are done testing you will need to deprovision the capacity to prevent additional charges Open Security Copilot and use Create From Scratch Agent Builder as outlined here. Add Sentinel data exploration MCP tools (these are the same instructions from the Foundry agent in the previous step). For more information on linking the Sentinel MCP tools, please refer to this article. Paste and adapt instructions. At this stage, I always validate the following: Agent Permissions – I have confirmed the agent has the necessary permissions to interact with the MCP tool and read data from your data lake instance. Agent Performance – I have confirmed a successful interaction with measured latency and benchmark results. This step intentionally avoids reimplementation. I am reusing proven logic. Phase 5: Execute, Validate, and Publish After setting up my agent, I navigate to the Agents tab to manually trigger the agent. For more information on testing an agent you can refer to this article. Now that the agent has been executed successfully, I download the agent Manifest file from the environment so that it can be packaged. Click View code on the Agent under the Build tab as outlined in this documentation. Publishing to the Microsoft Security Store If I were publishing my agent to the Microsoft Security Store, these are the steps I would follow: Finalize ingestion reliability. Document required permissions. Define supported scenarios clearly. Package agent instructions and guidance (by following these instructions). Summary Based on my experience developing Security Copilot agents on Microsoft Sentinel data lake, this playbook provides a practical, repeatable framework for ISVs to accelerate their agent development and delivery while maintaining high standards of quality. This foundation enables rapid iteration—future agents can often be built in days, not weeks, by reusing the same ingestion and data lake setup. When starting on your own agent development journey, keep the following in mind: To limit initial scope. To reuse Microsoft managed infrastructure. To separate ingestion from intelligence. What Success Looks Like At the end of this development process, you will have the following: A Microsoft Sentinel data connector live in Content Hub (or in process) that provides a data ingestion path. Data visible in data lake. A tested agent running in Security Copilot. Clear documentation for customers. A key success factor I look for is clarity over completeness. A focused agent is far more likely to be adopted. Need help? If you have any issues as you work to develop your agent, please reach out to the App Assure team for support via our Sentinel Advisory Service . Or if you have any other tips, please comment below, I’d love to hear your feedback.843Views2likes0CommentsUpdate: Changing the Account Name Entity Mapping in Microsoft Sentinel
The upcoming update introduces more consistent and predictable entity data across analytics, incidents, and automation by standardizing how the Account Name property is populated when using UPN‑based mappings in analytic rules. Going forward, Account Name property will consistently contain only the UPN prefix, with new dedicated fields added for the full UPN and UPN suffix. While this improves consistency and enables more granular automation, customers who rely on specific Account Name values in automation rules or Logic App playbooks may need to take action. Timeline Effective date: July 1, 2026. The change will apply automatically - no opt-in is required. Scope of impact Analytics Rules which include mapping of User Principal Name (UPN) to the Account Name entity field, where the resulting alerts are processed by Automation Rules or Logic App Playbooks that reference the AccountName property. What’s changing Currently When an Analytic Rule includes mapping of a full UPN (for example: 'user@domain.com') to the Account Name field, the resulting input value for the Automation Rule or/and Logic App Playbook is inconsistent. In some cases, it contains only the UPN prefix: 'user', and in other cases the full UPN ('user@domain.com'). After July 1, 2026 Account Name property will consistently contain only the UPN prefix The following new fields will be added to the entity object: AccountName (UPN prefix) UPNSuffix UserPrincipalName (full UPN) This change provides an enhanced filtering and automation logic based on these new fields. Example Before Analytics Rule maps: 'user@domain.com' Automation Rule receives: Account Name: 'user' or 'user@domain.com' (inconsistent) After Analytics Rule maps: 'user@domain.com' Automation Rule receives: Account Name: 'user' UPNSuffix: 'domain.com' Logic App Playbook and SecurityAlert table receives: AccountName: 'user' UPNSuffix: 'domain.com' UserPrincipalName: 'user@domain.com' Feature / Location Before After SecurityAlert table Logic App Playbook Entity Why does it matter? If your automation logic relies on exact string comparisons against the full UPN stored in Account Name, those conditions may no longer match after the update. This most commonly affects: Automation Rules using "Equals" condition on Account Name Logic App Playbooks comparing entity field 'accountName' to a full UPN value Call to action Avoid strict equality checks against Account Name Use flexible operators such as: Contains Starts with Leverage the new UPNSuffix field for clearer intent Example update Before - Account name will show as 'user' or 'user@domain.com' After - Account Name will show as 'user' Recommended changes: Account Name Contains/Startswith 'user' UPNSuffix Equals/Startswith/Contains 'domain.com' This approach ensures compatibility both before and after the change takes effect. Where to update Review any filters, conditions, or branching logic that depend on Account Name values. Automation Rules: Use the 'Account name' field Logic App Playbooks: Update conditions referencing the entity: 'accountName' For example: Automation Rule before the change: Automation Rule after the change: Summary A consistency improvement to Account Name mapping is coming on July 1, 2026 The change affects Automation Rules and Logic App Playbooks that rely on UPN to Account Name mappings New UPN related fields provide better structure and control Customers should follow the recommendations above before the effective change date1.9KViews0likes0CommentsCall to Action: Migrate Your Classic Alert‑trigger Automations to Automation Rules Before March 2026
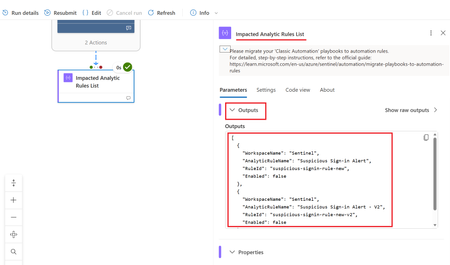
Reminder: Following the Retirement Announcement published in March 2023, classic alert‑trigger automation in Microsoft Sentinel, where playbooks are triggered directly from analytic rules will be deprecated in March 2026. To ensure your alert‑driven automations continue to run without interruption, please migrate to automation rules. How to Identify the Impacted Rules To help you quickly identify if any analytic rules should be updated, we created a Logic App solution that identifies all the analytic rules which use classic automation. The solution is available in two deployment options: Subscription-level version – scans all workspaces in the subscription Workspace-level version – scans a single workspace (useful when subscription Owner permissions are not available) Both options create an output of a list of analytic rules which need to be updated as described in the next section. The solution is published as part of Sentinel's GitHub community solutions with deployment instructions and further details: sentinel-classic-automation-detection After deploying and running the tool, open the Logic App run history. The final action contains the list of the analytic rules which require migration. How to Migrate the identified Analytic Rules from Classic Alert‑trigger Automations Once you have identified the analytic rules using classic automation, follow the official Microsoft Learn guidance to migrate them to automation rules: migrate-playbooks-to-automation-rules In short: Identify classic automation in your analytic rules Create automation rules to replace the classic automation To complete the migration, remove the Alert Automation Classic Actions identified in step #1 by clicking on the three dots and 'Remove' Summary Classic automation will retire in March 2026 Use the detection tool to identify any remaining classic alert-trigger playbooks Follow the official Microsoft documentation to complete the required changes Act now to ensure your SOC automations continue to run smoothly2.1KViews0likes0Comments
What’s New in Microsoft Sentinel: November 2025
Welcome to our new Microsoft Sentinel blog series! We’re excited to launch a new blog series focused on Microsoft Sentinel. From the latest product innovations and feature updates to industry recognition, success stories, and major events, you’ll find it all here. This first post kicks off the series by celebrating Microsoft’s recognition as a Leader in the 2025 Gartner Magic Quadrant for SIEM 1 . It also introduces the latest innovations designed to deliver measurable impact and empower defenders with adaptable, collaborative tools in an evolving threat landscape. Microsoft is recognized as a Leader in 2025 Gartner Magic Quadrant for Security Information and Event Management (SIEM) Microsoft Sentinel continues to drive security innovation—and the industry is taking notice. Microsoft was named a leader in the 2025 Gartner Magic Quadrant for Security Information and Event Management (SIEM) 1 , published on October 8, 2025. We believe this acknowledgment reinforces our commitment to helping organizations stay secure in a rapidly changing threat landscape. Read blog for more information. Take advantage of M365 E5 benefit and Microsoft Sentinel promotional pricing Microsoft 365 E5 benefit Customers with Microsoft 365 E5, A5, F5, or G5 licenses automatically receive up to 5 MB of free data ingestion per user per day, covering key security data sources like Azure AD sign-in logs and Microsoft Cloud App Security discovery logs—no enrollment required. Read more about M365 benefits for Microsoft Sentinel. New 50GB promotional pricing To make Microsoft Sentinel more accessible to small and mid-sized organizations, we introduced a new 50 GB commitment tier in public preview, with promotional pricing starting October 1, 2025, through March 31, 2026. Customers who choose the 50 GB commitment tier during this period will maintain their promotional rate until March 31, 2027. Available globally with regional variations in regional pricing it is accessible through EA, CSP, and Direct channels. For more information see Microsoft Sentinel pricing page. Partner Integrations: Strengthening TI collaboration and workflow automation Microsoft Sentinel continues to expand its ecosystem with powerful partner integrations that enhance security operations. With Cyware, customers can now share threat intelligence bi-directionally across trusted destinations, ISACs, and multi-tenant environments—enabling real-time intelligence exchange that strengthens defenses and accelerates coordinated response. Learn more about the Cyware integration. Learn more about the Cyware integration here. Meanwhile, BlinkOps integration combined with Sentinel’s SOAR capabilities empowers SOC teams to automate repetitive tasks, orchestrate complex playbooks, and streamline workflows end-to-end. This automation reduces operational overhead, cuts Mean Time to Respond (MTTR) and frees analysts for strategic threat hunting. Learn more about the BlinkOps integration. Learn more about the BlinkOps integration. Harnessing Microsoft Sentinel Innovations Security is being reengineered for the AI era, moving beyond static, rule-based controls and reactive post-breach response toward platform-led, machine-speed defense. To overcome fragmented tools, sprawling signals, and legacy architectures that cannot keep pace with modern attacks, Microsoft Sentinel has evolved into both a SIEM and a unified security platform for agentic defense. These updates introduce architectural enhancements and advanced capabilities that enable AI-driven security operations at scale, helping organizations detect, investigate, and respond with unprecedented speed and precision. Microsoft Sentinel graph – Public Preview Unified graph analytics for deeper context and threat reasoning. Microsoft Sentinel graph delivers an interactive, visual map of entity relationships, helping analysts uncover hidden attack paths, lateral movement, and root causes for pre- and post-breach investigations. Read tech community blog for more details. Microsoft Sentinel Model Context Protocol (MCP) server – Public Preview Context is key to effective security automation. Microsoft Sentinel MCP server introduces a standardized protocol for building context-aware solutions, enabling developers to create smarter integrations and workflows within Sentinel. This opens the door to richer automation scenarios and more adaptive security operations. Read tech community blog for more details. Enhanced UEBA with New Data Sources – Public Preview We are excited to announce support for six new sources in our user entity and behavior analytics algorithm, including AWS, GCP, Okta, and Azure. Now, customers can gain deeper, cross-platform visibility into anomalous behavior for earlier and more confident detection. Read our blog and check out our Ninja Training to learn more. Developer Solutions for Microsoft Sentinel platform – Public Preview Expanded APIs, solution templates, and integration capabilities empower developers to build and distribute custom workflows and apps via Microsoft Security Store. This unlocks faster innovation, streamlined operations, and new revenue opportunities, extending Sentinel beyond out-of-the-box functionality for greater agility and resilience. Read tech community blog for more details. Growing ecosystem of Microsoft Sentinel data connectors We are excited to announce the general availability of four new data connectors: AWS Server Access Logs, Google Kubernetes Engine, Palo Alto CSPM, and Palo Alto Cortex Xpanse. Visit find your Microsoft Sentinel data connector page for the list of data connectors currently supported. We are also inviting Private Previews for four additional connectors: AWS EKS, Qualys VM KB, Alibaba Cloud Network, and Holm Security towards our commitment to expand the breadth and depth to support new data sources. Our customer support team can help you sign up for previews. New agentless data connector for Microsoft Sentinel Solution for SAP applications We’re excited to announce the general availability of a new agentless connector for Microsoft Sentinel solution for SAP applications, designed to simplify integration and enhance security visibility. This connector enables seamless ingestion of SAP logs and telemetry directly into Microsoft Sentinel, helping SOC teams monitor critical business processes, detect anomalies, and respond to threats faster—all while reducing operational overhead. Events, Webinars and Training Stay connected with the latest security innovation and best practices. From global conferences to expert-led sessions, these events offer opportunities to learn, network, and explore how Microsoft is shaping AI-driven, end-to-end security for the modern enterprise. Microsoft Ignite 2025 Security takes center stage at Microsoft Ignite, with dedicated sessions and hands-on experiences for security professionals and leaders. Join us in San Francisco, November 17–21, 2025, or online, to explore our AI-first, end-to-end security platform designed to protect identities, devices, data, applications, clouds, infrastructure—and critically—AI systems and agents. Register today! Microsoft Security Webinars Stay ahead of emerging threats and best practices with expert-led webinars from the Microsoft Security Community. Discover upcoming sessions on Microsoft Sentinel SIEM & platform, Defender, Intune, and more. Sign up today and be part of the conversation that shapes security for everyone. Learn more about upcoming webinars. Onboard Microsoft Sentinel in Defender – Video Series Microsoft leads the industry in both SIEM and XDR, delivering a unified experience that brings these capabilities together seamlessly in the Microsoft Defender portal. This integration empowers security teams to correlate insights, streamline workflows, and strengthen defenses across the entire threat landscape. Ready to get started? Explore our video series to learn how to onboard your Microsoft Sentinel experience and unlock the full potential of integrated security. Watch Microsoft Sentinel is now in Defender video series. MDTI Convergence into Microsoft Sentinel & Defender XDR overview Discover how Microsoft Defender Threat Intelligence Premium is transforming cybersecurity by integrating into Defender XDR, Sentinel, and the Defender portal. Watch this session to learn about new features, expanded access to threat intelligence, and how these updates strengthen your security posture. Partner Sentinel Bootcamp Transform your security team from Sentinel beginners to advanced practitioners. This comprehensive 2-day bootcamp helps participants master architecture design, data ingestion strategies, multi-tenant management, and advanced analytics while learning to leverage Microsoft's AI-first security platform for real-world threat detection and response. Register here for the bootcamp. Looking to dive deeper into Microsoft Sentinel development? Check out the official https://aka.ms/AppAssure_SentinelDeveloper. It’s the central reference for developers and security teams who want to build custom integrations, automate workflows, and extend Sentinel’s capabilities. Bookmark this link as your starting point for hands-on guidance and tools. Stay Connected Check back each month for the latest innovations, updates, and events to ensure you’re getting the most out of Microsoft Sentinel. 1 Gartner® Magic Quadrant™ for Security Information and Event Management, Andrew Davies, Eric Ahlm, Angel Berrios, Darren Livingstone, 8 October 20253.6KViews2likes3Comments
Automate Extraction of Microsoft Sentinel Analytical Rules from GitHub Solutions
🔧 Enhancing Pre-Deployment Rule Insights Extracting metadata like Rule Name, Severity, MITRE Tactics, and Techniques for out-of-the-box analytical rules across multiple solutions can be time-consuming when done manually—especially before the rules are deployed. 🚀 Script Overview The PowerShell script, hosted on GitHub, lets you: Provide the exact Microsoft Sentinel solution name as input, from Microsoft Sentinel GitHub: Azure-Sentinel/Solutions at master · Azure/Azure-Sentinel · GitHub Automatically query the [Microsoft Sentinel GitHub repo] Parse all associated analytical rule YAMLs under that solution Export relevant metadata into a structured CSV 📥 GitHub Link This is My GitHub repository where the custom PowerShell script is hosted. It allows you to extract built-in analytical rules from Microsoft Sentinel solutions based on the solution name: 🔗 GitHub - SentinelArtifactExtract (Optimized Script) 📝 Pre-Requisites: Generate GitHub Personal Access token: GitHub official page to generate PAT: Managing your personal access tokens - GitHub Docs Why GitHub PAT token: It will help us to Authenticate and overcome the GitHub API rate limit Error (403). Download the Script from GitHub to Azure CloudShell: Use Invoke-WebRequest or curl to download the raw script: Command to Download the Raw Script from GitHub: Invoke-WebRequest -Uri "https://raw.githubusercontent.com/vdabhi123/SentinelArtifactExtract/main/Extract%20Sentinel%20Analytical%20Rule%20with%20Solution%20Name%20prompt/OptimizedVersionPromptforSolutionNameOnly" -OutFile "ExtractRules.ps1 Invoke-WebRequest in Azure CloudShell Update the Script with you GitHub PAT (generated in pre-requisite 1) in main script: To update the PAT token you can use vim and ensure to run the updated script. 🧪 How to Use the Script Open Azure Cloud Shell (PowerShell). Upload and run the script. (This is Optional if Pre-requisite 3 is followed) Run the Script and Enter the **exact** solution name (e.g., `McAfee ePolicy Orchestrator`). The script fetches rule metadata and exports to CSV in the same directory. Download the CSV from Cloud Shell. & 2 as highlighted. 📤 Sample Output The script generates a CSV with the following columns: - `Solution` - `AnalyticalRuleName` - `Description` - `Severity` - `MITRE_Tactics` - `MITRE_Techniques` Example file name: Formatted Output with all Analytical Rule and other metadata for the Solution: ✅ Benefits Streamlines discovery of built-in analytical rules for initial Microsoft Sentinel deployments. Accelerates requirements gathering by exporting rules into a shareable CSV format. Enables collaborative planning—output can be shared with clients or Microsoft to determine which rules to implement or recommend. Eliminates manual effort of browsing GitHub or Microsoft Sentinel UI or exporting and reviewing full JSON rule files individually. 💡 Pro Tips Always verify the solution name from the official Microsoft Sentinel GitHub Solutions folder. Azure-Sentinel/Solutions at master · Azure/Azure-Sentinel · GitHub 📌 Final Thoughts This script was created in response to a real-world project need and is focused on improving the discovery and extraction of Microsoft Sentinel analytical rules. A follow-up blog covering the export of additional Sentinel artifacts—such as Playbooks, Workbooks, and Hunting Queries—will be published soon.2KViews2likes0Comments
Help Protect your Exchange Environment With Microsoft Sentinel
TL;DR; Sentinel + Exchange Servers or Exchange Online = better protected New Microsoft Sentinel security solution for Exchange Online and on premises servers : Microsoft Exchange Security! This content is very useful for any organization concerned about keeping the highest security posture as possible and be alerted in case of suspicious activities for those critical items.19KViews6likes12CommentsCowrie honeypot and its Integration with Microsoft Sentinel.
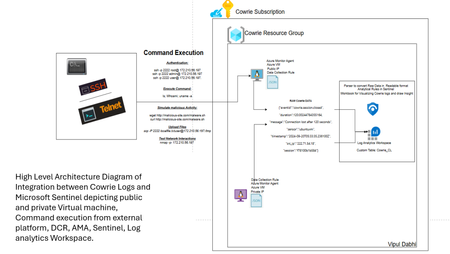
Honeypot: Honeypot is a security mechanism designed to attract, detect, and analyze malicious activities and attackers by simulating a vulnerable system or network service. The primary purpose of a honeypot is to provide a controlled environment where security professionals can observe and study attack methods, tools, and behaviors without putting actual production systems at risk. Integrating Honeypot (Cowrie) with Microsoft Sentinel brings several benefits for enhancing cybersecurity operations. Microsoft Sentinel is a cloud-native Security Information and Event Management (SIEM) service that provides intelligent security analytics and threat intelligence across the enterprise. By combining Cowrie’s detailed honeypot data with Sentinel’s advanced analytics and automation capabilities, organizations can achieve a more comprehensive and effective security posture. Analytical Rules, Threat Hunting, Automation, Workbooks, Custom Parsers.11KViews0likes1CommentIntroducing the Use Cases Mapper workbook
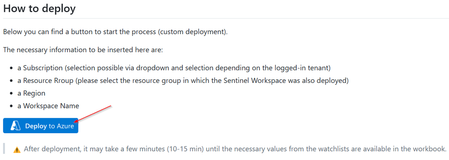
1. Intro While looking for the most effective use cases for Sentinel, it usually makes sense to start with data sources that already exist in some way in the corporate environment, whether due to a previous / third-party SIEM integration or due to an already implemented security stack / solution. The next logical step in this process is to determine preexisting sentinel solutions for the products already in use. Unfortunately, this often occurs only inadequately or is not carried out completely due to lack of resources. In addition, the solutions available (so called Content-Hub-Solutions) continue to evolve and once implemented, necessary updates may be neglected. This is where the Use Case Mapper Workbook can help. The workbook and the complementary resources (watchlists) can be used to map common Use Cases to the Mitre ATT&CK framework, i.e. the tactics and techniques listed there. This gives you a quick overview of the analysis options available in Sentinel (e.g. Analytic Rules & Hunting Queries) according to these Use Cases. The identified Use Cases in this context are: Credential Exploitation Lateral Movement Rapid Encryption Command and Control Communication Insider Risk Anomalous Privilege Escalation Third-Party Abuses Overexposure Data Exfiltration Mobile Data Security Communication Abuse Web Application Abuse NOTE: These can change over time, as attack & defense strategies and techniques are constantly changing as well. To be able to adapt this information to your own needs, the option of reducing the results to selected Data Sources (Content Hub Solutions) has been implemented as well. 2. Prerequisites Before getting started, you have to check the prerequisites that should be fulfilled. an Azure subscription with a Sentinel equipped Log Analytic Workspace The correct RBAC roles assigned - for the sake of simplicity, it should be 'Contributor' or 'Owner' 3. How to deploy/get started Go to the following website: Azure-Sentinel/Workbooks/use cases mapper workbook at master · Azure/Azure-Sentinel · GitHub Look for the 'Deploy to Azure' button Log into a suitable tenant Enter the required information (subscription, resource group, region, workspace name) (1) and click 'Review + create' (2) Check your entered information again and confirm it by clicking on 'Create' The new workbook (Use Case Mapper) should now appear in Sentinel in 'Workbooks' section. 4. How to use & structure In the first section of the workbook, you have the option to select one of the predefined Use Cases. The next step (2nd step) is to select the right data source/solution. The selection made before is presented in section 3 below. Based on the selections made, the following information is presented. Analytical rules - ID | Name | Solution | Technique + graphical representation Hunting Queries - ID | Name | Solution | Technique + graphical representation Workbooks - Name | Solution 5. Conclusion The Use Case Mapper Workbook is an invaluable tool for identifying gaps in your Sentinel environment and the established Content-Hub-Solutions. It simplifies the process of supplementing your solutions to achieve a complete implementation. Additionally, it helps you stay informed about updates (such as new hunting queries, analytic rules, or workbooks) and makes it possible to integrate them promptly. The workbook also provides a clear picture of the threats and vulnerabilities that should be mitigated with your solutions and where they can be found within the Mitre Att&ck Framework.5.9KViews2likes0Comments