ai
3 TopicsUnderstanding Microsoft 365 Copilot Risk Surface and Mitigations
Microsoft 365 Copilot acts on the access users already have. It does not grant new permissions — it is a force multiplier that makes existing access faster and easier to discover, aggregate, and act on across Microsoft 365. That speed and accessibility can also amplify existing security and governance gaps. In environments with overshared content, excessive permissions, or inconsistent governance, users may gain faster access to sensitive information than organizations realize. It’s a shift that carries important security implications organizations should understand before scaling deployment. Customers with Microsoft 365 E5 licensing may already have access to many of the tools that can help identify and reduce Copilot-related risk, but licensing alone does not reduce exposure. What’s often missing during early Copilot deployments is a clear understanding of the risk surface itself: what data is exposed, who can access it, and through which vectors.
Update Coverage Workbook in Microsoft Defender for Cloud to Include Defender for AI Plan status
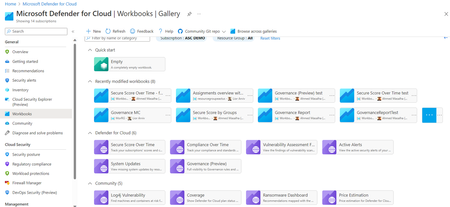
Option 1: Update the Existing Coverage Workbook Enhance the current workbook by adding a query that checks Defender for AI plan enablement across subscriptions. Steps Open the Coverage Workbook in Defender for Cloud. Edit the workbook and update the query section to include the line below. AIServices = defenderPlans.AI Display the results in a table or chart alongside other Defender plans. Save and publish the updated workbook for organization-wide visibility. Pros Single pane of glass for all Defender coverage. Easy for SOC teams already using the workbook. Cons Requires manual customization and maintenance. Updates may be overwritten during workbook template refresh. Option 2: Use Azure Resource Graph Explorer Run a Resource Graph query to check Defender for AI enablement status across multiple subscriptions without modifying the workbook. Steps Go to Azure Resource Graph Explorer in the Azure portal. Run the following query: __________________________________________________________________________________ securityresources | where type =~ "microsoft.security/pricings" | extend pricingTier = properties.pricingTier, subPlan = properties.subPlan | extend planSet = pack(name, level = case(isnotempty(subPlan),subPlan,pricingTier)) | summarize defenderPlans = make_bag(planSet) by subscriptionId | project subscriptionId, CloudPosture = defenderPlans.CloudPosture, VirtualMachines = defenderPlans.VirtualMachines, AppServices = defenderPlans.AppServices, AIServices = defenderPlans.AI, SqlServers = defenderPlans.SqlServers, SqlServerVirtualMachines = defenderPlans.SqlServerVirtualMachines, OpenSourceRelationalDatabases = defenderPlans.OpenSourceRelationalDatabases, CosmosDB = defenderPlans.CosmosDbs, StorageAccounts = defenderPlans.StorageAccounts, Containers = defenderPlans.Containers, KeyVaults = defenderPlans.KeyVaults, Arm = defenderPlans.Arm, DNS = defenderPlans.Dns, KubernetesService = defenderPlans.KubernetesService, ContainerRegistry = defenderPlans.ContainerRegistry The output appears as shown below. Export results to CSV or Power BI for reporting. Optionally, schedule the query using Azure Automation or Logic Apps for periodic checks. Pros No dependency on workbook customization. Flexible for ad hoc queries and automation. Cons Separate reporting interface from the Coverage Workbook. Requires manual execution or automation setup. Recommendation If your organization prefers a centralized dashboard, choose Option 1 and update the Coverage Workbook. For quick checks or automation, Option 2 using Resource Graph Explorer is simpler and more scalable.