agents
329 Topics
Using Jev with Agents in Microsoft Foundry for Model Evaluation
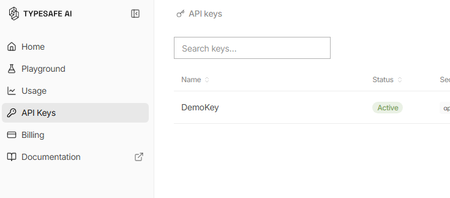
What is Jev? Jev is a new AI model from TypeSafe AI, first released in early access on 15 September 2026. TypeSafe describes Jev as its first “System One” model, designed specifically to make fast, structured decisions rather than generate free-form text. You provide Jev with some state or context and define the judgement you want it to make. It then returns a typed, probabilistic decision, such as: Choice: select from a defined set of options Score: evaluate something against an ordered scale Yes/No probability: determine the probability of a condition being true Unlike a conventional LLM, Jev gives up string generation in favour of type-safe structured values. Their description is essentially unstructured state in, typed probabilistic decisions out Why use Jev? Jev is particularly useful when an application needs to make a judgement rather than generate an answer. For example: Consistent evaluation against explicitly defined criteria Structured outputs that applications can consume directly Classification, assessment, routing and decision-support Agent workflows, where a judgement is required before taking an action Guardrails, such as assessing whether an agent should make a tool call Model routing, where a judgement determines which model or process should handle a request Every decision can also include a confidence or probability, allowing an application to use thresholds to decide when to proceed automatically or when further review is required. Jev and explainability Jev can provide a different approach to explainability for Model-as-a-Service (MaaS) and hosted LLM solutions. Traditional explainability techniques such as SHAP provide feature-attribution explanations for model predictions. Applying these techniques can be more difficult when the model is consumed solely through a hosted API and its internals are not available. Jev does not replace SHAP or provide the same type of feature-attribution explanation. Instead, it can be used as a separate judgement layer, evaluating an LLM's inputs, outputs or proposed actions against explicit criteria and returning structured decisions with confidence scores. For example: LLM generates an answer → Jev evaluates the answer → application decides what to do next This can provide a useful, measurable evaluation layer around otherwise opaque MaaS models. Could you do this with another LLM? Yes you could ask a conventional LLM to classify, score or evaluate an input and request structured JSON output. However, Jev has been purpose-built for this type of workload rather than general-purpose text generation. TypeSafe reports that Jev produces outputs in parallel rather than generating tokens sequentially, and its hosted service currently advertises typical decision latency of approximately 70–500 ms. Pricing As of September 2026, TypeSafe's documentation lists Jev 1.13 (jev-1.13.0) at $0.042 per million input tokens, with output tokens free. It lists rate limits of 250,000 tokens per second and 1,200 requests per minute, although TypeSafe states that these limits can change. As Jev produces decisions rather than generated text, you are effectively paying for the context it evaluates rather than for generated output. Pricing is subject to change and these figures are accurate only as of the date of this article Using Jev with Microsoft Foundry A useful pattern with Microsoft Foundry is to treat Jev as a specialised judgement/evaluation component alongside your generative models: User/Application → Foundry model or agent → Jev judgement → deterministic logic → action/response For example, a Foundry-hosted model could generate a proposed answer and Jev could evaluate that answer against predefined criteria before your application allows the workflow to continue. Here's how to set it up: First, you will need to apply for the preview for Jev from TypeSafe. Once you have an account you will need to create an API key Go to API keys in the menu and create a new key (copy the key for use in Foundry) You may also have received some free credit, which should be more than sufficient for experimenting with Jev given its low per-token cost. Next we go to Foundry and create a new agent for Jev In your agent, add a Tool and select OpenAPI tool as below Fill out the dialogue as follows You will have to create a new connection - The key should be in this format "Bearer apikey_<the rest of your key>" For the schema add this { "openapi": "3.0.3", "info": { "title": "TypeSafe Jev System One", "version": "1.1.0", "description": "Evaluate content using TypeSafe Jev System One." }, "servers": [ { "url": "https://api.typesafe.ai" } ], "paths": { "/v1/systemone": { "post": { "operationId": "evaluate_with_jev", "summary": "Evaluate content using Jev", "description": "Evaluate state against typed questions using TypeSafe Jev.", "security": [ { "bearerAuth": [] } ], "requestBody": { "required": true, "content": { "application/json": { "schema": { "type": "object", "additionalProperties": false, "required": [ "state", "model", "questions" ], "properties": { "state": { "type": "string", "description": "The original text or content for Jev to evaluate." }, "model": { "type": "string", "enum": [ "jev-latest" ], "default": "jev-latest", "description": "The TypeSafe Jev model. Use jev-latest." }, "questions": { "type": "object", "description": "A map of named questions for Jev to answer. Each question must be a Noul, Choice, or Score question.", "additionalProperties": { "oneOf": [ { "$ref": "#/components/schemas/NoulQuestion" }, { "$ref": "#/components/schemas/ChoiceQuestion" }, { "$ref": "#/components/schemas/ScoreQuestion" } ] } } } } } } }, "responses": { "200": { "description": "Successful Jev evaluation", "content": { "application/json": { "schema": { "type": "object", "additionalProperties": true } } } }, "400": { "description": "Invalid request" }, "401": { "description": "Authentication failed" }, "422": { "description": "Request validation failed" } } } } }, "components": { "schemas": { "NoulQuestion": { "type": "object", "additionalProperties": false, "required": [ "type", "instructions" ], "properties": { "type": { "type": "string", "enum": [ "noul" ] }, "instructions": { "type": "string", "description": "The yes/no question for Jev to evaluate." }, "criteria": { "type": "object", "additionalProperties": false, "properties": { "true": { "type": "string", "description": "Description of what a yes or value near 1 means." }, "false": { "type": "string", "description": "Description of what a no or value near 0 means." } } } } }, "ChoiceQuestion": { "type": "object", "additionalProperties": false, "required": [ "type", "instructions", "criteria" ], "properties": { "type": { "type": "string", "enum": [ "choice" ] }, "instructions": { "type": "string", "description": "The question for Jev to decide between the supplied choices." }, "criteria": { "type": "object", "description": "A map where each property name is a possible choice and its value describes that choice.", "minProperties": 2, "additionalProperties": { "type": "string" } } } }, "ScoreQuestion": { "type": "object", "additionalProperties": false, "required": [ "type", "instructions", "criteria" ], "properties": { "type": { "type": "string", "enum": [ "score" ] }, "instructions": { "type": "string", "description": "The attribute or question Jev should score." }, "criteria": { "type": "array", "description": "Ordered scoring levels from lowest to highest.", "minItems": 2, "items": { "type": "string" } } } } }, "securitySchemes": { "bearerAuth": { "type": "apiKey", "name": "Authorization", "in": "header" } } }, "security": [ { "bearerAuth": [] } ] } We are going to use Jev to assess complaints so our instructions for the Agent will be You are a customer-support triage agent. For every customer-support message you MUST call the evaluate_with_jev tool. IMPORTANT: When calling evaluate_with_jev, construct Jev questions using ONLY the following property names: For a Noul question: { "type": "noul", "instructions": "...", "criteria": { "true": "...", "false": "..." } } For a Choice question: { "type": "choice", "instructions": "...", "criteria": { "option1": "...", "option2": "..." } } For a Score question: { "type": "score", "instructions": "...", "criteria": [ "lowest level", "middle level", "highest level" ] } NEVER use these properties: - question - prompt - options - ordered_criteria Always use: - instructions - criteria For customer support tickets, ask Jev these three questions: billing: type = noul instructions = "Does this ticket concern billing, payments, charges, invoices or refunds?" criteria.true = "The issue concerns billing or a financial transaction." criteria.false = "The issue does not concern billing or a financial transaction." tone: type = choice instructions = "What is the customer's tone?" criteria: calm = "Neutral, polite or informational." frustrated = "Dissatisfied, impatient or inconvenienced." angry = "Strongly confrontational or extremely dissatisfied." urgency: type = score instructions = "How urgently does this ticket require attention?" criteria in this exact order: 1. "Can wait" 2. "Handle this week" 3. "Handle today" Always set model to "jev-latest". Pass the customer's original message as state. Do not classify the ticket yourself. Use the values returned by Jev. Always show the Jev output at the end of the response Now we can give a complaint and see what Jev says The room had no water in and one of the towels was dirty Response I’m sorry about the issues you experienced—no running water and a dirty towel are unacceptable. I’ll get this addressed right away. Immediate help I can arrange now: Send maintenance to restore water. Have housekeeping deliver fresh towels and re-service the bathroom. Provide bottled water immediately. If water can’t be restored quickly, arrange a room move. Please share: Your reservation name and room number Best contact number Whether there’s no water at all or only hot/cold is affected Whether you prefer immediate service or a room change If you’ve already left, let me know the date/time this happened so we can investigate and follow up. Jev output: { "model": "jev-1.13.0", "answers": { "billing": { "type": "noul", "noul": 0.02 }, "tone": { "type": "choice", "choice": "frustrated", "confidence": 0.6, "probabilities": { "frustrated": 0.74, "calm": 0.26, "angry": 0.0 } }, "urgency": { "type": "score", "score": 1.81, "confidence": 0.72, "legend": { "0": "Can wait", "1": "Handle this week", "2": "Handle today" }, "probabilities": { "0": 0.03, "1": 0.12, "2": 0.85 } } }, "usage": { "input_tokens": 466, "output_tokens": 75 } } We can now see both Jev's decision and the probabilities behind it. In this example, Jev determines that the complaint is very unlikely to be billing-related, identifies the customer's tone as frustrated, and gives a high probability that the issue should be handled today. This is where Jev becomes particularly useful in an agent workflow. Rather than relying on generated text to drive the next step, our application can use these structured probabilities to make deterministic decisions, such as routing the complaint, escalating it, or requiring human review when confidence falls below a defined threshold.
Amplify Healthcare Intelligence: Data, AI, and Agent-Powered Transformation
Join Microsoft for Amplify Healthcare Intelligence, a webinar and in-person workshop series designed for healthcare and life sciences organizations building the foundation for trusted AI. Every session starts from the same premise: you cannot deliver trusted AI without a trusted data foundation. Across the series you will see how leading organizations unify their data estate, ground AI agents in real business context, and turn that foundation into results they can measure. What You Will Learn How to build a unified, AI-ready data foundation across a fragmented healthcare data estate How to ground AI agents in trusted healthcare data and real business context How to modernize analytics while reducing complexity and cost How to accelerate innovation with Microsoft Fabric, Azure AI Foundry, Microsoft IQ, and Copilot technologies How to deliver measurable impact across clinical, operational, research, and business scenarios Whether you are defining your AI strategy, modernizing your analytics platform, or scaling AI across your organization, these sessions offer practical guidance, real-world customer examples, and hands-on learning to help you move from AI ambition to business impact. Webinars & In-Person Workshops 🎥 Webinars One-hour virtual sessions with actionable guidance, live demonstrations, customer stories, and best practices from Microsoft experts. Each webinar shows how leading healthcare organizations are turning data, AI, and enterprise intelligence into measurable business outcomes. All sessions are from 3-4 ET (12-1 PT) and are free to attend. Date Topic Register Oct 7 3-4 ET (12-1 PT) Building an AI-Ready Healthcare Data Foundation Register Oct 14 3-4 ET (12-1 PT) Building Trusted Healthcare AI: Grounding Agents with Enterprise Data and Context Register Oct 21 3-4 ET (12-1 PT) Finance in the Agent Era: AI-Powered Planning, Forecasting, and Insights Register Oct 28 3-4 ET (12-1 PT) Reduce BI Sprawl, Cut Cost and Build an AI-Ready Analytics Foundation Register Cannot join live? Register anyway. We will send you the recording and session materials after the event. Additional sessions will be added through the end of the year, so check back or register for one session to be notified as new dates are announced. 🏢 In-Person Workshops Our two-day workshops combine executive strategy, healthcare-specific use cases, architecture guidance, and hands-on labs designed to help teams identify and accelerate high-value AI opportunities. Attendance is free. Participants are responsible for their own travel and accommodation, and space at each location is limited. Workshops run 9am to 4pm local time on both days. Day 1: From Healthcare Data to Healthcare Intelligence Day 1 focuses on healthcare transformation strategy, customer examples, and the architectural patterns that make trusted AI possible at scale. The day closes with a networking reception and peer exchange. The Frontier Transformation imperative: from AI ambition to measurable impact Microsoft IQ: turning data into enterprise intelligence Building the unified data foundation Building trusted AI: security, governance, privacy, and compliance Healthcare transformation in action: clinical, operational, research, and finance scenarios Activating data with AI data agents and Copilot experiences Day 2: Hands-On Healthcare AI and Analytics Lab Day 2 is a guided, end-to-end lab. Participants build a working healthcare intelligence solution from raw data through to a grounded AI agent, using Microsoft Fabric, Azure AI Foundry, Copilot technologies, and modern data architectures. Build the foundation: data ingestion, lakehouse architecture, and data engineering Create actionable insights: semantic models and dashboards Prepare data for AI: AI-ready data assets and data governance Build and ground AI agents in trusted enterprise data From insight to intelligent action: planning your organization's next steps What to bring: a laptop with a current browser. Lab environments and credentials are provided on site, and no prior Fabric or Foundry experience is assumed. Date City Venue Register October 13-14, 2026 9am - 4pm Boston Microsoft New England One Memorial Drive Cambridge, MA 02142 Register October 27-28, 2026 9am - 4pm Silicon Valley Microsoft Silicon Valley 1045 La Avenida Street Mountain View, CA 94043 Register November 10-11, 2026 9am - 4pm Chicago Microsoft Chicago (AON Center) 200 East Randolph Drive, Suite 200 Chicago, IL 60601 Register December 8-9, 2026 9am - 4pm New York Microsoft Garage 300 Lafayette Street New York, NY 10012 Register Who Should Attend This series is built for the people who own the data estate and the people who depend on it. Sessions are technical enough for practitioners and strategic enough for the leaders who fund the work. Chief data officers and data and analytics leaders Data platform, data engineering, and business intelligence teams Data architects, engineers, and data scientists AI and innovation leaders Healthcare and life sciences executives Clinical, operational, research, and finance transformation leaders No prior Microsoft Fabric experience is required for any session in this series. Questions Wondering whether a session is the right fit, or whether to bring a team rather than an individual? Contact Camille Whicker and we will help you choose the right sessions for your organization.Copilot, Microsoft 365 & Power Platform Community call
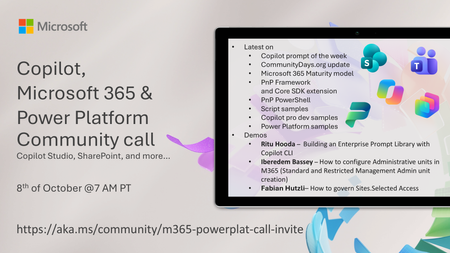
💡 Copilot, Microsoft 365 & Power Platform weekly community call focuses on different use cases and features within the Microsoft 365 and Power Platform - across Microsoft 365 Copilot, Copilot Studio, SharePoint, Power Apps and more. Demos in this call are presented by the community members. 👏 Looking to catch up on the latest news and updates, including cool community demos, this call is for you! 📅 On 8th of October we'll have following agenda: Latest news and events from Microsoft Topics Copilot prompt of the week CommunityDays.org update Microsoft 365 Maturity model PnP Framework and Core SDK extension PnP PowerShell Script samples Copilot pro dev samples Power Platform samples Demos this time Ritu Hooda – Building an Enterprise Prompt Library with Copilot CLI Iberedem Bassey – How to configure Administrative units in M365 (Standard and Restricted Management Admin unit creation) Fabian Hutzli – How to govern Sites.Selected Access 📅 Download recurrent invite from https://aka.ms/community/m365-powerplat-dev-call-invite 📞 & 📺 Join the Microsoft Teams meeting live at https://aka.ms/community/m365-powerplat-dev-call-join 💡 Building something cool for Microsoft 365 or Power Platform (Copilot, SharePoint, Power Apps, etc)? We are always looking for presenters - Volunteer for a community call demo at https://aka.ms/community/request/demo 👋 See you in the call! 📖 Resources: Previous community call recordings and demos from the Microsoft Community Learning YouTube channel at https://aka.ms/community/youtube Microsoft 365 & Power Platform samples from Microsoft and community - https://aka.ms/community/samples Microsoft 365 & Power Platform community details - https://aka.ms/community/home 🧡 Sharing is caring!189Views0likes0CommentsCopilot, Microsoft 365 & Power Platform product updates call
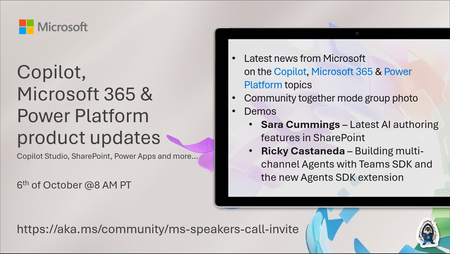
💡Copilot, Microsoft 365 & Power Platform product updates call concentrates on the different use cases and features within the Microsoft 365 and in Power Platform. Call includes topics like Microsoft 365 Copilot, Copilot Studio, Microsoft Teams, Power Platform, Microsoft Graph, Microsoft Viva, Microsoft Search, Microsoft Lists, SharePoint, Power Automate, Power Apps and more. 👏 Weekly Tuesday call is for all community members to see Microsoft PMs, engineering and Cloud Advocates showcasing the art of possible with Microsoft 365 and Power Platform. 📅 On the 6th of October we'll have following agenda: News and updates from Microsoft Together mode group photo Sara Cummings – Latest AI authoring features in SharePoint Ricky Castaneda – Building multi-channel Agents with Teams SDK and the new Agents SDK extension 📞 & 📺 Join the Microsoft Teams meeting live at https://aka.ms/community/ms-speakers-call-join 🗓️ Download recurrent invite for this weekly call from https://aka.ms/community/ms-speakers-call-invite 👋 See you in the call! 💡 Building something cool for Microsoft 365 or Power Platform (Copilot, SharePoint, Power Apps, etc)? We are always looking for presenters - Volunteer for a community call demo at https://aka.ms/community/request/demo 📖 Resources: Previous community call recordings and demos from the Microsoft Community Learning YouTube channel at https://aka.ms/community/youtube Microsoft 365 & Power Platform samples from Microsoft and community - https://aka.ms/community/samples Microsoft 365 & Power Platform community details - https://aka.ms/community/home 🧡 Sharing is caring!154Views0likes0CommentsWhen AI Starts Taking Action: Building Execution Boundaries with OpenSandbox and AKS
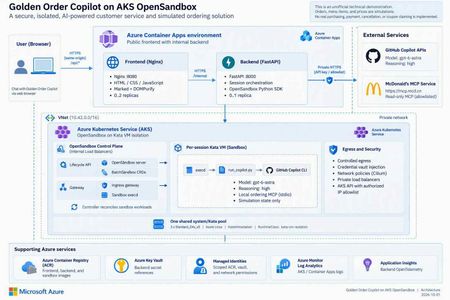
1. An agent needs more than a smarter model Imagine you are building a food-ordering assistant. In its first version, it says, “You might enjoy a burger and fries.” That is primarily a content-generation problem. In the next version, it queries coupons, reads a menu, calculates prices, creates files, and calls a local program to create an order. The engineering problem has changed. You are no longer asking a model to speak. You are allowing software to act on someone's behalf. This is a distinction I emphasize in technical talks: model capability determines what the agent can propose; the execution platform determines where, with which permissions, and for how long those proposals can become actions. Running every agent's tool processes inside the business API container creates awkward coupling. Leftover files, stuck processes, dependency changes, or excessive resource consumption from one session can affect another. Even if customers cannot invoke an arbitrary shell, CLI processes, tool dependencies, and temporary state still need boundaries. A sandbox is therefore not an instruction that says “please be safe.” It is a working environment with a lifecycle, a resource budget, and an access policy. Figure 1. A tool protocol, a working environment, and runtime isolation solve different problems. 2. Separate three concepts that often get conflated MCP describes tool interaction; it does not put tools inside a VM The Model Context Protocol gives model-facing applications a consistent way to discover and invoke tools. But “called through MCP” does not automatically mean “executed within a security boundary.” An MCP server can run on a developer's laptop, in a business-service container, remotely, or in a dedicated sandbox. Whether a tool can write data, who may invoke it, and how its side effects can be reversed are separate design questions. OpenSandbox makes the working environment an application resource OpenSandbox is an open-source platform for agent execution environments. It exposes sandbox lifecycle, command execution, file operations, and network-access capabilities. Applications use SDKs and APIs to create environments, run work, retrieve results, and clean up. Docker supports a local starting point; Kubernetes provides a cluster deployment path.1 Think of it as a workspace management system: it allocates a room, delivers materials, exposes ways to work, and reclaims the room at the end of its lease. The strength of the walls depends on the runtime and deployment underneath. OpenSandbox is not a language model, not a replacement for Kubernetes, and not synonymous with Kata. The upstream project also provides pools, multiple runtime paths, and snapshot-related capabilities. Availability, state semantics, and infrastructure requirements must be checked against the selected version and runtime. A project-wide feature list is not a promise that every backend behaves identically.1, 5 Kata adds a separate guest kernel to the sandbox pod Conventional containers generally share the host kernel. Kata Containers runs workloads in lightweight virtual machines, adding a VM boundary. With AKS Pod Sandboxing, the isolation unit is the pod using the Kata runtime, with its own guest kernel.2, 3 That does not mean every container in the same pod gets its own VM. Nor does a VM replace application authentication, outbound restrictions, or business approvals. The useful summary is: MCP defines the tool interface. OpenSandbox manages the working environment. Kata provides runtime isolation. The application still owns authorization and business rules. 3. What does “per-session Kata VM” actually isolate? In this project, a session is identified by session_id. The backend creates an OpenSandbox sandbox for a new session, and its pod selects the Kata RuntimeClass. Later requests in the same session reuse that environment. Several distinctions matter: It is not a new VM for every message. Related turns can reuse files and temporary state produced by the tools. It is not an Azure VM purchased for every user. Kata pod VMs run on AKS nodes; multiple sandboxes can share a node's underlying compute resources. It is not one sandbox per node. Capacity depends on resource settings, VM overhead, system components, and concurrent work. A session ID is not authorization. It identifies routing and resource mappings; production services must validate session ownership. My favorite analogy is a campus: AKS is the campus, nodes are buildings, Kata sandboxes are workrooms, and OpenSandbox is the workspace management system. A session repeatedly uses the same room; a lifecycle policy eventually clears it. That final step matters. Files surviving between turns does not mean they survive sandbox deletion. Orders, code artifacts, or audit records that must outlive the environment need explicit, governed persistence. Figure 2. This project hosts its frontend and backend in regular ACA, and OpenSandbox/Kata on AKS. Model inference is called through an external API, not hosted on the AKS nodes. 4. OpenSandbox on AKS: installation is not the finish line Kubernetes supplies scheduling and declarative resource management. OpenSandbox turns that infrastructure into sandbox operations that an application can consume. The execution path in this project is: The FastAPI backend requests a sandbox through the OpenSandbox SDK. The lifecycle service creates a BatchSandbox resource. The controller reconciles that declaration into a sandbox pod. The pod starts with the Kata runtime. The SDK accesses execd through the gateway for command and file operations. Deletion or expiration reclaims the sandbox. The upstream Kubernetes operator also supports pool allocation. However, warming an image in this sample is not the same as maintaining a ready-to-allocate pool of sandbox instances. Cached image layers and ready idle sandboxes are different latency optimizations.5 4.1 Declare the runtime, then verify the running boundary The important part of the project's BatchSandbox pod template is: spec: runtimeClassName: kata-vm-isolation nodeSelector: kubernetes.azure.com/kata-vm-isolation: "true" securityContext: seccompProfile: type: RuntimeDefault This is a fragment of the pod template, not a complete manifest that works independently of cluster prerequisites. The deployed example uses one shared system/Kata pool: three Standard_D4s_v5 Azure Linux nodes with KataVmIsolation, created through AKS API 2026-07-01. The model is gpt-6-astra accessed through GitHub Copilot APIs; this is not a GPU model-serving deployment. To avoid confusing “Kata appears in the configuration” with “the boundary is working,” deployment checks inspect the actual pool properties, three Ready nodes, the RuntimeClass, and the guest kernel inside a temporary Kata pod. The kernel check is a deployment acceptance signal, not a formal proof of the entire system's security. 4.2 More platform control also means more platform ownership OpenSandbox on AKS gives a team control over its runtime, images, network layout, and application integration. It also leaves the team responsible for node capacity, image provenance, control-plane upgrades, resource budgets, observability, recovery, and removal of temporary installation privileges. For simplicity, this demonstration uses a shared system/Kata pool. Three nodes are not presented as a high-availability guarantee. A production design should reconsider dedicated system and workload pools, zones, quotas, and tenant separation rather than copy the demonstration's footprint. 4.3 Credentials should be usable without being casually readable Credential Vault is especially interesting here. The trusted backend supplies credentials and bindings to OpenSandbox's egress sidecar. The Copilot workload process receives placeholders; the proxy injects authentication into matching outbound HTTPS requests.4 Precision matters: this reduces the workload's direct access to long-lived credentials; it does not make credentials disappear from the system. The backend and egress sidecar remain in the trusted computing base. It would be inaccurate to claim that real credentials can never exist anywhere within the pod VM. Preventing a model from reading a token also does not prevent misuse of operations authorized by that token. This project still restricts remote tools to read-only operations and uses exact hostname bindings for credential injection. Production systems should further scope operations, paths, tenants, and data. The upstream guide also explains that Kubernetes pause/resume can recreate the sidecar, requiring a trusted client to repopulate its in-memory vault.4 That distinction is valuable: restoring compute state, restoring identity context, and restoring business permissions are different operations. 5. Before comparing ACA Sandbox, stop treating it as another name for Dynamic Sessions Azure Container Apps includes several compute models: Model Primary concern Regular Container Apps Web apps, APIs, continuous services, and replica scaling Jobs Tasks that start, run, and complete Dynamic Sessions Isolated execution through a session pool and identifier Sandboxes Explicit lifecycle, state, and policy control over individual environments The current official overview describes ACA Sandboxes as a distinct resource model. A Microsoft.App/SandboxGroups resource is the management boundary for sandboxes, disk images, snapshots, volumes, and related resources. Documented capabilities include suspend/resume, memory and disk state, ports, egress policies, and Azure Blob/Data Disk volumes.6 Integration has its own control-plane contract: ARM manages sandbox groups, while the Sandboxes data plane manages individual instances, files, and related resources. The documentation requires a Microsoft Entra ID identity and the Container Apps SandboxGroup Data Owner role for sandbox management, assigned at an appropriate scope rather than granting broad access by default. These platform access requirements still do not replace your application's end-user authentication and authorization.6 Dynamic Sessions centers on Session Pool + identifier. A pool allocates a session, routes related requests to it, and reclaims it according to lifecycle and cooldown settings. Context can survive while that session exists; calling it “completely stateless per request” would be misleading. But it is not the same abstraction as a workspace with explicit snapshot and volume management.7, 8 There is also a release-status caveat. At the time of review, Microsoft Learn described these Sandboxes capabilities, while Microsoft's earlier repository documentation still carried an Early Access label and warned that early resources might need recreation.9 This article does not infer universal GA or regional access, nor does it treat the older “SDK coming soon” wording as current. Verify access, SDKs, RBAC, networking options, and service terms before adoption. Figure 3. This is an ownership comparison, not a security rating or performance ranking. 5.1 A comparison that helps make a decision Dimension OpenSandbox on AKS: this project's path ACA Sandboxes ACA Dynamic Sessions Main object OpenSandbox sandbox and Kubernetes workload Sandbox group and individual sandbox Session pool and identifier Platform operations Team operates OpenSandbox and configures AKS workloads/nodes; Azure still manages the AKS control plane Azure manages underlying infrastructure; the app explicitly manages sandbox lifecycle Azure manages pool allocation and session lifecycle Isolation This project explicitly selects Kata pod VMs Documented independent security boundary; this article does not infer a particular open-source runtime Officially documented Hyper-V isolation State Temporary per-session state here; upstream persistence/snapshot paths need separate configuration and validation Explicit suspend, resume, snapshots, and volumes Context while a session exists; treat state as ephemeral after reclamation Images and tools Custom images, CLI, MCP, and runtime policy OCI images converted to root filesystems; validate workload compatibility Built-in interpreters or custom container pools Network and credentials Team combines private networking, egress policy, Vault, and app authorization Service identity/network/policy capabilities; do not assume equivalence to OpenSandbox Vault Pool access and network controls; app owns identity and tool authorization Startup experience Depends on cache, scheduling, runtime, and initialization; no instant-start guarantee in this sample Documentation describes prewarmed subsecond startup/restore; measure your own workload Documentation describes low-latency prewarmed allocation; distinguish spare pool capacity from cold starts Team fit Kubernetes expertise and a need for deeper runtime control Managed infrastructure with explicit workspace state control Managed execution sessions without managing every environment's full lifecycle The ACA entries describe documented capabilities, not measurements from this project.6, 7, 8 A shared OCI image format does not make SDKs and APIs interchangeable. The existing backend depends on OpenSandbox creation, command-log, health, credential-proxy, and deletion semantics. Moving it to ACA Sandboxes requires mapping and testing those contracts, not changing an endpoint URL. Cost is also more than a price per hour. A useful measure is total cost per successfully completed task: execution resources, warm capacity, state storage, images, networking, logs, model usage, and operational effort. ACA documentation says stopped sandboxes incur no CPU/memory fees; that does not zero the bill for the application, storage, or dependencies. Deleting an AKS sandbox does not eliminate fixed node costs either.6 6. How I would choose for different scenarios Scenario A: upload a CSV and ask AI to run a short analysis If work is brief, the built-in runtime is sufficient, and state can be discarded afterward, I would evaluate Dynamic Sessions first to reduce platform work. Generated code remains untrusted input, and downloadable outputs still need content and authorization checks. Scenario B: a coding agent that works across turns and time This agent may need dependencies, a source tree, and process state. A user leaves, the environment pauses, and work continues later. ACA Sandboxes' explicit lifecycle is a compelling capability to validate. The design must still decide what may enter a snapshot, how credentials are reauthorized after restore, and how deletion policies meet business obligations. Scenario C: an enterprise with an established AKS platform If a team needs existing Kubernetes governance, runtime control, custom toolchains, or a platform built around a unified sandbox API, OpenSandbox on AKS is attractive. Its benefit is control and composability, not the assumption that open source removes operating costs. Scenario D: the agent only calls a governed business API If there is no generated-code execution, local tool process, or temporary filesystem requirement, a sandbox per user may be unnecessary. A regular ACA API with authentication, server-side permissions, and a well-defined tool gateway can be simpler. Not every agent needs a sandbox platform. These choices are not mutually exclusive. Our project uses regular ACA for the lightweight web/API layer and AKS for the execution plane. Different task classes could eventually use different execution backends, provided identity, lifecycle, results, and error contracts are explicit. 7. The concrete example: an ordering assistant that does not place real orders Project: kinfey/aks_opensbx_ghc_demo. This is an unofficial McDonald's-themed technical demonstration, not an official service or a real transaction system. Its value is not that AI can recommend a burger. It places several boundaries in an understandable business story: Application boundary: a public Nginx frontend and an internal FastAPI backend. Execution boundary: per-session OpenSandbox/Kata running Copilot CLI and local MCP. Operation boundary: selected read-only remote queries; order creation exists only in local simulation tools. Credential boundary: placeholders in the CLI workload, with authentication injected for allowed requests by a trusted egress proxy. Presentation boundary: original Markdown preserved in transit and sanitized before browser rendering. Figure 4. Querying external information and writing a simulated order are different paths, even when they appear in the same conversation. 7.1 What should a reasonable interaction look like? The following is an illustrative workflow, not an invented transcript of a live customer: A user asks, “Check current offers, then calculate a simulated meal.” The backend creates or reuses the session sandbox. Copilot invokes a read-only remote MCP tool for official offers rather than inventing them. Local get_menu and calculate_order tools price the simulation, clearly distinguished from official quotes. The assistant displays items and the total and asks for confirmation. Only after confirmation does it call local create_order, producing an explicitly simulated order. Session completion or the idle policy triggers sandbox cleanup; the order file is not retained as a durable business record. The tool rejects confirmed=false. Its limit should also be clear in any technical presentation: an agent-supplied boolean is not an independently authenticated, auditable purchase-approval system. Real commerce would require server-verifiable authorization bound to a user and the exact order contents. The current backend keeps session mappings in memory, runs at most one replica, and does not provide public user login or authenticated session ownership. These are demonstration constraints, not a production multitenancy template.10 7.2 Three lessons from making it work First: startup latency is not one number. An initial pull of the roughly 2.8 GB sandbox image took almost six minutes. That delay was not slow model inference, and it could not simply be attributed to feature approval. We moved image warmup outside the user request path and waited for actual execd health. End-to-end latency = queue/scheduling + image pull + guest startup + certificate/proxy setup + CLI startup + model/tool execution + result transport and rendering This is why a documented subsecond allocation from warm capacity should not be compared directly with one cold image pull in this project. A meaningful evaluation controls the image, cache state, concurrency, region, and measurement boundary, then tracks percentiles, failure rates, and cost per successful task. Second: a working isolation boundary does not guarantee a working data contract. We encountered a deceptively simple issue: the web renderer supported Markdown, but real replies still had no proper tables. CSS was not the problem: Copilot's default terminal output had already converted Markdown tables into character borders. Execd's line-oriented logging removed the terminators from nonempty lines. The fix extracted original assistant content from CLI JSONL, encoded it in a single-line JSON envelope across command logs, and decoded it back into Markdown in the backend. Marked and DOMPurify then preserved tables, headings, and code without inserting arbitrary model-generated HTML directly into the page. Third: acceptance must cover the real path. A browser test with a fixed reply proves that the renderer works, not that model output survives the CLI, logs, and API. The project added a live-model test that checks raw Markdown, actual DOM tables, mobile layout, and confirmed sandbox deletion.11 Similarly, successful remote tool use should be established from tool-execution events, not merely from the model saying “I checked.” The broader engineering rule is the same: prove completion with structured results and actual side effects, not a success-shaped sentence. 8. What I would add before calling this production I would not start by adding more tools. I would answer five questions: Question Required design Who owns the session? Authentication, tenant binding, server-side session ownership, and resource authorization Which state deserves to survive? Separate temporary workspace files, durable artifacts, business orders, and audit records Who may cause side effects? User approval bound to contents, idempotency, and auditable authorization beyond model instructions Where can the system fail? Stage-level startup metrics, admission control, budgets, timeouts, retries, and resource reclamation Can the execution backend change? Contract tests for create, execute, files, credentials, state restoration, and deletion For the last question, ACA Sandboxes is a worthwhile alternative backend to evaluate. But it should be a measured migration experiment with a deliberate identity design, not an untested promise of a seamless swap. Closing thought: an agent platform puts capability inside boundaries OpenSandbox gives applications an abstraction for working environments. AKS and Kata let a team implement that abstraction on observable, configurable infrastructure. ACA Sandboxes and Dynamic Sessions offer managed alternatives with different levels of operational ownership. I prefer to rewrite the selection question as three questions: What do we need to control? What are we willing to operate? How will we prove that execution completed as intended? Those questions are more useful than a simple “self-hosted versus serverless” debate. A reliable AI application needs both a capable model and a workspace with clear boundaries, a reclaimable lifecycle, and an auditable record of what happened. Further reading and scope Full deployment instructions: English README. Runnable source: project repository. The four diagram sets are original technical illustrations. imgs/ contains Chinese and English PNGs, scalable SVGs, and matching editable .excalidraw files. They are not benchmarks or product certifications. Resource descriptions are generic. Supply your own AZURE_RESOURCE_GROUP, AKS_NAME, and other configuration when reproducing the deployment. Sources OpenSandbox: scope, SDKs, runtimes, and examples Kata Containers: lightweight VM isolation OpenSandbox Credential Vault: broker and restore semantics, pinned revision OpenSandbox Kubernetes operator: BatchSandbox, Pool, snapshots, pinned revision Azure Container Apps Sandboxes overview Azure Container Apps Dynamic Sessions overview Official comparison of Dynamic Sessions and Sandboxes Microsoft's earlier ACA Sandboxes Early Access documentation This project: session management and runtime boundaries This project: real-reply end-to-end browser test258Views0likes0CommentsLand Your Offer - Anatomy of Revenue Generating Partner Offer - Part 2 - Copilot Envisioning
In Part 1 we dissected Copilot in 30 — a $0 trial offer for SMB customers. This time the customer is larger, the engagement is funded rather than free, and the anatomy of revenue changes with it. It also lands when Microsoft just introduced the new Copilot — Home, Code and Autopilot, running on usage-based billing and governed through FinOps for AI — which makes a structured envisioning engagement the front door to a much bigger conversation. Most organisations with 300 or more seats already believe Copilot and agents matter. What they lack is a clear picture of where AI will pay off, what it will take to get ready, and how they'll prove it before committing budget. The Frontier Accelerate for Copilot: Envisioning & POC engagement gives you a pre-sales, partner-led answer to all three — funded by Microsoft and sized from a 10-hour readiness sprint to a 280-hour enterprise programme. Package it as a Microsoft Marketplace offer and you have a repeatable front door to every Copilot, Agent 365 and Microsoft 365 E7 opportunity in your territory. Start Here: Why Publishing on Microsoft Marketplace Matters Microsoft Marketplace is Microsoft's partner-focused business platform, designed to help you reach more customers and simplify how you sell. A published offer gives your practice a permanent, discoverable storefront in the place customers and Microsoft sellers already look for Copilot expertise. More importantly, an offer turns your expertise into something repeatable. Define the engagement once — phases, activities, deliverables, sizing — and run it across every qualified customer instead of scoping from scratch. Professional service and managed service offer types are available in Partner Center, so one listing can carry the envisioning engagement, the POC and the ongoing services that follow. The Enterprise Opportunity: Interest Is High, Direction Is Missing The customers for this offer are organisations with at least 300 Office 365 / Microsoft 365 seats — mid-market through to the largest enterprises. They are the customers with the most to gain from Copilot and agents, and the most complexity to work through first: security and governance, tenant and access dependencies, adoption and change, and a credible way to measure value. That gap between ambition and a plan is where partners win. Microsoft is investing in the full Copilot journey in FY27, from envisioning and proof of concept through deployment and adoption — and the envisioning stage is where you shape the roadmap, the scope and the commercial conversation before anyone else does. Why Copilot and Agents Are the Right Place to Start Microsoft 365 Copilot puts AI inside the apps people already use every day — Outlook, Teams, Word, Excel and PowerPoint — so value arrives without a platform change. For larger organisations, that is only the first layer: Agent 365, custom agents built with Copilot Studio, and Microsoft 365 E7 extend Copilot from personal productivity into role-based and process-level automation. The new Copilot adds a third layer. Cowork takes delegated work and returns a finished result; Code lets knowledge workers build apps, dashboards and automations in natural language, hosted on Copilot Managed Runtime; and Autopilot is a persistent agent with its own identity that keeps work moving without a prompt. All three run on usage-based billing rather than the per-user subscription, which means every customer now has to decide which users and which scenarios justify consumption spend — and how to govern it with FinOps for AI. Each layer brings its own questions — which personas, which scenarios, what governance, what consumption model, which capabilities are worth paying for by the task — and each question is an envisioning conversation a partner is best placed to lead. Meet the Offer: Envisioning & POC, Sized to the Customer The Frontier Accelerate for Copilot: Envisioning & POC engagement is a pre-sales, partner-led engagement that identifies personas and use cases and builds a business case for Microsoft 365 Copilot, Agent 365, Microsoft 365 E7 and/or agents — with an optional proof of concept. The essentials: Who qualifies: Customers with a minimum of 300 Office 365 / Microsoft 365 seats; larger tiers unlock at 500, 1,000, 1,500, 3,000 / 5,000 and 10,000+ seats How it's sized: Six tiers — XXS (10 hrs), XS (20 hrs), S (40 hrs), M (100 hrs), L/XL (150 hrs) and XXL (280 hrs) — with hours scaling with the seats in scope What it covers: Five phases — Assess, Inspire, Design, POC and Executive Summary — with a working POC and measured results from the S tier upward What Microsoft provides: A delivery guide, pre-engagement planning resources and Microsoft Commercial Incentives (MCI) funding tied to proof of execution What the customer gets: Readiness findings, a business case and value plan including usage-based billing and Copilot Credits, technical requirements and a remediation plan, an adoption roadmap, a working POC and an executive readout Microsoft funds the engagement. You own the scope, the relationship and everything that follows. Your Role: From Trusted Assessor to Transformation Partner An envisioning engagement is not a workshop; it is a guided decision. Your job is to move the customer from curiosity to a signed proposal, with evidence at every step. Assess — identify high-value scenarios, choose the right assessments, define what success looks like and deliver readiness findings the customer can act on. Inspire — show what Copilot and agents can do across roles; make security, governance, adoption and reporting concrete rather than abstract concerns. Design — turn findings into a business case and value plan (including usage-based billing), a remediation plan, technical requirements, an adoption roadmap and clear POC criteria with risks, owners and dates. Prove — scope the POC users and products, prepare the environment, build the agent or solution, train the users and measure results including Copilot Credits consumed. Summarise — deliver the executive readout on seat growth and consumption, then convert: trial to paid licences, commercial proposal and signature, and a named wave 2 expansion plan. Every phase produces something the customer keeps — and every deliverable positions you as the partner who should build what comes next. Inside the Offer: Activities and Hours by Engagement Size Below is the full activity plan behind the offer, with hours for each of the six engagement sizes. Use it to size your own offer plans and statements of work. ID Phase Activity XXS XS S M L/XL XXL — Pre-req Customer eligibility (min. O365/M365 seats) 300+ 500+ 1,000+ 1,500+ 3,000+ / 5,000+ 10,000+ A1 Assess Identify high-value scenarios 0.5 1 1.75 3.75 5.5 10.5 A2 Assess Select assessment(s) 0.5 0.5 1 2.25 3.5 6.25 A3 Assess Define success 0.5 0.75 1.5 3 4.5 8.5 A4 Assess Deliver readiness assessment(s) 1 1.75 2.75 6 9 16.75 I1 Inspire Product overviews & demos across Copilot and agent capabilities 1 1.5 2 4.5 6.75 12.5 I2 Inspire Security/governance overview, incl. tenant and access dependencies 0.5 1 1.5 3 4.5 8.5 I3 Inspire Adoption/change overview 0.5 0.75 1 2.25 3.5 6.25 I4 Inspire Reporting/analytics overview 0.5 0.75 1 2.25 3.5 6.25 I5 Inspire Stories & Scenario Library 0.5 1 1.5 3 4.25 8.5 D1 Design Business case/value plan, incl. usage-based billing (UBB) 1 1.75 2.75 6.25 9.5 17.5 D2 Design Remediation plan 0.5 1 1.75 3.75 5.5 10.5 D3 Design Technical/functional requirements 0.75 1.5 2.25 5 7.5 14 D4 Design Adoption roadmap 0.5 1 1.75 3.75 5.5 10.5 D5 Design POC success criteria & environment prep 0.5 1 1.75 3.75 5.5 10.5 D6 Design Recommendations/risks/owners/dates, incl. validation and next-step owners 0.25 0.75 0.75 2.5 4 7 P1 POC Scope/users/products/features 0 0.25 1 3.5 5.25 9.75 P2 POC Confirm requirements/design 0 0.25 1 3.5 5.25 9.75 P3 POC IT access & environment prep 0 0.25 1.75 5.25 8 14.75 P4 POC Trial licenses 0 0.25 1 3.5 5.25 9.75 P5 POC Build POC agent(s)/solution(s); confirm Copilot Credits consumption 0 0.5 3.75 12.25 18.5 34.25 P6 POC Train POC users 0 0.25 1 3.5 5.25 9.75 P7 POC Measure/evaluate results, incl. usage and Copilot Credits consumed 0 0.25 1.5 3.5 5 10 E1 Exec summary Executive readout: seat growth and consumption implications 1 2 4 10 15 28 TOTAL Hours 10 20 40 100 150 280 Land Your Offer: What One Customer Is Worth The table below is the revenue anatomy of one Envisioning & POC engagement at each of the six sizes — and it shows that the funded engagement is only the first of three revenue streams. They stack on top of each other: MCI engagement incentive — Microsoft funds the envisioning and POC work itself, from $2K for a 10-hour XXS engagement to $100K for a 280-hour XXL programme, paid against proof of execution. CSP incentive on the licences that follow — earned on the Copilot revenue the business case unlocks, from the trial-to-paid conversion (T1) through the wave 2 expansion (X1), and growing as agent consumption and Copilot Credits scale. Managed services and follow-on professional services — the recurring engagement described in After the Readout, which is where the largest and most durable share of revenue lives. Item XXS XS S M L/XL XXL Minimum customer seats 300+ 500+ 1,000+ 1,500+ 3,000+ / 5,000+ 10,000+ Engagement hours 10 20 40 100 150 280 Post-delivery outcomes: Copilot rev (K) | Agent consumption (K) | Agent MAU 10 | 6 | 300 25 | 15 | 500 50 | 30 | 1,000 125 | 75 | 1,500 250/375 | 150/225 | 3,000/5,000 500 | 300 | 10,000 MCI engagement incentive (K) $2K $5K $10K $25K $50K / $75K $100K CSP incentive on Copilot revenue (K)† $1.95K $4.88K $9.75K $24.38K $48.75K / $73.13K $97.5K † CSP incentive shown at a blended 19.5% of the Copilot revenue outcome (direct bill 2.5 + 7 + 10; indirect reseller 7 + 12.5). Illustrative estimates from the offer plan — confirm current MCI payouts, CSP rates, eligibility and proof-of-execution requirements in the Microsoft Commercial Partner Incentives Guide. Now multiply. Everything above is the anatomy of a single customer. Landing the offer means running it across every qualifying customer in your territory — and you don't need to guess who they are. Partner Center's growth insights reporting, available through the AI Business Solutions & Security Insights (ASPX) dashboard, gives you account-level Copilot eligibility and seat whitespace, E7 opportunity, data security maturity, MCI eligibility and potential earnings for the customers you already manage. How the Offer Fits Together: From Sizing to Proof of Execution The offer runs left to right in three layers: Sizing & value — six engagement sizes from XXS (10 hrs) to XXL (280 hrs). Hours scale with the seats in scope, and value is tracked in the customer's own metrics. Five phases — Assess (A1–A4), Inspire (I1–I5), Design (D1–D6), POC (P1–P7) and Executive Summary (E1, T1, T2, X1). Each phase produces a concrete output the sponsor can see. Proof of execution — readiness and assessment findings; a business case and value plan including usage-based billing and Copilot Credits; technical requirements and a remediation plan; an adoption roadmap; a working POC with measured results; an executive readout covering next steps and consumption implications — and a named wave 2 expansion beyond the pilot team. The highlighted activities — security & governance (I2), adoption & change (I3), remediation plan (D2), technical requirements (D3), adoption roadmap (D4), IT access & environment (P3), build POC solution (P5), train POC users (P6), trial-to-paid conversion (T1), commercial proposal (T2) and the wave 2 expansion plan (X1) — are where the engagement stops being a project and becomes an ongoing relationship: managed services, ongoing optimisation and follow-on professional services after the engagement closes. After the Readout: Managed Services That Keep Delivering The executive readout is the start of the real engagement. Package these as standing services in your offer. Each one is sized in partner days so you can price it, and each one is tied to a result the customer's sponsor will recognise without a glossary: Managed service Partner activity — what you deliver and measure Customer business outcome — what it drives (illustrative targets, 1,500-seat customer) Deployment and remediation delivery • Effort: 5–10 days per wave • Activity: Close every item on the remediation plan and technical requirements (D2, D3) against dated owners, then licence and activate the wave's users by the roadmap date • Reported as: Items closed on time; seats activated; days from readout to go-live • Wave 1 live within 30 days of the readout, not 90 — two extra months of value on every seat • ≥95% of paid seats assigned and active; 75 idle seats would waste ≈$27K a year • Roll-out delivered within ±5% of the business-case budget Security and governance management • Effort: 2 days a month • Activity: Maintain the admin-settings baseline and data-protection controls, review agent permissions and access dependencies, approve plugins through the plugin registry and govern apps hosted on Copilot Managed Runtime, act on every Admin Settings Recommendation • Reported as: Recommended settings enabled; findings opened and closed; agents, plugins and apps with a named owner • Zero Copilot-related oversharing incidents; one enterprise data breach averages $4M+ • 100% of recommended settings on; findings closed within 30 days • Audit evidence produced in hours, not weeks — Data Security Maturity at Advanced-Healthy Adoption and change management • Effort: 3–4 days a month • Activity: Run the adoption roadmap (D4): coach champions, deliver role-based training, refresh scenarios, hold the monthly Copilot Analytics business review • Reported as: Active users as a share of assigned seats; people trained; low-activity users re-engaged • ≥80% of assigned seats active every month • 2–4 hours saved per user a week (≈3,000–6,000 hours across 1,500 seats) • ≈$0.5–1M a month of staff time released at $40/hour Agent and solution build-out • Effort: 5–15 days per agent or solution, then half a day a month to tune • Activity: Take each POC agent (P5) into production with Copilot Studio and Agent 365; release new Copilot Studio agents, Code-built apps and Autopilot agents from the scenario backlog, hosted on Copilot Managed Runtime • Reported as: Agents and apps live; active users per agent; tasks completed; Copilot Credits per completed task • 20–40% of tier-1 tickets or cases deflected per automated process • Cycle time cut 30–50% on each agent-run workflow; 200–500 hours removed a month per agent • Cost per completed task tracked and falling quarter on quarter FinOps for AI: consumption and licence management • Effort: 1-2 days a month • Activity: Track Copilot Credits and usage-based billing across Cowork, Code and Autopilot; set budgets, limits and model-family policies per user group; route credit requests through the customer's approval workflow; forecast spend and align seat additions, renewals and terms to each wave • Reported as: Reported as: Forecast versus actual variance; credits per active user; spend per business outcome; seats added; renewals completed on schedule • AI spend held within ±10% of forecast — no unplanned overage • Zero unused seats at renewal; 100% of renewals on schedule • Cost per outcome down 10–20% a year as usage matures Quarterly value reviews • Effort: 2 days a quarter • Activity: Refresh the business case (D1) with actuals, capture proof points in the customer's own words, agree and date the next named expansion wave with the executive sponsor • Reported as: Realised versus forecast value; proof points captured; next wave scheduled • ROI in dollars: ≈$125K a year of Copilot seats vs. $6M+ of time released • ≥3 quantified proof points in the sponsor's words each quarter • Each review dates the next wave: +100–300 seats or +1–2 agents a quarter Effort shown is indicative for an M-tier customer (1,500+ seats) and scales with seats and agents in scope, exactly as the engagement hours above do. Add the recurring rows together and one M-tier customer with three agents in production sustains roughly 9–10 partner days a month after the readout, before wave deployments and new agent or solution builds are counted. Every row pairs a number you can invoice against with a result the customer already cares about, which is what turns a recurring service into a renewable one and keeps you positioned as the customer's AI transformation partner as their ambitions grow. Each of these is a recurring, outcome-based service rather than a one-off project — and each keeps you positioned as the customer's AI transformation partner as their ambitions grow. Ready to Build Your Envisioning & POC Offer? Read the engagement terms in the Microsoft Commercial Partner Incentives Guide and download the delivery guide and pre-engagement planning resources. Confirm your eligibility for Microsoft Commercial Incentives engagements in Partner Center and align your delivery team on the five-phase model. Publish your offer in Partner Center as a professional service (Envisioning & POC) with a managed service follow-on (deployment, adoption and optimisation). Pick your first cohort — customers with 300+ Microsoft 365 seats and no clear Copilot or agent roadmap yet, then size each one to the right tier. Book the executive readout before Assess begins — so the conversion, proposal and wave 2 conversation is already on the calendar. The customers are already in your base. Publish the offer and open the conversation. Resources Frontier Accelerate for Copilot: Envisioning & POC | Microsoft Commercial Partner Incentives Guide Copilot Envisioning & POC — Delivery Guide Copilot Envisioning & POC — Pre-Engagement Planning The new Copilot is here: the opportunity for Microsoft partners300Views1like0CommentsCopilot, Microsoft 365 & Power Platform product updates call
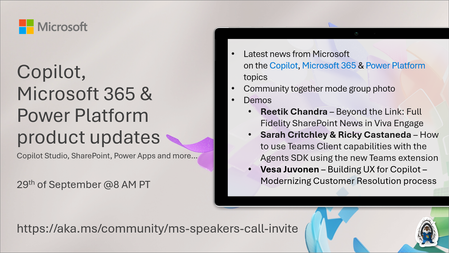
💡Copilot, Microsoft 365 & Power Platform product updates call concentrates on the different use cases and features within the Microsoft 365 and in Power Platform. Call includes topics like Microsoft 365 Copilot, Copilot Studio, Microsoft Teams, Power Platform, Microsoft Graph, Microsoft Viva, Microsoft Search, Microsoft Lists, SharePoint, Power Automate, Power Apps and more. 👏 Weekly Tuesday call is for all community members to see Microsoft PMs, engineering and Cloud Advocates showcasing the art of possible with Microsoft 365 and Power Platform. 📅 On the 29th of September we'll have following agenda: News and updates from Microsoft Together mode group photo Reetik Chandra – Beyond the Link: Full Fidelity SharePoint News in Viva Engage Sarah Critchley & Ricky Castaneda – How to use Teams Client capabilities with the Agents SDK using the new Teams extension Vesa Juvonen – Building UX for Copilot – Modernizing Customer Resolution process 📞 & 📺 Join the Microsoft Teams meeting live at https://aka.ms/community/ms-speakers-call-join 🗓️ Download recurrent invite for this weekly call from https://aka.ms/community/ms-speakers-call-invite 👋 See you in the call! 💡 Building something cool for Microsoft 365 or Power Platform (Copilot, SharePoint, Power Apps, etc)? We are always looking for presenters - Volunteer for a community call demo at https://aka.ms/community/request/demo 📖 Resources: Previous community call recordings and demos from the Microsoft Community Learning YouTube channel at https://aka.ms/community/youtube Microsoft 365 & Power Platform samples from Microsoft and community - https://aka.ms/community/samples Microsoft 365 & Power Platform community details - https://aka.ms/community/home 🧡 Sharing is caring!328Views0likes1CommentCopilot, Microsoft 365 & Power Platform Community call
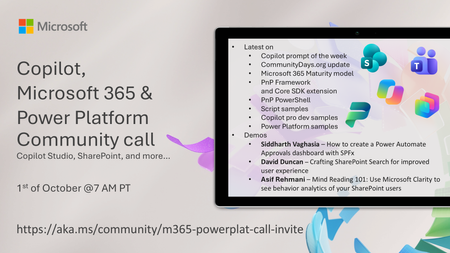
💡 Copilot, Microsoft 365 & Power Platform weekly community call focuses on different use cases and features within the Microsoft 365 and Power Platform - across Microsoft 365 Copilot, Copilot Studio, SharePoint, Power Apps and more. Demos in this call are presented by the community members. 👏 Looking to catch up on the latest news and updates, including cool community demos, this call is for you! 📅 On 1st of October we'll have following agenda: Latest on SharePoint Framework (SPFx) Latest on Copilot prompt of the week PnPjs CLI for Microsoft 365 Dev Proxy Reusable Controls for SPFx SPFx Toolkit VS Code extension PnP Search Solution Demos this time Siddharth Vaghasia – How to create a Power Automate Approvals dashboard with SPFx David Duncan – Crafting SharePoint Search for improved user experience Asif Rehmani – Mind Reading 101: Use Microsoft Clarity to see behavior analytics of your SharePoint users 📅 Download recurrent invite from https://aka.ms/community/m365-powerplat-dev-call-invite 📞 & 📺 Join the Microsoft Teams meeting live at https://aka.ms/community/m365-powerplat-dev-call-join 💡 Building something cool for Microsoft 365 or Power Platform (Copilot, SharePoint, Power Apps, etc)? We are always looking for presenters - Volunteer for a community call demo at https://aka.ms/community/request/demo 👋 See you in the call! 📖 Resources: Previous community call recordings and demos from the Microsoft Community Learning YouTube channel at https://aka.ms/community/youtube Microsoft 365 & Power Platform samples from Microsoft and community - https://aka.ms/community/samples Microsoft 365 & Power Platform community details - https://aka.ms/community/home 🧡 Sharing is caring!339Views0likes0Comments