.net
39 TopicsFrom Demo to Production: Building Microsoft Foundry Hosted Agents with .NET
The Gap Between a Demo and a Production Agent Let's be honest. Getting an AI agent to work in a demo takes an afternoon. Getting it to work reliably in production, tested, containerised, deployed, observable, and maintainable by a team. is a different problem entirely. Most tutorials stop at the point where the agent prints a response in a terminal. They don't show you how to structure your code, cover your tools with tests, wire up CI, or deploy to a managed runtime with a proper lifecycle. That gap between prototype and production is where developer teams lose weeks. Microsoft Foundry Hosted Agents close that gap with a managed container runtime for your own custom agent code. And the Hosted Agents Workshop for .NET gives you a complete, copy-paste-friendly path through the entire journey. from local run to deployed agent to chat UI, in six structured labs using .NET 10. This post walks you through what the workshop delivers, what you will build, and why the patterns it teaches matter far beyond the workshop itself. What Is a Microsoft Foundry Hosted Agent? Microsoft Foundry supports two distinct agent types, and understanding the difference is the first decision you will make as an agent developer. Prompt agents are lightweight agents backed by a model deployment and a system prompt. No custom code required. Ideal for simple Q&A, summarisation, or chat scenarios where the model's built-in reasoning is sufficient. Hosted agents are container-based agents that run your own code .NET, Python, or any framework you choose inside Foundry's managed runtime. You control the logic, the tools, the data access, and the orchestration. When your scenario requires custom tool integrations, deterministic business logic, multi-step workflow orchestration, or private API access, a hosted agent is the right choice. The Foundry runtime handles the managed infrastructure; you own the code. For the official deployment reference, see Deploy a hosted agent to Foundry Agent Service on Microsoft Learn. What the Workshop Delivers The Hosted Agents Workshop for .NET is a beginner-friendly, hands-on workshop that takes you through the full development and deployment path for a real hosted agent. It is structured around a concrete scenario: a Hosted Agent Readiness Coach that helps delivery teams answer questions like: Should this use case start as a prompt agent or a hosted agent? What should a pilot launch checklist include? How should a team troubleshoot common early setup problems? The scenario is purposefully practical. It is not a toy chatbot. It is the kind of tool a real team would build and hand to other engineers, which means it needs to be testable, deployable, and extensible. The workshop covers: Local development and validation with .NET 10 Copilot-assisted coding with repo-specific instructions Deterministic tool implementation with xUnit test coverage CI pipeline validation with GitHub Actions Secure deployment to Azure Container Registry and Microsoft Foundry Chat UI integration using Blazor What You Will Build By the end of the workshop, you will have a code-based hosted agent that exposes an OpenAI Responses-compatible /responses endpoint on port 8088 . The agent is backed by three deterministic local tools, implemented in WorkshopLab.Core : RecommendImplementationShape — analyses a scenario and recommends hosted or prompt agent based on its requirements BuildLaunchChecklist — generates a pilot launch checklist for a given use case TroubleshootHostedAgent — returns structured troubleshooting guidance for common setup problems These tools are deterministic by design, no LLM call required to return a result. That choice makes them fast, predictable, and fully testable, which is the right architecture for business logic in a production agent. The end-to-end architecture looks like this: The Hands-On Journey: Lab by Lab The workshop follows a deliberate build → validate → ship progression. Each lab has a clear outcome. You do not move forward until the previous checkpoint passes. Lab 0 — Setup and Local Run Open the repo in VS Code or a GitHub Codespace, configure your Microsoft Foundry project endpoint and model deployment name, then run the agent locally. By the end of Lab 0, your agent is listening on http://localhost:8088/responses and responding to test requests. dotnet restore dotnet build dotnet run --project src/WorkshopLab.AgentHost Test it with a single PowerShell call: Invoke-RestMethod -Method Post ` -Uri "http://localhost:8088/responses" ` -ContentType "application/json" ` -Body '{"input":"Should we start with a hosted agent or a prompt agent?"}' Lab 0 instructions → Lab 1 — Copilot Customisation Configure repo-specific GitHub Copilot instructions so that Copilot understands the hosted-agent patterns used in this project. You will also add a Copilot review skill tailored to hosted agent code reviews. This step means every code suggestion you receive from Copilot is contextualised to the workshop scenario rather than giving generic .NET advice. Lab 1 instructions → Lab 2 — Tool Implementation Extend one of the deterministic tools in WorkshopLab.Core with a real feature change. The suggested change adds a stronger recommendation path to RecommendImplementationShape for scenarios that require all three hosted-agent strengths simultaneously. // In RecommendImplementationShape — add before the final return: if (requiresCode && requiresTools && requiresWorkflow) { return string.Join(Environment.NewLine, [ $"Recommended implementation: Hosted agent (full-stack)", $"Scenario goal: {goal}", "Why: the scenario requires custom code, external tool access, and " + "multi-step orchestration — all three hosted-agent strengths.", "Suggested next step: start with a code-based hosted agent, register " + "local tools for each integration, and add a workflow layer." ]); } You then write an xUnit test to cover it, run dotnet test , and validate the change against a live /responses call. This is the workshop's most important teaching moment: every tool change is covered by a test before it ships. Lab 2 instructions → Lab 3 — CI Validation Wire up a GitHub Actions workflow that builds the solution, runs the test suite, and validates that the agent container builds cleanly. No manual steps — if a change breaks the build or a test, CI catches it before any deployment happens. Lab 3 instructions → Lab 4 — Deployment to Microsoft Foundry Use the Azure Developer CLI ( azd ) to provision an Azure Container Registry, publish the agent image, and deploy the hosted agent to Microsoft Foundry. The workshop separates provisioning from deployment deliberately: azd owns the Azure resources; the Foundry control plane deployment is an explicit, intentional final step that depends on your real project endpoint and agent.yaml manifest values. Lab 4 instructions → Lab 5 — Chat UI Integration Connect a Blazor chat UI to the deployed hosted agent and validate end-to-end responses. By the end of Lab 5, you have a fully functioning agent accessible through a real UI, calling your deterministic tools via the Foundry control plane. Lab 5 instructions → Key Concepts to Take Away The workshop teaches concrete patterns that apply well beyond this specific scenario. Code-first agent design Prompt-only agents are fast to build but hard to test and reason about at scale. A hosted agent with code-backed tools gives you something you can unit test, refactor, and version-control like any other software. Deterministic tools and testability The workshop explicitly avoids LLM calls inside tool implementations. Deterministic tools return predictable outputs for a given input, which means you can write fast, reliable unit tests for them. This is the right pattern for business logic. Reserve LLM calls for the reasoning layer, not the execution layer. CI/CD for agent systems AI agents are software. They deserve the same build-test-deploy discipline as any other service. Lab 3 makes this concrete: you cannot ship without passing CI, and CI validates the container as well as the unit tests. Deployment separation The workshop's split between azd provisioning and Foundry control-plane deployment is not arbitrary. It reflects the real operational boundary: your Azure resources are long-lived infrastructure; your agent deployment is a lifecycle event tied to your project's specific endpoint and manifest. Keeping them separate reduces accidents and makes rollbacks easier. Observability and the validation mindset Every lab ends with an explicit checkpoint. The culture the workshop builds is: prove it works before moving on. That mindset is more valuable than any specific tool or command in the labs. Why Hosted Agents Are Worth the Investment The managed runtime in Microsoft Foundry removes the infrastructure overhead that makes custom agent deployment painful. You do not manage Kubernetes clusters, configure ingress rules, or handle TLS termination. Foundry handles the hosting; you handle the code. This matters most for teams making the transition from demo to production. A prompt agent is an afternoon's work. A hosted agent with proper CI, tested tools, and a deployment pipeline is a week's work done properly once, instead of several weeks of firefighting done poorly repeatedly. The Foundry agent lifecycle —> create, update, version, deploy —>also gives you the controls you need to manage agents in a real environment: staged rollouts, rollback capability, and clear separation between agent versions. For the full deployment guide, see Deploy a hosted agent to Foundry Agent Service. From Workshop to Real Project This workshop is not just a learning exercise. The repository structure, the tooling choices, and the CI/CD patterns are a reference implementation. The patterns you can lift directly into a production project include: The WorkshopLab.Core / WorkshopLab.AgentHost separation between business logic and agent hosting The agent.yaml manifest pattern for declarative Foundry deployment The GitHub Actions workflow structure for build, test, and container validation The azd + ACR pattern for image publishing without requiring Docker Desktop locally The Blazor chat UI as a starting point for internal tooling or developer-facing applications The scenario, a readiness coach for hosted agents. This is also something teams evaluating Microsoft Foundry will find genuinely useful. It answers exactly the questions that come up when onboarding a new team to the platform. Common Mistakes When Building Hosted Agents Having run workshops and spoken with developer teams building on Foundry, a few patterns come up repeatedly: Skipping local validation before containerising. Always validate the /responses endpoint locally first. Debugging inside a container is slower and harder than debugging locally. Putting business logic inside the LLM call. If the answer to a user query can be determined by code, use code. Reserve the model for reasoning, synthesis, and natural language output. Treating CI as optional. Agent code changes break things just like any other code change. If you do not have CI catching regressions, you will ship them. Conflating provisioning and deployment. Recreating Azure resources on every deploy is slow and error-prone. Provision once with azd ; deploy agent versions as needed through the Foundry control plane. Not having a rollback plan. The Foundry agent lifecycle supports versioning. Use it. Know how to roll back to a previous version before you deploy to production. Get Started The workshop is open source, beginner-friendly, and designed to be completed in a single day. You need a .NET 10 SDK, an Azure subscription, access to a Microsoft Foundry project, and a GitHub account. Clone the repository, follow the labs in order, and by the end you will have a production-ready reference implementation that your team can extend and adapt for real scenarios. Clone the workshop repository → Here is the quick start to prove the solution works locally before you begin the full lab sequence: git clone https://github.com/microsoft/Hosted_Agents_Workshop_dotNET.git cd Hosted_Agents_Workshop_dotNET # Set your Foundry project endpoint and model deployment $env:AZURE_AI_PROJECT_ENDPOINT = "https://<resource>.services.ai.azure.com/api/projects/<project>" $env:MODEL_DEPLOYMENT_NAME = "gpt-4.1-mini" # Build and run dotnet restore dotnet build dotnet run --project src/WorkshopLab.AgentHost Then send your first request: Invoke-RestMethod -Method Post ` -Uri "http://localhost:8088/responses" ` -ContentType "application/json" ` -Body '{"input":"Should we start with a hosted agent or a prompt agent?"}' When the agent answers as a Hosted Agent Readiness Coach, you are ready to begin the labs. Key Takeaways Hosted agents in Microsoft Foundry let you run custom .NET code in a managed container runtime — you own the logic, Foundry owns the infrastructure. Deterministic tools are the right pattern for business logic in production agents: fast, testable, and predictable. CI/CD is not optional for agent systems. Build it in from the start, not as an afterthought. Separate your provisioning ( azd ) from your deployment (Foundry control plane) — it reduces accidents and simplifies rollbacks. The workshop is a reference implementation, not just a tutorial. The patterns are production-grade and ready to adapt. References Hosted Agents Workshop for .NET — GitHub Repository Workshop Lab Guide Deploy a Hosted Agent to Foundry Agent Service — Microsoft Learn Microsoft Foundry Portal Azure Developer CLI (azd) — Microsoft Learn .NET 10 SDK Download291Views0likes0Comments.NET 10 and Memory: Less Heap, Smarter GC, Faster Apps
As Microsoft steps into the Ignite 2025 era of “AI-first everything” across Azure, Foundry, and cloud-native workloads, .NET quietly got its own big upgrade: .NET 10, a new long-term support (LTS) release and the official successor to .NET 9, supported for three years. The release was celebrated at .NET Conf 2025 in November, where Microsoft shipped .NET 10 alongside Visual Studio 2026 and highlighted performance, memory efficiency and cloud-readiness as core pillars of the platform. A few days later at Microsoft Ignite 2025 in San Francisco, the story zoomed out: AI agents, Azure-hosted workloads, and App Service / Functions all moved forward with first-class .NET 10 support, positioning this runtime as the default foundation for modern cloud and AI solutions. I’m Hazem Ali, a Microsoft MVP, Principal AI & ML Engineer / Architect, and Founder & CEO of Skytells. In this article, I’ll walk through what .NET 10 actually changes in memory, heap, and stack behavior—and why that matters if you’re building high-throughput APIs, AI agents, or cloud-native services in the post-Ignite world. At a high level, .NET 10 does three big things for memory: Allocates more objects on the stack instead of the heap. Teaches the JIT to understand more “hidden” allocations (delegates, spans, small arrays). Leans on a smarter GC mode (DATAS) that adapts heap size to your app instead of your machine. Let’s unpack that in plain language. 1. Heap vs Stack in 60 Seconds Quick mental model: Stack Used for short-lived data. Allocation is extremely fast — often just advancing a pointer. Memory is released automatically when the function returns. Very cache-friendly due to tight, contiguous layout. Heap Used for long-lived or shared objects. Allocation is slower and requires runtime management. Objects are tracked by the garbage collector (GC) in managed runtimes. Creating too many short-lived objects on the heap increases GC pressure, which can lead to pauses and more cache misses. So any time the runtime can say: “This object definitely dies when this method returns” …it can put it on the stack instead, and the GC never has to care. .NET 10’s main memory trick is expanding how often it can safely do that. 2. From Heap to Stack: .NET 10 Gets Serious About Escape Analysis The JIT in .NET 10 spends more effort answering one question: “Does this object escape the current method?” If the answer is “no”, it can be stack-allocated. This is called escape analysis, and .NET 10 pushes it much further than .NET 9. 2.1 Delegates and Lambdas That Don’t Leak Consider this simple closure: int SumTwice(int y) { Func<int, int=""> addY = x => x + y; return DoubleResult(addY, y); static int DoubleResult(Func<int, int=""> f, int v) => f(v) * 2; }</int,></int,> The C# compiler turns that into: A hidden closure class with a field y . A delegate object pointing at a method on that closure. In .NET 9, both of these lived on the heap. In .NET 10, if the JIT can inline DoubleResult and prove the delegate never escapes the method, the delegate object is stack-allocated instead. Benchmarks in the official performance blog show: ~3× faster for this pattern ~70% fewer bytes allocated (only the closure remains on the heap) You don’t change the code; the JIT just stops paying the “lambda tax” as often. 2.2 Small Arrays of Value Types on the Stack .NET 10 adds the ability to stack-allocate small, fixed-size arrays of value types (that don’t hold GC references) when they clearly don’t outlive the method. Example from the official docs: static void Sum() { int[] numbers = { 1, 2, 3 }; int sum = 0; for (int i = 0; i < numbers.Length; i++) sum += numbers[i]; Console.WriteLine(sum); } The runtime article explicitly states that numbers is now stack-allocated in this scenario, because: The size is known at compile time ( int[3] ). The array never escapes the method. Result: no heap allocation for that small buffer, and one less thing for the GC to track. 2.3 Small Arrays of Reference Types Historically, arrays of reference types ( string[] , object[] , etc.) have always been heap allocations in .NET, and this remains true in .NET 10. The GC must track the references stored in these arrays, which makes stack allocation impossible. However, .NET 10 significantly reduces the cost of using small ref-type arrays by improving escape analysis around the patterns that create and consume them. While the array itself still lives on the heap, many of the associated allocations that previously accompanied these patterns can now be eliminated entirely. Example: static void Print() { string[] words = { "Hello", "World!" }; foreach (var s in words) Console.WriteLine(s); } In .NET 9, using a small string[] like this typically incurred extra hidden allocations (iterator objects, closure artifacts, helper frames). In .NET 10, if the JIT can prove the code is fully local and non-escaping: Iterator-related allocations can be removed, Delegate and closure helpers may be stack-allocated or optimized away, The only remaining heap object is the array itself — with no additional GC noise. A similar pattern appears in the performance blog’s benchmark: [Benchmark] public void Test() { Process(new string[] { "a", "b", "c" }); static void Process(string[] inputs) { foreach (string input in inputs) Use(input); static void Use(string s) { } } } On .NET 10, this benchmark shows zero additional heap allocations beyond the array itself, because the runtime eliminates the iterator and closure allocations that .NET 9 would create. The array still resides on the heap, but the overall memory footprint effectively drops to zero for the surrounding pattern. 2.4 Structs, Spans, and “Hidden” References .NET 10’s improved escape analysis can recognize when neither the struct nor its referenced array escapes, enabling the runtime to eliminate unnecessary heap allocations around the pattern. From the runtime docs: struct GCStruct { public int[] arr; } public static int Main() { int[] x = new int[10]; GCStruct y = new GCStruct() { arr = x }; return y.arr[0]; } In .NET 9, x is treated as escaping (through y ) and lives on the heap. In .NET 10, the JIT understands that neither y nor x escapes, so it can stack-allocate the array and associated data. This also benefits types like Span (which is just a struct with a reference and a length) and unlocks more cases where spans and small arrays become stack-only, not heap noise. 3. DATAS: The GC That Adapts to Your App Size On the GC side, the key concept is DATAS – Dynamic Adaptation To Application Sizes. Introduced as an opt-in mode in .NET 8. Enabled by default in .NET 9. By the time you land on .NET 10 LTS, DATAS is the default GC behavior for most apps, with more tuning and guidance from the GC team. 3.1 What DATAS Actually Does Official docs describe DATAS as a GC mode that: Adapts the heap size to the app’s memory requirements, Keeps the heap size roughly proportional to the live (long-lived) data size, Shrinks when the workload gets lighter and grows when it gets heavier. That’s different from classic Server GC, which: Assumes your process “owns” the machine, Grows the heap aggressively if there’s memory available, May end up with very different heap sizes depending on hardware. DATAS is especially targeted at bursty workloads and containerized apps where memory actually costs money and you might have many processes on the same node. 3.2 How You Control It From the GC configuration docs: DATAS can be toggled via: Environment variable: DOTNET_GCDynamicAdaptationMode=1 → enable DOTNET_GCDynamicAdaptationMode=0 → disable runtimeconfig.json : "System.GC.DynamicAdaptationMode": 1 or 0 MSBuild property: 1 But again: starting with .NET 9, it’s on by default, so in .NET 10 you typically only touch this if you have a very specific perf profile where DATAS isn’t a good fit. 4. What This Means for Your Apps Putting it together: You get fewer “silly” allocations for free .NET 10’s runtime now: Stack-allocates more delegates, closures, spans, and small arrays when they don’t escape. Reduces the abstraction penalty of idiomatic C# (LINQ, foreach , lambdas, etc.), so you don’t have to micro-optimize everything yourself. The GC behaves more like “pay for what you really use” With DATAS: Your heap won’t balloon just because you moved your app to a bigger SKU. Memory usage tracks live data instead of “whatever the machine has spare”. You still keep control when needed If you have: A latency-critical, always-hot service on a big dedicated machine, Or you’ve benchmarked and found DATAS not ideal for a specific scenario, …you can still flip DOTNET_GCDynamicAdaptationMode off and go back to classic Server GC semantics. 5. TL;DR for Busy Teams If you’re scanning this on a Friday: Upgrading from .NET 8 → 10 LTS gives you: Tuned DATAS GC as the default, Better JIT escape analysis, Stack-allocation of more small arrays and delegates. You don’t need to rewrite your code to benefit; just recompile and deploy. For critical services, benchmark with and without DATAS (toggle via DOTNET_GCDynamicAdaptationMode ) and pick what fits your SLOs. That’s the memory game-changer in .NET 10: the runtime quietly moves more stuff off the heap, while the GC learns to grow and shrink based on your real live data, not just the machine it’s sitting on.2.5KViews1like1Comment.NET MAUI on Linux with Visual Studio Code
Explore Cross-Platform Development with .NET MAUI on Linux! Dive into the latest release of the .NET MAUI extension for Visual Studio Code, enabling Linux users to develop apps for Android, Windows, iOS, and macOS. This guide offers a step-by-step tutorial on setting up your Linux system for .NET MAUI development, including installation of essential tools and leveraging the C# Dev Kit extension. Whether you're working on Ubuntu or another Linux distribution, this article, enriched with a video walkthrough by Gerald Versluis, simplifies the journey to creating powerful, versatile applications with .NET MAUI.102KViews4likes12CommentsHow to Use SemanticKernel with OpenAI and Azure OpenAI in C#
Discover the future of AI with Semantic Kernel for C# — your gateway to integrating cutting-edge language models. Jumpstart your projects with our easy-to-follow guides and examples. Get ready to elevate your applications to new heights!6.4KViews2likes1CommentSeamless File Management in ASP.NET Core: Azure Blob Storage with Configurable Local Mode
Setting up the Project Before we dive into the implementation, let’s set up the basic structure: Create an ASP.NET Core Web API project. Add the Azure.Storage.BlobsNuGet Package for Azure Blob Storage integration. Update appsettings.json to include storage configurations: "Storage": { "Mode": "Local", "BlobStorage": { "ConnectionString": "YourAzureBlobStorageConnectionString", "ContainerName": "YourContainerName" } } Mode: Determines whether to use Local or Azure Blob Storage. ConnectionString and ContainerName: Azure Blob Storage details. Implementing the Storage Service Here is a custom StorageService that handles file uploads, deletions, and downloads. It dynamically decides the storage location based on the configuration mode. public class StorageService : IStorageService { private readonly IConfiguration _configuration; private readonly IHttpContextAccessor _httpContextAccessor; private readonly string _storageMode; public StorageService(IConfiguration configuration, IHttpContextAccessor httpContextAccessor) { _configuration = configuration; _httpContextAccessor = httpContextAccessor; _storageMode = _configuration["Storage:Mode"]; } public async Task<string> UploadFile(IFormFile file) { try { if (_storageMode == "Local") { var uploads = Path.Combine(Directory.GetCurrentDirectory(), "wwwroot", "uploads"); var fileName = $"{DateTime.Now:MMddss}-{file.FileName}"; var filePath = Path.Combine(uploads, fileName); if (!Directory.Exists(uploads)) Directory.CreateDirectory(uploads); using (var fileStream = new FileStream(filePath, FileMode.Create)) { await file.CopyToAsync(fileStream); } var host = string.Format("{0}{1}", _httpContextAccessor.HttpContext!.Request.IsHttps ? "https://" : "http://", _httpContextAccessor.HttpContext.Request.Host); return $"{host}/uploads/{fileName}"; } else { var container = new BlobContainerClient(_configuration["Storage:BlobStorage:ConnectionString"], _configuration["Storage:BlobStorage:ContainerName"]); await container.CreateIfNotExistsAsync(PublicAccessType.Blob); var blob = container.GetBlobClient(file.FileName); using (var fileStream = file.OpenReadStream()) { await blob.UploadAsync(fileStream, new BlobHttpHeaders { ContentType = file.ContentType }); } return blob.Uri.ToString(); } } catch (Exception ex) { throw; } } public async Task<bool> DeleteFile(string fileName) { try { if (_storageMode == "Local") { var uploads = Path.Combine(Directory.GetCurrentDirectory(), "wwwroot", "uploads"); var filePath = Path.Combine(uploads, fileName); if (File.Exists(filePath)) { File.Delete(filePath); return true; } } else { var container = new BlobContainerClient(_configuration["Storage:BlobStorage:ConnectionString"],_configuration["Storage:BlobStorage:ContainerName"]); var blob = container.GetBlobClient(fileName); await blob.DeleteIfExistsAsync(); return true; } } catch (Exception ex) { return false; } } public byte[] DownloadFile(string fileName) { var blobServiceClient = new BlobServiceClient(_configuration["Storage:BlobStorage:ConnectionString"]); var container = blobServiceClient.GetBlobContainerClient(_configuration["Storage:BlobStorage:ContainerName"]); var blobClient = container.GetBlobClient(fileName); using (var memoryStream = new MemoryStream()) { blobClient.DownloadTo(memoryStream); return memoryStream.ToArray(); } } } Static File Middleware Add app.UseStaticFiles(); in Program.cs to serve local files. Usage Example Here’s how to use the UploadFile method in a Web API: public async Task<ServiceResponse<List<ProductPicture>>> UploadImages(List<IFormFile> images) { ServiceResponse<List<ProductPicture>> response = new(); try { List<ProductPicture> pictures = new(); foreach (var file in images) { var imageUrl = await _storageService.UploadFile(file); pictures.Add(new ProductPicture { Url = imageUrl, FileName = Path.GetFileName(imageUrl) }); } response.Data = pictures; } catch (Exception ex) { response.Success = false; response.Message = ex.Message; } return response; } Conclusion By integrating Azure Blob Storage and providing a configurable local storage mode, this approach ensures flexibility for both development and production environments. It reduces development friction while leveraging Azure’s scalability when deployed. For further details, explore the Azure Blob Storage Documentation and Quickstart: Azure Blob Storage.920Views0likes0CommentsA Guide to .NET Development Technologies
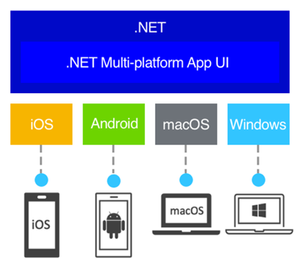
Enter the world of .NET — Microsoft’s cross-platform framework that serves as the backbone for a spectrum of powerful application development technologies. In this journey through the Microsoft ecosystem, we’ll explore the unique features of WinForms, WPF, WinUI, .NET MAUI, Blazor and ASP.NET Core APIs. Before we dive into the details of each technology, it’s important to note that the information here is gathered from trusted sources like Microsoft’s official Learn blogs, the .NET official website, and other reputable sources. Microsoft’s commitment to transparent and detailed documentation ensures that you’re getting accurate insights. WinForms Windows Forms is a UI framework for building Windows desktop apps. It provides one of the most productive ways to create desktop apps based on the visual designer provided in Visual Studio. Functionality such as drag-and-drop placement of visual controls makes it easy to build desktop apps. With Windows Forms, you develop graphically rich apps that are easy to deploy, update, and work while offline or while connected to the internet. Windows Forms apps can access the local hardware and file system of the computer where the app is running. To learn how to create a Windows Forms app, see Tutorial: Create a new WinForms app. Windows Presentation Foundation (WPF) A UI framework that is resolution-independent and uses a vector-based rendering engine, built to take advantage of modern graphics hardware. WPF provides a comprehensive set of application-development features that include Extensible Application Markup Language (XAML), controls, data binding, layout, 2D and 3D graphics, animation, styles, templates, documents, media, text, and typography. WPF is part of .NET, so you can build applications that incorporate other elements of the .NET API. If you want to create a skinned user interface, dynamically load some areas of the UI components from a web service, bind to XML or want to develop a desktop application which has the web-like navigation style, then WPF is a great choice. To learn how to create a WPF app, see Tutorial: Create a new WPF app. Windows UI Library (WinUI) The Windows UI Library (WinUI) is a native user experience (UX) framework for both Windows desktop and UWP applications. By incorporating the Fluent Design System into all experiences, controls, and styles, WinUI provides consistent, intuitive, and accessible experiences using the latest user interface (UI) patterns. With support for both desktop and UWP apps, you can build with WinUI from the ground up, or gradually migrate your existing MFC, WinForms, or WPF apps using familiar languages such as C++, C#, Visual Basic, and JavaScript (using React Native for Windows). At this time, there are two generations of the Windows UI Library (WinUI): WinUI 2 for UWP and WinUI 3 in the Windows App SDK. While both can be used in production-ready apps on Windows 10 and later, each have different development targets. .NET WAUI .NET Multi-platform App UI (MAUI) is an open-source, cross-platform framework for building Android, iOS, macOS, and Windows applications that leverage the native UI and services of each platform from a single .NET code base. Because .NET MAUI favors platform native experiences, it uses WinUI 3 and the Windows App SDK so apps get the latest user experience on Windows. This gives your apps access to everything you get with WinUI 3 plus the ability to reach to other platforms. .NET MAUI for Windows is a great choice if: You want to share as much .NET code as possible across mobile and desktop applications. You want to ship your application beyond Windows to other desktop and mobile targets with native platform experiences. You want to use C# and/or XAML for building cross-platform apps. You’re using Blazor for web development and wish to include all or part of that in a mobile or desktop application. For more information about .NET MAUI visit the link. Blazor Blazor is a web framework that is part of the ASP.NET Core framework. Blazor enables you to create progressive web apps using C#, having significantly less reliance on JavaScript that was necessary in previous versions of ASP.NET. This model is intended to make Blazor appealing to current C# developers, since they can focus less on JavaScript and write more in C# for full-stack development. In Blazor, both the server-side code (APIs, models, etc.) and the client are written in C#. This enables Blazor developers to do full-stack development all in .NET, though it’s also possible to write JavaScript if desired. Blazor Tutorials: Build your first web app with ASP.NET Core using Blazor. ASP.NET Core APIs In the realm of backend development, ASP.NET Core APIs take the spotlight. These APIs provide a robust foundation for building scalable and high-performance backend services, supporting modern application architectures such as microservices. With ASP.NET you use the same framework and patterns to build both web pages and services, side-by-side in the same project. Conclusion From WinForms to .NET MAUI, we’ve explored Microsoft’s tech universe. Each tool adds a unique touch to the toolkit. Whether you’re into desktop apps, web experiences, or robust backends, Microsoft’s ecosystem has you covered. But it doesn’t end here. Microsoft keeps evolving. Stay curious, explore, and find more on their official blogs, the .NET website, and other reliable sources. Resources: For further exploration and in-depth information, consider checking out these resources: .NET Official Website .NET Documentation1.2KViews0likes0CommentsGetting Started with Entity Framework Core
Today, we’ll discover a method to integrate database support into an ASP.NET Core API using Entity Framework Core. A database stands as a vital component in many applications, serving as the storage and retrieval hub for data. Traditionally, developers had to convert C# data access code into SQL statements, a process open to errors and time-consuming. However, with Entity Framework Core, you can delegate the tasks to the framework, allowing you to concentrate on application development.987Views0likes0CommentsEarn your C# certification with new learning series
We are excited to announce our new C# for Certification email learning series. This eight-week email series is intended to provide you with all the resources you need to complete the Foundational C# Certification training and take the exam. The learning series will give you a structured learning path and new content to learn each week.
22KViews5likes5CommentsBuilding Intelligent Applications with Local RAG in .NET and Phi-3: A Hands-On Guide
Let's learn how to do Retrieval Augmented Generation (RAG) using local resources in .NET! In this post, we’ll show you how to combine the Phi-3 language model, Local Embeddings, and Semantic Kernel to create a RAG scenario.19KViews5likes13Comments