.net
168 Topics
From Vibe Coding to Working App: How SRE Agent Completes the Developer Loop
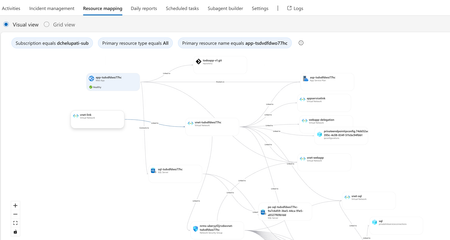
The Most Common Challenge in Modern Cloud Apps There's a category of bugs that drive engineers crazy: multi-layer infrastructure issues. Your app deploys successfully. Every Azure resource shows "Succeeded." But the app fails at runtime with a vague error like Login failed for user ''. Where do you even start? You're checking the Web App, the SQL Server, the VNet, the private endpoint, the DNS zone, the identity configuration... and each one looks fine in isolation. The problem is how they connect and that's invisible in the portal. Networking issues are especially brutal. The error says "Login failed" but the actual causes could be DNS, firewall, identity, or all three. The symptom and the root causes are in completely different resources. Without deep Azure networking knowledge, you're just clicking around hoping something jumps out. Now imagine you vibe coded the infrastructure. You used AI to generate the Bicep, deployed it, and moved on. When it breaks, you're debugging code you didn't write, configuring resources you don't fully understand. This is where I wanted AI to help not just to build, but to debug. Enter SRE Agent + Coding Agent Here's what I used: Layer Tool Purpose Build VS Code Copilot Agent Mode + Claude Opus Generate code, Bicep, deploy Debug Azure SRE Agent Diagnose infrastructure issues and create developer issue with suggested fixes in source code (app code and IaC) Fix GitHub Coding Agent Create PRs with code and IaC fix from Github issue created by SRE Agent Copilot builds. SRE Agent debugs. Coding Agent fixes. What I Built I used VS Code Copilot in Agent Mode with Claude Opus to create a .NET 8 Web App connected to Azure SQL via private endpoint: Private networking (no public exposure) Entra-only authentication Managed identity (no secrets) Deployed with azd up. All green. Then I tested the health endpoint: $ curl https://app-tsdvdfdwo77hc.azurewebsites.net/health/sql {"status":"unhealthy","error":"Login failed for user ''.","errorType":"SqlException"} Deployment succeeded. App failed. One error. How I Fixed It: Step by Step Step 1: Create SRE Agent with Azure Access I created an SRE Agent with read access to my Azure subscription. You can scope it to specific resource groups. The agent builds a knowledge graph of your resources and their dependencies visible in the Resource Mapping view below. Step 2: Connect GitHub to SRE Agent using GitHub MCP server I connected the GitHub MCP server so the agent could read my repository and create issues. Step 3: Create Sub Agent to analyze source code I created a sub-agent for analyzing source code using GitHub mcp tools. this lets SRE Agent understand not just Azure resources, but also the Bicep and source code files that created them. "you are expert in analyzing source code (bicep and app code) from github repos" Step 4: Invoke Sub-Agent to Analyze the Error In the SRE Agent chat, I invoked the sub-agent to diagnose the error I received from my app end point. It correlated the runtime error with the infrastructure configuration Step 5: Watch the SRE Agent Think and Reason SRE Agent analyzed the error by tracing code in Program.cs, Bicep configurations, and Azure resource relationships Web App, SQL Server, VNet, private endpoint, DNS zone, and managed identity. Its reasoning process worked through each layer, eliminating possibilities one by one until it identified the root causes. Step 6: Agent Creates GitHub Issue Based on its analysis, SRE Agent summarized the root causes and suggested fixes in a GitHub issue: Root Causes: Private DNS Zone missing VNet link Managed identity not created as SQL user Suggested Fixes: Add virtualNetworkLinks resource to Bicep Add SQL setup script to create user with db_datareader and db_datawriter roles Step 7: Merge the PR from Coding Agent Assign the Github issue to Coding Agent which then creates a PR with the fixes. I just reviewed the fix. It made sense and I merged it. Redeployed with azd up, ran the SQL script: curl -s https://app-tsdvdfdwo77hc.azurewebsites.net/health/sql | jq . { "status": "healthy", "database": "tododb", "server": "tcp:sql-tsdvdfdwo77hc.database.windows.net,1433", "message": "Successfully connected to SQL Server" } 🎉 From error to fix in minutes without manually debugging a single Azure resource. Why This Matters If you're a developer building and deploying apps to Azure, SRE Agent changes how you work: You don't need to be a networking expert. SRE Agent understands the relationships between Azure resources private endpoints, DNS zones, VNet links, managed identities. It connects dots you didn't know existed. You don't need to guess. Instead of clicking through the portal hoping something looks wrong, the agent systematically eliminates possibilities like a senior engineer would. You don't break your workflow. SRE Agent suggests fixes in your Bicep and source code not portal changes. Everything stays version controlled. Deployed through pipelines. No hot fixes at 2 AM. You close the loop. AI helps you build fast. Now AI helps you debug fast too. Try It Yourself Do you vibe code your app, your infrastructure, or both? How do you debug when things break? Here's a challenge: Vibe code a todo app with a Web App, VNet, private endpoint, and SQL database. "Forget" to link the DNS zone to the VNet. Deploy it. Watch it fail. Then point SRE Agent at it and see how it identifies the root cause, creates a GitHub issue with the fix, and hands it off to Coding Agent for a PR. Share your experience. I'd love to hear how it goes. Learn More Azure SRE Agent documentation Azure SRE Agent blogs Azure SRE Agent community Azure SRE Agent home page Azure SRE Agent pricing563Views3likes0Comments
Fix It Before They Feel It: Higher Reliability with Proactive Mitigation
What if your infrastructure could detect performance issues and fix them automatically—before your users even notice? This blog brings that vision to life using Azure SRE Agent, an AI-powered autonomous agent that monitors, detects, and remediates production issues in real-time. 💡 The magic: Zero human intervention required. The agent handles detection, diagnosis, remediation, and reporting—all autonomously. 📺 Watch the Demo This content was presented at .NET Day 2025. Watch the full session to see Azure SRE Agent in action: 🎬 Fix it before they feel it - .NET Day 2025 🎯 What You'll See in This Demo Watch as we intentionally deploy "bad" code to production and observe how the SRE Agent: Detects the degradation — Compares live response times against learned baselines Takes autonomous action — Executes a slot swap to roll back to healthy code Communicates the incident — Posts to Teams and creates a GitHub issue Generates reports — Summarizes deployment metrics for stakeholders 🚀 Key Capabilities Capability What It Shows Proactive Baseline Learning Agent learns normal response times and stores them in a knowledge base Real-time Anomaly Detection Instant comparison of current vs. baseline metrics Autonomous Remediation Agent executes Azure CLI commands to swap slots without human approval Cross-platform Communication Automatic Teams posts and GitHub issue creation Incident Reporting End-of-day email summaries with deployment health metrics Architecture Overview The solution uses Azure SRE Agent with three specialized sub-agents working together: Components Application Layer: .NET 9 Web API running on Azure App Service Application Insights for telemetry collection Azure Monitor Alerts for incident triggers Azure SRE Agent: AvgResponseTime Sub-Agent: Captures baseline metrics every 15 minutes, stores in Knowledge Store DeploymentHealthCheck Sub-Agent: Triggered by deployment alerts, compares metrics to baseline, auto-remediates DeploymentReporter Sub-Agent: Generates daily summary emails from Teams activity External Integrations: GitHub (issue creation, semantic code search, Copilot assignment) Microsoft Teams (deployment summaries) Outlook (summary reports) What the SRE Agent Does When a deployment occurs, the SRE Agent autonomously performs the following actions: 1. Health Check (DeploymentHealthCheck Sub-Agent) When a slot swap alert fires, the agent: Queries App Insights for current response times Retrieves the baseline from the Knowledge Store Compares current performance against baseline If degradation > 20%: Executes rollback and creates GitHub issue If healthy: Posts confirmation to Teams Healthy Deployment - No Action Needed (Teams Post): The agent confirms the deployment is healthy — response time (22ms) is 80% faster than baseline (116ms). Degraded Deployment - Automatic Rollback (Teams Post): The agent detects +332% latency regression (212ms vs 116ms baseline), executes a slot swap to rollback, and creates GitHub Issue. 2. Daily Summary (DeploymentReporter Sub-Agent) Every 24 hours, the reporter agent: Reads all Teams deployment posts from the last 24 hours Aggregates deployment metrics Sends an executive summary email Daily Summary (Outlook Email): The daily report shows 9 deployments, 6 healthy, 3 rollbacks, and 3 GitHub issues created — complete with response time details and issue links. Demo Flow View Step-by-Step Instructions → Step Action Step 1 Deploy Infrastructure + Applications Step 2 Create Sub-Agents, Triggers & Schedules Step 3 Swap bad code, watch agent remediate Setting Up the Demo Prerequisites Azure subscription with Contributor access Azure CLI installed and logged in (az login) .NET 9.0 SDK PowerShell 7.0+ Step 1: Deploy Infrastructure cd scripts .\1-setup-demo.ps1 -ResourceGroupName "sre-demo-rg" -AppServiceName "sre-demo-app-12345" This script will: Prompt for Azure subscription selection Deploy Azure infrastructure (App Service, App Insights, Alerts) Build and deploy healthy code to production Build and deploy problematic code to staging Full Setup Instructions → Step 2: Configure Azure SRE Agent Navigate to Azure SRE Agents Portal Sub Agent builder tab and create three sub-agents: Sub-Agent Purpose Tools Used AvgResponseTime Captures baseline response time metrics QueryAppInsightsByAppId, UploadKnowledgeDocument DeploymentHealthCheck Detects degradation and executes remediation SearchMemory, QueryAppInsights, PostTeamsMessage, CreateGithubIssue, Az CLI commands DeploymentReporter Generates deployment summary reports GetTeamsMessages, SendOutlookEmail Creating Each Sub-Agent In the Github links below you can find gif images that capture the creation flow AvgResponseTime + Baseline Task: Detailed Instructions → DeploymentHealthCheck + Swap Alert: Detailed Instructions → DeploymentReporter + Reporter Task: Detailed Instructions → Step 3: Run the Demo .\2-run-demo.ps1 This triggers the following flow: Slot Swap Occurs (demo script) ▼ Activity Log Alert Fires ▼ Incident Trigger Activated ▼ DeploymentHealthCheck Agent Runs ─ Queries current response time from App Insights ─ Retrieves baseline from knowledge store ─ Compares (if >20% degradation) ─ Executes: az webapp deployment slot swap ─ Creates GitHub issue (if degraded) ─ Posts to Teams channel Full Demo Instructions → Demo Timeline Time Event 0:00 Run 2-run-demo.ps1 0:30 Swap staging → production (bad code deployed) 1:00 Production now slow (~1500ms vs ~50ms baseline) ~5:00 Slot Swap Alert fires ~5:04 Agent executes slot swap (rollback) ~5:30 Production restored to healthy state ~6:00 Agent posts to Teams, creates GitHub issue How the Performance Toggle Works The app has a compile-time toggle in ProductsController.cs: private const bool EnableSlowEndpoints = false; // false = fast, true = slow The setup script creates two versions: Production: EnableSlowEndpoints = false → ~50ms responses Staging: EnableSlowEndpoints = true → ~1500ms responses (artificial delay) Get Started 🔗 Full source code and instructions: github.com/microsoft/sre-agent/samples/proactive-reliability 🔗 Azure SRE Agent documentation: https://learn.microsoft.com/en-us/azure/sre-agent/ Technology Stack Framework: ASP.NET Core 9.0 Infrastructure: Azure Bicep Monitoring: Application Insights + Log Analytics Automation: Azure SRE Agent Scripts: PowerShell 7.0+ Tags: Azure, SRE Agent, DevOps, Reliability, .NET, App Service, Application Insights, Autonomous Remediation331Views0likes1CommentBuild Long-Running AI Agents on Azure App Service with Microsoft Agent Framework
UPDATE 10/22/2025: An alternative implementation of this sample app has been added to this blog post. The alternate version uses a WebJob for background processing instead of an in-process hosted service. WebJobs are a great alternative for background processing in App Service, providing better separation of concerns, independent restarts, and dedicated logging. To learn more about WebJobs on App Service, see the Azure App Service WebJobs documentation. The AI landscape is evolving rapidly, and with the introduction of Microsoft Agent Framework, developers now have a powerful platform for building sophisticated AI agents that go far beyond simple chat completions. These agents can execute complex, multi-step workflows with persistent state, conversation threads, and structured execution—capabilities that are essential for production AI applications. Today, we're excited to share how Azure App Service provides an excellent platform for running Agent Framework workloads, especially those involving long-running operations. Let's explore why App Service is a great choice and walk through a practical example. 🔗 Quick link to sample app GitHub repo: https://github.com/Azure-Samples/app-service-agent-framework-travel-agent-dotnet 🔗 Quick link to WebJob sample app GitHub repo: https://github.com/Azure-Samples/app-service-agent-framework-travel-agent-dotnet-webjob The Challenge: Long-Running Agent Framework Flows Agent Framework enables AI agents to perform complex tasks that can take significant time to complete: Multi-turn reasoning: Iterative calls to large language models (LLMs) where each response informs the next prompt Tool integration: Function calling and external API interactions for real-time data Complex processing: Budget calculations, content optimization, multi-phase generation Persistent context: Maintaining conversation state across multiple interactions These workflows often take 30 seconds to several minutes to complete—far too long for synchronous HTTP request handling. Traditional web applications run into several constraints: ⏱️ Timeout Limitations: HTTP requests have timeout constraints (typically 30-230 seconds) ⚠️ Connection Issues: Clients may disconnect due to network interruptions or browser navigation 📈 Scalability Concerns: Long-running requests block worker threads and don't survive app restarts 🎯 Poor User Experience: Users see endless loading spinners with no progress feedback The Solution: Async Pattern with App Service Azure App Service provides a robust solution through the asynchronous request-reply pattern combined with background processing: API immediately returns (202 Accepted) with a task ID Background worker processes the Agent Framework workflow Client polls for status with real-time progress updates Durable state storage (Cosmos DB) maintains task status and results This pattern ensures: ✅ No HTTP timeouts—API responds in milliseconds ✅ Resilient to restarts—state survives deployments and scale events ✅ Progress tracking—users see real-time updates (10%, 45%, 100%) ✅ Better scalability—background workers process independently NOTE! This pattern can be implemented with either an in-process BackgroundService or as a separate WebJob process. Deployment Patterns: BackgroundService vs WebJob The following compares the two deployment options you have for this implementation. BackgroundService Pattern: ✅ Simpler deployment (single project) ✅ Shared process and memory ✅ Good for moderate workloads ⚠️ API and worker restart together WebJob Pattern (alternative): ✅ Separate processes (API + WebJob) ✅ Independent restart without API downtime ✅ Dedicated WebJob monitoring in portal ✅ Better for production operations ⚠️ Slightly more complex deployment (manual WebJob upload) Either of these options are a great way to help you get started with implementing long-running processes on App Service. To learn more about WebJobs on App Service, see the Azure App Service WebJobs documentation. Rapid Innovation Support The AI landscape is changing at an unprecedented pace. New models, frameworks, and capabilities are released constantly. Azure App Service's managed platform ensures your applications can adapt quickly without infrastructure rewrites: Framework Updates: Deploy new Agent Framework SDK versions like any application update Model Upgrades: Switch between GPT-4, GPT-4o, or future models with configuration changes Scaling Patterns: Start with combined API+worker, split into separate apps as needs grow New Capabilities: Integrate emerging AI services without changing hosting infrastructure App Service handles the platform complexity so you can focus on building great AI experiences. Sample Application: AI Travel Planner To demonstrate this pattern, we've built a Travel Planner application that uses Agent Framework to generate detailed, multi-day travel itineraries. The agent performs complex reasoning including: Researching destination attractions and activities Optimizing daily schedules based on location proximity Calculating detailed budget breakdowns Generating personalized travel tips and recommendations The entire application runs on a single P0v4 App Service with both the API and background worker combined—showcasing App Service's flexibility for hosting diverse workload patterns in one deployment. Key Architecture Components Azure App Service (P0v4 Premium) Hosts both REST API and background worker in a single app "Always On" feature keeps background worker running continuously Managed identity for secure, credential-less authentication Azure Service Bus Decouples API from long-running Agent Framework processing Reliable message delivery with automatic retries Dead letter queue for error handling Azure Cosmos DB Stores task status with real-time progress updates Automatic 24-hour TTL for cleanup Rich query capabilities for complex itinerary data Azure AI Foundry Hosts persistent agents with conversation threads Structured execution with Agent Framework runtime GPT-4o model for intelligent travel planning One of the powerful features of using Azure AI Foundry with Agent Framework is the ability to inspect agents and conversation threads directly in the Azure portal. This provides valuable visibility into what's happening during execution. Viewing Agents and Threads in Azure AI Foundry When you submit a travel plan request, the application creates an agent in Azure AI Foundry. You can navigate to your AI Foundry project in the Azure portal to see: Agents The application creates an agent for each request Important: Agents are **automatically deleted** after the itinerary is generated to keep your project clean Tip: You'll need to be quick! Navigate to Azure AI Foundry right after submitting a request to see the agent in action Once processing completes, the agent is removed as part of the cleanup process Conversation Threads Unlike agents, threads persist even after the agent completes You can view the complete conversation history at any time See the exact prompts sent to the model and the responses generated Useful for debugging, understanding agent behavior, and improving prompts The ephemeral nature of agents (created per request, deleted after completion) keeps your Azure AI Foundry project clean while the persistent threads give you full traceability of every interaction. Alternative Architecture: WebJob Pattern The alternate version of this app uses a WebJob for background processing instead of an in-process hosted service. However, just a single App Service is still required. WebJobs are a great alternative for background processing in App Service, providing better separation of concerns, independent restarts, and dedicated logging. To learn more about WebJobs on App Service, see the Azure App Service WebJobs documentation. Get Started Today The complete Travel Planner application is available as a reference implementation so you can quickly get started building your own apps with Agent Framework on App Service. Try one or both of these today! 🔗 GitHub Repository for background process version: https://github.com/Azure-Samples/app-service-agent-framework-travel-agent-dotnet 🔗 GitHub Repository for WebJob version: https://github.com/Azure-Samples/app-service-agent-framework-travel-agent-dotnet-webjob The repo includes: Complete .NET 9 source code with Agent Framework integration Infrastructure as Code (Bicep) for automated deployment Web UI with real-time progress tracking Comprehensive README with deployment instructions Deploy in minutes: git clone https://github.com/Azure-Samples/app-service-agent-framework-travel-agent-dotnet.git cd app-service-agent-framework-travel-agent-dotnet azd auth login azd up IMPORTANT! For the WebJob version, you will also need to manually deploy the WebJob. See the instructions in the README to learn how to do this. Key Takeaways ✅ Agent Framework enables sophisticated AI agents beyond simple chat completions ✅ Long-running workflows (30s-minutes) require async patterns to avoid timeouts ✅ App Service provides a simple, cost-effective platform for these workloads ✅ Async request-reply pattern with Service Bus + Cosmos DB ensures reliability ✅ Rapid innovation in AI is supported by App Service's adaptable platform Whether you're building travel planners, document processors, research assistants, or other AI-powered applications, Azure App Service gives you the flexibility and reliability you need—without the complexity of container orchestration or function programming models. What's Next? Build on This Foundation This Travel Planner is just the starting point—a foundation to help you understand the patterns and architecture. Agent Framework is designed to grow with your needs, making it easy to add sophisticated capabilities with minimal effort: 🛠️ Add Tool Calling Connect your agent to real-time APIs for weather, flight prices, hotel availability, and actual booking systems. Agent Framework's built-in tool calling makes this straightforward. 🤝 Implement Multi-Agent Systems Create specialized agents (flight expert, hotel specialist, activity planner) that collaborate to build comprehensive travel plans. Agent Framework handles the orchestration. 🧠 Enhance with RAG Add retrieval-augmented generation to give your agent deep knowledge of destinations, local customs, and insider tips from your own content library. 📊 Expand Functionality Real-time pricing and availability Interactive refinement based on user feedback Personalized recommendations from past trips Multi-language support for global users The beauty of Agent Framework is that these advanced features integrate seamlessly into the pattern we've built. Start with this sample, explore the Agent Framework documentation, and unlock powerful AI capabilities for your applications! Learn More Microsoft Agent Framework Documentation Azure App Service Documentation Async Request-Reply Pattern Azure App Service WebJobs documentation Have you built AI agents on App Service? We'd love to hear about your experience! Share your thoughts in the comments below. Questions about Agent Framework on App Service? Drop a comment and our team will help you get started.2KViews1like3Comments
Unlocking Application Modernisation with GitHub Copilot
AI-driven modernisation is unlocking new opportunities you may not have even considered yet. It's also allowing organisations to re-evaluate previously discarded modernisation attempts that were considered too hard, complex or simply didn't have the skills or time to do. During Microsoft Build 2025, we were introduced to the concept of Agentic AI modernisation and this post from Ikenna Okeke does a great job of summarising the topic - Reimagining App Modernisation for the Era of AI | Microsoft Community Hub. This blog post however, explores the modernisation opportunities that you may not even have thought of yet, the business benefits, how to start preparing your organisation, empowering your teams, and identifying where GitHub Copilot can help. I’ve spent the last 8 months working with customers exploring usage of GitHub Copilot, and want to share what my team members and I have discovered in terms of new opportunities to modernise, transform your applications, bringing some fun back into those migrations! Let’s delve into how GitHub Copilot is helping teams update old systems, move processes to the cloud, and achieve results faster than ever before. Background: The Modernisation Challenge (Then vs Now) Modernising legacy software has always been hard. In the past, teams faced steep challenges: brittle codebases full of technical debt, outdated languages (think decades-old COBOL or VB6), sparse documentation, and original developers long gone. Integrating old systems with modern cloud services often requiring specialised skills that were in short supply – for example, check out this fantastic post from Arvi LiVigni (@arilivigni ) which talks about migrating from COBOL “the number of developers who can read and write COBOL isn’t what it used to be,” making those systems much harder to update". Common pain points included compatibility issues, data migrations, high costs, security vulnerabilities, and the constant risk that any change could break critical business functions. It’s no wonder many modernisation projects stalled or were “put off” due to their complexity and risk. So, what’s different now (circa 2025) compared to two years ago? In a word: Intelligent AI assistance. Tools like GitHub Copilot have emerged as AI pair programmers that dramatically lower the barriers to modernisation. Arvi’s post talks about how only a couple of years ago, developers had to comb through documentation and Stack Overflow for clues when deciphering old code or upgrading frameworks. Today, GitHub Copilot can act like an expert co-developer inside your IDE, ready to explain mysterious code, suggest updates, and even rewrite legacy code in modern languages. This means less time fighting old code and more time implementing improvements. As Arvi says “nine times out of 10 it gives me the right answer… That speed – and not having to break out of my flow – is really what’s so impactful.” In short, AI coding assistants have evolved from novel experiments to indispensable tools, reimagining how we approach software updates and cloud adoption. I’d also add from my own experience – the models we were using 12 months ago have already been superseded by far superior models with ability to ingest larger context and tackle even further complexity. It's easier to experiment, and fail, bringing more robust outcomes – with such speed to create those proof of concepts, experimentation and failing faster, this has also unlocked the ability to test out multiple hypothesis’ and get you to the most confident outcome in a much shorter space of time. Modernisation is easier now because AI reduces the heavy lifting. Instead of reading the 10,000-line legacy program alone, a developer can ask Copilot to explain what the code does or even propose a refactored version. Rather than manually researching how to replace an outdated library, they can get instant recommendations for modern equivalents. These advancements mean that tasks which once took weeks or months can now be done in days or hours – with more confidence and less drudgery - more fun! The following sections will dive into specific opportunities unlocked by GitHub Copilot across the modernisation journey which you may not even have thought of. Modernisation Opportunities Unlocked by Copilot Modernising an application isn’t just about updating code – it involves bringing everyone and everything up to speed with cloud-era practices. Below are several scenarios and how GitHub Copilot adds value, with the specific benefits highlighted: 1. AI-Assisted Legacy Code Refactoring and Upgrades Instant Code Comprehension: GitHub Copilot can explain complex legacy code in plain English, helping developers quickly understand decades-old logic without scouring scarce documentation. For example, you can highlight a cryptic COBOL or C++ function and ask Copilot to describe what it does – an invaluable first step before making any changes. This saves hours and reduces errors when starting a modernisation effort. Automated Refactoring Suggestions: The AI suggests modern replacements for outdated patterns and APIs, and can even translate code between languages. For instance, Copilot can help convert a COBOL program into JavaScript or C# by recognising equivalent constructs. It also uses transformation tools (like OpenRewrite for Java/.NET) to systematically apply code updates – e.g. replacing all legacy HTTP calls with a modern library in one sweep. Developers remain in control, but GitHub Copilot handles the tedious bulk edits. Bulk Code Upgrades with AI: GitHub Copilot’s App Modernisation capabilities can analyse an entire codebase and generate a detailed upgrade plan, then execute many of the code changes automatically. It can upgrade framework versions (say from .NET Framework 4.x to .NET 6, or Java 8 to Java 17) by applying known fix patterns and even fixing compilation errors after the upgrade. Teams can finally tackle those hundreds of thousand-line enterprise applications – a task that could take multiple years with GitHub Copilot handling the repetitive changes. Technical Debt Reduction: By cleaning up old code and enforcing modern best practices, GitHub Copilot helps chip away at years of technical debt. The modernised codebase is more maintainable and stable, which lowers the long-term risk hanging over critical business systems. Notably, the tool can even scan for known security vulnerabilities during refactoring as it updates your code. In short, each legacy component refreshed with GitHub Copilot comes out safer and easier to work on, instead of remaining a brittle black box. 2. Accelerating Cloud Migration and Azure Modernisation Guided Azure Migration Planning: GitHub Copilot can assess a legacy application’s cloud readiness and recommend target Azure services for each component. For instance, it might suggest migrating an on-premises database to Azure SQL, moving file storage to Azure Blob Storage, and converting background jobs to Azure Functions. This provides a clear blueprint to confidently move an app from servers to Azure PaaS. One-Click Cloud Transformations: GitHub Copilot comes with predefined migration tasksthat automate the code changes required for cloud adoption. With one click, you can have the AI apply dozens of modifications across your codebase. For example: File storage: Replace local file read/writes with Azure Blob Storage SDK calls. Email/Comms: Swap out SMTP email code for Azure Communication Services or SendGrid. Identity: Migrate authentication from Windows AD to Azure AD (Entra ID) libraries. Configuration: Remove hard-coded configurations and use Azure App Configuration or Key Vault for secrets. GitHub Copilot performs these transformations consistently, following best practices (like using connection strings from Azure settings). After applying the changes, it even fixes any compile errors automatically, so you’re not left with broken builds. What used to require reading countless Azure migration guides is now handled in minutes. Automated Validation & Deployment: Modernisation doesn’t stop at code changes. GitHub Copilot can also generate unit tests to validate that the application still behaves correctly after the migration. It helps ensure that your modernised, cloud-ready app passes all its checks before going live. When you’re ready to deploy, GitHub Copilot can produce the necessary Infrastructure-as-Code templates (e.g. Azure Resource Manager Bicep files or Terraform configs) and even set up CI/CD pipeline scripts for you. In other words, the AI can configure the Azure environment and deployment process end-to-end. This dramatically reduces manual effort and error, getting your app to the cloud faster and with greater confidence. Integrations: GitHub Copilot also helps tackle larger migration scenarios that were previously considered too complex. For example, many enterprises want to retire expensive proprietary integration platforms like MuleSoft or Apigee and use Azure-native services instead, but rewriting hundreds of integration workflows was daunting. Now, GitHub Copilot can assist in translating those workflows: for instance, converting an Apigee API proxy into an Azure API Management policy, or a MuleSoft integration into an Azure Logic App. Multi-Cloud Migrations: if you plan to consolidate from other clouds into Azure, GitHub Copilot can suggest equivalent Azure services and SDK calls to replace AWS or GCP-specific code. These AI-assisted conversions significantly cut down the time needed to reimplement functionality on Azure. The business impact can be substantial. By lowering the effort of such migrations, GitHub Copilot makes it feasible to pursue opportunities that deliver big cost savings and simplification. 3. Boosting Developer Productivity and Quality Instant Unit Tests (TDD Made Easy): Writing tests for old code can be tedious, but GitHub Copilot can generate unit test cases on the fly. Developers can highlight an existing function and ask Copilot to create tests; it will produce meaningful test methods covering typical and edge scenarios. This makes it practical to apply test-driven development practices even to legacy systems – you can quickly build a safety net of tests before refactoring. By catching bugs early through these AI-generated tests, teams gain confidence to modernise code without breaking things. It essentially injects quality into the process from the start, which is crucial for successful modernisation. DevOps Automation: GitHub Copilot helps modernise your build and deployment process as well. It can draft CI/CD pipeline configurations, Dockerfiles, Kubernetes manifests, and other DevOps scripts by leveraging its knowledge of common patterns. For example, when setting up a GitHub Actions workflow to deploy your app, GitHub Copilot will autocomplete significant parts (like build steps, test runs, deployment jobs) based on the project structure. This not only saves time but also ensures best practices (proper caching, dependency installation, etc.) are followed by default. Microsoft even provides an extension where you can describe your Azure infrastructure needs in plain language and have GitHub Copilot generate the corresponding templates and pipeline YAML. By automating these pieces, teams can move to cloud-based, automated deployments much faster. Behaviour-Driven Development Support: Teams practicing BDD write human-readable scenarios (e.g. using Gherkin syntax) describing application behaviour. GitHub Copilot’s AI is adept at interpreting such descriptions and suggesting step definition code or test implementations to match. For instance, given a scenario “When a user with no items checks out, then an error message is shown,” GitHub Copilot can draft the code for that condition or the test steps required. This helps bridge the gap between non-technical specifications and actual code. It makes BDD more efficient and accessible, because even if team members aren’t strong coders, the AI can translate their intent into working code that developers can refine. Quality and Consistency: By using AI to handle boilerplate and repetitive tasks, developers can focus more on high-value improvements. GitHub Copilot’s suggestions are based on a vast corpus of code, which often means it surfaces well-structured, idiomatic patterns. Starting from these suggestions, developers are less likely to introduce errors or reinvent the wheel, which leads to more consistent code quality across the project. The AI also often reminds you of edge cases (for example, suggesting input validation or error handling code that might be missed), contributing to a more robust application. In practice, many teams find that adopting GitHub Copilot results in fewer bugs and quicker code reviews, as the code is cleaner on the first pass. It’s like having an extra set of eyes on every pull request, ensuring standards are met. Business Benefits of AI-Powered Modernisation Bringing together the technical advantages above, what’s the payoff for the business and stakeholders? Modernising with GitHub Copilot can yield multiple tangible and intangible benefits: Accelerated Time-to-Market: Modernisation projects that might have taken a year can potentially be completed in a few months, or an upgrade that took weeks can be done in days. This speed means you can deliver new features to customers sooner and respond faster to market changes. It also reduces downtime or disruption since migrations happen more swiftly. Cost Savings: By automating repetitive work and reducing the effort required from highly paid senior engineers, GitHub Copilot can trim development costs. Faster project completion also means lower overall project cost. Additionally, running modernised apps on cloud infrastructure (with updated code) often lowers operational costs due to more efficient resource usage and easier maintenance. There’s also an opportunity cost benefit: developers freed up by Copilot can work on other value-adding projects in parallel. Improved Quality & Reliability: GitHub Copilot’s contributions to testing, bug-fixing, and even security (like patching known vulnerabilities during upgrades) result in more robust applications. Modernised systems have fewer outages and security incidents than shaky legacy ones. Stakeholders will appreciate that with GitHub Copilot, modernisation doesn’t mean “trading one set of bugs for another” – instead, you can increase quality as you modernise (GitHub’s research noted higher code quality when using Copilot, as developers are less likely to introduce errors or skip tests). Business Agility: A modernised application (especially one refactored for cloud) is typically more scalable and adaptable. New integrations or features can be added much faster once the platform is up-to-date. GitHub Copilot helps clear the modernisation hurdle, after which the business can innovate on a solid, flexible foundation (for example, once a monolith is broken into microservices or moved to Azure PaaS, you can iterate on it much faster in the future). AI-assisted modernisation thus unlocks future opportunities (like easier expansion, integrations, AI features, etc.) that were impractical on the legacy stack. Employee Satisfaction and Innovation: Developer happiness is a subtle but important benefit. When tedious work is handled by AI, developers can spend more time on creative tasks – designing new features, improving user experience, exploring new technologies. This can foster a culture of innovation. Moreover, being seen as a company that leverages modern tools (like AI Copilot) helps attract and retain top tech talent. Teams that successfully modernise critical systems with Copilot will gain confidence to tackle other ambitious projects, creating a positive feedback loop of improvement. To sum up, GitHub Copilot acts as a force-multiplier for application modernisation. It enables organisations to do more with less: convert legacy “boat anchors” into modern, cloud-enabled assets rapidly, while improving quality and developer morale. This aligns IT goals with business goals – faster delivery, greater efficiency, and readiness for the future. Call to Action: Embrace the Future of Modernisation GitHub Copilot has proven to be a catalyst for transforming how we approach legacy systems and cloud adoption. If you’re excited about the possibilities, here are next steps and what to watch for: Start Experimenting: If you haven’t already, try GitHub Copilot on a sample of your code. Use Copilot or Copilot Chat to explain a piece of old code or generate a unit test. Seeing it in action on your own project can build confidence and spark ideas for where to apply it. Identify a Pilot Project: Look at your application portfolio for a candidate that’s ripe for modernisation – maybe a small legacy service that could be moved to Azure, or a module that needs a refactor. Use GitHub Copilot to assess and estimate the effort. Often, you’ll find tasks once deemed “too hard” might now be feasible. Early successes will help win support for larger initiatives. Stay Tuned for Our Upcoming Blog Series: This post is just the beginning. In forthcoming posts, we’ll dive deeper into: Setting Up Your Organisation for Copilot Adoption: Practical tips on preparing your enterprise environment – from licensing and security considerations to training programs. We’ll discuss best practices (like running internal awareness campaigns, defining success metrics, and creating Copilot champions in your teams) to ensure a smooth rollout. Empowering Your Colleagues: How to foster a culture that embraces AI assistance. This includes enabling continuous learning, sharing prompt techniques and knowledge bases, and addressing any scepticism. We’ll cover strategies to support developers in using Copilot effectively, so that everyone from new hires to veteran engineers can amplify their productivity. Identifying High-Impact Modernisation Areas: Guidance on spotting where GitHub Copilot can add the most value. We’ll look at different domains – code, cloud, tests, data – and how to evaluate opportunities (for example, using telemetry or feedback to find repetitive tasks suited for AI, or legacy components with high ROI if modernised). Engage and Share: As you start leveraging Copilot for modernisation, share your experiences and results. Success stories (even small wins like “GitHub Copilot helped reduce our code review times” or “we migrated a component to Azure in 1 sprint”) can build momentum within your organisation and the broader community. We invite you to discuss and ask questions in the comments or in our tech community forums. Take a look at the new App Modernisation Guidance—a comprehensive, step-by-step playbook designed to help organisations: Understand what to modernise and why Migrate and rebuild apps with AI-first design Continuously optimise with built-in governance and observability Modernisation is a journey, and AI is the new compass and Copilot to guide the way. By embracing tools like GitHub Copilot, you position your organisation to break through modernisation barriers that once seemed insurmountable. The result is not just updated software, but a more agile, cloud-ready business and a happier, more productive development team. Now is the time to take that step. Empower your team with Copilot, and unlock the full potential of your applications and your developers. Stay tuned for more insights in our next posts, and let’s modernise what’s possible together!1.4KViews4likes1CommentHost remote MCP servers on Azure Functions
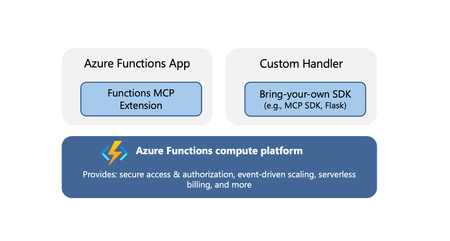
Model Context Protocol (MCP) servers allow AI agents to access external tools, data, and systems, greatly extending the capability and power of agents. When you’re ready to expose your MCP servers externally, within your organization or to the world, it’s important that the servers are run in a secure, scalable, and reliable environment. Azure Functions provides such a robust platform for hosting your remote MCP servers, offering high scalability with the Flex Consumption plan, built‑in authentication feature for Microsoft Entra and OAuth, and a serverless billing model. The platform also offers two hosting options for added flexibility and convenience. The options allow for hosting of MCP servers built with Azure Functions MCP extension or the official MCP SDKs. Azure Functions MCP Extension (GA) The MCP extension allows you to build and host servers using Azure Functions programming model, i.e. using triggers and bindings. The MCP tool trigger allows you to focus on implementing tools you want to expose, instead of worrying about handling protocol and server logistics. The MCP extension launched as public preview back in April and is now generally available, with support for .NET, Java, JavaScript, Python, and Typescript. New features in the extension Support for streamable-http transport Support for the newer streamable-http transport is added to the extension. Unless your client specifically requires the older Server-Sent Events (SSE) transport, you should use the streamable-http. The two transports have different endpoints in the extension: Transport Endpoint Streamable HTTP /runtime/webhooks/mcp Server-Sent Events (SSE) /runtime/webhooks/mcp/sse Defining server information You can use the extensions.mcp section in host.json to define MCP server information. { "version": "2.0", "extensions": { "mcp": { "instructions": "Some test instructions on how to use the server", "serverName": "TestServer", "serverVersion": "2.0.0", "encryptClientState": true, "messageOptions": { "useAbsoluteUriForEndpoint": false }, "system": { "webhookAuthorizationLevel": "System" } } } } Built-in server authentication and authorization The built-in feature implements the requirements of the MCP authorization protocol, such as issuing 401 challenge and hosting the Protected Resource Metadata document. You can configure it to use identity providers like Microsoft Entra for server authentication. In addition to server authenticating, you can also leverage this feature to implement on-behalf-of (OBO) auth flows where the client invokes a tool that accesses some downstream services on-behalf-of the user. Learn more about the built-in authentication and authorization feature. Mavin Build Plugin for Java For Java applications, the Maven Build Plugin (version 1.40.0) parses and verifies MCP tool annotations during build time. This process automatically generates the correct MCP extension configuration, ensuring that the MCP tool defined by the user is properly set up. The build-time analysis is especially beneficial for Java apps, as it allows developers to utilize the MCP extension without concerns about increased cold start times. We'll continuously enhance the plugin’s capabilities. Upcoming improvements, such as property type inference, will reduce manual configuration and make it even easier to use the McpToolTrigger. Get started Checkout the quickstarts to get an MCP extension server deployed in minutes: C# (.NET) remote-mcp-functions-dotnet Python remote-mcp-functions-python TypeScript (Node.js) remote-mcp-functions-typescript Java remote-mcp-functions-java References Learn more about the MCP extension and tool trigger in official documentations. Self‑hosted MCP server (public preview) In addition to the MCP extension, Azure Functions also supports hosting MCP servers implemented with the official SDKs. This is a suitable option for teams that have existing SDK‑based servers or who favor the SDK experience over the Functions programming model. There is no need to modify your server code; you can lift and shift these MCP servers to Azure Functions— which is why they are termed self‑hosted. The hosting capability supports the following features: Stateless servers that use the streamable-http transport. If you need your server to be stateful, consider using the Functions MCP extension for now. Servers implemented with Python, TypeScript, C#, or Java MCP SDK. Built-in server authentication and authorization like the MCP extension Hosting requirement Self-hosted MCP servers are deployed to the Azure Functions platform as custom handlers. You can think of custom handlers as lightweight web servers that receive events from the Functions host. The only requirement for hosting the MCP server is a file called host.json. Add this file to your project root to tell Functions how to run the server. An example host.json for a Python server looks like: { "version": "2.0", "configurationProfile": "mcp-custom-handler", "customHandler": { "description": { "defaultExecutablePath": "python", "arguments": ["path to main python script, e.g. hello.py"] }, "port": "8000" } } Get started Check out quickstarts to get your self-hosted MCP server deployed in minutes: C# (.NET) mcp-sdk-functions-hosting-dotnet Python mcp-sdk-functions-hosting-python TypeScript (Node.js) mcp-sdk-functions-hosting-node Java Coming soon! References Read the official documentation of self-hosted MCP servers and learn about integrations with Azure services like Foundry and API Center. For .NET developers - check out the overview of self-hosted MCP servers from the recent .NET Conference! We’d love to hear from you! Let us know your thoughts about hosting remote MCP server on Azure Functions. Does either of the options meet your needs? What other MCP features are you looking for? Let us know what you’d like us to prioritize next!965Views3likes1Comment
Unlocking Client-Side Configuration at Scale with Azure App Configuration and Azure Front Door
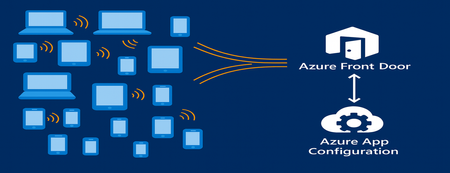
As modern apps shift more logic to the browser, Azure App Configuration now brings dynamic configuration directly to client-side applications. Through its integration with Azure Front Door, developers can deliver configuration to thousands or millions of clients with CDN-scale performance while avoiding the need to expose secrets or maintain custom proxy layers. This capability is especially important for AI-powered and agentic client applications, where model settings and behaviors often need to adjust rapidly and safely. This post introduces the new capability, what it unlocks for developers, and how to start building dynamic, configuration-driven client experiences in Azure. App Configuration for Client Applications Centralized Settings and Feature Management App Configuration gives developers a single, consistent place to define configuration settings and feature flags. Until now, this capability was used almost exclusively by server-side applications. With Azure Front Door integration, these same settings can now power modern client experiences across: Single Page Applications (React, Vue, Angular, Next.js, and others using JavaScript) Mobile/ and desktop applications with .Net MAUI JavaScript-powered UI components or embedded widgets running in browser Any browser-based application that can run JavaScript This allows developers to update configuration without redeploying the client app. CDN-Accelerated Configuration Delivery with Azure Front Door Azure Front Door enables client applications to fetch configuration using a fast, globally distributed CDN path. Developers benefit from: High-scale configuration delivery to large client populations Edge caching for fast, low-latency configuration retrieval Reduced load on your backend configuration store through CDN offloading Dedicated endpoint that exposes only the configuration subset it is scoped for. Secure and Scalable Architecture App Configuration integrates with Azure Front Door to deliver configuration to client-side apps using a simple, secure, and CDN-accelerated flow. How it works The browser calls Azure Front Door anonymously, like any CDN asset. Front Door uses managed identity to access App Configuration securely. Only selected key-values, feature flags or snapshots are exposed through Azure Front Door. No secrets or credentials are shipped to the client. Edge caching enables high throughput and low latency configuration delivery. This provides a secure and efficient design for client applications and eliminates the need for custom gateway code or proxy services. Developer Scenarios: What You Can Build CDN-delivered configuration unlocks a range of rich client application scenarios: Client-side feature rollouts for UI components A/B testing or targeted experiences using feature flags Control AI/LLM model parameters and UI behaviors through configuration Dynamically control client-side agent behavior, safety modes, and guardrail settings through configuration Consistent behavior for clients using snapshot-based configuration references These scenarios previously required custom proxies. Now, they work out-of-the-box with Azure App Configuration + Azure Front Door. End-to-End Developer Journey The workflow for enabling client-side configuration with App Configuration is simple: Define key values or feature flags in Azure App Configuration Connect App Configuration to Azure Front Door in the portal Scope configuration exposed by Front Door endpoint with key value or snapshot filter. Use the updated AppConfig JavaScript or .NET provider to connect to Front Door anonymously. Client app fetches configuration via Front Door with CDN performance Update your configuration centrally, no redeployment required To see this workflow end-to-end, check out this demo video. The video shows how to connect an App Configuration store to Azure Front Door and use the Front Door endpoint in a client application. It also demonstrates dynamic feature flag refresh as updates are made in the store. Portal Experience to connect Front Door Once you create your App Configuration store with key values and/or feature flags, you can configure the Front Door connection directly in the Azure portal. The App Configuration portal guides you through connecting a profile, creating an endpoint, and scoping which keys, labels, or snapshots will be exposed to client applications. A detailed “How-To” guide is available in the App Configuration documentation. Using the Front Door Endpoint in Client Applications JavaScript Provider Minimum version for this feature is 2.3.0-preview, get the provider from here. Add below snippet in your code to fetch the key values and/or feature flags from App Configuration through front door. import { loadFromAzureFrontDoor } from "@azure/app-configuration-provider"; const appConfig = await loadFromAzureFrontDoor("https://<your-afd-endpoint>", { featureFlagOptions: { enabled: true }, }); const yoursetting = appConfig.get("<app.yoursetting>"); .NET Provider Minimum version supporting this feature is 8.5.0-preview, get the provider from here builder.Configuration.AddAzureAppConfiguration(options => { options.ConnectAzureFrontDoor(new Uri("https://<your-afd-endpoint>")) .UseFeatureFlags(featureFlagOptions => { featureFlagOptions.Select("<yourappprefix>"); }); }); See our GitHub samples for JavaScript and .NET MAUI for complete client application setups. Notes & Limitations Feature flag scoping requires two key prefix filters, startsWith(".appconfig.featureflag") and ALL keys. Portal Telemetry feature does not reflect client-side consumption yet. This feature is in preview, and currently not supported in Azure sovereign clouds. Conclusion By combining Azure App Configuration with Azure Front Door, developers can now power a new generation of dynamic client applications. Configuration is delivered at CDN speed, securely and at scale letting you update experiences instantly, without redeployment or secret management on client side. This integration brings App Configuration’s flexibility directly to the browser, making it easier to power AI-driven interfaces, agentic workflows, and dynamic user experiences. Try client-side configuration with App Configuration today and update your apps’ behavior in real time, without any redeployments.534Views2likes0CommentsBulletproof agents with the durable task extension for Microsoft Agent Framework
Today, we're thrilled to announce the public preview of the durable task extension for Microsoft Agent Framework. This extension transforms how you build production-ready, resilient and scalable AI agents by bringing the proven durable execution (survives crashes and restarts) and distributed execution (runs across multiple instances) capabilities of Azure Durable Functions directly into the Microsoft Agent Framework. Now you can deploy stateful, resilient AI agents to Azure that automatically handle session management, failure recovery, and scaling, freeing you to focus entirely on your agent logic. Whether you're building customer service agents that maintain context across multi-day conversations, content pipelines with human-in-the-loop approval workflows, or fully automated multi-agent systems coordinating specialized AI models, the durable task extension gives you production-grade reliability, scalability and coordination with serverless simplicity. Key features of the durable task extension include: Serverless Hosting: Deploy agents on Azure Functions with auto-scaling from thousands of instances to zero, while retaining full control in a serverless architecture. Automatic Session Management: Agents maintain persistent sessions with full conversation context that survives process crashes, restarts, and distributed execution across instances Deterministic Multi-Agent Orchestrations: Coordinate specialized durable agents with predictable, repeatable, code-driven execution patterns Human-in-the-Loop with Serverless Cost Savings: Pause for human input without consuming compute resources or incurring costs Built-in Observability with Durable Task Scheduler: Deep visibility into agent operations and orchestrations through the Durable Task Scheduler UI dashboard Click here to create and run a durable agent # Python endpoint = os.getenv("AZURE_OPENAI_ENDPOINT") deployment_name = os.getenv("AZURE_OPENAI_DEPLOYMENT_NAME", "gpt-4o-mini") # Create an AI agent following the standard Microsoft Agent Framework pattern agent = AzureOpenAIChatClient( endpoint=endpoint, deployment_name=deployment_name, credential=AzureCliCredential() ).create_agent( instructions="""You are a professional content writer who creates engaging, well-structured documents for any given topic. When given a topic, you will: 1. Research the topic using the web search tool 2. Generate an outline for the document 3. Write a compelling document with proper formatting 4. Include relevant examples and citations""", name="DocumentPublisher", tools=[ AIFunctionFactory.Create(search_web), AIFunctionFactory.Create(generate_outline) ] ) # Configure the function app to host the agent with durable session management app = AgentFunctionApp(agents=[agent]) app.run() // C# var endpoint = Environment.GetEnvironmentVariable("AZURE_OPENAI_ENDPOINT"); var deploymentName = Environment.GetEnvironmentVariable("AZURE_OPENAI_DEPLOYMENT") ?? "gpt-4o-mini"; // Create an AI agent following the standard Microsoft Agent Framework pattern AIAgent agent = new AzureOpenAIClient(new Uri(endpoint), new DefaultAzureCredential()) .GetChatClient(deploymentName) .CreateAIAgent( instructions: """You are a professional content writer who creates engaging, well-structured documents for any given topic. When given a topic, you will: 1. Research the topic using the web search tool 2. Generate an outline for the document 3. Write a compelling document with proper formatting 4. Include relevant examples and citations""", name: "DocumentPublisher", tools: [ AIFunctionFactory.Create(SearchWeb), AIFunctionFactory.Create(GenerateOutline) ]); // Configure the function app to host the agent with durable thread management // This automatically creates HTTP endpoints and manages state persistence using IHost app = FunctionsApplication .CreateBuilder(args) .ConfigureFunctionsWebApplication() .ConfigureDurableAgents(options => options.AddAIAgent(agent) ) .Build(); app.Run(); Why the durable task extension? As AI agents evolve from simple chatbots to sophisticated systems handling complex, long-running tasks, new challenges emerge: Conversations span multiple days and weeks, requiring persistent state across process restarts, crashes, and disruptions. Tool calls might take longer than typical timeouts allow, needing automatic checkpointing and recovery. High-volume workloads require elastic scaling across distributed instances to handle thousands of concurrent agent conversations. Multiple specialized agents need coordination with predictable, repeatable execution for reliable business processes. Agents sometimes must wait for human approval before proceeding, ideally without consuming resources. The Durable Extension addresses these challenges by extending Microsoft Agent Framework with capabilities from Azure Durable Functions, enabling you to build AI agents that survive failures, scale elastically, and execute predictably through durable and distributed execution. The extension is built on four foundational value pillars, which we refer to as the 4D’s: Durability Every agent state change (messages, tool calls, decisions) is durably checkpointed automatically. Agents survive and automatically resume from infrastructure updates, crashes, and can be unloaded from memory during long waiting periods without losing context. This is essential for agents that orchestrate long-running operations or wait for external events. Distributed Agent execution is accessible across all instances, enabling elastic scaling and automatic failover. Healthy nodes seamlessly take over work from failed instances, ensuring continuous operation. This distributed execution model allows thousands of stateful agents to scale up and run in parallel. Deterministic Agent orchestrations execute predictably using imperative logic written as ordinary code. Define the execution path, enabling automated testing, verifiable guardrails, and business-critical workflows that stakeholders can trust. This complements agent-directed workflows by providing explicit control flow when needed. Debuggability Use familiar development tools (IDEs, debuggers, breakpoints, stack traces, and unit tests) and programming languages to develop and debug. Your agent and agent orchestrations are expressed as code, making them easily testable, debuggable, and maintainable. Features in action Serverless hosting Deploy agents to Azure Functions (with expansion to other Azure computes soon) with automatic scaling to thousands of instances or down to zero when not in use. Pay only for the compute resources you consume. This code-first deployment approach gives you full control over the compute environment while maintaining the benefits of a serverless architecture. # Python endpoint = os.getenv("AZURE_OPENAI_ENDPOINT") deployment_name = os.getenv("AZURE_OPENAI_DEPLOYMENT_NAME", "gpt-4o-mini") # Create an AI agent following the standard Microsoft Agent Framework pattern agent = AzureOpenAIChatClient( endpoint=endpoint, deployment_name=deployment_name, credential=AzureCliCredential() ).create_agent( instructions="""You are a professional content writer who creates engaging, well-structured documents for any given topic. When given a topic, you will: 1. Research the topic using the web search tool 2. Generate an outline for the document 3. Write a compelling document with proper formatting 4. Include relevant examples and citations""", name="DocumentPublisher", tools=[ AIFunctionFactory.Create(search_web), AIFunctionFactory.Create(generate_outline) ] ) # Configure the function app to host the agent with durable session management app = AgentFunctionApp(agents=[agent]) app.run() Automatic session management Agent sessions are automatically checkpointed in durable storage that you configure in your function app, enabling durable and distributed execution across multiple instances. Any instance can resume an agent's execution after interruptions or process failures, ensuring continuous operation. Under the hood, agents are implemented as durable entities. These are stateful objects that maintain their state across executions. This architecture enables each agent session to function as a reliable, long-lived entity with preserved conversation history and context. Example scenario: A customer service agent handling a complex support case over multiple days and weeks. The conversation history, context, and progress are preserved even if the agent is redeployed or moves to a different instance. # First interaction - start a new thread to create a document curl -X POST https://your-function-app.azurewebsites.net/api/agents/DocumentPublisher/threads \ -H "Content-Type: application/json" \ -d '{"message": "Create a document about the benefits of Azure Functions"}' # Response includes thread ID and initial document outline/draft # {"threadId": "doc789", "response": "I'll create a comprehensive document about Azure Functions benefits. Let me search for the latest information... [Document Draft] # Benefits of Azure Functions\n\n## Introduction\nAzure Functions is a serverless compute service that enables you to run event-driven code without managing infrastructure...\n\n## Cost Efficiency\n- Pay only for execution time\n- No charges for idle resources\n- Automatic scaling reduces over-provisioning...\n\n## Developer Productivity\n- Multiple language support (C#, Python, JavaScript, Java)\n- Integrated development tools and CI/CD...\n\n## Scalability\n- Automatic scaling based on demand\n- Handle millions of requests seamlessly...\n\nReferences: [Azure documentation, serverless computing studies]"} # Second interaction - continue the same thread to refine the document curl -X POST https://your-function-app.azurewebsites.net/api/agents/DocumentPublisher/threads/doc789 \ -H "Content-Type: application/json" \ -d '{"message": "Can you add a section about integration with other Azure services?"}' # Agent remembers the Azure Functions document context and adds the requested section # {"threadId": "doc789", "response": "I've added a comprehensive integration section to your Azure Functions document:\n\n## Integration with Azure Services\n\n### Azure Storage\nSeamless triggers and bindings for Blob Storage, Queue Storage, and Table Storage enable event-driven architectures...\n\n### Azure Event Grid & Event Hubs\nProcess real-time event streams and implement publish-subscribe patterns at scale...\n\n### Azure Cosmos DB\nBuilt-in bindings for document database operations with automatic change feed processing...\n\n### Azure Service Bus\nReliable message processing with enterprise messaging features...\n\n### Azure AI Services\nEasily integrate OpenAI, Cognitive Services, and AI Search for intelligent applications...\n\nThe document now includes this section after the Scalability section. Would you like me to add use cases or deployment best practices?"} Deterministic multi-agent orchestrations Coordinate multiple specialized durable agents using imperative code where you define the control flow. This differs from agent-directed workflows where the agent decides the next steps. Deterministic Orchestrations provide predictable, repeatable execution patterns with automatic checkpointing and recovery. Example scenario: An email processing system that uses a spam detection agent, then conditionally routes to different specialized agents based on the classification. The orchestration automatically recovers if any step fails and completed agent calls are not re-executed. # Python app.orchestration_trigger(context_name="context") def document_publishing_orchestration(context: DurableOrchestrationContext): """Deterministic orchestration coordinating multiple specialized agents.""" doc_request = context.get_input() # Get specialized agents from the orchestration context research_agent = context.get_agent("ResearchAgent") writer_agent = context.get_agent("DocumentPublisherAgent") # Step 1: Research the topic using web search research_result = yield research_agent.run( messages=f"Research the following topic and gather key information: {doc_request.topic}", response_schema=ResearchResult ) # Step 2: Generate outline based on research findings outline = yield context.call_activity("generate_outline", { "topic": doc_request.topic, "research_data": research_result.findings }) # Step 3: Write the document with the research and outline document = yield writer_agent.run( messages=f"""Create a comprehensive document about {doc_request.topic}. Research findings: {research_result.findings} Outline: {outline} Write a well-structured, engaging document with proper formatting and citations.""", response_schema=DocumentResponse ) # Step 4: Save and publish the generated document return yield context.call_activity("publish_document", { "title": doc_request.topic, "content": document.text, "citations": document.citations }) Human-in-the-loop Orchestrations and agents can pause for human input, approval, or review without consuming compute resources. Durable execution enables orchestrations to wait for days or even weeks while waiting for human responses, even if the app crashes or restarts. When combined with serverless hosting, all compute resources are spun down during the wait period, eliminating compute costs until the human provides their input. Example scenario: A content publishing agent that generates drafts, sends them to human reviewers, and waits days for approval without running (or paying for) compute resources during the review period. When the human response arrives, the orchestration automatically resumes with full conversation context and execution state intact. # Python app.orchestration_trigger(context_name="context") def content_approval_workflow(context: DurableOrchestrationContext): """Human-in-the-loop workflow with zero-cost waiting.""" topic = context.get_input() # Step 1: Generate content using an agent content_agent = context.get_agent("ContentGenerationAgent") draft_content = yield content_agent.run(f"Write an article about {topic}") # Step 2: Send for human review yield context.call_activity("notify_reviewer", draft_content) # Step 3: Wait for approval - no compute resources consumed while waiting approval_event = context.wait_for_external_event("ApprovalDecision") timeout_task = context.create_timer(context.current_utc_datetime + timedelta(hours=24)) winner = yield context.task_any([approval_event, timeout_task]) if winner == approval_event: timeout_task.cancel() approved = approval_event.result if approved: result = yield context.call_activity("publish_content", draft_content) return result else: return "Content rejected" else: # Timeout - escalate for review result = yield context.call_activity("escalate_for_review", draft_content) return result Built-in agent observability Configure your Function App with the Durable Task Scheduler as the durable backend (what persists agents and orchestration state). The Durable Task Scheduler is the recommended durable backend for your durable agents, offering the best throughput performance, fully managed infrastructure, and built-in observability through a UI dashboard. The Durable Task Scheduler dashboard provides deep visibility into your agent operations: Conversation history: View complete conversation threads for each agent session, including all messages, tool calls, and conversation context at any point in time Multi-agent visualization: See the execution flow when calling multiple specialized agents with visual representation of agent handoffs, parallel executions, and conditional branching Performance metrics: Monitor agent response times, token usage, and orchestration duration Execution history: Access detailed execution logs with full replay capability for debugging Demo Video Language support The Durable Extension supports: C# (.NET 8.0+) with Azure Functions Python (3.10+) with Azure Functions Support for additional computes coming soon. Get started today Click here to create and run a durable agent Learn more Overview documentation C# Samples Python Samples6.9KViews3likes7CommentsAzure Functions Ignite 2025 Update
Azure Functions is redefining event-driven applications and high-scale APIs in 2025, accelerating innovation for developers building the next generation of intelligent, resilient, and scalable workloads. This year, our focus has been on empowering AI and agentic scenarios: remote MCP server hosting, bulletproofing agents with Durable Functions, and first-class support for critical technologies like OpenTelemetry, .NET 10 and Aspire. With major advances in serverless Flex Consumption, enhanced performance, security, and deployment fundamentals across Elastic Premium and Flex, Azure Functions is the platform of choice for building modern, enterprise-grade solutions. Remote MCP Model Context Protocol (MCP) has taken the world by storm, offering an agent a mechanism to discover and work deeply with the capabilities and context of tools. When you want to expose MCP/tools to your enterprise or the world securely, we recommend you think deeply about building remote MCP servers that are designed to run securely at scale. Azure Functions is uniquely optimized to run your MCP servers at scale, offering serverless and highly scalable features of Flex Consumption plan, plus two flexible programming model options discussed below. All come together using the hardened Functions service plus new authentication modes for Entra and OAuth using Built-in authentication. Remote MCP Triggers and Bindings Extension GA Back in April, we shared a new extension that allows you to author MCP servers using functions with the MCP tool trigger. That MCP extension is now generally available, with support for C#(.NET), Java, JavaScript (Node.js), Python, and Typescript (Node.js). The MCP tool trigger allows you to focus on what matters most: the logic of the tool you want to expose to agents. Functions will take care of all the protocol and server logistics, with the ability to scale out to support as many sessions as you want to throw at it. [Function(nameof(GetSnippet))] public object GetSnippet( [McpToolTrigger(GetSnippetToolName, GetSnippetToolDescription)] ToolInvocationContext context, [BlobInput(BlobPath)] string snippetContent ) { return snippetContent; } New: Self-hosted MCP Server (Preview) If you’ve built servers with official MCP SDKs and want to run them as remote cloud‑scale servers without re‑writing any code, this public preview is for you. You can now self‑host your MCP server on Azure Functions—keep your existing Python, TypeScript, .NET, or Java code and get rapid 0 to N scaling, built-in server authentication and authorization, consumption-based billing, and more from the underlying Azure Functions service. This feature complements the Azure Functions MCP extension for building MCP servers using the Functions programming model (triggers & bindings). Pick the path that fits your scenario—build with the extension or standard MCP SDKs. Either way you benefit from the same scalable, secure, and serverless platform. Use the official MCP SDKs: # MCP.tool() async def get_alerts(state: str) -> str: """Get weather alerts for a US state. Args: state: Two-letter US state code (e.g. CA, NY) """ url = f"{NWS_API_BASE}/alerts/active/area/{state}" data = await make_nws_request(url) if not data or "features" not in data: return "Unable to fetch alerts or no alerts found." if not data["features"]: return "No active alerts for this state." alerts = [format_alert(feature) for feature in data["features"]] return "\n---\n".join(alerts) Use Azure Functions Flex Consumption Plan's serverless compute using Custom Handlers in host.json: { "version": "2.0", "configurationProfile": "mcp-custom-handler", "customHandler": { "description": { "defaultExecutablePath": "python", "arguments": ["weather.py"] }, "http": { "DefaultAuthorizationLevel": "anonymous" }, "port": "8000" } } Learn more about MCPTrigger and self-hosted MCP servers at https://aka.ms/remote-mcp Built-in MCP server authorization (Preview) The built-in authentication and authorization feature can now be used for MCP server authorization, using a new preview option. You can quickly define identity-based access control for your MCP servers with Microsoft Entra ID or other OpenID Connect providers. Learn more at https://aka.ms/functions-mcp-server-authorization. Better together with Foundry agents Microsoft Foundry is the starting point for building intelligent agents, and Azure Functions is the natural next step for extending those agents with remote MCP tools. Running your tools on Functions gives you clean separation of concerns, reuse across multiple agents, and strong security isolation. And with built-in authorization, Functions enables enterprise-ready authentication patterns, from calling downstream services with the agent’s identity to operating on behalf of end users with their delegated permissions. Build your first remote MCP server and connect it to your Foundry agent at https://aka.ms/foundry-functions-mcp-tutorial. Agents Microsoft Agent Framework 2.0 (Public Preview Refresh) We’re excited about the preview refresh 2.0 release of Microsoft Agent Framework that builds on battle hardened work from Semantic Kernel and AutoGen. Agent Framework is an outstanding solution for building multi-agent orchestrations that are both simple and powerful. Azure Functions is a strong fit to host Agent Framework with the service’s extreme scale, serverless billing, and enterprise grade features like VNET networking and built-in auth. Durable Task Extension for Microsoft Agent Framework (Preview) The durable task extension for Microsoft Agent Framework transforms how you build production-ready, resilient and scalable AI agents by bringing the proven durable execution (survives crashes and restarts) and distributed execution (runs across multiple instances) capabilities of Azure Durable Functions directly into the Microsoft Agent Framework. Combined with Azure Functions for hosting and event-driven execution, you can now deploy stateful, resilient AI agents that automatically handle session management, failure recovery, and scaling, freeing you to focus entirely on your agent logic. Key features of the durable task extension include: Serverless Hosting: Deploy agents on Azure Functions with auto-scaling from thousands of instances to zero, while retaining full control in a serverless architecture. Automatic Session Management: Agents maintain persistent sessions with full conversation context that survives process crashes, restarts, and distributed execution across instances Deterministic Multi-Agent Orchestrations: Coordinate specialized durable agents with predictable, repeatable, code-driven execution patterns Human-in-the-Loop with Serverless Cost Savings: Pause for human input without consuming compute resources or incurring costs Built-in Observability with Durable Task Scheduler: Deep visibility into agent operations and orchestrations through the Durable Task Scheduler UI dashboard Create a durable agent: endpoint = os.getenv("AZURE_OPENAI_ENDPOINT") deployment_name = os.getenv("AZURE_OPENAI_DEPLOYMENT_NAME", "gpt-4o-mini") # Create an AI agent following the standard Microsoft Agent Framework pattern agent = AzureOpenAIChatClient( endpoint=endpoint, deployment_name=deployment_name, credential=AzureCliCredential() ).create_agent( instructions="""You are a professional content writer who creates engaging, well-structured documents for any given topic. When given a topic, you will: 1. Research the topic using the web search tool 2. Generate an outline for the document 3. Write a compelling document with proper formatting 4. Include relevant examples and citations""", name="DocumentPublisher", tools=[ AIFunctionFactory.Create(search_web), AIFunctionFactory.Create(generate_outline) ] ) # Configure the function app to host the agent with durable session management app = AgentFunctionApp(agents=[agent]) app.run() Durable Task Scheduler dashboard for agent and agent workflow observability and debugging For more information on the durable task extension for Agent Framework, see the announcement: https://aka.ms/durable-extension-for-af-blog. Flex Consumption Updates As you know, Flex Consumption means serverless without compromise. It combines elastic scale and pay‑for‑what‑you‑use pricing with the controls you expect: per‑instance concurrency, longer executions, VNet/private networking, and Always Ready instances to minimize cold starts. Since launching GA at Ignite 2024 last year, Flex Consumption has had tremendous growth with over 1.5 billion function executions per day and nearly 40 thousand apps. Here’s what’s new for Ignite 2025: 512 MB instance size (GA). Right‑size lighter workloads, scale farther within default quota. Availability Zones (GA). Distribute instances across zones. Rolling updates (Public Preview). Unlock zero-downtime deployments of code or config by setting a single configuration. See below for more information. Even more improvements including: new diagnostic settingsto route logs/metrics, use Key Vault App Config references, new regions, and Custom Handler support. To get started, review Flex Consumption samples, or dive into the documentation to see how Flex can support your workloads. Migrating to Azure Functions Flex Consumption Migrating to Flex Consumption is simple with our step-by-step guides and agentic tools. Move your Azure Functions apps or AWS Lambda workloads, update your code and configuration, and take advantage of new automation tools. With Linux Consumption retiring, now is the time to switch. For more information, see: Migrate Consumption plan apps to the Flex Consumption plan Migrate AWS Lambda workloads to Azure Functions Durable Functions Durable Functions introduces powerful new features to help you build resilient, production-ready workflows: Distributed Tracing: lets you track requests across components and systems, giving you deep visibility into orchestration and activities with support for App Insights and OpenTelemetry. Extended Sessions support in .NET isolated: improves performance by caching orchestrations in memory, ideal for fast sequential activities and large fan-out/fan-in patterns. Orchestration versioning (public preview): enables zero-downtime deployments and backward compatibility, so you can safely roll out changes without disrupting in-flight workflows Durable Task Scheduler Updates Durable Task Scheduler Dedicated SKU (GA): Now generally available, the Dedicated SKU offers advanced orchestration for complex workflows and intelligent apps. It provides predictable pricing for steady workloads, automatic checkpointing, state protection, and advanced monitoring for resilient, reliable execution. Durable Task Scheduler Consumption SKU (Public Preview): The new Consumption SKU brings serverless, pay-as-you-go orchestration to dynamic and variable workloads. It delivers the same orchestration capabilities with flexible billing, making it easy to scale intelligent applications as needed. For more information see: https://aka.ms/dts-ga-blog OpenTelemetry support in GA Azure Functions OpenTelemetry is now generally available, bringing unified, production-ready observability to serverless applications. Developers can now export logs, traces, and metrics using open standards—enabling consistent monitoring and troubleshooting across every workload. Key capabilities include: Unified observability: Standardize logs, traces, and metrics across all your serverless workloads for consistent monitoring and troubleshooting. Vendor-neutral telemetry: Integrate seamlessly with Azure Monitor or any OpenTelemetry-compliant backend, ensuring flexibility and choice. Broad language support: Works with .NET (isolated), Java, JavaScript, Python, PowerShell, and TypeScript. Start using OpenTelemetry in Azure Functions today to unlock standards-based observability for your apps. For step-by-step guidance on enabling OpenTelemetry and configuring exporters for your preferred backend, see the documentation. Deployment with Rolling Updates (Preview) Achieving zero-downtime deployments has never been easier. The Flex Consumption plan now offers rolling updates as a site update strategy. Set a single property, and all future code deployments and configuration changes will be released with zero-downtime. Instead of restarting all instances at once, the platform now drains existing instances in batches while scaling out the latest version to match real-time demand. This ensures uninterrupted in-flight executions and resilient throughput across your HTTP, non-HTTP, and Durable workloads – even during intensive scale-out scenarios. Rolling updates are now in public preview. Learn more at https://aka.ms/functions/rolling-updates. Secure Identity and Networking Everywhere By Design Security and trust are paramount. Azure Functions incorporates proven best practices by design, with full support for managed identity—eliminating secrets and simplifying secure authentication and authorization. Flex Consumption and other plans offer enterprise-grade networking features like VNETs, private endpoints, and NAT gateways for deep protection. The Azure Portal streamlines secure function creation, and updated scenarios and samples showcase these identity and networking capabilities in action. Built-in authentication (discussed above) enables inbound client traffic to use identity as well. Check out our updated Functions Scenarios page with quickstarts or our secure samples gallery to see these identity and networking best practices in action. .NET 10 Azure Functions now supports .NET 10, bringing in a great suite of new features and performance benefits for your code. .NET 10 is supported on the isolated worker model, and it’s available for all plan types except Linux Consumption. As a reminder, support ends for the legacy in-process model on November 10, 2026, and the in-process model is not being updated with .NET 10. To stay supported and take advantage of the latest features, migrate to the isolated worker model. Aspire Aspire is an opinionated stack that simplifies development of distributed applications in the cloud. The Azure Functions integration for Aspire enables you to develop, debug, and orchestrate an Azure Functions .NET project as part of an Aspire solution. Aspire publish directly deploys to your functions to Azure Functions on Azure Container Apps. Aspire 13 includes an updated preview version of the Functions integration that acts as a release candidate with go-live support. The package will be moved to GA quality with Aspire 13.1. Java 25, Node.js 24 Azure Functions now supports Java 25 and Node.js 24 in preview. You can now develop functions using these versions locally and deploy them to Azure Functions plans. Learn how to upgrade your apps to these versions here In Summary Ready to build what’s next? Update your Azure Functions Core Tools today and explore the latest samples and quickstarts to unlock new capabilities for your scenarios. The guided quickstarts run and deploy in under 5 minutes, and incorporate best practices—from architecture to security to deployment. We’ve made it easier than ever to scaffold, deploy, and scale real-world solutions with confidence. The future of intelligent, scalable, and secure applications starts now—jump in and see what you can create!2.5KViews0likes0Comments