Guest post by Ami Zou , Microsoft Student Partner at University College London studying Computer Science, Mathematics and Economics.

About me
In my spare time, I love learning new technologies and going to hackathons. Our hackathon project Pantrylogs using Artificial Intelligence was selected as one of the 10 Microsoft Imagine Cup UK finalists. I’m interested in learning more about AI, Data Science, and Machine Learning to improve the performances of our application.
In this article, I would love to share my experience of using Azure Machine Learning Studio with you. Follow the steps, and within half an hour, you will have a working Machine Learning experiment :D
Machine Learning Studio
Azure Machine Learning Studio is a very powerful browser-based, visual drag-and-drop authoring environment.
I love using it because it is very simple. We don’t have to write any code but just need to drag and drop the modules to deploy our ideas. There are many different modules that cover all you needs for machine learning and there are also Python, R, and other programming language modules where you can put customized code to make the algorithm work the way you want.
As a student, we get FREE Azure membership. Yes, free! It costs us nothing to start a Machine Learning experiment and we can use up to 100 modules per experiment and get a $100 free credit for any Azure product see http://aka.ms/azure4students .
Are you excited to build your first Azure Machine Learning experiment? Do it now!
Simply register with Azure and get started with Machine Learning :D.
Simple Azure ML experiment based on Car Data
Let’s build a simple ML experiment based on car data together to see how Azure ML Studio work.
There are two parts of the experiment: firstly, we will create a training environment to analyse the car data and train the machine learning experiment; secondly, we will publish it as a predictive experiment and use Linear Regression to predict the price of a car based on its features such as brand, door, bhp and etc.
Here is a snapshot of our final predictive experiment:
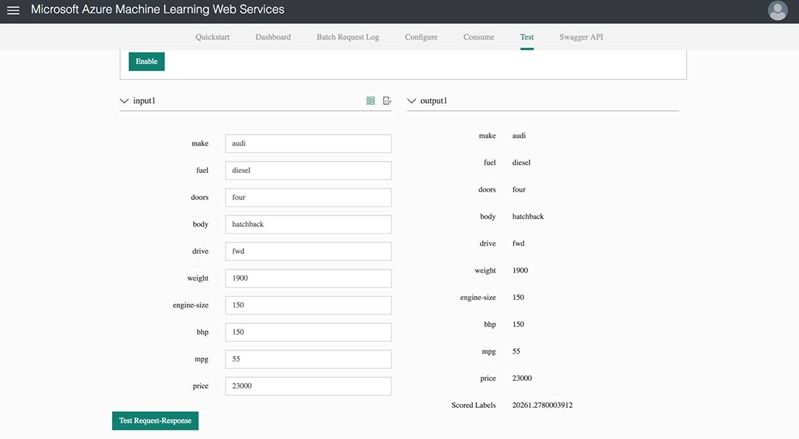
You can see we predict the price of an Audi to be £20,000 based on loads of car data against the real price £23,000. We know the model is accurate because Audi is overpriced :)
Ready? Let’s have a closer look:
Part 1: Create a Training Environment
Before starting the lab, please Download the car data Car prices.csv from GitHub: https://github.com/martinkearn/AI-Services-Workshop/blob/master/MachineLearning/Car%20prices.csv
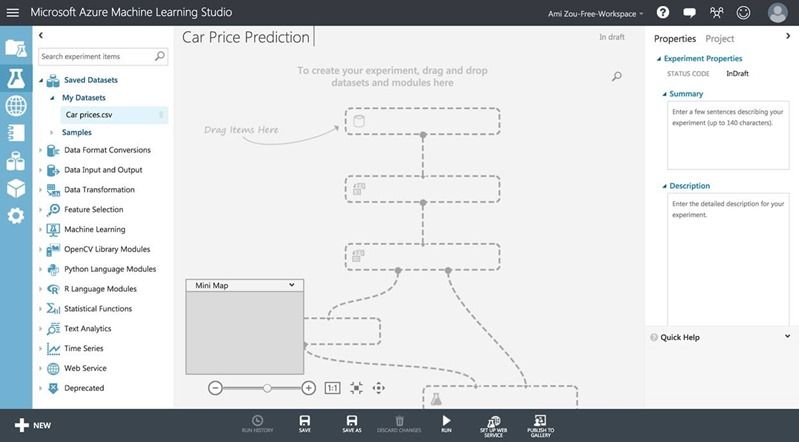
1. 1: Create an experiment and load dataFirstly, we need to create a new blank experiment and upload our car data:
- Sign into the Azure Machine Learning Studio: http://aiday.info/MLStudio
- Once you sign in, click Datasets > New > From Local File > Car prices.csv to load our car dataset.
- Then click Experiments > New > Blank experiment to create a new blank experiment.
- Finally click Save in the bottom command bar and Type ‘Car Price Prediction’ to save our car prediction experiment.
This should be what it looks like: a blank experiment named ‘Car Price Prediction’ with Car prices.csv in My Datasets.
As the starting point in our experiment, we need to add the data.
No codes needed, ML Studio uses a drag-and-drop authoring environment: drag modules from the left side navigation and drop them onto the canvas . ‘ Stitch ’ modules together by connecting the input/output ports (the small circles on the top and bottom of the modules) on the modules (ML Studio will automatically draw a line between them).
Now in our experiment,
- Drag ‘ Car prices.csv’ from Datasets > My DataSets on the left side navigation to the canvas.
- Then Right-Click the Output port (small circle on the bottom of ) and select Visualise to visualise the data.

(Step 1 and 2)
When you finish, the visualisation should look like this:

A lot of times raw data contains some unnecessary parts and missing values, and we need to clean it to make it an uninformed, ‘prepared’ data for our machine learning experiment.
We will be using the ‘ Clean Missing Data ’ module to remove rows with missing values to produce a clean dataset:
- Drag the Data Transformation > Manipulation > ‘Clean missing data’ module (or simply Search for it)
- Connect the output port (small circle on the bottom) of Car prices.csv to the input port (small circle on the top) of Clean missing data

(Step 2)
- Click on Clean missing data and use the right side panel to set the Cleaning mode = " Remove entire row "


(Step 3) (Step 4)
- Using bottom command bar (the green arrow) to Run the experiment and observe green ticks which indicates that everything is working as it should be.

(Step 4)
- Right-click > Visualise the Output Port (small circle on the bottom) of Clean missing data and note that the rows with missing data have been removed .

(Step 5)
1.4 - Split DataThe way machine learning works is that we use some actual data to train the algorithm, and then test the algorithm by comparing its output (in our case, the predicted car price) with the actual data (in our case, the actual car price).
Therefore we have to reserve some actual data for testing. Here let’s make it 75% for training and 25% for testing but you can surely modify that:
- Drag the Data Transformation > Sample & Split > ‘Split Data’ module (or Search for it)
- Connect ‘Clean Missing Data’s output port to Split Data module’s input port

(Step 2)
- Click on 'Split Data' and use the right side pane l to set ‘Fraction of rows in the first output dataset’ to 0.75


(Step 3) (Step 4)
- Run the experiment and observe the green ticks .
Now the left output port of the Split Data module represents a random 75% of the data and the right output port represents a random 25%.
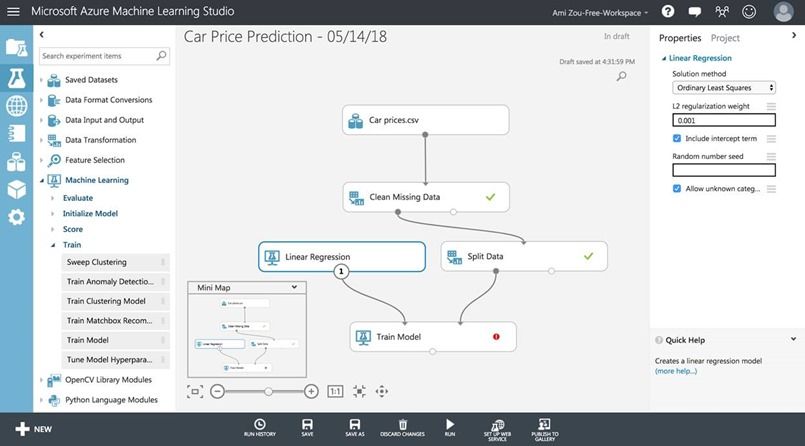
1.5 - Add Linear RegressionThere are many machine learning algorithms such as Linear Regression, Classification and Regression Tree, Naive Bayes, K-nearest Neighbors and etc (see ‘Top 10 Machine Learning Algorithm’ in the Resource session). For our task of predicting a single data point, the best suitable algorithm is the Linear Regression. We just need to add ‘Linear Regression’ module to the machine learning algorithm:
- Drag the Machine Learning > Initialize Model > Regression > Linear Regression module (or just Search for it)
- Place next to the ‘Split data’ module
Here is what it should look like:

Now comes to the most important part -- using Linear Regression to train the model on the price field. The algorithm learns the factors in the data that impact and affect the price, and then uses those factors to predict the price. The output, predicted price, is called a ‘Scored Label’.
- Drag the Machine Learning > Train > Train Model module (or Search for it)
- Connect Train Model’s Left Input (Upper) Port to Linear Regression’s Output (Bottom) port, so we are taking the output of the Linear Regression as one of the inputs of the Train Model.

(Step 2)
- Connect Train Model’s Right Input Port to Split Data’s Left Output Port.
(Step 3)
- Click on Train Model and click the Launch column selector in the right side panel.
- Add price as a selected column.

(Step 5)
- Run the experiment and observe the green ticks .
Now we're using the Linear Regression algorithm to train on price using 75% of the data set and reserving the rest 25% of the data for future predicting:

Finally, let’s test the performance of our model by comparing it against the remaining 25% of data to see how accurate the price prediction is.
- Drag the Machine Learning > Score > Score Model module (or Search for it).
- Connect Score Model’s Left Input Port to Train Model’s Output Port.
- Connect Score Model’s Right Input Port to Split data’s Right Output Port.

(Step 2 and 3)
- Run the experiment and observe the green ticks .
- Right-click Score Model’s Output Port > Visualise

(Step 5)
- Compare the price to scored label. This shows that the predicted price (i.e. scored label) is in the right 'ball park' compared to the actual price.

Yay! Now we have a functional training experiment! Let’s jump to the second part -- converting the training experiment to a predictive experiment and using some new data to test the API :D
Part 2: Create and Publish a Predictive Experiment
2.1 - Convert to Predictive ExperimentLet’s convert our training experiment to a ‘predictive experiment’ so we can use it to score new data:
- Run the experiment and observe the green ticks

(Step 1)
- Using the bottom command bar open the Setup Web Service menu and choose Predictive Web Service

(Step 2)
- Run the new predictive experiment (this may take approximately 30 seconds)

(Step 3 and 4)
- Using the bottom command bar , Deploy Web Service . The experiment will now be deployed and you'll see a screen when it is completed.
Here it is what it looks like when it completes - the experiment is not be deployed and there is a screen containing the endpoint, key and some test interfaces .

Now it is time to use our deployed predictive experiment to test some new car data, get new predicted prices, and see how good our model is!
- Stay at the last shown screen OR use the left navigation panel , and go to Web Services > Car Price Prediction [Predictive Exp]
- Click Test (preview) . This is in the Test column for the request/response endpoint - not the big blue button, but the small link next to it which will pops up a new tab when you click it.
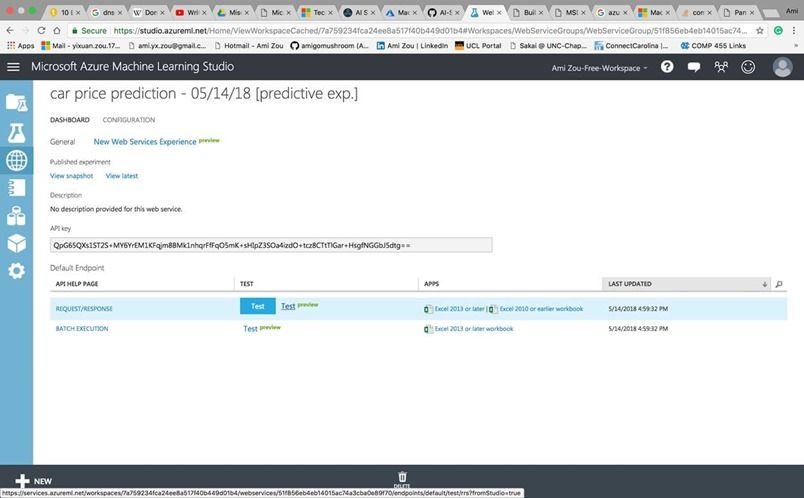
(Step 2: Click the ‘Test ’hyperlink - not the Blue ‘Test’ Button )
- Complete the Input1 form with the following data
○ make = audi
○ fuel = diesel
○ doors = four
○ body = hatchback
○ drive = fwd
○ weight = 1900
○ engine-size = 150
○ bhp = 150
○ mpg = 55
○ price = 23000

(Step 3)
- Click Test Request-Response

(Step 4 and 5)
- Observe scored labels (the predicted price: 20261.2780003912 ) is lower than the actual price of £23,000. We know the model is right because it is an Audi and therefore it is overpriced :)
Congrats! Now we have a fully functional predictive experiment! Test it with some other new data or modify the model.
Conclusions
So, how do you feel about Azure ML Studio? Easy to use right?I like Azure because it is so easy to use and we get free student membership. Compared to other ML Resources such as Google ML Kit, we don’t have to write any code but just need to drag and drop the modules in Azure ML Studio. Our free student membership allows as to use up to 100 modules per experiment and has 10GB storage while Amazon ML on AWS charges per hour. Of course if we want to go into production we will have to pay for Azure subscription, but the free membership is far more than enough for studying purpose, and what’s interesting, high-level ML APIs for enterprise producers such as HPE Haven OnDemand is hosted on Azure.
Azure ML Studio is very powerful. For instance, with our car dataset, there are so many other things we can do with the training model. We can normalise the data to make it a standardised dataset (values between 0 and 1). We can pick many different algorithms such as Clustering and Classification from ‘Machine Learning > Initialize Model’ to satisfy our needs for the model. There are also specified modules for data analysis programming languages such as R and Python.
I love it also because there are loads of resources and supportive communities. You can easily find tutorials and examples, and Microsoft Developer Networks has many Machine Learning related forums.
And because it’s free! Azure student membership includes free access to many other interesting and useful products such as Microsoft IoT Hub, SQL Database, and Cognitive Services which I use a lot for Pantrylogs . You can really play around with it and learn something new each time. It is always exciting to experiment some new technologies, isn’t it?
Now go explore Azure Machine Learning Studio and learn more about data and machine learning :D
Related Resources
- Microsoft Azure Machine Learning Studio: https://studio.azureml.net
- GitHub Machine Learning Lab: https://github.com/martinkearn/AI-Services-Workshop/blob/master/MachineLearning/MachineLearning-Lab.md
- Azure Machine Learning Real-World Examples: https://aischool.microsoft.com/learning-paths/2qon88L7GIWEeUuEaas6wK
- Microsoft Docs: https://docs.microsoft.com/en-us/
- Top 10 Machine Learning Algorithms: https://towardsdatascience.com/a-tour-of-the-top-10-algorithms-for-machine-learning-newbies-dde4edffae11
- Basic Machine Learning Tools and Frameworks for Data Scientists and Developers: https://www.computerworlduk.com/galleries/data/machine-learning-tools-harness-artificial-intelligence-for-your-business-3623891/
- Microsoft Developer Networks: https://social.msdn.microsoft.com/Forums/en-US/home?brandIgnore=True
- Microsoft ML Resources: https://docs.microsoft.com/en-us/azure/machine-learning/
 Microsoft