First published on MSDN on Jun 11, 2017

Image source: https://www.windowscentral.com/microsoft-hololens

Guest post by Sondre Agledahl, Microsoft Student Partner at University College London. I am a games programmer, excited to see how emerging technology can be used to make completely new and meaningful immersive experiences (and to be young enough to take full advantage of it!). Avid ROM hacker and karaoke enthusiast. Computer Science student at UCL.
The possibilities for creating new and novel gaming experiences using mixed reality are really endless, and we have only so far seen the tip of the iceberg of what can be achieved with this new technology.
As a developer looking to pioneer the creation of some of these new immersive experiences, you’ll be happy to find that an extensive library of open-source tools already exist to quickly and easily make the transition to mixed reality development. Notably, Microsoft’s own HoloToolkit for Unity includes a complete Unity package, replete with scripts, components and prefabs for interacting with the HoloLens device.
What follows is a simple tutorial that introduces the core elements of HoloLens development in Unity (gaze, gesture, voice recognition, and spatial awareness). Starting from scratch, we will create a highly customisable Unity project where you can fire virtual arrows with your fingertips, to interact with our own holograms, as well as with the real world around you.
The finished game can be deployed either to your own HoloLens device (should you be lucky enough to have one!) or to the official HoloLens emulator.
If you want to follow along with this tutorial, go ahead and download the project's asset package to get started. You can also find the complete project source code on GitHub .
Firstly, you’ll want to make sure that your development PC is running Windows 10, as no other operating system currently supports HoloLens development.
From here, the following tools are needed to get started:
· Visual Studio 2015/2017
· Windows 10 (UWP) SDK
· Unity
· HoloLens emulator (if you don’t have access to a physical device)
We’ll walk through the installation process for each of these components in turn:
1. If you haven’t already done so, install the Visual Studio IDE (either the 2017 version, or 2015 with update 3) and the Unity game engine . In fact, you only need to download one of these, as the other program is included as an optional component when installing the other.
2. Make sure you have the newest Windows 10 SDK installed (select the Universal Windows Platform development workload when installing Visual Studio, or download it separately ).
3. If you don’t have access to a physical HoloLens device, you can download the free HoloLens emulator to test your projects on your regular PC.
o Note: The HoloLens emulator is not compatible with Windows 10 Home, so if this is your version of Windows, you will have to upgrade to either the Professional, Enterprise or Education editions. If you’re a student, chances are your university can offer you a free upgrade to Windows 10 Education – have a look at your university website and Microsoft Imagine Access http://imagine.microsoft.com
o Activate Hyper-V functionality for Windows by going to Control Panel -> Programs and Features -> Turn Windows features on or off , then select and install Hyper-V .
o If you’re using Visual Studio 2017 (without Visual Studio 2015 installed as well), follow the official Microsoft guidelines for making the emulator compatible with this version:
1. Add or locate this key: HKLM\SOFTWARE\ Microsoft\Analog
2. Add a REG_SZ value in that key with name: “OverrideHoloLensSDKPrerequisites”, and value: “TRUE”
3. If you are on an x64 version of Windows, also add or locate this key: HKLM\SOFTWARE\Wow6432Node\Microsoft\Analog
4. Add a REG_SZ value in that key with name: “OverrideHoloLensSDKPrerequisites”, and value: “TRUE”
Start by creating a new 3D project in Unity, and give it an appropriate name (“ArrowMaster” is a good one).

Beginning with our empty Unity scene, we will make some initial adjustments to allow for compatibility with the HoloLens.
First of all, select Edit -> Project Settings -> Player , and click on the green Windows Store logo in the Inspector. Under the Other Settings tab, tick the Virtual Reality Supported box, and make sure Windows Holographic is listed under SDKs. Then, under the Publishing Settings tab, find the Capabilities list, and tick the Microphone and SpatialPerception boxes, giving Unity permission to make use of these features.

Next, we want to make sure our game runs as smoothly as possible (slowdowns can cause our players to get sick), so we’ll lower the graphics quality for our build. Go to Edit -> Project Settings -> Quality , then click on the small arrow icon under the Windows Store logo in the Inspector and select Fastest .

From here we will make a few adjustments to our scene’s Main Camera to set it up in such a way that it can represent our player, with the player’s position and head rotation represented by the Camera’s. First, reset the Camera’s Transform component so that its position is centred at the origin (that is, position (0, 0, 0)).
Next, under the Camera component, find the Clear Flags option and select Solid Color . Under Background set the camera background colour to solid black (RGB (0, 0, 0)). Everything our Main Camera in Unity currently sees as black will represent the real world behind our holograms to our player.
Finally, to make sure our holograms don’t render too close to the player’s face, set the Clipping Planes -> Near option to the HoloLens recommended 0.85.

Now we’re ready to import our HoloLens-tailored assets. Select Assets -> Import package -> Custom package… and select the location where you’ve unpacked this project’s asset package .
This package includes a copy of Microsoft’s HoloToolkit assets, as well as a couple of simple object prefabs. (If you would rather create your own GameObjects for this project from scratch, please do! OpenGameArt and FreeSound.org are some excellent starting resources.)
Through the project explorer, go to the HoloToolkit -> Input -> Prefabs -> Cursor folder, and drag the DefaultCursor prefab into your scene hierarchy. This cursor object will represent the point the player is currently looking at through their HoloLens.


Next, select GameObject -> Create empty to create a new empty GameObject in your scene and rename it “Managers” . Find the HoloToolkit -> Input -> Prefabs folder and drag the InputManager prefab onto your Managers object to child it to this object in your scene hierarchy.


Find the HoloToolkit -> SpatialMapping -> Prefabs folder and drag the SpatialMapping prefab into your scene as a child of the Managers object in the same way. This object is responsible for giving Unity information about the HoloLens’s mapping of the player’s surroundings.
Then, click on your SpatialMapping instance in the scene hierarchy and find its components in the Inspector tab. Under the SpatialMappingManager script component, you will see the “Draw Visual Meshes” box. When this is ticked (i.e. set to true ), our application will draw a wireframe representation of the spatially mapped environment surrounding the player while the game is running.
If you’re deploying your game to a physical device, I recommend unticking this box, as it is largely unneeded for our purposes, and consumes unnecessary performance. If you’re deploying to the HoloLens emulator, however, feel free to leave the box ticked, as it can give you a useful visualisation of the virtual room you’ll be playing in.

Next, with your SpatialMapping instance still selected, click on Add Component , and add a Spatial Mapping Collider to the object. This effectively assigns a collider component to the player’s real-world surroundings, allowing us to make our holograms collide with a real-world environment in a realistic (or unrealistic – whichever you prefer!) way.


Finally, add an EventSystem to your scene by right-clicking on your Managers object, and selecting UI -> Event System .


With these preliminaries out of the way, we’re all set to develop HoloLens applications, and are ready to make something new!
The first thing we want to do in our game is to allow our player to fire arrows by tapping his or her finger. We will accomplish this by writing a script and attach it to our Main Camera object. Using a GestureRecognizer , we will set up an event listener for a “Tap” event, and assign it to a callback method that instantiates and fires an Arrow object in the direction of the user’s gaze.
Included in the Prefabs folder in the root of your project explorer, you will find an Arrow prefab that we will use for this purpose. This Arrow comes with a Collider, RigidBody and AudioSource already attached and configured.
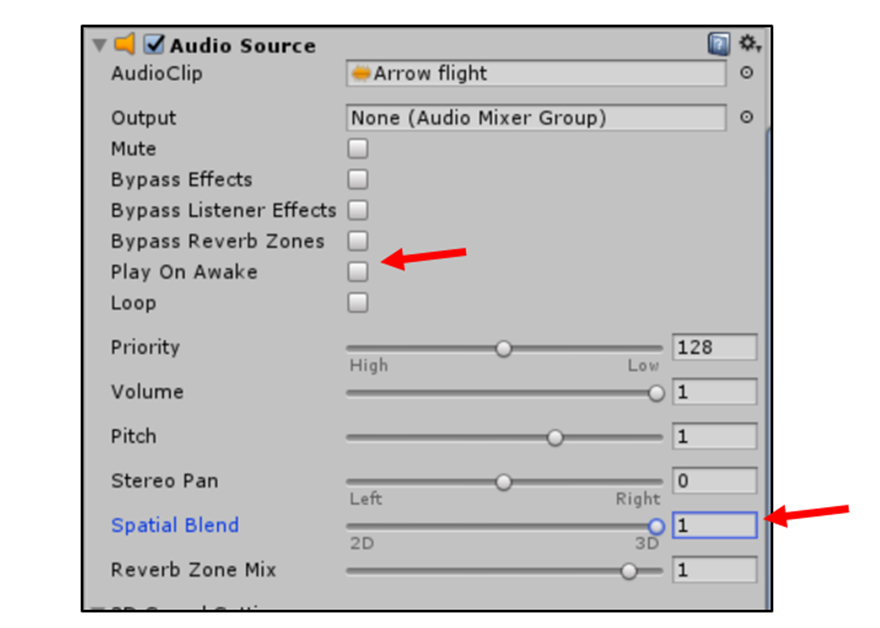
We’ll start by giving our Main Camera an AudioSource to play a “whoosh” sound as we fire our arrows. Navigate to the Sounds folder, and drag the Arrow flight.mp3 file onto the Main Camera object in the hierarchy. Looking at your Main Camera in the Inspector, you will see that an Audio Source component has been added. Edit its properties so that Play On Awake is unchecked (so our arrow sound doesn’t play when the game starts) and Spatial Blend is set to 1.
Now, with your Main Camera object still selected in the hierarchy, add a new script component to it called Bow . This will be the script we’ll use to fire our arrows. Double-click on your new Bow.cs script to open it in Visual Studio.


If you already have experience writing scripts in C#, I would encourage you to write this script yourself, consulting the Unity Docs for more information about the GestureRecognizer object. If this is not something you’re familiar with, or you get stuck while coding, I’ve included my implementation below, that you can copy and paste into your Bow.cs file.
In summary, our Bow script needs to do the following (remember to include the UnityEngine.VR.WSA.Input namespace to access the GestureRecognizer object!):
1. Access our Arrow prefab
2. Set up a GestureRecognizer to recognise “Tap” events
3. Invoke a callback method for each “Tap” event for shooting our arrow
4. Play our arrow flight sound
5. Instantiate our Arrow prefab at the current position and rotation of the camera
6. Apply a force to the arrow so that it shoots forwards
Bow.cs
1: using System.Collections;
2: using System.Collections.Generic;
3: using UnityEngine;
4: using UnityEngine.VR.WSA.Input;
5:
6: public class Bow : MonoBehaviour
7: {
8:
9: // The magnitude of the force the arrow will be fired by
10: public float fireForce = 1f;
11: public GameObject arrowPrefab;
12:
13: private GestureRecognizer gestureRecognizer;
14:
15: void Start()
16: {
17: // Set up GestureRecognizer to register user's finger taps
18: gestureRecognizer = new GestureRecognizer();
19: gestureRecognizer.TappedEvent += GestureRecognizerOnTappedEvent;
20: gestureRecognizer.SetRecognizableGestures(GestureSettings.Tap);
21: gestureRecognizer.StartCapturingGestures();
22: }
23:
24: // Called whenever a "tap" gesture is registered
25: private void GestureRecognizerOnTappedEvent(InteractionSourceKind source, int tapCount, Ray headRay)
26: {
27: Shoot();
28: }
29:
30: // This method will be publicly accessible to allow for voice-activated firing later
31: public void Shoot()
32: {
33: GetComponent<AudioSource>().Play();
34:
35: // Instantiate arrow at current posisiton and rotation of camera
36: GameObject arrow = Instantiate(arrowPrefab, transform.position, transform.rotation) as GameObject;
37:
38: // Calculate the direction for firing the arrow 5 degrees upward
39: Vector3 fireDirection = Quaternion.AngleAxis(-5, transform.right) * transform.forward;
40: Rigidbody arrowBody = arrow.GetComponent<Rigidbody>();
41:
42: // Apply a force (with desired magnitude) in this direction to the arrow
43: arrowBody.AddForce(fireDirection * fireForce);
44: }
45: }
46: (Post-code
47: Now, having exposed arrowPrefab as a public GameObject in the Bow script, it will show up as an empty field in the Inspector when the Main Camera object is selected. Locate this empty Arrow Prefab field, then navigate to the Prefabs folder, and drag the Arrow prefab into this empty field. Now the Bow script will have access to this our Arrow prefab and will instantiate it in the Shoot method.
48:
49: Well done! The player can now use their fingers as a virtual bow and arrow! Of course, working from the Unity editor alone you wouldn’t know. If you’d like to try to build and deploy your project at this stage, you can jump ahead to Section 6 of the tutorial and fire away (you can do this as many times as you like throughout the project to test your implementations).
50: Now, with this behaviour in place, our fired arrows will bounce off of the player’s real-world surroundings (because of the Spatial Mapping Collider we attached to our SpatialMapping object earlier). While this is quite a novel thing to see in action by itself, it’s not exactly the behaviour we would expect from an arrow. What we want is for our arrows to stick to the objects they collide with.
51: There are a number of approaches we could take to creating this “sticky” behaviour, but thankfully Unity allows us to use a very simple and straightforward solution: By setting our Arrow’s RigidBody component to Kinematic (signifying that we don’t want the object to conform to Unity’s physics engine), we can effectively freeze its position in space whenever we want to.
52: On top of this, we can make fired arrows continue to stick to the objects they collide with even if these objects move later, by setting each arrow to be the child of the object it collided with in the Transform hierarchy.
53: We can accomplish these behaviours through a simple script that we attach to our Arrow prefab. Find the Arrow prefab again inside the Prefabs folder, and add a new script component to it called Arrow. Open it up in Visual Studio.
54:
55: To recap, we need our Arrow.cs script to accomplish the following:
56: 1. Whenever it collides with something, play its attached collision sound
57: 2. Set its RigidBody component to be Kinematic
58: 3. Child it to the GameObject it collided with in the Transform hierarchy
59: If you have difficultly implementing any of the above, check my implementation below:
60: Arrow.cs
61: using System.Collections;
62: using System.Collections.Generic;
63: using UnityEngine;
64:
65: public class Arrow : MonoBehaviour
66: {
67:
68: private void OnCollisionEnter(Collision collision)
69: {
70: GetComponent<AudioSource>().Play();
71:
72: // Make the arrow's RigidBody "kinematic", to freeze its movement when it collides with something
73: GetComponent<Rigidbody>().isKinematic = true;
74:
75: // Child its transform component to the GameObject it collided with, so if that object moves, the arrow moves with it
76: transform.parent = collision.transform;
77: }
78: }
Now, having exposed arrowPrefab as a public GameObject in the Bow script, it will show up as an empty field in the Inspector when the Main Camera object is selected. Locate this empty Arrow Prefab field, then navigate to the Prefabs folder, and drag the Arrow prefab into this empty field. Now the Bow script will have access to this our Arrow prefab and will instantiate it in the Shoot method.


Well done! The player can now use their fingers as a virtual bow and arrow! Of course, working from the Unity editor alone you wouldn’t know. If you’d like to try to build and deploy your project at this stage, you can jump ahead to Section 6 of the tutorial and fire away (you can do this as many times as you like throughout the project to test your implementations).
Now, with this behaviour in place, our fired arrows will bounce off of the player’s real-world surroundings (because of the Spatial Mapping Collider we attached to our SpatialMapping object earlier). While this is quite a novel thing to see in action by itself, it’s not exactly the behaviour we would expect from an arrow. What we want is for our arrows to stick to the objects they collide with.
There are a number of approaches we could take to creating this “sticky” behaviour, but thankfully Unity allows us to use a very simple and straightforward solution: By setting our Arrow’s RigidBody component to Kinematic (signifying that we don’t want the object to conform to Unity’s physics engine), we can effectively freeze its position in space whenever we want to.
On top of this, we can make fired arrows continue to stick to the objects they collide with even if these objects move later, by setting each arrow to be the child of the object it collided with in the Transform hierarchy.
We can accomplish these behaviours through a simple script that we attach to our Arrow prefab. Find the Arrow prefab again inside the Prefabs folder, and add a new script component to it called Arrow . Open it up in Visual Studio.


To recap, we need our Arrow.cs script to accomplish the following:
1. Whenever it collides with something, play its attached collision sound
2. Set its RigidBody component to be Kinematic
3. Child it to the GameObject it collided with in the Transform hierarchy
If you have difficultly implementing any of the above, check my implementation below:
Arrow.cs
1: using System.Collections;
2: using System.Collections.Generic;
3: using UnityEngine;
4:
5: public class Arrow : MonoBehaviour
6: {
7:
8: private void OnCollisionEnter(Collision collision)
9: {
10: GetComponent<AudioSource>().Play();
11:
12: // Make the arrow's RigidBody "kinematic", to freeze its movement when it collides with something
You now have a set of responsive, semi-realistic arrows to fire! Again, feel free to jump ahead to Section 6 to see how to test your solution, and try sticking arrows all over your furniture (or, if you’re using the emulator, map out the shape of the simulated room by covering it in arrows)!
Now that our firing mechanism is in place, it’s time to make our project a little more game-like, by introducing an actual objective. Navigate back to the Prefabs folder, and drag a Target prefab into your scene.

Inspecting the Transform component of your new Target instance, you’ll see that its position is set to (0, 0, 2). By default, the HoloLens treats Unity world units as real-life metres, so the player will see this target initially as being two metres in front of him or her – a reasonable firing range.
Now, you’ll note that the target already comes with a RigidBody and a Collider attached, so you can already fire arrows at the target just and have them stick to it right out of the box. To add an extra layer of interactivity, however, let’s make our target actually respond when the player successfully strikes it with an arrow.
As you can see, our Target comes with an AudioSource and accompanying AudioClip attached. Whenever the player hits the target with an arrow, we want to play this sound, then have the target briefly change colour – both of which indicate to the player that we registered their successful shot. From here, we want to make it so that the target can only be struck a certain number of times before it falls to the floor.
As before, select your Target object, and add a new script component to it called Target . Open it in Visual Studio.


Our Target.cs script will have to accomplish the following:
1. Access the Target ’s renderer component to change its colour
2. Play its sound when something collides with the Target
3. Briefly change its colour, then change it back again
4. Check if it has been struck too many times to stay afloat
5. If so, have it fall to the floor
6. Make sure all children objects of the Target fall to the floor as well
As always, feel free to copy my implementation (or to compare it against yours after you’ve finished) if you need some guidance:
Target.CS
1: using System.Collections;
2: using System.Collections.Generic;
3: using UnityEngine;
4:
5: public class Target : MonoBehaviour
6: {
7: // How many times the target can be struck before it falls to the floor
8: public int hitCapacity = 3;
9:
10: // The colour the target flashes to when hit by an arrow
11: public Color hitColor = Color.green;
12:
13: private int timesHit = 0;
14: private Renderer mRend;
15: private Color defaultColor;
16:
17: private void Start()
18: {
19: mRend = GetComponent<Renderer>();
20: defaultColor = mRend.material.color; // Store a reference to the default colour of the target
21: }
22:
23:
24: private void OnCollisionEnter(Collision collision)
25: {
26: GetComponent<AudioSource>().Play();
27:
28: // Briefly change the colour of the target to confirm it has been hit
29: mRend.material.color = hitColor;
30: Invoke("SetDefaultColor", 0.5f); // Invokes helper method to reset colour after 0.5 seconds
31:
32: timesHit++;
33:
34: // After desired number of hits, target will fall to the floor
35: if (timesHit >= hitCapacity)
36: {
37: Fall();
38: }
39: }
40:
41: private void SetDefaultColor()
42: {
43: mRend.material.color = defaultColor;
44: }
45:
46: private void Fall()
47: {
48: // Set the target's RigidBody to no longer be kinematic, so it will be affected by physics (and fall to the floor)
49: GetComponent<Rigidbody>().isKinematic = false;
50:
51: // Iterate over each of target's transform children (i.e. arrows that have struck it) and do the same to them
52: foreach (Transform child in transform)
53: {
54: child.GetComponent<Rigidbody>().isKinematic = false;
55: }
56: }
57: }
Very cool. We now have elements in place for a simple yet satisfying holographic mini-game.
Go ahead and create two more duplicates of your Target object in your scene, and set them up next to each other to form a mini-sized target range. Shown below are our three targets placed at positions (0, 0, 2), (0.5, 0.5, 2) and (-0.5, 0.5, 2) respectively.

Before we move on, there is one more adjustment we can make to our project to ensure players have the smoothest arrow-firing experience possible.
If you’ve already deployed and tested your project thus far, you may have noticed that your arrows can often end up colliding and sticking to each other rather than the target you’re trying to hit. We can prevent this mildly annoying behaviour with a simple tweak to our physics layers.
Find your Arrow prefab again in the Prefabs folder, and in the Inspector, select Layer -> Add Layer… In the first blank User Layer entry, type “Arrows” and press Enter on your keyboard. Find the Arrow prefab again in the Inspector, and set its Layer to our newly created Arrows layer.


Next, in your main Unity menu, select Edit -> Project Settings -> Physics. Inside the PhysicsManager that opens in the Inspector, find the Layer Collision Matrix tab, and uncheck the Arrows-Arrows entry. This will make it so that our arrows will no longer collide with each other, which is going to make for a much less frustrating experience for our players.

Much better. Have a play around with the current state of the project if you want, before we move on to making our final addition to our project – voice commands
The last unique element of HoloLens development we are going to touch on is speech recognition. Thankfully, the UnitEngine.Windows API makes setting up voice commands with custom behaviours very simple.
We will make use of a KeywordRecognizer event listener object. This KeyWordRecognizer is initialised with a list of strings containing plain English phrases that we want to use as voice commands, and is set it up like any other event listener. Unity will automatically begin listening for cases of these phrases being spoken through the user’s microphone, invoking our custom callback methods whenever a phrase is recognised.
Let’s implement two speech commands in our little game – one alternative command for firing arrows, and another for resetting the scene so the player can start over.
Select your Main Camera in the scene hierarchy, and add to it a new script component called SpeechControl . Open it up in Visual Studio.


As always, let’s go over exactly what we want this script to accomplish before we write our code. Consult the handy Unity Docs for more information about the KeyWordRecognizer or any other objects or methods you’re unsure about.
1. Remember to include the UnityEngine.Windows.Speech namespace to access the KeyWordRecognizer !
2. Initialise a KeyWordRecognizer with a list of strings (our voice commands)
3. Set up a callback method for a speech recognition event, and start listening
4. When a phrase is recognised, check which one it is
5. Shoot an arrow from the Camera’s Bow script if appropriate
6. Or reload the scene from the beginning
My implementation:
SpeechControl.cs
1: using System.Collections;
2: using System.Collections.Generic;
3: using UnityEngine;
4: using UnityEngine.SceneManagement;
5: using UnityEngine.Windows.Speech;
6:
7: public class SpeechControl : MonoBehaviour {
8:
9: public string fireCommand = "fire";
10: public string resetCommand = "reset";
11:
12: private KeywordRecognizer keywordRecognizer;
13:
14: void Start()
15: {
16: // Set up Keyword Recognizer to register our assigned voice commands
17: keywordRecognizer = new KeywordRecognizer(new[] { fireCommand, resetCommand });
18: keywordRecognizer.OnPhraseRecognized += KeywordRecognizer_OnPhraseRecognized;
19: keywordRecognizer.Start();
20: }
21:
22: // Called whenever a voice command is recognised
23: private void KeywordRecognizer_OnPhraseRecognized(PhraseRecognizedEventArgs args)
24: {
25: string cmd = args.text;
26:
27: // If user said "fire", shoot arrow from Bow
28: if (cmd == fireCommand)
29: {
30: GetComponent<Bow>().Shoot();
31: }
32:
33: // If user said "reset", reload the Unity scene to start from the beginning
34: else if (cmd == resetCommand)
35: {
36: SceneManager.LoadSceneAsync(0, LoadSceneMode.Single);
37: }
38: }
39: }
If you managed to successfully implement the above script – well done! You can now bring back your fallen targets as many times as you like.

We now have a fully functioning HoloLens experience that incorporates gaze recognition, spatial mapping and speech commands! In the last section, we will look at how to bring our game to life by building it and deploying it to a real device.
Before building your project, make sure that your working Unity scene is saved (either through File -> Save Scene or simply pressing CTRL+S ). I’ve simply named my scene “Game” and stored it in the root of the Assets folder.
Now, with the current state of your scene open in Unity, select File -> Build Settings . Under the Scenes In Build rectangle that appears at the top of the screen, click on Add Open Scenes to add your main scene to the build if you haven’t already. From here, under Platforms , select Windows Store , and press the Switch Platform button.
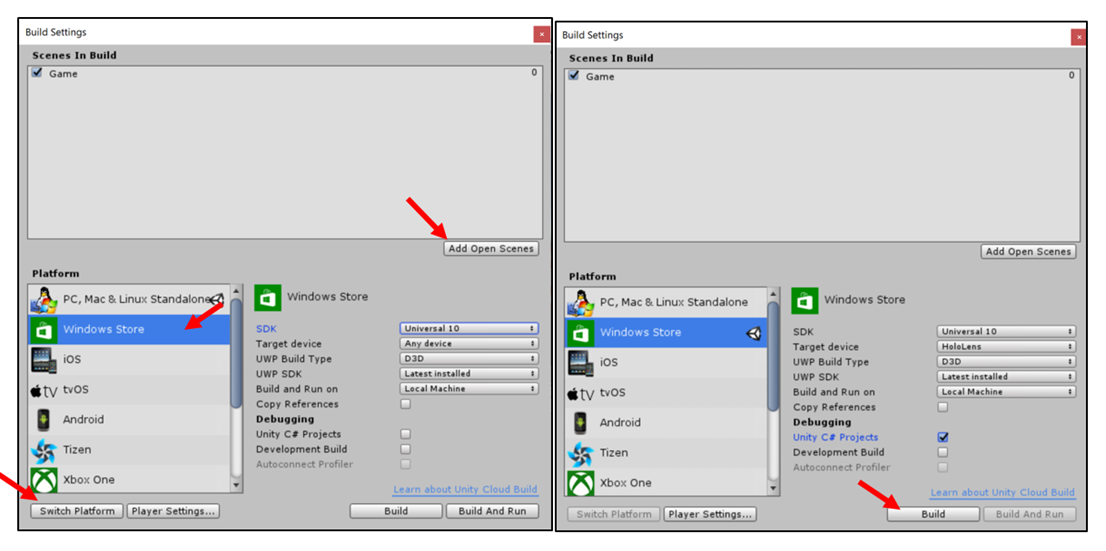
Once the target platform has switched, we will make a couple of other minor adjustments to our build settings to target the HoloLens. On the right-hand options list, make sure SDK is set to Universal 10 , Target Device to HoloLens and UWP Build Type to D3D . Under the Debugging options, tick the Unity C# Projects box, and press the Build button to build your solution!

Unity will prompt you to select a target folder for your build. Simply create a new folder inside your project (named “App” by convention). After a short wait, your project folder should open up. Open the build folder you just created, and double-click on the Visual Studio Solution (.sln) file inside to open it in Visual Studio (in my case, this is the ArrowMaster.sln inside the App folder).

With the solution open in Visual Studio, find the two dropdown menus next to the green play button at the top of the screen. In the leftmost menu ( Solution Configurations ) select Release , and in the next menu ( Solution Platform ) select x86 . Finally, expand the dropdown menu right next to the green Start button and select either Device (if you’re deploying directly to a physical HoloLens over USB) or HoloLens Emulator (if you installed it earlier).

Finally, in the top menu bar, select Debug -> Start Without Debugging (or simply press CTRL + F5 ) to deploy your project. If you’re using a physical HoloLens, the project will load automatically on your device once it has finished building, whereas if you’re using the emulator, you will have to wait for the emulator to finish booting up before the project starts.

If everything worked smoothly and your game runs as it should – congratulations! You have just launched your first self-created mixed reality experience! (For emulator users, use the W-A-S-D keys and your mouse to control virtual movement in your game – or use an Xbox controller).

I hope you enjoyed this brief tutorial on getting started with mixed reality game development. Our little bow-and-arrow game here is really only a very simple example of the sort of experiences you can create for players through Unity’s integration with the HoloLens’s interactive holograms, spatial mapping and gaze and voice recognition technologies.
Hopefully it has given you an idea of just how simple it is to make the transition from conventional 3D game development to Mixed Reality, with virtually no real knowledge of how the technology works under the hood required.
If you’re unsure where to go next in your Mixed Reality development journey, why not try to expand our bow-and-arrow game to add some more novelty and polish? (Feel free to fork the project on GitHub ). I can suggest a couple of improvements:
· Let the player switch to an alternate projectile type (a gun, a slingshot?) with slightly different behaviour through the use of a voice command.
· Have the targets spawn in random locations relative to the Main Camera’s position every time the scene is loaded (making sure targets never appear inside of objects in the spatially mapped environment).
· Modify the targets to fire their own projectiles at the player that they have to dodge, and induce a mildly annoying visual effect whenever the player gets hit.
· Set a time limit for the game that is shown to the player. Play an extra jingle if the player manages to break all of the targets within the time limit, and play a sad violin tune if they fail.
From there, if you’re looking to learn more about game development for HoloLens through Unity, I would highly suggest checking out the official Microsoft Mixed Reality guides at the Windows Dev Center website. These include both step-by-step tutorials ( Academy ) as well as in-depth documentation about how the HoloLens and its software APIs work ( Development ).
Asset credits:
· 3D model for archery set (arrows and targets) by OpenGameArt user yd (Public Domain)
· Arrow flight and impact sounds by FreeSound.org user Robinhood76 (Creative Commons)
· Target hit sound by FreeSound.org user grunz (Creative Commons)
Source Control for the project : https://github.com/colonelsalt/ArrowMaster
Image source: https://www.windowscentral.com/microsoft-hololens
Guest post by Sondre Agledahl, Microsoft Student Partner at University College London. I am a games programmer, excited to see how emerging technology can be used to make completely new and meaningful immersive experiences (and to be young enough to take full advantage of it!). Avid ROM hacker and karaoke enthusiast. Computer Science student at UCL.
Introduction
The possibilities for creating new and novel gaming experiences using mixed reality are really endless, and we have only so far seen the tip of the iceberg of what can be achieved with this new technology.
As a developer looking to pioneer the creation of some of these new immersive experiences, you’ll be happy to find that an extensive library of open-source tools already exist to quickly and easily make the transition to mixed reality development. Notably, Microsoft’s own HoloToolkit for Unity includes a complete Unity package, replete with scripts, components and prefabs for interacting with the HoloLens device.
What follows is a simple tutorial that introduces the core elements of HoloLens development in Unity (gaze, gesture, voice recognition, and spatial awareness). Starting from scratch, we will create a highly customisable Unity project where you can fire virtual arrows with your fingertips, to interact with our own holograms, as well as with the real world around you.
The finished game can be deployed either to your own HoloLens device (should you be lucky enough to have one!) or to the official HoloLens emulator.
If you want to follow along with this tutorial, go ahead and download the project's asset package to get started. You can also find the complete project source code on GitHub .
Section 1 – Installing the tools
Firstly, you’ll want to make sure that your development PC is running Windows 10, as no other operating system currently supports HoloLens development.
From here, the following tools are needed to get started:
· Visual Studio 2015/2017
· Windows 10 (UWP) SDK
· Unity
· HoloLens emulator (if you don’t have access to a physical device)
We’ll walk through the installation process for each of these components in turn:
1. If you haven’t already done so, install the Visual Studio IDE (either the 2017 version, or 2015 with update 3) and the Unity game engine . In fact, you only need to download one of these, as the other program is included as an optional component when installing the other.
2. Make sure you have the newest Windows 10 SDK installed (select the Universal Windows Platform development workload when installing Visual Studio, or download it separately ).
3. If you don’t have access to a physical HoloLens device, you can download the free HoloLens emulator to test your projects on your regular PC.
o Note: The HoloLens emulator is not compatible with Windows 10 Home, so if this is your version of Windows, you will have to upgrade to either the Professional, Enterprise or Education editions. If you’re a student, chances are your university can offer you a free upgrade to Windows 10 Education – have a look at your university website and Microsoft Imagine Access http://imagine.microsoft.com
o Activate Hyper-V functionality for Windows by going to Control Panel -> Programs and Features -> Turn Windows features on or off , then select and install Hyper-V .
o If you’re using Visual Studio 2017 (without Visual Studio 2015 installed as well), follow the official Microsoft guidelines for making the emulator compatible with this version:
1. Add or locate this key: HKLM\SOFTWARE\ Microsoft\Analog
2. Add a REG_SZ value in that key with name: “OverrideHoloLensSDKPrerequisites”, and value: “TRUE”
3. If you are on an x64 version of Windows, also add or locate this key: HKLM\SOFTWARE\Wow6432Node\Microsoft\Analog
4. Add a REG_SZ value in that key with name: “OverrideHoloLensSDKPrerequisites”, and value: “TRUE”
Section 2 – Setting up your Unity scene
Start by creating a new 3D project in Unity, and give it an appropriate name (“ArrowMaster” is a good one).
Beginning with our empty Unity scene, we will make some initial adjustments to allow for compatibility with the HoloLens.
First of all, select Edit -> Project Settings -> Player , and click on the green Windows Store logo in the Inspector. Under the Other Settings tab, tick the Virtual Reality Supported box, and make sure Windows Holographic is listed under SDKs. Then, under the Publishing Settings tab, find the Capabilities list, and tick the Microphone and SpatialPerception boxes, giving Unity permission to make use of these features.
Next, we want to make sure our game runs as smoothly as possible (slowdowns can cause our players to get sick), so we’ll lower the graphics quality for our build. Go to Edit -> Project Settings -> Quality , then click on the small arrow icon under the Windows Store logo in the Inspector and select Fastest .
From here we will make a few adjustments to our scene’s Main Camera to set it up in such a way that it can represent our player, with the player’s position and head rotation represented by the Camera’s. First, reset the Camera’s Transform component so that its position is centred at the origin (that is, position (0, 0, 0)).
Next, under the Camera component, find the Clear Flags option and select Solid Color . Under Background set the camera background colour to solid black (RGB (0, 0, 0)). Everything our Main Camera in Unity currently sees as black will represent the real world behind our holograms to our player.
Finally, to make sure our holograms don’t render too close to the player’s face, set the Clipping Planes -> Near option to the HoloLens recommended 0.85.
Now we’re ready to import our HoloLens-tailored assets. Select Assets -> Import package -> Custom package… and select the location where you’ve unpacked this project’s asset package .
This package includes a copy of Microsoft’s HoloToolkit assets, as well as a couple of simple object prefabs. (If you would rather create your own GameObjects for this project from scratch, please do! OpenGameArt and FreeSound.org are some excellent starting resources.)
Through the project explorer, go to the HoloToolkit -> Input -> Prefabs -> Cursor folder, and drag the DefaultCursor prefab into your scene hierarchy. This cursor object will represent the point the player is currently looking at through their HoloLens.
Next, select GameObject -> Create empty to create a new empty GameObject in your scene and rename it “Managers” . Find the HoloToolkit -> Input -> Prefabs folder and drag the InputManager prefab onto your Managers object to child it to this object in your scene hierarchy.
Find the HoloToolkit -> SpatialMapping -> Prefabs folder and drag the SpatialMapping prefab into your scene as a child of the Managers object in the same way. This object is responsible for giving Unity information about the HoloLens’s mapping of the player’s surroundings.
Then, click on your SpatialMapping instance in the scene hierarchy and find its components in the Inspector tab. Under the SpatialMappingManager script component, you will see the “Draw Visual Meshes” box. When this is ticked (i.e. set to true ), our application will draw a wireframe representation of the spatially mapped environment surrounding the player while the game is running.
If you’re deploying your game to a physical device, I recommend unticking this box, as it is largely unneeded for our purposes, and consumes unnecessary performance. If you’re deploying to the HoloLens emulator, however, feel free to leave the box ticked, as it can give you a useful visualisation of the virtual room you’ll be playing in.
Next, with your SpatialMapping instance still selected, click on Add Component , and add a Spatial Mapping Collider to the object. This effectively assigns a collider component to the player’s real-world surroundings, allowing us to make our holograms collide with a real-world environment in a realistic (or unrealistic – whichever you prefer!) way.
Finally, add an EventSystem to your scene by right-clicking on your Managers object, and selecting UI -> Event System .
With these preliminaries out of the way, we’re all set to develop HoloLens applications, and are ready to make something new!
Section 3 – Firing virtual arrows
The first thing we want to do in our game is to allow our player to fire arrows by tapping his or her finger. We will accomplish this by writing a script and attach it to our Main Camera object. Using a GestureRecognizer , we will set up an event listener for a “Tap” event, and assign it to a callback method that instantiates and fires an Arrow object in the direction of the user’s gaze.
Included in the Prefabs folder in the root of your project explorer, you will find an Arrow prefab that we will use for this purpose. This Arrow comes with a Collider, RigidBody and AudioSource already attached and configured.
We’ll start by giving our Main Camera an AudioSource to play a “whoosh” sound as we fire our arrows. Navigate to the Sounds folder, and drag the Arrow flight.mp3 file onto the Main Camera object in the hierarchy. Looking at your Main Camera in the Inspector, you will see that an Audio Source component has been added. Edit its properties so that Play On Awake is unchecked (so our arrow sound doesn’t play when the game starts) and Spatial Blend is set to 1.
Now, with your Main Camera object still selected in the hierarchy, add a new script component to it called Bow . This will be the script we’ll use to fire our arrows. Double-click on your new Bow.cs script to open it in Visual Studio.
If you already have experience writing scripts in C#, I would encourage you to write this script yourself, consulting the Unity Docs for more information about the GestureRecognizer object. If this is not something you’re familiar with, or you get stuck while coding, I’ve included my implementation below, that you can copy and paste into your Bow.cs file.
In summary, our Bow script needs to do the following (remember to include the UnityEngine.VR.WSA.Input namespace to access the GestureRecognizer object!):
1. Access our Arrow prefab
2. Set up a GestureRecognizer to recognise “Tap” events
3. Invoke a callback method for each “Tap” event for shooting our arrow
4. Play our arrow flight sound
5. Instantiate our Arrow prefab at the current position and rotation of the camera
6. Apply a force to the arrow so that it shoots forwards
My implementation:
Bow.cs
1: using System.Collections;
2: using System.Collections.Generic;
3: using UnityEngine;
4: using UnityEngine.VR.WSA.Input;
5:
6: public class Bow : MonoBehaviour
7: {
8:
9: // The magnitude of the force the arrow will be fired by
10: public float fireForce = 1f;
11: public GameObject arrowPrefab;
12:
13: private GestureRecognizer gestureRecognizer;
14:
15: void Start()
16: {
17: // Set up GestureRecognizer to register user's finger taps
18: gestureRecognizer = new GestureRecognizer();
19: gestureRecognizer.TappedEvent += GestureRecognizerOnTappedEvent;
20: gestureRecognizer.SetRecognizableGestures(GestureSettings.Tap);
21: gestureRecognizer.StartCapturingGestures();
22: }
23:
24: // Called whenever a "tap" gesture is registered
25: private void GestureRecognizerOnTappedEvent(InteractionSourceKind source, int tapCount, Ray headRay)
26: {
27: Shoot();
28: }
29:
30: // This method will be publicly accessible to allow for voice-activated firing later
31: public void Shoot()
32: {
33: GetComponent<AudioSource>().Play();
34:
35: // Instantiate arrow at current posisiton and rotation of camera
36: GameObject arrow = Instantiate(arrowPrefab, transform.position, transform.rotation) as GameObject;
37:
38: // Calculate the direction for firing the arrow 5 degrees upward
39: Vector3 fireDirection = Quaternion.AngleAxis(-5, transform.right) * transform.forward;
40: Rigidbody arrowBody = arrow.GetComponent<Rigidbody>();
41:
42: // Apply a force (with desired magnitude) in this direction to the arrow
43: arrowBody.AddForce(fireDirection * fireForce);
44: }
45: }
46: (Post-code
47: Now, having exposed arrowPrefab as a public GameObject in the Bow script, it will show up as an empty field in the Inspector when the Main Camera object is selected. Locate this empty Arrow Prefab field, then navigate to the Prefabs folder, and drag the Arrow prefab into this empty field. Now the Bow script will have access to this our Arrow prefab and will instantiate it in the Shoot method.
48:
49: Well done! The player can now use their fingers as a virtual bow and arrow! Of course, working from the Unity editor alone you wouldn’t know. If you’d like to try to build and deploy your project at this stage, you can jump ahead to Section 6 of the tutorial and fire away (you can do this as many times as you like throughout the project to test your implementations).
50: Now, with this behaviour in place, our fired arrows will bounce off of the player’s real-world surroundings (because of the Spatial Mapping Collider we attached to our SpatialMapping object earlier). While this is quite a novel thing to see in action by itself, it’s not exactly the behaviour we would expect from an arrow. What we want is for our arrows to stick to the objects they collide with.
51: There are a number of approaches we could take to creating this “sticky” behaviour, but thankfully Unity allows us to use a very simple and straightforward solution: By setting our Arrow’s RigidBody component to Kinematic (signifying that we don’t want the object to conform to Unity’s physics engine), we can effectively freeze its position in space whenever we want to.
52: On top of this, we can make fired arrows continue to stick to the objects they collide with even if these objects move later, by setting each arrow to be the child of the object it collided with in the Transform hierarchy.
53: We can accomplish these behaviours through a simple script that we attach to our Arrow prefab. Find the Arrow prefab again inside the Prefabs folder, and add a new script component to it called Arrow. Open it up in Visual Studio.
54:
55: To recap, we need our Arrow.cs script to accomplish the following:
56: 1. Whenever it collides with something, play its attached collision sound
57: 2. Set its RigidBody component to be Kinematic
58: 3. Child it to the GameObject it collided with in the Transform hierarchy
59: If you have difficultly implementing any of the above, check my implementation below:
60: Arrow.cs
61: using System.Collections;
62: using System.Collections.Generic;
63: using UnityEngine;
64:
65: public class Arrow : MonoBehaviour
66: {
67:
68: private void OnCollisionEnter(Collision collision)
69: {
70: GetComponent<AudioSource>().Play();
71:
72: // Make the arrow's RigidBody "kinematic", to freeze its movement when it collides with something
73: GetComponent<Rigidbody>().isKinematic = true;
74:
75: // Child its transform component to the GameObject it collided with, so if that object moves, the arrow moves with it
76: transform.parent = collision.transform;
77: }
78: }
Now, having exposed arrowPrefab as a public GameObject in the Bow script, it will show up as an empty field in the Inspector when the Main Camera object is selected. Locate this empty Arrow Prefab field, then navigate to the Prefabs folder, and drag the Arrow prefab into this empty field. Now the Bow script will have access to this our Arrow prefab and will instantiate it in the Shoot method.
Well done! The player can now use their fingers as a virtual bow and arrow! Of course, working from the Unity editor alone you wouldn’t know. If you’d like to try to build and deploy your project at this stage, you can jump ahead to Section 6 of the tutorial and fire away (you can do this as many times as you like throughout the project to test your implementations).
Now, with this behaviour in place, our fired arrows will bounce off of the player’s real-world surroundings (because of the Spatial Mapping Collider we attached to our SpatialMapping object earlier). While this is quite a novel thing to see in action by itself, it’s not exactly the behaviour we would expect from an arrow. What we want is for our arrows to stick to the objects they collide with.
There are a number of approaches we could take to creating this “sticky” behaviour, but thankfully Unity allows us to use a very simple and straightforward solution: By setting our Arrow’s RigidBody component to Kinematic (signifying that we don’t want the object to conform to Unity’s physics engine), we can effectively freeze its position in space whenever we want to.
On top of this, we can make fired arrows continue to stick to the objects they collide with even if these objects move later, by setting each arrow to be the child of the object it collided with in the Transform hierarchy.
We can accomplish these behaviours through a simple script that we attach to our Arrow prefab. Find the Arrow prefab again inside the Prefabs folder, and add a new script component to it called Arrow . Open it up in Visual Studio.
To recap, we need our Arrow.cs script to accomplish the following:
1. Whenever it collides with something, play its attached collision sound
2. Set its RigidBody component to be Kinematic
3. Child it to the GameObject it collided with in the Transform hierarchy
If you have difficultly implementing any of the above, check my implementation below:
Arrow.cs
1: using System.Collections;
2: using System.Collections.Generic;
3: using UnityEngine;
4:
5: public class Arrow : MonoBehaviour
6: {
7:
8: private void OnCollisionEnter(Collision collision)
9: {
10: GetComponent<AudioSource>().Play();
11:
12: // Make the arrow's RigidBody "kinematic", to freeze its movement when it collides with something
You now have a set of responsive, semi-realistic arrows to fire! Again, feel free to jump ahead to Section 6 to see how to test your solution, and try sticking arrows all over your furniture (or, if you’re using the emulator, map out the shape of the simulated room by covering it in arrows)!
Section 4 – Something to shoot at
Now that our firing mechanism is in place, it’s time to make our project a little more game-like, by introducing an actual objective. Navigate back to the Prefabs folder, and drag a Target prefab into your scene.
Inspecting the Transform component of your new Target instance, you’ll see that its position is set to (0, 0, 2). By default, the HoloLens treats Unity world units as real-life metres, so the player will see this target initially as being two metres in front of him or her – a reasonable firing range.
Now, you’ll note that the target already comes with a RigidBody and a Collider attached, so you can already fire arrows at the target just and have them stick to it right out of the box. To add an extra layer of interactivity, however, let’s make our target actually respond when the player successfully strikes it with an arrow.
As you can see, our Target comes with an AudioSource and accompanying AudioClip attached. Whenever the player hits the target with an arrow, we want to play this sound, then have the target briefly change colour – both of which indicate to the player that we registered their successful shot. From here, we want to make it so that the target can only be struck a certain number of times before it falls to the floor.
As before, select your Target object, and add a new script component to it called Target . Open it in Visual Studio.
Our Target.cs script will have to accomplish the following:
1. Access the Target ’s renderer component to change its colour
2. Play its sound when something collides with the Target
3. Briefly change its colour, then change it back again
4. Check if it has been struck too many times to stay afloat
5. If so, have it fall to the floor
6. Make sure all children objects of the Target fall to the floor as well
As always, feel free to copy my implementation (or to compare it against yours after you’ve finished) if you need some guidance:
Target.CS
1: using System.Collections;
2: using System.Collections.Generic;
3: using UnityEngine;
4:
5: public class Target : MonoBehaviour
6: {
7: // How many times the target can be struck before it falls to the floor
8: public int hitCapacity = 3;
9:
10: // The colour the target flashes to when hit by an arrow
11: public Color hitColor = Color.green;
12:
13: private int timesHit = 0;
14: private Renderer mRend;
15: private Color defaultColor;
16:
17: private void Start()
18: {
19: mRend = GetComponent<Renderer>();
20: defaultColor = mRend.material.color; // Store a reference to the default colour of the target
21: }
22:
23:
24: private void OnCollisionEnter(Collision collision)
25: {
26: GetComponent<AudioSource>().Play();
27:
28: // Briefly change the colour of the target to confirm it has been hit
29: mRend.material.color = hitColor;
30: Invoke("SetDefaultColor", 0.5f); // Invokes helper method to reset colour after 0.5 seconds
31:
32: timesHit++;
33:
34: // After desired number of hits, target will fall to the floor
35: if (timesHit >= hitCapacity)
36: {
37: Fall();
38: }
39: }
40:
41: private void SetDefaultColor()
42: {
43: mRend.material.color = defaultColor;
44: }
45:
46: private void Fall()
47: {
48: // Set the target's RigidBody to no longer be kinematic, so it will be affected by physics (and fall to the floor)
49: GetComponent<Rigidbody>().isKinematic = false;
50:
51: // Iterate over each of target's transform children (i.e. arrows that have struck it) and do the same to them
52: foreach (Transform child in transform)
53: {
54: child.GetComponent<Rigidbody>().isKinematic = false;
55: }
56: }
57: }
Very cool. We now have elements in place for a simple yet satisfying holographic mini-game.
Go ahead and create two more duplicates of your Target object in your scene, and set them up next to each other to form a mini-sized target range. Shown below are our three targets placed at positions (0, 0, 2), (0.5, 0.5, 2) and (-0.5, 0.5, 2) respectively.
Before we move on, there is one more adjustment we can make to our project to ensure players have the smoothest arrow-firing experience possible.
If you’ve already deployed and tested your project thus far, you may have noticed that your arrows can often end up colliding and sticking to each other rather than the target you’re trying to hit. We can prevent this mildly annoying behaviour with a simple tweak to our physics layers.
Find your Arrow prefab again in the Prefabs folder, and in the Inspector, select Layer -> Add Layer… In the first blank User Layer entry, type “Arrows” and press Enter on your keyboard. Find the Arrow prefab again in the Inspector, and set its Layer to our newly created Arrows layer.
Next, in your main Unity menu, select Edit -> Project Settings -> Physics. Inside the PhysicsManager that opens in the Inspector, find the Layer Collision Matrix tab, and uncheck the Arrows-Arrows entry. This will make it so that our arrows will no longer collide with each other, which is going to make for a much less frustrating experience for our players.
Much better. Have a play around with the current state of the project if you want, before we move on to making our final addition to our project – voice commands
Section 5 – Voice control
The last unique element of HoloLens development we are going to touch on is speech recognition. Thankfully, the UnitEngine.Windows API makes setting up voice commands with custom behaviours very simple.
We will make use of a KeywordRecognizer event listener object. This KeyWordRecognizer is initialised with a list of strings containing plain English phrases that we want to use as voice commands, and is set it up like any other event listener. Unity will automatically begin listening for cases of these phrases being spoken through the user’s microphone, invoking our custom callback methods whenever a phrase is recognised.
Let’s implement two speech commands in our little game – one alternative command for firing arrows, and another for resetting the scene so the player can start over.
Select your Main Camera in the scene hierarchy, and add to it a new script component called SpeechControl . Open it up in Visual Studio.
As always, let’s go over exactly what we want this script to accomplish before we write our code. Consult the handy Unity Docs for more information about the KeyWordRecognizer or any other objects or methods you’re unsure about.
1. Remember to include the UnityEngine.Windows.Speech namespace to access the KeyWordRecognizer !
2. Initialise a KeyWordRecognizer with a list of strings (our voice commands)
3. Set up a callback method for a speech recognition event, and start listening
4. When a phrase is recognised, check which one it is
5. Shoot an arrow from the Camera’s Bow script if appropriate
6. Or reload the scene from the beginning
My implementation:
SpeechControl.cs
1: using System.Collections;
2: using System.Collections.Generic;
3: using UnityEngine;
4: using UnityEngine.SceneManagement;
5: using UnityEngine.Windows.Speech;
6:
7: public class SpeechControl : MonoBehaviour {
8:
9: public string fireCommand = "fire";
10: public string resetCommand = "reset";
11:
12: private KeywordRecognizer keywordRecognizer;
13:
14: void Start()
15: {
16: // Set up Keyword Recognizer to register our assigned voice commands
17: keywordRecognizer = new KeywordRecognizer(new[] { fireCommand, resetCommand });
18: keywordRecognizer.OnPhraseRecognized += KeywordRecognizer_OnPhraseRecognized;
19: keywordRecognizer.Start();
20: }
21:
22: // Called whenever a voice command is recognised
23: private void KeywordRecognizer_OnPhraseRecognized(PhraseRecognizedEventArgs args)
24: {
25: string cmd = args.text;
26:
27: // If user said "fire", shoot arrow from Bow
28: if (cmd == fireCommand)
29: {
30: GetComponent<Bow>().Shoot();
31: }
32:
33: // If user said "reset", reload the Unity scene to start from the beginning
34: else if (cmd == resetCommand)
35: {
36: SceneManager.LoadSceneAsync(0, LoadSceneMode.Single);
37: }
38: }
39: }
If you managed to successfully implement the above script – well done! You can now bring back your fallen targets as many times as you like.
We now have a fully functioning HoloLens experience that incorporates gaze recognition, spatial mapping and speech commands! In the last section, we will look at how to bring our game to life by building it and deploying it to a real device.
Section 6 – Deploy to Hololens (or emulator)
Before building your project, make sure that your working Unity scene is saved (either through File -> Save Scene or simply pressing CTRL+S ). I’ve simply named my scene “Game” and stored it in the root of the Assets folder.
Now, with the current state of your scene open in Unity, select File -> Build Settings . Under the Scenes In Build rectangle that appears at the top of the screen, click on Add Open Scenes to add your main scene to the build if you haven’t already. From here, under Platforms , select Windows Store , and press the Switch Platform button.
Once the target platform has switched, we will make a couple of other minor adjustments to our build settings to target the HoloLens. On the right-hand options list, make sure SDK is set to Universal 10 , Target Device to HoloLens and UWP Build Type to D3D . Under the Debugging options, tick the Unity C# Projects box, and press the Build button to build your solution!
Unity will prompt you to select a target folder for your build. Simply create a new folder inside your project (named “App” by convention). After a short wait, your project folder should open up. Open the build folder you just created, and double-click on the Visual Studio Solution (.sln) file inside to open it in Visual Studio (in my case, this is the ArrowMaster.sln inside the App folder).
With the solution open in Visual Studio, find the two dropdown menus next to the green play button at the top of the screen. In the leftmost menu ( Solution Configurations ) select Release , and in the next menu ( Solution Platform ) select x86 . Finally, expand the dropdown menu right next to the green Start button and select either Device (if you’re deploying directly to a physical HoloLens over USB) or HoloLens Emulator (if you installed it earlier).
Finally, in the top menu bar, select Debug -> Start Without Debugging (or simply press CTRL + F5 ) to deploy your project. If you’re using a physical HoloLens, the project will load automatically on your device once it has finished building, whereas if you’re using the emulator, you will have to wait for the emulator to finish booting up before the project starts.
If everything worked smoothly and your game runs as it should – congratulations! You have just launched your first self-created mixed reality experience! (For emulator users, use the W-A-S-D keys and your mouse to control virtual movement in your game – or use an Xbox controller).
I hope you enjoyed this brief tutorial on getting started with mixed reality game development. Our little bow-and-arrow game here is really only a very simple example of the sort of experiences you can create for players through Unity’s integration with the HoloLens’s interactive holograms, spatial mapping and gaze and voice recognition technologies.
Hopefully it has given you an idea of just how simple it is to make the transition from conventional 3D game development to Mixed Reality, with virtually no real knowledge of how the technology works under the hood required.
If you’re unsure where to go next in your Mixed Reality development journey, why not try to expand our bow-and-arrow game to add some more novelty and polish? (Feel free to fork the project on GitHub ). I can suggest a couple of improvements:
· Let the player switch to an alternate projectile type (a gun, a slingshot?) with slightly different behaviour through the use of a voice command.
· Have the targets spawn in random locations relative to the Main Camera’s position every time the scene is loaded (making sure targets never appear inside of objects in the spatially mapped environment).
· Modify the targets to fire their own projectiles at the player that they have to dodge, and induce a mildly annoying visual effect whenever the player gets hit.
· Set a time limit for the game that is shown to the player. Play an extra jingle if the player manages to break all of the targets within the time limit, and play a sad violin tune if they fail.
From there, if you’re looking to learn more about game development for HoloLens through Unity, I would highly suggest checking out the official Microsoft Mixed Reality guides at the Windows Dev Center website. These include both step-by-step tutorials ( Academy ) as well as in-depth documentation about how the HoloLens and its software APIs work ( Development ).
Asset credits:
· 3D model for archery set (arrows and targets) by OpenGameArt user yd (Public Domain)
· Arrow flight and impact sounds by FreeSound.org user Robinhood76 (Creative Commons)
· Target hit sound by FreeSound.org user grunz (Creative Commons)
Source Control for the project : https://github.com/colonelsalt/ArrowMaster
Updated Mar 21, 2019
Version 2.0Lee_Stott Microsoft
MicrosoftJoined September 25, 2018
Educator Developer Blog
Follow this blog board to get notified when there's new activity