vscode
62 TopicsJune 2025 Recap: Azure Database for PostgreSQL
Hello Azure Community, We have introduced a range of exciting new features and updates to Azure Database for PostgreSQL in June. From general availability of PG 17 to public preview of the SSD v2 storage tier for High Availability, there have been some significant feature announcements across multiple areas in the last month. Stay tuned as we dive deeper into each of these feature updates. Before that, let’s look at POSETTE 2025 highlights. POSETTE 2025 Highlights We hosted POSETTE: An Event for Postgres 2025 in June! This year marked our 4th annual event featuring 45 speakers and a total of 42 talks. PostgreSQL developers, contributors, and community members came together to share insights on topics covering everything from AI-powered applications to deep dives into PostgreSQL internals. If you missed it, you can catch up by watching the POSETTE livestream sessions. If this conference sounds interesting to you and want to be part of it next year, don’t forget to subscribe to POSETTE news. Feature Highlights General Availability of PostgreSQL 17 with 'In-Place' upgrade support General Availability of Online Migration Migration service support for PostgreSQL 17 Public Preview of SSD v2 High Availability New Region: Indonesia Central VS Code Extension for PostgreSQL enhancements Enhanced role management Ansible collection released for latest REST API version General Availability of PostgreSQL 17 with 'In-Place' upgrade support PostgreSQL 17 is now generally available on Azure Database for PostgreSQL flexible server, bringing key community innovations to your workloads. You’ll see faster vacuum operations, richer JSON processing, smarter query planning (including better join ordering and parallel execution), dynamic logical replication controls, and enhanced security & audit-logging features—backed by Azure’s five-year support policy. You can easily upgrade to PostgreSQL 17 using the in-place major version upgrade feature available through the Azure portal and CLI, without changing server endpoints or reconfiguring applications. The process includes built-in validations and rollback safety to help ensure a smooth and reliable upgrade experience. For more details, read the PostgreSQL 17 release announcement blog. General Availability of Online Migration We're excited to announce that Online Migration is now generally available for the Migration service for Azure Database for PostgreSQL! Online migration minimizes downtime by keeping your source database operational during the migration process, with continuous data synchronization until cut over. This is particularly beneficial for mission-critical applications that require minimal downtime during migration. This milestone brings production-ready online migration capabilities supporting various source environments including on-premises PostgreSQL, Azure VMs, Amazon RDS, Amazon Aurora, and Google Cloud SQL. For detailed information about the capabilities and how to get started, visit our Migration service documentation. Migration service support for PostgreSQL 17 Building on our PostgreSQL 17 general availability announcement, the Migration service for Azure Database for PostgreSQL now fully supports PostgreSQL 17. This means you can seamlessly migrate your existing PostgreSQL instances from various source platforms to Azure Database for PostgreSQL flexible server running PostgreSQL 17. With this support, organizations can take advantage of the latest PostgreSQL 17 features and performance improvements while leveraging our online migration capabilities for minimal downtime transitions. The migration service maintains full compatibility with PostgreSQL 17's enhanced security features, improved query planning, and other community innovations. Public Preview of SSD v2 High Availability We’re excited to announce the public preview High availability (HA) support for the Premium SSD v2 storage tier in Azure Database for PostgreSQL flexible server. This support allows you to enable Zone-Redundant HA using Premium SSD v2 during server deployments. In addition to high availability on SSDv2 you now get improved resiliency when using Premium SSD v2 with zone-redundant HA, helping customers build resilient, high-performance PostgreSQL applications with minimal overhead. This feature is particularly well-suited for mission-critical workloads, including those in financial services, real-time analytics, retail, and multi-tenant SaaS platforms. Key Benefits of Premium SSD v2: Flexible disk sizing: Scale from 32 GiB to 64 TiB in 1-GiB increments Fast failovers: Planned or unplanned failovers typically around 10 seconds Independent performance configuration: Achieve up to 80,000 IOPS and 1,200 Mbps throughput without resizing your disk. Baseline performance: Free throughput of 125 MB/s and 3,000 IOPS for disks up to 399 GiB, and 500 MB/s and 12,000 IOPS for disks 400 GiB and above at no additional cost. For more details, please refer to the Premium SSD v2 HA blog. New Region: Indonesia Central New region rollout! Azure Database for PostgreSQL flexible server is now available in Indonesia Central, giving customers in and around the region lower latency and data residency options. This continues our mission to bring Azure PostgreSQL closer to where you build and run your apps. For the full list of regions visit: Azure Database for PostgreSQL Regions. VS Code Extension for PostgreSQL enhancements The brand-new VS code extension for PostgreSQL launched in mid-May and has already garnered over 122K installs from the Visual Studio Marketplace! And the kickoff blog about this new IDE for PostgreSQL in VS Code has had over 150K views. This extension makes it easier for developers to seamlessly interact with PostgreSQL databases. We have been committed to make this experience better and have introduced several enhancements to improve reliability and compatibility updates. You can now have better control over service restarts and process terminations on supported operating systems. Additionally, we have added support for parsing additional connection-string formats in the “Create Connection” flow, making it more flexible and user-friendly. We also resolved Entra token-fetching failures for newly created accounts, ensuring a smoother onboarding experience. On the feature front, you can now leverage Entra Security Groups and guest accounts across multiple tenants when establishing new connections, streamlining permission management in complex Entra environments. Don’t forget to update to the latest version in the marketplace to take advantage of these enhancements and visit our GitHub repository to learn more about this month’s release. If you learn best by video, these 2 videos are a great way to learn more about this new VS Code extension: POSETTE 2025: Introducing Microsoft’s VS Code Extension for PostgreSQL Demo of using VS code extension for PostgreSQL Enhanced role management With the introduction of PostgreSQL 16, a strict role hierarchy structure has been implemented. As a result, GRANT statements that were functional in PostgreSQL 11-15 may no longer work in PostgreSQL 16. We have improved the administrative flexibility and addressed this limitation in Azure Database for PostgreSQL flexible server across all PostgreSQL versions. Members of ‘azure_pg_admin’ can now manage, and access objects owned by any role that is non-restricted, giving control and permission over user-defined roles. To learn more about this improvement, please refer to our documentation on roles. Ansible collection released for latest REST API version A new version of Ansible collection for Azure Database for PostgreSQL flexible server is now released. Version 3.6.0 now includes the latest GA REST API features. This update introduces several enhancements, such as support for virtual endpoints, on-demand backups, system-assigned identity, storage auto-grow, and seamless switchover of read replicas to a new site (Read Replicas - Switchover), among many other improvements. To get started with using please visit flexible server Ansible collection link. Azure Postgres Learning Bytes 🎓 Using PostgreSQL VS code extension with agent mode The VS Code extension for PostgreSQL has been trending amongst the developer community. In this month's Learning Bytes section, we want to share how to enable the extension and use GitHub Copilot to create a database in Agent Mode, add dummy data, and visualize it using the Agent Mode and VS Code extension. Step 1: Download the VS code Extension for PostgreSQL Step 2: Check GitHub Copilot and Agent mode is enabled Go to File -> Preferences -> Settings (Ctrl + ,). Search and enable "chat.agent.enabled" and "pgsql copilot.enable". Reload VS Code to apply changes. Step 3: Connect to Azure Database for PostgreSQL Use the extension to enter instance details and establish a connection. Create and view schemas under Databases -> Schemas. Step 4: Visualize and Populate Data Right-click the database to visualize schemas. Ask the agent to insert dummy data or run queries. Conclusion That's all for the June 2025 feature updates! We are dedicated to continuously improve Azure Database for PostgreSQL with every release. Stay updated with the latest updates to our features by following this link. Your feedback is important and helps us continue to improve. If you have any suggestions, ideas, or questions, we’d love to hear from you. Share your thoughts here: aka.ms/pgfeedback We look forward to bringing you even more exciting updates throughout the year, stay tuned!1.1KViews3likes0CommentsBuild an AI-Powered Space Invaders Game
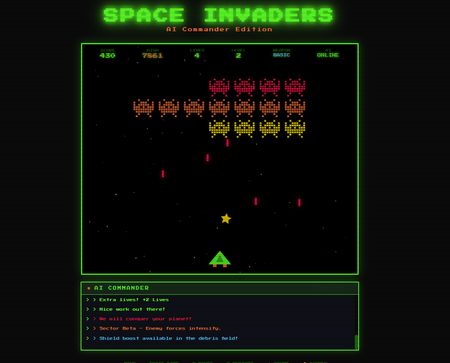
Build an AI-Powered Space Invaders Game: Integrating LLMs into HTML5 Games with Microsoft Foundry Local Introduction What if your game could talk back to you? Imagine playing Space Invaders while an AI commander taunts you during battle, delivers personalized mission briefings, and provides real-time feedback based on your performance. This isn't science fiction it's something you can build today using HTML, JavaScript, and a locally-running AI model. In this tutorial, we'll explore how to create an HTML5 game with integrated Large Language Model (LLM) features using Microsoft Foundry Local. You'll learn how to combine classic game development with modern AI capabilities, all running entirely on your own machine—no cloud services, no API costs, no internet connection required during gameplay. We'll be working with the Space Invaders - AI Commander Edition project, which demonstrates exactly how to architect games that leverage local AI. Whether you're a student learning game development, exploring AI integration patterns, or building your portfolio, this guide provides practical, hands-on experience with technologies that are reshaping how we build interactive applications. What You'll Learn By the end of this tutorial, you'll understand how to combine traditional web development with local AI inference. These skills transfer directly to building chatbots, interactive tutorials, AI-enhanced productivity tools, and any application where you want intelligent, context-aware responses. Set up Microsoft Foundry Local for running AI models on your machine Understand the architecture of games that integrate LLM features Use GitHub Copilot CLI to accelerate your development workflow Implement AI-powered game features like dynamic commentary and adaptive feedback Extend the project with your own creative AI features Why Local AI for Games? Before diving into the code, let's understand why running AI locally matters for game development. Traditional cloud-based AI services have limitations that make them impractical for real-time gaming experiences. Latency is the first challenge. Cloud API calls typically take 500ms to several seconds, an eternity in a game running at 60 frames per second. Local inference can respond in tens of milliseconds, enabling AI responses that feel instantaneous and natural. When an enemy ship appears, your AI commander can taunt you immediately, not three seconds later. Cost is another consideration. Cloud AI services charge per token, which adds up quickly when generating dynamic content during gameplay. Local models have zero per-use cost, once installed, they run entirely on your hardware. This frees you to experiment without worrying about API bills. Privacy and offline capability complete the picture. Local AI keeps all data on your machine, perfect for games that might handle player information. And since nothing requires internet connectivity, your game works anywhere, on planes, in areas with poor connectivity, or simply when you want to play without network access. Understanding Microsoft Foundry Local Microsoft Foundry Local is a runtime that enables you to run small language models (SLMs) directly on your computer. It's designed for developers who want to integrate AI capabilities into applications without requiring cloud infrastructure. Think of it as having a miniature AI assistant living on your laptop. Foundry Local handles the complex work of loading AI models, managing memory, and processing inference requests through a simple API. You send text prompts, and it returns AI-generated responses, all happening locally on your CPU or GPU. The models are optimized to run efficiently on consumer hardware, so you don't need a supercomputer. For our Space Invaders game, Foundry Local powers the "AI Commander" feature. During gameplay, the game sends context about what's happening, your score, accuracy, current level, enemies remaining and receives back contextual commentary, taunts, and encouragement. The result feels like playing alongside an AI companion who actually understands the game. Setting Up Your Development Environment Let's get your machine ready for AI-powered game development. We'll install Foundry Local, clone the project, and verify everything works. The entire setup takes about 10-15 minutes. Step 1: Install Microsoft Foundry Local Foundry Local installation varies by operating system. Open your terminal and run the appropriate command: # Windows (using winget) winget install Microsoft.FoundryLocal # macOS (using Homebrew) brew install microsoft/foundrylocal/foundrylocal These commands download and install the Foundry Local runtime along with a default small language model. The installation includes everything needed to run AI inference locally. Verify the installation by running: foundry --version If you see a version number, Foundry Local is ready. If you encounter errors, ensure you have administrator/sudo privileges and that your package manager is up to date. Step 2: Install Node.js (If Not Already Installed) Our game's AI features require a small Node.js server to communicate between the browser and Foundry Local. Check if Node.js is installed: node --version If you see a version number (v16 or higher recommended), you're set. Otherwise, install Node.js: # Windows winget install OpenJS.NodeJS.LTS # macOS brew install node # Linux sudo apt install nodejs npm Node.js provides the JavaScript runtime that powers our proxy server, bridging browser code with the local AI model. Step 3: Clone the Project Get the Space Invaders project onto your machine: git clone https://github.com/leestott/Spaceinvaders-FoundryLocal.git cd Spaceinvaders-FoundryLocal This downloads all game files, including the HTML interface, game logic, AI integration module, and server code. Step 4: Install Dependencies and Start the Server Install the Node.js packages and launch the AI-enabled server: npm install npm start The first command downloads required packages (primarily for the proxy server). The second starts the server, which listens for AI requests from the game. You should see output indicating the server is running on port 3001. Step 5: Play the Game Open your browser and navigate to: http://localhost:3001 You should see Space Invaders with "AI: ONLINE" displayed in the game HUD, indicating that AI features are active. Use arrow keys or A/D to move, SPACE to fire, and P to pause. The AI Commander will start providing commentary as you play! Understanding the Project Architecture Now that the game is running, let's explore how the different pieces fit together. Understanding this architecture will help you modify the game and apply these patterns to your own projects. The project follows a clean separation of concerns, with each file handling a specific responsibility: Spaceinvaders-FoundryLocal/ ├── index.html # Main game page and UI structure ├── styles.css # Retro arcade visual styling ├── game.js # Core game logic and rendering ├── llm.js # AI integration module ├── sound.js # Web Audio API sound effects ├── server.js # Node.js proxy for Foundry Local └── package.json # Project configuration index.html: Defines the game canvas and UI elements. It's the entry point that loads all other modules. game.js: Contains the game loop, physics, collision detection, scoring, and rendering logic. This is the heart of the game. llm.js: Handles all communication with the AI backend. It formats game state into prompts and processes AI responses. server.js: A lightweight Express server that proxies requests between the browser and Foundry Local. sound.js: Synthesizes retro sound effects using the Web Audio API—no audio files needed! How the AI Integration Works The magic of the AI Commander happens through a simple but powerful pattern. Let's trace the flow from gameplay event to AI response. When something interesting happens in the game, you clear a wave, achieve a combo, or lose a life, the game logic in game.js triggers an AI request. This request includes context about the current game state: your score, accuracy percentage, current level, lives remaining, and what just happened. The llm.js module formats this context into a prompt. For example, when you clear a wave with 85% accuracy, it might construct: You are an AI Commander in a Space Invaders game. The player just cleared wave 3 with 85% accuracy. Score: 12,500. Lives: 3. Provide a brief, enthusiastic comment (1-2 sentences). This prompt travels to server.js , which forwards it to Foundry Local. The AI model processes the prompt and generates a response like: "Impressive accuracy, pilot! Wave 3 didn't stand a chance. Keep that trigger finger sharp!" The response flows back through the server to the browser, where llm.js passes it to the game. The game displays the message in the HUD, creating the illusion of playing alongside an AI companion. This entire round trip typically completes in 50-200 milliseconds, fast enough to feel responsive without interrupting gameplay. Using GitHub Copilot CLI to Explore and Modify the Code GitHub Copilot CLI accelerates your development workflow by letting you ask questions and generate code directly in your terminal. Let's use it to understand and extend the Space Invaders project. Installing Copilot CLI If you haven't installed Copilot CLI yet, here's the quick setup: # Install GitHub CLI winget install GitHub.cli # Windows brew install gh # macOS # Authenticate with GitHub gh auth login # Add Copilot extension gh extension install github/gh-copilot # Verify installation gh copilot --help With Copilot CLI ready, you can interact with AI directly from your terminal while working on the project. Exploring Code with Copilot CLI Use Copilot to understand unfamiliar code. Navigate to the project directory and try: gh copilot explain "How does llm.js communicate with the server?" Copilot analyzes the code and explains the communication pattern, helping you understand the architecture without reading every line manually. You can also ask about specific functions: gh copilot explain "What does the generateEnemyTaunt function do?" This accelerates onboarding to unfamiliar codebases, a valuable skill when working with open source projects or joining teams. Generating New Features Want to add a new AI feature? Ask Copilot to help generate the code: gh copilot suggest "Create a function that asks the AI to generate a mission briefing at the start of each level, including the level number and a random mission objective" Copilot generates starter code that you can customize and integrate. This combination of AI-powered development tools and AI-integrated gameplay demonstrates how LLMs are transforming both how we build games and how games behave. Customizing the AI Commander The default AI Commander provides generic gaming commentary, but you can customize its personality and responses. Open llm.js to find the prompt templates that control AI behavior. Changing the AI's Personality The system prompt defines who the AI "is." Find the base prompt and modify it: // Original const systemPrompt = "You are an AI Commander in a Space Invaders game."; // Customized - Drill Sergeant personality const systemPrompt = `You are Sergeant Blaster, a gruff but encouraging drill sergeant commanding space cadets. Use military terminology, call the player "cadet," and be tough but fair.`; // Customized - Supportive Coach personality const systemPrompt = `You are Coach Nova, a supportive and enthusiastic gaming coach. Use encouraging language, celebrate small victories, and provide gentle guidance when players struggle.`; These personality changes dramatically alter the game's feel without changing any gameplay code. It's a powerful example of how AI can add variety to games with minimal development effort. Adding New Commentary Triggers Currently the AI responds to wave completions and game events. You can add new triggers in game.js : // Add AI commentary when player achieves a kill streak if (killStreak >= 5 && !streakCommentPending) { requestAIComment('killStreak', { count: killStreak }); streakCommentPending = true; } // Add AI reaction when player narrowly avoids death if (nearMissOccurred) { requestAIComment('nearMiss', { livesRemaining: lives }); } Each new trigger point adds another opportunity for the AI to engage with the player, making the experience more dynamic and personalized. Understanding the Game Features Beyond AI integration, the Space Invaders project demonstrates solid game development patterns worth studying. Let's explore the key features. Power-Up System The game includes eight different power-ups, each with unique effects: SPREAD (Orange): Fires three projectiles in a spread pattern LASER (Red): Powerful beam with high damage RAPID (Yellow): Dramatically increased fire rate MISSILE (Purple): Homing projectiles that track enemies SHIELD (Blue): Grants an extra life EXTRA LIFE (Green): Grants two extra lives BOMB (Red): Destroys all enemies on screen BONUS (Gold): Random score bonus between 250-750 points Power-ups demonstrate state management, tracking which power-up is active, applying its effects to player actions, and handling timeouts. Study the power-up code in game.js to understand how temporary state modifications work. Leaderboard System The game persists high scores using the browser's localStorage API: // Saving scores localStorage.setItem('spaceInvadersScores', JSON.stringify(scores)); // Loading scores const savedScores = localStorage.getItem('spaceInvadersScores'); const scores = savedScores ? JSON.parse(savedScores) : []; This pattern works for any data you want to persist between sessions—game progress, user preferences, or accumulated statistics. It's a simple but powerful technique for web games. Sound Synthesis Rather than loading audio files, the game synthesizes retro sound effects using the Web Audio API in sound.js . This approach has several benefits: no external assets to load, smaller project size, and complete control over sound parameters. Examine how oscillators and gain nodes combine to create laser sounds, explosions, and victory fanfares. This knowledge transfers directly to any web project requiring audio feedback. Extending the Project: Ideas for Students Ready to make the project your own? Here are ideas ranging from beginner-friendly to challenging, each teaching valuable skills. Beginner: Customize Visual Theme Modify styles.css to create a new visual theme. Try changing the color scheme from green to blue, or create a "sunset" theme with orange and purple gradients. This builds CSS skills while making the game feel fresh. Intermediate: Add New Enemy Types Create a new enemy class in game.js with different movement patterns. Perhaps enemies that move in sine waves, or boss enemies that take multiple hits. This teaches object-oriented programming and game physics. Intermediate: Expand AI Interactions Add new AI features like: Pre-game mission briefings that set up the story Dynamic difficulty hints when players struggle Post-game performance analysis and improvement suggestions AI-generated names for enemy waves Advanced: Multiplayer Commentary Modify the game for two-player support and have the AI provide play-by-play commentary comparing both players' performance. This combines game networking concepts with advanced AI prompting. Advanced: Voice Integration Use the Web Speech API to speak the AI Commander's responses aloud. This creates a more immersive experience and demonstrates browser speech synthesis capabilities. Troubleshooting Common Issues If something isn't working, here are solutions to common problems. "AI: OFFLINE" Displayed in Game This means the game can't connect to the AI server. Check that: The server is running ( npm start shows no errors) You're accessing the game via http://localhost:3001 , not directly opening the HTML file Foundry Local is installed correctly ( foundry --version works) Server Won't Start If npm start fails: Ensure you ran npm install first Check that port 3001 isn't already in use by another application Verify Node.js is installed ( node --version ) AI Responses Are Slow Local AI performance depends on your hardware. If responses feel sluggish: Close other resource-intensive applications Ensure your laptop is plugged in (battery mode may throttle CPU) Consider that first requests may be slower as the model loads Key Takeaways Local AI enables real-time game features: Microsoft Foundry Local provides fast, free, private AI inference perfect for gaming applications Clean architecture matters: Separating game logic, AI integration, and server code makes projects maintainable and extensible AI personality is prompt-driven: Changing a few lines of prompt text completely transforms how the AI interacts with players Copilot CLI accelerates learning: Use it to explore unfamiliar code and generate new features quickly The patterns transfer everywhere: Skills from this project apply to chatbots, assistants, educational tools, and any AI-integrated application Conclusion and Next Steps You've now seen how to integrate AI capabilities into a browser-based game using Microsoft Foundry Local. The Space Invaders project demonstrates that modern AI features don't require cloud services or complex infrastructure, they can run entirely on your laptop, responding in milliseconds. More importantly, you've learned patterns that extend far beyond gaming. The architecture of sending context to an AI, receiving generated responses, and integrating them into user experiences applies to countless applications: customer support bots, educational tutors, creative writing tools, and accessibility features. Your next step is experimentation. Clone the repository, modify the AI's personality, add new commentary triggers, or build an entirely new game using these patterns. The combination of GitHub Copilot CLI for development assistance and Foundry Local for runtime AI gives you powerful tools to bring intelligent applications to life. Start playing, start coding, and discover what you can create when your games can think. Resources Space Invaders - AI Commander Edition Repository - Full source code and documentation Play Space Invaders Online - Try the basic version without AI features Microsoft Foundry Local Documentation - Official installation and API guide GitHub Copilot CLI Documentation - Installation and usage guide GitHub Education - Free developer tools for students Web Audio API Documentation - Learn about browser sound synthesis Canvas API Documentation - Master HTML5 game rendering1KViews0likes3CommentsYour Entire Agentic AI Workflow, Now Inside VS Code: New Course Available
If you build with AI, you know the tax: jumping between a browser portal to pick a model, a terminal to run it, a separate playground to test a prompt, and finally your editor to write the code. Every context switch is a small drain on focus—and it adds up. What if the whole loop lived in the one tool you never leave? That's the promise of the Foundry Toolkit for Visual Studio Code, and it's exactly what our new VS Code Learn: Foundry Toolkit video series is here to show you
Mind the Specs: Grading formal specifications and KPIs as artefacts for LLM-driven code generation
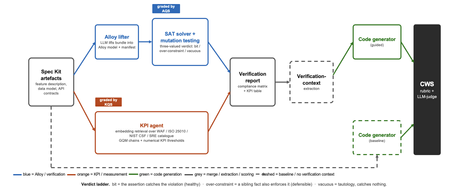
Large language models now write code straight from a prompt, but the specification in between is never checked, and a model asked to judge its own work brings the same blind spots to the review. We built a pipeline that lifts a plain-language requirements bundle into two graded specifications (a formal Alloy model and a set of numerical KPI targets), scores both before a single line of code is written, and hands the graded result to the code generator. It starts from GitHub Spec Kit and the Azure Well-Architected Framework. Here is what we built, and what we learned from running it at scale. The problem Writing software used to be four separate activities: gathering requirements, writing a specification, verifying it, and implementing it. A language model collapses all four into a single step. Two of those activities used to give us a quality signal before any code existed: a formal specification you could inspect, and measurable targets an implementation had to hit. The prompt-to-code loop inherits neither. There is no externally observable signal, before a line of code is written, that the requirements a model received are even well-formed enough to drive a correct implementation. You might think the model could just check its own work. It cannot do so reliably. Ask a language model to check the logic it just wrote: not only will it bring the same blind spot to the review, but its stochastic nature will make it produce different answers on each run. A SAT solver does not behave this way. Its verdict is deterministic: the same specification produces the same verdict every time. The thing that historically kept formal specification out of everyday development was never its rigour, it was the cost of writing the specification by hand. And that is exactly the step a language model can now do. What we built We built an agentic pipeline that sits between the requirements and the generated code. In plain terms it takes the requirements once, turns them into two things that can be checked by a machine: a precise description of rules that the system must obey, and a set of measurable targets that the system must hit. These artefacts are both graded, and are handed to the code generator. We split the work in two and gave each half to the tool that is good at it. The language model does the creative part, turning messy prose into formal structure. Deterministic checks, not the model's own opinion, grade what it produces. From a single Spec Kit artefacts bundle the pipeline builds two graded specifications before any code exists, and then carries both into code generation. Since these grades are computed deterministically rather than just generated, you can actually trust them. The input is a GitHub Spec Kit bundle. Spec Kit is an open-source, specification-first toolkit: instead of prompting for code directly, you describe what you want to build, and it produces a set of structured artefacts, a feature specification, a data model, and a set of API contracts. Our pipeline reads that bundle and turns it into the two graded specifications in parallel. overview. Spec Kit artefacts on the left. The Alloy lifter (with SAT solver and the attack step) and the KPI agent run in parallel. Their graded outputs are merged into a verification report that feeds the guided code generator. A dashed baseline path feeds the goal alone to the generator for comparison. Lift the requirements into a formal model The first half is structural. An Alloy lifter translates the requirements into a formal model written in Alloy, a specification language whose rules a SAT solver can check exhaustively, and whose verdict is deterministic, so the grade never depends on asking an LLM what it thinks. A banking requirement like "zero balance discrepancies" becomes a precise, checkable rule: the money leaving one account and the money arriving in another must always add up to the balances you started with, so a transfer can never quietly create or destroy money. The solver searches for any scenario that would break the rule. We modified Spec Kit's templates to force the model to output functional requirements and their corresponding Alloy code blocks in a structured format. Against the stock templates, that change alone nearly doubled the Alloy code compilation rate, jumping from 40 to 74 percent. A machine-written specification cannot be trusted, though, so the lifter does more than write it: it attacks it. Each load-bearing rule is deliberately broken by clearing its body and injecting a clause that forces a violation and the solver is re-run on the broken model. If the solver fails after this mutation, the original rule genuinely caught the violation it was meant to catch. If it still passes, the rule never really constrained anything on its own. Mutation testing usually grades a test suite against a specification that is assumed correct; here the roles are reversed, and the specification itself is on trial. Turn the requirements into measurable targets The second half is measurable. A KPI agent takes the same Spec Kit bundle, retrieves the most relevant principles from the Azure Well-Architected Framework, and derives numerical targets in the Goal-Question-Metric style. Each target carries an explicit threshold, a direction, and a measurement method, the kind of target a monitoring tool could actually track. Where earlier automated approaches stopped at describing quality in words, this half emits the actual numbers an implementation has to satisfy. And the knowledge base is a setting, not a fixture: swapping the Well-Architected Framework for ISO 25010, the NIST Cybersecurity Framework, or Google's SRE workbook requires zero changes to the underlying code. Review the report before any code Both graded halves merge into one human-readable verification report: the patterns the model applied, which rules passed, the counterexamples the solver found, the attack results, and the KPI threshold table. A developer reads it first and can see exactly where the specification is weak: a rule that passed for the wrong reason, or a requirement that nothing covers. After revising the specification, they re-run the lifting phase. Because the process is cached, re-runs are cheap, allowing the developer to loop until the report looks perfect, all before any code exists. The work shifts from reviewing generated code after the fact to curating a specification and reading a report before anything is built. Carry the graded context into code generation Only then does the report do its real job. In the guided pipeline, the merged report becomes the context handed to a code generator, which is asked to implement each rule, requirement, and KPI threshold and to leave markers tracing the code back to them. A baseline generator gets only the plain-language goal. Same generator, same settings; the only difference is whether it can see the graded specification. Feeding graded artefacts, rather than raw prose, into code generation is the piece that ties the whole pipeline together. So three choices separate this from simply asking a model for a spec: the specification is attacked rather than trusted, the targets are numbers rather than prose, and what reaches the code generator is graded evidence rather than raw text. How we tested it We ran the pipeline at scale: 270 Alloy lifts and 1,930 KPI records, across three application domains chosen to differ sharply (banking, software-as-a-service, and healthcare), three levels of requirement detail, four knowledge bases, and three model tiers, with ten runs of each combination so a real effect could be told apart from noise. For the code-generation half, we generated two codes for each case, once with the graded report as context and once from the plain-language goal alone, and compared the two. What we found First, the foundation: the specifications proved gradeable. The rubric cleanly separated sound specifications from degenerate ones. Because it returned the same verdict run after run, the grades are reliable enough to act on. The three key observations are as follows: The model matters more than the prompt Of the two knobs a practitioner controls, the model you choose and the amount of detail you write, the model dominated by roughly nine to one. A weak model could not be rescued by richer requirements. But you do not need the most expensive one: a mid-tier model delivered about 98 percent of the best model's quality at under a third of the cost and about half the time. The cheapest tier was a false economy, producing a model the analyser could even load only 23 percent of the time. More detail can backfire More requirements are not always better. Sparse and standard requirements scored the same, but over-specified requirements collapsed: KPI quality fell from about 0.89 to about 0.73, and the effect held across all four knowledge bases. Pile in too much numerical detail and the pipeline starts echoing the numbers it was handed instead of deriving sound ones, which is the opposite of what more detail is supposed to buy. Graded context produces far better code This is the payoff, and it is the point of the whole pipeline. Across all nine combinations of domain and detail, code generated with the graded verification context scored about 8 out of 10, against about 1 out of 10 for the same generator given only the plain-language goal. The guided code carried the traceability back to each requirement, the named rules, and the structural patterns that a bare prompt gives us no way to know about. This part of the study is a single run per combination, so we report the size and the consistency of the gap rather than a precise average, but the gap was large and it held in every case. What this means for you Four things to take from our study into your own work: Write requirements at a standard, middle level of detail. Not sparse, and not exhaustively numerical. The middle is the sweet spot on both halves of the specification. Reach for a capable mid-tier model before you invest in heavy prompt engineering. Model choice moves quality more than requirement detail does, and the mid tier is the value leader. Give the code generator externally graded context instead of letting it specify for itself. That is where most of the quality gain came from. Treat the knowledge base as a setting worth tuning, not a fixed ingredient. Each is a recommendation that data supports under the conditions we tested, not a universal law. The limit Every grade measures structure, not meaning. A high score says the specification is well-formed, discriminating, and stable. It does not say whether the invariants are the right ones, or the thresholds are the right ones for your deployment. A specification can be perfectly well-formed and still describe the wrong system. That judgement stays with a human, which is where we think it belongs. The pipeline is built to make that judgement efficient by moving it earlier, to curating the specification and reading the report, rather than to remove it. Generated code should not be shipped end to end without human validation. Try it The full pipeline, every input, and the artefacts behind every figure are in the project repository. If you want the Microsoft tools it builds on, start here: Project repository: https://github.com/RadaanMadhan/Specification-Led-Development GitHub Spec Kit: https://github.com/github/spec-kit Azure Well-Architected Framework: https://learn.microsoft.com/en-us/azure/well-architected/ If you'd like to explore the work in more detail, we've included the full technical report in the project repository, covering the related work, methodology, pipeline design, experimental setup, and extended results. About the team This project was carried out by six students at Imperial College London: Leon Hausmann, Charlotte Maxwell, Radaan Madhan, Keshav Das, Anson Huang, and Ander Cobo, in collaboration with Microsoft and supervised by Lee Stott (Microsoft) and Max Cattafi (Imperial College London)378Views1like0CommentsJupyter Notebooks in Visual Studio Code
Visual Studio Code offers many great features for Data Scientists and Python developers alike, allowing you to explore and experiment on your data using the flexibility of Jupyter Notebooks combined with the power and productivity of VS Code. Tune in to learn how to supercharge your Jupyter Notebooks with VS Code.11KViews1like1CommentPair Programming and test-driven development with Visual Studio Live Share and GitHub Copilot
Pair programming and TDD are valuable software development techniques that can enhance the development process, and GitHub Copilot can help teams effectively utilize these practices to produce high-quality code.7.8KViews1like1CommentSetting up Python for Data Science Environments
Data Science is an intersection of domain knowledge, technical expertise, and statistics. It gives us the power to evaluate existing data, perform various functions such as visualization and manipulation which in turn help us in decision making. 2.8KViews0likes1Comment
Enhancing Data Security and Digital Trust in the Cloud using Azure Services.
Enhancing Data Security and Digital Trust in the Cloud by Implementing Client-Side Encryption (CSE) using Azure Apps, Azure Storage and Azure Key Vault. Think of Client-Side Encryption (CSE) as a strategy that has proven to be most effective in augmenting data security and modern precursor to traditional approaches. CSE can provide superior protection for your data, particularly if an authentication and authorization account is compromised.3.1KViews0likes0CommentsFine-Tuning Language Models with Azure AI Foundry: A Detailed Guide
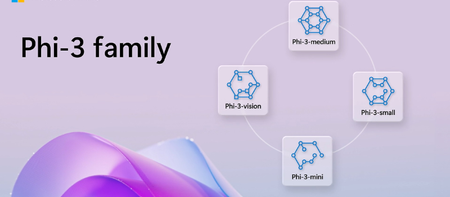
What is Azure AI Foundry? Azure AI Foundry is a comprehensive platform designed to simplify the development, deployment, and management of AI models. It provides a user-friendly interface and powerful tools that enable developers to create custom AI solutions without needing extensive machine learning expertise. Key Features of Azure AI Foundry One-Button Fine-Tuning: A streamlined process that allows users to fine-tune models with minimal configuration. Integration with Development Tools: Seamless integration with popular development environments, particularly Visual Studio Code. Support for Multiple Models: Access to a variety of pre-trained models, including the Phi family of models. Understanding Fine-Tuning Fine-tuning is the process of taking a pre-trained model and adapting it to a specific dataset or task. This is particularly useful when the base model has been trained on a large corpus of general data but needs to perform well on a narrower domain. Why Fine-Tune? Improved Performance: Fine-tuning can significantly enhance the model's accuracy and relevance for specific tasks. Reduced Training Time: Starting with a pre-trained model reduces the amount of data and time required for training. Customization: Tailor the model to meet the unique needs of your application or business. One-Button Fine-Tuning in Azure AI Foundry Step-by-Step Process Select the Model: Log in to Azure AI Foundry and navigate to the model selection interface. Choose Phi-3 or another small language model from the available options. Prepare Your Data: Ensure your dataset is formatted correctly. Typically, this involves having a set of input-output pairs that the model can learn from. Upload your dataset to Azure AI Foundry. The platform supports various data formats, making it easy to integrate your existing data. Initiate Fine-Tuning: Locate the one-button fine-tuning feature within the Azure AI Foundry interface. Click the button to start the fine-tuning process. The platform will handle the configuration and setup automatically. Monitor Progress: After initiating fine-tuning, you can monitor the process through the Azure portal. The portal provides real-time updates on training metrics, allowing you to track the model's performance as it learns. Evaluate the Model: Once fine-tuning is complete, evaluate the model's performance using a validation dataset. Azure AI Foundry provides tools for assessing accuracy, precision, recall, and other relevant metrics. Deploy the Model: After successful evaluation, you can deploy the fine-tuned model directly from Azure AI Foundry. The platform supports various deployment options, including REST APIs and integration with other Azure services. Using the AI Toolkit in Visual Studio Code Overview of the AI Toolkit The AI Toolkit for Visual Studio Code enhances the development experience by providing tools specifically designed for AI model management and fine-tuning. This integration allows developers to work within a familiar environment while leveraging powerful AI capabilities. Key Features of the AI Toolkit 1) Model Management: Easily manage and switch between different models, including Phi-3 and Ollama models. 2) Data Handling: Simplified data upload and preprocessing tools to prepare datasets for training. 3) Real-Time Collaboration: Collaborate with team members in real-time, sharing insights and progress on AI projects. How to Use the AI Toolkit 1) Install the AI Toolkit: Open Visual Studio Code and navigate to the Extensions Marketplace. Search for "AI Toolkit" and install the extension. 2) Connect to Azure AI Foundry: Once installed, configure the toolkit to connect to your Azure AI Foundry account. This will allow you to access your models and datasets directly from Visual Studio Code. 3) Fine-Tune Models: Use the toolkit to initiate fine-tuning processes directly from your development environment. Monitor training progress and view logs without leaving Visual Studio Code. 4) Consume Ollama Models: The AI Toolkit supports the consumption of Ollama models, providing additional flexibility in your AI projects. This feature allows you to integrate various models seamlessly, enhancing your application's capabilities. Microsoft ONNX Live for Fine-Tuning What is Microsoft ONNX Live? Microsoft ONNX Live is a platform that allows developers to deploy and optimize AI models using the Open Neural Network Exchange (ONNX) format. ONNX is an open-source format that enables interoperability between different AI frameworks, making it easier to deploy models across various environments. Key Features of Microsoft ONNX Live Model Optimization: ONNX Live provides tools to optimize models for performance, ensuring they run efficiently in production environments. Cross-Framework Compatibility: Models trained in different frameworks (like PyTorch or TensorFlow) can be converted to ONNX format, allowing for greater flexibility in deployment. Real-Time Inference: ONNX Live supports real-time inference, enabling applications to utilize AI models for immediate predictions. Fine-Tuning with ONNX Live Model Conversion: If you have a model trained in a different framework, you can convert it to ONNX format using tools provided by Microsoft. This conversion allows you to leverage the benefits of ONNX Live for deployment and optimization. Integration with Azure AI Foundry: Once your model is in ONNX format, you can integrate it with Azure AI Foundry for fine-tuning. The one-button fine-tuning feature can be used to adapt the ONNX model to your specific dataset. Optimization Techniques: After fine-tuning, you can apply various optimization techniques available in ONNX Live to enhance the model's performance. Techniques such as quantization and pruning can significantly reduce the model size and improve inference speed. Deployment: Once optimized, the model can be deployed directly from Azure AI Foundry or ONNX Live. This deployment can be done as a REST API, allowing easy integration with web applications and services. Additional Resources To further enhance your understanding and capabilities in fine-tuning language models, consider exploring the following resources: Phi-3 Cookbook: This comprehensive guide provides insights into getting started with Phi models, including best practices for fine-tuning and deployment. Explore the Phi-3 Cookbook. Ignite Fine-Tuning Workshop: This workshop offers a hands-on approach to learning about fine-tuning techniques and tools. It includes real-world scenarios to help you understand the practical applications of fine-tuning. Visit the GitHub Repository. Conclusion Fine-tuning language models like Phi-3 using Azure AI Foundry, combined with the AI Toolkit in Visual Studio Code and Microsoft ONNX Live, provides a powerful and efficient workflow for developers. The one-button fine-tuning feature simplifies the process, while the integration with ONNX Live allows for optimization and deployment flexibility. By leveraging these tools, you can enhance your AI applications, ensuring they are tailored to meet specific needs and perform optimally in production environments. Whether you are a seasoned AI developer or just starting, Azure AI Foundry and its associated tools offer a robust ecosystem for building and deploying advanced AI solutions. References Microsoft Docs Links Fine-Tuning Models in Azure OpenAI Azure AI Services Documentation Azure Machine Learning Documentation Microsoft Learn Links Develop Generative AI Apps in Azure Fine-Tune a Language Model Azure AI Foundry Overview Get started with AI Toolkit for Visual Studio Code2.3KViews0likes0CommentsModel Mondays S2:E4 Understanding AI Developer Experiences with Leo Yao
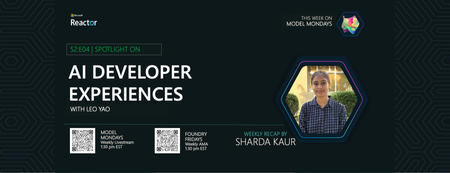
This week in Model Mondays, we put the spotlight on the AI Toolkit for Visual Studio Code - and explore the tools and workflows that make building generative AI apps and agents easier for developers. Read on for my recap. This post was generated with AI help and human revision & review. To learn more about our motivation and workflows, please refer to this document in our website. About Model Mondays Model Mondays is a weekly series designed to help you grow your Azure AI Foundry Model IQ step by step. Each week includes: 5-Minute Highlights – Quick news and updates about Azure AI models and tools on Monday 15-Minute Spotlight – Deep dive into a key model, protocol, or feature on Monday 30-Minute AMA on Friday – Live Q&A with subject matter experts from the Monday livestream If you're looking to grow your skills with the latest in AI model development, this series is a great place to begin. Useful links: Register for upcoming livestreams Watch past episodes Join the AMA on AI Developer Experiences Visit the Model Mondays forum Spotlight On: AI Developer Experiences 1. What is this topic and why is it important? AI Developer Experiences focus on making the process of building, testing, and deploying AI models as efficient as possible. With the right tools—such as the AI Toolkit and Azure AI Foundry extensions for Visual Studio Code—developers can eliminate unnecessary friction and focus on innovation. This is essential for accelerating the real-world impact of generative AI. 2. What is one key takeaway from the episode? The integration of Azure AI Foundry with Visual Studio Code allows developers to manage models, run experiments, and deploy applications directly from their preferred development environment. This unified workflow enhances productivity and simplifies the AI development lifecycle. 3. How can I get started? Here are a few resources to explore: Install the AI Toolkit for VS Code Explore Azure AI Foundry Documentation Join the Microsoft Tech Community to follow and contribute to discussions 4. What’s New in Azure AI Foundry? Azure AI Foundry continues to evolve to meet developer needs with more power, flexibility, and productivity. Here are some of the latest updates highlighted in this week’s episode: AI Toolkit for Visual Studio Code Now with deeper integration, allowing developers to manage models, run experiments, and deploy applications directly within their editor—streamlining the entire workflow. Prompt Shields Enhanced security capabilities designed to protect generative AI applications from prompt injection and unsafe content, improving reliability in production environments. Model Router A new intelligent routing system that dynamically directs model requests to the most suitable model available—enhancing performance and efficiency at scale. Expanded Model Catalog The catalog now includes more open-source and proprietary models, featuring the latest from Hugging Face, OpenAI, and other leading providers. Improved Documentation and Sample Projects Newly added guides and ready-to-use examples to help developers get started faster, understand workflows, and build confidently. My A-Ha Moment Before watching this episode, setting up an AI development environment always felt like a challenge. There were so many moving parts—configurations, integrations, and dependencies—that it was hard to know where to begin. Seeing the AI Toolkit in action inside Visual Studio Code changed everything for me. It was a realization moment: “That’s it? I can explore models, test prompts, and deploy apps—without ever leaving my editor?” This episode made it clear that building with AI doesn’t have to be complex or intimidating. With the right tools, experimentation becomes faster and far more enjoyable. Now, I’m genuinely excited to build, test, and explore new generative AI solutions because the process finally feels accessible. Coming Up Next Week In the next episode, we’ll be exploring Fine-Tuning and Distillation with Dave Voutila. This session will focus on how to adapt Azure OpenAI models to your unique use cases and apply best practices for efficient knowledge transfer. Register here to reserve your spot and be part of the conversation. Join the Community Building in AI is better when we do it together. That’s why the Azure AI Developer Community exists—to support your journey and provide resources every step of the way. Join the Discord for real-time discussions, events, and peer learning Explore the Forum to catch up on AMAs, ask questions, and connect with other developers About Me I'm Sharda, a Gold Microsoft Learn Student Ambassador passionate about cloud technologies and artificial intelligence. I enjoy learning, building, and helping others grow in tech. Connect with me: LinkedIn GitHub Dev.to Microsoft Tech Community445Views0likes0Comments