virtualization
8 TopicsThe OpenVMM Project
What is OpenVMM? Virtualization platforms are made up of three key components: Firstly, there is the hypervisor – the privileged software that interfaces directly with the hardware to provide the low-level primitives required to execute virtual machines (VMs). Secondly, there is the Virtual Machine Manager (VMM) – the software that uses the hypervisor interfaces to provide the general capabilities required to run VMs and manage their lifecycle. Lastly, there is the host operating system on which the VMM runs, which provides networking and storage access. OpenVMM is an open-source, cross-platform VMM project written in Rust. Released under the MIT license and developed openly in the OpenVMM GitHub repository , it can serve as a key building block for all types of virtualization scenarios. OpenVMM is used in the OpenHCL paravisor, an execution environment that runs within the guest VM, and it can also be used as a traditional VMM on a host operating system. How Has OpenVMM Evolved Since Being Open Source? Since we open soured OpenVMM in 2024, our active developer community has grown to over 100 contributors with over 200 forks. The OpenVMM project has benefited from strong ongoing contributions from industry partners like Intel and Arm, which have helped the project evolve and mature in several aspects, including cross-platform virtualization, device emulation, testing infrastructure and confidential computing. Advancing Cross-Platform Virtualization Contributions have enhanced OpenVMM's support across architectures, host operating systems, and virtualization backends. Key enhancements include aarch64 support for the MSHV backend and correctness improvements for KVM-based virtualization. Expanding Device Model and Device Emulation Support Device support has grown to now include: - Emulated SMMUv3 for Arm-based VMs - Compute Express Link (CXL) emulation - PCIe NUMA and ACS configuration exposure - Modern VFIO device assignment interfaces for improved hardware passthrough - Full VLAN support for NetVSP networking Strengthening Testing and Engineering Infrastructure Several improvements have been made to the Petri testing framework based on community feedback. These include physical NVMe test plumbing, CXL coverage, transparent-huge-page enablement, and richer diagnostic reporting like halt reason error messages for easier debugging. In parallel, improvements in CI and build systems and release engineering have streamlined development workflows, including new build support for Azure Linux. Innovations in Confidential Computing One of the most significant areas of growth has been confidential computing. Thanks to contributions from Intel, we developed General Availability paravisor support for Intel TDX Confidential VMs in Azure in the open via over 50 GitHub issues and then focused on changes that have led to substantial performance gains, like reducing Confidential VM performance overhead from roughly 3% to about 1% in CPU/memory intensive workloads. Thanks to contributions from Arm, support for an entirely new confidential architecture, Arm CCA Realm is underway, with initial Arm CCA foundational enablement for OpenHCL and TMK test infrastructure already completed, and GICv3 support in OpenHCL and support for booting Linux guests using tmk_vmm almost complete. Collaboration with AMD continues to enhance support for AMD SEV-SNP Confidential VMs through paravisor performance optimizations and improved debugging capabilities like virtual NMI support and paravisor boot serial logging. We also continue growing paravisor attestation and sealing capabilities, like adding support for stateless Confidential VMs with hardware sealing policy. Growing Beyond the Core Project OpenVMM has also shown signs of broader ecosystem/product integration. Community members are exploring how OpenVMM can power adjacent technologies and products. For example, contributors within the Windows Subsystem for Linux (WSL) ecosystem are exploring using OpenVMM as VMM backend option for WSL VMs. As we develop new OpenVMM functionality in the open, we would love your feedback. You can learn more about this project on and how to use it on https://openvmm.dev. Why OpenVMM? The motivation behind building OpenVMM comes from three of its core characteristics: cross-platform, distributed and flexible, and its modern security architecture. Cross-Platform There is a need for a VMM that works consistently across Windows and Linux and across multiple hypervisors. Broad cross-platform support is one of the design principles of, as well as one of the key motivations for developing OpenVMM. OpenVMM supports a variety of host operating systems including Linux, Windows, and macOS, and a variety of virtualization backends including MSHV, WHP, KVM and hypervisor.framework. It also supports both x64 and AArch64 architectures. Distributed and Flexible OpenVMM is designed to be a collection of VMM components that can be combined to build specialized VMMs custom tailored to power specific scenarios. Although OpenVMM can run as a traditional VMM on the host, it is designed so that its runtime functionality can be split across multiple environments, like running in a paravisor inside a guest VM. In fact, our goal of running OpenVMM inside a paravisor environment, and this scenario’s unique threading model requirements, was one of the reasons OpenVMM was created. The ability to use OpenVMM in a variety of environments simultaneously is enabled by OpenVMM’s modular design and internal message-passing architecture. Components can be reused in different scenarios without being tied to the broader “block diagram”. OpenVMM is also flexible in terms of the wide range of scenarios in can support. It can optimize modern workloads while also supporting legacy workloads. For instance, today OpenVMM supports different boot modes: UEFI, BIOS and Linux Direct Boot, and it has wide device support across direct assigned devices, para-virtualized devices (both Virtio and VMBus), and emulated devices: vTPM, NVMe, serial UARTs and legacy x86 (i440BX + PIIX4 chipset, IDE HDD/Optical, Floppy, PCI, VGA graphics). In fact, Azure compatibility has also been a goal, which is why OpenVMM has support for the Microsoft Hypervisor ABI and all Hyper-V emulated and para-virtualized devices. Going back to OpenVMM’s modular design, one can choose a subset of the Hyper-V guest interface, or an alternate interface altogether, for new scenarios with different requirements. Modern Security Architecture OpenVMM aims to have a modern, secure design. It does this, firstly, by implementing as much virtualization functionality (emulation, instruction completion, paravirtualized devices, and memory management) in user mode as possible. This can improve security via hardware memory protection and enhanced exploit mitigations, and it also makes it easier to service the code, diagnose issues, and mitigate problems in the field, enabling faster patching of security vulnerabilities. Secondly, OpenVMM uses powerful process sandboxing, allowing unrelated VMM functionality to run in separate processes. On Windows, this sandboxing is backed by least-privileged app containers (LPAC), while on Linux it’s supported by kernel namespaces and (in the future) SeLinux. Lastly, like with many newer VMMs, OpenVMM is written in Rust, which reduces the opportunity for programming error leading to guest escape. With Safe Rust, programmers do not have to worry about type-safety or memory-safety... about the possibility of a dangling pointer, a use-after-free, or other kinds of Undefined Behaviors (which became known as nasal demons in 1992 for good reason). The OpenVMM community has been actively involved in Rust since the early days, driving the compiler and libraries forward. OpenVMM was one of the five case studies used by the Rust async working group to evaluate the utility of the stabilized MVP version of async functions in traits - OpenVMM is the Microsoft tool cited in Rust’s blog Stabilizing async in traits in 2023! There are many other great security initiatives in Rust that OpenVMM benefits from: ongoing efforts are regularly creating new open-source security tools for Rust developers, conducting audits and threat models and developing a collaborative team of Rust security experts. Conclusion Today, we covered why the OpenVMM project started and how it has grown since being open source. Microsoft is committed to working across open-source projects and supporting multiple VMMs for customers, alongside OpenVMM. Our goal is to give customers choices to find the solution that best meets their requirements and their workloads as well as to provide the strong performance and isolation capabilities of the Microsoft Hypervisor - which is used in Azure, on-prem, and Client scenarios - to a wide range of VMMs in various virtualization topologies and operating systems. For example, we are working on VMMs like Cloud-hypervisor and Hyperlight which power Azure workloads, and we are also investing in broad compatibility, getting a wide range of VMMs including QEMU to run with the Microsoft Hypervisor to support diverse Linux workloads in Azure. - Core OS Team.2.2KViews1like0CommentsOpenHCL: the new, open source paravisor
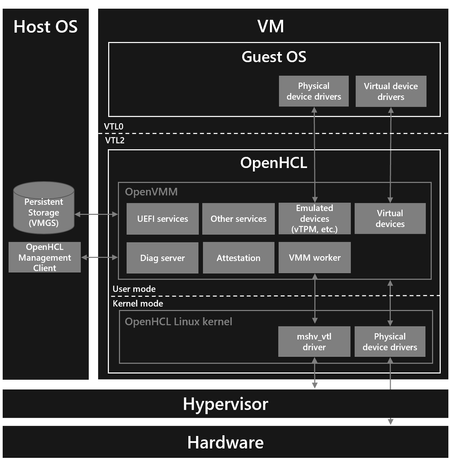
Intro From the beginning of the cloud computing era, virtualization technology has enabled compute workloads to run as virtual machines (VMs) in a server environment. As hardware has evolved, and new functionality has become available, the software stack has kept VMs running seamlessly, thanks to sophisticated advances in the hypervisor and virtualization software. Confidential Computing is a powerful technology for significantly improving the security of VMs running in the cloud. However, the trust boundary of a Confidential VM imposes a barrier that prevents the hypervisor from offering the rich virtualization services that VMs normally expect. Customers desiring the benefits of Confidential VMs are therefore forced to update the operating systems of their VMs to newer versions, which must be continually revised as Confidential VM technology maintains its path of rapid evolution. Microsoft has embraced a different approach that offers much more flexibility to customers through the use of a “paravisor”. A paravisor executes within the confidential trust boundary and provides the virtualization and device services needed by a general-purpose operating system (OS), enabling existing VM workloads to execute securely without requiring continual update of the OS to take advantage of innovative advances in Confidential Computing. As Confidential Computing evolves, the software stack can keep VMs running seamlessly thanks to the paravisor, in much the same way other advances in virtualization software kept VMs running seamlessly on ever evolving hardware. Microsoft developed the first paravisor in the industry, and for years, we have been enhancing the paravisor offered to Azure customers. This effort now culminates in the release of a new, open source paravisor, called OpenHCL. We plan to develop OpenHCL in the open here: microsoft/openvmm: Home of OpenVMM and OpenHCL (github.com). OpenHCL Capabilities A paravisor is essentially an execution environment that runs within the guest VM - at a higher privilege level than the guest OS - and provides various services to the guest. A paravisor can run in both confidential environments and traditional (non-confidential) environments. We use VBS to run a paravisor on Microsoft’s virtualization stack. When running in a confidential environment, these privilege levels must be enforced by the confidential hardware platform, and our architecture allows VBS to be appropriately enforced in a hardware platform-agnostic manner. Today, OpenHCL can run on both x86-64 and ARM64 platforms, and it has support for Intel TDX and AMD SEV-SNP confidential hardware platforms. OpenHCL runs in the L1 VMM of a TDX Confidential VM and in the VMPL0 of an SEV-SNP Confidential VM. See the OpenHCL user guide for step-by-step instructions to use it. OpenHCL offers a rich set of powerful services to both Confidential and traditional VMs alike: Device emulation via standard device interfaces, essentially offering a set of emulated devices. Device translation via standard device interfaces, such as NVMe to para-virtualized SCSI, allowing assignment of hardware devices directly to VMs (accelerated IO) without requiring guest OS changes - enabling VMs to take advantage of the performance of cutting-edge devices. Diagnostics support (particularly useful for debugging Confidential VMs where it is difficult to use traditional debugging methods). (To Confidential VMs specifically) Support for guests that are not fully enlightened - such as Windows and older versions of Linux - to run on confidential hardware platforms via standard architectural interfaces. For Confidential VMs, even though OpenHCL provides value to guests that are not fully enlightened (by enabling them), OpenHCL can also provide a lot of value to fully enlightened guests by offering them any of its other services as different scenarios require it. OpenHCL is used in Azure in new Azure Boost SKUs, and it will be used in future Azure Confidential VM SKUs. In the past month alone, over 1.5 Million VMs were running with OpenHCL in Azure [1] . OpenHCL Architecture OpenHCL is composed of several open source components, the most important one being OpenVMM, the modular, cross-platform, virtual machine monitor (VMM) written in Rust. This VMM runs several user mode processes that power OpenHCL. Running a VMM inside OpenHCL allows us to support guests with assigned devices and provide device translation support. Additionally, it allows us to share confidential and non-confidential architecture. We run the same VMM in the same environment for both Confidential and traditional VMs, and the VMM provides the same services tailored to their requirements. This avoids fragmented virtualization solutions among Confidential and traditional VMs. The other components of OpenHCL are a boot loader and a small, customized Linux kernel built to support the VMM, with min. Kconfig to minimize binary size and runtime RAM usage. Running a kernel to support our environment allows the VMM code to be mostly standard Rust, making the VMM much more powerful by enabling it to use the broadly supported and stable Rust toolchains and crate ecosystem. The Two Approaches to Running Confidential VMs There are two approaches to running a guest OS inside a Confidential VM: either the guest must be fully enlightened (modified to understand and manage all aspects of running as a Confidential VM), or it can rely on a paravisor to implement the Confidential Computing enlightenments on its behalf. In Azure, all IaaS Confidential VMs leverage a paravisor today. The paravisor enabled Azure to support the widest variety of guests, including Windows versions released almost a decade ago [2] and Linux versions using kernels as old as the 5.19 kernel [3] (and versions using even older kernels that had a small set of patches backported, such as some Ubuntu and RHEL distro versions). This provides customers with an easier lift-and-shift as well as the flexibility to gain future Confidential Computing advances without needing to upgrade their workloads. Customers’ legacy solutions are safe with Azure because of the approach we embraced. Why is Windows not fully enlightened? When we developed support for the first Confidential VM in Azure on the confidential hardware platforms available at the time, it was not possible to fully enlighten Windows for those platforms because Windows required APIC emulation to be done in a paravisor. APIC emulation, traditionally done by the hypervisor, must be done by another entity for Confidential VMs, where the hypervisor is outside the trust boundary. It can be done by the paravisor or by the hardware platform if it supports APIC virtualization. Early confidential hardware platforms (like 3rd Gen AMD EPYC™ processors) did not support APIC virtualization, so APIC emulation had to be done in a paravisor for Windows guests. This had to be so for Windows guests, but not necessarily for Linux guests, because the architecture of Windows relies directly on the APIC for interrupt management whereas the architecture of Linux does not. Some aspects of Windows interrupt management do not flow through the kernel and are inlined in drivers, so Windows drivers rely on the interrupt management behavior offered by the APIC. Linux offers kernel service routines for handling interrupt state, so Linux drivers rely on these routines. In addition to this, Windows relies on the presence of a TPM for security features, and one cannot implement a vTPM for a Confidential VM with enlightenments alone. We chose to implement a vTPM in a paravisor. Given all the functionality we have built into the paravisor, our plan is not to fully enlighten Windows and continue supporting Windows guests via a paravisor in Azure. For future versions of Linux, we’re evaluating both approaches – fully enlightened and relying on a paravisor – and we will aim to do what is best for customers. OpenHCL and COCONUT-SVSM An SVSM like COCONUT-SVSM plays a very valuable role for Confidential Computing; it can store secrets and provide virtualization services to improve the usability of fully enlightened guests. OpenHCL solves a different problem than COCONUT-SVSM. COCONUT-SVSM aims to provide services to Confidential VMs with fully enlightened guests using new interfaces. OpenHCL aims to provide services to Confidential VMs using existing standard architectural interfaces. COCONUT-SVSM provides device emulation, but OpenHCL uniquely provides this via existing standard interfaces. When running with an SVSM (like COCONUT-SVSM), the guest must establish a specific relationship with the SVSM by discovering its presence and then interact with the SVSM using a custom calling convention. Essentially, a guest needs to be specifically modified to be able to take advantage of SVSM services, including devices. With OpenHCL, existing device interfaces just work, so the guest does not need any custom calling contract modifications to consume them. OpenHCL enables devices to be discovered over standard enumeration mechanisms, like PCI virtualization or existing vTPM device contracts. COCONUT-SVSM could potentially be leveraged by OpenHCL in the future. OpenHCL's VMM component is Rust based, which has strong memory safety properties; evolving OpenHCL's kernel component to also be Rust based would improve the memory safety of OpenHCL. During the development of OpenHCL, we chose the Linux kernel because it was a familiar OS platform for contributors and provided the capabilities needed. Now that Rust-based COCONUT-SVSM exists, we are interested in moving to that in the future and building OpenHCL support for it if it gains the features that OpenHCL needs. Open for Collaboration In this blog we described the existing capabilities and the value of OpenHCL for the future of computing, but we have much more we plan to do with OpenHCL. We track the roadmap of OpenHCL in the open; below are some of its future milestones. As we develop new functionality in the open, we would love to collaborate with you. Please reach out to us if you have ideas you’d like to add to the roadmap or any other feedback; you can open a GitHub issue and even contribute to the project! You can learn more about this project on: https://openvmm.dev. Milestone: OpenHCL support for Intel TDX (Trust Domain Extensions) in Azure Intel and Microsoft collaborated on and co-developed the TDX partitioning architecture so that it could be leveraged by a paravisor. The first ever TDX module with TD partitioning was an amazing co-engineering project between Intel and Microsoft. Intel released TD partitioning as part of the TDX Module that accompanied the general availability of 5th Generation Xeon, and this has also been backported to 4th Generation Xeon. Using this TDX module, Azure launched the first generation of Azure TDX Confidential VMs, being the first cloud service provider to offer TDX in public preview as well as the first cloud service provider to offer Windows guest support for TDX. Intel has been contributing to OpenHCL for the past 6+ months, and we’re close to feature completeness in OpenHCL for the next generation of Azure TDX Confidential VMs! Milestone: OpenHCL support for AMD SEV-SNP (Secure Encrypted Virtualization-Secure Nested Paging) in Azure Microsoft and AMD have a long history of collaboration with multiple Azure Confidential VM offerings, powered by AMD Infinity Guard's SEV-SNP. We have been engaging with AMD to ensure OpenHCL and AMD’s platform can best work together to provide great performance and security for customers in the future. Virtual Machine Privilege Levels (VMPLs) provide hardware isolated abstraction layers within a VM for additional security controls, as well as assistance with managing communication with the hypervisor. Microsoft used AMD’s VMPLs to build the first paravisor for Confidential VMs in Azure, and we continue to develop support in OpenHCL to reach feature completeness for future generations of AMD Azure SEV-SNP Confidential VMs. Milestone: OpenHCL support for Arm CCA (Confidential Compute Architecture) Arm Confidential Compute Architecture (CCA) comprises a collection of open source software, firmware, specifications, and hardware support to bring Confidential Computing to the Arm architecture. CCA provides protected environments called Realms that can be used to host Confidential VMs. Microsoft started engaging with Arm almost two years ago to make sure CCA is well equipped to support paravisor stacks like OpenHCL, and our collaboration lead to the creation of the Planes feature, which enables multiple of levels of privilege to coexist inside a Realm. Planes provide the ability to host a paravisor and a guest VM in the same Realm, with the paravisor providing security and compatibility services to the guest. We are excited to collaborate further with Arm to build OpenHCL support for CCA in the open. Milestone: OpenHCL support for KVM as host Today OpenHCL runs only on MSHV. We are looking forward to developing OpenHCL support for KVM as host in collaboration with other cloud service providers and the Linux and KVM community to enable others to leverage OpenHCL in their virtualization stacks. We recently began engaging with Red Hat to discuss the value of OpenHCL and how it has the potential to open the door for significant cross-OS interoperability in the confidential virtualization world. We are excited to collaborate with Red Hat to build an open and collaborative confidential computing ecosystem. - Core OS Team. [1] This number is from when this blog was published, Oct 2024, but this number keeps growing every month. [2] Specifically, older versions include Windows Client 10 (released almost a decade ago) and Windows Server 2019. [3] Specifically, older versions include Linux versions using the kernel 5.19 (for SNP) and 6.6 (for both SNP and TDX).35KViews7likes2CommentsOptimizing your Hyper-V hosts
The good news is that Hyper-V is designed to provide optimal performance and functionality based on the dynamics of what’s running on the host and the needs of the VMs regarding memory and CPU resources. In most cases, running with the defaults will work great. For those cases where some tuning to optimize for host CPU or live migration is desired, this blog will cover some opportunities to adjust your Hyper-V systems. Overview of CPU Scheduling Before we get into the ways to configure and manage Hyper-V there are a few key concepts that are important to understand. For more details, reference: Manage Hyper-V hypervisor scheduler types | Microsoft Learn Physical CPUs and Logical Processors Modern systems allow for multiple physical CPUs, with each CPU having multiple Logical Processors (LPs). LPs are what the host and VMs virtual processors map to for thread execution. Here is an outline of how CPUs, Cores, and Logical Processors relate: A host has X number of sockets in which a CPU plugs into Each CPU has X number of cores Each Core has one or more Logical Processors (LP) o Simultaneous Multithreading (SMT) allows for 2 LPs per Core, if enabled. If not enabled, there is 1 LP per core. Diagram 1: Showing the host having a single Socket and the CPU with 4 cores. With SMT enabled, this will show 2 logical processors per core. Note, the diagram above also shows that each core has 2 LPs, and the virtual processors are mapped to LPs of the Core. A core will not execute threads on its LPs from VPs of different VMs. This is why it’s recommended to configure VMs with an even number of VPs. The image below shows how this configuration looks in Task Manager. It’s an easy way to confirm that SMT is configured, there are twice as many logical processors as there are cores: This is the powershell to get the same information: PS C:\Users\Administrator> (Get-WmiObject -Class Win32_Processor) | fl NumberOfEnabledCore,NumberOfLogicalProcessors NumberOfEnabledCore : 4 NumberOfLogicalProcessors : 8 Virtual Processors and Scheduling Part of the configuration of a VM is the number of Virtual Processors (VPs) it has. As the name implies, the operating system in the VM sees these as CPUs to execute threads on. The scheduler then manages execution on an LP. The sum of the VPs configured for the running VMs can be greater than the available LPs. To manage this, there is a “scheduler” in the hypervisor or host that manages which VP can execute on which LP. Diagram 2: Showing a configuration where there are more Virtual Processors than Logical Processors. The scheduler will assign which VPs each set of LPs in a core will execute at any moment in time. Because there are more VP’s than LPs in the above example, when the other VPs have threads waiting to execute it will stop the execution of LPs of some cores switch them to execution for waiting VPs, so another moment in time for the same system might look like this: Diagram 3: Showing the same configuration as diagram 2, but in a different moment in time where there is a difference in the Virtual Processor to Logical Processor assignment For the purposes of this blog, most examples will be specific to the “Core Scheduler” with SMT enabled on the system, unless otherwise noted. The Core Scheduler is the default and recommended option for Windows Server and Azure Local. For more information on the different schedulers refer to: https://learn.microsoft.com/en-us/windows-server/virtualization/hyper-v/manage/manage-hyper-v-scheduler-types#hypervisor-scheduler-types Optimize Host and VM CPU by Dedicating CPUs to the Host The host OS is running processes critical to the system, like managing live migrations for VMs, hosting services like the Failover Cluster Service, and managing virtual machines’ resources. If the host is showing high CPU utilization, it may be that the host is impacted by the CPU demand of the VMs. Dedicating CPUs for the host’s use can alleviate the impact of contention between its processes and the resources that the VMs it’s hosting require. This separation can be beneficial to the VMs also, as it keeps host processes from causing contention with the VMs CPU scheduling. Using MinRoot MinRoot is a feature that limits CPUs that are used for the host. This article describes, in detail, how it works and how to configure MinRoot. Essentially, a BCDedit command is used to specify the number of Virtual Processors (VPs) to assign to the Host. It assigns a Logical Processor (LPs) directly to each host VP for the host’s use. The remaining LPs of the system will be available to VMs without the host VPs being scheduled on them. The LPs assigned to the host may share time with VPs from VMs. The MinRoot setting will become effective once the host is restarted. Diagram 4: Showing a configuration where MinRoot is used to dedicate 2 logical processors to the host. The other 6 logical processors are shared between the VMs Choosing the number of LPs dedicated to the host is similar to the process of identifying the number of VPs to assign to a VM. It depends on what’s running inside of it (its workloads). Common variables include the CPU load from networking (RDMA enabled networks can help reduce this) and other software that has CPU demands. The CPU utilization from the OS may increase with the increase of the number or type of VMs running on it. Loads are specific to each deployment and often change over time, so occasional monitoring of host CPU utilization, particularly at times of peak loads, is recommended. This article has some helpful information on how to use Performance Monitor, which is a tool that is built into Windows Server and Azure Local and Windows Client, which is commonly used to analyze CPU utilization. While the article references Microsoft SQL Server, the premise is the same for general CPU utilization monitoring. Optimizing Live Migration Live migration (LM) is used to load balance VMs between hosts and to facilitate host maintenance with limited impact on the workloads running inside of the VMs. For example, Failover clusters use LM to automatically move VMs for activities like updating hosts using Cluster Aware Updating (CAU). More information: Live Migration Overview | Microsoft Learn Limiting the interruption of network communications and CPU while a VM it is moving from one host to another is often important for workloads that have low “jitter” requirements. Hyper-V’s Live Migration has been optimized over the years for speed and reliability. The initial phase of a live migration copies the VM state from the source host to the destination host using multiple passes, since the VMs are in use and the memory and processor state are continuously changing. Once the delta between the source and destination state is minimal, the source VM is paused, and the final memory and state copy is completed. It is at that point that the destination VM is resumed and becomes active. This final phase is often completed in under a second, but the time can depend on the amount of CPU/Memory churn caused by what’s running in the VM, and network bandwidth and latency that is used to transfer the state. Here are some settings that can optimize live migration. It’s also good to remember that if the hosts are part of a failover cluster, all nodes of the cluster should be configured identically. Number of Simultaneous Live Migrations The number of LM sessions that a host can run at the same time, whether source or destination, is controlled by setting the -MaximumVirtualMachineMigrations parameter. Live migration uses host resources like CPU and networking. If the goal is to reduce the time for individual VMs to be live migrated, then a lower number is better. If the goal is to take a set of VMs and live migrate them all in the shortest amount of time, then a higher number might be better. However, since VMs are constantly changing memory state because they are running and active, simultaneously live migrating more VMs might actually take more overall time to accomplish. The recommendation is to keep this number low and analyze the effect on the LM time and the system resources when trying higher settings, to find the sweet spot for your system. To get the value: Get-VMHost -MaximumVirtualMachineMigrations To set the value to 2: Set-VMHost -MaximumVirtualMachineMigrations 2 Reminder: ensure this setting is the same across all nodes of a failover cluster Host Networking Considerations Live migrations use a network connection between the source and destination nodes. Optimizing the network configuration can allow the initial and final memory and state transfers to complete faster. RDMA and SMB RDMA is a network offload that reduces host CPU overhead for the network traffic, while increasing the throughput. It requires NICs on the hosts and switches that the traffic flows to support RDMA and to be properly configured. When enabled, the same network traffic can have as much as 20% higher throughput (more data per second) and 20% less CPU usage. Therefore, the live migration will be completed faster with less system CPU impact. RDMA does require the servers to have NICs that have the capability, and the proper configuration for the NICs and switches that the network traffic flows through between the source/destination servers. RDMA configuration is specific to the NICs and switches in the environment, so details are not in-scope for this blog. If the source/destination systems for a live migration are configured to allow RDMA networking, live migration needs to be set to use SMB as the transport protocol. Set live migration to use SMB: Live migration can transfer data between nodes using 3 different mechanisms. The default is “TCP/IP” which uses a Hyper-V managed connection between the source and destination systems. “Compression” is useful to reduce the amount of data that is transmitted over the networking by compressing it. Compression will use more host CPU to do the compression and decompression on each node. This is often the best option for scenarios like doing live migration over a WAN where bandwidth is limited or charged. “SMB” allows the data to be transmitted using SMB optimizations like SMB Direct, which is what allows the LM traffic to go over RDMA enabled connections. If the nodes have more than one network path with the same characteristics (throughput, RDMA/Non-RDMA), SMB will manage using all of them using SMB Mulitchannel. To change the setting, use Set-VMHost from a PowerShell Console, opened as Administrator. This is the command to use to change to SMB. Ensure this is set consistently all the nodes of a failover cluster. Set-VMHost –VirtualMachineMigrationPerformanceOption SMB Set SMB bandwidth limit for Live Migration Live migration will use as much of the network bandwidth as possible, which can starve other components that may need to use the same connection, like failover cluster traffic. When the system is set to use SMB for live migration, it is recommended to set a limit for live migration traffic. The amount of bandwidth to limit live migration depends on the available bandwidth between the source and destination systems. For example, if there are 2 connections between the host and destination which are RDMA capable and have a throughput of 10Gb (Gigabit), the aggregate would be 20Gb. A general recommendation would be to limit live migration traffic to ~50%, which would be 10Gb. While a good starting point, if live migrations are too slow the limit could be increased. Likewise, if other components of the system, like Failover Cluster and Cluster Shared Volumes, are having issues during live migration, reducing the limit for Live Migration may be needed. To set the bandwidth limit for live migration traffic over SMB (example value of 10Gb): Install the SMB bandwidth limit feature Add-WindowsFeature -Name FS-SMBBW Then set the limit for LiveMigration Set-SmbBandwidthLimit -Category LiveMigration -BytesPerSecond 10GB Resources: Virtual Machine Resource Controls | Microsoft Learn Live Migration Overview | Microsoft Learn Optimizing Hyper-V Live Migrations on an Hyperconverged Infrastructure - Microsoft Community Hub https://learn.microsoft.com/en-us/troubleshoot/windows-server/virtualization/troubleshoot-live-migration-guidance Set up hosts for live migration without Failover Clustering | Microsoft Learn Monitor CPU Usage - SQL Server | Microsoft Learn6KViews2likes2CommentsRun untrusted content safely with Windows Sandbox
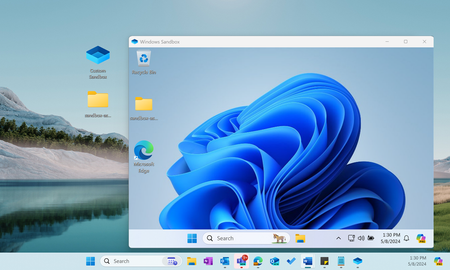
As a developer, accessing unfamiliar files or repos can sometimes be a challenge. You do not know if they are safe or potential malware. But what if we told you there's a way to view untrusted files without risking your host OS?22KViews5likes3Comments