virtual machines
197 Topics
Azure Elastic SAN Next Generation public preview: Mission-critical performance & cloud-native scale
Mission-critical applications such as SAP HANA, Epic, and core transactional databases demand consistently high performance and predictable low latency. Cloud-native platforms running stateful applications, vector databases, and fast-growing fleets of AI agent environments need persistent storage that can scale across thousands of volumes. Meeting these growing storage demands without overprovisioning resources or adding operational complexity is a common challenge that organizations face today. To address this challenge, we are announcing the public preview of Azure Elastic SAN Next Generation, bringing together the performance mission-critical applications demand, the scale cloud-native workloads need, and the cost efficiency enabled by Elastic SAN’s storage consolidation model and dynamic performance sharing. Elastic SAN Next Generation expands the workloads that can benefit from Elastic SAN—whether you’re migrating an on-premises SAN estate, modernizing enterprise applications, or building cloud-native applications. At a glance Mission-critical performance. Up to 400,000 IOPS and 10,000 MB/s per volume, with low sub-millisecond latency and noisy-neighbor protection for Business Critical volume groups. Cloud-native scale. Up to 1 PiB of capacity, 4 million IOPS, 160 GB/s of throughput, and 20,000 volumes per SAN. Cost efficiency. Thin provisioning, autoscale, thin cloning (coming soon), and independent scaling of capacity and performance, built on the consolidation economics of Elastic SAN. Data protection and recovery. Instant snapshots with automatic hardening, complemented by application-consistent backups through Commvault and Druva. Elastic SAN Next Generation builds on the Elastic SAN foundation customers already know: a familiar SAN, volume-group, and volume hierarchy; enterprise-grade security, data protection and resiliency; and shared storage infrastructure that lowers storage TCO and simplifies storage management. Mission-critical performance for your most demanding applications For I/O-intensive enterprise applications, storage performance directly affects how quickly transactions complete and how predictably applications respond under load. Consolidation is valuable only when the storage platform can meet those requirements. The new Business Critical tier delivers up to 5× the IOPS and nearly 8× the throughput per volume compared with today’s General Purpose iSCSI volumes, alongside low sub-millisecond latency. Quality of Service (QoS) provides noisy-neighbor protection at the Business Critical volume-group level, protecting configured IOPS and throughput allocations from contention elsewhere on the SAN. For customers migrating an on-premises SAN estate, moving data is only part of the challenge—the destination must also meet the different service levels their applications depend on. Business Critical and General Purpose bring that familiar tiered-storage approach to Azure, with higher performance and noisy-neighbor protection extending Elastic SAN to more demanding applications. This helps customers map workloads across their SAN estate to appropriate storage tiers and plan storage migrations at the SAN level—helping accelerate SAN migrations to Azure during datacenter exits and hardware refreshes. These applications also benefit from the economics of a shared SAN. Customers can reserve performance for critical workloads while sharing available performance across volumes and provisioning capacity to match their needs—helping improve utilization and reduce overprovisioning. For the representative workload configuration evaluated, Elastic SAN Next Generation offers approximately 43% lower monthly storage costs than competing cloud provider. See “Consolidation economics in practice” below for more details. Scale persistent storage for cloud-native and AI workloads Growing SaaS database fleets, distributed vector databases, and persistent agent stores and workspaces can create demand for thousands of volumes. Across these workloads, customers need storage that keeps pace while remaining simple to provision, organize, and manage. Elastic SAN Next Generation supports up to 20,000 volumes per SAN at preview, with higher limits on the roadmap. For database fleets and agent platforms using persistent block storage on Azure, this provides room to expand through a familiar SAN management model. Volumes remain organized into groups, with network and security policies applied centrally rather than configured volume by volume—bringing scale and management simplicity together as application estates grow. Shared performance helps improve utilization as activity varies across databases and agent environments, while thin provisioning and autoscale help align capacity provisioning with growth. Thin cloning (coming soon) will provide space-efficient, instantly mountable volume copies for agent workspaces that start from a common baseline—helping teams expand these environments without making a full data copy for each one. More workloads. Greater control. Better storage economics. Across these workloads, Elastic SAN Next Generation helps customers match performance and connectivity to their applications, provision resources efficiently as demand grows, and protect data with appropriate recovery options. Choose the performance and connectivity that fit your workloads Assign a QoS tier to each volume group: Business Critical offers reserved IOPS and throughput for noisy-neighbor protection and can draw on available shared performance beyond its reservation. General Purpose uses dynamically shared performance without reservations. The new Direct Attach option combines a familiar disk-attachment workflow for supported Azure virtual machines, with SAN-level provisioning and volume group management. Customers don’t need to configure guest-side iSCSI sessions. iSCSI remains available to provide low-cost external storage for bare-metal environments, including Azure VMware Solution (AVS) and Nutanix, and for any workload that needs high volume density per host. Take agent sandboxes as an example. If each agent gets its own isolated volume, a single VM can need 100+ volumes. iSCSI handles that scale and still delivers the raw performance of block storage. QoS tier Connectivity Performance model Max IOPS per volume Max throughput per volume Example workload profiles Business Critical Direct Attach Volume-group performance reservations with noisy-neighbor protection; low sub-millisecond latency 400,000 10,000 MB/s Transaction-heavy databases and demanding enterprise applications General Purpose Direct Attach Shared performance; sub-millisecond latency 80,000 2,000 MB/s Vector databases, open-source databases, persistent application stores General Purpose iSCSI Shared performance 80,000 1,280 MB/s Azure VMware Solution, Nutanix, and other iSCSI-preferred environments Per-volume performance depends on volume capacity, any reservations on the Volume Group and the performance provisioned at the SAN level. Lower storage TCO as your workloads grow Performance sharing improves utilization. Flexible provisioning complements it by helping customers keep capacity and performance spending aligned with what their applications need: Thin provisioning: give applications room to grow without buying all that capacity upfront. The aggregate logical capacity assigned to volumes can be up to 5× the SAN’s provisioned capacity. Capacity charges remain based on the SAN capacity provisioned—not the full logical capacity assigned to volumes. Autoscale: reduce manual capacity management. Automatically grow SAN capacity based on utilization thresholds you define, helping accommodate growth without repeatedly resizing capacity yourself. Independent provisioning: buy capacity and performance according to your needs. Provision capacity, IOPS, and throughput independently at the SAN level, rather than purchasing additional capacity solely to obtain more performance. Thin cloning (coming soon): create new copies without duplicating all the data upfront.Create space-efficient, instantly mountable copies of Business Critical volumes for development, testing, and agent workspaces that start from a common baseline. Consolidation economics in practice Consider a workload portfolio of mission-critical databases, cloud-native workloads and their application servers, requiring 150 TiB of logical volume capacity to accommodate 60 TiB of current data and projected near-term growth. Thin provisioning allows customers to present the full logical capacity to their VMs, while initially provisioning and paying for 66 TiB of SAN capacity: 60 TiB for current data and 6 TiB of headroom with autoscaling enabled. The model also assumes workload peaks do not fully coincide: their combined peak requires 400,000 IOPS & 12.8 GBps, compared with 600,000 IOPS & 19.2 GBps when provisioning each workload independently for its peak. Resources and cost Elastic SAN Next Generation Other Cloud Provider Total logical volume capacity 150 TiB 150 TiB Current data usage 60 TiB 60 TiB Provisioned capacity 66 TiB 150 TiB Provisioned IOPS 400,000 600,000 Provisioned throughput (MBps) 12,800 19,200 Modeled monthly storage cost $25,764.05 $45,536.30 At this initial utilization, the modeled monthly storage cost is approximately 43% lower with Elastic SAN Next Generation. The savings reflect capacity provisioned for current data (including headroom), included baseline performance of 2000 IOPS & 64 MBps per provisioned TiB, and dynamic performance sharing across workloads whose peaks do not fully coincide. As data usage grows, autoscale increases provisioned SAN capacity up to the configured maximum of 150 TiB, with capacity charges increasing accordingly. Enhanced Data Protection and Recovery As more applications rely on shared storage, recovery becomes an essential part of the storage strategy. Elastic SAN Next Generation combines native snapshots with partner-enabled backup and recovery, supporting both rapid volume recovery and application-aware protection. Instant snapshots with automatic hardening. Incremental, crash-consistent snapshots provide instant access and instant restore for five hours after creation. In parallel, each snapshot is automatically hardened to lower-cost storage. Once hardened, its lifecycle is independent of the source volume, preserving a recovery point even if that volume is deleted. Hardened snapshots support standard restores, with an option for faster restores. Application-consistent backups through leading partners. Leading third-party backup partners such as Commvault and Druva build on Elastic SAN snapshots to provide enterprise-grade protection, including application-consistent backups, advanced backup policies and retention management, and recovery workflows ranging from cross-region disaster recovery to granular file and folder restore. Integration with Veeam is on the roadmap - Capabilities and supported scenarios vary by integration. Get started with the public preview Azure Elastic SAN Next Generation is now in public preview with locally redundant storage (LRS) in France Central and Southeast Asia. UK South, East US and West US 2 are coming soon. Start with a representative workload and evaluate the tier, connectivity, and provisioning model that fit your environment. Review the documentation for supported VM configurations, connectivity options, and preview limitations before you begin. Sign up for the preview: aka.ms/esannextgenpreviewsignup Explore the documentation: aka.ms/esannextgendocs Whether you’re modernizing the applications that run your business or building the platforms that come next, Azure Elastic SAN Next Generation expands your storage choices—with performance matched to your workloads, room to grow, and a familiar model for keeping storage efficient and manageable. Mission-critical performance. Cloud-native scale. The consolidation economics of Elastic SAN. We can’t wait to see what you build.360Views0likes0CommentsAzure Native Commvault Cloud is now generally available
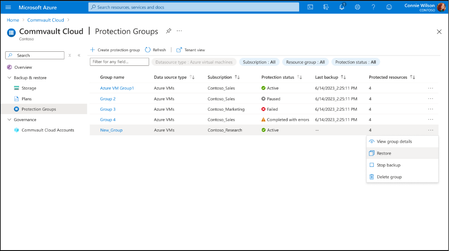
As you modernize critical applications and adopt AI, protecting and recovering data becomes essential to innovation. New AI-powered experiences depend on the availability and integrity of the systems and data behind them. Protection needs to fit how teams operate in Azure, with clear policies and practical recovery options when disruption occurs. Azure Native Commvault Cloud is now generally available as an Azure Native ISV service. The service brings Commvault backup and recovery for Azure virtual machines into the Azure portal, with data-protection resources managed as Azure resources and applicable Commvault charges included on your Azure bill. This gives you another option for protecting business-critical workloads in Azure, combining Commvault's data-protection capabilities with a familiar Azure management experience. A familiar Azure experience for protecting virtual machines Built jointly by Microsoft and Commvault, this integration goes beyond Marketplace purchase and deployment. From Azure, you can configure backup storage, define protection policies, and run supported backup and recovery operations. After setting up identity and access, create a Commvault Cloud account to connect your Azure subscription and Commvault tenant, then configure storage, backup plans, and protection groups. In the Azure portal, you can view protection groups, check protection status and backup details, and take group-level actions. Azure Native Commvault Cloud protection groups in the Azure portal, showing protection status, backup information, and group-level actions. With this integration, you can protect and recover Azure VMs directly from Azure: Apply consistent protection policies. Backup plans specify where backup data is stored, how often full or incremental backups run, and how long backups are retained. Protection groups associate selected virtual machines with those plans. Policy-based protection helps keep recovery readiness continuous as Azure environments change. Discover and protect VMs as your environment grows. During protection-group configuration, you can discover virtual machines and select them manually or define rules to include or exclude resources. You can preview the results before applying a rule to check that the intended VMs are included. Each time the protection group runs, it automatically brings newly matching VMs under the group’s protection plan, helping you maintain coverage as your Azure environment expands. Recover at the scope the situation requires. Individual or multiple VMs can be recovered from a protection group. From an available recovery point, you can restore to a disk attached to an existing VM or recover a full virtual machine, either in place or to a new VM. You can also start an on-demand backup without waiting for the next scheduled run. Strengthen cyber resilience. Immutable, air-gapped backup protection helps safeguard recovery data from ransomware, accidental deletion, and malicious modification. The integration uses a managed identity for supported workload-protection operations and maps Microsoft Entra groups to Commvault roles. Supported backup and recovery actions are available in the Azure portal, while Commvault Command Center provides detailed job information and troubleshooting. A team responsible for protecting a group of Azure VMs, can manage the protection policy, resource selection, and recovery action through a consistent and familiar Azure workflow rather than as disconnected administrative tasks. Extending our investment in partner-led resilience Microsoft and Commvault have worked together for more than 25 years. In our 2026 Azure Storage outlook, we described our investment in co-engineered partner solutions, including Commvault, that go beyond Marketplace availability to deliver more deeply integrated services. This launch puts that strategy into practice for backup and recovery. Commvault brings its experience in data protection and cyber resilience; Azure brings the platform and resource-management experience you already use. Together, we are giving you more choice in how you protect critical workloads, so resilience can evolve alongside your investments in cloud and AI. “Azure Native Commvault Cloud reflects how customers want to consume enterprise recovery today: through the cloud platforms they already trust and operate every day. By bringing Commvault's recovery, resilience, and cyber protection capabilities directly into Azure, we're helping organizations simplify protection, strengthen recovery readiness, and give teams greater confidence as they modernize critical workloads, data platforms, and AI-powered applications,” said Rajiv Kottomtharayil, Chief Product Officer, Commvault. Get started with Azure Native Commvault Cloud Explore Azure Native Commvault Cloud on Microsoft Learn and follow the getting-started guidance to prepare identity and access, connect your Azure subscription, and configure protection for Azure virtual machines.295Views0likes1CommentAnnouncing preview of new Azure DH/EHasv8 VMs based on 6th Gen AMD EPYC™ (“Venice”) processors
We are excited to announce the preview of the new Azure DHasv8, DHalsv8 and EHasv8-series virtual machines (VMs), powered by 6th Generation AMD EPYC™ (“Venice”) processors. Designed for the next generation of cloud applications, these VMs deliver expanded compute and memory scalability, enhanced storage and networking performance, and flexible configurations to support demanding enterprise, database, and broad range of AI workloads. The preview includes general purpose (DHasv8-series and DHalsv8-series) and memory-optimized (EHasv8-series) VMs, available with and without local disks. These VMs are in preview in the East US Azure region. To request access to the preview, please fill out the request form. Key enhancements include expanded VM sizes up to 480 cores to support diverse workload requirements; increased memory capacity of up to 3.8 TiB on the EHasv8-series for memory-intensive workloads; and up to 2x higher remote storage IOPS and networking bandwidth on the largest VM sizes compared to the previous generation. The new VMs are available in three memory (GiB)-to-core configurations, such as 2:1 (DHalsv8-series, DHaldsv8-series), 4:1 (DHasv8-series, DHadsv8-series), and 8:1 (EHasv8-series, EHadsv8-series), giving customers greater flexibility to align infrastructure resources with their workload requirements. Greater performance and scalability for modern cloud workloads Purpose-built to meet the growing demands of agentic AI, the new Azure DHasv8-series and EHasv8-series VMs deliver high core density, large memory capacity and bandwidth, enhanced platform I/O, and flexible configurations, with seamless integration into existing AI services. These capabilities help customers run highly concurrent, CPU-intensive AI workloads at scale. Higher core density enables greater parallelism, supporting multiple agent sandboxes, multi-agent orchestration, parallel tool execution, data retrieval, preprocessing, and other CPU-intensive operations across AI pipelines. Beyond AI, these VMs are optimized for demanding SQL and other database workloads, combining increased memory bandwidth, larger cache, and enhanced networking to accelerate queries, improve transaction concurrency, and boost cache-sensitive application performance. They enable customers to scale transactional databases, analytical processing, and memory-intensive applications with greater performance and efficiency. These VMs leverage the latest Azure Boost innovations to enhance performance and security. They feature the next-generation Microsoft Azure Network Adapter (MANA), offering stable, forward-compatible networking drivers for Windows and Linux, and support the NVMe protocol for both local and remote disks. Together, these capabilities provide a scalable foundation for organizations building and deploying increasingly sophisticated agentic AI applications and many diverse workloads. Get started with the Azure AMD v8 VM preview During the preview, these new Azure AMD v8 VMs are available for free. However, your Azure subscription will be billed for fees and applicable taxes associated with use of other Azure resources and services, such as disk storage, used in the deployment of these preview VMs. These VMs support all Azure managed disk types, with storage billed separately. See Azure managed disk types for options and regional availability. Explore the capabilities of the next generation of Azure AMD based VMs. To request preview access, complete the request form.321Views0likes0Comments
Public Preview: Azure Compute -Spot plus
We’re excited to announce the public preview of Azure Compute Spot plus, an enhanced tier of Azure Spot VMs that brings greater runtime consistency and earlier eviction signals to interruption-tolerant workloads. These capabilities give workloads more time to prepare and adapt as capacity conditions change. Standard Spot remains a great fit for highly resilient workloads focused on maximizing savings. For workloads that value greater predictability and additional time to respond to interruptions, Spot plus delivers an enhanced experience over Standard Spot. Key Spot plus capabilities Improved runtime Spot plus is designed to deliver better runtime than standard Spot VMs, while remaining evictable. Billing protection for early eviction If Azure evicts a Spot plus VM to reclaim capacity within the first 60 minutes, you are not charged for that VM's usage. Earlier eviction notice Spot plus provides up to 2 minutes of eviction notice giving workloads time to checkpoint, drain, etc. Rebalance notifications Receive early signals, typically 30 seconds to 15 minutes ahead when a VM is at elevated risk of eviction. Transparent pricing and cost visibility Spot plus is priced at a premium over standard Spot but remains well below pay-as-you-go. See pricing for, Linux Virtual Machines, Windows Virtual Machines Familiar deployment surfaces Deploy Spot plus through the Compute API, ARM templates, the Azure portal, Azure CLI, Azure PowerShell, and the Azure SDKs, on single-instance VMs and Virtual Machine Scale Sets (Flexible and Uniform orchestration). Spot vs. Spot plus differences Capability Spot Spot plus Best for Highly resilient workloads where lowest price matters most Interruption-tolerant workloads that need more runtime consistency and more warning Runtime No minimum runtime target Improved runtime targeting at least 60 minutes (Best Effort) Billing protection None No charge if Azure reclaims capacity within 60 minutes Price Up to 90% off pay-as-you-go Premium over Spot, still below pay-as-you-go Eviction notice Up to 30 seconds 30 seconds to 2 minutes Rebalance notification Up to 15 minutes 30 seconds – 15 minutes Getting started Register your subscription for the following: Compute API AFEC that supports Spot plus priority, <Microsoft.Compute/SpotPlus>at Features - Register - REST API (Azure Resource Management) | Microsoft Learn Register “Microsoft.Compute” and “Microsoft.Resources” at Providers - Register - REST API (Azure Resource Management) | Microsoft Learn Deploy a VM or scale set with SpotPlus priority, api-version should be ≥ 2026-04-01 Create a VM with SpotPlus priority Virtual machine priority types Learn more about Rebalance Notifications, listen to the rebalance signals via Scheduled Events, Linux VMs, Windows VMs242Views0likes0Comments
Announcing Public Preview of VM adaptive placement
Today at Microsoft Ignite, we're announcing the public preview of VM adaptive placement, a new way to create Azure virtual machines that helps increase the success rate of your deployment. With a standard VM create, you name one exact VM size, and the deployment fails if that size isn't available. With adaptive placement, you name a preferred size instead. Azure deploys your preferred size when it can. If the size isn't available in the region, Azure deploys a compatible alternative size with the same number of vCPUs and the same or newer generation. A new way to create a VM, not a new type of VM Adaptive placement is an optional operation to create VMs instead of standard VM create operation. It isn't a new VM type, and it isn't a new pricing offer. The VM you get is a regular Azure VM: you pay standard rates for the size that's deployed, and it supports the same lifecycle operations as any other VM. At a glance Standard VM create VM adaptive placement What you specify One exact size (hardwareProfile.vmSize) A preferred size (flexProfile.preferredVMSize) When that size has no capacity The deployment fails with an allocation error Azure deploys a compatible size with the same vCPU count The size you get The size you named Your preferred size or a compatible alternative What you pay Standard rate for the size you named Standard rate for the size Azure deploys How it works You specify a preferred size. In the VM create request, set flexProfile.preferredVMSize (for example, Standard_D4s_v5) instead of hardwareProfile.vmSize. Azure tries your preferred size first. If the region has capacity for it, that's the size you get. If your preferred size can't be used, Azure selects a compatible alternative. The alternative has the same vCPU count, is the same or a newer generation (for example, v5 or later for a v5 preferred size), comes from the supported D-, E- and F-series families, and delivers performance equivalent to your preferred size. Adaptive placement works within your existing quota. Azure only considers sizes your subscription has quota for, so quota across related D-, E- and F-series families gives Azure more room to find capacity. Adaptive placement improves your chances of getting a VM when capacity is tight, but it isn't a capacity guarantee. When to use adaptive placement Adaptive placement is a good fit when you create individual VMs, your workload runs well on more than one size with the same vCPU count (for example, any 4-vCPU general purpose size), and getting the VM running matters more to you than landing on one specific hardware generation. It replaces the retry loops and hand-maintained fallback lists many teams build today with a decision Azure makes at the moment of your request, based on where capacity is available. Get started During the preview, you can create a VM with adaptive placement by using the REST API (API version 2026-04-01 or later), Azure PowerShell (Az 16.5.0 or later), the Azure SDK for .NET (Azure.ResourceManager.Compute 1.19.0 or later) or the Azure SDK for Python (azure-mgmt-compute 39.0.0 or later). Before you start, make sure you have quota in the target region for the family of your preferred size. To create a VM, include flexProfile in the request and leave out hardwareProfile.vmSize, because the two properties can't be used together. The rest of the request, including the image, OS profile and network settings, is the same as any VM create: PUT https://management.azure.com/subscriptions/{subscriptionId}/resourceGroups/{resourceGroupName}/providers/Microsoft.Compute/virtualMachines/{vmName}?api-version=2026-04-01 { "location": "<region>", "properties": { "flexProfile": { "preferredVMSize": "Standard_D4s_v5" }, "storageProfile": { ... }, "osProfile": { ... }, "networkProfile": { ... } } } After the VM is created, a GET on the VM shows both your preference and the result. flexProfile.preferredVMSize is the size you asked for, and hardwareProfile.vmSize is the size Azure deployed: { "properties": { "provisioningState": "Succeeded", "flexProfile": { "preferredVMSize": "Standard_D4s_v5" }, "hardwareProfile": { "vmSize": "<deployed-size>" } } } You can also turn on adaptive placement for an existing VM by updating it to specify flexProfile.preferredVMSize instead of hardwareProfile.vmSize. That update can change the VM's deployed size. To switch back to a standard VM, send a PUT request that omits flexProfile and specifies hardwareProfile.vmSize. Pricing There's no additional charge for adaptive placement. You pay standard rates for the VM size Azure deploys, which can be your preferred size or a compatible alternative, so check the deployed size after creation to know which rate applies. Azure Reservations and other pricing benefits apply based on the deployed size, using the same rules as any other VM. For current rates, see Virtual Machines pricing (https://azure.microsoft.com/pricing/details/virtual-machines/). What's supported in the preview During the preview, your preferred size can come from the D-series (general purpose), E-series (memory optimized) or F-series (compute optimized) families. Other families, such as B, L, M, N and H, aren't supported during the preview. Adaptive placement is available in the following regions: centraluseuap, eastasia, eastus2euap, uksouth, australiacentral2, australiaeast, brazilsouth, canadacentral, francesouth, germanywestcentral, japaneast, koreasouth, northcentralus, northeurope, southafricawest, swedencentral, switzerlandwest, ukwest, and westcentralus. Keep these limitations in mind: Adaptive placement is for single VMs. For Scale sets , use instance mix instead Azure chooses the alternative sizes. You can't provide your own fallback list. Adaptive placement doesn't support VMs associated with Capacity Reservations, Azure Dedicated Hosts, Availability Sets or Proximity Placement Groups. You can't create a VM with adaptive placement in the Azure portal during the preview. Frequently asked questions Could an alternative size give me fewer vCPUs, an older generation or lower performance? No. Any alternative has the same vCPU count as your preferred size, is the same or a newer generation, and delivers equivalent performance. You can always see which size was deployed. What happens when I stop and start the VM? Stopping, deallocating and starting a VM doesn't reselect its size. The VM starts on the size it was deployed with, so the billed size doesn't change because of a stop and start. If you update flexProfile.preferredVMSize while the VM is deallocated, that update can select a different compatible size, and billing follows the newly deployed size. What if no alternative size is available? Azure deploys your preferred size, the same as a standard VM create. If that size also can't be deployed, the request fails with the usual allocation error. Are you attending Microsoft Ignite? Microsoft Ignite runs November 17–20, 2026, in San Francisco and online. To see adaptive placement in action, join breakout session BRK430, "Architecting your workloads for maximum compute flexibility." Learn more Create a VM with adaptive placement (preview) [add the Microsoft Learn link] VM adaptive placement is in preview and subject to the Supplemental Terms of Use for Microsoft Azure Previews (https://azure.microsoft.com/support/legal/preview-supplemental-terms/). Try it with your workloads and tell us what you think in the comments below.321Views0likes0CommentsZone resilience for Azure VMs
We’re announcing the preview of zone resilience for Azure VMs. This capability lets you recover an eligible Azure virtual machine (VM) in another availability zone within the same region, while keeping the VM configuration intact. No re-create of VM required, you recover the existing VM rather than create a new replacement VM. Zone resilience provides a customer-initiated recovery option for standalone zonal VMs. Enable zone movement before an outage, then initiate recovery when a zone failure affects your VM. Recovery involves downtime and depends on available capacity in the target zone; it isn’t automatic failover. SAP RISE sees zone resilience for VM as an option for several workloads that do not natively provide cloud-based high availability capabilities, such as SAP Sybase IQ, helping simplify recovery from zonal infrastructure disruptions. Over time, SAP intends to evaluate additional non-database workload scenarios where zone resilience for Azure VMs could provide operational simplicity and infrastructure resiliency benefits for customer landscapes — Lalit, Head of RISE Engineering and Operations, SAP Recover the VM, not just its disks Storage resilience and compute recovery solve different parts of an outage. ZRS managed disks synchronously replicate data across availability zones but replicated disks alone don’t restart an affected VM in a healthy zone. Zone resilience connects those capabilities. It updates the zone placement of the existing VM and reuses its supported disks and configuration. You can prepare an eligible VM for recovery while its source zone is healthy, then use that recovery path if an outage occurs. Key benefits Recover the existing VM: Change its zone placement without creating a replacement VM resource Reuse data replicated across zones: Recover using the existing OS and data disks, rather than restoring copies of the disks to a new or existing VM Control when recovery starts: Confirm the impact on your workload and dependencies, select a target zone, and initiate recovery through supported management tools Note: ZRS replication provides a near-zero recovery point objective (RPO) for data committed to disks. This doesn’t cover active requests, in-memory data, temporary disks, or application state that hasn’t been written to those disks. Application health and data consistency still need to be verified after recovery How zone resilience works Zone recovery workflow: Confirm VM impact and choose a healthy zone in the same region that supports your VM size. Force-deallocate the VM, stopping the workload; update the existing VM’s zone. The VM is unavailable during deallocation and restart, Start the VM in the target zone, subject to best-effort capacity. Verify the VM and workload before restoring traffic. Prepare for an outage Zone resilience must be enabled while the source availability zone is healthy. You can enable it when creating an eligible VM or on an eligible existing VM. Existing VMs must be deallocated before enablement, so plan for that interruption. The configuration requires: A standalone VM deployed in a specific availability zone. All disks should be ZRS - Premium SSD ZRS or Standard SSD ZRS SKU supported for the OS disk and every attached data disk. Supported networking, including zone-redundant Standard SKU public IP addresses and load balancers where used, and supported zone-redundant gateways where applicable. Static and dynamic private IP addresses are supported. The preview does not support On-demand capacity reservations, Azure Site Recovery, VM Scale Sets or data disks with write acceleration. Review the full requirements and limitations before enabling it. Zone resilience addresses recovery within a region, not regional disaster recovery. Leverage Azure Site Recovery for regional disaster recovery. For workloads that need high availability (HA), continue to deploy multiple instances across availability zones and distribute traffic between them. Single-VM recovery is not a substitute for highly available architecture. Get started Start by reviewing an existing VM’s zone placement, disk redundancy, and network dependencies against the preview requirements. Then enable zone movement through a supported Azure CLI, Azure PowerShell, or Bicep workflow while the source zone is healthy, and document the recovery and workload-validation steps in your runbook. Read the public-preview documentation for availability, access requirements, supported tool versions, and step-by-step instructions. For architecture guidance, see Reliability in Azure Virtual Machines177Views0likes0CommentsSoft delete in Azure Compute Gallery is now generally available
At Microsoft Ignite, we're excited to announce the general availability (GA) of soft delete in Azure Compute Gallery (ACG). Last year, we introduced soft delete in public preview as part of our investments in image resiliency. Since then, we've listened closely to your feedback. Soft delete reaches GA with new capabilities that give you more control over how long deleted images stay recoverable, more flexibility to keep workloads running while you decide, and more visibility into where each image sits in its lifecycle. Why soft delete matters Accidental deletion of a VM image can break deployment pipelines, block scale-out operations and force teams to rebuild and revalidate images from scratch. Before Soft Delete, deleting an image version from Azure Compute Gallery was permanent. With Soft Delete enabled, a deleted image version isn't immediately removed; it enters a soft-deleted state and remains recoverable until it is permanently deleted. Soft Delete is available for private galleries, direct shared galleries and community galleries. What's new at GA: Configurable retention period (up to 365 days) During the preview, deleted images were recoverable for a fixed seven days. You can now set the retention period from 7 to 365 days (default seven days). New grace period (up to 90 days) When the retention period expires, a grace period begins in which the image is still recoverable but can no longer be consumed. Configure it from 7 to 90 days (default seven days). Keep deploying during retention With API version 2026-03-03, a soft-deleted image remains available for consumption during the retention period: you can still create VMs and virtual machine scale sets and scale out existing scale sets. With earlier API versions, these operations were blocked during the retention period. Consumption is blocked only once the grace period begins, giving you a window to discover any remaining dependencies while the image is still recoverable. Lifecycle visibility Listing soft-deleted images now returns new properties: softDeleteTime, consumptionEndTime, hardDeletionTargetTime. Property What it tells you softDeleteTime When the image was soft deleted. consumptionEndTime When the retention period ends. hardDeletionTargetTime When the grace period ends and the image is scheduled for permanent deletion. You can use these timestamps to see how long you have to recover an image before it's permanently removed. Bypass soft delete when you need to While bypassing soft delete is not recommended, a new optional bypassSoftDelete query parameter lets you permanently delete an active image version immediately when you don't need the recovery window. You can also hard delete an image already in the soft-deleted state without waiting for the retention and grace periods to end. Image lifecycle with soft delete enabled Stage Duration Can you deploy from it? Can you recover it? Active — Yes Not applicable Soft deleted: retention period 7 - 365 days, default 7 Yes (API version 2026-03-03) Yes Soft deleted: grace period 7 - 90 days, default 7 No Yes Permanently deleted Platform deletes the image when the grace period ends No No A soft-deleted image remains consumable until consumptionEndTime and recoverable until hardDeletionTargetTime. Getting started Create a Gallery with soft delete enabled: From Azure Portal, Search for Azure Compute Gallery Create Azure Compute Gallery and enable Soft delete for image versions, and configure retention period and grace period Review and Create Enable soft delete on an existing gallery: Open the gallery for which you want to enable soft delete. Select the soft delete tab, select “enables soft delete for image versions” and customize the retention period and grace period and save. Soft delete an image version: Open Image definition and select the version you want to delete and click Delete. List the soft deleted image versions in the image definition: From the Image definition blade, toggle the switch “show soft deleted versions” to list all the soft deleted images in a Image definition. Recover the deleted image: From the Image definition blade, toggle the switch “show soft deleted versions” to list all the soft deleted images in a Image definition. Select the image version you want to recover and click “Undelete” button to recover the image. Permanently delete the image version: From the Image definition blade, toggle the switch “show soft deleted versions” to list all the soft deleted images in a Image definition. Select the image version you want to permanently delete and click “delete” button to recover the image. Common operations Soft delete an image version: send DELETE on the image version List soft-deleted images: send GET on .../softDeletedArtifactTypes/Images/artifacts/{image-definition-name}/versions, or toggle "Show soft deleted versions" in the portal. Run the following ARG query to list all the soft deleted image versions across all galleries: Computeartifactresources | where type =~ "microsoft.compute/galleries/softdeletedartifacttypes/artifacts/versions Recover an image: send PUT on the image version with its home region any time before hardDeletionTargetTime, or select Undelete in the portal. Permanently delete: send DELETE with bypassSoftDelete=true for an active image, or DELETE on the soft-deleted artifact; in the portal, select the soft-deleted version and then Delete. Good to know Only subscription owners, or users and service principals assigned the Compute Gallery Sharing Admin role at the subscription or gallery level, can enable soft delete. Soft delete takes effect immediately once enabled on a gallery. Billing: Soft delete is free. The replica count doesn't reduce when an image is soft deleted, and you're charged for all retained replicas until the image is permanently deleted. Quota: Soft-deleted image versions continue to count against your quota. Quota is released only after the image version is permanently deleted. Conclusion Soft delete gives Azure Compute Gallery customers a reliable safety net for their images and raises the baseline for image protection and availability. Enable soft delete on your galleries today, set retention and grace periods that match your operational and compliance needs, and share your feedback in the comments. Learn more Soft delete in Azure Compute Gallery documentation: https://aka.ms/sigsoftdelete Previous post – Enhancing Resiliency in Azure Compute Gallery (Azure Compute Blog, Nov 18, 2025): https://techcommunity.microsoft.com/blog/azurecompute/enhancing-resiliency-in-azure-compute-gallery/4470082133Views0likes0CommentsAzure NetApp Files: The Data Backbone for NVIDIA AI Model Training, Inference, and Microsoft Foundry
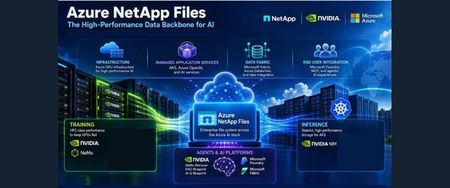
Azure NetApp Files provides a unified data foundation for enterprise AI, connecting data mobility, model training, inference, and agentic workflows. This article explores how caching, replication, high-throughput storage, low-latency checkpointing, and rapid dataset cloning help bring data closer to GPU compute and support efficient experimentation. It also examines persistent storage for containerized inference on Azure Kubernetes Service and integration with NVIDIA’s AI stack, Microsoft Foundry, and Microsoft Fabric. Two reference use cases illustrate its role in supporting domain-specific model training and modernizing AI inference while reducing infrastructure complexity.384Views0likes0CommentsAzure NCv6 Virtual Machines: Enhancements and GA Transition
NCv6 Virtual Machines are Azure's flexible, next generation platform enabling both leading-edge graphics and generative AI compute workloads. Featuring NVIDIA RTX PRO 6000 Blackwell Server Edition (BSE) GPUs, Intel Xeon™ 6 "Granite Rapids" 6900P series CPUs, and a suite of Microsoft Azure technologies, NCv6 VMs are available now in Preview. Today, we are pleased to share a series of exciting updates coming soon to Azure NCv6 that will: Enhance VM performance and capabilities Provide more VM sizes for customers to "right size" their usage Bring NCv6 to production readiness with a transition to General Availability, and Expand accessibility across the global Azure cloud New VM Sizes, Features, and Performance Enhancements In the coming weeks, Azure will debut seven new NCv6-series VM sizes and two different sub-families for customers to choose from. The standout features introduced with the new VM sizes include: 🧩 Fractional GPU support, enabling graphics workload customers to deploy VMs with as little as 1/2 or 1/4 of a RTX PRO™ 6000. VMs with fractional GPU support also feature reduced vCPU, memory, SSD, and networking to help customers optimize costs and right size their VMs to their workloads. ⚡ Increased vCPU per VM size (e.g. 288 vCPU instead of 256) to provide more performance for high-end VDI workstations and better align with the Intel Xeon 6900P's triple compute tile architecture. 🛠️ General Purpose and Compute Optimized VM sizes. The former provides larger amounts of CPU memory for demanding generative AI inference and ISV CAD/CAE simulations, while the latter offers reduced memory to enable customers with less memory intensive workloads to cost optimize their deployments. The new VM sizes will replace the existing three VM sizes offered in Preview, and be available as follows: NCv6 - General Purpose VM sizes: Size Name vCPUs Memory (GB) Networking (Mb/s) GPUs GPU Mem (GB) Temp Disk NVMe Disk Standard_NC36ds_xl_RTXPro6000_v6 36 132 22500 1/4 24 256 1600 Standard_NC72ds_xl_RTXPro6000_v6 72 264 45000 1/2 48 512 3200 Standard_NC144ds_xl_RTXPro6000_v6 144 516 90000 1 96 1024 6400 Standard_NC288ds_xl_RTXPro6000_v6 288 1032 180000 2 192 2048 12800 Standard_NC324ds_xl_RTXPro6000_v6 324 1284 180000 2 192 2048 12800 NCv6-Compute Optimized VM sizes: Size Name vCPUs Memory (GB) Networking (Mbps) GPUs GPU Mem (GB) Temp Disk NVMe Disk Standard_NC24lds_xl_RTXPro6000_v6 24 72 22500 1/4 24 256 1600 Standard_NC36lds_xl_RTXPro6000_v6 36 72 22500 1/4 24 256 1600 Standard_NC72lds_xl_RTXPro6000_v6 72 132 45000 1/2 48 512 3200 Standard_NC144lds_xl_RTXPro6000_v6 144 264 90000 1 96 1024 6400 Standard_NC288lds_xl_RTXPro6000_v6 288 516 180000 2 192 2048 12800 Standard_NC324lds_xl_RTXPro6000_v6 324 648 180000 2 192 2048 12800 Note that, until the new VM sizes are available, Microsoft Learn resources will continue to reflect the currently offered VM sizes and technical specifications. Transition to General Availability In the coming weeks, Azure will transition NCv6-series from Preview to General Availability (GA) status. With this transition, NCv6 VMs will become covered by the Azure Service Level Agreement (SLA) and thus ready to support production-grade deployments by customers, partners, and service providers. When the transition to NCv6 VMs occurs, they will be available in the Azure West US2 and Southeast Asia regions. Information on availability timing of additional regions is provided below. Regional Expansion Across the Azure Cloud At the beginning of Preview, NCv6 VMs debuted in the West US2 region. Since then, we have also added NCv6 VMs to the Southeast Asia region. Both regions will be part of the transition to GA status. We are pleased to share that in the proceeding months covering Q3 of 2026, NCv6 VMs will also become available in the following Azure regions: • East US • West Europe • East US 2 • North Europe • South Central US • Germany West Central • West US • Korea Central Ready to build for the future with Azure NCv6? NCv6 Virtual Machines are available now in Preview. Start your production-grade AI journey today and explore the next frontier of Azure AI infrastructure. Join the PreviewUpgrade Azure CycleCloud Slurm Node OS Images Without Recreating the VM Scale Set
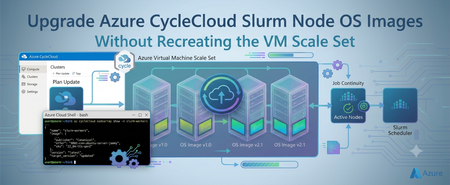
Overview Operating-system image updates in an Azure CycleCloud Slurm cluster are not the same as installing ordinary packages inside a running node. A CycleCloud Slurm node is typically an instance in an Azure Virtual Machine Scale Set (VMSS), and the VMSS model defines the image from which its OS disk is created. This distinction is especially important when the VMSS uses Manual upgrade mode. Changing an image setting does not automatically upgrade running instances. Likewise, reimaging a node without first changing the VMSS model can rebuild that node from the same old image. This article describes a controlled, node-by-node method for moving an existing CycleCloud-managed Slurm partition from one Ubuntu HPC image version to another without deleting and recreating the entire VMSS. NOTE: The same procedure can be used for other schedulers. The appropriate scheduler specific commands need to used for node servicing. The validated example changes the image reference from: microsoft-dsvm:ubuntu-hpc:2404:24.04.2026052601 to: microsoft-dsvm:ubuntu-hpc:2404:24.04.2026092501 These versions are examples from the validated procedure. Always select and validate an image appropriate for your region, VM size, kernel, drivers, scheduler integration, and application stack. Problem statement A CycleCloud Slurm cluster may have long-running compute or GPU nodes that require a newer OS image for reasons such as: Security and compliance updates Kernel fixes Updated device drivers Platform fixes Updated HPC libraries Standardization on a newer image baseline Application or container-runtime compatibility Supportability requirements The most straightforward lifecycle operation is often to update the image in CycleCloud, scale the partition down, allow CycleCloud to remove the old VMSS, and then scale the partition back up. CycleCloud then creates a new VMSS using the updated image. Although that method provides a clean deployment, it may be undesirable in a busy HPC environment because: The complete partition may need a maintenance window. All nodes in the partition may become unavailable together. Deleting the scale set deliberately releases the partition’s current VM allocations. Capacity must be acquired again when the partition is restarted. Azure capacity is dynamic and cannot always be guaranteed at the time of reacquisition. Validation happens after a larger infrastructure change instead of on a single canary node. A deployment problem can affect the entire partition rather than one selected instance. Large distributed workloads may take significant time to drain from the full partition. Administrators may therefore need a method that updates the OS image of selected idle nodes while the remaining nodes continue serving workloads. The challenge is that three separate states must be understood and managed: CycleCloud cluster configuration The image definition CycleCloud will use when it creates or recreates infrastructure. VMSS model The image reference currently defined on the existing scale set. VMSS instance state Whether a particular VMSS instance has applied the latest VMSS model. If these three states are not handled in the correct order, a reimage can complete successfully while leaving the node on the old image. Why reimage alone does not solve the problem A reimage replaces the node’s OS disk using the image and configuration associated with its current infrastructure model. Reimage does not, by itself, select a newer OS image. This creates a common failure pattern: The desired image is changed in the CycleCloud cluster configuration. The existing VMSS continues to reference the old image. A CycleCloud, Slurm, or VMSS reimage action is initiated. The OS disk is rebuilt. The node returns using the old image because the VMSS model still references that image. For a VMSS configured with Manual upgrade mode, the required order is: Drain the selected Slurm node. Change the image reference in the existing VMSS model. Confirm the new image in the VMSS model. Confirm that existing instances report LatestModelApplied=False. Apply the latest model to one selected instance using az vmss update-instances. Wait for the node to return. Confirm that the selected instance reports LatestModelApplied=True. Verify the new image from inside the VM. Validate the OS, scheduler, drivers, network fabric, container runtime, and workload. Resume the node. Repeat for the remaining instances. Update the CycleCloud node-array image configuration to prevent configuration drift. Advantages of this approach No full VMSS recreation The existing VMSS object is updated in place. The process does not intentionally delete the complete scale set and create a replacement. Node-level maintenance Only the selected VMSS instance is disrupted. Other nodes can remain available, provided that the workload and cluster architecture support node-by-node maintenance. Canary validation One idle node can be upgraded first. The new image can be tested against the actual scheduler, drivers, network, containers, and applications before expanding the change. Smaller failure domain If the first upgraded node fails validation, it can remain drained while the remaining nodes continue using the previous image. Reduced capacity exposure The procedure avoids deliberately scaling the entire partition to zero and releasing all current allocations at once. This can reduce exposure to capacity reacquisition risk. However, it should not be treated as a guarantee that host placement or capacity will never change during platform servicing. Controlled scheduling Nodes can be upgraded as they become idle. Slurm drain and resume operations create a clear boundary between: Workload evacuation Infrastructure servicing Technical validation Return to production Measurable rollout progress The latestModelApplied property provides an explicit signal showing which VMSS instances have received the updated model. Easier rollback control If the canary node fails, the rollout can stop before all nodes are changed. This is generally easier to manage than recovering an entire recreated partition. Important limitations This is a rolling infrastructure procedure, not a zero-downtime operation. The selected node becomes unavailable while its OS disk is serviced. Jobs running on that node must complete, migrate, be requeued, or be stopped. Multi-node MPI and distributed training jobs may make node-by-node maintenance impractical. A partition-wide maintenance window may be safer when jobs span most or all nodes. Data or configuration stored only on the OS disk may be lost during servicing. Node bootstrap should be reproducible and important state should be stored externally. Containers do not isolate applications from every host change. The host kernel, GPU driver, RDMA stack, device plugins, mounts, and scheduler integration remain important to containerized workloads. A direct VMSS update does not permanently update the CycleCloud cluster definition. CycleCloud must be updated after successful validation to prevent configuration drift. Prerequisites Before starting, confirm the following: The target node belongs to the expected CycleCloud-managed VMSS. The VMSS uses Manual upgrade mode. The target image has been selected and validated for the environment. The target image is available for the required region and VM size. You have Azure permissions to read and update the VMSS and its instances. (Contributor or Virtual Machine contributor role for the subscription) Azure CLI is installed and authenticated in the correct tenant and context. jq is available on the Linux node for metadata formatting. You have Slurm administrative permission to drain and resume nodes. Required application and configuration state is not stored only on the OS disk. A maintenance window has been approved. A rollback plan has been documented. The first target is an idle or noncritical canary node. Define placeholders instead of embedding environment-specific values: RESOURCE_GROUP="<RESOURCE-GROUP>" VMSS_NAME="<VMSS-NAME>" INSTANCE_ID="<INSTANCE-ID>" SLURM_NODE="<SLURM-NODE-NAME>" TARGET_IMAGE_VERSION="24.04.2026092501" PREVIOUS_IMAGE_VERSION="24.04.2026052601" Detailed upgrade procedure Step 1: Capture the current image from inside the HPC compute node Run the following on the target VM. curl -s -H Metadata:true --noproxy "" "http://169.254.169.254/metadata/instance/compute?api-version=2021-10-01" | jq '{publisher, offer, sku, version, osType}' Output: { "publisher": "microsoft-dsvm", "offer": "ubuntu-hpc", "sku": "2404", "version": "24.04.2026052601", "osType": "Linux" } Also record the current OS release and kernel: cat /etc/os-release uname -r Keep these results in the change record. They provide the baseline needed to prove that the image changed after the operation. vinil@”$SLURM_NODE”:~$ cat /etc/os-release PRETTY_NAME="Ubuntu 24.04.4 LTS" NAME="Ubuntu" VERSION_ID="24.04" VERSION="24.04.4 LTS (Noble Numbat)" VERSION_CODENAME=noble ID=ubuntu ID_LIKE=debian HOME_URL="https://www.ubuntu.com/" SUPPORT_URL="https://help.ubuntu.com/" BUG_REPORT_URL="https://bugs.launchpad.net/ubuntu/" PRIVACY_POLICY_URL="https://www.ubuntu.com/legal/terms-and-policies/privacy-policy" UBUNTU_CODENAME=noble LOGO=ubuntu-logo vinil@”$SLURM_NODE”:~$ uname -r 6.8.0-1054-azure Step 2: Confirm the VMSS upgrade mode and current image Run the following from Azure Cloud Shell: az vmss show --resource-group "$RESOURCE_GROUP" --name "$VMSS_NAME" --query "{UpgradeMode:upgradePolicy.mode,Image:virtualMachineProfile.storageProfile.imageReference}" --output json Sanitized output: { "Image": { "offer": "ubuntu-hpc", "publisher": "microsoft-dsvm", "sku": "2404", "version": "24.04.2026052601" }, "UpgradeMode": "Manual" } The important value is: "UpgradeMode": "Manual" With Manual upgrade mode, changing the VMSS model does not automatically update existing instances. Do not continue until the current image and upgrade mode match the change plan. Step 3: Map Slurm nodes to VMSS instance IDs List all instances in the scale set: az vmss list-instances --resource-group "$RESOURCE_GROUP" --name "$VMSS_NAME" --query "[].{InstanceId:instanceId,ComputerName:osProfile.computerName,ProvisioningState:provisioningState}" --output table Output: InstanceId ComputerName ProvisioningState ------------ -------------- ------------------- 0 <NODE-000> Succeeded 1 <NODE-001> Succeeded Confirm the mapping carefully. A VMSS instance ID is not necessarily the same as a Slurm node name. For the first validation: INSTANCE_ID="0" SLURM_NODE="slurm-hpc-1" Only one instance should be selected for the canary upgrade. Step 4: Drain the selected Slurm node Prevent Slurm from scheduling new jobs on the node: SLURM_NODE="slurm-hpc-1" scontrol update NodeName="$SLURM_NODE" State=DRAIN Reason="VMSS OS image upgrade" Confirm the state: sinfo -N -n "$SLURM_NODE" Output: NODELIST NODES PARTITION STATE slurm-hpc-1 1 hpc* drain Check whether jobs are still assigned to the node: root@slurm01-scheduler:~# squeue -w "$SLURM_NODE" JOBID PARTITION NAME USER ST TIME NODES NODELIST(REASON) root@slurm01-scheduler:~# Proceed only when: The node is DRAINING while existing work completes, or DRAINED when no work remains. squeue -w returns no active jobs for the node. Dependencies involving distributed jobs have been considered. The node does not hold application state required by active workloads. Do not continue while the node is still running a workload. Step 5: Update the OS image in the VMSS model Update only the image version in the existing scale-set model: az vmss update --resource-group "$RESOURCE_GROUP" --name "$VMSS_NAME" --set virtualMachineProfile.storageProfile.imageReference.version="$TARGET_IMAGE_VERSION" The command may return a large JSON object. The important sections should contain: { "upgradePolicy": { "mode": "Manual" }, "virtualMachineProfile": { "storageProfile": { "imageReference": { "offer": "ubuntu-hpc", "publisher": "microsoft-dsvm", "sku": "2404", "version": "24.04.2026092501" } } } } At this point: The VMSS model references the target image. Existing VMSS instances have not yet been upgraded. No node should be assumed to be using the target image yet. This separation is one of the most important concepts in the procedure. Step 6: Verify the target image in the VMSS model Query only the image reference: az vmss show --resource-group "$RESOURCE_GROUP" --name "$VMSS_NAME" --query "virtualMachineProfile.storageProfile.imageReference" --output json Output: { "offer": "ubuntu-hpc", "publisher": "microsoft-dsvm", "sku": "2404", "version": "24.04.2026092501" } Do not continue until the VMSS model shows the intended target image. Step 7: Confirm that existing instances have not applied the new model Run: az vmss list-instances --resource-group "$RESOURCE_GROUP" --name "$VMSS_NAME" --expand instanceView --query "[].{InstanceId:instanceId,ComputerName:osProfile.computerName,LatestModelApplied:latestModelApplied,ProvisioningState:provisioningState}" --output table Output: InstanceId ComputerName LatestModelApplied ProvisioningState ------------ -------------- -------------------- ----------------- 0 <NODE-000> False Succeeded 1 <NODE-001> False Succeeded The important value is: LatestModelApplied=False This confirms that: The VMSS model contains the new image. The existing VMSS instances are still using their previous model. The model change has not automatically upgraded the nodes. Step 8: Apply the latest model to the canary instance Apply the updated VMSS model to only the selected instance: az vmss update-instances --resource-group "$RESOURCE_GROUP" --name "$VMSS_NAME" --instance-ids "$INSTANCE_ID" This operation is disruptive to the selected node. Its OS disk is serviced and connectivity is temporarily unavailable. Do not start another node upgrade until this instance has: Returned to a successful provisioning state. Booted correctly. Completed CycleCloud initialization. Reconnected to Slurm. Passed the complete validation checklist. Step 9: Confirm that the canary applied the latest model Run the instance-view query again: az vmss list-instances --resource-group "$RESOURCE_GROUP" --name "$VMSS_NAME" --expand instanceView --query "[].{InstanceId:instanceId,ComputerName:osProfile.computerName,LatestModelApplied:latestModelApplied,ProvisioningState:provisioningState}" --output table Expected result after upgrading instance 0: InstanceId ComputerName LatestModelApplied ProvisioningState ------------ -------------- -------------------- ----------------- 0 <NODE-000> True Succeeded 1 <NODE-001> False Succeeded This is the desired canary state: Instance 0 has applied the latest model. Instance 1 remains on the previous model. The VMSS continues to exist. The rollout can pause for detailed validation. Do not rely only on ProvisioningState=Succeeded. Confirm both the model status and the in-guest OS image. Step 10: Verify the image from inside the upgraded node After the VM becomes accessible, query its metadata again: curl -s -H Metadata:true --noproxy "" "http://169.254.169.254/metadata/instance/compute?api-version=2021-10-01" | jq '{publisher, offer, sku, version, osType}' Output { "publisher": "microsoft-dsvm", "offer": "ubuntu-hpc", "sku": "2404", "version": "24.04.2026092501", "osType": "Linux" } This confirms that the image changed from: microsoft-dsvm:ubuntu-hpc:2404:24.04.2026052601 to: microsoft-dsvm:ubuntu-hpc:2404:24.04.2026092501 Step 11: Verify the operating-system release Run: # cat /etc/os-release PRETTY_NAME="Ubuntu 24.04.5 LTS" NAME="Ubuntu" VERSION_ID="24.04" VERSION="24.04.5 LTS (Noble Numbat)" VERSION_CODENAME=noble ID=ubuntu ID_LIKE=debian HOME_URL="https://www.ubuntu.com/" SUPPORT_URL="https://help.ubuntu.com/" BUG_REPORT_URL="https://bugs.launchpad.net/ubuntu/" PRIVACY_POLICY_URL="https://www.ubuntu.com/legal/terms-and-policies/privacy-policy" UBUNTU_CODENAME=noble LOGO=ubuntu-logo Verify the running kernel: # uname -r 6.8.0-1067-azure The result should match the kernel expected for the approved target image and its driver stack. The actual kernel output should be recorded internally rather than copied into a public article if it contains environment-specific information. Step 12: Validate operating-system health # Check for failed services: systemctl --failed --no-pager # Check the overall system state: systemctl is-system-running # Review boot errors: journalctl -b -p err --no-pager # If cloud-init is used: cloud-init status --long Validation criteria should include: The node booted successfully. No unexpected failed services remain. Cloud-init or equivalent bootstrap completed. CycleCloud initialization completed. Required filesystems and application paths are available. DNS resolution works. Time synchronization is healthy. Identity and authentication components work. Monitoring and security agents are operational. No unexpected kernel or device initialization errors are present. Step 13: Validate CycleCloud and Slurm integration Confirm that Slurm can see the node: scontrol show node "$SLURM_NODE" Review the node’s: State Features Partitions CPU count Memory Generic resources Reason field Registration status The OS image upgrade may change bootstrap timing or host configuration. Confirm that CycleCloud applied the expected node configuration and that Slurm did not register the node with unexpected hardware or resource values. Step 14: Validate HPC and accelerator dependencies An OS image update can change the kernel, device drivers, user-space libraries, and bootstrap behavior. Validate every host-level dependency used by the partition. GPU validation For GPU nodes: nvidia-smi Confirm: All expected GPUs are visible. The driver initializes successfully. No unexpected device or driver errors are reported. The driver is compatible with the application and container stack. InfiniBand and RDMA validation For InfiniBand or RDMA nodes: ibv_devices ibstat Confirm: Expected devices are present. Ports are active. Link state is correct. The expected transport stack is available. Container validation For containerized environments, validate: Container runtime startup GPU device exposure RDMA device exposure Host-library injection Required mounts User namespace behavior Scheduler integration Application-specific plugins A container does not remove dependency on the host kernel, GPU driver, network device stack, or scheduler configuration. Workload validation Run representative tests such as: A single-node CPU job A GPU visibility and compute test An RDMA connectivity test An MPI or UCX smoke test A container launch test A small version of a production workload Do not treat a successful VM boot as sufficient proof that the node is production-ready. Step 15: Resume the validated node After all checks pass: scontrol update NodeName="$SLURM_NODE" State=RESUME Verify the state: sinfo -N -n "$SLURM_NODE" Confirm that: Slurm returns the node to the expected state. No unexpected drain reason remains. A small test job runs successfully. The node behaves as expected under scheduling. Step 16: Upgrade the next instance After the canary node has passed validation, select the next idle instance: INSTANCE_ID="1" SLURM_NODE="<NODE-001>" Drain it: scontrol update NodeName="$SLURM_NODE" State=DRAIN Reason="VMSS OS image upgrade" Confirm there are no jobs: sinfo -N -n "$SLURM_NODE" squeue -w "$SLURM_NODE" Apply the already-updated VMSS model: az vmss update-instances --resource-group "$RESOURCE_GROUP" --name "$VMSS_NAME" --instance-ids "$INSTANCE_ID" After the operation completes, repeat all control-plane, operating-system, scheduler, driver, network, container, and workload validation. When both example instances have been upgraded, the expected state is: InstanceId ComputerName LatestModelApplied ProvisioningState ------------ -------------- -------------------- ----------------- 0 <NODE-000> True Succeeded 1 <NODE-001> True Succeeded Repeat the drain, update, validate, and resume cycle until every intended instance reports LatestModelApplied=True and passes workload validation. Update-instances versus reimage These operations address different layers of the upgrade. Operation What it changes Key point az vmss update VMSS model Existing instances remain unchanged in Manual mode. az vmss update-instances Selected VMSS instances Applies the latest VMSS model to the selected instances. az vmss reimage Selected instance OS disks Rebuilds the OS disk but should not be treated as a substitute for applying the latest model in this workflow. CycleCloud or Slurm reimage action Requests node reimage through the cluster workflow Does not itself change an old VMSS image reference to a new one. Scale down and scale up after changing CycleCloud Recreates infrastructure from the CycleCloud definition Provides a clean deployment but may require partition-wide downtime and capacity reacquisition. The most important rule is: A reimage can reproduce the old OS if the infrastructure model still references the old image. The validated sequence is therefore: Update VMSS model verify model confirm LatestModelApplied=False run update-instances confirm LatestModelApplied=True verify the image from inside the node Prevent configuration drift in CycleCloud Directly modifying the existing VMSS is not the final configuration-management step. CycleCloud remains the owner of the cluster definition. If CycleCloud later removes and recreates the VMSS, the replacement scale set will use the image configured in the CycleCloud node array. If the CycleCloud definition still points to the previous image, newly created nodes may return to that version even though the current VMSS was upgraded manually. After the canary and rollout succeed: Update the OS image in the corresponding CycleCloud node-array configuration. Use the same publisher, offer, SKU, and version validated in the VMSS. Review or export the cluster configuration to confirm the new value is persistent. Test a controlled scale-out or node replacement if the maintenance plan permits. Record the CycleCloud configuration change with the VMSS change. The desired end state is: CycleCloud node-array image = VMSS model image = Image reported by every upgraded VMSS instance Updating only the current VMSS should not be treated as a permanent CycleCloud configuration change. Rollback strategy A rollback plan should be prepared before the first node is changed. If the canary fails validation: Keep the node drained. Stop the rollout to all remaining nodes. Capture boot, extension, driver, scheduler, and application logs. Change the VMSS model back to the previous image. Apply the previous model to the affected instance. Revalidate the restored node. Resume it only after the previous service level has been restored. Example rollback: az vmss update --resource-group "$RESOURCE_GROUP" --name "$VMSS_NAME" --set virtualMachineProfile.storageProfile.imageReference.version="$PREVIOUS_IMAGE_VERSION" Apply the restored model: az vmss update-instances --resource-group "$RESOURCE_GROUP" --name "$VMSS_NAME" --instance-ids "$INSTANCE_ID" Verify the model: az vmss show --resource-group "$RESOURCE_GROUP" --name "$VMSS_NAME" --query "virtualMachineProfile.storageProfile.imageReference" --output json Verify the instance status: az vmss list-instances --resource-group "$RESOURCE_GROUP" --name "$VMSS_NAME" --expand instanceView --query [].{InstanceId:instanceId,LatestModelApplied:latestModelApplied,ProvisioningState:provisioningState}" --output table Because a VMSS has one current model, coordinate rollback carefully if some nodes are already on the new image. Restore the intended VMSS model after the affected node has been recovered, and do not continue the rollout until the incompatibility is understood. Conclusion Updating the OS image of CycleCloud Slurm nodes without recreating the entire VMSS is possible when the scale set uses Manual upgrade mode. However, it requires a deliberate separation between: The CycleCloud cluster definition The VMSS model The model applied to each VMSS instance The core workflow is: Drain one node Update the VMSS image reference Verify the new VMSS model Confirm LatestModelApplied=False Apply the latest model to one instance Confirm LatestModelApplied=True Verify the image inside the VM Validate the complete HPC workload path Resume the node Repeat for the remaining nodes Align the CycleCloud configuration This approach provides a controlled canary rollout, limits disruption to selected nodes, avoids deliberate recreation of the full scale set, and makes validation and rollback easier to manage. Its success depends on disciplined scheduler operations, complete host-level validation, careful treatment of distributed workloads, and final synchronization of the CycleCloud cluster configuration.