siem
5 TopicsTicketing system integration – Alert update API
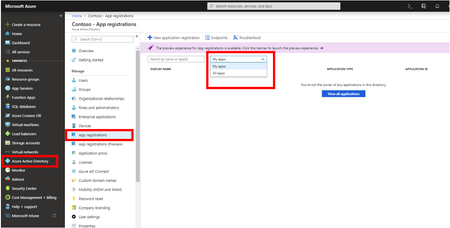
5 Minutes Low complexity In our last API blog we demonstrated how you can use Windows Defender ATP APIs to pull alerts using a simple PowerShell script. Typical use cases where pulling of alerts using APIs apply to ticketing system and SIEM integration scenarios. As a follow up to that blog, we’re going to demonstrate how you can apply it in two common integration use cases: Create tickets or alert objects in an external system (SIEM, ITSM) after pulling the alerts, and Update tickets or alert objects from an external system and have the changes reflected in Windows Defender ATP In this blog we’ll focus on updating the alert as part of a typical ticketing/SIEM integration. Integration flow The integration flow generally occurs in two steps: ticket creation then ticket update. Ticket/alert creation Windows Defender ATP - Pull alerts from Windows Defender ATP as demonstrated in the “Hello World” blog. External - Create ticket/alert object in the external system. Ticket update External – User updates the ticket/alert object in the external system. Windows Defender ATP - Update the alert in Windows Defender ATP according to changes in the external system. What are the differences from the “Hello World” blog? The app now needs the alert write permission (vs. the alert read permission we used) The customer must create the ticket using the ticketing system API We recommend storing the Windows Defender ATP alert ID as part of the ticket to enable later update of the corresponding Windows Defender ATP alert. The update command we demonstrate here should be called from the ticketing/SIEM system for every relevant change or a scheduled task should pull changes from the ticketing/SIEM system and update WDATP using the update command. Let’s get our hands dirty In this section, we’ll walk you through the following: Step 1: Add the required permission to your application Step 2: Create the ticket/alert from an external system Step 3: Update the Windows Defender ATP alert based on the change done on the external system Step 1 - Add the required permission to the application: With your Global administrator credentials, login to the Azure portal. Azure Active Directory > App registrations. Click the drop-down button and select “All apps”. Choose the application you created in the “Hello World” example. If you used the suggested name, it was “ContosoSIEMConnector”. In the application page choose: Settings > Required permissions > WindowsDefenderATP Check the checkbox near “Read and write all alerts” permission, then click Save. In the “Required permissions” page, select the “Grant permissions” button and then click “Yes”. Done! You have successfully added the required permissions to the application. Step 2 – Create the ticket/alert in the external system: Depending on the external system API or integration tool that you use, this step might be applied in various methods. However, the general idea is to periodically pull new alerts from Windows Defender ATP as demonstrated in the “hello world” blog. For each alert you should call the external system API to create a ticket. We recommend that you store the alert ID in the created object. It will be handy for Windows Defender ATP alert object update later. The following example is an update of the “Hello World” code. It demonstrates how to iterate over the alerts and shows how to get their alert ID. NOTE: Some SIEM platforms allow direct JSON file import. This is out of this blog’s scope. Copy this example to the same folder where you stored the “Hello World” scripts. Name it “Get-Alerts-And-Open-Ticket.ps1”. # Returns Alerts created in the past 4 hours. # Setting a place holder for a code to open a ticket in external ticketing system. $token = .\Get-Token.ps1 $dateTime = (Get-Date).ToUniversalTime().AddHours(-4).ToString("o") $url = "https://api.securitycenter.windows.com/api/alerts?`$filter=alertCreationTime ge $dateTime" $headers = @{ 'Content-Type' = 'application/json' Accept = 'application/json' Authorization = "Bearer $token" } $response = Invoke-RestMethod -Method Get -Uri $url -Headers $headers -ErrorAction Stop #foreach alert, get the alertId and the data that needed to open a ticket and call the ticketing system API to open the ticket foreach ($alert in $response.value){ $alertId = $alert.id $alertTitle = $alert.title #extract the rest of the data relevant to the ticket. # replace the next line with your code to open the ticket using the ticketing system's API [System.Windows.MessageBox]::Show("Alert title - $alertTitle. \nAlert ID - $alertId") } The script will display a message box with the alert title and alert ID. Run the script. You’re welcome to replace the message box code with your own ticketing system ticket creation code. Step 3 – Update the Windows Defender ATP alert according to the ticket/alert change: To simplify the API usage we created the following script called “Alert-Update.ps1”. Store it in the same folder with the other scripts (the same folder we saved the Get-Token.ps1). Alert-Update.ps1 param ( [Parameter(Mandatory=$true)] [string]$alertId, #an input parameter for the alert's ID [ValidatePattern("^[A-Za-z0-9._%+-]+@[A-Za-z0-9.-]+\.[A-Za-z]{2,}$")] #only valid email address formats are allowed [string]$assignedTo, #an input parameter for the email address we want to assign the alert to. [Parameter()] [ValidateSet('New','InProgress','Resolved')] #validate that the input contains valid status value [string]$status, #an input parameter for alert's new status. [Parameter()] [ValidateSet('Unknown','FalsePositive','TruePositive')] #validate that the input contains valid classification value [string]$classification,#an input parameter for alert's new status. [Parameter()] [ValidateSet('NotAvailable','Apt','Malware','SecurityPersonnel', 'SecurityTesting', 'UnwantedSoftware', 'Other' )] #validate that the input contains valid classification value [string]$determination #an input parameter for alert's new status. ) $token = .\Get-Token.ps1 #Execute Get-Token.ps1 script to get the authorization token $url = "https://api.securitycenter.windows.com/api/alerts/$alertId" #Set the url with the current alert ID. $body = @{} if($assignedTo -ne [string]::Empty) { $body.Add("assignedTo",$assignedTo) } if($status -ne [string]::Empty) { $body.Add("status",$status) } if($classification -ne [string]::Empty) { $body.Add("classification",$classification) } if($determination -ne [string]::Empty) { $body.Add("determination",$determination) } $headers = @{ 'Content-Type' = 'application/json' Accept = 'application/json' Authorization = "Bearer $token" } $response = Invoke-WebRequest -Method Patch -Uri $url -Body ($body | ConvertTo-Json) -Headers $headers -ErrorAction Stop if($response.StatusCode -eq 200) #check the response status code { return $true #update ended successfully } else { return $false #update failed } Option 1: Push update Ticketing systems as well as SIEM systems expose extensibility interfaces to enrich the experience with custom flows. You can use the following calls to update the Windows Defender ATP alert according to the ticket changes. For example, if an analyst decides to close the ticket as a false positive. The automation code should call the following command: .\Alert-Update.ps1 -alertId 636845233049028347_-906875643 -classification FalsePositive -status Resolved For cases of alert classification and assignment change use the following command: .\Alert-Update.ps1 -alertId 636845233049028347_-906875643 -classification FalsePositive -assignedTo haim@cotoso.com Option 2: Pull update Instead of integrating the API call into the SIEM or ticketing system, you can schedule a periodical call to collect ticket changes and update the Windows Defender ATP alert. Same is true for webhooks as a callback mechanism. For both you can use the same API calls. Tip for PowerShell newbies – use the PowerShell console Intellisense to browse for different command options. Type the script name and a hyphen to get auto-completion options (see below). Conclusion: Windows Defender ATP open API exposes the building blocks for simple scenarios as well as complex multi-stage integrations. In this example we demonstrated the typical use cases where you can apply the use of APIs to create and update tickets in the context of external tools. In the future we’ll share specific product integration examples. You’re more than welcome to share your experience or integration examples. If you are interested in specific product integration examples, let us know. In the next blog, we’ll walk you through using Windows Defender ATP APIs to isolate machine from the network which can be very handy as a quick response to a high-risk security alert. Thanks! @Haim Goldshtein, security software engineer, Windows Defender ATP @Dan Michelson, program manager, Windows Defender ATPEnabling IoT/OT Threat Monitoring in Your SOC with Microsoft Sentinel
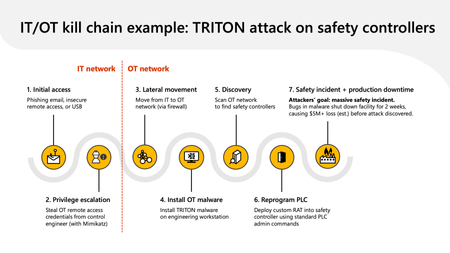
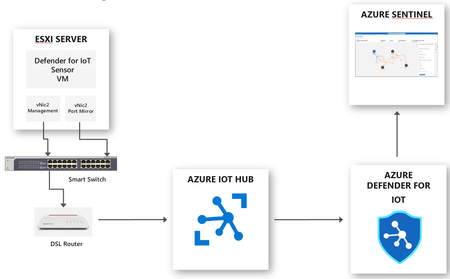
Recent ransomware attacks that shut down a US gas pipeline and global food processor have raised board-level awareness about IoT and Operational Technology (OT) risk, including safety risks and lost revenue from production downtime. To help jump-start IoT/OT detection and response in your SOC, we've created a new Microsoft Sentinel solution that leverages telemetry from Microsoft Defender for IoT — our agentless IoT/OT security monitoring technology — that provides pre-built, IoT/OT-specific analytics rules, workbooks, SOAR playbooks, and mappings to the MITRE ATT&CK for ICS (industrial control systems) framework.
Microsoft Defender for IoT - General Release Update
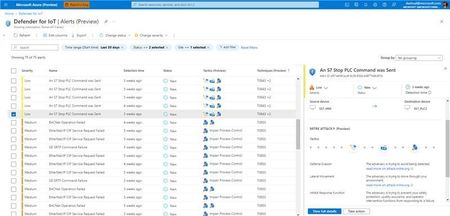
Today we are excited to announce that our first General Availability (GA) release, version 22.1, is now available with additional Public Preview features via Azure portal to scale large environments and control the security components from a single pane of glass. This version follows up our December announcement for the Unified Device Inventory via Azure portal. In this release, the Defender for IoT sensor console has been re-designed to create a unified Microsoft Azure experience and enhanced and simplified workflows. Microsoft Defender for IoT's OT Sensor is a key component for deep packet inspection and OT environment analysis. The latest release emphasizes accessibility and reduces time to value by minimizing installation times for faster and more efficient deployment. Lastly, we have leveraged our detection capabilities to get broader security coverage, with an emphasis on customizing the alert engine to detect even the most minor changes in your business-critical environments. With this release we are introducing revamped unified user experience on both the sensor console as well as the Azure portal when performing detailed incident investigation and response. What's New ? OT sensor features for Defender for IoT in the Azure portal (Public Preview) Easily connect sensors to Defender for IoT by using a new, fast connectivity model that presents a secure, plug-and-play experience Customizable reports for enhanced visibility of your environment security posture Automated updating of threat intelligence to keep your sensors up-to-date with the latest threats. Microsoft Defender for Endpoint can easily be integrated with Defender for IoT, allowing you to analyze how IoT devices relate to security exposures for better results. Detecting threats using MITRE ATT&CK for ICS. Use insight into the tactics and techniques associated with your alerts to analyze and interpret them. Using these additional alert enhancements will allow you to better understand attackers' characteristics, the actions they are likely to take within the OT network, and respond accordingly (supported also via Microsoft Sentinel). OT Sensor version 22.1 User experience has been completely revamped across the entire system based on feedback from our enterprise customers collected over the last five years. Among the new features is a detailed device page with advanced information that appears on the New Device Inventory page. We've also implemented global readiness and accessibility features to comply with Microsoft standards. These updates include localization for over 15 languages. The Overview page now includes data that better highlights system deployment details, critical network monitoring health, top alerts, and important trends and statistics. Utilize the new sensor installation wizard, which verifies if traffic is being collected appropriately during installation. Alerts are now available from the new Alerts page of Defender for IoT in the Azure portal. Improve the security and operational efficiency of your IoT/OT network using alerts. View contextual information regarding each alert, for example, similar events occurring around the same time, or a map of all connected devices. Use our tailored threat detection engine with flexible custom alerts and advanced Deep Packet Inspection, (DPI) to detect specific changes in your production lines and schedule custom rules to run and detect threats outside of regular working hours Improved support for high resolution screens and themes, including high contrast and dark modes. About Microsoft Defender for IoT Microsoft Defender for IoT provides agentless, network-layer security, provides security for diverse industrial equipment, and interoperates with Microsoft Sentinel and other SOC tools. Continuous asset discovery, vulnerability management, and threat detection for Internet of Things (IoT) devices, operational technology (OT) and Industrial Control Systems (ICS) can be deployed on-premises or in Azure-connected environments. To learn more, visit Microsoft Defender for IoT Release Notes | Microsoft Docs Download links available at Defender for IoT Management Portal - Microsoft Azure. '