security
92 TopicsStop Hand-Building VMs at 2 AM: Automated Image Pipelines with Azure Image Builder and Compute Gallery
Hello Folks! If you have ever stood up a marketplace Ubuntu VM, SSH’d in, layered on your monitoring agent, security tooling, a couple of CA certs, and a hardening script, then captured the result and called it your “golden image,” I have bad news. That image was already drifting from the next one your coworker built before you finished naming the snapshot. At the Microsoft Azure Infra Summit 2026, Sandeep Raichura (PM for Azure Compute Gallery) and Kofi Forsen (PM for Azure VM Image Builder) rebuilt the whole workflow the right way. Source, customize, validate, distribute, deploy. No clicks. No tribal knowledge. No 2 AM heroics. 📺 Watch the session: Why IT Pros Should Care You carry the pager when a bad image rolls into ten regions. You explain why three teams have three different Ubuntu 22.04 baselines with three different agents. You find out at 2 AM that someone deleted “the old image” and the old image was the one production VMSS was still pulling. This session is in your lane. It covers: Why hand-rolled images stop working the moment a second team needs one. How Azure VM Image Builder (AIB) turns image creation into declarative pipeline code. How Azure Compute Gallery handles versioning, replication, sharing, and accidental-deletion protection. How automatic image creation triggers chain a marketplace update through your golden image, into every downstream image, with zero manual steps. How VM Scale Sets close the loop with rolling upgrades and automatic OS upgrade. In short, this is the practitioner version of “do VM image management properly,” from the PMs who own both services. What is Azure Image Builder and Azure Compute Gallery The two services do different jobs and you really do need both. Azure VM Image Builder is the build engine. You hand it a JSON template that declares: A source (marketplace image, managed image, VHD, or existing gallery version). Customizers (shell, PowerShell, Windows updates, file copies, restart steps). One or more distribute targets (usually a Compute Gallery image definition). AIB spins up a temporary build VM, runs your customizers in order, validates, generalizes, captures, and publishes. Every build runs the exact same way. No SSH, no RDP, no “I forgot to install the monitoring agent this time.” Azure Compute Gallery is the management layer for the resulting artifacts. Formerly Shared Image Gallery, it has three levels: Gallery. The top-level container. Sharing policy lives here: RBAC, Direct Shared Gallery, or Community Gallery. Image definition. The metadata. OS type, generation, security type, publisher / offer / SKU. The SKU of an image family. Image version. The actual replicated artifact. Controls regions, replica counts, storage type (ZRS by default), end-of-life date, and the safety flags. AIB writes the artifact. Compute Gallery stores, versions, replicates, and shares it. Building an automated image pipeline The session walked through the five steps a real pipeline needs, with no manual intervention in the critical path: Source. A marketplace image or any other base. Customize. Scripts that install agents, harden, configure, and validate. Stored in a storage account so AIB can pull them with the right managed identity. Validate. Built-in validation hooks plus your own smoke tests baked into the customizer. Fail fast. Do not silently continue. Distribute. Push the captured image to a Compute Gallery image definition. Pick your regions and replica counts here. Version. Compute Gallery handles semantic versioning, replication, and safety flags. The trick that makes this a real pipeline is the two-template pattern Kofi demoed: A source template builds the org-wide golden image from the marketplace base. Its source reference is set to latest for the marketplace SKU (for example, Canonical Ubuntu 22.04 latest). A distro template layers user-group-specific tooling on top of the golden image. Its source reference is the golden image gallery version, also set to latest. Both templates get an automatic image creation trigger attached. Triggers only fire when the template references latest. From that point on: Canonical publishes a new Ubuntu 22.04. The source template’s trigger fires, AIB rebuilds your golden image, and a new version lands in the source gallery. That new golden image version fires the distro template’s trigger. AIB rebuilds every downstream distro image automatically. VM Scale Sets configured for automatic OS upgrade pick up the new image version and roll it out in batches, pausing if the Application Health probe goes red. You set it up once. After that you only come back when you want to change something on purpose. Safety by design in Compute Gallery A bad image at the top of this chain takes out thousands of VMs at the bottom. Sandeep was clear: safety is not optional, it is built in. The four features worth turning on every time: ZRS storage by default. Image versions stored on zone-redundant storage so a zonal failure does not take the image down. Exclude from latest. Stage an image into a region without making it the default for new deployments. Flip the flag when you are ready to roll. You can set this globally on the version or per region. Block deletion before end-of-life. The image cannot be deleted until its end-of-life date. This is the flag that stops the 2 AM accidental delete. Soft delete. If everything else fails, soft delete gives you a recovery window to restore an image version that should not have been removed. Combine those four with a sane end-of-life date on every version and your blast radius drops dramatically. Real-world scenarios A few patterns that came up in the session and the Q&A: Multi-region fleets. Define your target regions in the AIB template. AIB hands the artifact to Compute Gallery and Compute Gallery does the replication. Your scale sets in every region pull a local replica, not a cross-region copy. Open-source publisher. Use a Community Gallery so anyone in Azure can deploy your image. You provide a contact URL and email at the gallery level so consumers know where to file issues. Partner sharing. Use Direct Shared Gallery to grant specific subscriptions or tenants access without making the image public. VM Scale Sets with rolling upgrade. Reference the image definition (not a specific version) when you create the scale set. The scale set tracks latest. Pair it with a rolling upgrade policy and the Application Health extension. AIB publishes, Compute Gallery replicates, the scale set rolls, and the rollout pauses itself if the Application Health probe goes red. Getting Started Pick the highest-pain item and start there. You do not have to do this all at once. Stand up a Compute Gallery in one region. Create one image definition with proper publisher / offer / SKU metadata. Turn on soft delete at the gallery. Wrap an existing build script in an AIB image template. Use a marketplace image as the source. Distribute to your new gallery. Add excludeFromLatest, endOfLifeDate, and the block-deletion flags to your image version. Default to ZRS storage. Register the Microsoft.VirtualMachineImages and the triggers feature. Attach an automatic image creation trigger to the template. Set the source reference to latest. Build a second template that takes your golden image as its source. Attach a trigger to that one too. Create a VM Scale Set that references the image definition and enable automatic OS upgrade with rolling upgrades and the Application Health extension. That is the loop. Source updates flow through automatically. Bad images do not delete each other. Fleets roll forward in batches. Resources Azure VM Image Builder overview. The service concepts, supported OS, regions, and capabilities. Azure Compute Gallery overview. Gallery, definition, version, replication, and sharing. Azure VM Image Builder best practices. Identity, networking, customizers, and operational guidance from the product team. Automatic Image Creation with Image Builder triggers. Step-by-step to wire up source-image triggers. Create an image definition and image version. Portal, CLI, PowerShell, and REST flows for publishing artifacts. Automatic OS image upgrades for VM Scale Sets. The closing leg of the pipeline. Share images using Community Gallery. Public, non-commercial sharing for open-source publishers. Azure Image Builder samples on GitHub. Reference templates, customization scripts, and end-to-end examples. Watch the rest of the Summit This session was one of many at the Microsoft Azure Infrastructure Summit 2026. If you want the keynotes, the IaC deep dives, the AKS sessions, and the rest of the infra track, the full playlist is here: Microsoft Azure Infra Summit 2026 playlist Cheers! Pierre Roman471Views1like1CommentDeployment Stacks: Treating Your Azure Deployments Like Real Resources
Hello Folks! If you have ever come back from vacation to find a “mystery” storage account no one remembers creating, or watched a junior admin nuke a production resource because they clicked the wrong tile in the portal, this session is for you. Sydney Smith from the Azure Deployments team walked through Deployment Stacks at the Microsoft Azure Infrastructure Summit 2026, and the message is simple: classic Azure deployments are just history records, and history records cannot protect anything. Deployment Stacks change that. A stack is a real Azure resource. It has a resource ID. It supports RBAC. It tracks what it owns. It can refuse to let people break it. That is a real upgrade to how we run Infrastructure as Code in Azure, and IT pros should be paying attention. 📺 Watch the session: Why IT Pros Should Care Let me cut through the noise. Here is why this matters to anyone running Azure infrastructure: Orphaned resources cost real money. Classic deployments do not track ownership. Remove a resource from your template, and the live resource sits in Azure forever, billing you and adding security risk. Deployment history is fragile. Anyone can groom it away. You lose the audit trail. There is no native change protection. Without stacks, the only thing standing between your production VNet and a midnight portal click is RBAC discipline. That is not enough. Drift is invisible. You cannot detect what you cannot define as the source of truth. No unified view. Resources scattered across resource groups or subscriptions are hard to manage as one unit. Stacks give you a single lifecycle aware unit, with built in guardrails, that you can govern with RBAC and policy like any other Azure resource. That is the kind of plumbing IT operations has been asking for. What are Deployment Stacks A deployment stack is a native Azure resource that manages a group of resources as one lifecycle aware unit. It is the modern evolution of Azure deployments. Where a classic deployment is a record of what happened, a stack is a living thing that knows what it owns. Key facts to anchor on: A stack is of type Microsoft.Resources/deploymentStacks. It is a first class Azure resource. A stack can span multiple resource groups and even multiple subscriptions. You feed it a Bicep or ARM JSON template, the same files you already have. No rewrite required. It produces a snapshot of the resources it manages, and uses that snapshot for lifecycle decisions. Two feature sets do the heavy lifting: Resource lifecycle management. Creates, updates, and deletes across scopes are managed as one operation. Resource change protection. Stacks can apply deny assignments on the resources they manage, blocking changes that did not come through the stack itself. That second point is the one that changes how you think about safety in production. How Deployment Stacks change your workflow Honestly, the syntax change is tiny. If you know az deployment group create, you already know az stack group create. Same template, same parameter files, same scope. You just swap deployment for stack and add a couple of new parameters. What changes in the day to day: Your template becomes the source of truth. Remove a resource from Bicep, and the next stack run can clean it up automatically. No more manual hunt and delete. You get a portal view. The stack resource shows you what it manages, what is detached, and what the deny settings look like. You can clean up everything in one step. Deleting a stack with the right unmanage setting tears down all its resources and the empty resource groups, without you mapping out dependency order. Pipelines get cleaner. The bicep-deploy GitHub Action and the equivalent Azure DevOps task speak stacks natively. Create, validate, what-if, delete. Same shared package on the backend, so features hit GitHub and ADO at roughly the same time. The honest tradeoff: stacks are powerful enough to delete things at scale. That is the whole point. So you need to think harder about which mode you pick. Deny settings and lifecycle control Two parameters carry most of the weight, and you need to understand both before you push a stack into production. action-on-unmanage controls what happens when a resource leaves the template: detachAll: resources stay in Azure, the stack stops tracking them. This is the default and the safest. No delete operation. Good when you are still learning stacks. deleteResources: resources are deleted, the resource group stays. deleteAll: full cleanup. Resources go, empty resource groups go. This is what you pair with strict deny settings if you want the template to be the only source of truth. deny-settings-mode controls who can change what: none: no protection. Anyone with RBAC can do anything. Use this only when you really mean it. denyDelete: blocks delete operations. Updates are still allowed. denyWriteAndDelete: the strict one. No changes outside the stack. This plus deleteAll makes your template the absolute source of truth. A handy escape hatch: excludedActions lets you punch specific resource types or operations through the deny wall. For example, you can deny delete across the board but allow deleting your managed identities or storage accounts. Use this sparingly. Every exception is a future ticket. A few honest tradeoffs to keep in mind: denyWriteAndDelete is strict on purpose. Portal admins will get permission errors. That is the feature, not a bug. Train your team. deleteAll is permanent. Pair it with what-if before every change so you do not nuke something by accident. Resources should not be managed by two stacks. The deny assignments from each stack will fight each other and block updates. If two apps share a SQL database, pull it in as an existing resource rather than dual managing it. Stacks are not just for Bicep. They consume ARM JSON templates today. Terraform users do not get the same first party stack experience, so if you live in Terraform world, stacks are not your tool. Getting Started You do not need a giant rollout plan. Pick something small and learn the parameters in a safe environment. A practical path: Pick a non production Bicep template you already trust. Anything that creates a small set of resources in one resource group works. Deploy it as a stack with safe defaults. Use actionOnUnmanage=detachAll and denySettingsMode=denyDelete. You get protection without risking accidental deletes. Try removing a resource from the template and redeploy. Watch how the resource shows up as detached in the portal. Get comfortable with what that looks like. Graduate to deletes. When you trust the workflow, switch to deleteResources or deleteAll in a dev environment. Always run what-if first. Adopt Stacks What-If. The newer Stacks What-If commandlet triangulates the stack snapshot, the live resource state, and the desired state from your template. The result is a far less noisy diff than classic what-if, and the RBAC model only needs read access on the what-if resource for follow up gets. Big win for production review workflows. Wire it into your pipeline. The bicep-deploy GitHub Action and the Azure DevOps task both support type: deploymentStack with create, validate, and delete operations. Start with a create pipeline, then add a what-if pipeline for PR validation, then a cleanup pipeline that uses delete to tear down ephemeral environments. If you hit an out of sync error between your stack and Azure, the bypass-stack-out-of-sync-error parameter lets the pipeline reconverge automatically instead of forcing a manual cleanup. Read the docs before you flip it on, but it saves real time when state drifts. Resources Create and deploy Azure deployment stacks in Bicep Bicep documentation on Microsoft Learn What-If for ARM and Bicep deployments Deploy Bicep files by using GitHub Actions Azure Bicep on GitHub Bicep Deploy GitHub Action and ADO task Bicep and ARM community news and monthly call signup Watch the rest of the Summit If this session helped, there are plenty more where it came from. The full Microsoft Azure Infrastructure Summit 2026 playlist covers everything from Azure Local and Azure Files to AKS networking, SRE agents, and the keynote with Jeremy Winter. Worth a binge if you run Azure infrastructure for a living. Microsoft Azure Infrastructure Summit 2026 playlist Cheers! Pierre Roman309Views2likes0CommentsLock Down AKS End to End with Application Gateway for Containers and Managed Cilium L7
Hello Folks! If your AKS cluster looks like most production clusters I have walked through, one of two things is true. Either nobody writes any network policies and every pod can talk to every other pod, so one compromised container blows up the entire blast radius. Or somebody wrote a few coarse rules along the lines of “namespace A talks to namespace B over port 80”, which sounds secure right up until an attacker realizes that port 80 is exactly where they were planning to live anyway. Real attacks happen at Layer 7, dressed up like ordinary HTTP traffic, and L3 / L4 plumbing cannot tell the difference. That is the gap session MAIS09 from the Microsoft Azure Infrastructure Summit 2026 closes. Vyshnavi Namani and Darshil Shah from the Azure Networking product team walked through how two AKS-managed add-ons, Application Gateway for Containers (AGC) and Cilium L7 via Advanced Container Networking Services (ACNS), can lock down the entire path from the public internet to a single pod. No NGINX. No external WAF appliance. No third-party CNI to babysit. 📺 Watch the session: Why IT Pros Should Care Let me cut to the chase. If you operate AKS clusters today, this session matters because: You probably still have an ingress controller and an external WAF stitched together with annotations and prayers. AGC plus ACNS collapses that stack into first-party add-ons that AKS owns end to end. Both Application Gateway for Containers and Advanced Container Networking Services are generally available. This is not a preview demo, this is production. Security is finally readable. Every rule is a YAML object. Code review, audit, GitOps. No more “what does this NGINX config map even do anymore” archaeology. It actually works on a real attack pattern. The demo shows WAF killing a SQL-injection-style GET that Cilium would have happily forwarded, because the method (GET) was on the allow list. If you have ever had to explain to an auditor why a single compromised pod could pivot across your whole cluster, this is your exit ramp. The AKS Security Gap This Closes Most clusters are protected by a load balancer at the edge and basically nothing inside. The cluster door looks like a vault, but the hallways are wide open. Cilium calls this the lateral movement problem, and it is exactly how Kubernetes attacks unfold in the wild. Compromise a pod, then phone home, then pivot. What MAIS09 demonstrates is something different. AGC is the L7 front door (the metal detector at the lobby). ACNS Cilium L7 is the lock on every pod’s office door. Both speak HTTP. Both enforce identity. Both are managed by AKS itself. The legacy alternative, Application Gateway Ingress Controller (AGIC), bolted a full Application Gateway onto your cluster through a translator. Two services, two lifecycles, two finger-pointing teams when something broke. AGC is the successor, built from scratch for Kubernetes, speaking the Gateway API natively, enabled with a single AKS flag. AKS provisions the controller, wires the identity, delegates the subnet, and owns the upgrades. You own the policies. AGC + Managed Cilium, End to End Here is the mental model from the session. Picture four concentric layers of defense between the public internet and a pod. AGC front end. One Azure resource, one public DNS name, and (thanks to the Kubernetes Gateway API) multiple hostnames behind the same IP. The demo runs Contoso, Fabrikam, and Adventure Works on a single AGC public IP using three HTTPRoute objects. One infrastructure, three websites. Real cost savings, real ownership clarity (platform owns the Gateway, app teams own the HTTPRoutes). Azure WAF on AGC. This is the content inspector. It runs the OWASP Core Rule Set (DRS 2.1 in the demo) against every incoming request, looks for SQL injection, cross-site scripting, path traversal, and the rest of the OWASP Top 10, and returns a 403 before the packet ever touches your pod. Microsoft maintains the rule set, you bind it to AGC via a SecurityPolicy. ACNS Cilium L7 ingress on every pod. This is where identity-based policy lives. Rules key off pod labels, not IPs, because IPs change every time the cluster autoscaler does its job. The demo uses an allow-agc-l7-get-only CiliumNetworkPolicy that lets the AGC backend reach the tenant pods, but only with GET or GET /products. Anything else, POST, PUT, DELETE, gets a Cilium-synthesized 403 before NGINX ever sees the request. ACNS east-west and egress policy. Two more policies do the heavy lifting inside. client-may-call-contoso-get-only lets the client pod reach Contoso with GET, and only Contoso. A default-deny baseline blocks everything else (pod-to-pod and pod-to-internet) with a single carve-out for kube-dns on port 53. The magic is that the same Cilium engine handles north-south, east-west, and egress with one consistent identity model. eBPF in the Linux kernel does the enforcement on the same node as the pod, so the decision happens before the packet leaves the host. No sidecars, no iptables sprawl, no daemonset you need to upgrade by hand. Real-world Scenarios The demo walks through six tests and the results map directly onto things you are probably trying to solve right now: Multi-site hosting on one IP. Three hostnames, one AGC, three 200 OKs from three different backend pods. If you are paying for three load balancers today, you can stop. WAF blocks a malicious GET that ACNS would have let through. This is the punch line of why you need both layers. The method (GET) is on the Cilium allow list, but the payload is a SQLi pattern. WAF returns 403 at the edge. Defense in depth, working as advertised. Method enforcement at the pod door. GET returns 200, POST/PUT/DELETE return 403, GET /admin returns 403, GET /products returns 200. Cilium is doing actual HTTP inspection, not just dropping packets. East-west enforcement with readable verdicts. Client to Contoso GET is 200. Same client, same destination, POST is 403 (L7 deny, TCP completed). Client to Fabrikam is 000 (L4 drop, no TCP handshake). Reading the difference between 403 and 000 is now a debuggable signal, not a mystery. Default-deny egress kills phone-home. A pod tries to reach bing.com. DNS resolves (the carve-out works), TCP SYN goes nowhere, wget gives up with exit code 1. If that pod was compromised and trying to exfiltrate data, this is where the attack chain dies. Selective allow still works. Same pod, same tools, but a DNS lookup against kube-dns inside the cluster returns instantly. We did not unplug the network. We locked it down with a purpose. Honest tradeoffs to call out. The session does not pretend everything is free. AGC introduces a billed subnet association and a managed identity you do not manage in BYO mode. Cilium L7 needs the Cilium data plane (ACNS Container Network Security features are Cilium-only). The Envoy proxy that handles L7 inspection has a cost only when you actually enforce L7, which is a fair deal in my book. Getting Started If you want to try this on a cluster of your own, three flags do most of the work on az aks create: --network-dataplane cilium (turns on the eBPF data plane) --enable-acns (enables Advanced Container Networking Services, including Hubble observability and Cilium L7 policy) --enable-app-routing or the ALB add-on flag (provisions the AGC controller as an AKS-managed add-on) From there you write four YAML objects: a default-deny CiliumNetworkPolicy, an allow-DNS carve-out, an AGC ingress allow with method and path constraints, and your east-west allow rules. The session repo includes the full set so you can clone and follow along. One bonus worth knowing about. ACNS ships Hubble out of the box, with pre-built Azure Managed Grafana dashboards. Flow logs, service maps, policy hit counts. Even on pods that are not yet under L7 enforcement, you get observability for free. When something breaks at 2 a.m., you have an audit trail instead of a tcpdump. Resources Azure Application Gateway for Containers documentation Set up Layer 7 policies with Advanced Container Networking Services AKS security concepts Cluster security best practices for AKS Container Network Observability for AKS (Hubble, Prometheus, Grafana) Advanced Container Networking Services hands-on lab Use cases of Advanced Network Observability for AKS (Azure Networking Blog) Watch the Rest of the Summit If MAIS09 hit the spot, there are dozens more sessions in the same playlist covering AKS networking at scale, Azure Local, AVM, the new Deployment Agent, and a lot more. Grab a coffee and binge. Microsoft Azure Infrastructure Summit 2026 playlist Cheers! Pierre Roman454Views1like1CommentJSON Web Token (JWT) Validation in Azure Application Gateway: Secure Your APIs at the Gate
Hello Folks! In a Zero Trust world, identity becomes the control plane and tokens become the gatekeepers. Recently, in an E2E conversation with my colleague Vyshnavi Namani, we dug into a topic every ITPro supporting modern apps should understand: JSON Web Token (JWT) validation, specifically using Azure Application Gateway. In this post we’ll distill that conversation into a technical guide for infrastructure pros who want to secure APIs and backend workloads without rewriting applications. Why IT Pros Should Care About JWT Validation JSON Web Token (JWT) is an open standard token format (RFC 7519) used to represent claims or identity information between two parties. JWTs are issued by an identity provider (Microsoft Entra ID) and attached to API requests in an HTTP Authorization: Bearer <token> header. They are tamper-evident and include a digital signature, so they can be validated cryptographically. JWT validation in Azure Application Gateway means the gateway will check every incoming HTTPS request for a valid JWT before it forwards the traffic to your backend service. Think of it like a bouncer or security guard at the club entrance: if the client doesn’t present a valid “ID” (token), they don’t get in. This first-hop authentication happens at the gateway itself. No extra custom auth code is needed in your APIs. The gateway uses Microsoft Entra ID (Azure AD) as the authority to verify the token’s signature and claims (issuer/tenant, audience, expiry, etc.). By performing token checks at the edge, Application Gateway ensures that only authenticated requests reach your application. If the JWT is missing or invalid, the gateway could deny the request depending on your configuration (e.g. returns HTTP 401 Unauthorized) without disturbing your backend. If the JWT is valid, the gateway can even inject an identity header (x-msft-entra-identity) with the user’s tenant and object ID before passing the call along 9 . This offloads authentication from your app and provides a consistent security gate in front of all your APIs. Key benefits of JWT validation at the gateway: Stronger security at the edge: The gateway checks each token’s signature and key claims, blocking bad tokens before they reach your app. No backend work needed: Since the gateway handles JWT validation, your services don’t need token‑parsing code. Therefore, there is less maintenance and lower CPU use. Stateless and scalable: Every request brings its own token, so there’s no session management. Any gateway instance can validate tokens independently, and Azure handles key rotation for you. Simplified compliance: Centralized JWT policies make it easier to prove only authorized traffic gets through, without each app team building their own checks. Defense in depth: Combine JWT validation with WAF rules to block malicious payloads and unauthorized access. In short, JWT validation gives your Application Gateway the smarts to know who’s knocking at the door, and to only let the right people in. How JWT Validation Works At its core, JWT validation uses a trusted authority (for now it uses Microsoft Entra ID) to issue a token. That token is presented to the Application Gateway, which then validates: The token is legitimate The token was issued by the expected tenant The audience matches the resource you intend to protect If all checks pass, the gateway returns a 200 OK and the request continues to your backend. If anything fails, the gateway returns 403 Forbidden, and your backend never sees the call. You can check code and errors here: JSON Web Token (JWT) validation in Azure Application Gateway (Preview) Setting Up JWT Validation in Azure Application Gateway The steps to configure JWT validation in Azure Application Gateway are documented here: JSON Web Token (JWT) validation in Azure Application Gateway (Preview) Use Cases That Matter to IT Pros Zero Trust Multi-Tenant Workloads Geolocation-Based Access AI Workloads Next Steps Identify APIs or workloads exposed through your gateways. Audit whether they already enforce token validation. Test JWT validation in a dev environment. Integrate the policy into your Zero Trust architecture. Collaborate with your dev teams on standardizing audiences. Resources Azure Application Gateway JWT Validation https://learn.microsoft.com/azure/application-gateway/json-web-token-overview Microsoft Entra ID App Registrations https://learn.microsoft.com/azure/active-directory/develop/quickstart-register-app Azure Application Gateway Documentation https://learn.microsoft.com/azure/application-gateway/overview Azure Zero Trust Guidance https://learn.microsoft.com/security/zero-trust/zero-trust-overview Azure API Management and API Security Best Practices https://learn.microsoft.com/azure/api-management/api-management-key-concepts Microsoft Identity Platform (Tokens, JWT, OAuth2 https://learn.microsoft.com/azure/active-directory/develop/security-tokens Using Curl with JWT Validation Scenarios https://learn.microsoft.com/azure/active-directory/develop/v2-oauth2-client-creds-grant-flow#request-an-access-token Final Thoughts JWT validation in Azure Application Gateway is a powerful addition to your skills for securing cloud applications. It brings identity awareness right into your networking layer, which is a huge win for security and simplicity. If you manage infrastructure and worry about unauthorized access to your APIs, give it a try. It can drastically reduce the “attack surface” by catching invalid requests early. As always, I’d love to hear about your experiences. Have you implemented JWT validation on App Gateway, or do you plan to? Let me know how it goes! Feel free to drop a comment or question. Cheers! Pierre Roman 1.4KViews1like1Comment
Strengthening Azure File Sync security with Managed Identities
Hello Folks, As IT pros, we’re always looking for ways to reduce complexity and improve security in our infrastructure. One area that’s often overlooked is how our services authenticate with each other. Especially when it comes to Azure File Sync. In this post, I’ll walk you through how Managed Identities can simplify and secure your Azure File Sync deployments, based on my recent conversation with Grace Kim, Program Manager on the Azure Files and File Sync team. Why Managed Identities Matter Traditionally, Azure File Sync servers authenticate to the Storage Sync service using server certificates or shared access keys. While functional, these methods introduce operational overhead and potential security risks. Certificates expire, keys get misplaced, and rotating credentials can be a pain. Managed Identities solve this by allowing your server to authenticate securely without storing or managing credentials. Once enabled, the server uses its identity to access Azure resources, and permissions are managed through Azure Role-Based Access Control (RBAC). Using Azure File Sync with Managed Identities provides significant security enhancements and simpler credential management for enterprises. Instead of relying on storage account keys or SAS tokens, Azure File Sync authenticates using a system-assigned Managed Identity from Microsoft Entra ID (Azure AD). This keyless approach greatly improves security by removing long-lived secrets and reducing the attack surface. Access can be controlled via fine-grained Azure role-based access control (RBAC) rather than a broadly privileged key, enforcing least-privileged permissions on file shares. I believe that Azure AD RBAC is far more secure than managing storage account keys or SAS credentials. The result is a secure-by-default setup that minimizes the risk of credential leaks while streamlining authentication management. Managed Identities also improve integration with other Azure services and support enterprise-scale deployments. Because authentication is unified under Azure AD, Azure File Sync’s components (the Storage Sync Service and each registered server) seamlessly obtain tokens to access Azure Files and the sync service without any embedded secrets. This design fits into common Azure security frameworks and encourages consistent identity and access policies across services. In practice, the File Sync managed identity can be granted appropriate Azure roles to interact with related services (for example, allowing Azure Backup or Azure Monitor to access file share data) without sharing separate credentials. At scale, organizations benefit from easier administration. New servers can be onboarded by simply enabling a managed identity (on an Azure VM or an Azure Arc–connected server) and assigning the proper role, avoiding complex key management for each endpoint. Azure’s logging and monitoring tools also recognize these identities, so actions taken by Azure File Sync are transparently auditable in Azure AD activity logs and storage access logs. Given these advantages, new Azure File Sync deployments now enable Managed Identity by default, underscoring a shift toward identity-based security as the standard practice for enterprise file synchronization. This approach ensures that large, distributed file sync environments remain secure, manageable, and well-integrated with the rest of the Azure ecosystem. How It Works When you enable Managed Identity on your Azure VM or Arc-enabled server, Azure automatically provisions an identity for that server. This identity is then used by the Storage Sync service to authenticate and communicate securely. Here’s what happens under the hood: The server receives a system-assigned Managed Identity. Azure File Sync uses this identity to access the storage account. No certificates or access keys are required. Permissions are controlled via RBAC, allowing fine-grained access control. Enabling Managed Identity: Two Scenarios Azure VM If your server is an Azure VM: Go to the VM settings in the Azure portal. Enable System Assigned Managed Identity. Install Azure File Sync. Register the server with the Storage Sync service. Enable Managed Identity in the Storage Sync blade. Once enabled, Azure handles the identity provisioning and permissions setup in the background. Non-Azure VM (Arc-enabled) If your server is on-prem or in another cloud: First, make the server Arc-enabled. Enable System Assigned Managed Identity via Azure Arc. Follow the same steps as above to install and register Azure File Sync. This approach brings parity to hybrid environments, allowing you to use Managed Identities even outside Azure. Next Steps If you’re managing Azure File Sync in your environment, I highly recommend transitioning to Managed Identities. It’s a cleaner, more secure approach that aligns with modern identity practices. ✅ Resources 📚 https://learn.microsoft.com/azure/storage/files/storage-sync-files-planning 🔐 https://learn.microsoft.com/azure/active-directory/managed-identities-azure-resources/overview ⚙️ https://learn.microsoft.com/azure/azure-arc/servers/overview 🎯 https://learn.microsoft.com/azure/role-based-access-control/overview 🛠️ Action Items Audit your current Azure File Sync deployments. Identify servers using certificates or access keys. Enable Managed Identity on eligible servers. Use RBAC to assign appropriate permissions. Let me know how your transition to Managed Identities goes. If you run into any snags or have questions, drop a comment. Cheers! Pierre666Views0likes0CommentsAzure File Sync: A Practical, Tested Deployment Playbook for ITPros.
This post distills that 10‑minute drill into a step‑by‑step, battle‑tested playbook you can run in your own environment, complete with the “gotchas” that trip folks up, why they happen, and how to avoid them. But first... Why Use Azure File Sync? Hybrid File Services: Cloud Meets On-Prem Azure File Sync lets you centralize your organization’s file shares in Azure Files while keeping the flexibility, performance, and compatibility of your existing Windows file servers. You can keep a full copy of your data locally or use your Windows Server as a fast cache for your Azure file share. This means you get cloud scalability and resilience, but users still enjoy local performance and familiar protocols (SMB, NFS, FTPS). Cloud Tiering: Optimize Storage Costs With cloud tiering, your most frequently accessed files are cached locally, while less-used files are tiered to the cloud. You control how much disk space is used for caching, and tiered files can be recalled on-demand. This enables you to reduce on-prem storage costs without sacrificing user experience. Multi-Site Sync: Global Collaboration Azure File Sync is ideal for distributed organizations. You can provision local Windows Servers in each office, and changes made in one location automatically sync to all others. This simplifies file management and enables faster access for cloud-based apps and services. Business Continuity and Disaster Recovery Azure Files provides resilient, redundant storage, so your local server becomes a disposable cache. If a server fails, you simply add a new server to your Azure File Sync deployment, install the agent, and sync. Your file namespace is downloaded first, so users can get back to work quickly. You can also use warm standby servers or Windows Clustering for even faster recovery. Cloud-Side Backup Note: Azure File Sync is NOT a backup solution.... But, you ca reduce on-prem backup costs by taking centralized backups in the cloud using Azure Backup. Azure file shares have native snapshot capabilities, and Azure Backup can automate scheduling and retention. Restores to the cloud are automatically downloaded to your Windows Servers. Seamless Migration Azure File Sync enables seamless migration of on-prem file data to Azure Files. You can sync existing file servers with Azure Files in the background, moving data without disrupting users or changing access patterns. File structure and permissions remain intact, and apps continue to work as expected. Performance, Security, and Compatibility Recent improvements have boosted Azure File Sync’s performance (up to 200 items/sec), and it now supports Windows Server 2025 and integrates with Windows Admin Center for unified management. Managed identities and Active Directory-based authentication are supported for secure, keyless access. Real-World Use Cases Branch Office Consolidation: Multiple sites, each with its own file server, can be consolidated into a central Azure File Share while maintaining local performance. Business Continuity: Companies facing threats like natural disasters use Azure File Sync to improve server recovery times and ensure uninterrupted work. Collaboration: Organizations leverage Azure File Sync for fast, secure collaboration across locations, reducing latency and simplifying IT management. The Quick Troubleshooting TL;DR Insufficient permissions during cloud endpoint creation → “Role assignment creation failed.” You need Owner or the Azure File Sync Administrator built‑in role; Contributor isn’t enough because the workflow must create role assignments. Region mismatches → Your file share and Storage Sync Service must live in the same region as the deployment target. Wrong identity/account → If you’re signed into the wrong tenant or account mid‑portal (easy to do), the wizard fails when it tries to create the cloud endpoint. Switch to the account that actually has the required role and retry. Agent/version issues → An old agent on your Windows Server will cause registration or enumeration problems. Use the latest agent and consider auto‑upgrade to stay current. Networking & access keys → Ensure access keys are enabled on the storage account and required outbound URLs/ports are allowed. Operational expectations → Azure File Sync runs on a roughly 24‑hour change detection cycle by default; for DR drills or immediate needs, trigger change detection via PowerShell. And remember: File Sync is not a backup. Back up the storage account. End‑to‑End Deployment Playbook 1) Prerequisites (don’t skip these) Storage account supporting SMB 3.1.1 (and required authentication settings), with access keys enabled. Create your Azure file share in the same region as your File Sync deployment. Establish a clear naming convention Windows Server for the File Sync agent (example: Windows Server 2019) Identity & Access: Assign either Owner or Azure File Sync Administrator (a least‑privilege built‑in role designed specifically for this scenario). Contributor will let you get partway (storage account, Storage Sync Service) but will fail when creating the cloud endpoint because it can’t create role assignments. 2) Lay down the cloud side In the Azure portal, create the file share in your chosen storage account/region. Create a Storage Sync Service (ideally in a dedicated resource group), again ensuring the region is correct and supported for your needs. 3) Prep the server On your Windows Server, install the Azure File Sync agent (latest version). During setup, consider enabling auto‑upgrade; if the server is down during a scheduled upgrade, it catches up on the next boot, keeping you current with security and bug fixes. Register the server to your Storage Sync Service (select subscription, resource group, and service). If you have multiple subscriptions, the portal can occasionally hide one, PowerShell is an alternative path if needed. 4) Create the sync topology In the Storage Sync Service, create a Sync Group. This is the container for both cloud and server endpoints. Under normal conditions, the cloud endpoint is created automatically when you select the storage account + file share. If you hit “role assignment creation failed” here, verify your signed‑in account and role. Switching back to the account with the proper role resolves it; you can then recreate the cloud endpoint inside the existing Sync Group. Add a server endpoint: pick the registered server (it must show up in the drop‑down, if it doesn’t, registration isn’t complete) and the local path to sync. 5) Cloud tiering & initial sync behavior Cloud tiering keeps hot data locally and stubs colder data to conserve space. If you disable cloud tiering, you’ll maintain a full local copy of all files. If enabled, set the Volume Free Space Policy (how much free space to preserve on the volume) and review recall policy implications. Choose the initial sync mode, merge existing content or overwrite. 6) Ops, monitoring, and DR notes Change detection cadence is approximately 24 hours. For DR tests or urgent cutovers, run the change detection PowerShell command to accelerate discovery of changes. Backups: Azure File Sync is not a backup. Protect your storage account using your standard backup strategy. Networking: Allow required outbound ports/URLs; validate corporate proxies/firewalls. Monitoring: Turn on the logging and monitoring you need for telemetry and auditing. 7) Performance & cost planning Evaluate Provisioned v2 storage accounts to dial in IOPS/throughput to your business needs and gain better pricing predictability. It’s a smart time to decide this up front during a new deployment. 8) Identity options & least privilege You can also set up managed identities for File Sync to reduce reliance on user principals. If you do use user accounts, ensure they carry the Azure File Sync Administrator role or Owner. Keep the agent updated; it’s basic hygiene that prevents a surprising number of issues. 9) Quotas & capacity troubleshooting Hitting quota problems? Revisit your Volume Free Space Policy (cloud tiering) and recall policy. Sometimes the answer is simply adding a disk or increasing its size as data patterns evolve. Key Benefits for Infra Teams Hybrid file services without forklift: Keep your existing Windows file servers while centralizing data in Azure Files, adding elasticity and resiliency with minimal disruption . Right‑sized capacity on‑prem: Cloud tiering preserves local performance for hot data and trims cold data footprint to stretch on‑prem storage further. Operational predictability: Built‑in auto‑upgrade for the agent and a known change detection cycle, with the ability to force change detection for DR/failover testing. Least‑privilege by design: The Azure File Sync Administrator role gives just the rights needed to deploy/manage sync without over‑provisioning. Performance on your terms: Option to choose Provisioned v2 to meet IOPS/throughput targets and bring cost clarity. Available Resources What is Azure File Sync?: https://learn.microsoft.com/azure/storage/file-sync/file-sync-introduction Azure Files: More performance, more control, more value for your file data: https://azure.microsoft.com/blog/azure-files-more-performance-more-control-more-value-for-your-file-data/ Azure File Sync Deployment Guide: https://learn.microsoft.com/azure/storage/file-sync/file-sync-deployment-guide Troubleshooting documentation : https://learn.microsoft.com/troubleshoot/azure/azure-storage/files/file-sync/file-sync-troubleshoot Azure File Sync “copilot” troubleshooting experience: https://learn.microsoft.com/azure/copilot/improve-storage-accounts Next Steps (Run This in Your Lab) Verify roles: On the target subscription/resource group, grant Azure File Sync Administrator (or Owner) to your deployment identity. Confirm in Access control (IAM). Create the file share in the same region as your Storage Sync Service. Enable access keys on the storage account. Install the latest agent on your Windows Server; enable auto‑upgrade. Register the server to your Storage Sync Service. Create a Sync Group, then the cloud endpoint. If you see a role assignment error, re‑check your signed‑in account/role and retry. Add the server endpoint with the right path, decide on cloud tiering, set Volume Free Space Policy, and choose initial sync behavior (merge vs overwrite). Open required egress on your network devices, enable monitoring/logging, and plan backup for the storage account. Optionally evaluate Provisioned v2 for throughput/IOPS and predictable pricing before moving to production. If you’ve got a scenario that behaves differently in the field, I want to hear about it. Drop me a note with what you tried, what failed, and where in the flow it happened. Cheers! Pierre1.4KViews0likes0CommentsUnlocking Private IP for Azure Application Gateway: Security, Compliance, and Practical Deployment
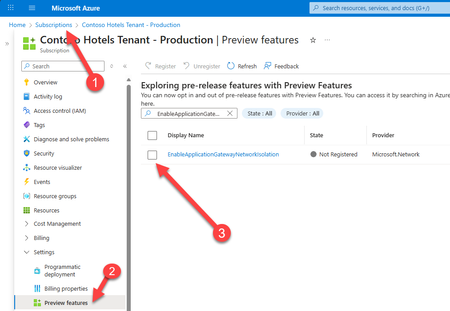
If you’re responsible for securing, scaling, and optimizing cloud infrastructure, this update is for you. Based on my recent conversation with Vyshnavi Namani, Product Manager on the Azure Networking team, I’ll break down what private IP means for your environment, why it matters, and how to get started. Why Private IP for Application Gateway? Application Gateway has long been the go-to Layer 7 load balancer for web traffic in Azure. It manages, routes, and secures requests to your backend resources, offering SSL offloading and integrated Web Application Firewall (WAF) capabilities. But until now, public IPs were the norm, meaning exposure to the internet and the need for extra security layers. With Private IP, your Application Gateway can be deployed entirely within your virtual network (VNet), isolated from public internet access. This is a huge win for organizations with strict security, compliance, or policy requirements. Now, your traffic stays internal, protected by Azure’s security layers, and only accessible to authorized entities within your ecosystem. Key Benefits for ITPRO 🔒 No Public Exposure With a private-only Application Gateway, no public IP is assigned. The gateway is accessible only via internal networks, eliminating any direct exposure to the public internet. This removes a major attack vector by keeping traffic entirely within your trusted network boundaries. 📌 Granular Network Control Private IP mode grants full control over network policies. Strict NSG rules can be applied (no special exceptions needed for Azure management traffic) and custom route tables can be used (including a 0.0.0.0/0 route to force outbound traffic through on-premises or appliance-based security checkpoints). ☑️ Compliance Alignment Internal-only gateways help meet enterprise compliance and data governance requirements. Sensitive applications remain isolated within private networks, aiding data residency and preventing unintended data exfiltration. Organizations with “no internet exposure” policies can now include Application Gateway without exception. Architectural Considerations and Deployment Prerequisites To deploy Azure Application Gateway with Private IP, you should plan for the following: SKU & Feature Enablement: Use the v2 SKU (Standard_v2 or WAF_v2). The Private IP feature is GA but may require opt-in via the EnableApplicationGatewayNetworkIsolation flag in Azure Portal, CLI, or PowerShell. Dedicated Subnet: Deploy the gateway in a dedicated subnet (no other resources allowed). Recommended size: /24 for v2. This enables clean NSG and route table configurations. NSG Configuration: Inbound: Allow AzureLoadBalancer for health probes and internal client IPs on required ports. Outbound: Allow only necessary internal destinations; apply a DenyAll rule to block internet egress. User-Defined Routes (UDRs): Optional but recommended for forced tunneling. Set 0.0.0.0/0 to route traffic through an NVA, Azure Firewall, or ExpressRoute gateway. Client Connectivity: Ensure internal clients (VMs, App Services, on-prem users via VPN/ExpressRoute) can reach the gateway’s private IP. Use Private DNS or custom DNS zones for name resolution. Outbound Dependencies: For services like Key Vault or telemetry, use Private Link or NAT Gateway if internet access is required. Plan NSG and UDRs accordingly. Management Access: Admins must be on the VNet or connected network to test or manage the gateway. Azure handles control-plane traffic internally via a management NIC. Migration Notes: Existing gateways may require redeployment to switch to private-only mode. Feature registration must be active before provisioning. Practical Scenarios Here are several practical scenarios where deploying Azure Application Gateway with Private IP is especially beneficial: 🔐 Internal-Only Web Applications Organizations hosting intranet portals, HR systems, or internal dashboards can use Private IP to ensure these apps are only accessible from within the corporate network—via VPN, ExpressRoute, or peered VNets. 🏥 Regulated Industries (Healthcare, Finance, Government) Workloads that handle sensitive data (e.g., patient records, financial transactions) often require strict network isolation. Private IP ensures traffic never touches the public internet, supporting compliance with HIPAA, PCI-DSS, or government data residency mandates. 🧪 Dev/Test Environments Development teams can deploy isolated environments for testing without exposing them externally. This reduces risk and avoids accidental data leaks during early-stage development. 🌐 Hybrid Network Architectures In hybrid setups where on-prem systems interact with Azure-hosted services, Private IP gateways can route traffic securely through ExpressRoute or VPN, maintaining internal-only access and enabling centralized inspection via NVAs. 🛡️ Zero Trust Architectures Private IP supports zero trust principles by enforcing least-privilege access, denying internet egress, and requiring explicit NSG rules for all traffic—ideal for organizations implementing segmented, policy-driven networks. Resources https://docs.microsoft.com/azure/application-gateway/ https://learn.microsoft.com/azure/application-gateway/configuration-overview https://learn.microsoft.com/azure/virtual-network/network-security-groups-overview https://learn.microsoft.com/azure/virtual-network/virtual-network-peering-overview Next Steps Evaluate Your Workloads: Identify apps and services that require internal-only access. Plan Migration: Map out your VNets, subnets, and NSGs for a smooth transition. Enable Private IP Feature: Register and deploy in your Azure subscription. Test Security: Validate that only intended traffic flows through your gateway. Final Thoughts Private IP for Azure Application Gateway is an improvement for secure, compliant, and efficient cloud networking. If you’re an ITPRO managing infrastructure, now’s the time check out this feature and level up your Azure architecture. Have questions or want to share your experience? Drop a comment below. Cheers! Pierre717Views1like0CommentsShielded VM Template Creation in a Hyper-V Guarded Fabric
To set up a shielded virtual machine template on a Hyper-V guarded fabric, you need to prepare a secure environment (Host Guardian Service, guarded hosts) and then create a BitLocker-protected, signed template disk. This document assumes that all Windows Server instances used are running Windows Server 2022 or Windows Server 2025. Prerequisites and Environment Setup Host Guardian Service (HGS): Deploy an HGS cluster (typically 3 nodes for high availability) in a separate Active Directory forest dedicated to HGS. For production, HGS should run on physical (or highly secured) servers, ideally as a three-node cluster. Ensure the HGS servers have the Host Guardian Service role installed and are up to date with software updates. Attestation Mode: TPM-Based: Ensure that HGS is configured for TPM-trusted attestation. In TPM mode, HGS uses each host’s TPM 2.0 identity (EKpub) and measured boot sequence to verify the host’s health and authenticity. This requires capturing each Hyper-V host’s TPM identifier and establishing a security baseline: TPM 2.0 and Boot Measurements: On each Hyper-V host, retrieve the TPM’s public endorsement key (EKpub) and add it to the HGS trust store (e.g. using Get-PlatformIdentifier on the host and Add-HgsAttestationTpmHost on HGS). HGS will also require a TPM baseline (PCR measurements of the host’s firmware/boot components) and a Code Integrity (CI) policy defining allowed binaries. Generate these from a reference host and add them to HGS so that only hosts booting with the approved firmware and software can attest successfully. Host Requirements: Each guarded host (Hyper-V host) must meet hardware/OS requirements for TPM attestation. This includes TPM 2.0, UEFI 2.3.1+ firmware with Secure Boot enabled, and support for IOMMU/SLAT (for virtualization-based security). On each host, enable the Hyper-V role and install the Host Guardian Hyper-V Support feature (available in Datacenter edition). This feature enables virtualization-based protection of code integrity (ensuring the host hypervisor only runs trusted code), which is required for TPM attestation. (Test this configuration in a lab first as VBS/CI can affect some drivers). Guarded Fabric Configuration: Join Hyper-V hosts to the fabric domain and configure networking so that guarded hosts can reach the HGS servers (set up DNS or DNS forwarding between the fabric domain and HGS domain). After setting up HGS and adding host attestation data, configure each Hyper-V host as a guarded host by pointing it to the HGS cluster for attestation and key retrieval (using Set-HgsClientConfiguration to specify the HGS attestation and key protection URLs and any required certificates). Once a host attests successfully, it becomes an authorized guarded host able to run shielded VMs. HGS will release the necessary decryption keys only to those hosts that pass health attestation. Step 1: Create and Configure the Template VM (Gen 2) Prepare a Generation 2 VM: On a Hyper-V host (it can be a regular host or even a non-guarded host for template creation), create a new Generation 2 virtual machine. Generation 2 with UEFI is required for Secure Boot and virtual TPM support. Attach a blank virtual hard disk (VHDX) for the OS. Install Windows Server on this VM using standard installation media. Partition and File System Requirements: When installing the OS on the template VM, ensure the VHDX is initialized with a GUID Partition Table (GPT) and that the Windows setup creates the necessary partitions: there should be at least a small System/EFI boot partition (unencrypted) and the main OS partition (which will later be BitLocker-encrypted). The disk must be a basic disk (not dynamic within the guest OS) and formatted with NTFS to support BitLocker. Using the default Windows setup on a blank drive typically meets these requirements (the installer will create the EFI and OS partitions automatically on a GPT disk). Configure the OS: Boot the VM and perform any baseline configuration needed. Do not join this VM to any domain and avoid putting sensitive data on it as it should be a generic base image. Apply the latest Windows Updates and install any required drivers or software that should be part of the template OS (e.g. common management agents). Ensuring the template OS is fully updated is important for a reliable shielding process. Enable Remote Management: Because shielded VMs can only be managed remotely (no console access), consider configuring the template to enable Remote Desktop and/or PowerShell WinRM, and ensure the firewall is configured accordingly. You may also install roles/features that many VMs will need. However, do not configure a static IP or unique machine-specific settings in this template as those will be supplied via an answer file during provisioning. Step 2: Generalize the VM with Sysprep Run Sysprep: In the VM, open an elevated Command Prompt and run: C:\Windows\System32\Sysprep\Sysprep.exe /oobe /generalize /shutdown Choose “Enter System Out-of-Box Experience (OOBE)”, check “Generalize”, and set Shutdown option to “Shutdown” if using the GUI. This strips out machine-specific details and prepares the OS for first-boot specialization. The VM will shut down upon completion. Do Not Boot After Sysprep: Leave the VM off after it shuts down. The OS on the VHDX is now in a generalized state. Do not boot this VM again (doing so will boot into OOBE and break its generalized state). At this point you have a prepared OS disk (the VHDX) ready for sealing. (Optional) Backup the VHDX: It’s a good idea to make a copy of the sysprep’ed VHDX at this stage. After the next step (sealing the template), the disk will be BitLocker-encrypted and cannot be easily modified. Keeping an unencrypted copy allows you to easily update the template image in the future if needed. Step 3: Protect and Seal the Template Disk (Shielded Template Wizard) Next, seal the template VM’s OS disk using the Shielded VM Template Disk Creation process. This will encrypt the disk (preparing it for BitLocker) and produce a signed catalog so that the disk’s integrity can be verified later. Install Shielded VM Tools: On a machine with GUI (this can be a management server or even Windows 11 with RSAT), install the Shielded VM Tools component. On Windows Server, use PowerShell: Install-WindowsFeature RSAT-Shielded-VM-Tools -IncludeAllSubFeature (and reboot if prompted). This provides the Template Disk Wizard (TemplateDiskWizard.exe) and PowerShell cmdlets like Protect-TemplateDisk. Obtain a Signing Certificate: Acquire a certificate to sign the template disk’s Volume Signature Catalog (VSC). For production, use a certificate issued by a trusted CA that both the fabric administrators and tenants trust (e.g. an internal PKI or a certificate from a mutually trusted authority). The certificate’s public key will be referenced later by tenants to trust this template. (For a lab or demo, you can use a self-signed cert, but this is not recommended for production.) Import the certificate into the local machine’s certificate store if it’s not already present. Launch the Template Disk Wizard: Open Template Disk Wizard (found in Administrative Tools after installing RSAT, or run TemplateDiskWizard.exe). This wizard will guide you through protecting the VHDX: Certificate: Select the signing certificate obtained in the previous step. This certificate will be used to sign the template’s catalog. Virtual Disk: Browse to and select the generalized VHDX from Step 2 (the sysprep’ed OS disk). Signature Catalog Info: Provide a friendly name and version for this template disk (e.g. Name: “WS2025-ShieldedTemplate”, Version: 1.0.0.0). These labels help identify the disk and version to tenants. Proceed to the final page and Generate. The wizard will now: o Enable BitLocker on the OS volume of the VHDX and store the BitLocker metadata on the disk (but it does not encrypt the volume yet as encryption will finalize when a VM instance is provisioned with this disk). o Compute a cryptographic hash of the disk and create a Volume Signature Catalog (VSC) entry (which is stored in the disk’s metadata) signed with your certificate. This ensures the disk’s integrity can be verified; only disks matching this signed hash will be recognized as this template. Wait for the wizard to finish (it may take some time to initialize BitLocker and sign the catalog, depending on disk size). Click Close when done. The VHDX is now a sealed template disk. It’s marked internally as a shielded template and cannot be used to boot a normal VM without going through the shielded provisioning process (attempting to boot it in an unshielded way will likely cause a blue screen). The disk’s OS volume is still largely unencrypted at rest (encryption will complete when a VM is created), but it’s protected by BitLocker keys that will be released only to an authorized host via HGS. Extract the VSC File (for Tenant Use): It’s recommended to extract the template’s Volume Signature Catalog to a separate file. This .vsc file contains the disk’s identity (hash, name, version) and the signing certificate info. Tenants will use it to authorize this template in their shielding data. Use PowerShell on the RSAT machine: Save-VolumeSignatureCatalog -TemplateDiskPath "C:\path\WS2022-ShieldedTemplate.vhdx" -VolumeSignatureCatalogPath "C:\path\WS2022-ShieldedTemplate.vsc" This saves the .vsc file separately. Share this .vsc with the VM owners (tenants) or have it available for the shielding data file creation in the next step. Alternatively to the wizard, you can use PowerShell: after installing RSAT, run Protect-TemplateDisk -Path <VHDX> -Certificate <Cert> -TemplateName "<Name>" -Version <X.Y.Z.W> to seal the disk in one step. The wizard and PowerShell achieve the same result. Step 4: Create the Shielding Data File (PDK) A shielding data file (with extension .pdk) contains the sensitive configuration and keys required to deploy a shielded VM from the template. This includes the local administrator password, domain join credentials, RDP certificate, and the list of guardians (trust authorities) and template disk signatures the VM is allowed to use. For security, the shielding data is created by the tenant or VM owner on a secure machine outside the fabric, and is encrypted so that fabric admins cannot read the contents. Prerequisites for Shielding Data: Obtain the Volume Signature Catalog (.vsc) file for the template disk (from Step 3) to authorize that template. If the VM should use a trusted RDP certificate (to avoid man-in-the-middle when connecting via RDP), obtain a certificate (e.g. a wildcard certificate from the tenant’s CA) to include. This is optional; if the VM will join a domain and get a computer certificate or if you’re just testing, you may skip a custom RDP certificate. Prepare an unattend answer file or have the information needed to create one (admin password, timezone, product key, etc.). Use the PowerShell function New-ShieldingDataAnswerFile to generate a proper unattend XML for shielded VMs. The unattend will configure the VM’s OS on first boot (e.g. set the Administrator password, optionally join a domain, install roles, enable RDP, etc.). Ensure the unattend enables remote management (e.g. turn on RDP and firewall rules, or enable WinRM) because console access is not available for shielded VMs. Also, do not hardcode any per-VM values in the unattend that should differ for each instance; use placeholders or plan to supply those at deployment time. Creating the .PDK file: On a secure workstation (not on a guarded host) with RSAT Shielded VM Tools installed, launch the Shielding Data File Wizard (ShieldingDataFileWizard.exe). This tool will collect the needed info and produce an encrypted PDK file. Owner and Guardian Keys: First, set up the guardians. “Guardians” are certificates that represent who owns the VM and which fabrics (HGS instances) are authorized to run it. Typically: The Owner Guardian is a key pair that the tenant/VM owner possesses (the private key stays with the tenant). Create an Owner guardian (if not already) via the wizard’s Manage Local Guardians > Create option. This generates a key pair on your machine. Give it a name (e.g. “TenantOwner”). The Fabric Guardian(s) correspond to the HGS of the hosting fabric. Import the HGS guardian metadata file provided by the hoster (this is an XML with the HGS public key, exported via Export-HgsGuardian on the HGS server). In the wizard, use Manage Local Guardians > Import to add the hoster’s guardian(s) (for example, “Contoso HGS”). For production, you might import multiple datacenter guardians if the VM can run in multiple cloud regions, include each authorized fabric’s guardian. After adding, select all the guardian(s) that represent fabrics where this VM is allowed to run. Also select your Owner guardian (the wizard may list it separately). This establishes that the VM will be owned by your key and can only run on hosts approved by those fabric guardians. Template Disk (VSC) Authorization: The wizard will prompt to add Volume ID Qualifiers or trusted template disks. Click Add and import the .vsc file corresponding to the template disk prepared in Step 3. You can usually choose whether the shielding data trusts only that specific version of the template or future versions as well (Equal vs. GreaterOrEqual version matching). Select the appropriate option based on whether you want to allow updates to the template without regenerating the PDK. This step ensures the secrets in the PDK will only unlock when that specific signed template disk is used. Unattend and Certificates: Provide the answer file (Unattend.xml) for the VM’s specialization. If you created one with New-ShieldingDataAnswerFile, load it here. Otherwise, the wizard may have a simplified interface for common settings (depending on version, it may prompt for admin password, domain join info, etc.). Also, if using a custom RDP certificate, import it at this stage (so the VM will install that cert for remote desktop). Create the PDK: Specify an output file name for the shielding data (e.g., MyVMShieldingData.pdk) and finish the wizard. It will create the .pdk file, encrypting all the provided data. The Owner guardian’s private key is used to encrypt secrets, and the Fabric guardian’s public key ensures that HGS (holding the corresponding private key) is needed to unlock the file. The PDK is now ready to use for provisioning shielded VMs. (You can also create PDKs via PowerShell with New-ShieldingDataFile for automation.) Note the PDK is encrypted such that only the combination of the owner’s key and an authorized fabric’s HGS can decrypt it. Fabric admins cannot read sensitive contents of the PDK, and an unauthorized or untrusted host cannot launch a VM using it. Keep the PDK file safe, as it contains the keys that will configure your VM. Step 5: (Optional) Prepare a Shielding Helper VHDX In some scenarios, especially if you need to convert an existing VM into a shielded VM or if you are not using SCVMM for provisioning, a Shielding Helper disk is used. The Shielding Helper is a special VHDX containing a minimal OS that helps encrypt the template disk and inject the unattend inside a VM without exposing secrets to the host. SCVMM can automate this, but if you need to do it manually or for existing VMs, prepare the helper disk as follows: Create a Helper VM: On a Hyper-V host (not necessarily guarded), create a Gen 2 VM with a new blank VHDX (do not reuse the template disk to avoid duplicate disk IDs). Install a supported OS (Windows Server 2016 or higher, a Server Core installation is sufficient) on this VM. This VM will be temporary and its VHD will become the helper disk. Ensure you can log into it (set a password, etc.), then shut it down. Initialize the Helper Disk: On a Hyper-V host with RSAT Shielded VM Tools, run the PowerShell cmdlet: Initialize-VMShieldingHelperVHD -Path "C:\VMs\ShieldingHelper.vhdx" This command should point to the VHDX of the helper VM. This injects the necessary provisioning agent and settings into the VHDX to make it a shielding helper disk. The VHDX is modified in-place (consider making a backup beforehand). Do Not Boot the Helper VM Again: After initialization, do not start the helper VM from Step 1. The VHDX is now a specialized helper disk. You can discard the VM’s configuration. Only the VHDX file is needed going forward. Reuse for Conversions / Non-VMM Deployments: For manually shielding an existing VM, you would attach this helper VHDX to the VM and use PowerShell (e.g. ConvertTo-ShieldedVM or a script) to encrypt the VM’s OS disk using the helper. The helper boots in place of the VM’s OS, uses the PDK to apply BitLocker and the unattend to the OS disk, then shuts down. The VM is then switched to boot from its now-encrypted OS disk with a virtual TPM. (Note: Each initialized helper VHDX is typically one-time-use for a given VM; if you need to shield multiple VMs manually, create or copy a fresh helper disk for each to avoid BitLocker key reuse). Step 6: Prepare the Template Disk and PDK on the Host Copy the VHDX and PDK: Transfer the sealed template .vhdx and the .pdk file to the Hyper‑V host (or a cluster shared volume if the host is part of a Hyper‑V cluster). For example, place them in C:\ShieldedVM\templates\ on the host. This ensures the host can read the files during VM provisioning. Verify File Trust: (Optional) Double-check that the template disk’s signature is recognized by the tenant’s shielding data. The template’s .vsc file (volume signature catalog) should have been used when creating the PDK, so the PDK will “trust” that specific template hash. Also verify that the HGS guardian in the PDK matches your fabric’s HGS public key. These must align, or the VM provisioning will be rejected by HGS. Note: The PDK is encrypted and cannot be opened by the fabric admin as it’s designed so that only HGS (and the VM owner) can decrypt its contents. The host will use it as-is during provisioning. Make sure you do not modify or expose the PDK’s contents. PowerShell to finalize the shielded VM setup. Set up the key protector on the existing VM. For a clean process, you can use New-ShieldedVM on the guarded host: New-ShieldedVM -Name "Finance-App1" ` -TemplateDiskPath "C:\ShieldedVM\Templates\WS2025-ShieldedTemplate.vhdx" ` -ShieldingDataFilePath "C:\ShieldedVM\Templates\TenantShieldingData.pdk" -Wait This single command will create a new VM named “Finance-App1” using the specified template disk and shielding data file. It automatically configures the VM’s security settings: attaches a vTPM, injects the Key Protector (from the PDK) into the VM’s security settings, and attaches the shielding helper disk to boot and apply the unattend. The -Wait flag tells PowerShell to wait until provisioning is complete before returning. Note: Ensure the VM name is unique in your Hyper-V inventory. The New-ShieldedVM cmdlet requires the GuardedFabricTools module and will fail if the host isn’t a guarded host or if guardians are not properly configured. It uses the host’s configured HGS connection to request keys when provisioning. If your shielding data’s unattend file included placeholders for unique settings (for example, a static IP address, custom computer name, etc.), you can supply those values with the -SpecializationValues parameter on New-ShieldedVM. This takes a hashtable mapping the placeholder keys to actual values. For instance: $specVals = @{ "@ComputerName@" = "Finance-App1" "@IP4Addr-1@" = "10.0.0.50/24" "@Gateway-1@" = "10.0.0.1" } New-ShieldedVM -Name "Finance-App1" -TemplateDiskPath C:\ShieldedVM\Templates\WS2025-ShieldedTemplate.vhdx ` -ShieldingDataFilePath C:\ShieldedVM\Templates\TenantShieldingData.pdk -SpecializationValues $specVals -Wait This would replace placeholders like @ComputerName@ in the unattend with “Finance-App1”, etc. Use this only if the unattend (inside the PDK) was set up with such tokens. In many cases, the shielding data might already contain all required settings, so specialization values are optional. Step 7: Monitoring Provisioning and First Boot Once the shielded VM deployment is initiated (either by WAC or PowerShell), the provisioning process begins on the guarded host. This process is automatic and involves several stages behind the scenes: The host registers a new Key Protector for the VM (containing the VM’s BitLocker key, sealed to the VM’s virtual TPM and the fabric’s HGS). It then contacts the HGS. HGS verifies the host’s health (attestation) and, if the host is authorized and healthy, releases the key protector to the host. The VM is initially started using a temporary shielding helper OS (often a small utility VHD). This helper OS boots inside the new VM and uses the unattend file from the PDK to configure the main OS disk. It injects the administrator password, domain or network settings, enables RDP/WinRM, and then finalizes BitLocker encryption of the VM’s OS volume using the VM’s vTPM. This encryption locks the OS disk so it can only be decrypted by that VM’s vTPM (which in turn is only released by HGS to trusted hosts). When specialization is complete, the VM will shut down automatically. This shutdown is a signal that provisioning is finished. The helper disk is then automatically detached, and the VM is now fully shielded. As an administrator, you should monitor this process to know when the VM is ready: In Windows Admin Center’s VM list, you may see the VM’s state change (it might show as “Off” or “Stopped” after the provisioning shutdown). You may not get a detailed status in WAC during provisioning. Refresh the view to see if the VM has turned off after a few minutes. Using PowerShell, you can query the status: run Get-ShieldedVMProvisioningStatus -VMName <Name> on the guarded host to check progress. This cmdlet shows stages or any errors during provisioning. (If the provisioning fails, the cmdlet or Hyper-V event logs will show error details. Common causes include guardian mismatches or unattend errors.) Once the VM has shut down indicating success, you can proceed to start it normally. In WAC, select the VM and click Start (or use Start-VM -Name <Name> in PowerShell). The VM will boot its now-configured OS. On first boot, it will go through final OS specialization (the standard Sysprep specialize/pass completion). Step 8: Post-Deployment Access and Management Your new VM is now running as a shielded VM. Key points for management: Limited Host Access: Because it’s shielded, the Hyper-V host admin cannot view the VM’s console or use PowerShell Direct on this VM. In WAC (or Hyper-V Manager), if you try to connect to the VM’s console, it will be blocked (you might see a black screen or an error). This is expected as shielded VMs are isolated from host interference. All management must be done through the network. Accessing the VM: Use the credentials set in the unattend/PDK to log on to the VM via Remote Desktop (RDP) or another remote method (e.g. PowerShell Remoting). Ensure the VM is connected to a network and has an IP (via DHCP or the unattend’s settings). The unattend should have enabled RDP or WinRM as configured earlier. For example, if the PDK joined the VM to a domain, you can RDP with a domain account; if not, use the local Administrator and the password from the shielding data. Verify Shielded Status: In WAC’s inventory, the VM should show as a generation 2 VM with a TPM. You can confirm it’s shielded by checking VM’s Security settings (they will show that the VM is using a Key Protector and is shielded, often the UI will have those options greyed-out/enforced). You can also use PowerShell: Get-VMSecurity -VMName <Name>. It should show Shielded: True and list the Key Protector ID, etc. Routine Management: You can manage the VM (start/stop/reset) in WAC like any other VM. Backups, replication, etc., should be done with shielded VM-compatible methods (e.g. use Hyper-V checkpoints or backup APIs as the VM’s disks are encrypted but manageable through Hyper-V). Fabric admins cannot alter the VM’s settings that would compromise its security (for instance, you cannot remove the vTPM or turn off shielding without the VM owner’s consent). Further Reading: Install HGS in a new forest | https://learn.microsoft.com/en-us/windows-server/security/guarded-fabric-shielded-vm/guarded-fabric-install-hgs-default Guarded fabric and shielded VMs | https://learn.microsoft.com/en-us/windows-server/security/guarded-fabric-shielded-vm/guarded-fabric-and-shielded-vms-top-node Capture TPM-mode information required by HGS | https://learn.microsoft.com/en-us/windows-server/security/guarded-fabric-shielded-vm/guarded-fabric-tpm-trusted-attestation-capturing-hardware Guarded host prerequisites | https://learn.microsoft.com/en-us/windows-server/security/guarded-fabric-shielded-vm/guarded-fabric-guarded-host-prerequisites Review HGS prerequisites | https://learn.microsoft.com/en-us/windows-server/security/guarded-fabric-shielded-vm/guarded-fabric-prepare-for-hgs Create a Windows shielded VM template disk | https://learn.microsoft.com/en-us/windows-server/security/guarded-fabric-shielded-vm/guarded-fabric-create-a-shielded-vm-template Shielded VMs for tenants - Creating shielding data to define a shielded VM | https://learn.microsoft.com/en-us/windows-server/security/guarded-fabric-shielded-vm/guarded-fabric-tenant-creates-shielding-data Shielded VMs - Preparing a VM Shielding Helper VHD | https://learn.microsoft.com/en-us/windows-server/security/guarded-fabric-shielded-vm/guarded-fabric-vm-shielding-helper-vhd771Views0likes0CommentsStep-by-Step Guide: How to setup conditional access reauthentication policy for PIM?
Once a user is authenticated through Entra ID, they remain signed in as long as the session is valid—even if they close and reopen the browser. However, in scenarios involving sensitive tasks or high-risk operations, it’s beneficial to require reauthentication. Forcing a fresh sign-in adds an extra layer of security by reducing the risk of session hijacking and token replay attacks. It also prevents attackers from maintaining persistence across services and devices, limiting their ability to move laterally within the environment. A common example is when a user elevates their permissions to a higher-privileged role using Entra ID Privileged Identity Management (PIM). By leveraging Conditional Access reauthentication policies, we can require users to reauthenticate before gaining privileged access—adding an important layer of security. In this blog post, I’ll Walk through how to configure this policy step by step. High-Level Configuration Tasks The following steps outline the configuration process for enforcing reauthentication using Conditional Access and Privileged Identity Management (PIM): Create an Authentication Context in Conditional Access. Update Entra ID Privileged Identity Management (PIM) to associate the relevant role with the Authentication Context. Create a Conditional Access policy that enforces reauthentication based on the defined context. Step 1: Create an Authentication Context Authentication Context allows you to define a label that represents a specific authentication requirement (e.g., MFA, compliant device, reauthentication). This label can be referenced in PIM configurations and Conditional Access policies. To create an Authentication Context: Sign in to the Microsoft Entra admin center. Navigate to Protection > Conditional Access > Authentication context. Click + New authentication context. 4.In the creation pane, provide a Name and Description for the context. 5. Click Save to create the context. Step 2: Update PIM Configuration In this setup, the Security Administrator role is already managed via Privileged Identity Management (PIM). For more information on configuring PIM roles, refer to the official documentation: 🔗 Configure Microsoft Entra PIM The next step is to associate the previously created Authentication Context with the PIM role to enforce conditional access policies during role activation. To update PIM with Authentication Context: Sign in to the Microsoft Entra admin center. Navigate to Identity Governance > Privileged Identity Management, and select the role you want to modify (in this example, Security Administrator). Click on Settings. 4. In the Role settings pane, select Edit. 5. Under the On activation, require section, choose Microsoft Entra Conditional Access authentication context. 6. From the dropdown menu, select the Authentication Context you created earlier. 7. Click Update to save and apply the changes. Step 3: Create a Conditional Access Policy to Enforce Reauthentication The final step is to create a Conditional Access policy that forces reauthentication whenever a user activates a privileged role protected by the authentication context. To create the Conditional Access policy: Sign in to the Microsoft Entra admin center. Navigate to Protection > Conditional Access. Click + Create new policy. In the policy creation pane: o Provide a meaningful name for the policy. o Under Users, select the users or groups this policy should apply to. o Under Target resources, choose Authentication context, and then select the context you created earlier. Go to the Session section and configure Sign-in frequency to Every time. This setting ensures that users are prompted for reauthentication each time the context is invoked. Enable the policy by toggling On, then click Create to finalize it. Testing the Configuration With all the required configurations in place, the next step is to test the Conditional Access reauthentication policy in action. I signed in to the Azure portal using a user account that is eligible for the Security Administrator role. Navigating to PIM > My roles > Eligible assignments, I located the Security Administrator role and clicked Activate. At this stage, a message appears on the activation page: "A Conditional Access policy is enabled and may require additional verification. Click to continue." No further action can be taken on this screen until this prompt is addressed, so I clicked the link as instructed. As expected, I was prompted to reauthenticate, in line with the policy we configured. After successfully reauthenticating, I was redirected back to the role activation page, where I could now enter the required justification and additional details. Clicking Activate completed the role activation process successfully. ✅ This confirms that the Conditional Access policy enforcing reauthentication is working as intended for PIM role activation. This concludes the blog post. I hope it has provided you with a clear understanding of how to configure and enforce Conditional Access reauthentication for Privileged Identity Management roles using Authentication Context.5.4KViews2likes1CommentUnderstanding the Windows Server Event Log
What is the Event Log? Each event log records events that happen on the Windows Server computer. Examining the events in these logs can help you trace activity, respond to events, and keep your systems secure. Configuring these logs properly can help you manage the logs more efficiently and use the information that they provide more effectively. Windows Server saves event log files as XML files that can be reported on and managed as part of a collective reporting schema. There are several additional log providers and categories that you can monitor. Event Viewer is the tool most people use to interact with their event logs. Event viewer tracks information in a number of logs termed the “Windows Logs”, which include the application, security, setup, system, and forwarded event logs. Application. The application log records events logged by applications and services running on the system. Events in this Windows log are classified as error, warning, or information, depending on the severity of the event. An error is a significant problem, such as loss of data. A warning is an event that is not necessarily significant but might indicate a possible future problem. An information event describes the successful operation of a program, driver, or service. Security. This Windows log contains security-related events, which are called "audit events," and are described as successful or failed, depending on the event, such as whether a user's attempt to log on to Windows was successful. Setup. This Windows log records events related to installing programs and services on the computer. Computers that are configured as domain controllers have additional logs displayed in this category. System. This Windows log records system events that are sent by Windows and Windows system services, and are classified as error, warning, or information. Forwarded Events. This Windows log records events are forwarded to this log by other computers. Event log forwarding is a built in technology that allows you to centralize your event logs on a single computer. It’s pretty basic compared to dedicated telemetry tools like System Center Operations manager or your favorite third party alternative. Applications and Services Logs. Each application or service installed on the computer probably has an individual log. These logs store events from a single application or service rather than events that might have systemwide impact. This category of logs includes four subtypes for which the application or service can provide events: Admin, Operational, Analytic, and Debug logs. Admin. Events that are found in the Admin channels indicate a problem and a well-defined solution that an administrator can act on. An example of an admin event is an event that occurs when an application fails to connect to a printer. These events are either well documented or have a message associated with them that gives the reader direct instructions of what must be done to rectify the problem. Operational. Events that are found in the Operational channels are used for analyzing and diagnosing a problem or occurrence. They can be used to trigger tools or tasks based on the problem or occurrence. An example of an operational event is an event that occurs when a printer is added or removed from a system. Analytic. Events that are found in the Analytic channels aid in performance evaluations and troubleshooting. These events are published in high volume, so they should only be enabled and logged for limited amounts of time as part of a diagnostic process. They describe program operation and may indicate problems that cannot be handled by user intervention. Debug. Events that are found in the Debug channels can be used by developers when troubleshooting issues with their programs. You should Note that Both Analytic and Debug logs are hidden and disabled by default. To use these logs: Start Event Viewer Click the View menu, and then select Show Analytic and Debug Logs to make these logs visible. Then select the Analytic or Debug log that you want to enable and on the Action menu, click Properties. On the properties dialog box, select Enable logging and click OK. Each of these logs has attributes, such as maximum log size, access rights for each log, and retention settings and methods, each of which can be defined in the appropriate Event Log section in Group Policy. Event Log Settings You can configure the event log settings in the following locations within the Group Policy Management Console: Computer Configuration\Administrative Templates\Windows Components\Event Log Service\ Subordinate folders exist for the following event logs by default: Application Security Setup System The same set of policy settings is available for each event log. The Setup folder has an additional policy setting that allows logging to be turned on. The following sections describe the options and issues for configuring event log settings for better system management and security. Maximum log size (KB) The maximum log size policy setting specifies the maximum sizes of the log files. An individual setting may be specified for each of the Application, Security, Setup, and System event log channels. The user interfaces of both the Local Group Policy Editor and the Microsoft Management Console Event Viewer snap-in allow you to enter values as large as 2 terabytes. If this setting is not configured, event logs have a default maximum size of 20 megabytes. Although there is no simple equation to determine the best log size for a particular server, you can calculate a reasonable size by multiplying the average event size by the average number of events per month, assuming that you back your logs up on a monthly schedule. The average event takes up about 500 bytes within each log, and the log file sizes must be a multiple of 64 KB. If you can estimate the average number of events that are generated each day for each type of log in your organization, you can determine a good size for each type of log file. For example, if your file server generates 5,000 events per day in its Security log and you want to ensure that you have at least four weeks of data available at all times, you should configure the size of that log to about 70 MB (calculated as 500 bytes * 5000 events per day * 28 days = 70,000,000 bytes). Then check the servers occasionally over the following four weeks to verify that your calculations are correct and that the logs retain enough events for your needs. Event log size and log wrapping should be defined to match the business and security requirements that you determined when you designed your organization's security plan. You can set a maximum log size value of between 1024 and 2,147,483,647 kilobytes in multiples of 64 kilobytes. That's an approximate maximum log file size of 2 TB if you're feeling relaxed about the amount of storage you have. Microsoft’s current recommendation for how to configure this setting is 4GB. The approximate maximum events per second that can be recorded is over 300,000. From a practical perspective if you're thinking about log files that big, you should be using a tool like Azure Monitor or Systems Center Operations Manager to query and analyze your event data. If you were mucking around with log files that size in event viewer, you’re probably going to run into some issues. Log File Location The Control the location of the log file policy allows you to configure where event logs are written. By default event log files are located in the %WinDir%\System32\Winevt\Logs folder. You can move these logs manually or by using policy. To move the event log files to a specified folder, follow these steps: Open Event Viewer. Right-click the log that you want to configure, and then select Properties. In the Log path box, type the desired location for the event log, and then select OK. This change takes effect immediately. However, the events that were already logged are still saved in the previous location. If you relocate the event log files to an unavailable disk, the events will be lost. If you significantly increase the number of objects to audit in your organization and if you enabled the Audit: Shut down system immediately if unable to log security audits setting, there is a risk that the Security log will reach its capacity and force the computer to shut down. If such a shutdown occurs, the computer is unusable until an administrator clears the Security log. To prevent such a shutdown, you can disable the Audit: Shut down system immediately if unable to log security audits setting. Log Access Policies The following default log access rights are enforced: Log Access Policy Application and Setup logs All authenticated users can write/read/clear the log. System log Only system software and administrators can write or clear the log. Any authenticated user can read events from it. Security log Only system software and administrators can read or clear the log. The Log Access Policy setting determines which user accounts have access to log files and what usage rights are granted. Individual setting may be specified for each of the Application, Security, Setup, and System event log channels. This policy requires you use Security Descriptor Definition Language (SDDL) to identify security principals rather than just selecting a user or group. This makes it a lot more cumbersome to use than it should be. Enabling this policy allows you to enter a security descriptor for the log file. The security descriptor controls who can read, write, or clear the event log. Control Event Log Behavior The Control Event Log behavior when the log file reaches its maximum size policy setting controls Event Log behavior when the log file reaches its maximum size. If you enable this policy setting and the "Retain old events" policy setting is enabled, the Event Log file is automatically closed and renamed when it is full. A new file is then started. When this policy setting is disabled and a log file reaches its maximum size, new events overwrite old events in the same log file. If this policy setting is enabled and a log file reaches its maximum size and the Retain Old Events policy is not enabled, new events are not written to the log and are lost. Backup log automatically when full The "backup log automatically when full" policy setting controls Event Log behavior when the log file reaches its maximum size and takes effect only if the Retain old events policy setting is enabled. If you enable this policy setting and the Retain old events policy setting is enabled, the Event Log file is automatically closed and renamed when it is full. A new file is then started. If you disable this policy setting and the Retain old events policy setting is enabled, new events are discarded and the old events are retained. When this policy setting is not configured and the Retain old events policy setting is enabled, new events are discarded and the old events are retained. You should archive logs to an external location at scheduled intervals and you ensure that the maximum log size is large enough to accommodate the interval. Alternatively use a monitoring solution that ingests and archives logs in an external location. Summary The event logs record events that happen on the computer. Examining the events in these logs can help you trace activity, respond to events, and keep your systems secure. Configuring these logs properly can help you manage the logs more efficiently and use the information that they provide more effectively. Ensure that you configure log file policies so that log file size is appropriate and that important event log data is not overwritten or goes unlogged.11KViews4likes0Comments