openai
65 TopicsAdding a Fallback Model to Hermes with Microsoft Foundry
So the plan was simple. Leave the Bedrock configuration untouched, then wire Microsoft Foundry in behind it as a fallback, so Hermes always has somewhere else to go when the primary provider is not responding. A few other reasons pushed me towards Foundry in particular: Redundancy that does not need me. If Bedrock is throttled or out of quota, I want Hermes to fail over on its own rather than waiting for me to notice. A catalogue I already pay for. Foundry puts the latest GPT models next to open-weight and partner models in one place, so I can pick a model that suits the task instead of settling for whatever a single provider happens to offer. Enterprise controls out of the box. Region pinning, private networking, content filters and per-deployment quota all sit in the same portal, which makes the setup far easier to defend to a security reviewer. Learning the mechanics before I need them. Working out how Hermes handles a provider chain is much nicer on a quiet Tuesday than during a live outage. Here is the short version, if you are deciding whether to read on. Time: about thirty minutes if nothing goes wrong. Cost: pay-as-you-go tokens only, and none at all while the fallback sits idle. Result: an assistant that keeps answering when your primary provider stops. Before you start, you will need three things: a machine with Hermes already installed and a working primary provider configured, an Azure subscription with access to Microsoft Foundry in a region you can actually deploy into, and enough quota in that region to create a deployment. One thing that made this easy to justify: Foundry deployments bill per token on the standard pay-as-you-go tier. A fallback provider that never gets invoked costs nothing beyond the requests it actually serves, so the insurance is close to free until the day you need it. Chat surface (CLI, messaging) → Hermes Gateway → Primary Amazon Bedrock → Fallback Microsoft Foundry Figure 1: Where the fallback sits. Every request goes through the Hermes gateway to the primary provider; only when that provider is unavailable does the chain continue to Microsoft Foundry. Part 1: Deploying a Model on Microsoft Foundry The first half of this job happens entirely inside the Microsoft Foundry portal and has nothing to do with Hermes yet. All you are really doing here is making sure your Azure subscription can serve a model, and that you hold an endpoint and key Hermes can authenticate with later. 1. Deploy model in Foundry → 2. Copy endpoint + key → 3. hermes fallback add → 4. Authenticate → 5. Select models, test Figure 2: The whole setup in five moves. The first two happen in the Microsoft Foundry portal (orange); the rest happen on the Hermes machine (blue). Go to Microsoft Foundry > Build > Models > Deploy > Deploy a base model. You can deploy a fine-tuned model instead if you already have one, which works just as well with Hermes. Check the region shown at the top of the portal before you commit, because both model availability and deployment quota differ from one region to the next. Then deploy the model you have selected: In this case I deployed gpt-5.6-sol, which is the model Hermes will fall back to. The choice was deliberate rather than exciting. My primary model on Bedrock is a general-purpose chat model, and a fallback is only useful if the answers it gives feel like a continuation of the same conversation rather than a different assistant wearing the same name. The gpt-5.6-sol deployment matches that behaviour closely, it was available in the region I wanted to pin, and the quota I was granted comfortably covers a day of normal use. If a fallback surprises you the first time it fires, it is the wrong fallback. Once the deployment finishes, open it and take note of two values: the target endpoint URI and the API key. Copy both somewhere safe now, because you will be pasting them into Hermes in the next part. If your organisation rotates keys on a schedule, use a key with the longest life you are allowed, since a fallback secured with a credential that expires quietly stops being a fallback. What to copy Where it lives in the portal Where Hermes asks for it Target endpoint URI Deployment > Endpoint > Target URI "Endpoint" prompt in hermes fallback add API key Deployment > Endpoint > Key "API key" prompt, or choose Entra ID instead Deployment name Deployment > Details > Name Shown in the model list Hermes returns Region Top of the portal, next to the resource Must match the region you deployed into Figure 3: Everything Hermes will ask for, and where to find each value before you leave the portal. Part 2: Adding Foundry to Hermes as a Fallback With the Foundry side sorted, everything from here happens in the Hermes CLI. One thing worth knowing before you start: this is the fallback command, not the primary model command, so your existing Bedrock configuration is left completely alone. Nothing in this section can break what is already working, which makes it a good one to try on a live setup. Run the Hermes fallback command: When Hermes asks which provider to add, choose Azure Foundry. The picker still carries the old name; it is the same service that the portal now calls Microsoft Foundry. Paste the target endpoint URI from your deployment, then authenticate with the API key you copied earlier. Hermes also offers Microsoft Entra ID at this prompt, which is the better option if your organisation would rather not have a static key sitting on the machine. If authentication fails here, check the endpoint before you start suspecting the key. In my experience the endpoint is wrong far more often than the credential is, usually because the deployment name at the end of the URI does not match the deployment you actually created. Once authentication succeeds, Hermes lists the deployments your Foundry resource exposes and asks which ones you want to use. You can select more than one, and the order is not cosmetic: Hermes walks down the chain from top to bottom whenever the provider above is unavailable. Treat that list as a priority order, not a shopping basket. What happens to the primary What Hermes does What you see in the chat Responds normally Routes every request to the primary and never touches the chain Nothing. The fallback stays idle Throttled or out of quota Retries the next provider down the chain on the same request A reply, served by the fallback model Endpoint unreachable Keeps failing over on each new request until the primary recovers Slightly different tone and latency, but a working assistant Every provider fails Returns the error rather than hanging An error worth chasing with hermes status Figure 4: The chain in practice. The fallback only earns its keep in the middle two rows, which is exactly why it is easy to forget you configured it. Part 3: Promoting Foundry to the Primary Model At this stage Foundry is sitting in the back seat as a backup. I wanted to reverse the arrangement and make Foundry the primary while Bedrock slides down into the fallback slot, partly because I preferred keeping day-to-day traffic inside my Azure subscription, and partly because I wanted proof the chain works in both directions. Before promotion After promotion Primary: Amazon Bedrock → Primary: Microsoft Foundry Fallback: Microsoft Foundry → Fallback: Amazon Bedrock Figure 5: The promotion, in effect. Nothing is added or removed; the two providers simply trade places in the chain. There is no dedicated "promote" command in Hermes, so the manual route is a short sequence of steps rather than a single instruction: Select the fallback provider/model as the new primary: hermes model Remove the now-duplicate model from the fallback chain: hermes fallback remove Optionally add the old primary model as a fallback: hermes fallback add Restart the messaging gateway: hermes gateway restart Verify the result: hermes status / hermes fallback list That sequence works, and it is good to know what is happening underneath. But since I already had a working provider configured, I would rather just ask Hermes to rearrange itself. This is the part I genuinely enjoy about the tool: the configuration is something you can talk to, not only something you type commands at. Prompt: Okay now please make the model I configured on Microsoft Foundry into the main model, and make the Bedrock one the fallback model! Hermes rewrites the provider chain on its own and confirms the swap once it is done, which is a great deal less error-prone than running the five commands by hand. Part 4: Testing the Switch Configuration you have not tested is just an assumption with extra steps, so the next thing is to confirm Hermes really is talking to Foundry. Type /model when running Hermes to bring up the model picker. You will be prompted to select a provider first. Pick the Microsoft Foundry entry, then choose the specific deployment from the list underneath it. The active model should switch straight away. Send it a plain "Hello" to check that the deployment actually responds, rather than just looking correct in the menu. Appearing in a dropdown and serving a request are two very different things. A second test is worth the thirty seconds it costs: run hermes status to confirm which provider is live, then hermes fallback list to confirm the chain is ordered the way you intended. The picker tells you what you selected; those two commands tell you what Hermes will actually do at three in the morning. Part 5: The Obstacle, and What It Actually Taught Me Every walkthrough has the part the author quietly leaves out. Here is mine: the wrinkle was not the model, it was capacity. My first attempt deployed into the region closest to me out of habit, and the portal turned it down because there was no capacity left for that model at the tier I asked for. The model was clearly listed in the catalogue; being listed and being deployable in your region, on your subscription, at your quota, are three separate questions. Redeploying in a different region fixed it in a couple of minutes, but it meant the endpoint URI changed, which in turn meant the value I had already pasted into Hermes was stale. Re-running hermes fallback add against the new endpoint sorted it out. The lesson is cheap enough to hand over for free: check quota and regional capacity for your specific subscription before you design a walkthrough, a demo or a production fallback around one deployment. In the Foundry portal, Management then Quota shows exactly what you have been granted per region and per model family, which is the only list that matters. Symptom Likely cause Fix Deployment rejected in the portal No capacity for that model at the tier you asked for, in that region Deploy in another region, or drop to a smaller tier Hermes rejects the credential Endpoint URI does not match the deployment you created Re-copy the target URI from the deployment, not the resource Provider authenticates but lists nothing Key belongs to a different Foundry resource Check you are in the right resource, then re-run hermes fallback add Fallback never fires Chain ordered the wrong way round hermes fallback list, then reorder Figure 6: The four things that went wrong, or nearly did, and what fixed each one. There is a silver lining worth stating plainly. Because the fallback chain was already in place, a deployment that refused to come up did not take the assistant down with it. That is precisely the scenario this whole exercise was meant to cover, and it turned up on day one without me having to simulate it. Command Cheat Sheet Everything used in this walkthrough, collected in one place: hermes fallback add: attach a provider to the fallback chain hermes fallback remove: drop a provider from the chain hermes fallback list: show the chain in priority order hermes model: set the primary model hermes gateway restart: restart the messaging gateway after a change hermes status: confirm which provider is currently live /model: switch models from inside a running session Conclusion Adding Microsoft Foundry as a fallback behind my existing Bedrock setup took an afternoon, and most of that was spent recovering from a regional capacity limit I should have checked first. The work itself is small: deploy a model, copy the endpoint and key, run hermes fallback add, authenticate, pick your deployments. The payoff is that Hermes no longer depends on one provider staying healthy. Three things are worth carrying away from this: Check quota, not just the catalogue. The Foundry catalogue shows what Microsoft offers. It does not show what your subscription and region can actually deploy today. Confirm that first, before you build anything on top of a specific deployment. Order your fallback chain deliberately. Hermes works down the list from top to bottom, so the sequence you choose during setup is the failover policy you are going to live with. Put the model you actually trust at the top. Treat the endpoint as part of the credential. Redeploying in a new region changes the endpoint URI, and a fallback pointed at an endpoint that no longer exists is not a fallback. Re-run the setup whenever the deployment moves. The switch from Bedrock primary to Foundry primary also proved the chain runs in both directions, which is the real point. Provider redundancy is only useful if you have watched it work. Next on my list is deliberately breaking the primary provider to confirm the failover triggers on its own, without me typing a single command. If you run this against a different model, region or provider pairing, I would genuinely like to know how it went, particularly if your quota experience was better than mine. Drop it in the comments.285Views0likes0CommentsSet Up Plaud Note Pro with Microsoft Foundry
Prerequisites Riffado, up and running: follow the setup guide in the official Riffado repository to get it going with Docker Compose. A Microsoft Foundry (formerly Azure AI Foundry) resource, with the models you want deployed; in my case, whisper for transcription and o3-mini for summaries. A Plaud device, or any audio recordings you can import into Riffado. Once Riffado is up, head to the Settings page > Providers > Add Provider, and select Custom. This is where the Azure details will go. Why "OpenAI-compatible" isn’t one thing on Microsoft Foundry Azure AI Foundry exposes two different API surfaces on the same resource, and which one serves your model depends on the model: Surface Path shape Serves OpenAI-compatible? v1 route /openai/v1/… gpt-4o-transcribe, gpt-4o-mini-transcribe, chat models, embeddings Yes: Bearer auth, model in the body, no api-version needed Classic route /openai/deployments/{name}/… Whisper (and other legacy audio) No: deployment name lives in the URL, and ?api-version= is mandatory A generic OpenAI client (Riffado's included) can only speak the first dialect. It has nowhere to put a deployment name in the path and no way to append a query parameter. That single fact drives everything below. Part 1 - Transcription Whisper and the DeploymentNotFound mystery Symptom My very first transcription attempt in Riffado failed with 404 Resource not found. Off to a flying start. Configured provider: base URL https://<resource>.services.ai.azure.com, model whisper. Dead end #1: the missing path The first bug was mine: the base URL had no path. Riffado's OpenAI client appends /audio/transcriptions to whatever you give it, so requests were hitting https://<resource>…/audio/transcriptions, a path that doesn't exist on the resource at all. Fixing the base URL to end in /openai/v1 got us to a more interesting error: POST /openai/v1/audio/transcriptions · model=whisper {"error":{"code":"DeploymentNotFound","message":"The API deployment for this resource does not exist. If you created the deployment within the last 5 minutes, please wait a moment and try again."}} Dead end #2: catalog ≠ deployment Worth checking before anything else: selecting a model in the Foundry catalog is not deploying it. GET /openai/v1/models lists everything you could deploy; only Deployments → Deploy model creates an endpoint that answers. If you get DeploymentNotFound, first confirm a deployment actually exists (the listing below requires only the API key): enumerate real deployments (classic control-plane, key auth) curl -s -H "api-key: $KEY" \ "https://<resource>.openai.azure.com/openai/deployments?api-version=2023-03-15-preview" # → {"data":[{"id":"whisper","model":"whisper","status":"succeeded",…}]} The actual cause Here is the part that nearly drove me mad: the deployment existed and was succeeded, yet the v1 route still said DeploymentNotFound. Because Whisper deployments are not served on the v1 route at all. They only answer on the classic path. Verified side by side with the same tiny WAV file: Request Result POST /openai/v1/audio/transcriptions · model=whisper · Bearer 404 DeploymentNotFound POST /openai/deployments/whisper/audio/transcriptions?api-version=2024-06-01 · Bearer 200 {"text":"you"} Same classic path, without ?api-version= 404 Resource not found Three constraints, then: Whisper needs the classic path; the classic path needs api-version; Riffado can send neither. One piece of good news hiding in the table: the classic route accepts Authorization: Bearer, not just Azure's api-key header, so the shim doesn't have to touch auth at all. The fix: a Caddy shim Drop a stock caddy:2-alpine container into the Compose network. Riffado points at it as if it were OpenAI; the shim rewrites the path, injects api-version, and proxies to Azure. The Bearer header passes through untouched. azure-shim.Caddyfile { admin off auto_https off } :80 { @transcribe path /v1/audio/transcriptions /audio/transcriptions handle @transcribe { rewrite * /openai/deployments/whisper/audio/transcriptions?api-version=2024-06-01 reverse_proxy https://<resource>.services.ai.azure.com { header_up Host <resource>.services.ai.azure.com } } handle { respond "azure-shim ok" 200 } } docker-compose.yml (added service) azure-shim: image: caddy:2-alpine restart: unless-stopped volumes: - ./azure-shim.Caddyfile:/etc/caddy/Caddyfile:ro Riffado's provider settings become: Field Value Base URL http://azure-shim/v1 Model whisper (must equal the deployment name) API key the Azure resource key (forwarded as Bearer) Verified From inside the Riffado container: POST http://azure-shim/v1/audio/transcriptions → 200 {"text":"…"}. Transcription works end-to-end in the UI. Part 2 · Summaries & titles o3-mini and the empty answer Symptom The summary button showed "An unexpected error occurred." The container logs were more honest: riffado-app logs Error generating title: TypeError: undefined is not an object (evaluating 'C.choices[0]') Riffado calls chat/completions and reads choices[0] without checking whether the response was an error. So anything the API refuses becomes "an unexpected error." What was it refusing? Cause 1: reasoning models reject the classic knobs o3-mini belongs to Azure/OpenAI's o-series reasoning models, which hard-reject parameters every classic chat client sends. Riffado sends temperature: 0.7 and max_tokens: 50 for titles (0.5 / 2000 for summaries), and o3-mini answers: POST /openai/v1/chat/completions · model=o3-mini HTTP 400 {"error":{"message":"Unsupported parameter: 'max_tokens' is not supported with this model. Use 'max_completion_tokens' instead.", …}} # and with max_tokens fixed: HTTP 400 {"error":{"message":"Unsupported parameter: 'temperature' is not supported with this model.", …}} Cause 2: reasoning tokens starve the output Stripping the bad params gets you to 200, and then comes a subtler failure, my personal favourite of this whole saga. Reasoning models spend completion tokens on internal "thinking" before emitting a single visible character. Riffado's 50-token title budget is consumed entirely by reasoning, and the reply comes back syntactically valid and empty: max_completion_tokens reasoning_effort finish_reason content 50 not set length "" (all 50 spent reasoning) 2000 not set stop "Q3 Budget Planning Strategy Meeting" 2000 low stop same, less reasoning overhead The fix: a Node shim that rewrites the request body Caddy can rewrite paths but not JSON bodies, so this shim is ~60 lines of dependency-free Node on node:20-alpine. Per request it: converts max_tokens → max_completion_tokens, strips temperature / top_p / penalties, floors the token budget at 4000, sets reasoning_effort: "low", maps /v1/* → /openai/v1/*, and forwards to the Azure resource. o3-shim.js const http = require('http'); const https = require('https'); const UPSTREAM_HOST = '<resource>.services.ai.azure.com'; // Params o-series reasoning models reject on chat/completions. const STRIP = ['temperature','top_p','presence_penalty', 'frequency_penalty','logprobs','top_logprobs']; const server = http.createServer((req, res) => { const chunks = []; req.on('data', c => chunks.push(c)); req.on('end', () => { let body = Buffer.concat(chunks); // Riffado's base_url is http://o3-shim/v1 → map to Azure's /openai/v1 let path = req.url; if (path.startsWith('/v1/')) path = '/openai' + path; const ct = (req.headers['content-type'] || '').toLowerCase(); if (ct.includes('application/json') && body.length) { try { const j = JSON.parse(body.toString('utf8')); if (j && typeof j === 'object' && !Array.isArray(j)) { if ('max_tokens' in j) { if (!('max_completion_tokens' in j)) j.max_completion_tokens = j.max_tokens; delete j.max_tokens; } // Reasoning spends tokens before any visible output; small // budgets (Riffado sends 50 for titles) return empty strings. if (Array.isArray(j.messages)) { j.max_completion_tokens = Math.max(Number(j.max_completion_tokens) || 0, 4000); if (!('reasoning_effort' in j)) j.reasoning_effort = 'low'; } for (const k of STRIP) delete j[k]; body = Buffer.from(JSON.stringify(j)); } } catch (_) { /* not JSON - forward untouched */ } } const headers = { ...req.headers, host: UPSTREAM_HOST, 'content-length': Buffer.byteLength(body) }; const up = https.request( { host: UPSTREAM_HOST, port: 443, method: req.method, path, headers }, upRes => { res.writeHead(upRes.statusCode, upRes.headers); upRes.pipe(res); } ); up.on('error', e => { res.writeHead(502, {'content-type':'application/json'}); res.end(JSON.stringify({error:{message:'o3-shim upstream error: '+e.message}})); }); up.end(body); }); }); server.listen(80, () => console.log('o3-shim listening on :80')); docker-compose.yml (added service) o3-shim: image: node:20-alpine restart: unless-stopped working_dir: /app command: ["node", "/app/o3-shim.js"] volumes: - ./o3-shim.js:/app/o3-shim.js:ro Add a second provider in Riffado (base URL http://o3-shim/v1, model o3-mini, the resource's API key) and set it as the default enhancement provider (summaries/titles), keeping the Whisper one as default for transcription. Riffado's exact title request (temperature: 0.7, max_tokens: 50) through the shim → 200, finish_reason: stop, real title text. A full meeting-transcript summary returns structured key points and action items. The final shape Reading it left to right: Riffado never talks to Azure directly. Transcription requests pass through azure-shim, a stock Caddy container that rewrites each request onto Whisper's classic deployment path and injects the mandatory api-version parameter. Summary and title requests pass through o3-shim, a tiny Node server that rewrites the request body into the shape o3-mini accepts and floors the token budget so the model's internal reasoning cannot starve the actual answer. As far as Riffado is concerned, it is simply talking to two ordinary OpenAI providers. Both shims live on the Compose network only; nothing is exposed publicly. Riffado is unmodified. Verification checklist Each layer, testable in isolation. Run these before blaming the app: smoke tests # 1. Key + resource alive? (v1 models listing, Bearer auth) curl -s -H "Authorization: Bearer $KEY" \ https://<resource>.services.ai.azure.com/openai/v1/models | head -c 200 # 2. Whisper answers on the classic path? curl -s -H "Authorization: Bearer $KEY" -F file=@test.wav \ "https://<resource>.services.ai.azure.com/openai/deployments/whisper/audio/transcriptions?api-version=2024-06-01" # 3. Shim translates correctly? (from inside the compose network) docker exec riffado-app node -e "fetch('http://azure-shim/') .then(r=>r.text()).then(console.log)" # 4. o3-mini via shim, sending the params Riffado sends? # (temperature + max_tokens:50; the shim must absorb both) If you'd rather not run shims Both shims exist because of the specific models chosen. Pick models that live natively on the v1 route and Riffado connects directly, with base URL https://<resource>.services.ai.azure.com/openai/v1 and zero extra containers: Transcription: deploy gpt-4o-mini-transcribe (or gpt-4o-transcribe) instead of Whisper. Summaries: deploy a non-reasoning chat model such as gpt-4o-mini, which happily accepts temperature and max_tokens. The shim approach earns its keep when you're standardized on specific models (Whisper's transcription quality, o3-mini's reasoning), or when you want a control point to add logging, retries, or budget caps later. For reference, this is what the finished setup looks like on Riffado's side. Each shim is registered as a plain Custom provider. Here is the whisper provider pointing at azure-shim, with Use for transcription ticked: And once both are saved, they sit side by side in the providers list, whisper tagged for transcription and o3-mini tagged for enhancement: A quick look at the Foundry portal In the Microsoft Foundry portal, head over to Models > AI Services and you will find a pleasant surprise: fifteen AI service models already deployed and ready to use, covering the Azure Speech family (including Voice Live and Speech to Text), Azure Translator, Azure Language, and Content Understanding: You can of course deploy another model for this, but the pre-deployed ones are a handy cost-saving option. Click on the Azure Speech – Voice Live radio button and you will be shown the Base URL and API Key, which you can then paste into the provider settings on Riffado's Settings page. A quick note on cost: these services are not free. They are billed pay-as-you-go based on usage. Azure Speech transcription is charged per audio hour, and Voice Live pricing is tiered by the model you choose. The free tier does include a monthly allowance, though. Check the Azure Speech pricing page before committing. And if you would rather deploy a dedicated transcription model such as whisper, Foundry gives you the flexibility to do just that. Open the model page in the catalogue, click Deploy, and go with Default settings unless you need custom quotas or guardrails: Let's test the setup On your Plaud device, just tap to start recording. The little LED bars light up to show it is listening: Or skip the device entirely and upload an audio file straight into Riffado using the Upload Audio button. Either way, the recording lands on the Recordings page; hit Transcribe and let the spinner do its thing: As you can see below, whisper, the transcription model we deployed earlier, even managed to transcribe a recording in Malay without a hitch. My 3:32 test clip came back as 186 words of clean Malay, with the language correctly detected and tagged: I have also set o3-mini as the enhancement provider, and it enhanced the transcription with a proper summary, key points, and title as well! The Meeting Notes-style summary came straight out of o3-mini through the shim, with zero manual prompting. Wrapping up What started as a TikTok-fuelled impulse buy nearly killed off by subscription pricing ended up as a fully self-hosted pipeline: Plaud for recording, Riffado as the interface, and Microsoft Foundry serving whisper and o3-mini behind two tiny shims. The total extra infrastructure came to two containers and roughly sixty lines of code, and not a single monthly subscription in sight. If you try this setup and run into a failure mode I have not covered here, do share it in the comments. Half the fun is in the debugging.312Views0likes0CommentsMicrosoft Agent Framework Multi-Agent Workflow Architecture for Automated Kubernetes Assessments
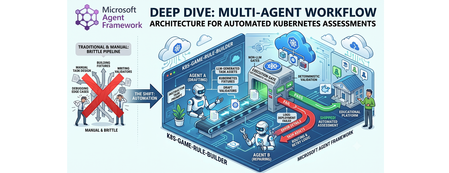
Why this system generates tests (design rationale) This project does not generate tests just to "check code." It generates tests because, in a Kubernetes learning game, the test suite is the grading contract. The design goals are: Scale content creation: instructors should not hand-author every task and checker. Keep grading objective: student success is measured against Kubernetes API state, not subjective review. Avoid fragile tasks: generated tasks must survive empty/wrong cluster states without crashing. Make failures repairable: when checks break, the system should patch and re-validate automatically. So the pipeline generates a full task package (setup, answer, check, cleanup) where tests define exactly what "correct" means. Lifecycle: from concept to production-ready grader Reader mental model: this is a content compiler with validation stages, not a single chat completion. Phase 1: Pedagogical intent -> structured concept The Idea Agent converts a topic into a constrained concept object (objective, progression, task IDs, difficulty variants). Memory rules block duplicates and previously failed concepts. Phase 2: Concept -> executable grading package The Generator Agent turns that concept into files: student instructions (instruction.md) learning material (concept.md) parameter source (session.json) setup and answer manifests (setup.template.yaml, answer.template.yaml) deterministic pytest flow (test_01 ... test_06) At this point, output is still untrusted draft content. Phase 3: Structural correctness gate Deterministic validation checks file presence, syntax, JSON/YAML shape, and template correctness. This catches basic integrity issues before cluster execution. Phase 4: Behavioral correctness gate (real cluster) Pytest executes against Kubernetes and verifies runtime behavior using real kubectl-derived state. This proves that generated checks actually evaluate cluster resources as intended. Phase 5: Anti-false-positive gate (skip-answer mode) The same suite runs with SKIP_ANSWER_TESTS=True to verify grader integrity: answer deployment is skipped test_05_check.py must fail If it still passes, the grader is invalid (it would accept wrong student submissions). Phase 6: Self-healing repair loop On any failure, deterministic error logs are fed into the Fixer Agent, which patches only broken files. The workflow then re-enters validation + test gates. Phase 7: Finalization If all gates pass -> task is kept as production-ready content. If retries are exhausted -> task is moved to unsuccessful/ with FAILURE_REPORT.txt for human triage. This lifecycle explains the core architecture decision: LLMs generate candidate graders, deterministic execution certifies them. Concrete generated sample (what the pipeline actually produces) Below is a representative generated task for topic: ConfigMap Environment Variable Injection. Generated directory layout tests/game01/050_configmap_env_injection/ ├── __init__.py ├── instruction.md ├── concept.md ├── session.json ├── setup.template.yaml ├── answer.template.yaml ├── test_01_setup.py ├── test_02_ready.py ├── test_03_answer.py ├── test_05_check.py └── test_06_cleanup.py session.json (runtime variables) { "namespace": "{{random_name()}}{{random_number(100,999)}}{{student_id()}}", "configmap_name": "{{random_name()}}", "deployment_name": "{{random_name()}}", "container_name": "app", "env_key": "APP_MODE", "env_value": "production" } Why this exists: task values are randomized per student/session, so tests verify behavior by variable contract instead of hardcoded names. setup.template.yaml (baseline state only) apiVersion: v1 kind: Namespace metadata: name: {{ namespace }} Why this exists: setup should create prerequisites only. It must not accidentally include the final answer. answer.template.yaml (expected correct solution) apiVersion: v1 kind: ConfigMap metadata: name: {{ configmap_name }} namespace: {{ namespace }} data: {{ env_key }}: "{{ env_value }}" --- apiVersion: apps/v1 kind: Deployment metadata: name: {{ deployment_name }} namespace: {{ namespace }} spec: replicas: 1 selector: matchLabels: app: env-demo template: metadata: labels: app: env-demo spec: containers: - name: {{ container_name }} image: nginx:latest env: - name: {{ env_key }} valueFrom: configMapKeyRef: name: {{ configmap_name }} key: {{ env_key }} Why this exists: defines canonical "correct cluster state" that graders must detect. test_02_ready.py (wait for setup resources) import json import time from tests.helper.kubectrl_helper import build_kube_config, run_kubectl_command class TestReady: def test_001_namespace_active(self, json_input): kube_config = build_kube_config( json_input["cert_file"], json_input["key_file"], json_input["host"] ) time.sleep(2) result = run_kubectl_command( kube_config, f"kubectl get namespace {json_input['namespace']} -o json", ) data = json.loads(result) assert data.get("status", {}).get("phase") == "Active" Why this matters: validates setup-stage readiness only. It should not check answer resources yet. test_05_check.py (student grading contract) import json from tests.helper.kubectrl_helper import build_kube_config, run_kubectl_command class TestCheck: def test_001_configmap_key_exists(self, json_input): kube_config = build_kube_config( json_input["cert_file"], json_input["key_file"], json_input["host"] ) result = run_kubectl_command( kube_config, f"kubectl get configmap {json_input['configmap_name']} -n {json_input['namespace']} -o json", ) data = json.loads(result) assert data["data"][json_input["env_key"]] == json_input["env_value"] def test_002_deployment_uses_configmap_env(self, json_input): kube_config = build_kube_config( json_input["cert_file"], json_input["key_file"], json_input["host"] ) result = run_kubectl_command( kube_config, f"kubectl get deployment {json_input['deployment_name']} -n {json_input['namespace']} -o json", ) data = json.loads(result) env = data["spec"]["template"]["spec"]["containers"][0].get("env", []) matched = [ e for e in env if e.get("name") == json_input["env_key"] and e.get("valueFrom", {}).get("configMapKeyRef", {}).get("name") == json_input["configmap_name"] and e.get("valueFrom", {}).get("configMapKeyRef", {}).get("key") == json_input["env_key"] ] assert matched, "Deployment container must consume env var from ConfigMap key" Why this matters: this is the real grading logic. If a student deploys wrong resource wiring, this test fails with explicit reason. Why skip-answer validation is essential for this sample When SKIP_ANSWER_TESTS=True, answer deployment is skipped. In this mode: test_03_answer.py should be skipped test_05_check.py must fail (ConfigMap/Deployment wiring is absent) If test_05_check.py still passes, the grader is broken (false positive), and the workflow routes to Fixer. Rule Builder Workflow Flowchart Multi-graph architecture views 1) Control-plane graph (orchestration DAG) 2) Runtime sequence (who calls what) 3) State machine (task lifecycle) 4) Prompt lifecycle graph (how prompts evolve) 5) MCP + Kubernetes execution boundary graph Core Agent Framework Primitives Used This repository is a practical example of Agent Framework as a graph orchestrator, not just an agent wrapper. WorkflowBuilder builds a typed DAG with explicit edges. @executor functions implement deterministic nodes (validation, pytest, decisions, routing prep). AgentExecutor wraps LLM agents so they behave as graph nodes. WorkflowContext shared state carries typed data and retry metadata between nodes. add_multi_selection_edge_group(...) + selector functions enforce conditional routing. MCPStdioTool connects filesystem MCP tools into agents for controlled file I/O. Production graph construction (from workflow/builder.py) looks like this: workflow = ( WorkflowBuilder(start_executor=initialize_retry) .add_edge(initialize_retry, generator_executor) .add_edge(generator_executor, parse_generated_task) .add_edge(parse_generated_task, run_validation) .add_edge(run_validation, run_pytest) .add_edge(run_pytest, make_decision) .add_multi_selection_edge_group( make_decision, [keep_task, remove_task], selection_func=select_action, ) .add_edge(keep_task, run_pytest_skip_answer) .add_multi_selection_edge_group( run_pytest_skip_answer, [check_loop, complete_workflow], selection_func=select_skip_answer_action, ) .add_multi_selection_edge_group( check_loop, [fix_task, complete_workflow], selection_func=select_loop_action, ) .add_edge(fix_task, fixer_executor) .add_edge(fixer_executor, parse_generated_task) .build() ) This is the architectural heart of the system: agents and deterministic executors are first-class nodes in the same graph. Detailed Node-by-Node Mechanics 1. Idea Agent (🧠): Concept Synthesis with Memory Constraints The Idea Agent (agents/k8s_task_idea_agent.py) generates a structured concept with three difficulty variations (BEGINNER/INTERMEDIATE/ADVANCED). It is memory-aware: task_ideas_memory.json tracks successful concepts. task_ideas_failure_memory.json tracks concepts that failed downstream. Memory constraints are injected using AgentMiddleware (system-level prompt injection) to avoid duplicate or previously failed concepts. For Responses-only models, the agent switches to a tool-call contract (save_k8s_task_concept) instead of structured response formatting. 2. Generator Agent (⚙️): MCP-Backed File Authoring The Generator Agent receives a strict prompt and writes task files through MCP filesystem tools. Key framework details: Built through chat_client.as_agent(...). MCP tool attached via tools=mcp_tool. Function-call execution observability added with LoggingFunctionMiddleware. Uses absolute-path-only policy in instructions to prevent path drift. 3. Deterministic Validation + Test (✅): Non-LLM Gates After generation, the graph moves through deterministic executors: run_validation calls pure Python checks (k8s_task_validator). run_pytest executes pytest --import-mode=importlib --rootdir=. .... Raw pytest output is persisted in workflow state for later fixing. This is critical: no LLM is asked whether code is correct. 4. Skip-Answer Test (🧪): Grader Correctness Gate Even if standard tests pass, the workflow enforces a second tier: SKIP_ANSWER_TESTS=True pytest --import-mode=importlib --rootdir=. Implementation detail: the executor writes JUnit XML, parses it, and asserts that: test_03_answer.py is skipped test_05_check.py fails as expected If test_05_check.py does not fail, the task is treated as invalid and sent back to retry/fix. 5. Fixer Agent + Retry Loop (🔧): Bounded Self-Healing On failure, fix_task builds a targeted prompt containing: failure reasons from deterministic nodes full captured pytest output explicit rule to patch only broken files in place The Fixer Agent runs through AgentExecutor, writes patches via MCP, and the graph loops back to parse_generated_task. Retries are stateful (retry_count, max_retries) and hard-bounded. On exhaustion, complete_workflow moves the task to unsuccessful/<game>/ and writes FAILURE_REPORT.txt. Agent Prompt Design (The Part That Makes It Work) If you want to understand why this pipeline works, you need to inspect prompts as operational contracts, not generic instructions. Real Idea Agent Prompt (from code) IDEA_AGENT_INSTRUCTIONS = ( "You are a Kubernetes task idea generator that creates detailed task concepts with three difficulty variations. " "Read official K8s documentation and propose comprehensive learning concepts for a Kubernetes game. " "\n\nYour task:\n" "1. Choose ONE Kubernetes concept not yet covered (check context for existing concepts)\n" "2. Generate exactly 3 variations: BEGINNER, INTERMEDIATE, and ADVANCED\n" "3. Use 3-digit task IDs (001-999) in format: XXX_concept_name_level (e.g., 041_secrets_basic)\n" "4. Each variation should build on the previous one with increasing complexity\n" "5. Include practical, hands-on scenarios covering: Workloads, Services, Storage, Configuration, Security, Scheduling, Policies\n" "\nProvide the concept, tags, description, and 3 variations with task_id, difficulty, title, objective, key_skills, and estimated_time." ) Responses-only models use a stricter tool-call version: IDEA_AGENT_INSTRUCTIONS_TOOL_CALL = ( IDEA_AGENT_INSTRUCTIONS + "\n\n" "**CRITICAL**: You MUST call the save_k8s_task_concept tool to save your generated concept.\n" "...\n" "Always call save_k8s_task_concept with your generated concept." ) Idea Agent Prompt Contract The Idea Agent prompt enforces: one concept per run exactly three difficulty variations strict task ID format (XXX_concept_name_level) practical skill progression Core pattern: You are a Kubernetes task idea generator... 1. Choose ONE Kubernetes concept not yet covered 2. Generate exactly 3 variations: BEGINNER, INTERMEDIATE, ADVANCED 3. Use 3-digit task IDs in format XXX_concept_name_level ... It is strengthened by runtime memory injection: previously generated concepts are blocked previously failed concepts are blocked For Responses-only models, the contract becomes tool-driven: CRITICAL: You MUST call the save_k8s_task_concept tool... This reduces ambiguity in output structure and makes downstream parsing deterministic. Real Generator Agent Prompt (from code) def _get_generator_instructions(): return ( "You are a Kubernetes task generator with filesystem tools.\n" f"The MCP filesystem is rooted at: {PATHS.tests_root.parent}\n" f"You MUST use ABSOLUTE paths for ALL file operations.\n" f"Task directory: {PATHS.game_root}/XXX_task_name/\n" "...\n" "CRITICAL: test_02_ready.py checks resources from setup.template.yaml, NOT answer.template.yaml.\n" "...\n" "MUST use polling loops (60s timeout, 15s interval)\n" "MUST use try/except and safe .get() JSON access\n" ) The generator prompt is long on purpose: it encodes path correctness, file schema, YAML/Jinja structure, and testing strategy in a single deterministic contract. Generator Agent Prompt Contract The Generator prompt is intentionally long and prescriptive because it defines filesystem safety and grading correctness requirements. Key constraints encoded in the prompt: Absolute path writes only (prevents writing to wrong workspace paths) No directory creation (directory is pre-created by executor) Required file set (instruction.md, concept.md, session.json, templates, tests) test-flow invariants: test_01_setup.py deploys setup test_02_ready.py checks setup resources only test_03_answer.py deploys answer test_05_check.py validates final solution robust test coding style: polling loops, try/except, .get()-based JSON parsing, explicit debug output Example contract fragment: CRITICAL PATH RULES: ✅ CORRECT: /abs/path/tests/gameXX/050_task/file.py ❌ WRONG: tests/gameXX/050_task/file.py (relative) CRITICAL: test_02_ready.py checks resources from setup.template.yaml, NOT answer.template.yaml. This is why generation quality is high before the Fixer loop even starts. Real Runtime Retry Prompt Builder (from code) def _build_retry_generation_prompt(combined: CombinedValidationResult) -> str: task_id = combined.test.task_id failure_reasons = _build_failure_reasons(combined) return ( f"Generate a complete Kubernetes learning task with ID '{task_id}' about '{combined.target_topic}'. " f"This is retry attempt {combined.retry_count + 1} of {combined.max_retries}. " f"\n\n⚠️ PREVIOUS ATTEMPT FAILED:" f"\n{chr(10).join([f' - {reason}' for reason in failure_reasons])}" f"\n\nIMPORTANT: You MUST use the exact task ID '{task_id}' - do not generate a new ID." f"\n\n✅ Directory already exists: {PATHS.game_root}/{task_id}/" f"\nWrite all files directly into this directory. Do NOT call create_directory." "..." ) This means retries are not generic retries; they are failure-conditioned retries with precise constraints. Fixer Agent Prompt Contract The Fixer prompt is a repair protocol, not a regeneration prompt. It includes: exact failure reasons from deterministic validators raw pytest output instruction to read current task files first strict directive to patch only broken files Core behavior constraints: DO NOT rewrite all files. Make TARGETED FIXES to ONLY the broken files. Use ABSOLUTE paths for all file operations. This keeps retries cheap, preserves working artifacts, and improves convergence speed. Real Runtime Fix Prompt Builder (from code) def _build_fix_prompt(combined: CombinedValidationResult, raw_test_output: str) -> str: task_id = combined.test.task_id failure_reasons = _build_failure_reasons(combined) prompt = ( f"Fix the failed Kubernetes task '{task_id}' located in '{PATHS.game_root}/{task_id}/'." f"\n\nThis is fix attempt {combined.retry_count + 1} of {combined.max_retries}." f"\n\n⚠️ TASK FAILED WITH THESE ERRORS:" f"\n{chr(10).join([f' - {reason}' for reason in failure_reasons])}" ) if raw_test_output: prompt += f"\n\n📋 FULL TEST OUTPUT:\n```\n{raw_test_output}\n```" prompt += ( f"\n\n🔍 YOUR TASK:" f"\n1. READ all files from '{PATHS.game_root}/{task_id}/'" f"\n6. Make TARGETED FIXES to ONLY the broken files" f"\n7. WRITE ONLY the fixed files back" f"\n\n⚠️ CRITICAL: DO NOT rewrite all files! Only fix the broken ones!" ) return prompt How Prompt Output Enters the Agent Framework Graph The prompt builders above are used by deterministic executors and sent to agent nodes through AgentExecutorRequest: await ctx.send_message( AgentExecutorRequest( messages=[Message(role="user", contents=[fix_prompt])], should_respond=True ) ) So prompt generation and graph routing are tightly coupled: each route transition emits a specific prompt payload into the next LLM node. Runtime-Constructed Prompts in Executors The most important prompts are built dynamically in workflow executors: _build_retry_generation_prompt(...) _build_fix_prompt(...) These functions inject live context: retry_count / max_retries concept + objective metadata validation/test failure reasons full captured test logs So each retry is context-rich and specific, not another blind generation attempt. Prompt + Middleware + Deterministic Gates = Reliability In this repository, reliability does not come from prompt text alone. It comes from three layers working together: Prompt contracts constrain agent behavior. Middleware injects memory and logs tool invocations. Deterministic executors enforce objective pass/fail gates. That combination is why the workflow remains auditable and predictable even when LLM outputs vary. Agent Framework Execution Model in This Repo Strongly-Typed Message Passing workflow/models.py defines transport models used between nodes: ValidationResult and TestResult (Pydantic) CombinedValidationResult (dataclass with should_keep and should_retry) InitialWorkflowState (seed payload for each run) This keeps node contracts explicit and simplifies selector logic. Fail-Fast Shared State Management Executors use ctx.get_state(...) with a sentinel (_MISSING) and raise explicit exceptions if required state is absent. This prevents hidden fallback behavior and catches graph/data wiring errors early. Conditional Routing with Selectors Selectors (workflow/selectors.py) encode graph decisions: select_action → keep vs remove select_skip_answer_action → complete vs loop select_loop_action → fix vs complete This separates decision policy from executor implementation. Streaming Workflow Runtime workflow.run(initial_state, stream=True) emits output events incrementally. The runner (workflow/runner.py) consumes these events to detect successful completions and update concept memory accordingly. Agent Construction and API Selection Strategy The repository uses Azure CLI auth (AzureCliCredential) and dynamically selects API mode by deployment name (agents/config.py): Chat Completions path: OpenAIChatCompletionClient Responses-only model path: OpenAIChatClient or custom ResponsesAgent Why this matters: some codex-class deployments are Responses-only, so the architecture supports both without changing workflow logic. How MCP Actually Controls Kubernetes (Important Distinction) In this repo, MCP is used for filesystem control; Kubernetes control is done through kubectl tools. 1) MCP server role: controlled file I/O The workflow starts MCP stdio servers (official filesystem server) and mounts them into agents: docs_mcp_tool = MCPStdioTool( name="filesystem_docs", command="npx", args=["-y", "@modelcontextprotocol/server-filesystem", str(PATHS.k8s_docs_root)], load_prompts=False, ) tests_mcp_tool = MCPStdioTool( name="filesystem_tests", command="npx", args=["-y", "@modelcontextprotocol/server-filesystem", str(PATHS.tests_root.parent)], load_prompts=False, ) Those MCP tools are passed into Generator/Fixer agents, which then call MCP file functions (read/write/list) inside allowed roots only. 2) Kubernetes cluster control role: kubectl execution tool Cluster actions are not performed by MCP filesystem server; they are performed by a dedicated function tool: def run_kubectl_command(command: str) -> str: kubeconfig_path = os.environ.get("KUBECONFIG", "/home/developer/.kube/config") cmd_list = ["kubectl"] + command.split() result = subprocess.run( cmd_list, capture_output=True, text=True, check=True, env={**os.environ, "KUBECONFIG": kubeconfig_path}, ) return result.stdout And the Kubernetes agent forces tool usage: agent = responses_client.as_agent( name="KubernetesAgent", instructions="...You MUST use the run_kubectl_command tool...", tools=[run_kubectl_command], default_options={"tool_choice": "required"}, ) So the control plane is: MCP filesystem → manipulate generated task files. kubectl tool → query/mutate real cluster state. deterministic pytest/validator executors → accept or reject results. 3) End-to-end command flow in practice When generated tests run, they execute real kubectl get ... -o json checks in test code, and the deterministic runner captures raw output: pytest_command = f"pytest --import-mode=importlib --rootdir=. {task_with_val.task_directory}/" result = run_pytest_command(pytest_command) ctx.set_state(f"raw_output_{task_with_val.task_id}", raw_output) This means Kubernetes state verification is always grounded in live command output, not model speculation. Should MCP run Kubernetes tests? Short answer: not in this design. Current architecture keeps test execution deterministic and local: pytest is run by run_pytest_command(...) (pure Python subprocess runner) test results are parsed and stored in workflow state retry/fix routing uses those deterministic outputs This is intentional. If test execution were delegated to an LLM-facing MCP command tool, you would lose strict control over execution semantics and error handling. Recommended pattern: Use MCP for file/document access and controlled editing. Use deterministic executors for pytest and validation. Use LLM agents only for generation and repair. If you still want MCP-driven test execution, add a separate locked-down command MCP server (only whitelisted pytest/kubectl commands), but keep pass/fail decision logic in deterministic executors. How tests are run in this workflow (with code) The workflow executes tests in deterministic executors, not inside LLM agents. 1) Workflow node calls pytest runner run_pytest executor builds the command and calls the pure Python runner: @executor(id="run_pytest") async def run_pytest(task_with_val: TaskWithValidation, ctx: WorkflowContext[TestResult]) -> None: from agents.pytest_runner import run_pytest_command pytest_command = f"pytest --import-mode=importlib --rootdir=. {task_with_val.task_directory}/" result = run_pytest_command(pytest_command) raw_output = result["details"][0] if result.get("details") else "" ctx.set_state(f"raw_output_{task_with_val.task_id}", raw_output) ... 2) Deterministic subprocess execution The runner normalizes command flags and executes pytest via subprocess: def run_pytest_command(command: str) -> dict[str, Any]: normalized_command = _normalize_pytest_command(command) # adds -s if needed cmd_list = shlex.split(normalized_command) result = subprocess.run( cmd_list, capture_output=True, text=True, check=False, cwd=str(PATHS.pytest_rootdir), ) combined_output = result.stdout + "\n" + result.stderr _save_test_output(normalized_command, combined_output, skip_answer) ... Exit codes are interpreted deterministically: 0 → pass 5 → no tests collected (fail) others → fail with exit code reason 3) Skip-answer validation tier After normal pass, the workflow runs pytest again with SKIP_ANSWER_TESTS=True and parses JUnit XML: os.environ["SKIP_ANSWER_TESTS"] = "True" pytest_command = f"pytest --import-mode=importlib --rootdir=. --junitxml={junit_path} {task_dir}/" result = run_pytest_command(pytest_command) test_05_failed, test_03_skipped = _parse_skip_answer_junit(junit_path) The parser checks per-testcase outcomes: if "test_05_check.py" in context and has_failure_or_error: test_05_failed = True if "test_03_answer.py" in context and has_skipped: test_03_skipped = True 4) How failures trigger fix loop If pytest fails (or skip-answer logic fails), failure reasons and raw output are pushed into state, then the Fixer Agent receives a generated fix prompt containing that output: ctx.set_state(f"failure_reasons_{task_id}", reasons) ctx.set_state(f"raw_output_{task_id}", raw_output) fix_prompt = _build_fix_prompt(combined, raw_test_output) await ctx.send_message( AgentExecutorRequest( messages=[Message(role="user", contents=[fix_prompt])], should_respond=True ) ) That is the key loop: deterministic test output drives LLM repair, then deterministic tests re-run. ResponsesAgent Internals (Advanced Agent Framework Pattern) The custom ResponsesAgent (agents/responses_agent.py) demonstrates a lower-level integration pattern: Connect MCP tool lazily. Call Responses API. Parse ResponseFunctionToolCall items. Execute tools (MCP + custom callables). Feed function_call_output back to model. Repeat until final text response. It also runs a middleware chain around tool invocations, preserving observability and consistency with standard agent paths. Why This Architecture Is Robust This design works because Agent Framework is used as a deterministic orchestration layer around probabilistic generation: LLM creativity is constrained by typed state and strict prompts. deterministic executors act as objective quality gates. retries are targeted, bounded, and auditable. failures produce durable forensic artifacts (FAILURE_REPORT.txt + test logs). For Kubernetes education pipelines, this yields high throughput without sacrificing grader reliability. GitHub Repo - https://github.com/wongcyrus/k8s-game-rule-builder About the Author Cyrus Wong is the senior lecturer of Hong Kong Institute of Information Technology (HKIIT) @ IVE(Lee Wai Lee).and he focuses on teaching public Cloud technologies. He is a passionate advocate for the adoption of cloud technology across various media and events. With his extensive knowledge and expertise, he has earned prestigious recognitions such as AWS AI Hero, Microsoft MVP- Microsoft Foundry, and Google Developer Expert - Cloud(AI).404Views0likes0CommentsSigning in to Microsoft Foundry from OpenClaw using Azure AD: a smoother way to bring your models in
This post is a quick update to walk through the new flow. If you read the previous one, think of this as the easier path I wish I had the first time round. If you have not seen the original, you can find it here: Integrating Microsoft Foundry with OpenClaw: Step by Step Model Configuration | Microsoft Community Hub Pre-requisite: You will need the Azure CLI (azure-cli) installed on your machine. The official install guide for Linux is here: https://learn.microsoft.com/en-us/cli/azure/install-azure-cli-linux?view=azure-cli-latest I am on Linux so I went the Homebrew route, which keeps things simple. The formula is here: https://formulae.brew.sh/formula/azure-cli Microsoft also has official docs covering the Homebrew/Linuxbrew install: https://learn.microsoft.com/en-us/cli/azure/install-azure-cli-macos?view=azure-cli-latest#install-with-homebrew Once Homebrew is ready, run this in your terminal: brew install azure-cli Why this matters: Before this update, every Foundry model you wanted to use in OpenClaw needed its own API key and endpoint pasted into the config. It worked, but it was tedious, and keys are easy to leak if you are copying them around. The Azure AD path solves both problems. You authenticate as yourself (or a service principal), OpenClaw asks Azure for the list of Foundry resources you have access to, and it brings the models in automatically. Signing in to Microsoft Foundry from OpenClaw via Azure AD A device-code OAuth handshake replaces the old static-API-key flow. OpenClaw delegates auth to the local Azure CLI; the CLI handles the browser-side sign-in, holds the resulting tokens, and refreshes them silently. OpenClaw then walks the Azure resource graph, subscriptions → Foundry resources → model deployments and registers each model into its own config. No API keys move through OpenClaw at any point. Sequence diagram of the OAuth 2.0 device-authorization flow as orchestrated by OpenClaw. Phases 1–3 establish identity (the developer authenticates once, in a real browser, against Azure AD). Phases 4–5 perform service discovery (OpenClaw walks the ARM resource hierarchy, subscriptions → Foundry accounts → model deployments and persists the result to a local provider config). After registration, every model call OpenClaw makes against Foundry reuses the same Azure-CLI-managed token cache: tokens refresh transparently, and access is gated by the Foundry resource's RBAC assignments rather than a static API key. Dashed lines denote return values; the teal line in step 7 marks the single token-issuance event the rest of the system pivots on. Walking through the new flow: Start with the command to onboard openclaw as if you were setting up OpenClaw for the first time: openclaw onboard Kick things off with the OpenClaw onboard command, the same one you would use when setting up OpenClaw for the first time. When it prompts you, choose update values. Next, you will be asked to configure your models. Scroll down a little and you will see Microsoft Foundry listed as a supported provider. Pick it. From here, you have two options. You can sign in with an API key, which is what I covered in the previous blog post, or you can sign in through Azure AD. The Azure AD path is easier and more secure, so that is the one we will use. OpenClaw will give you a URL and a device code. Copy the URL into your browser and use the code to complete the sign in. (This is where the az CLI from the pre-requisite section earns its keep.) If everything worked, you should see a success prompt similar to this: Once you are signed in, OpenClaw will ask you to pick the Azure subscription that your Microsoft Foundry resource lives in. Pick the subscription, then pick the Foundry resource where your models are deployed. And that is pretty much it. All the models you have deployed to that Foundry resource get pulled into OpenClaw automatically. Compared to the old way of pasting API keys and endpoints one by one, this is a huge time saver, and you do not have to babysit any keys. From here you can start using your Foundry-deployed models inside OpenClaw straight away: Wrapping up The Azure AD sign-in option in OpenClaw is one of those small updates that quietly removes a real pain point. If you have ever juggled multiple Foundry endpoints and rotated keys across them, you already know why. With this flow, you sign in once, your models show up, and you can get back to actually building. If you have not tried OpenClaw with Microsoft Foundry yet, this is a good time to give it a go. And if you were holding off because of the key management overhead, that excuse is gone now. References Previous post on integrating Microsoft Foundry with OpenClaw using API keys: Integrating Microsoft Foundry with OpenClaw: Step by Step Model Configuration | Microsoft Community Hub Install the Azure CLI on Linux: https://learn.microsoft.com/en-us/cli/azure/install-azure-cli-linux?view=azure-cli-latest Install the Azure CLI on macOS: https://learn.microsoft.com/en-us/cli/azure/install-azure-cli-macos?view=azure-cli-latest#install-with-homebrew Homebrew formula for azure-cli: https://formulae.brew.sh/formula/azure-cli388Views0likes0CommentsProvePresent: Ending Proxy Attendance with Azure Serverless & Azure OpenAI
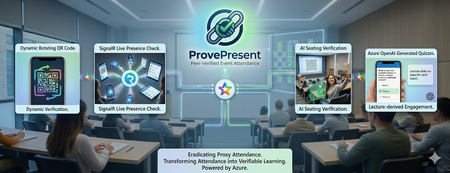
Problem Most schools use a smart‑card‑based attendance system where students tap their cards on a reader. However, this method is unreliable because students can give their cards to friends or simply tap and leave immediately. Teachers cannot accurately assess real student performance—whether high‑performing students are genuinely attending class or whether poor performance is due to actual absence. Another issue is that even if students are physically present in a lecture, teachers still cannot tell whether they are paying attention to the projector or actually learning. The current workaround is for teachers to override the attendance record by calling each student one by one, which is time‑consuming in large lectures and adds little educational value. It is also only a one‑time check, meaning students can still leave the lecture room immediately afterwards. Another issue is that we have many out‑of‑school activities such as site visit, and the school needs to ensure everyone’s presence promptly in each check point. This kind of problem isn’t unique to schools. It’s a common challenge for event organizers, where verifying attendee presence is essential but often slow, causing long queues. Organizers usually rely on a few mobile scanners to check in attendees one by one. Solution ProvePresent is an AI tool designed to verify attendance and create real‑time challenges for participants, ensuring that attendance records are authentic and that attendees remain focused on the presentation. It uses OTP login with school email. Check-in and Check-out With a Real‑time QR Code The code refreshes every 25 seconds, and the presenter can display it on the projector for everyone to scan when checking in at the beginning and checking out at the end of the session. However, this alone cannot prevent someone from capturing the code and sending it to others who are not in the room, or from using two devices to help someone else scan for attendance—even if geolocation checks are enabled. We will explain this next. This check‑in and check‑out process is highly scalable, and no one needs to queue while waiting for someone to scan their QR code! Organizers can set geolocation restrictions to prevent anyone from checking in remotely in a simple manner. Keep Attendee Alive with Signalr The SignalR live connection allows the presenter to create real‑time challenges for attendees, helping to verify their presence and ensure they are genuinely focused on the presentation. AI Powered Live Quiz The presenter shares their presentation screen, and two Microsoft Foundry agents with Azure OpenAI Chatgpt 5.3 —ImageAnalysisAgent, which extracts key information from the shared screen, and QuizQuestionGenerator, which generates simple questions based on the current slide—work together to create challenges. The question is broadcast to all online attendees, who must answer within 20 seconds. This feature keeps attendees on the webpage and prevents them from doing anything unrelated to the presentation. Detailed report can be downloaded for further analysis. Attendee Photo Capture Request all online students to capture and upload photos of their venue view. The system will analyze the images to estimate seating positions using Microsoft Foundry agents with Azure OpenAI ChatGPT 5.3 PositionEstimationAgent and complete an image challenge. When the presenter clicks Capture Attendee Photos, all online attendees are prompted to take a photo and upload it to blob storage. The PositionEstimationAgent then analyzes the image to estimate their seating location, which can provide insights into student performance. Analysis Notes: Analyzed 13 students in 2 overlapping batches. Batch 1: The venue is a computer lab with the projector screen at the front center, whiteboards on the left, and cabinets on the right. Relative depth was estimated mainly from screen size and number of monitor rows visible ahead. Column estimates were inferred from screen angle and side-room features, with lower confidence for the rotated side-view image. Batch 2: These six photos appear to come from the same computer lab with the projector at the front center. Relative depth was estimated mainly from projector size and number of visible desk/monitor rows ahead. Left-right placement was inferred from projector skew and side-wall visibility. Within this batch, 240124734 and 240167285 seem closest to the front, 240286514 and 240158424 are slightly farther back, 240293498 is farther back again, and 240160364 appears furthest. Pass around the QR code attendance sheet Traditionally, the attendance sheet is circulated for attendees to sign, but this method is unreliable because no one monitors the signing process, allowing one attendee to sign for someone who is absent. It is also slow and not scalable for large groups. The QR Code attendance sheet functions as a chain. The presenter randomly distributes a short‑lived, one‑time QR code—representing a virtual attendance sheet—to any number of attendees, just like handing out multiple physical sheets. Each attendee must find another participant to scan their code to record attendance, continuing the chain until the final group of attendees. The presenter then verifies the last group’s presence. The first chain is a dead chain because that student left the venue and cannot find another student to scan his QR code. The second chain contains 20 student attendance records. It also provides useful insights into their friendship and seating patterns. Architecture This project is built using Vibe Coding, so we will not share highly technical details in this post. If you'd like to learn more, leave a comment, and we will write another blog to cover the specifics. GitHub Repo https://github.com/wongcyrus/ProvePresent Conclusion ProvePresent demonstrates how Azure serverless technology and Azure OpenAI can work together to solve a long‑standing problem in education: verifying genuine student presence and engagement. By combining real‑time QR code verification, SignalR‑powered live interactions, AI‑generated quizzes, and intelligent photo‑based seating analysis, we created a system where “being present” is no longer just a checkbox—it becomes a verifiable, interactive, and meaningful part of the learning experience. Instead of relying on outdated smart‑card systems or manual roll calls, educators gain a dynamic tool that keeps students attentive, provides insight into classroom behavior, and produces useful analytics for improving teaching outcomes. Students, in turn, benefit from an engaging, modern attendance experience that aligns with how digital‑native learners expect classes to operate. This is only the beginning. With Microsoft Foundry agents and the flexibility of Azure Functions, there are many opportunities to extend ProvePresent further—richer analytics, smarter engagement models, and seamless integration with LMS platforms. If there’s interest, we’re happy to share more technical details, architectural deep dives, and future roadmap ideas in a follow‑up post. Thank you for the contribution of Microsoft Student Ambassadors Hong Kong Institute of Information Technology (HKIIT) Wong Wing Ho, CHAN Sham Jayson, Pang Ho Shum, and Chan Ka Chun. They are major in Higher Diploma in Cloud and Data Centre Administration. About the Author Cyrus Wong is the senior lecturer of Hong Kong Institute of Information Technology (HKIIT) @ IVE(Lee Wai Lee).and he focuses on teaching public Cloud technologies. He is a passionate advocate for the adoption of cloud technology across various media and events. With his extensive knowledge and expertise, he has earned prestigious recognitions such as AWS Builder Center, Microsoft MVP- Microsoft Foundry, and Google Developer Expert for Google Cloud Platform & AI.299Views0likes0CommentsIntegrating Microsoft Foundry with OpenClaw: Step by Step Model Configuration
Step 1: Deploying Models on Microsoft Foundry Let us kick things off in the Azure portal. To get our OpenClaw agent thinking like a genius, we need to deploy our models in Microsoft Foundry. For this guide, we are going to focus on deploying gpt-5.2-codex on Microsoft Foundry with OpenClaw. Navigate to your AI Hub, head over to the model catalog, choose the model you wish to use with OpenClaw and hit deploy. Once your deployment is successful, head to the endpoints section. Important: Grab your Endpoint URL and your API Keys right now and save them in a secure note. We will need these exact values to connect OpenClaw in a few minutes. Step 2: Installing and Initializing OpenClaw Next up, we need to get OpenClaw running on your machine. Open up your terminal and run the official installation script: curl -fsSL https://openclaw.ai/install.sh | bash The wizard will walk you through a few prompts. Here is exactly how to answer them to link up with our Azure setup: First Page (Model Selection): Choose "Skip for now". Second Page (Provider): Select azure-openai-responses. Model Selection: Select gpt-5.2-codex , For now only the models listed (hosted on Microsoft Foundry) in the picture below are available to be used with OpenClaw. Follow the rest of the standard prompts to finish the initial setup. Step 3: Editing the OpenClaw Configuration File Now for the fun part. We need to manually configure OpenClaw to talk to Microsoft Foundry. Open your configuration file located at ~/.openclaw/openclaw.json in your favorite text editor. Replace the contents of the models and agents sections with the following code block: { "models": { "providers": { "azure-openai-responses": { "baseUrl": "https://<YOUR_RESOURCE_NAME>.openai.azure.com/openai/v1", "apiKey": "<YOUR_AZURE_OPENAI_API_KEY>", "api": "openai-responses", "authHeader": false, "headers": { "api-key": "<YOUR_AZURE_OPENAI_API_KEY>" }, "models": [ { "id": "gpt-5.2-codex", "name": "GPT-5.2-Codex (Azure)", "reasoning": true, "input": ["text", "image"], "cost": { "input": 0, "output": 0, "cacheRead": 0, "cacheWrite": 0 }, "contextWindow": 400000, "maxTokens": 16384, "compat": { "supportsStore": false } }, { "id": "gpt-5.2", "name": "GPT-5.2 (Azure)", "reasoning": false, "input": ["text", "image"], "cost": { "input": 0, "output": 0, "cacheRead": 0, "cacheWrite": 0 }, "contextWindow": 272000, "maxTokens": 16384, "compat": { "supportsStore": false } } ] } } }, "agents": { "defaults": { "model": { "primary": "azure-openai-responses/gpt-5.2-codex" }, "models": { "azure-openai-responses/gpt-5.2-codex": {} }, "workspace": "/home/<USERNAME>/.openclaw/workspace", "compaction": { "mode": "safeguard" }, "maxConcurrent": 4, "subagents": { "maxConcurrent": 8 } } } } You will notice a few placeholders in that JSON. Here is exactly what you need to swap out: Placeholder Variable What It Is Where to Find It <YOUR_RESOURCE_NAME> The unique name of your Azure OpenAI resource. Found in your Azure Portal under the Azure OpenAI resource overview. <YOUR_AZURE_OPENAI_API_KEY> The secret key required to authenticate your requests. Found in Microsoft Foundry under your project endpoints or Azure Portal keys section. <USERNAME> Your local computer's user profile name. Open your terminal and type whoami to find this. Step 4: Restart the Gateway After saving the configuration file, you must restart the OpenClaw gateway for the new Foundry settings to take effect. Run this simple command: openclaw gateway restart Configuration Notes & Deep Dive If you are curious about why we configured the JSON that way, here is a quick breakdown of the technical details. Authentication Differences Azure OpenAI uses the api-key HTTP header for authentication. This is entirely different from the standard OpenAI Authorization: Bearer header. Our configuration file addresses this in two ways: Setting "authHeader": false completely disables the default Bearer header. Adding "headers": { "api-key": "<key>" } forces OpenClaw to send the API key via Azure's native header format. Important Note: Your API key must appear in both the apiKey field AND the headers.api-key field within the JSON for this to work correctly. The Base URL Azure OpenAI's v1-compatible endpoint follows this specific format: https://<your_resource_name>.openai.azure.com/openai/v1 The beautiful thing about this v1 endpoint is that it is largely compatible with the standard OpenAI API and does not require you to manually pass an api-version query parameter. Model Compatibility Settings "compat": { "supportsStore": false } disables the store parameter since Azure OpenAI does not currently support it. "reasoning": true enables the thinking mode for GPT-5.2-Codex. This supports low, medium, high, and xhigh levels. "reasoning": false is set for GPT-5.2 because it is a standard, non-reasoning model. Model Specifications & Cost Tracking If you want OpenClaw to accurately track your token usage costs, you can update the cost fields from 0 to the current Azure pricing. Here are the specs and costs for the models we just deployed: Model Specifications Model Context Window Max Output Tokens Image Input Reasoning gpt-5.2-codex 400,000 tokens 16,384 tokens Yes Yes gpt-5.2 272,000 tokens 16,384 tokens Yes No Current Cost (Adjust in JSON) Model Input (per 1M tokens) Output (per 1M tokens) Cached Input (per 1M tokens) gpt-5.2-codex $1.75 $14.00 $0.175 gpt-5.2 $2.00 $8.00 $0.50 Conclusion: And there you have it! You have successfully bridged the gap between the enterprise-grade infrastructure of Microsoft Foundry and the local autonomy of OpenClaw. By following these steps, you are not just running a chatbot; you are running a sophisticated agent capable of reasoning, coding, and executing tasks with the full power of GPT-5.2-codex behind it. The combination of Azure's reliability and OpenClaw's flexibility opens up a world of possibilities. Whether you are building an automated devops assistant, a research agent, or just exploring the bleeding edge of AI, you now have a robust foundation to build upon. Now it is time to let your agent loose on some real tasks. Go forth, experiment with different system prompts, and see what you can build. If you run into any interesting edge cases or come up with a unique configuration, let me know in the comments below. Happy coding!12KViews2likes2CommentsHow to Set Up Claude Code with Microsoft Foundry Models on macOS
Introduction Building with AI isn't just about picking a smart model. It is about where that model lives. I chose to route my Claude Code setup through Microsoft Foundry because I needed more than just a raw API. I wanted the reliability, compliance, and structured management that comes with Microsoft's ecosystem. When you are moving from a prototype to something real, having that level of infrastructure backing your calls makes a significant difference. The challenge is that Foundry is designed for enterprise cloud environments, while my daily development work happens locally on a MacBook. Getting the two to communicate seamlessly involved navigating a maze of shell configurations and environment variables that weren't immediately obvious. I wrote this guide to document the exact steps for bridging that gap. Here is how you can set up Claude Code to run locally on macOS while leveraging the stability of models deployed on Microsoft Foundry. Requirements Before we open the terminal, let's make sure you have the necessary accounts and environments ready. Since we are bridging a local CLI with an enterprise cloud setup, having these credentials handy now will save you time later. Azure Subscription with Microsoft Foundry Setup - This is the most critical piece. You need an active Azure subscription where the Microsoft Foundry environment is initialized. Ensure that you have deployed the Claude model you intend to use and that the deployment status is active. You will need the specific endpoint URL and the associated API keys from this deployment to configure the connection. An Anthropic User Account - Even though the compute is happening on Azure, the interface requires an Anthropic account. You will need this to authenticate your session and manage your user profile settings within the Claude Code ecosystem. Claude Code Client on macOS - We will be running the commands locally, so you need the Claude Code CLI installed on your MacBook. Step 1: Install Claude Code on macOS The recommended installation method is via Homebrew or Curl, which sets it up for terminal access ("OS level"). Option A: Homebrew (Recommended) brew install --cask claude-code Option B: Curl curl -fsSL https://claude.ai/install.sh | bash Verify Installation: Run claude --version. Step 2: Set Up Microsoft Foundry to deploy Claude model Navigate to your Microsoft Foundry portal, and find the Claude model catalog, and deploy the selected Claude model. [Microsoft Foundry > My Assets > Models + endpoints > + Deploy Model > Deploy Base model > Search for "Claude"] In your Model Deployment dashboard, go to the deployed Claude Models and get the "Endpoints and keys". Store it somewhere safe, because we will need them to configure Claude Code later on. Configure Environment Variables in MacOS terminal: Now we need to tell your local Claude Code client to route requests through Microsoft Foundry instead of the default Anthropic endpoints. This is handled by setting specific environment variables that act as a bridge between your local machine and your Azure resources. You could run these commands manually every time you open a terminal, but it is much more efficient to save them permanently in your shell profile. For most modern macOS users, this file is .zshrc. Open your terminal and add the following lines to your profile, making sure to replace the placeholder text with your actual Azure credentials: export CLAUDE_CODE_USE_FOUNDRY=1 export ANTHROPIC_FOUNDRY_API_KEY="your-azure-api-key" export ANTHROPIC_FOUNDRY_RESOURCE="your-resource-name" # Specify the deployment name for Opus export CLAUDE_CODE_MODEL="your-opus-deployment-name" Once you have added these variables, you need to reload your shell configuration for the changes to take effect. Run the source command below to update your current session, and then verify the setup by launching Claude: source ~/.zshrc claude If everything is configured correctly, the Claude CLI will initialize using your Microsoft Foundry deployment as the backend. Once you execute the claude command, the CLI will prompt you to choose an authentication method. Select Option 2 (Antrophic Console account) to proceed. This action triggers your default web browser and redirects you to the Claude Console. Simply sign in using your standard Anthropic account credentials. After you have successfully signed in, you will be presented with a permissions screen. Click the Authorize button to link your web session back to your local terminal. Return to your terminal window, and you should see a notification confirming that the login process is complete. Press Enter to finalize the setup. You are now fully connected. You can start using Claude Code locally, powered entirely by the model deployment running in your Microsoft Foundry environment. Conclusion Setting up this environment might seem like a heavy lift just to run a CLI tool, but the payoff is significant. You now have a workflow that combines the immediate feedback of local development with the security and infrastructure benefits of Microsoft Foundry. One of the most practical upgrades is the removal of standard usage caps. You are no longer limited to the 5-hour API call limits, which gives you the freedom to iterate, test, and debug for as long as your project requires without hitting a wall. By bridging your local macOS terminal to Azure, you are no longer just hitting an API endpoint. You are leveraging a managed, compliance-ready environment that scales with your needs. The best part is that now the configuration is locked in, you don't need to think about the plumbing again. You can focus entirely on coding, knowing that the reliability of an enterprise platform is running quietly in the background supporting every command.1.4KViews1like0CommentsBuilding with Azure OpenAI Sora: A Complete Guide to AI Video Generation
In this comprehensive guide, we'll explore how to integrate both Sora 1 and Sora 2 models from Azure OpenAI Service into a production web application. We'll cover API integration, request body parameters, cost analysis, limitations, and the key differences between using Azure AI Foundry endpoints versus OpenAI's native API. Table of Contents Introduction to Sora Models Azure AI Foundry vs. OpenAI API Structure API Integration: Request Body Parameters Video Generation Modes Cost Analysis per Generation Technical Limitations & Constraints Resolution & Duration Support Implementation Best Practices Introduction to Sora Models Sora is OpenAI's groundbreaking text-to-video model that generates realistic videos from natural language descriptions. Azure AI Foundry provides access to two versions: Sora 1: The original model focused primarily on text-to-video generation with extensive resolution options (480p to 1080p) and flexible duration (1-20 seconds) Sora 2: The enhanced version with native audio generation, multiple generation modes (text-to-video, image-to-video, video-to-video remix), but more constrained resolution options (720p only in public preview) Azure AI Foundry vs. OpenAI API Structure Key Architectural Differences Sora 1 uses Azure's traditional deployment-based API structure: Endpoint Pattern: https://{resource-name}.openai.azure.com/openai/deployments/{deployment-name}/... Parameters: Uses Azure-specific naming like n_seconds, n_variants, separate width/height fields Job Management: Uses /jobs/{id} for status polling Content Download: Uses /video/generations/{generation_id}/content/video Sora 2 adapts OpenAI's v1 API format while still being hosted on Azure: Endpoint Pattern: https://{resource-name}.openai.azure.com/openai/deployments/{deployment-name}/videos Parameters: Uses OpenAI-style naming like seconds (string), size (combined dimension string like "1280x720") Job Management: Uses /videos/{video_id} for status polling Content Download: Uses /videos/{video_id}/content Why This Matters? This architectural difference requires conditional request formatting in your code: const isSora2 = deployment.toLowerCase().includes('sora-2'); if (isSora2) { requestBody = { model: deployment, prompt, size: `${width}x${height}`, // Combined format seconds: duration.toString(), // String type }; } else { requestBody = { model: deployment, prompt, height, // Separate dimensions width, n_seconds: duration.toString(), // Azure naming n_variants: variants, }; } API Integration: Request Body Parameters Sora 1 API Parameters Standard Text-to-Video Request: { "model": "sora-1", "prompt": "Wide shot of a child flying a red kite in a grassy park, golden hour sunlight, camera slowly pans upward.", "height": "720", "width": "1280", "n_seconds": "12", "n_variants": "2" } Parameter Details: model (String, Required): Your Azure deployment name prompt (String, Required): Natural language description of the video (max 32000 chars) height (String, Required): Video height in pixels width (String, Required): Video width in pixels n_seconds (String, Required): Duration (1-20 seconds) n_variants (String, Optional): Number of variations to generate (1-4, constrained by resolution) Sora 2 API Parameters Text-to-Video Request: { "model": "sora-2", "prompt": "A serene mountain landscape with cascading waterfalls, cinematic drone shot", "size": "1280x720", "seconds": "12" } Image-to-Video Request (uses FormData): const formData = new FormData(); formData.append('model', 'sora-2'); formData.append('prompt', 'Animate this image with gentle wind movement'); formData.append('size', '1280x720'); formData.append('seconds', '8'); formData.append('input_reference', imageFile); // JPEG/PNG/WebP Video-to-Video Remix Request: Endpoint: POST .../videos/{video_id}/remix Body: Only { "prompt": "your new description" } The original video's structure, motion, and framing are reused while applying the new prompt Parameter Details: model (String, Optional): Your deployment name prompt (String, Required): Video description size (String, Optional): Either "720x1280" or "1280x720" (defaults to "720x1280") seconds (String, Optional): "4", "8", or "12" (defaults to "4") input_reference (File, Optional): Reference image for image-to-video mode remix_video_id (String, URL parameter): ID of video to remix Video Generation Modes 1. Text-to-Video (Both Models) The foundational mode where you provide a text prompt describing the desired video. Implementation: const response = await fetch(endpoint, { method: 'POST', headers: { 'Content-Type': 'application/json', 'api-key': apiKey, }, body: JSON.stringify({ model: deployment, prompt: "A train journey through mountains with dramatic lighting", size: "1280x720", seconds: "12", }), }); Best Practices: Include shot type (wide, close-up, aerial) Describe subject, action, and environment Specify lighting conditions (golden hour, dramatic, soft) Add camera movement if desired (pans, tilts, tracking shots) 2. Image-to-Video (Sora 2 Only) Generate a video anchored to or starting from a reference image. Key Requirements: Supported formats: JPEG, PNG, WebP Image dimensions must exactly match the selected video resolution Our implementation automatically resizes uploaded images to match Implementation Detail: // Resize image to match video dimensions const targetWidth = parseInt(width); const targetHeight = parseInt(height); const resizedImage = await resizeImage(inputReference, targetWidth, targetHeight); // Send as multipart/form-data formData.append('input_reference', resizedImage); 3. Video-to-Video Remix (Sora 2 Only) Create variations of existing videos while preserving their structure and motion. Use Cases: Change weather conditions in the same scene Modify time of day while keeping camera movement Swap subjects while maintaining composition Adjust artistic style or color grading Endpoint Structure: POST {base_url}/videos/{original_video_id}/remix?api-version=2024-08-01-preview Implementation: let requestEndpoint = endpoint; if (isSora2 && remixVideoId) { const [baseUrl, queryParams] = endpoint.split('?'); const root = baseUrl.replace(/\/videos$/, ''); requestEndpoint = `${root}/videos/${remixVideoId}/remix${queryParams ? '?' + queryParams : ''}`; } Cost Analysis per Generation Sora 1 Pricing Model Base Rate: ~$0.05 per second per variant at 720p Resolution Scaling: Cost scales linearly with pixel count Formula: const basePrice = 0.05; const basePixels = 1280 * 720; // Reference resolution const currentPixels = width * height; const resolutionMultiplier = currentPixels / basePixels; const totalCost = basePrice * duration * variants * resolutionMultiplier; Examples: 720p (1280×720), 12 seconds, 1 variant: $0.60 1080p (1920×1080), 12 seconds, 1 variant: $1.35 720p, 12 seconds, 2 variants: $1.20 Sora 2 Pricing Model Flat Rate: $0.10 per second per variant (no resolution scaling in public preview) Formula: const totalCost = 0.10 * duration * variants; Examples: 720p (1280×720), 4 seconds: $0.40 720p (1280×720), 12 seconds: $1.20 720p (720×1280), 8 seconds: $0.80 Note: Since Sora 2 currently only supports 720p in public preview, resolution doesn't affect cost, only duration matters. Cost Comparison Scenario Sora 1 (720p) Sora 2 (720p) Winner 4s video $0.20 $0.40 Sora 1 12s video $0.60 $1.20 Sora 1 12s + audio N/A (no audio) $1.20 Sora 2 (unique) Image-to-video N/A $0.40-$1.20 Sora 2 (unique) Recommendation: Use Sora 1 for cost-effective silent videos at various resolutions. Use Sora 2 when you need audio, image/video inputs, or remix capabilities. Technical Limitations & Constraints Sora 1 Limitations Resolution Options: 9 supported resolutions from 480×480 to 1920×1080 Includes square, portrait, and landscape formats Full list: 480×480, 480×854, 854×480, 720×720, 720×1280, 1280×720, 1080×1080, 1080×1920, 1920×1080 Duration: Flexible: 1 to 20 seconds Any integer value within range Variants: Depends on resolution: 1080p: Variants disabled (n_variants must be 1) 720p: Max 2 variants Other resolutions: Max 4 variants Concurrent Jobs: Maximum 2 jobs running simultaneously Job Expiration: Videos expire 24 hours after generation Audio: No audio generation (silent videos only) Sora 2 Limitations Resolution Options (Public Preview): Only 2 options: 720×1280 (portrait) or 1280×720 (landscape) No square formats No 1080p support in current preview Duration: Fixed options only: 4, 8, or 12 seconds No custom durations Defaults to 4 seconds if not specified Variants: Not prominently supported in current API documentation Focus is on single high-quality generations with audio Concurrent Jobs: Maximum 2 jobs (same as Sora 1) Job Expiration: 24 hours (same as Sora 1) Audio: Native audio generation included (dialogue, sound effects, ambience) Shared Constraints Concurrent Processing: Both models enforce a limit of 2 concurrent video jobs per Azure resource. You must wait for one job to complete before starting a third. Job Lifecycle: queued → preprocessing → processing/running → completed Download Window: Videos are available for 24 hours after completion. After expiration, you must regenerate the video. Generation Time: Typical: 1-5 minutes depending on resolution, duration, and API load Can occasionally take longer during high demand Resolution & Duration Support Matrix Sora 1 Support Matrix Resolution Aspect Ratio Max Variants Duration Range Use Case 480×480 Square 4 1-20s Social thumbnails 480×854 Portrait 4 1-20s Mobile stories 854×480 Landscape 4 1-20s Quick previews 720×720 Square 4 1-20s Instagram posts 720×1280 Portrait 2 1-20s TikTok/Reels 1280×720 Landscape 2 1-20s YouTube shorts 1080×1080 Square 1 1-20s Premium social 1080×1920 Portrait 1 1-20s Premium vertical 1920×1080 Landscape 1 1-20s Full HD content Sora 2 Support Matrix Resolution Aspect Ratio Duration Options Audio Generation Modes 720×1280 Portrait 4s, 8s, 12s ✅ Yes Text, Image, Video Remix 1280×720 Landscape 4s, 8s, 12s ✅ Yes Text, Image, Video Remix Note: Sora 2's limited resolution options in public preview are expected to expand in future releases. Implementation Best Practices 1. Job Status Polling Strategy Implement adaptive backoff to avoid overwhelming the API: const maxAttempts = 180; // 15 minutes max let attempts = 0; const baseDelayMs = 3000; // Start with 3 seconds while (attempts < maxAttempts) { const response = await fetch(statusUrl, { headers: { 'api-key': apiKey }, }); if (response.status === 404) { // Job not ready yet, wait longer const delayMs = Math.min(15000, baseDelayMs + attempts * 1000); await new Promise(r => setTimeout(r, delayMs)); attempts++; continue; } const job = await response.json(); // Check completion (different status values for Sora 1 vs 2) const isCompleted = isSora2 ? job.status === 'completed' : job.status === 'succeeded'; if (isCompleted) break; // Adaptive backoff const delayMs = Math.min(15000, baseDelayMs + attempts * 1000); await new Promise(r => setTimeout(r, delayMs)); attempts++; } 2. Handling Different Response Structures Sora 1 Video Download: const generations = Array.isArray(job.generations) ? job.generations : []; const genId = generations[0]?.id; const videoUrl = `${root}/${genId}/content/video`; Sora 2 Video Download: const videoUrl = `${root}/videos/${jobId}/content`; 3. Error Handling try { const response = await fetch(endpoint, fetchOptions); if (!response.ok) { const error = await response.text(); throw new Error(`Video generation failed: ${error}`); } // ... handle successful response } catch (error) { console.error('[VideoGen] Error:', error); // Implement retry logic or user notification } 4. Image Preprocessing for Image-to-Video Always resize images to match the target video resolution: async function resizeImage(file: File, targetWidth: number, targetHeight: number): Promise<File> { return new Promise((resolve, reject) => { const img = new Image(); const canvas = document.createElement('canvas'); const ctx = canvas.getContext('2d'); img.onload = () => { canvas.width = targetWidth; canvas.height = targetHeight; ctx.drawImage(img, 0, 0, targetWidth, targetHeight); canvas.toBlob((blob) => { if (blob) { const resizedFile = new File([blob], file.name, { type: file.type }); resolve(resizedFile); } else { reject(new Error('Failed to create resized image blob')); } }, file.type); }; img.onerror = () => reject(new Error('Failed to load image')); img.src = URL.createObjectURL(file); }); } 5. Cost Tracking Implement cost estimation before generation and tracking after: // Pre-generation estimate const estimatedCost = calculateCost(width, height, duration, variants, soraVersion); // Save generation record await saveGenerationRecord({ prompt, soraModel: soraVersion, duration: parseInt(duration), resolution: `${width}x${height}`, variants: parseInt(variants), generationMode: mode, estimatedCost, status: 'queued', jobId: job.id, }); // Update after completion await updateGenerationStatus(jobId, 'completed', { videoId: finalVideoId }); 6. Progressive User Feedback Provide detailed status updates during the generation process: const statusMessages: Record<string, string> = { 'preprocessing': 'Preprocessing your request...', 'running': 'Generating video...', 'processing': 'Processing video...', 'queued': 'Job queued...', 'in_progress': 'Generating video...', }; onProgress?.(statusMessages[job.status] || `Status: ${job.status}`); Conclusion Building with Azure OpenAI's Sora models requires understanding the nuanced differences between Sora 1 and Sora 2, both in API structure and capabilities. Key takeaways: Choose the right model: Sora 1 for resolution flexibility and cost-effectiveness; Sora 2 for audio, image inputs, and remix capabilities Handle API differences: Implement conditional logic for parameter formatting and status polling based on model version Respect limitations: Plan around concurrent job limits, resolution constraints, and 24-hour expiration windows Optimize costs: Calculate estimates upfront and track actual usage for better budget management Provide great UX: Implement adaptive polling, progressive status updates, and clear error messages The future of AI video generation is exciting, and Azure AI Foundry provides production-ready access to these powerful models. As Sora 2 matures and limitations are lifted (especially resolution options), we'll see even more creative applications emerge. Resources: Azure AI Foundry Sora Documentation OpenAI Sora API Reference Azure OpenAI Service Pricing This blog post is based on real-world implementation experience building LemonGrab, my AI video generation platform that integrates both Sora 1 and Sora 2 through Azure AI Foundry. The code examples are extracted from production usage.1.3KViews0likes0CommentsCreate Stunning AI Videos with Sora on Azure AI Foundry!
Special credit to Rory Preddy for creating the GitHub resource that enable us to learn more about Azure Sora. Reach him out on LinkedIn to say thanks. Introduction Artificial Intelligence (AI) is revolutionizing content creation, and video generation is at the forefront of this transformation. OpenAI's Sora, a groundbreaking text-to-video model, allows creators to generate high-quality videos from simple text prompts. When paired with the powerful infrastructure of Azure AI Foundry, you can harness Sora's capabilities with scalability and efficiency, whether on a local machine or a remote setup. In this blog post, I’ll walk you through the process of generating AI videos using Sora on Azure AI Foundry. We’ll cover the setup for both local and remote environments. Requirements: Azure AI Foundry with sora model access A Linux Machine/VM. Make sure that the machine already has the package below: Java JRE 17 (Recommended) OR later Maven Step Zero – Deploying the Azure Sora model on AI Foundry Navigate to the Azure AI Foundry portal and head to the “Models + Endpoints” section (found on the left side of the Azure AI Foundry portal) > Click on the “Deploy Model” button > “Deploy base model” > Search for Sora > Click on “Confirm”. Give a deployment name and specify the Deployment type > Click “Deploy” to finalize the configuration. You should receive an API endpoint and Key after successful deploying Sora on Azure AI Foundry. Store these in a safe place because we will be using them in the next steps. Step one – Setting up the Sora Video Generator in the local/remote machine. Clone the roryp/sora repository on your machine by running the command below: git clone https://github.com/roryp/sora.git cd sora Then, edit the application.properties file in the src/main/resources/ folder to include your Azure OpenAI Credentials. Change the configuration below: azure.openai.endpoint=https://your-openai-resource.cognitiveservices.azure.com azure.openai.api-key=your_api_key_here If port 8080 is used for another application, and you want to change the port for which the web app will run, change the “server.port” configuration to include the desired port. Allow appropriate permissions to run the “mvnw” script file. chmod +x mvnw Run the application ./mvnw spring-boot:run Open your browser and type in your localhost/remote host IP (format: [host-ip:port]) in the browser search bar. If you are running a remote host, please do not forget to update your firewall/NSG to allow inbound connection to the configured port. You should see the web app to generate video with Sora AI using the API provided on Azure AI Foundry. Now, let’s generate a video with Sora Video Generator. Enter a prompt in the first text field, choose the video pixel resolution, and set the video duration. (Due to technical limitation, Sora can only generate video of a maximum of 20 seconds). Click on the “Generate video” button to proceed. The cost to generate the video should be displayed below the “Generate Video” button, for transparency purposes. You can click on the “View Breakdown” button to learn more about the cost breakdown. The video should be ready to download after a maximum of 5 minutes. You can check the status of the video by clicking on the “Check Status” button on the web app. The web app will inform you once the download is ready and the page should refresh every 10 seconds to fetch real-time update from Sora. Once it is ready, click on the “Download Video” button to download the video. Conclusion Generating AI videos with Sora on Azure AI Foundry is a game-changer for content creators, marketers, and developers. By following the steps outlined in this guide, you can set up your environment, integrate Sora, and start creating stunning AI-generated videos. Experiment with different prompts, optimize your workflow, and let your imagination run wild! Have you tried generating AI videos with Sora or Azure AI Foundry? Share your experiences or questions in the comments below. Don’t forget to subscribe for more AI and cloud computing tutorials!1.6KViews0likes3CommentsGetting Started with the AI Toolkit: A Beginner’s Guide with Demos and Resources
If you're curious about building AI solutions but don’t know where to start, Microsoft’s AI Toolkit is a great place to begin. Whether you’re a student, developer, or just someone exploring AI for the first time, this toolkit helps you build real-world solutions using Microsoft’s powerful AI services. In this blog, I’ll Walk you through what the AI Toolkit is, how you can get started, and where you can find helpful demos and ready-to-use code samples. What is the AI Toolkit? The AI Toolkit is a collection of tools, templates, and sample apps that make it easier to build AI-powered applications and copilots using Microsoft Azure. With the AI Toolkit, you can: Build intelligent apps without needing deep AI expertise. Use templates and guides that show you how everything works. Quickly prototype and deploy apps with natural language, speech, search, and more. Watch the AI Toolkit in Action Microsoft has created a video playlist that covers the AI Toolkit and shows you how to build apps step-by-step. You can watch the full playlist here: It is especially useful for developers who want to bring AI into their projects, but also for beginners who want to learn by doing. AI Toolkit Playlist – https://aka.ms/AIToolkit/videos These videos help you understand the flow of building AI agents, using Azure OpenAI, and other cognitive services in a hands-on way. Explore Sample Projects on GitHub Microsoft also provides a public GitHub repository where you can find real code examples built using the AI Toolkit. Here’s the GitHub repo: AI Toolkit Samples – https://github.com/Azure-Samples/AI_Toolkit_Samples This repository includes: Sample apps using Azure AI services like OpenAI, Cognitive Search, and Speech. Instructions to deploy apps using Azure. Code that you can clone, test, and build on top of. You don’t have to start from scratch just open the code, understand the structure, and make small edits to experiment. How to Get Started Here’s a simple path if you’re just starting: Watch 2 or 3 videos from the AI Toolkit Playlist. Go to the GitHub repository and try running one of the examples. Make small changes to the code (like updating the prompt or output). Try deploying the solution on Azure by following the guide in the repo. Keep building and learning. Why This Toolkit is Worth Exploring As someone who is also learning and experimenting, I found this toolkit to be: Easy to understand, even for beginners. Focused on real-world applications, not just theory. Helpful for building responsible AI solutions with good documentation. It gives a complete picture — from writing code to deploying apps. Final Thoughts The AI Toolkit helps you start your journey in AI without feeling overwhelmed. It provides real code, real use cases, and practical demos. With the support of Microsoft Learn and Azure samples, you can go from learning to building in no time. If you’re serious about building with AI, this is a resource worth exploring. Continue the discussion in the Azure AI Foundry Discord community at Https://aka.ms/AI/discord Join the Azure AI Foundry Discord Server! References AI Toolkit Playlist (YouTube) https://aka.ms/AIToolkit/videos AI Toolkit GitHub Repository https://github.com/Azure-Samples/AI_Toolkit_Samples Microsoft Learn: AI Toolkit Documentation https://learn.microsoft.com/en-us/azure/ai-services/toolkit/ Azure AI Services https://azure.microsoft.com/en-us/products/ai-services/2.1KViews0likes0Comments