networking
507 Topics
Announcing Windows Server vNext Preview Build 29667
Hello Windows Server Insiders! Today we are pleased to release a new build of the next Windows Server Long-Term Servicing Channel (LTSC) Preview that contains both the Desktop Experience and Server Core installation options for Datacenter and Standard editions and Azure Edition (for VM evaluation only). Branding remains Windows Server 2025 in this preview - when reporting issues please refer to Windows Server vNext preview. Build 29531 established a new Server preview baseline build. Please perform a clean install of Build 29531 (or later) using the installation media linked below. Please note: Upgrades from Windows Server vNext preview builds older than 29531 are not supported. We encourage all Windows Server vNext preview users to perform a clean install using 29531 or later to successfully upgrade to future Windows Server vNext preview builds. While upgrades from earlier Windows Server previews (Build 26525 and older) are not technically blocked by setup.exe, a number of known issues have been identified related to upgrades necessitating the establishment of a new baseline build for our Server vNext Preview Program. The new baseline build (29531) will not be Flighted due to upgrade issues. Flighting support resumed with preview build 29550 or later. What's New Trusted Launch for virtual machines (TVMs) on Windows Server—a security feature you can enable when creating Generation 2 VMs. This initial preview supports TVMs with Secure Boot, vTPM, and vTPM state protection (at rest), managed via PowerShell. ⚠ Not supported in this release: Moving TVMs to another server TVMs in failover clusters or Hyper-V Replica Boot integrity verification TVMs in Windows Admin Center (WAC) Instructions Install the latest ServerInsider preview build. Enable Hyper-V (restarts the server): Install-WindowsFeature -Name Hyper-V -IncludeManagementTools -Restart Set the registry keys: New-Item -Path "HKLM:\SOFTWARE\Microsoft\AszIgvmAgent" -Force New-ItemProperty -Path "HKLM:\SOFTWARE\Microsoft\AszIgvmAgent" -Name "TvmWinServer" -Value 1 -PropertyType DWord -Force Enable Trusted Launch: Enable-WindowsOptionalFeature -Online -FeatureName "IsolatedGuestVm" -NoRestart Verify IGVmAgent is running (should show Running): Get-Service -Name "IGVmAgent" If it isn't running, report the issue with the IGVmAgent and IGVmSystem Operational logs (Event Viewer → Applications and Services Logs → Microsoft → Windows). Create an external virtual switch (if needed): (Get-VMSwitch | Where-Object { $_.SwitchType -eq "External" }).Name Create the TVM. With an existing Gen 2 VHDX: New-VM -Name <VMName> -Generation 2 -GuestStateIsolationType TrustedLaunch -SwitchName <switch> -VHDPath <path to vhdx> -Path <config path> Or with a new VHD, then attach a Gen 2–compatible guest OS ISO: New-VM -Name <VMName> -SwitchName <switch> -NewVHDPath <new VHD path> -NewVHDSizeBytes 40GB -Generation 2 -GuestStateIsolationType TrustedLaunch -Path <config path> Add-VMDvdDrive -VMName <VMName> -Path <Guest OS ISO path> Ensure the DVD drive is first in the firmware boot order so the VM boots from it. Verify isolation type (should return TrustedLaunch): (Get-VM -Name <VMName>).GuestStateIsolationType Verify guest state protection: Stop the IGVmAgent service and restart the VM—without IGVmAgent running, a Trusted launch VM with guest state protection won't start. For more information, please review our blog post: Announcing Trusted Launch for Virtual Machines for Windows Server Insiders | Microsoft Community Hub NVMe-over-Fabrics (NVMe-oF) extends the NVMe protocol—originally designed for local PCIe-attached SSDs—across a network fabric. Instead of using legacy SCSI-based protocols such as iSCSI or Fibre Channel, NVMe-oF allows a host to communicate directly with remote NVMe controllers using the same NVMe command set used for local devices. In this Insider build, Windows Server supports: NVMe-oF over TCP (NVMe/TCP), allowing NVMe-oF to run over standard Ethernet networks without specialized hardware. NVMe-oF over RDMA (NVMe/RDMA), enabling low-latency, high-throughput NVMe access over RDMA-capable networks (for example, RoCE or iWARP) using supported RDMA NICs. For more information, please visit: Introducing the Windows NVMe-oF Initiator Preview in Windows Server Insiders Builds | Microsoft Community Hub ReFS Boot is enabled for Windows Server vNext preview builds. Known Limitations ReFS Boot systems create a minimum 2GB WinRE partition. When WinRE cannot be updated due to space constraints, the system may disable WinRE. Disabling WinRE does not remove the partition. If the WinRE partition is deleted and the boot volume is extended over it, this operation is unrecoverable without a clean install. For more information, please visit: Resilient File System (ReFS) overview | Microsoft Learn Feedback Hub app is available for Server Desktop users! The app should automatically update with the latest version, but if it does not, simply Check for updates in the app’s settings tab. Known Issues A race condition in the TLS hybrid key exchange implementation may cause the LSASS service to crash when hybrid groups are negotiated by a TLS server. To avoid this issue until the fix is released, please disable hybrid groups (X25519_MLKEM768, SecP256r1_MLKEM768, SecP384r1_MLKEM1024) using TLS cmdlets or Group Policy, as outlined here. Server Core Upgrades and AppCompat FOD: Enabling AppCompat FOD after reinstall may fail due to legacy 3rd-party license compatibility issues on Server Core devices. Server Core users may be unable to install the latest AppCompat FOD after upgrading to build 29574. This appears to be limited to Server Core installations with 3rd-party application licenses that fail compatibility checks after upgrade. This will be addressed in a future build. Upgrading from older builds of Windows Server vNext previews (26525 or older) are not supported. Please perform a clean install of build 29531 or later. Users may experience failures when attempting to upgrade from earlier previews (build 26525 and older). VMs may fail to upgrade or start after upgrade from older preview builds impacting live migration and failover cluster scenarios. Download Windows Server Insider Preview (microsoft.com) Flighting: The label for this flight may incorrectly reference Windows 11. However, when selected, the package installed is the Windows Server vNext update. Please ignore the label and proceed with installing your flight. This issue will be addressed in a future release. Available Downloads Downloads to certain countries may not be available. See Microsoft suspends new sales in Russia - Microsoft On the Issues. Windows Server Long-Term Servicing Channel Preview in ISO format in 18 languages, and in VHDX format in English only. Windows Server Datacenter Azure Edition Preview in ISO and VHDX format, English only. Microsoft Server Languages and Optional Features Preview Keys: Keys are valid for preview builds only Server Standard: MFY9F-XBN2F-TYFMP-CCV49-RMYVH Datacenter: 2KNJJ-33Y9H-2GXGX-KMQWH-G6H67 Azure Edition does not accept a key. Symbols: Available on the public symbol server – see Using the Microsoft Symbol Server. Expiration: This Windows Server Preview will expire October 15, 2027. How to Download Registered Insiders may navigate directly to the Windows Server Insider Preview download page. If you have not yet registered as an Insider, see GETTING STARTED WITH SERVER on the Windows Insiders for Business portal. We value your feedback! The most important part of the release cycle is to hear what's working and what needs to be improved, so your feedback is extremely valued. Please use the new Feedback Hub app for Windows Server if you are running a Desktop version of Server. If you are using a Core edition, or if you are unable to use the Feedback Hub app, you can use your registered Windows 10 or Windows 11 Insider device and use the Feedback Hub application. In the app, choose the Windows Server category and then the appropriate subcategory for your feedback. In the title of the Feedback, please indicate the build number you are providing feedback on as shown below to ensure that your issue is attributed to the right version: [Server #####] Title of my feedback See Give Feedback on Windows Server via Feedback Hub for specifics. The Windows Server Insiders space on the Microsoft Tech Communities supports preview builds of the next version of Windows Server. Use the forum to collaborate, share and learn from experts. For versions that have been released to general availability in market, try the Windows Server for IT Pro forum or contact Support for Business. Diagnostic and Usage Information Microsoft collects this information over the internet to help keep Windows secure and up to date, troubleshoot problems, and make product improvements. Microsoft server operating systems can be configured to turn diagnostic data off, send Required diagnostic data, or send Optional diagnostic data. During previews, Microsoft asks that you change the default setting to Optional to provide the best automatic feedback and help us improve the final product. Administrators can change the level of information collection through Settings. For details, see http://aka.ms/winserverdata. Also see the Microsoft Privacy Statement. Terms of Use This is pre-release software - it is provided for use "as-is" and is not supported in production environments. Users are responsible for installing any updates that may be made available from Windows Update. All pre-release software made available to you via the Windows Server Insider program is governed by the Insider Terms of Use.103Views0likes0Comments
Hyper-v Ubuntu 26.04LTS Multiple DHCP entries
Good evening, am running windows server 2022 datacenter edition, which is running multiple hyper-v machines. I have been installing a new instance of ubuntu 26.04.1LTS but have noticed something weird. Maybe you could assist. Issue: When fresh install Ubuntu 26.04.1 into a VM using hyper-v, I notice 2 IP addresses appear in windows DHCP (192.168.40.20, 192.168.40.21). When I shut down the instance only one disappears (192.168.40.21). If I delete 192.168.40.20 and restart the VM instance both Ip addresses reappear in DHCP. Points to note: Image was downloaded direct off the website with no changes (have redownloaded to make sure image is not broken) Have tried using a different name for the server Have noticed the ubuntu instance only picks up one address (192.168.40.21) for the adaptor. Am unable to ping 192.168.40.20 or connect to that address via ssh. Would anyone have any idea, where the second IP address would be coming from in DHCP?10Views0likes0CommentsZero Trust DNS is Here: Elevating Enterprise Security on Windows 11
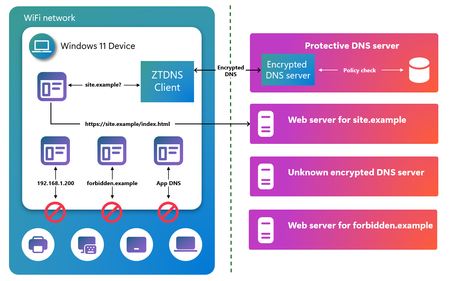
When attackers target an enterprise today, they rarely begin with a blunt smash-through-the-front-door intrusion. They begin quietly by resolving a domain. In most cases, modern malware, phishing kits, and human-operated ransomware operators rely on DNS as the entry point to discover infrastructure, beacon command-and-control, and exfiltrate data. Thus, it is becoming even more important to secure DNS to help protect against increasingly frequent, complex, and expensive cyberattacks. Enterprises have invested heavily in Protective DNS services with cutting-edge threat intelligence to identify and block malicious domains in real time but if an endpoint device can simply bypass them, the entire Zero Trust posture is weakened. Today, Microsoft is closing that gap. Introducing Zero Trust DNS (ZTDNS) We are excited to announce that Zero Trust DNS (ZTDNS) is now generally available on Windows 11 Enterprise and Windows 11 Education editions. ZTDNS is a new enterprise security feature in Windows that helps ensure DNS policy configured on the enterprise DNS server is enforced on the device. This is an important advancement for organizations working to enable that outbound connectivity on managed Windows devices aligns with enterprise authorization and policy. ZTDNS provides device-level enforcement of an enterprise’s DNS policy, in-box on Windows 11 helping ensure devices only communicate with destinations the organization intends. It doesn’t require installing and managing additional agents or maintaining a “best effort” block list on each endpoint device. With ZTDNS, the enterprise DNS resolver becomes the policy source of truth and Windows becomes the enforcement point. For more information, check out our documentation. This can be particularly useful for organizations in highly regulated industries, or where compliance with NIST standards is of paramount importance. Without ZTDNS, the system DNS client could be pointed to a network-provided malicious DNS server, which can resolve unapproved domains and return incorrect resolutions to redirect the system to attacker’s endpoint. If the malicious DNS server uses encrypted DNS, IT administrators won’t be able to analyze the DNS traffic to prevent or mitigate potential attacks. Applications can use their own DNS client to completely bypass system policies. Also, system remains vulnerable to in-network attackers. ZTDNS protects against these attack vectors by mandating the use of Windows DNS client and only sending encrypted DNS queries to the trusted DNS servers. Since ZTDNS blocks all outbound connections and local name resolution by default, the system is protected against in-network threats. Why is ZTDNS needed? In enterprise scenarios, DNS is no longer just a lookup mechanism but a policy decision point. However, without device-level enforcement, attackers can hijack device DNS to: Redirect DNS queries from the device to a malicious or compromised DNS server Use their own encrypted DNS client and bypass system DNS client Bypass DNS completely with direct IP connections In such cases, organizations lose the ability to control which network destinations the endpoint is allowed to reach even if a Protective DNS service is used. ZTDNS addresses this by only allowing outbound connections to IP addresses that were resolved by the trusted DNS server for a query issued by the Windows DNS client. More importantly, it achieves this without terminating end-to-end encryption. How does ZTDNS work? ZTDNS integrates the Windows DNS client with the Windows Filtering Platform to help enforce domain-name-based network lockdown using encrypted DNS. ZTDNS is off by default and can be configured on a Windows 11 device with an enterprise-approved DNS over HTTPS (DoH) or DNS over TLS (DoT) server. When enabled, ZTDNS blocks all outbound IP-based connections by default and only allows outbound connections to IP addresses resolved by the trusted DNS server or those added to the manual exception list by the IT administrator. It mandates the use of encrypted DNS (DoH or DoT) and only trusts the DNS resolutions initiated by the Windows DNS client and answered by the trusted DNS server to create outbound allow exceptions. This helps provide a strong, enforceable control that aligns with Zero Trust principles: all destinations are untrusted by default unless specifically permitted. In a nutshell, when configured and enabled, ZTDNS will have the following effects on your Windows 11 device: Encrypted DNS enforcement (DoH or DoT) Default deny for outbound IPv4 and IPv6 traffic Dynamic allow listing of IP addresses returned by trusted DNS servers Static allow listing of IP addresses approved by the IT administrator via manual exceptions Centralized logging of permitted and blocked connections Deploying ZTDNS ZTDNS is available in the latest builds of Windows 11 Enterprise and Windows 11 Education. To deploy ZTDNS, enterprises can configure and enable it via: netsh commands JSON configuration We are also actively developing a Microsoft Intune experience for ZTDNS and we will share more information when the details are available. For detailed deployment guidance, check out our official documentation. Connect with us For customers attending Microsoft Ignite 2025, please join us at session BRK258: Inside Windows Security, from client to cloud to learn more about ZTDNS. Alternatively, you can also visit the Windows Resiliency Initiative & Windows Security booth to discuss ZTDNS in depth. For customers who are unable to attend Microsoft Ignite 2025, we would still welcome the opportunity to connect. If you have questions about Zero Trust DNS, deployment considerations, or would like to share feedback from your evaluation, please contact us at ztdnsteam@microsoft.com. Securing the Present, Innovating for the Future Security is a shared responsibility. Through collaboration across hardware and software ecosystems, we can build more resilient systems secure by design and by default, from Windows to the cloud, enabling trust at every layer of the digital experience. The updated Windows Security book is available to help you understand how to stay secure with Windows. Learn more about Windows 11 and Copilot+ PCs. To learn more about Microsoft Security solutions, visit our website. Bookmark the Security blog to keep up with our expert coverage on security matters. Also, follow us on LinkedIn (Microsoft Security) and X (@MSFTSecurity) for the latest news and updates on cybersecurity.2.9KViews0likes2Comments
Hyper-V Cluster Failover Event viewer log showing SMB traffic connect to quorum disk network share
Hi, To tweak my SIEM, I need to correlate smb network traffic between Hyper-V servers and witness disk stored on a network share on another server. I'm searching a log who tell me the Hyper-V is connecting to the witness disk (on network shared drive) for doing something ... probably I will be able to correlate and put exception when this happens and the SMB traffic between Hyper-V and the other server to stop always receive this alert. Any cues would be appreciated! Thanks453Views0likes1CommentNPS network policy with multiple Client ip4 addesses
I have a wireless policy on my NPS server with the primary wireless controller added using a Client IPv4 address entry in the policy. I want to add the backup controller as well but it seems it is adding it as a and condition. I need it to be added as an or condition when the primary controller is unreachable. How can I add multiple Client ip4 addessess in a Network policy with an or condition? An and condition would require both to be reachable. thanks.145Views0likes1CommentAzure VM Agent Status not ready
I have created a red hat openshift private cluster but the VMS are stuck in the state of "agent status not ready." I have followed these troubleshooting steps: Linux Virtual Machine Agent Status "Not Ready" - Microsoft Community Hub However, all of them seem to point to trying to check and see what is on the VM itself. I am unable to do this because I can't SSH into the machine. Has anyone else ran into this issue and been able to resolve it? I am deploying it via CLI as I was not able to do it via GUI for some reason. This is my script: #az login az account set --name "accountnamehidden" #az provider register -n Microsoft.RedHatOpenShift --wait #az provider register -n Microsoft.Compute --wait #az provider register -n Microsoft.Storage --wait #az provider register -n Microsoft.Authorization --wait $LOCATION= "eastus" # the location of your cluster $RESOURCEGROUP= "sample-rg" # the name of the resource group where you want to create your cluster $CLUSTER= "K8sDev1test" # the name of your cluster $arovnet= "sample-vnet" $mastersubnet = "k8sDev1-master-ue-snet" $workersubnet = "k8sDev1-worker-ue-snet" az aro create --resource-group "samplerg" --vnet-resource-group "sample-vnet-rg" --name $CLUSTER --vnet $arovnet --master-subnet "k8sDev1-master-ue-snet" --worker-subnet "k8sDev1-worker-ue-snet" --apiserver-visibility Private --ingress-visibility Private --fips true --outbound-type UserDefinedRouting --client-id hidden --client-secret hiddenAnnouncing Windows Server vNext Preview Build 29659
Hello Windows Server Insiders! Today we are pleased to release a new build of the next Windows Server Long-Term Servicing Channel (LTSC) Preview that contains both the Desktop Experience and Server Core installation options for Datacenter and Standard editions and Azure Edition (for VM evaluation only). Branding remains Windows Server 2025 in this preview - when reporting issues please refer to Windows Server vNext preview. Build 29531 established a new Server preview baseline build. Please perform a clean install of Build 29531 (or later) using the installation media linked below. Please note: Upgrades from Windows Server vNext preview builds older than 29531 are not supported. We encourage all Windows Server vNext preview users to perform a clean install using 29531 or later to successfully upgrade to future Windows Server vNext preview builds. While upgrades from earlier Windows Server previews (Build 26525 and older) are not technically blocked by setup.exe, a number of known issues have been identified related to upgrades necessitating the establishment of a new baseline build for our Server vNext Preview Program. The new baseline build (29531) will not be Flighted due to upgrade issues. Flighting support resumed with preview build 29550 or later. What's New Trusted Launch for virtual machines (TVMs) on Windows Server—a security feature you can enable when creating Generation 2 VMs. This initial preview supports TVMs with Secure Boot, vTPM, and vTPM state protection (at rest), managed via PowerShell. ⚠ Not supported in this release: Moving TVMs to another server TVMs in failover clusters or Hyper-V Replica Boot integrity verification TVMs in Windows Admin Center (WAC) Instructions 1. Install the latest ServerInsider preview build. 2. Enable Hyper-V (restarts the server): Install-WindowsFeature -Name Hyper-V -IncludeManagementTools -Restart 3. Set the registry keys: New-Item -Path "HKLM:\SOFTWARE\Microsoft\AszIgvmAgent" -Force New-ItemProperty -Path "HKLM:\SOFTWARE\Microsoft\AszIgvmAgent" -Name "TvmWinServer" -Value 1 -PropertyType DWord -Force 4. Enable Trusted Launch: Enable-WindowsOptionalFeature -Online -FeatureName "IsolatedGuestVm" -NoRestart 5. Verify IGVmAgent is running (should show Running): Get-Service -Name "IGVmAgent" If it isn't running, report the issue with the IGVmAgent and IGVmSystem Operational logs (Event Viewer → Applications and Services Logs → Microsoft → Windows). 6. Create an external virtual switch (if needed): (Get-VMSwitch | Where-Object { $_.SwitchType -eq "External" }).Name 7. Create the TVM. With an existing Gen 2 VHDX: New-VM -Name <VMName> -Generation 2 -GuestStateIsolationType TrustedLaunch -SwitchName <switch> -VHDPath <path to vhdx> -Path <config path> Or with a new VHD, then attach a Gen 2–compatible guest OS ISO: New-VM -Name <VMName> -SwitchName <switch> -NewVHDPath <new VHD path> -NewVHDSizeBytes 40GB -Generation 2 -GuestStateIsolationType TrustedLaunch -Path <config path> Add-VMDvdDrive -VMName <VMName> -Path <Guest OS ISO path> Ensure the DVD drive is first in the firmware boot order so the VM boots from it. 8. Verify isolation type (should return TrustedLaunch): (Get-VM -Name <VMName>).GuestStateIsolationType 9. Verify guest state protection: Stop the IGVmAgent service and restart the VM—without IGVmAgent running, a Trusted launch VM with guest state protection won't start. For more information, please review our blog post: Announcing Trusted Launch for Virtual Machines for Windows Server Insiders | Microsoft Community Hub Quick Machine Recovery available in Windows Server vNext Insider Previews. Quick machine recovery (QMR) is now available for Server vNext Insiders to test. This feature enables the recovery of Windows Server devices when they encounter boot critical errors that prevent them from booting. QMR can automatically search for cloud‑based remediations to recover from widespread boot failures significantly reducing the burden on IT administrators when multiple devices are impacted. This supports the goals of the Windows Resiliency Initiative by enabling applicable fixes to be delivered through trusted Windows Update to restore affected devices, helping reduce downtime and minimize manual recovery efforts across enterprise environments. This feature is currently enabled in the latest Server vNext Insider builds for customers to experience test mode. A Group Policy option to enable or disable the feature will be introduced in upcoming builds to provide additional administrative control. To simulate the quick machine recovery experience, use the following commands from an elevated command prompt: Enable test mode: reagentc.exe /SetRecoveryTestmode Configure Windows to boot to Windows Recovery Environment on the next boot: reagentc.exe /BootToRe Reboot your device.The system goes through autoremediation of a simulated crash safely and reboots back to Windows Server. For more information, please review Quick machine recovery (QMR) and Windows Resiliency Initiative. When providing feedback using Feedback hub, please select QMR from the Recovery and Uninstall category in the app. NVMe-over-Fabrics (NVMe-oF) extends the NVMe protocol—originally designed for local PCIe-attached SSDs—across a network fabric. Instead of using legacy SCSI-based protocols such as iSCSI or Fibre Channel, NVMe-oF allows a host to communicate directly with remote NVMe controllers using the same NVMe command set used for local devices. In this Insider build, Windows Server supports: NVMe-oF over TCP (NVMe/TCP), allowing NVMe-oF to run over standard Ethernet networks without specialized hardware. NVMe-oF over RDMA (NVMe/RDMA), enabling low-latency, high-throughput NVMe access over RDMA-capable networks (for example, RoCE or iWARP) using supported RDMA NICs. For more information, please visit: Introducing the Windows NVMe-oF Initiator Preview in Windows Server Insiders Builds | Microsoft Community Hub ReFS Boot is enabled for Windows Server vNext preview builds. Known Limitations ReFS Boot systems create a minimum 2GB WinRE partition. When WinRE cannot be updated due to space constraints, the system may disable WinRE. Disabling WinRE does not remove the partition. If the WinRE partition is deleted and the boot volume is extended over it, this operation is unrecoverable without a clean install. For more information, please visit: Resilient File System (ReFS) overview | Microsoft Learn Feedback Hub app is available for Server Desktop users! The app should automatically update with the latest version, but if it does not, simply Check for updates in the app’s settings tab. Known Issues A race condition in the TLS hybrid key exchange implementation may cause the LSASS service to crash when hybrid groups are negotiated by a TLS server. To avoid this issue until the fix is released, please disable hybrid groups (X25519_MLKEM768, SecP256r1_MLKEM768, SecP384r1_MLKEM1024) using TLS cmdlets or Group Policy, as outlined here. Server Core Upgrades and AppCompat FOD: Enabling AppCompat FOD after reinstall may fail due to legacy 3rd-party license compatibility issues on Server Core devices. Server Core users may be unable to install the latest AppCompat FOD after upgrading to build 29574. This appears to be limited to Server Core installations with 3rd-party application licenses that fail compatibility checks after upgrade. This will be addressed in a future build. Upgrading from older builds of Windows Server vNext previews (26525 or older) are not supported. Please perform a clean install of build 29531 or later. Users may experience failures when attempting to upgrade from earlier previews (build 26525 and older). VMs may fail to upgrade or start after upgrade from older preview builds impacting live migration and failover cluster scenarios. Download Windows Server Insider Preview (microsoft.com) Flighting: The label for this flight may incorrectly reference Windows 11. However, when selected, the package installed is the Windows Server vNext update. Please ignore the label and proceed with installing your flight. This issue will be addressed in a future release. Available Downloads Downloads to certain countries may not be available. See Microsoft suspends new sales in Russia - Microsoft On the Issues. Windows Server Long-Term Servicing Channel Preview in ISO format in 18 languages, and in VHDX format in English only. Windows Server Datacenter Azure Edition Preview in ISO and VHDX format, English only. Microsoft Server Languages and Optional Features Preview Keys: Keys are valid for preview builds only Server Standard: MFY9F-XBN2F-TYFMP-CCV49-RMYVH Datacenter: 2KNJJ-33Y9H-2GXGX-KMQWH-G6H67 Azure Edition does not accept a key. Symbols: Available on the public symbol server – see Using the Microsoft Symbol Server. Expiration: This Windows Server Preview will expire October 15, 2027. How to Download Registered Insiders may navigate directly to the Windows Server Insider Preview download page. If you have not yet registered as an Insider, see GETTING STARTED WITH SERVER on the Windows Insiders for Business portal. We value your feedback! The most important part of the release cycle is to hear what's working and what needs to be improved, so your feedback is extremely valued. Please use the new Feedback Hub app for Windows Server if you are running a Desktop version of Server. If you are using a Core edition, or if you are unable to use the Feedback Hub app, you can use your registered Windows 10 or Windows 11 Insider device and use the Feedback Hub application. In the app, choose the Windows Server category and then the appropriate subcategory for your feedback. In the title of the Feedback, please indicate the build number you are providing feedback on as shown below to ensure that your issue is attributed to the right version: [Server #####] Title of my feedback See Give Feedback on Windows Server via Feedback Hub for specifics. The Windows Server Insiders space on the Microsoft Tech Communities supports preview builds of the next version of Windows Server. Use the forum to collaborate, share and learn from experts. For versions that have been released to general availability in market, try the Windows Server for IT Pro forum or contact Support for Business. Diagnostic and Usage Information Microsoft collects this information over the internet to help keep Windows secure and up to date, troubleshoot problems, and make product improvements. Microsoft server operating systems can be configured to turn diagnostic data off, send Required diagnostic data, or send Optional diagnostic data. During previews, Microsoft asks that you change the default setting to Optional to provide the best automatic feedback and help us improve the final product. Administrators can change the level of information collection through Settings. For details, see http://aka.ms/winserverdata. Also see the Microsoft Privacy Statement. Terms of Use This is pre-release software - it is provided for use "as-is" and is not supported in production environments. Users are responsible for installing any updates that may be made available from Windows Update. All pre-release software made available to you via the Windows Server Insider program is governed by the Insider Terms of Use.612Views1like0CommentsAssign IP Address for Windows Server 2025 VM on Hyper-V
I have built my first Windows Server 2025 VM on HyperV and trying to assign an IP address. I want the VM's to be like an actual server so I Created an external vswitch. The HyperV server IP is 172.16.1.41 with a physical gateway of 172.16.1.5. I have tried to assign the new VM with 172.16.1.42/255.255.255.0 and the Gateway is 172.16.1.5 also. However, I cannot get a positive ping. Do I need another VSWITCH configured or what am I missing?366Views0likes5Comments
Hyper-V Converged Networking for VEEAM Backups
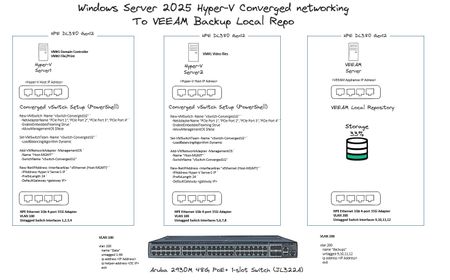
Hi All, As per the image below, I have 3 x HPE DL380 Gen 12 Servers, Server1 and Server2 are ADDS domain joined, VEEAM Local Repo is not. For the converged networking to work, is there anything else I need to perform in terms of additional power-shell commands, VLAN tagging etc? Thanks!331Views0likes2Comments