microsoft sentinel
818 TopicsManage all your Microsoft Sentinel data in one place with Unified Data Management (Public Preview)
As security teams bring in more data from more sources and use it across SIEM and XDR workflows, decisions about connector health, ingestion volume, and cost optimization get harder. Today, we’re announcing the public preview of Unified Data Management for Microsoft Sentinel, available in the new Data & connectors experience in the Microsoft Defender portal, so you can monitor and manage your data from a single place. What Unified Data Management is and why it matters Unified Data Management brings connectors, tables, and ingestion health together. Instead of moving between separate pages, you can see your full data landscape, spot issues, and act on them from one view. It’s designed to help you quickly answer questions like: Which connectors are configured and which need attention? Which tables are receiving data? Are there ingestion spikes, drops, or stale data patterns? Which tables drive the most ingestion volume? What schema, transformations, and retention settings apply to a table? You’ll find it under Setup & configuration > Data & connectors, organized into three tabs: Overview, Connectors, and Tables. Overview: See health at a glance The Overview tab gives you a workspace-level snapshot of ingestion and health, so you can catch data issues before they impact analytics, detections, investigations, or reporting. It surfaces: Ingestion volume: Daily ingestion split by Analytics tier and Data Lake tier for your selected time range. Connectors that need attention: Connectors with credential errors, ingestion failures, or outages, including error type, failure count, and last successful ingestion. Table ingestion fluctuations: Tables with unexpected volume changes, grouped into spikes and drops. Data ingestion volume by table: Your top ingesting tables, ranked by daily volume. Ingestion latency by table: How long it takes for data to become available after it’s generated. Together, these insights help you troubleshoot connector failures, track down cost spikes, validate that new connectors are flowing, and catch unexpected changes in volume. Figure 1: The Overview tab shows daily ingestion volume by tier alongside data health insights, including connectors that need attention and tables with unexpected volume spikes or drops. Connectors: One inventory for unified and classic connectors The Connectors tab puts unified data connectors and Sentinel classic data connectors side by side, so it’s easier to see which data sources are onboarded and how they're connected. From here, you can: View onboarded connectors with their status, provider, content source, and available updates. Switch between unified connectors and Sentinel classic connectors. Search and filter connectors by provider, data type, and status. Open connector details to review configuration and health. Unified connectors reduce duplication by allowing supported data sources to connect once and feed data across Microsoft security products. Sentinel classic connectors continue to support the broad connector ecosystem, including connectors built with the Codeless Connector Framework (CCF). Figure 2: The Connectors tab brings unified and Sentinel classic connectors into a single inventory, with counts for onboarded and connected connectors, available updates, and filters for provider, data type, and status. Tables: Health, schema, transformations, and retention in one place The Tables tab brings Microsoft Sentinel and Microsoft Defender XDR tables together with their health signals, schema, transformations, and retention settings. Key insights now appear right in the grid, so you can compare tables side by side: last data received, average daily ingestion volume, estimated daily ingestion cost, volume anomaly, tier, and retention settings. This makes it easier to spot tables that have gone stale, are growing unexpectedly, or are driving a big share of your ingestion volume. Select any table to open the details panel, which organizes everything about that table into tabs: Details panel tab What it shows Overview Table type, tier, analytics retention, total retention, and other table metadata. Schema Column names, data types, and descriptions, with no KQL query required. Transformations Filter, Split, and Scope Tag transformation rules applied to the table. Retention Analytics retention and total retention settings. Figure 3: The Tables tab opens a details panel for any selected table. The Schema tab is especially useful when you need to understand incoming data, validate table fields, or create transformation logic without first writing schema-discovery queries. Built for everyday data operations in the Microsoft Defender portal Data management touches nearly every part of security operations, from detection and investigation to hunting, retention, and cost optimization. By bringing these tasks into the Microsoft Defender portal, Unified Data Management cuts down on context switching and makes it clearer how connectors, tables, health, transformations, and retention fit together. It’s one more step in Microsoft Sentinel’s investment in a unified security operations experience, where SIEM and XDR data can be managed and used together. Preview availability and prerequisites Unified Data Management is now available in public preview in commercial cloud environments. To experience it, you’ll need: Microsoft Sentinel onboarded to the Microsoft Defender portal. Unified role-based access control (URBAC) enabled in the Microsoft Defender portal. Data (manage) permission in the Data Operations permission group. Workspace permissions equivalent to Log Analytics Contributor, including permissions to write workspace and table settings. Get started Ready to try it? Open the Microsoft Defender portal and go to Setup & configuration > Data & connectors. From there: Start on the Overview tab to check ingestion volume and data health. Use the Connectors tab to view your unified and classic connectors. Explore the Tables tab to review table health, schema, transformations, and retention. For implementation and configuration guidance, see: Manage data in Microsoft Sentinel and Defender Configure data connectors Manage your existing tables and data Monitor the health of your Microsoft Sentinel data connectors Unified connectors overview Microsoft Sentinel data connectors More Microsoft Sentinel data integration news Public Preview: Nested API Support Comes to Microsoft Sentinel CCF Create a pull codeless connector for Microsoft Sentinel Logs Ingestion API in Azure Monitor433Views0likes0Comments
Expanded cross-tenant delegated access in Microsoft Defender is generally available
Security operations rarely stop at a single tenant boundary. Managed security service providers (MSSPs) protect many customer environments, and central security teams often operate across a tenant estate spanning business units, regions, or subsidiaries. In both cases, teams need to delegate security work without granting broad access or managing permissions one analyst at a time. Today, we’re announcing the general availability of cross-tenant delegated administration in Microsoft Defender, built on the same governance relationship model as Microsoft Entra Tenant Governance. Organizations can now use a consistent governance model to establish cross-tenant relationships, delegate access to partner or central security teams, and enforce least-privilege permissions across their tenant estate. We’re also extending delegated access to support Microsoft Sentinel resources and enabling granular permissions for delegated users through Defender unified RBAC, reducing the need for separate access models across identity and security. With the consistent access model, MSSPs partners (non-CSP) and multitenant organizations can run security operations across tenants, while each customer or governed tenant decides exactly what access to grant. Govern access across your tenant estate Microsoft Entra Tenant Governance helps organizations establish least-privilege governance relationships across related tenants. The same governance relationship model now extends into Microsoft Defender and Sentinel, enabling MSSPs and central security teams to manage security operations across governed environments without requiring separate local administrator identities in each tenant. This model helps organizations: Scale without multiplying identities. Analysts use their home-tenant accounts instead of requiring local administrator or Microsoft Entra B2B guest accounts in every governed tenant. Apply least privilege. Each governed tenant controls the roles and resource scopes assigned to remote tenant groups. Simplify ongoing administration. The partner or central team keeps access current by managing membership in its own security groups rather than maintaining individual assignments across customer tenants. Support integrated security operations. MSSPs and multitenant organizations can use a consistent governance relationship to support delegated operations across Microsoft Defender and Sentinel. Bring identity and security access together. Use a consistent governance relationship model across Microsoft Entra, Defender, and Sentinel, reducing the need for separate delegated-access arrangements. One relationship, two controls A governance relationship is a directional connection between two Microsoft Entra tenants: The governing tenant is where the MSSP or central security team manages its analysts and security groups. The governed tenant is the customer or organizational tenant that grants delegated access. After the relationship is approved, selected security groups from the governing tenant are represented in the governed tenant as remote tenant groups. The governed tenant can then assign the supported roles and resource scopes those groups need, while the governing tenant continues to manage group membership. This creates a clear separation of responsibilities: tenant administrators set the access boundaries in the governed tenant, and partners or central security teams manage their analysts within those boundaries. How the relationship works The governance relationship is established through a three-step, consent-based handshake: The governed tenant sends an invitation. A customer or organizational administrator enables governance invitations in Microsoft Defender and invites the governing tenant. The governing tenant sends the relationship request. The MSSP or central security team creates an access template containing the relevant security groups and Microsoft Entra role assignments, then sends the governance relationship request. The governed tenant approves the request and assigns roles and resource scopes. The governed tenant explicitly approves the governance relationship and configures the Defender and Sentinel roles and resource scopes granted to the remote tenant groups. With approval and permissions in place, the governance relationship is ready to be used. Figure 1: The governed tenant reviews the requested role assignments and retains final approval over delegated access. The relationship provides the cross-tenant foundation. Governed-tenant administrators then apply the workload and resource permissions required for the intended security operations: For Microsoft Defender: Administrators can assign supported Microsoft Defender unified RBAC roles to remote tenant groups, including custom roles with the permissions and scopes required for the work. For Microsoft Sentinel: Customers can manage delegated access using Defender unified RBAC or Azure RBAC, assigning remote tenant groups the permissions needed to operate customer environments with least privilege. Figure 2: Assign custom roles to a remote tenant group using Defender unified RBAC. This distinction allows each governed tenant to approve the relationship and right-size access for its own environment while the governing tenant manages the analysts who perform the work. What partners are saying Partners are seeing how expanded support for delegated access can simplify cross-tenant operations and help them deliver managed security services with least privilege. “The ability to assign Azure RBAC and Defender Unified RBAC to remote tenant groups over GDAP will allow us to securely and efficiently configure and access customer environments at scale. Historically, we would need to configure a range of different access methods to access all the different services, but now we can use GDAP to access everything we need to provide managed SOC services.” — Riley Boon, Senior Capability Engineer, CyberCX “Microsoft's investments in its partner programs pay off in real outcomes for the products BlueVoyant and our customers rely on every day. Over the past several months, Microsoft has worked alongside BlueVoyant to address limitations in Granular Delegated Admin Privileges (GDAP) and deliver new capabilities, including support for assigning GDAP security groups to Sentinel workspace roles and Unified Role-Based Access Control (URBAC) support for GDAP remote tenant groups. These improvements let us manage customer environments with least-privilege access. That is what customers have been asking for and Microsoft listened.” — Ryan Sturm, Senior Manager – Microsoft Security Engineering, BlueVoyant Whether you’re onboarding your first customer tenant or consolidating access across dozens, the same model applies: tenant administrators set the boundaries, and your team works within them. Get started Start with the work your partner or central security team needs to do. Identify the eligible security groups, establish the governance relationship, and assign only the workload roles and scopes that work requires. Configure delegated access with governance relationships for multitenant organizations Manage unified role-based access control in multitenant management Create custom roles with Microsoft Defender unified RBAC Additional resources Microsoft Entra tenant governance documentation908Views0likes0CommentsIntroducing the Microsoft Sentinel ASIM EmailEvent schema
Email remains one of the most common entry points for security threats. Yet email products often describe the same activity with different table names, fields, and values. This makes it harder to build detections and investigations that work consistently across data sources. The Microsoft Sentinel Advanced Security Information Model, or ASIM, EmailEvent schema is now available. It provides a common structure for email delivery and inspection events, helping customers and partners create security content that works across supported email data sources. A consistent view of email security activity EmailEvent standardizes the information analysts need to understand what happened to an email and why. It covers: Email delivery and inspection events Sender, source, and recipient information Message subject, size, direction, and delivery location URLs and file attachments SPF, DKIM, and DMARC authentication results Delivery actions such as delivered, blocked, quarantined, or deleted Threat, risk, confidence, tactic, technique, and remediation details Instead of learning a different data model for every product, analysts can query the normalized EmailEvent fields. Parser developers map each source's native data to the same schema. How it works Consider an email that contains a suspicious attachment. The email security product records the sender, recipients, attachment, authentication results, inspection verdict, and final action. A connector collects that event. A parser or Data Collection Rule maps the source fields to EmailEvent. Microsoft Sentinel can then query the normalized record using the same field names used for other supported email sources. This common structure separates security content from the details of a specific product. When another source adds an EmailEvent parser, existing source-independent queries and detections can work with that source without being rewritten around its native field names. Why it matters Simpler analytics: Write queries against one consistent set of email fields. Broader coverage: Apply source-independent security content across normalized email sources. Faster investigations: Compare delivery, authentication, attachment, URL, and threat details without translating different data models. Easier integration: Give connector and parser developers a defined contract for bringing new email telemetry into ASIM. EmailEvent does not replace the rich native data produced by email security products. It provides a consistent security layer that makes that data easier to use together. Build on EmailEvent The EmailEvent release includes the schema definition, source-independent parser framework, filtering parser, deployment templates, and validation support in the Azure-Sentinel repository. The schema version is 1.0.0. Customers can use normalized EmailEvent data to develop hunting queries, analytics rules, workbooks, and investigation experiences. Partners and community contributors can create source-specific parsers that map their email data to the schema. Get started Normalization Email Schema MS Learn Learn about normalization and ASIM Explore the EmailEvent implementation in Azure-Sentinel Deploy ASIM parsers Thank you to the ASIM engineering and partner teams who contributed to the schema, deployment path, validation, and release.678Views1like0Comments
How Granular Delegated Admin Privileges (GDAP) allows Sentinel customers to delegate access
Simplifying Defender SIEM and XDR delegated access As Microsoft Sentinel and Defender converge into a unified experience, organizations face a fundamental challenge: the lack of a scalable, comprehensive, delegated access model that works seamlessly across Entra ID and Sentinel’s Azure Resource Manage creating a significant barrier for Managed Security Service Providers (MSSPs) and large enterprises with complex multi-tenant structures. Extending GDAP beyond CSPs: a strategic solution In response to these challenges, we have developed an extension to GDAP that makes it available to all Sentinel and Defender customers, including non-CSP organizations. This expansion enables both MSSPs and customers with multi-tenant organizational structures to establish secure, granular delegated access relationships directly through the Microsoft Defender portal. This is now available in public preview. The GDAP extension aligns with zero-trust security principles through a three-way handshake model requiring explicit mutual consent between governing and governed tenants before any relationship is established. This consent-based approach enhances transparency and accountability, reducing risks associated with broad, uncontrolled permissions. By integrating with Microsoft Defender, GDAP enables advanced threat detection and response capabilities across tenant boundaries while maintaining granular permission management through Entra ID roles and Unified RBAC custom permissions. Delivering unified management of delegated access across SIEM and XDR With GDAP, customers gain a truly unified way to manage access across both Microsoft Sentinel and Defender—using a single, consistent delegated access model for SIEM and XDR. For Sentinel customers, this brings parity with the Azure portal experience: where delegated access was previously managed through Azure Lighthouse, it can now be handled directly in the Defender portal using GDAP. More importantly, for organizations running SIEM and XDR together, GDAP eliminates the need to switch between portals—allowing teams to view, manage, and govern security access from one centralized experience. The result is simpler administration, reduced operational friction, and a more cohesive way to secure multi-tenant environments at scale. How GDAP for non-CSPs works: the three-step handshake The GDAP handshake model implements a security-first approach through three distinct steps, each requiring explicit approval to prevent unauthorized access. Step 1 begins with the governed tenant initiating the relationship, allowing the governing tenant to request GDAP access. Step 2 shifts control to the governing tenant, which creates and sends a delegated access request with specific requested permissions through the multi-tenant organization (MTO) portal. Step 3 returns to the governed tenant for final approval. The approach provides customers with complete visibility and control over who can access their security data and with what permissions, while giving MSSPs a streamlined, Microsoft-supported mechanism for managing delegated relationships at scale. Step 4 assigns Sentinel permissions. In Azure resource management, assign governing tenant’s groups with Sentinel workspaces permissions (in the governed tenant), selecting the governing tenant’s security groups used in the created relationship. Learn more here: Configure delegated access with governance relationships for multitenant organizations - Unified se…7.1KViews2likes37CommentsPlanning your move to Microsoft Defender portal for all Microsoft Sentinel customers
In November 2023, Microsoft announced our strategy to unify security operations by bringing the best of XDR and SIEM together. Our first step was bringing Microsoft Sentinel into the Microsoft Defender portal, giving teams a single, comprehensive view of incidents, reducing queue management, enriching threat intel, streamlining response and enabling SOC teams to take advantage of Gen AI in their day-to-day workflow. Since then, considerable progress has been made with thousands of customers using this new unified experience; to enhance the value customers gain when using Sentinel in the Defender portal, multi-tenancy and multi-workspace support was added to help customers with more sophisticated deployments. Our mission is to unify security operations by bringing all your data, workflows, and people together to unlock new capabilities and drive better security outcomes. As a strong example of this, last year we added extended posture management, delivering powerful posture insights to the SOC team. This integration helps build a closed-loop feedback system between your pre- and post-breach efforts. Exposure Management is just one example. By bringing everything together, we can take full advantage of AI and automation to shift from a reactive to predictive SOC that anticipates threats and proactively takes action to defend against them. Beyond Exposure Management, Microsoft has been constantly innovating in the Defender experience, adding not just SIEM but also Security Copilot. The Sentinel experience within the Defender portal is the focus of our innovation energy and where we will continue to add advanced Sentinel capabilities going forward. Onboarding to the new unified experience is easy and doesn’t require a typical migration. Just a few clicks and permissions. Customers can continue to use Sentinel in the Azure portal while it is available even after choosing to transition. Today, we’re announcing that we are moving to the next phase of the transition with a target to retire the Azure portal for Microsoft Sentinel by July 1, 2026. Customers not yet using the Defender portal should plan their transition accordingly. “Really amazing to see that coming, because cross querying with tables in one UI is really cool! Amazing, big step forward to the unified [Defender] portal.” Glueckkanja AG “The biggest benefit of a unified security operations solution (Microsoft Sentinel + Microsoft Defender XDR) has been the ability to combine data in Defender XDR with logs from third party security tools. Another advantage developed has been to eliminate the need to switch between Defender XDR and Microsoft Sentinel portals, now having a single pane of glass, which the team has been wanting for some years.” Robel Kidane, Group Information Security Manager, Renishaw PLC Delivering the SOC of the future Unifying threat protection, exposure management and security analytics capabilities in one pane of glass not only streamlines the user experience, but also enables Sentinel customers to realize security outcomes more efficiently: Analyst efficiency: A single portal reduces context switching, simplifies workflows, reduces training overhead, and improves team agility. Integrated insights: SOC-focused case management, threat intelligence, incident correlation, advanced hunting, exposure management, and a prioritized incident queue enriched with business and sensitivity context—enabling faster, more informed detection and response across all products. SOC optimization: Security controls that can be adjusted as threats and business priorities change to control costs and provide better coverage and utilization of data, thus maximizing ROI from the SIEM. Accelerated response: AI-driven detection and response which reduces mean time to respond (MTTR) by 30%, increases security response efficiency by 60%, and enables embedded Gen AI and agentic workflows. What’s next: Preparing for the retirement of the Sentinel Experience in the Azure Portal Microsoft is committed to supporting every single customer in making that transition over the next 12 months. Beginning July 1, 2026, Sentinel users will be automatically redirected to the Defender portal. After helping thousands of customers smoothly make the transition, we recommend that security teams begin planning their migration and change management now to ensure continuity and avoid disruption. While the technical process is very straightforward, we have found that early preparation allows time for workflow validation, training, and process alignment to take full advantage of the new capabilities and experience. Tips for a Successful Migration to Microsoft Defender 1. Leverage Microsoft’s help: Leverage Microsoft documentation, instructional videos, guidance, and in-product support to help you be successful. A good starting point is the documentation on Microsoft Learn. 2. Plan early: Engage stakeholders early including SOC and IT Security leads, MSSPs, and compliance teams to align on timing, training and organizational needs. Make sure you have an actionable timeline and agreement in the organization around when you can prioritize this transition to ensure access to the full potential of the new experience. 3. Prepare your environment: Plan and design your environment thoroughly. This includes understanding the prerequisites for onboarding Microsoft Sentinel workspaces, reviewing and deciding on access controls, and planning the architecture of your tenant and workspace. Proper planning will ensure a smooth transition and help avoid any disruptions to your security operations. 4. Leverage Advanced Threat Detection: The Defender portal offers enhanced threat detection capabilities with advanced AI and machine learning for Microsoft Sentinel. Make sure to leverage these features for faster and more accurate threat detection and response. This will help you identify and address critical threats promptly, improving your overall security posture. 5. Utilize Unified Hunting and Incident Management: Take advantage of the enhanced hunting, incident, and investigation capabilities in Microsoft Defender. This provides a comprehensive view for more efficient threat detection and response. By consolidating all security incidents, alerts, and investigations into a single unified interface, you can streamline your operations and improve efficiency. 6. Optimize Cost and Data Management The Defender portal offers cost and data optimization features, such as SOC Optimization and Summary Rules. Make sure to utilize these features to optimize your data management, reduce costs, and increase coverage and SIEM ROI. This will help you manage your security operations more effectively and efficiently. Unleash the full potential of your Security team The unified SecOps experience available in the Defender portal is designed to support the evolving needs of modern SOCs. The Defender portal is not just a new home for Microsoft Sentinel - it’s a foundation for integrated, AI-driven security operations. We’re committed to helping you make this transition smoothly and confidently. If you haven’t already joined the thousands of security organizations that have done so, now is the time to begin. Resources AI-Powered Security Operations Platform | Microsoft Security Microsoft Sentinel in the Microsoft Defender portal | Microsoft Learn Shifting your Microsoft Sentinel Environment to the Defender Portal | Microsoft Learn Microsoft Sentinel is now in Defender | YouTube48KViews9likes22CommentsWhat’s new in Microsoft Sentinel: September 2026
Welcome back to What's new in Microsoft Sentinel. In September, Case Management brings investigation and collaboration together in Microsoft Defender, with a shared workspace to track work through resolution. Defender unified RBAC custom roles for granular delegated admin privileges (GDAP) give you finer control over what managed security service providers (MSSPs) and other partners can access. In Sentinel data lake, a single Codeless Connector Framework (CCF) connector can bring in data from many accounts, and our connector catalog has passed 500 data connectors. Read on for the details. Sentinel innovations: Sentinel SIEM Sentinel data lake Sentinel SIEM Case Management (Public Preview) Starting September 23, 2026, Case Management brings investigation and collaboration together in one experience in Defender. With Incident Cases, you can investigate, coordinate response, assign work, capture notes, and track progress through resolution, all from a shared workspace that holds investigation context alongside tasks and workflow tracking. Your existing Sentinel automation, playbooks, workbooks, and integrations carry over unchanged. This builds on the integrated security operations (ISOC) vision of bringing the context and workflows practitioners need to investigate and respond together in Defender. Read our Case Management blog, see the documentation, and watch the demo to learn more. Unified RBAC custom roles (Public Preview) If you work with a managed security service provider (MSSP) or manage multiple tenants, giving partners the right level of access is simpler. Granular delegated admin privileges (GDAP) sets which partner groups can be delegated access to your tenant, and Defender unified role-based access control (RBAC) sets what they can see and do once delegated. You can assign unified RBAC custom roles to GDAP remote tenant groups and scope each role down to specific security products, data sources, and data collections so partners receive only the access they need. GDAP previously only supported Microsoft Entra directory roles, which often meant handing partners more access than the job needed. Anyone who is a member of a remote tenant group receives its permissions. Your partner manages who belongs to the group, while you keep control of the role and its scope. Learn more. Sentinel data lake Multi-account support for codeless connectors (Public Preview) A single connector built on the Codeless Connector Framework (CCF) can bring data from many accounts, tenants, or environments into one Sentinel workspace. A unified connections list shows each account as its own row, labeled so you can tell them apart by account name, tenant ID, or environment. An “Add connection” experience walks you through setting up each one, and an independent lifecycle per connection means you can edit or remove any account without affecting the rest. Shared, efficient ingestion sends all of it to the same table, so you have one place to investigate instead of a separate connector for every account. This helps if you run separate production and development accounts, segment by region or business unit, or manage several customers in one workspace. Learn more. Sentinel data connectors pass the 500 mark Sentinel has reached an exciting milestone of more than 500 data connectors. Our connectors bring security signals from Microsoft services, non-Microsoft solutions, multicloud environments, applications, infrastructure, and custom sources into Sentinel, where they can be correlated and analyzed to help teams detect threats, investigate incidents, hunt across their digital estate, and automate response. With 500+ connectors and growing, Sentinel makes it easier for organizations to unify their security ecosystem and give the security operations center (SOC) broader visibility where it matters most. Find your connector. Additional resources Blogs and documentation: Integrated Security Operations Center in Microsoft Defender ISOC in Microsoft Defender (preview) Activate Microsoft Defender unified role-based access control (URBAC) Support multiple connections in a codeless connector Upcoming webinars: Oct 6: Security Immersion Event: Into the Breach Oct 14: Microsoft Security Immersion Event: Shadow Hunter Upcoming events: Oct 19: Microsoft Security Days Summit: Dallas Edition (In Person) ISOC: What's new with the Defenders Capture the Flag: Agent Wars (Hands-on) Nov 17–20: Microsoft Ignite at Moscone Center in San Francisco, CA, USA. See what's next in Microsoft Security. Register now. Stay connected Check back each month for the latest innovations, updates, and events to ensure you’re getting the most out of Microsoft Sentinel. We’ll see you in the next edition!944Views2likes1Comment
From “No” to “Now”: A 7-Layer Strategy for Enterprise AI Safety
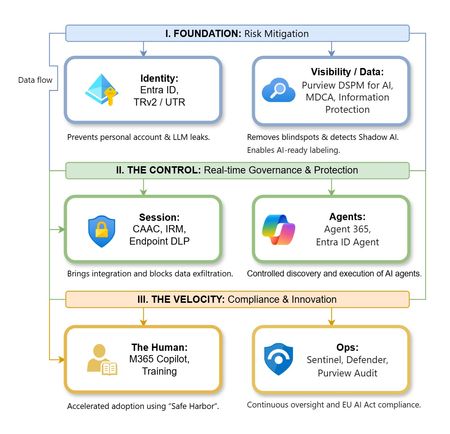
The “block” posture on Generative AI has failed. In a global enterprise, banning these tools doesn't stop usage; it simply pushes intellectual property into unmanaged channels and creates a massive visibility gap in corporate telemetry. The priority has now shifted from stopping AI to hardening the environment so that innovation can run at velocity without compromising data sovereignty. Traditional security perimeters are ineffective against the “slow bleed” of AI leakage - where data moves through prompts, clipboards, and autonomous agents rather than bulk file transfers. To secure this environment, a 7-layer defense-in-depth model is required to treat the conversation itself as the new perimeter. 1. Identity: The Only Verifiable Perimeter Identity is the primary control plane. Access to AI services must be treated with the same rigor as administrative access to core infrastructure. The strategy centers on enforcing device-bound Conditional Access, where access is strictly contingent on device health. To solve the "Account Leak" problem, the deployment of Tenant Restrictions v2 (TRv2) is essential to prevent users from signing into personal tenants using corporate-managed devices. For enhanced coverage, Universal Tenant Restrictions (UTR) via Global Secure Access (GSA) allows for consistent enforcement at the cloud edge. While TRv2 authentication-plane is GA, data-plane protection is GA for the Microsoft 365 admin center and remains in preview for other workloads such as SharePoint and Teams. 2. Eliminating the Visibility Gap (Shadow AI) You can’t secure what you can't see. Microsoft Defender for Cloud Apps (MDCA) serves to discover and govern the enterprise AI footprint, while Purview DSPM for AI (formerly AI Hub) monitors Copilot and third-party interactions. By categorizing tools using MDCA risk scores and compliance attributes, organizations can apply automated sanctioning decisions and enforce session controls for high-risk endpoints. 3. Data Hygiene: Hardening the “Work IQ” AI acts as a mirror of internal permissions. In a "flat" environment, AI acts like a search engine for your over-shared data. Hardening the foundation requires automated sensitivity labeling in Purview Information Protection. Identifying PII and proprietary code before assigning AI licenses ensures that labels travel with the data, preventing labeled content from being exfiltrated via prompts or unauthorized sharing. 4. Session Governance: Solving the “Clipboard Leak” The most common leak in 2025 is not a file upload; it’s a simple copy-paste action or a USB transfer. Deploying Conditional Access App Control (CAAC) via MDCA session policies allows sanctioned apps to function while specifically blocking cut/copy/paste. This is complemented by Endpoint DLP, which extends governance to the physical device level, preventing sensitive data from being moved to unmanaged USB storage or printers during an AI-assisted workflow. Purview Information Protection with IRM rounds this out by enforcing encryption and usage rights on the files themselves. When a user tries to print a "Do Not Print" document, Purview triggers an alert that flows into Microsoft Sentinel. This gives the SOC visibility into actual policy violations instead of them having to hunt through generic activity logs. 5. The “Agentic” Era: Agent 365 & Sharing Controls Now that we're moving from "Chat" to "Agents", Agent 365 and Entra Agent ID provide the necessary identity and control plane for autonomous entities. A quick tip: in large-scale tenants, default settings often present a governance risk. A critical first step is navigating to the Microsoft 365 admin center (Copilot > Agents) to disable the default “Anyone in organization” sharing option. Restricting agent creation and sharing to a validated security group is essential to prevent unvetted agent sprawl and ensure that only compliant agents are discoverable. 6. The Human Layer: “Safe Harbors” over Bans Security fails when it creates more friction than the risk it seeks to mitigate. Instead of an outright ban, investment in AI skilling-teaching users context minimization (redacting specifics before interacting with a model) - is the better path. Providing a sanctioned, enterprise-grade "Safe Harbor" like M365 Copilot offers a superior tool that naturally cuts down the use of Shadow AI. 7. Continuous Ops: Monitoring & Regulatory Audit Security is not a “set and forget” project, particularly with the EU AI Act on the horizon. Correlating AI interactions and DLP alerts in Microsoft Sentinel using Purview Audit (specifically the CopilotInteraction logs) data allows for real-time responses. Automated SOAR playbooks can then trigger protective actions - such as revoking an Agent ID - if an entity attempts to access sensitive HR or financial data. Final Thoughts Securing AI at scale is an architectural shift. By layering Identity, Session Governance, and Agentic Identity, AI moves from being a fragmented risk to a governed tool that actually works for the modern workplace.Defender streaming setup and integration with private event hub
Hey team, Do we know Defeneder supports private endpoint only event hubs to ingest data - I think only public is supported Configure Azure Event Hubs for Microsoft Defender XDR event ingestion - Microsoft Defender XDR | Microsoft Learn Could anyone please clarify?251Views0likes1CommentIntegrating Fluent Bit with Microsoft Sentinel
This guide will walk you through the steps required to integrate Fluent Bit with Microsoft Sentinel. Beware that in this article, we assume you already have a Sentinel workspace, a Data Collection Endpoint and a Data Collection Rule, an Entra ID application and finally a Fluent Bit installation. As mentioned above, log ingestion API supports ingestion both in custom tables as built-in tables, like CommonSecurityLog, Syslog, WindowsEvent and more. In case you need to check which tables are supported please the following article: https://learn.microsoft.com/en-us/azure/azure-monitor/logs/logs-ingestion-api-overview#supported-tables Prerequisites: Before beginning the integration process, ensure you have the following: An active Azure subscription with Microsoft Sentinel enabled; Microsoft Entra ID Application taking note of the ClientID, TenantID and Client Secret – create one check this article: https://learn.microsoft.com/en-us/entra/identity-platform/quickstart-register-app?tabs=certificate A Data Collection Endpoint (DCE) – to create a data collection endpoint, please check this article: https://learn.microsoft.com/en-us/azure/azure-monitor/essentials/data-collection-endpoint-overview?tabs=portal A Data Collection Rule (DCR) – fields from the Data Collection Rule need to match exactly to what exists in table columns and also the fields from the log source. To create a DCR please check this article: https://learn.microsoft.com/en-us/azure/azure-monitor/essentials/data-collection-rule-create-edit?tabs=cli Depending on the source, it might require a custom table to be created or an existing table from log analytics workspace; Fluent Bit installed on your server or container – In case you haven’t yet installed Fluent Bit, in the following article you'll find the instructions per type of operating system: https://docs.fluentbit.io/manual/installation/getting-started-with-fluent-bit High level architecture: Step 1: Setting up Fluent Big configuration file Before we step-in into the configuration, Fluent Bit has innumerous output plugins and one of those is through Log Analytics Ingestion API both to supported Sentinel tables but also for custom tables. You can check more information about it here in Fluent Bit documentation: https://docs.fluentbit.io/manual/pipeline/outputs/azure_logs_ingestion Moving forwarder, in order to configure Fluent Bit to send logs into Sentinel log analytics workspace, please take note of the specific input plugin you are using or intend to use to receive logs and how can you use it to output the logs to Sentinel workspace. For example most of the Fluent Bit plugins allow to set a “tag” key which can be used within the output plugin so that there’s a match in which logs are intended to send. On the other hand, in a scenario where multiple input plugins are used and all are required send logs to Sentinel, then a match of type wildcard "*" could be used as well. Another example, in a scenario where there are multiple input plugins of type “HTTP” and you want to just send a specific one into Sentinel, then the “match” field must be set according to the position of the required input plugin, for example “match http.2”, if the input plugin would the 3 rd in the list of HTTP inputs. If nothing is specified in the "match" field, then it will assume "http.0" by default. For better understanding, here’s an example of how a Fluent Bit config file could look: First, the configuration file is located under the path ”/etc/fluent-bit/fluent-bit.conf” The first part is the definition of all “input plugins”, then follows the “filter plugins” which you can use for example to rename fields from the source to match for what exists within the data collection rule schema and Sentinel table columns and finally there’s the output plugins. Below is a screenshot of a sample config file: INPUT plugins section: In this example we’re going to use the “dummy input” to send sample messages to Sentinel. However, in your scenario you could leverage other’s input plugins within the same config file. After everything is configured in the input section, make sure to complete the “FILTER” section if needed, and then move forward to the output plugin section, screenshot below. OUTPUT plugins section: In this section, we have output plugins to write on a local file based on two tags “dummy.log” and “logger”, an output plugin that prints the outputs in json format and the output plugin responsible for sending data to Microsoft Sentinel. As you can see, this one is matching the “tag” for “dummy.log” where we’ve setup the message “{“Message”:”this is a sample message for testing fluent bit integration to Sentinel”, “Activity”:”fluent bit dummy input plugn”, “DeviceVendor”:”Ubuntu”}. Make sure you insert the correct parameters in the output plugin, in this scenario the "azure_logs_ingestion" plugin. Step 2: Fire Up Fluent Bit When the file is ready to be tested please execute the following: sudo /opt/fluent-bit/bin/fluent-bit -c /etc/fluent-bit/fluent-bit.conf Fluent bit will start initialization all the plugins it has under the config file. Then you’re access token should be retrieved if everything is well setup under the output plugin (app registration details, data collection endpoint URL, data collection rule id, sentinel table and important to make sure the name of the output plugin is actually “azure_logs_ingestion”). In a couple of minutes you should see this data under your Microsoft Sentinel table, either an existing table or a custom table created for the specific log source purpose. Summary Integrating Fluent Bit with Microsoft Sentinel provides a powerful solution for log collection and analysis. By following this guide, hope you can set up a seamless integration that enhances your organization's ability to monitor and respond to security threats, just carefully ensure that all fields processed in Fluent Bit are mapped exactly to the fields in Data Collection Rule and Sentinel table within Log Analytics Workspace. Special thanks to “Bindiya Priyadarshini” that collaborated with me on this blog post. Cheers!3.2KViews2likes2CommentsMigrate Sentinel to Defender - Why It Is a Security Architecture Decision, Not Just a Portal Change
Microsoft will retire the Sentinel experience in Azure on March 31, 2027. Most of the conversation around this transition focuses on cost optimization and portal consolidation. That framing undersells what is actually happening. The unified Defender portal is not a new interface for the same capabilities. It is the platform foundation for a fundamentally different SOC operating model — one built on a 2-tier data architecture, graph-based investigation, and AI agents that can hunt, enrich, and respond at machine speed. Partners who understand this will help customers build security programs that match how attackers actually operate. This document covers four things: What the unified experience delivers — the security capabilities that do not exist in standalone Sentinel and why they matter against today’s threats. What the transition really involves - is not data migration, but it is a data architecture project that changes how telemetry flows, where it lives, and who queries it. Where the partner opportunity lives — a structured progression from professional services (transactional, transition execution, and advisory) to ongoing managed security services. Why does the unified experience win competitively — factual capability advantages that give partners a defensible position against third-party SIEM alternatives. The Bigger Picture: Preparing for the Agentic SOC Before getting into transition mechanics, partners need to understand where the industry is headed — because the platform decisions made during this transition will determine whether a customer’s SOC is ready for what comes next. The security industry is moving from human-driven, alert-centric workflows to an operating model built on three pillars: Intellectual Property — the detection logic, hunting hypotheses, response playbooks, and domain expertise that differentiate one security team from another. Human Orchestration — the judgment, context, and decision-making that humans bring to complex incidents. Humans set strategy, validate findings, and make containment decisions. They do not manually triage every alert. AI Agents - built agents that execute repeatable work: enriching incidents, hunting across months of telemetry, validating security posture, drafting response actions, and flagging anomalies for human review. The SOC of 2027 will not be scaled by hiring more analysts. It will be scaled by deploying agents that encode institutional knowledge into automated workflows — orchestrated by humans who focus on the decisions that require judgment. This transformation requires a platform that provides three things: Deep telemetry — agents need months of queryable data to analyze behavioral patterns, build baselines, and detect slow-moving threats. The Sentinel data lake provides this at a cost point that makes long-retention feasible. Relationship context — agents need to understand how entities connect. Which accounts share credentials? What is the blast radius of a compromised service principle? What is the attack path from a phished user to domain admin? Sentinel Graph provides this. Extensibility — partners and customers need to build and deploy their own agents without waiting for Microsoft to ship them. The MCP framework and Copilot agent architecture provide this. None of these exist in Azure experience for Sentinel. All three ship with the Defender experience. The urgency goes beyond the March 2027 deadline. Organizations are deploying AI agents, copilots, and autonomous workflows across their businesses — and every one of those creates a new attack surface. Prompt injection, data poisoning, agent hijacking, cross-plugin exploitation — these are not theoretical risks. They are in the wild today. Defending against AI-powered attacks requires a security platform that is itself AI Agent-ready. The new experience in Defender unlocks this experience. What Unified SIEM and XDR Actually Delivers The original framing — “single pane of glass for SIEM and XDR” — is accurate but insufficient. Here is what the unified platform delivers that standalone Sentinel does not. Cross-Domain Incident Correlation The Defender correlation engine does not just group alerts by time proximity. It builds multi-stage incident graphs that link identity compromise to lateral movement to data exfiltration across SIEM and XDR telemetry — automatically. Consider a token theft chain: an infostealer harvests browser session cookies (endpoint telemetry), the attacker replays the token from a foreign IP (Entra ID sign-in logs), creates a mailbox forwarding rule (Exchange audit logs), and begins exfiltrating data (DLP alerts). In standalone Sentinel, these are four separate alerts in four different tables. In the unified platform, they are one correlated incident with a visual attack timeline. 2-Tier Data Architecture The Sentinel data lake introduces a second storage tier that changes the economics and capabilities of security telemetry: Analytics Tier Data Lake Purpose Real-time detection rules, SOAR, alerting Hunting, forensics, behavioral analysis, AI agent queries Latency Sub-5-minute query and alerting Minutes to hours acceptable Cost ~$4.30/GB PAYG ingestion (~$2.96 at 100 GB/day commitment) ~$0.05/GB ingestion + $0.10/GB data processing (at least 20x cheaper) Retention 90 days default (expensive to extend) Up to 12 years at low cost Best for High-signal, low-volume sources High-volume, investigation-critical sources The architecture decision is not “which tier is cheaper.” It is “which tier gives me the right detection capability for each data source.” Analytics tier candidates: Entra ID sign-in logs, Azure activity, audit logs, EDR alerts, PAM events, Defender for Identity alerts, email threat detections. These need sub-5-minute alerting. Data lake candidates: Raw firewall session logs, full DNS query streams, proxy request logs, Sysmon process events, NSG flow logs. These drive hunting and forensic analysis over weeks or months. Dual-ingest sources: Some sources need both tiers. Entra ID sign-in logs are the canonical example — analytics tier for real-time password spray detection, Data Lake for graph-based blast radius analysis across months of authentication history. Implementation is straightforward: a single Data Collection Rule (DCR) transformation handles the split. One collection point, two routing destinations. The right framing: “Right data in the right tier = better detections AND lower cost.” Cost savings are a side effect of good security architecture, not the goal. Sentinel Graph Sentinel graph enables SOC teams and AI agents to answer questions that flat log queries cannot: What is the blast radius of this compromised account? Which service principals share credentials with the breached identity? What is the attack path from this phished user to domain admin? Which entities are connected to this suspicious IP across all telemetry sources? Graph-based investigation turns isolated alerts into context-rich intelligence. It is the difference between knowing “this account was compromised” and understanding “this account has access to 47 service principals, 3 of which have written access to production Key Vault.” Security Copilot Integration Security Copilot embedded in the defender portal helps analysts summarize incidents, generate hunting queries, explain attacker behavior, and draft response actions. For complex multi-stage incidents, it reduces the time from “I see an alert” to “I understand the full scope” from hours to minutes. With free SCUs available with Microsoft 365 E5, teams can apply AI to the highest-effort investigation work without adding incremental cost. MCP and the Agent Framework The Model Context Protocol (MCP) and Copilot agent architecture let partners and customers build purpose-built security agents. A concrete example: an MCP-enabled agent can automatically enrich a phishing incident by querying email metadata, checking the sender against threat intelligence, pulling the user’s recent sign-in patterns, correlating with Sentinel Graph for lateral risk, and drafting a containment recommendation — in under 60 seconds. This is where partner intellectual property becomes competitive advantage. The agent framework is the mechanism for encoding proprietary detection logic, response playbooks, and domain expertise into automated workflows that run at machine speed. Security Store Security Store allows partners to evolve from one‑time transition projects into repeatable, scalable offerings—supporting professional services, managed services, and agent‑based IP that align with the customer’s unified SecOps operating model As part of the transition, the Microsoft Security Store becomes the extension layer for the Defender —allowing partners to deliver differentiated agents, SaaS, and security services natively within Defender and Sentinel, instead of building and integrating in isolation The 4 Investigation Surfaces: A Customer Maturity Ladder The Sentinel Data Lake exposes four distinct investigation surfaces, each representing a step toward the Agentic SOC — and a partner service opportunity: Surface Capability Maturity Level Partner Opportunity KQL Query Ad-hoc hunting, forensic investigation Basic — “we can query” Hunting query libraries; KQL training Graph Analytics Blast radius, attack paths, entity relationships Intermediate — “we understand relationships” Graph investigation training; attack path workshops Notebooks (PySpark) Statistical analysis, behavioral baselines, ML models Advanced — “we predict behaviors” Custom notebook development; anomaly scoring Agent/MCP Access Autonomous hunting, triage, response at machine speed Agentic SOC — “we automate” Custom agent development; MCP integration The customer who starts with “help us hunt better” ends up at “build us agents that hunt autonomously.” That is the progression from professional services to managed services. What the Transition Actually Involves It is not a data migration — customers’ underlying log data and analytics remain in their existing Log Analytics workspaces. That is important for partners to communicate clearly. But partners should not set the expectation that nothing changes except the URL. Microsoft’s official transition guide documents significant operational changes — including automation rules and playbooks, analytics rule, RBAC restructuring to the new unified model (URBAC), API schema changes that break ServiceNow and Jira integrations, analytics rule transitions where the Fusion engine is replaced by the Defender XDR correlation engine, and data policy shifts for regulated industries. Most customers cannot navigate this complexity without professional help. Important: Transitioning to the Defender portal has no extra cost - estimate the billing with the new Sentinel Cost Estimator Optimizing the unified platform means making deliberate changes: Adding dual-ingest for critical sources that need both real-time detection and long-horizon hunting. Moving high-volume telemetry to the Data Lake — enabling hunting at scale that was previously cost-prohibitive. Retiring redundant data copies where Defender XDR already provides the investigation capability. Updating RBAC, automation, and integrations for the unified portal’s consolidated schema and permission structure. Training analysts on new investigation workflows, Sentinel Graph navigation, and Copilot-assisted triage. Threat Coverage: The Detection Gap Most Organizations Do Not Know They Have This transition is an opportunity to quantify detection maturity — and most organizations will not like what they find. Based on real-world breach analysis — infostealers, business email compromise, human-operated ransomware, cloud identity abuse, vulnerability exploitation, nation-state espionage, and other prevalent threat categories — organizations running standalone Sentinel with default configurations typically have significant detection gaps. Those gaps cluster in three areas: Cross-domain correlation gaps — attacks that span identity, endpoint, email, and cloud workloads. These require the Defender correlation engine because no single log source tells the complete story. Long-retention hunting gaps — threats like command-and-control beaconing and slow data exfiltration that unfold over weeks or months. Analytics-tier retention at 90 days is too expensive to extend and too short for historical pattern analysis. Graph-based analysis gaps — lateral movement, blast radius assessment, and attack path analysis that require understanding entity relationships rather than flat log queries. The unified platform with proper log source coverage across Microsoft-native sources can materially close these gaps — but only if the transition includes a detection coverage assessment, not just a portal cutover. Partners should use MITRE ATT&CK as the common framework for measuring detection maturity. Map existing detections to ATT&CK tactics and techniques before and after transition — a measurable, defensible improvement that justifies advisory fees and ongoing managed services. Partner Opportunity: Professional Services to Managed Services This transition creates a structured progression for all partner types — from professional services that build trust and surface findings, to managed security services that deliver ongoing value. The key insight most partners miss: do not jump from “transition assessment” to “managed services pitch.” Customers are not ready for that conversation until they have experienced the value of professional services. The bridge engagement — whether transactional, transition execution, or advisory — builds trust, demonstrates the expertise, and surfaces the findings that make the managed services conversation a logical next step. Professional Services (transactional + transition execution + advisory) → Managed Security Services (MSSP) The USX transition is the ideal professional services entry point because it combines a mandatory deadline (March 2027) with genuine technical complexity (analytics rule, automation behavioral changes, RBAC restructuring, API schema shifts) that most customers cannot navigate alone. Every engagement produces findings — detection gaps, automation fragility, staffing shortfalls — that are the most credible possible evidence for managed services. Professional Services Transactional Partners Offer Customer Value Key Deliverables Transition Readiness Assessment Risk-mitigated transition with clear scope Sentinel deployment inventory; Defender portal compatibility check; transition roadmap with timeline; MITRE ATT&CK detection coverage baseline Transition Execution and Enablement Accelerated time-to-value, minimal disruption Workspace onboarding; RBAC and automation updates; Dual-portal testing and validation; SOC team training on unified workflows Security Posture and Detection Optimization Better detections and lower cost Data ingestion and tiering strategy; Dual-ingest implementation for critical sources; Detection coverage gap analysis; Automation and Copilot/MCP recommendations Advisory Partners Offer Customer Value Key Deliverables Executive and Strategy Advisory Leadership alignment on why this transition matters Unified SecOps vision and business case; Zero Trust and SOC modernization alignment; Stakeholder alignment across security, IT, and leadership Architecture and Design Advisory Future-ready architecture optimized for the Agentic SOC Target-state 2-tier data architecture; Dual-ingest routing decisions mapped to MITRE tactics; RBAC, retention, and access model design Detection Coverage and Gap Analysis Measurable detection maturity improvement Current-state MITRE ATT&CK coverage mapping; Gap analysis against 24 threat patterns; Detection improvement roadmap with priority recommendations SOC Operating Model Advisory Smooth analyst adoption with clear ownership Redesigned SOC workflows for unified portal; Incident triage and investigation playbooks; RACI for detection engineering, hunting, and platform ops Agentic SOC Readiness Preparation for AI-driven security operations MCP and agent architecture assessment; Custom agent development roadmap; IP + Human Orchestration + Agent operating model design Cost, Licensing and Value Advisory Transparent cost impact with strong business case Current vs. future cost analysis; Data tiering optimization recommendations; TCO and ROI modeling for leadership The conversion to managed services is evidence-based. Every professional services engagement produces findings — detection gaps, automation fragility, staffing shortfalls. Those findings are the most credible possible case for ongoing managed services. Managed Security Services The unified platform changes the managed security conversation. Partners are no longer selling “we watch your alerts 24/7.” They are selling an operating model where proprietary AI agents handle the repeatable work — enrichment, hunting, posture validation, response drafting — and human experts focus on the decisions that require judgment. This is where the competitive moat forms. The formula: IP + Human Orchestration + AI Agents = differentiated managed security. The unified platform enables this through: Multi-tenancy — the built-in multitenant portal eliminates the need for third-party management layers. Sentinel Data Lake — agents can query months of customer telemetry for behavioral analysis without cost constraints. Sentinel Graph — agents can traverse entity relationships to assess blast radius and map attack paths. MCP extensibility — partners can build agents that integrate with proprietary tools and customer-specific systems. Partners who build proprietary agents encoding their detection logic into the MCP framework will differentiate from partners who rely on out-of-box capabilities. The Securing AI Opportunity Organizations are deploying AI agents, copilots, and autonomous workflows across their businesses at an accelerating pace. Every AI deployment creates a new attack surface — prompt injection, data poisoning, agent hijacking, cross-plugin exploitation, unauthorized data access through agentic workflows. These are not theoretical risks. They are in the wild today. Partners who can help customers secure their AI deployments while also using AI to strengthen their SOC will command premium positioning. This requires a security platform that is itself AI Agent-ready — one that can deploy defensive agents at the same pace organizations deploy business AI. The unified Defender portal is that platform. Partners who position USX as “preparing your SOC for AI-driven security operations” will differentiate from partners who position it as “moving to a new portal.” Cost and Operational Benefits Better security architecture also costs less. This is not a contradiction — it is the natural result of putting the right data in the right tier. Benefit How It Works Eliminate low-value ingestion Identify and remove log sources that are never used for detections, investigations, or hunting. Immediately lowers analytics-tier costs without impacting security outcomes. Right-size analytics rules Disable unused rules, consolidate overlapping detections, and remove automation that does not reduce SOC effort. Pay only for processing that delivers measurable security value. Avoid SIEM/XDR duplication Many threats can be investigated directly in Defender XDR without duplicating telemetry into Sentinel. Stop re-ingesting data that Defender already provides. Tier data by detection need Store high-volume, hunt-oriented telemetry in the Data Lake at at least 20x lower cost. Promote only high-signal sources to the analytics tier. Full data fidelity preserved in both tiers. Reduce operational overhead Unified SIEM+XDR workflows in a single portal reduce tool switching, accelerate investigations, simplify analyst onboarding, and enable SOC teams to scale without proportional headcount increases. Improve detection quality The Defender correlation engine produces higher-fidelity incidents with fewer false positives. SOC teams spend less time triaging noise and more time on real threats. Competitive Positioning Partners need defensible talking points when customers evaluate third-party SIEM alternatives. The following advantages are factual, sourced from Microsoft’s transition documentation and platform capabilities — not marketing claims. No extra cost for transitioning — even for non-E5 customers. Third-party SIEM migrations involve licensing, data migration, detection rewrite, and integration rebuild costs. Native cross-domain correlation across Sentinel + Defender products into multi-stage incident graphs. Third-party SIEMs receive Microsoft logs as flat events — they lack the internal signal context, entity resolution, and product-specific intelligence that powers cross-domain correlation. Custom detections across SIEM + XDR — query both Sentinel and Defender XDR tables without ingesting Defender data into Sentinel. Eliminates redundant ingestion cost. Alert tuning extends to Sentinel — previously Defender-only capability, now applicable to Sentinel analytics rules. Net-new noise reduction. Unified entity pages — consolidated user, device, and IP address pages with data from both Sentinel and Defender XDR, plus global search across SIEM and XDR. Third-party SIEMs provide entity views from ingested data only. Built-in multi-tenancy for MSSPs — multitenant portal manages incidents, alerts, and hunting across tenants without third-party management layers. Try out the new GDAP capabilities in Defender portal. Industry validation: Microsoft’s SIEM+XDR platform has been recognized as a Leader by both Forrester (Security Analytics Platforms, 2025) and Gartner (SIEM Magic Quadrant, 2025). Summary: What Partners Should Take Away Topic Key Message Framing USX is a security architecture transformation, not a portal transition. Lead with detection capability, not cost savings. Platform foundation Sentinel Data Lake + Sentinel Graph + MCP/Agent Framework = the platform for the Agentic SOC. 4 investigation surfaces KQL → Graph → Notebooks → Agent/MCP. A maturity ladder from “we can query” to “we automate at machine speed.” Architecture 2-tier data model (analytics + Data Lake) with dual-ingest for critical sources. Cost savings are a side effect of good architecture. Transition complexity Analytics rules and automation rules. API schema changes. RBAC restructuring. Most customers need professional help. Partner engagement model Professional Services (transactional + transition execution + advisory) → Managed Services (MSSP). Competitive positioning No extra cost. Native correlation. Cross-domain detections. Built-in multi-tenancy. Capabilities third-party SIEMs cannot replicate. Partner differentiation IP + Human Orchestration + AI Agents. Partners who build proprietary agents on MCP have competitive advantage. Timeline March 31, 2027. Start now — phased transition with one telemetry domain first, then scale.3.6KViews5likes5Comments