microsoft foundry
129 TopicsTransforming Enterprise Documents into AI Knowledge with Agentic RAG
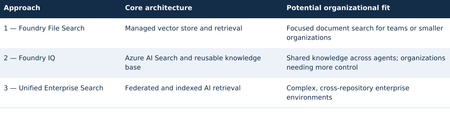
TECHNICAL RESEARCH PAPER Research Disclaimer This article is a technical research paper intended solely for educational, research, and illustrative purposes. It reflects the author’s personal technical perspectives. All concepts, architectural designs, diagrams, and implementation approaches are provided “AS IS” for technical exploration and review, not as production-ready development guidance. Organizations considering implementing these approaches should consult their internal software development standards, enterprise architecture teams, corporate security policies, and governance requirements. Any production implementation must undergo appropriate end-to-end architectural, security, privacy, compliance, and responsible AI or ethics reviews, along with necessary testing and organizational approvals before deployment. Enterprise Agentic Search Master Research Plan and Technical Architecture | Three Independent Agentic RAG Approaches Using Microsoft Technologies Three independent architectural approaches — overview 1. Executive summary This research paper explores three independent approaches to transforming enterprise documents and knowledge repositories into AI-powered search experiences using Agentic Retrieval-Augmented Generation (RAG), Microsoft Foundry, and ASP.NET Core. Organizations can evaluate and adopt any one approach independently according to their business requirements, organizational size, document volume, technical complexity, available resources, and security considerations. Approach 1 — Microsoft Foundry File Search: A streamlined option with managed ingestion, vector storage, retrieval, and an optional ASP.NET Core/Blazor conversational web interface. It may be a sufficient standalone solution for focused document-search needs. Approach 2 — Microsoft Foundry IQ: A knowledge-centric option built around Azure AI Search and reusable knowledge bases, suitable for applications that need more configurable retrieval or shared knowledge across authorized agents. It does not require Approach 1 to be implemented first. Approach 3 — Unified Enterprise Agentic Search: A broader design combining federated and indexed retrieval across approved enterprise repositories, for organizations with extensive integration, authorization, governance, and cross-source search requirements. These are alternatives, not mandatory sequential stages. Approaches 1 and 2 may each be complete solutions. Organizations considering Approach 3 may optionally pilot Approach 1 or 2 to assess retrieval quality, citations, user experience, and operational readiness, but neither pilot is a prerequisite. The examples are research illustrations, not production-ready implementation instructions. 2. Three independent architectural approaches Select an approach based on organizational needs rather than following a required progression: Optional evaluation path: An enterprise exploring Approach 3 can run a focused File Search or Foundry IQ POC first. A small organization may stop at Approach 1 or 2 if its requirements are met. 3. How documents become AI-searchable For indexed sources, the broad workflow is similar across managed File Search and Foundry IQ-backed Azure AI Search, although ingestion details, formats, and service capabilities differ. Federated retrieval may query existing repositories without creating new embeddings. Indexed document processing and agent retrieval workflow The original document is not replaced by vectors alone: searchable text and source references are retained. Scanned PDFs and images may need OCR or multimodal processing. 3.1 Example: what happens to one PDF? Source: IIS-AppPool-Troubleshooting.pdf. Example passage: “If an IIS application pool repeatedly terminates, examine WAS events and investigate rapid-fail protection.” Illustrative document chunk, vector, and metadata A query such as “Why does my IIS application pool keep crashing?” may retrieve the relevant passage through semantic similarity. The agent uses the readable retrieved content to explain the issue and cite its source. Architecture note: This paper targets the new Microsoft Foundry Agent Service (Responses API-based), not classic Foundry agents or legacy Assistants API implementations. 4. Approach 1 — Microsoft Foundry File Search 4.1 Objective Explore a potentially standalone AI-powered search solution over 20 approved technical documents with limited ingestion configuration. Evaluate one Foundry File Search-enabled agent through the built-in Playground and/or a custom conversational web application. 4.2 Architecture flow Approach 1 — Microsoft Foundry File Search architecture 4.3 What is a managed vector store? A managed vector store exposes searchable passages, embeddings, and metadata while abstracting ingestion and retrieval. In standard Foundry Agent Service setup, files can remain in customer-managed Azure Storage and Azure AI Search can back the vector store; basic setup uses Microsoft-managed resources. Where supported, multiple agents in the same project can reference the same vector store ID through File Search tool configuration, subject to API and permission boundaries. 4.4 User experience options Option 1: Use the Foundry Agent Playground to ask questions, inspect citations, and evaluate multi-document synthesis. Option 2: Build an ASP.NET Core/Blazor portal using supported APIs/SDKs with multi-turn chat, streaming where supported, clickable citations, error handling, and Microsoft Entra ID sign-in. Keep privileged credentials on the server. 4.5 Illustrative implementation and deliverables • Prepare 20 approved documents and a fixed question set. • Configure a compatible Foundry project, model, agent, and File Search tool. • Upload files; verify managed processing and retrieval quality. • Test in the Playground; optionally implement and test the Blazor portal. • Evaluate answer grounding, citations, latency, ingestion behavior, and costs. Possible standalone deliverable: File Search agent, managed vector store, working selected interface(s), and an evaluation report. The custom portal is optional; Approach 2 is not required. 5. Approach 2 — Microsoft Foundry IQ 5.1 Objective Evaluate a reusable knowledge-base architecture with Azure AI Search-backed retrieval. This is an independent option: it can be built directly without first implementing Foundry File Search. For a comparative research exercise, the same 20 documents and questions may be reused. 5.2 Architecture flow Approach 2 — Microsoft Foundry IQ architecture 5.3 What is an Azure AI Search index? An Azure AI Search index is a structured, searchable collection of content extracted from enterprise data sources, including documents, websites, and other supported repositories. It stores searchable text, vector embeddings, metadata, and source references, enabling keyword, vector, hybrid, and semantic search to retrieve relevant information efficiently. During ingestion, documents can be processed, divided into smaller chunks, and converted into vector embeddings that represent their semantic meaning. When a user submits a natural-language question, Azure AI Search can combine keyword matching with vector similarity and semantic ranking to identify relevant passages, which an AI agent can use to generate grounded responses with citations to the original sources. 5.4 What Foundry IQ adds? Microsoft Foundry IQ builds on Azure AI Search by providing reusable knowledge bases and agentic retrieval capabilities across supported enterprise data sources. Multiple authorized AI agents can access the same knowledge base without duplicating document ingestion, while agentic retrieval can intelligently plan and execute searches to identify relevant information. Supported remote SharePoint knowledge sources can also be queried through the Copilot Retrieval API without creating a separate local vector index. This capability may require eligible Microsoft 365 Copilot licensing for end users, with access governed by source-specific permissions. For indexed content, document-level security trimming depends on supported knowledge-source capabilities and properly configured access control lists (ACLs) or security filters. 5.5 User experience and optional comparison A Foundry IQ solution may use the Agent Playground and/or its own ASP.NET Core/Blazor application. If an organization is comparing Approaches 1 and 2, it can optionally reuse a common web UI and provide an agent selector. Reusing Approach 1 is not a dependency. 5.6 Illustrative implementation and deliverables • Provision compatible Azure AI Search and Foundry resources. • Create the knowledge base and supported knowledge source; validate ingestion. • Connect a Foundry agent; evaluate retrieval and citations in the Playground. • Optionally build or reuse a Blazor interface for the same agent. • Measure relevance, knowledge reuse, latency, costs, and operational complexity. Direct-file ingestion may depend on preview, region, or API availability; Azure Blob ingestion may be needed. Possible standalone deliverable: reusable knowledge base, index, connected agent, selected interface(s), and evaluation report. 6. Foundry File Search versus Foundry IQ Section 6 — Foundry File Search versus Foundry IQ Key takeaway: Both File Search and Foundry IQ can support keyword, vector, and semantic relevance, with hybrid retrieval where supported. File Search emphasizes managed processing and search behavior; Foundry IQ provides reusable knowledge bases and more configurable Azure AI Search-backed sources. The distinction is control, source integration, and operations—not whether embeddings or semantic relevance exist. Both may be standalone solutions. 7. Approach 3 — Unified Enterprise Agentic Search 7.1 Objective Explore a comprehensive architecture for organizations requiring search across multiple repositories, with both federated and indexed retrieval, grounded answers, citations, and permission-aware access. This approach can be evaluated directly; smaller POCs are optional validation exercises, not prerequisites. 7.2 Unified enterprise architecture flow Section 7 — Unified Enterprise Agentic Search architecture 7.3 Option A — Federated enterprise search Query approved repositories through source APIs/connectors while retaining documents in place. Delegated access and source-native ACLs must be enforced for each connector. Remote SharePoint retrieval through Copilot Retrieval can require Microsoft 365 Copilot licenses for end users; source-specific permission behavior must be validated. Other repositories may require custom connectors or indexing. 7.4 Option B — Indexed enterprise AI search Index approved extracted text, vectors, metadata, and source references in Azure AI Search. Foundry IQ can provide reusable knowledge retrieval. OCR and complex layout extraction are not guaranteed by default File Search or every Foundry IQ knowledge source: test each format and add Azure AI Search OCR/Document Intelligence layout skills or other processing where needed. Derived indexed content requires explicit authorization and security trimming. 7.5 Combined example For “Find documentation explaining HTTP 503 errors in IIS and compare it with internal troubleshooting procedures,” the agent could retrieve current SharePoint guidance through Option A and indexed engineering articles through Option B, synthesize findings, and cite original sources. 8. A Unified UI for All Three Approaches: ASP.NET Core / Blazor Conversational Portal Section 8 — Unified ASP.NET Core/Blazor conversational portal for all three approaches The shared Blazor UI and ASP.NET Core backend can route requests to any of the three independent approaches. Approach 3 additionally coordinates federated and indexed retrieval; all paths return grounded answers and source citations. The retrieval router shown in the diagram is custom ASP.NET Core application/BFF logic, not a standalone Microsoft product. It selects the configured File Search, Foundry IQ, or federated/indexed enterprise path and normalizes citations. The architecture targets the new Microsoft Foundry Agent Service (Responses API-based). 9. Security and governance Section 9 — Security and governance Use approved noncustomer documents for initial research. Validate source permissions and prevent restricted content disclosure. Azure AI Search does not automatically preserve original repository ACLs when content is copied into an index. Indexed security trimming requires appropriate ACL fields and identity-aware filters or supported permission integration; not every knowledge source provides user-level trimming out of the box. Customer data requires organizational approvals. 10. Independent POC evaluation and success criteria Evaluate only the approach or approaches an organization is considering. A side-by-side comparison is optional, not a required sequence. If comparing File Search and Foundry IQ, use identical documents, questions, models, and prompts where possible. Section 10 — Independent POC evaluation and success criteria Illustrative acceptance target: at least 90% correct retrieval on a curated test set, valid citations for grounded responses, and reliable operation through the selected interface(s). These are proposed research criteria, not platform guarantees. Approach 3 additionally requires source-permission, cross-repository, and governance validation. 11. Independent estimates and potential deliverables Section 11 — Independent estimates and potential deliverables These are independent, illustrative POC estimates, not a cumulative rollout schedule. The Approach 2 estimate assumes compatible resources and an existing interface or Playground-only evaluation; building a new custom application can add effort. Approach 3 needs a separately scoped plan for connectors, access control, compliance reviews, testing, deployment, and operational readiness. 12. Research findings and needs-based architectural direction Approach 1: Consider Foundry File Search where a manageable document collection and simpler managed retrieval meet the organization’s requirements. Approach 2: Consider Foundry IQ where reusable knowledge, multiple agents, or greater search configurability are important. Approach 3: Consider unified enterprise retrieval where many systems, security boundaries, and content types must be integrated. No approach is universally preferred, and organization size alone is not a definitive selection criterion. A smaller organization may need advanced governance, while a large enterprise team may only need a focused File Search solution. Optional POCs using Approach 1 or 2 can inform an Approach 3 decision without becoming mandatory prerequisites. Envisioned outcome: A needs-appropriate, citation-grounded enterprise knowledge search experience built with Microsoft technologies, subject to technical validation, organizational security and privacy review, and responsible AI governance. The architectures remain independent research options rather than an endorsed implementation sequence. 13. Implementation notes and service lifecycle Current agent runtime: Target the current Microsoft Foundry Agent Service, not classic agents. Classic agents are deprecated and scheduled for retirement on March 31, 2027. Agentic retrieval: Foundry IQ query planning uses a supported model at low/medium reasoning effort. Minimal effort skips LLM query planning; model and API support must be checked. Availability and previews: Verify regional support, RBAC, API version, and GA-versus-preview status for File Search, Foundry IQ knowledge sources, and portal features before implementation. POC schedule: The illustrative estimates assume ready resources and a working Playground or reusable UI; region, permissions, and unsupported document formats can extend delivery. Technical validation: Microsoft Learn — Foundry File Search; Foundry IQ FAQ; Agentic Retrieval; Foundry Agent Service (classic) migration; Azure AI Search OCR and Document Layout skills.156Views0likes0CommentsMicrosoft Foundry Guardrails Getting in Your Way? Here’s How to Dial Them Down
How This All Started So here’s the story. I just got back from a trip and had a pile of footage sitting on my laptop. Being the lazy (sorry, efficient) person I am, I fired up OpenCode and asked GPT-6 Astra, running on Microsoft Foundry, to cut me a travelogue. Nothing fancy: under two minutes, nice lighting, clean transitions, no cringy effects, a quick QA before showing me, and the output in its own folder. Easy, right? Nope. This is what I got instead: “Image processing blocked due to content policy violation.” Seriously? It’s holiday footage! Nothing even remotely dodgy in there. This is a classic false positive from the default guardrails, and the good news is it’s totally fixable. Let me show you how. My Setup Quick context before we dive in: I’ve got two models deployed on Microsoft Foundry, gpt-6-astra and gpt-6-sol. Both were running on Microsoft’s out-of-the-box guardrail. Step 1: Find the Guardrails Page Head over to the Microsoft Foundry portal, click Build, then hit Guardrails in the left menu. You’ll see three guardrails that Microsoft gives you by default: Microsoft.Default, Microsoft.DefaultV2 and Microsoft.MAIDefault. Microsoft.DefaultV2 is the one every new deployment gets, which is why it’s sitting on both of my models. Here’s the catch: you can’t edit or delete these Microsoft-managed defaults. So instead of tweaking them, we’re going to build our own guardrail and swap it in. Step 2: Create Your Own Guardrail Smash that "Create" button and you’ll land on the Create guardrail page. This is where all the knobs and switches live: Every control has three bits: the risk type, the intervention point (does it check what you send in, what the model spits out, or both?) and the action. The magic trick for loosening things up is flipping the action from Block to Annotate. With Annotate, Foundry still scans the content and tags it in the API response, but it stops slamming the door on your request. So What Does Each Setting Actually Do? Before you go on a switching-off spree, it’s worth knowing what each of these does and what you’re giving up when you loosen it. Here’s the quick tour: Jailbreak: This one catches prompts trying to trick the model into ignoring its rules. On Block, those prompts get rejected outright. On Annotate, they go through with a flag. Turn it off completely and you’re trusting the model’s own training to keep it in line. Network (egress rules): Controls which outbound calls a hosted agent is allowed to make. As the portal points out, it only applies to hosted agents, so for plain model deployments like mine it doesn’t change a thing. Indirect prompt injections: Watches user input and tool responses (files, docs, web pages the model reads) for sneaky instructions someone has planted. Leave it on and your agents are protected when they read outside content; switch it off and a dodgy file could quietly hijack your model. For an agentic tool like OpenCode, which reads files and runs shell commands, I’d honestly keep this one on, even if it’s just on Annotate. Spotlighting (Preview): Tags external content inside the prompt so the model can tell your real instructions apart from random untrusted data. Think of it as an extra seatbelt against indirect attacks. Content harms (Hate, Sexual, Self-harm, Violence): Each of these has a severity slider that starts at Medium blocking, meaning anything rated medium or higher gets blocked. Slide it down to Lowest blocking and only the really nasty stuff gets stopped, which kills off most false positives like mine. The asterisk means these four are mandatory: you can turn the dial down, but you can’t switch them off. Blocklists: Want to ban specific words or phrases, like profanity or your competitor’s name? This is where you do it. It’s off by default. Protected material for code and text: Checks whether the model is about to spit out known copyrighted text (song lyrics, articles and so on) or code lifted from public repos. Block stops it; Annotate lets it through with a flag. Switch it off and you’re rolling the dice on your app reproducing someone else’s copyrighted work. Step 3: Pick Your Models Hit Next and Foundry asks which agents and models you want this guardrail on. Any model you’ve already deployed in your project shows up here. For me that’s gpt-6-astra and gpt-6-sol, so I ticked both. Step 4: Name It and Pick a Streaming Mode One more Next and you’re on the Review page. Give your guardrail a name (I went with NoGuardrails, because subtlety isn’t my thing) and pick a streaming mode. You’ve got two choices: Default: Foundry buffers the response and runs it through the guardrail before each chunk goes out. Nothing reaches the user until it’s been checked. Safest option, but you’ll feel a bit of lag when streaming. Asynchronous: Content streams back the moment it’s generated, with the filters running in the background. Much snappier, but flagged content might flash up briefly before the filter catches it, so your app has to clean up after the fact. Microsoft pitches this for low-latency stuff like internal dev tools, which is exactly my use case. Give the summary a quick once-over, then click Create. Done! Did It Work? Yep! With my shiny new guardrail in place, I fired off the exact same request, this time to GPT-6 Sol. And boom: no more content policy error. The model went straight to work scanning my footage and putting the video together. Wrapping Up Look, Microsoft’s default guardrails are a solid starting point, but they can be a bit trigger-happy when you’re doing perfectly legit stuff like video editing, creative work or internal tooling. Since you can’t touch the defaults, the trick is to roll your own: flip Block to Annotate where it makes sense, drag those content harm sliders down, pick the streaming mode that fits your app, and assign it to your deployments. That’s it! One friendly word of warning though: with great power comes great responsibility. Only loosen what you actually need, keep things like indirect prompt injection detection switched on for any agent that reads files or browses the web, and think twice before doing this on anything customer-facing. And if you want to go further than the portal lets you, like switching content filters off completely, you’ll need to apply to Microsoft for approval first. Happy building!220Views1like2CommentsInformation Extraction with Low-Inference-Cost Models: 85% F1 Gain via Foundry Interactive Training
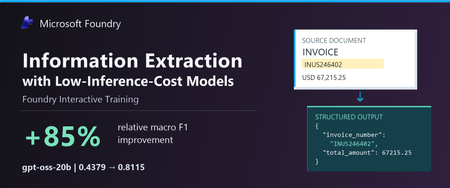
Authors: Shih-Yao Lin, Apurva Saksena The task: turn documents into structured data Many business workflows need to turn documents into structured data. The model must find the right values, capture the requested records, and return output the next system can use. Long documents and repeated tables make this harder. We tested gpt-oss-20b and gpt-oss-120b to explore lower-cost alternatives to frontier models. In our baseline tests, both fell short on field coverage. gpt-oss-20b also declined the task or returned unparseable output. We wanted to see whether task-specific fine-tuning could improve these results. In Figure 1, we show an invoice that we held out from training. We can quickly spot the invoice number, customer, due date, and balance, but our application must map those values to the correct schema fields, preserve all 37 line items, and return complete, valid JSON. A wrong or missing value can trigger downstream errors or manual review, while invalid JSON can break the workflow altogether. We used schema-guided extraction. We gave the model document text and a JSON Schema defining the required fields, then asked it to return one JSON object. Our grader compared normalized field-path/value pairs with the expected answer, counting repeated occurrences. We measure precision as the share of extracted pairs that match the expected answer, and recall as the share of expected pairs we recover correctly. We use F1 to combine the two into one score, using their harmonic mean. F1 ranges from 0 to 1, with higher scores indicating better extraction. A wrong value hurts precision and can also hurt recall if the expected value remains unmatched. A missing value hurts recall. What changed after fine-tuning We evaluated the base and fine-tuned versions of gpt-oss-20b and gpt-oss-120b on the same 20 documents. Both improved their extraction F1. gpt-oss-20b rose from 0.4379 to 0.8115, and gpt-oss-120b rose from 0.6816 to 0.8573. gpt-oss-20b made the larger gain, with an 85.3% relative improvement after 100 GRPO steps. Fine-tuned gpt-oss-120b finished with the higher F1. Fine-tuning helped both models, but the size of the improvement differed. We also evaluated GPT-5.5, GPT-5.6-sol, and GPT-6-sol as reference models. They scored 0.9760, 0.9766, and 0.9764, respectively—still higher than our fine-tuned models. gpt-oss-20b reached 83.1% of GPT-5.6-sol’s reference F1. This is a substantial improvement for gpt-oss-20b and a promising starting point for further task-specific tuning. Our base and tuned scores are averaged across repeated evaluations, while the reference models used a different single-pass protocol. These reference scores provide useful context for the progress we made, with the evaluation differences noted above. These improvements make lower inference-cost base models worth a closer look. Table 1 compares published Azure inference prices. The pricing comparison is intended to provide inference-cost context only and should not be interpreted as a complete total-cost-of-ownership analysis, which would also include training, hosting, retries, and operational costs. Table 1. Extraction macro F1 and published Azure inference prices (USD per 1M tokens); GPT-5.5, GPT-5.6-sol, and GPT-6-sol are included as frontier-model references Model Macro F1 Azure input / 1M Azure output / 1M gpt-oss-20b 0.8115 $0.07 $0.30 gpt-oss-120b 0.8573 $0.15 $0.60 GPT-5.6-sol 0.9766 $4.00 $20.00 GPT-5.5 0.9760 $5.00 $30.00 GPT-6-sol 0.9764 $2.00 $10.00 Notes: Prices checked October 9, 2026, in USD; input rates are uncached. gpt-oss-20b prices are published fine-tuned inference rates for Regional deployments. gpt-oss-120b prices are base-model rates; its fine-tuned rates remain unconfirmed. Frontier prices use Global Standard pricing, with the short-context tier for GPT-5.6-sol and GPT-6-sol. These rates do not represent measured deployment costs for our experimental checkpoints. Token rates exclude training and hosting costs. F1 scores come from fine-tuned checkpoints for the two gpt-oss models and reference runs for the frontier models. All use the same 20 documents, but tuned scores average repeated evaluations while frontier references use a different single-pass protocol. We observed more parseable output and higher coverage We looked through gpt-oss-20b’s responses and found examples where it declined the task or said it could not finish. We tracked this with a “refusal-wording rate”: the share of responses where our grader detected an apology or cannot-complete language. This measures wording, not whether the model made a safety refusal. We tracked JSON parseability and field coverage separately, although these problems can overlap. After fine-tuning, the refusal-wording rate (Refusals) fell from 25% to zero; JSON parseability (Valid JSON) rose from 63.8% to 98.8%, and coverage rose from 47.1% to 94.9%. Valid JSON means our grader could read the response as an object or array. Coverage compares the number of predicted field/value pairs with the expected count, capped at 100%. Wrong or extra pairs can raise coverage, so we read it alongside F1 rather than treat it as a measure of correctness. Extraction quality and output behavior before and after fine-tuning on the same 20 documents. Bars show means across repeated evaluations. “Valid JSON” measures JSON parseability, not schema compliance or value correctness. “Refusal rate” measures detected refusal wording, not safety refusals. Higher is better except for refusal rate. Figure 4 shows how these measures changed during training. We repeated the full training run with a second seed. It reached 0.8101 F1, close to the headline run’s 0.8115. We ran four temperature-0 evaluations for each seed. Across all eight post-training evaluations, our grader detected no refusal wording. What we learned from the model comparison We saw different starting points and different gains between the two models. gpt-oss-20b had clearer output problems before training: it sometimes declined the task, returned unparseable JSON, or missed required information. After fine-tuning, we saw improvements in extraction F1, JSON parseability, and field coverage, along with less refusal wording. gpt-oss-120b started with fewer format problems. We detected no refusal wording, and 96.3% of its baseline responses were parseable JSON. But parseable output did not mean complete or correct extraction. After fine-tuning, its field coverage rose from 74.1% to 94.1%, and its F1 rose from 0.6816 to 0.8573. gpt-oss-20b made the larger F1 gain, while fine-tuned gpt-oss-120b finished with the higher F1. For us, the lesson is to measure the problem first. Try simpler, lower-cost changes, such as prompting, before committing to training. Then consider fine-tuning when your grader can reward the improvements your application needs. How we trained with Foundry Interactive Training We used the Foundry Interactive Training API [1] with 17 training documents, expected structured answers, and a Python grader. We followed the cookbook to connect our grader to Foundry’s managed generation and training operations. We ran 100 group relative policy optimization, or GRPO, steps and saved checkpoints for evaluation. For each document, we had gpt-oss-20b generates eight candidate answers. Our grader awarded partial credit for correct values and penalized invalid JSON. GRPO used the candidates’ relative scores to reinforce better answers. We used the expected answers only for grading. We did not include them in the inputs we gave the model during reinforcement training. The model had to produce its own answers, and the grader supplied the feedback. 5. Customers define the application outcome and quality bar; Foundry Interactive Training runs the post-training loop in Microsoft Foundry. How customers can use Foundry Interactive Training To try this approach, bring four ingredients: a supported base model, examples from your workload, expected outcomes, or another way to check the answers, and a Python grader. Your grader should measure what matters to the application—not just whether an answer looks convincing. Get connected. Request access to the Microsoft Foundry Interactive Training public preview [2] and connect the onboarding cookbook [3][4] to an assigned Foundry project. Separate your data. Build training, validation, and final test sets. Use validation data to choose checkpoints. Keep the final test set for an independent check, with new sources and document structures where possible. Build your grader. Implement a grader that rewards the desired outcome. For our extraction task, we checked normalized field-path/value pairs and penalized unparseable JSON. Run a bounded experiment. Set a training budget, inspect the training signal, and compare saved checkpoints on the validation set. Once you choose a checkpoint, evaluate it on the untouched final test set. Evaluate and prepare for deployment. Use session sampling to test your LoRA adapter on held-out prompts and compare it with the baseline. Save checkpoints so you can continue experimenting. Before using the model in an application, confirm the supported deployment path, model compatibility, and serving costs. Takeaway With Foundry Interactive Training, we improved extraction F1 for both gpt-oss-20b and gpt-oss-120b. We brought our task examples and a Python grader, and Foundry managed the generation and training loop. gpt-oss-20b made the larger gain, while fine-tuned gpt-oss-120b reached the higher F1. We did not match the frontier references, but our results show why task-specific fine-tuning is worth exploring before switching to a higher-priced model. The final choice should depend on independently tested quality and the full cost of deployment. Reference [1] https://github.com/microsoft-foundry/fine-tuning [2] What is interactive training (preview) in Microsoft Foundry? - Microsoft Foundry | Microsoft Learn [3] Interactive Training - Public Preview Intake Form [4] https://github.com/microsoft-foundry/fine-tuning/tree/main/interactive_training365Views0likes0CommentsIntroducing Microsoft-Decision-1 in Microsoft Foundry for decision and classification workloads
Not every step in an AI application needs a large language model to generate a response. Many high-volume application steps are decisions: classify an input, select an option, assign a score, verify a condition, prioritize an item, or control a workflow. To suit these tasks, a new class of models have been developed to address these fast, structured, requests. We are excited to be adding Microsoft-Decision-1 to the Foundry Models Catalog. Our newest, decision model for applications that need to choose among predefined options rather than generate open-ended text. What are decision models? As AI applications mature, the industry is moving beyond the idea that every model interaction needs to result in generated content. Developers are increasingly building systems composed of different models, tools, and application logic, each suited to a different part of the workload. Within those systems, many of the most frequent operations are not generation problems at all. They are decisions about what should happen next. Decision models were designed for this emerging layer of the AI stack. Rather than producing an open-ended response, they evaluate a defined set of possibilities and return structured signals that an application can use to take action. That makes them particularly relevant as developers move toward more dynamic AI applications, where models need to work together and applications must continuously determine where requests should go, which actions should be taken, and when additional processing is needed. For developers, this creates an opportunity to be more intentional about where and how different models are used. Instead of relying on a general-purpose generative model for every step, developers can match the model to the task, using generative and reasoning models where their capabilities are needed and decision models for focused, repeatable choices. The result is a more modular approach to AI application design, where generation, reasoning, and decision-making become complementary building blocks for creating intelligent systems. What is Microsoft-Decision-1? Now available in public preview, Microsoft-Decision-1 is a decision model built on Qwen3.5-9B and designed for applications that need to make fast, structured choices among predefined options. It brings a purpose-built decision capability to the Foundry Models catalog, giving developers another building block for designing AI applications where different steps may benefit from different types of models. Built for predefined decisions. Microsoft-Decision-1 supports use cases such as agent controls, model routing, intent analysis, data labeling, AI judging, incident response routing, data validation, and content classification. Structured for application logic. The model produces predefined answers and confidence signals that applications can use to select the next action or route uncertain results for further review. Designed for lower-latency, lower-cost workflows. Microsoft-Decision-1 is intended for simple, repeatable, and time-sensitive decisions that do not require the generative capabilities or extended reasoning of a larger language model. You can explore these capabilities in the Foundry Playground. This example below shows Microsoft-Decision-1 checking urgency, selecting a support team, and scoring priority for a customer request. Microsoft-Decision-1 represents an area of continued model innovation at Microsoft. The team will rebase future iterations of the model on OpenAI models and Microsoft’s MAI models, bringing together advances from Microsoft’s own model portfolio with a model architecture purpose-built for decision-making. Over time, this work could create opportunities to further explore how Microsoft models can be specialized for the high-volume decisions that sit inside applications and agentic systems. For developers, Microsoft-Decision-1 expands the choices available when building applications and agents with Foundry. Rather than using the same model for every step, developers can combine generative and reasoning models with a decision model and choose the capability that best fits each part of the workflow. That model diversity is increasingly important as AI applications evolve from single-model experiences into systems that coordinate specialized models, tools, and actions. How developers are building with Microsoft-Decision-1 Enterprise applications make decisions throughout a workflow: identifying a customer’s intent, selecting a tool, routing an incident or checking whether a response meets specified criteria. For example, a support application could classify a request as a billing question, a technical issue or an account-access problem. An agent could evaluate a proposed response against a quality rubric and determine whether to accept it, revise it or request review. If the player doesn’t load, open the video in a new window: Open video These decisions can sit alongside generative and reasoning steps in the same application. A language model might draft a response, while Microsoft-Decision-1 evaluates it against defined criteria. With Microsoft-Decision-1 in the Foundry catalog, developers can explore decision workloads through the platform they use to discover and deploy models across various scenarios: Classification: Assign inputs to defined categories, such as customer intents or feedback themes. Routing: Select a model, tool, destination or workflow from a set of options. Evaluation and verification: Assess responses or inputs against specified criteria. Workflow control: Decide whether to continue, retry, stop or send a case for review. A different model for a different kind of workload For developers, decision models introduce a different way to think about optimization. An AI application may make thousands of small choices around a comparatively small number of complex generative or reasoning tasks. Running every one of those steps through the same general-purpose model can overlook an opportunity to optimize the system around the work each step actually needs to perform. That pattern is showing up across Microsoft. Xbox Research used Microsoft-Decision-1 to categorize more than 10,000 pieces of open-ended feedback into researcher-defined themes, reporting quality competitive with GPT-5 while running 80–100 times faster. Other Microsoft teams have also evaluated the model for assessing Copilot response quality and supporting adaptive replanning in Microsoft Discovery. These scenarios matter because they are not simply classification benchmarks. They are examples of decisions embedded inside larger applications. As AI architectures become more modular, developers can consider generation, reasoning, and decision-making as distinct workloads, then select models based on what each step actually requires. For benchmark methodology, measured results and additional examples, read the Command Line blog here. Putting Microsoft-Decision-1 to work For tasks with predefined outcomes, evaluate Microsoft-Decision-1 using representative inputs and the quality, latency and cost requirements of your application. Compare decision accuracy, including ambiguous cases, latency under expected traffic and cost per completed decision. Where confidence estimates inform automation or review thresholds, validate their calibration on your own data. Start with a decision in your application: The following Python example shows how to compare support-routing decisions with expected labels and measure request latency. Replace the illustrative messages and category definitions with examples from your own workload. Before running: Deploy Microsoft-Decision-1 in your Microsoft Foundry subscription and configure FOUNDRY_BASE_URL and FOUNDRY_API_KEY. Set FOUNDRY_MODEL to the model or deployment identifier specified in the quickstart. Keep credentials outside the source code. Model requests incur applicable usage charges. Integration note: Confirm the route and authentication header before running it against your deployment. #!/usr/bin/env python3 """Classify support requests with Microsoft-Decision-1.""" import json import os import urllib.error import urllib.request from collections.abc import Mapping from statistics import median from time import perf_counter from typing import Any from azure.identity import DefaultAzureCredential OPTIONS = { "billing": "Charges, invoices, refunds, or subscription payments", "technical": "Software errors, bugs, or integration failures", "account": "Sign-in, password, or account-access problems", } EXAMPLES = [ ("I was charged twice.", "billing"), ("The integration crashes during checkout.", "technical"), ("I cannot sign in after resetting my password.", "account"), ] AZURE_ENDPOINT = os.environ["AZURE_ENDPOINT"].rstrip("/") DEPLOYMENT_NAME = os.environ["DEPLOYMENT_NAME"] TIMEOUT_SECONDS = 60 TOKEN_SCOPE = "https://cognitiveservices.azure.com/.default" CREDENTIAL = DefaultAzureCredential() class DecisionAPIError(RuntimeError): """Raised when the API can't return a valid classification.""" def read_choice( payload: Any, options: Mapping[str, str], ) -> str: if not isinstance(payload, dict): raise DecisionAPIError("The API returned an invalid response.") answers = payload.get("answers") if not isinstance(answers, dict): raise DecisionAPIError("The API returned no answers object.") answer = answers.get("team") if not isinstance(answer, dict) or answer.get("type") != "choice": raise DecisionAPIError("The API returned an invalid answer.") choice = answer.get("choice") if not isinstance(choice, str) or choice not in options: raise DecisionAPIError( f"The API selected an unsupported team: {choice!r}." ) return choice def predict( text: str, options: Mapping[str, str], ) -> str: if not text.strip(): raise ValueError("text must not be empty.") if len(options) < 2: raise ValueError("options must contain at least two choices.") body = json.dumps( { "model": DEPLOYMENT_NAME, "state": text, "questions": { "team": { "type": "choice", "instructions": ( "Which team should handle this customer support " "request? Select exactly one team based on the " "primary problem." ), "criteria": dict(options), } }, } ).encode("utf-8") access_token = CREDENTIAL.get_token(TOKEN_SCOPE).token request = urllib.request.Request( f"{AZURE_ENDPOINT}/providers/microsoft/v1/systemone", data=body, headers={ "Authorization": f"Bearer {access_token}", "Content-Type": "application/json", "Accept": "application/json", }, method="POST", ) try: with urllib.request.urlopen( request, timeout=TIMEOUT_SECONDS, ) as response: response_body = response.read() except urllib.error.HTTPError as exc: raise DecisionAPIError( f"The API returned HTTP {exc.code}." ) from exc except urllib.error.URLError as exc: raise DecisionAPIError( f"Couldn't reach the API: {exc.reason}." ) from exc try: payload = json.loads(response_body) except (json.JSONDecodeError, UnicodeDecodeError) as exc: raise DecisionAPIError( "The API returned invalid JSON." ) from exc return read_choice(payload, options) def main() -> None: correct = 0 latencies_ms = [] for text, expected in EXAMPLES: start = perf_counter() predicted = predict(text, OPTIONS) elapsed_ms = (perf_counter() - start) * 1000 correct += int(predicted == expected) latencies_ms.append(elapsed_ms) print( f"Expected={expected}, predicted={predicted}, " f"latency={elapsed_ms:.1f} ms" ) accuracy = correct / len(EXAMPLES) print(f"Accuracy: {accuracy:.1%}") print( "Median request latency: " f"{median(latencies_ms):.1f} ms" ) if __name__ == "__main__": main() This small dataset illustrates the evaluation process. For meaningful results, use a larger, representative labeled dataset and inspect errors by category. The measured latency includes the client call and network time; sequential requests do not measure latency under production load. Assess cost and confidence calibration separately. Your application defines the available options and resulting actions. Use evaluation results to determine where automation is appropriate and where additional validation or human review is needed. Pricing Model Deployment Type Input Tokens (#/1M) Output tokens (#/1M) Microsoft-Decision-1 US Datazone $0.042 N/A EU Datazone $0.042 N/A Get started Explore Microsoft-Decision-1 in the Foundry catalog to make your first request. We look forward to seeing how developers use Microsoft-Decision-1 to bring structured decisions into their applications and agents through Microsoft Foundry.7.3KViews1like1CommentDelivering Agent Skills Over MCP
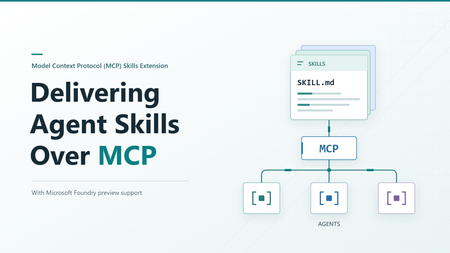
Getting a skill working with one agent is a useful start. Sharing it with other agents raises a different question: where should that skill live? You could give each agent its own copy. But when the skill changes, those copies need updating. The official Skills extension for Model Context Protocol (MCP) provides a standard way to make skills available from a server, so compatible agents can find and load them when needed. Let's look at what happens across that connection, then where Microsoft Foundry fits in. What the extension adds MCP already gives agents access to content from servers through resources. The Skills extension builds on that. It adds a way to ask which skills a server offers and get the details needed to load them. It doesn't change the skill format, and it doesn't run a skill on the server. The application running your agent, called the host, still decides how to offer skills to the user or model and load the selected instructions. Both the server and the host need the right support. Being able to call an MCP tool isn't enough to discover and load remote skills. A custom tool that returns skill text isn't, by itself, an implementation of this extension either. The extension is identified as io.modelcontextprotocol/skills . Its proposal, SEP-2640, has reached Final status. Client support is still developing, so a published specification doesn't mean every MCP host supports it yet. How an agent gets a skill The basic sequence is straightforward: find out what's available, select a skill, and read the content needed to use it. The host's MCP client handles the requests to the server. We'll follow the case where the server provides a file list, called a manifest. It includes each file's address, size, and a SHA-256 digest: a fingerprint used to check that the file received matches what the server listed. The examples below use a generic example-skill with two files. They illustrate the official message shapes, not a captured server session. They use protocol revision 2026-07-28 and include its required request metadata. The _meta block tells the server which protocol version and client capabilities apply to each request, including the client's Skills extension support. Both sides must declare support. Use a client and server that support this revision. The Foundry examples later follow its separately documented path. These examples show JSON-RPC message bodies, not complete HTTP requests. For Streamable HTTP, POST each message to the server's MCP endpoint with Content-Type: application/json , Accept: application/json, text/event-stream , and MCP-Protocol-Version: 2026-07-28 headers. Also set Mcp-Method to the body's method , such as skills/list . For resources/read , set Mcp-Name to the requested URI, such as skill://example-skill/SKILL.md . The mirrored values must match the body. See the HTTP header requirements. Find out what's available First, the server declares that it supports resources and the Skills extension. This is the relevant fragment of its server/discover response: { "capabilities": { "resources": {}, "extensions": { "io.modelcontextprotocol/skills": {} } } } The empty extension object means skills are supported, but optional directory reading isn't enabled. The client can now ask for the available skills: { "jsonrpc": "2.0", "id": 1, "method": "skills/list", "params": { "_meta": { "io.modelcontextprotocol/protocolVersion": "2026-07-28", "io.modelcontextprotocol/clientCapabilities": { "extensions": { "io.modelcontextprotocol/skills": {} } }, "io.modelcontextprotocol/clientInfo": { "name": "example-client", "version": "1.0.0" } } } } Here is a response containing one skill: { "jsonrpc": "2.0", "id": 1, "result": { "resultType": "complete", "skills": [ { "uri": "skill://example-skill/SKILL.md", "frontmatter": { "name": "example-skill", "description": "An example skill for this article." }, "resources": [ { "uri": "skill://example-skill/SKILL.md", "digest": "sha256:d2069d0f3682fea0d69e62247386e950e9ad958bab5b186b456dc1fb8266e312", "size": 138 }, { "uri": "skill://example-skill/references/notes.md", "digest": "sha256:e76b3033746e3c5d8cc970b21b15ce40f868e6902c065521a1abf373f4a19c85", "size": 58 } ] } ], "ttlMs": 300000, "cacheScope": "public" } } The resources array is the manifest. It lists both files, but doesn't contain their text. The host can show the skill's name and description without fetching either file. size counts bytes, not characters. The cache fields describe how long the result stays fresh and whether it can be shared. They aren't trust checks, and public here is a choice for this illustrative server, not a recommendation for private skill content. resultType: "complete" means this request completed, not that the server's entire catalog is in the response. If it includes nextCursor , pass that value as params.cursor on the next skills/list request. Each skill's manifest stays whole on one page. The user or model can then select a relevant skill. The host keeps track of which server it came from and its address, known as a URI. Read and load the instructions After any required approval, the host uses resources/read to get the selected skill's instructions. It checks them against the details from the listing before adding them to the agent's context, the information available to the model. The request uses the instruction URI from the listing: { "jsonrpc": "2.0", "id": 2, "method": "resources/read", "params": { "uri": "skill://example-skill/SKILL.md", "_meta": { "io.modelcontextprotocol/protocolVersion": "2026-07-28", "io.modelcontextprotocol/clientCapabilities": { "extensions": { "io.modelcontextprotocol/skills": {} } }, "io.modelcontextprotocol/clientInfo": { "name": "example-client", "version": "1.0.0" } } } } This time, the response contains the actual file text: { "jsonrpc": "2.0", "id": 2, "result": { "resultType": "complete", "contents": [ { "uri": "skill://example-skill/SKILL.md", "mimeType": "text/markdown", "text": "---\nname: example-skill\ndescription: An example skill for this article.\n---\n\nRead references/notes.md when additional guidance is needed.\n" } ], "ttlMs": 300000, "cacheScope": "public" } } The \n sequences represent line breaks in the file. Encoding the decoded text as UTF-8 produces 138 bytes. Computing SHA-256 over those bytes produces the digest shown in the first manifest entry. The fingerprint covers the file bytes, not the surrounding JSON response. Reading the file and loading the skill are different steps. An MCP resource browser could read the same file to display it to a person. That doesn't make the skill active. The host must handle the checks and approvals that come with loading it for the agent. Get supporting files when needed If the agent needs a reference or another supporting file, the host reads it from the same server using resources/read . It checks that the file is in the saved manifest and that its contents match before using it. For our example, the relative reference resolves to the second URI in the manifest. When that file is needed, the client sends: { "jsonrpc": "2.0", "id": 3, "method": "resources/read", "params": { "uri": "skill://example-skill/references/notes.md", "_meta": { "io.modelcontextprotocol/protocolVersion": "2026-07-28", "io.modelcontextprotocol/clientCapabilities": { "extensions": { "io.modelcontextprotocol/skills": {} } }, "io.modelcontextprotocol/clientInfo": { "name": "example-client", "version": "1.0.0" } } } } The server returns: { "jsonrpc": "2.0", "id": 3, "result": { "resultType": "complete", "contents": [ { "uri": "skill://example-skill/references/notes.md", "mimeType": "text/markdown", "text": "Use only the information relevant to the current request.\n" } ], "ttlMs": 300000, "cacheScope": "public" } } Those 58 bytes match the second manifest entry. Even a changed line ending would change the fingerprint, so the host must check the exact bytes received. Here's how those steps fit together: The host reads instructions and supporting files as needed, checking each against the server's manifest before use. Files that aren't needed stay unread. Connecting to a server doesn't mean downloading every skill it offers. And loading a skill still doesn't guarantee that the agent will follow every instruction correctly. Which request does what? You don't need to memorize the method names, but these are the ones you'll see when working with an implementation: Method When to use it skills/list Find available skills and get their details skills/get Get or refresh the details for one skill using its URI resources/read Read instructions or a supporting file resources/directory/read List the files and folders directly inside a directory, if the server supports it You don't need to call skills/get after every skills/list . The listing already contains a complete entry for each returned skill. Use skills/get when you already know a skill's URI or need fresh details for that skill. For example, a direct lookup looks like this: { "jsonrpc": "2.0", "id": 4, "method": "skills/get", "params": { "uri": "skill://example-skill/SKILL.md", "_meta": { "io.modelcontextprotocol/protocolVersion": "2026-07-28", "io.modelcontextprotocol/clientCapabilities": { "extensions": { "io.modelcontextprotocol/skills": {} } }, "io.modelcontextprotocol/clientInfo": { "name": "example-client", "version": "1.0.0" } } } } The response puts the same complete entry shown above under result.skill instead of result.skills , alongside resultType , ttlMs , and cacheScope . It returns metadata and the manifest, not the file text. { "jsonrpc": "2.0", "id": 4, "result": { "resultType": "complete", "skill": { "uri": "skill://example-skill/SKILL.md", "frontmatter": { "name": "example-skill", "description": "An example skill for this article." }, "resources": [ { "uri": "skill://example-skill/SKILL.md", "digest": "sha256:d2069d0f3682fea0d69e62247386e950e9ad958bab5b186b456dc1fb8266e312", "size": 138 }, { "uri": "skill://example-skill/references/notes.md", "digest": "sha256:e76b3033746e3c5d8cc970b21b15ce40f868e6902c065521a1abf373f4a19c85", "size": 58 } ] }, "ttlMs": 300000, "cacheScope": "public" } } A listing can be partial, so not seeing a skill there doesn't necessarily mean it is unavailable. It can still be looked up by URI. Directory reading is optional. Clients can only use it when the server declares directoryRead: true . If the manifest already lists the files they need, an extra directory request isn't necessary. What gets checked before loading? Getting content from a server doesn't automatically make it trustworthy. The extension sets rules for checking that content and keeping track of its source. The host must remember both the server and the skill's URI. Two servers might offer skills with the same name, or even the same URI. They are still separate skills and must not silently replace each other. The host must also identify the originating server when it adds the content to the model's context. For skills with a manifest, the host must check both the size and digest of each file it reads. The size checks the byte count. The SHA-256 digest detects content changes even when the file's length stays the same. Both must match the manifest before the host uses the file. The host also checks that the metadata at the top of the instructions, called frontmatter, matches the listing. If a file no longer matches, the host must not use it. It can refresh the entry with skills/get . Saved approval is tied to the file URIs and fingerprints. If a refreshed manifest changes, adds, or removes a file, that approval is revoked and the host must ask again before loading or executing the changed skill. For example, if the server changes the notes file above after listing it, the read may succeed but verification will fail. That's a host-side rejection, not a JSON-RPC error from the server. The host must not use the changed text under the old manifest. These checks tell you that the content matches what the server offered. They don't tell you whether the content is safe or the instructions are good. There is an exception to the file-checking approach. Servers can mark generated content as "resources": "dynamic" when stable fingerprints aren't available. Hosts may refuse to load it. If they accept it, they must still check the frontmatter. Because the content can change between requests, approving it once doesn't automatically approve different instructions or scripts returned later. The host cannot treat the earlier approval as permission to use that changed content. Permissions are separate too. Reading a script doesn't give the agent permission to run it. Under the Skills extension specification, the host must obtain explicit user approval for that skill before allowing host-side execution. The extension defines this requirement, but the host implements the approval and execution controls. If the skill's instructions ask the agent to use an additional tool, that request is not permission to use it. The host must still enforce its tool access controls and obtain any required user approval. Where Microsoft Foundry fits Microsoft Foundry offers skills support in preview. Its integration guide describes toolbox-based skill discovery as following SEP-2640. A toolbox gives agents one MCP endpoint for accessing its tools and skills. To share a skill this way: Upload the skill content to create a skill version in your Foundry project. Add a reference to the skill to a toolbox in the same project. Connect an agent that supports this skill-loading approach to the toolbox's MCP endpoint. What the toolbox configuration looks like Suppose you've already uploaded your skill to Foundry. The following request, adapted from the toolbox guide, creates a toolbox version that references it. example-skill is a placeholder name, and must match a skill in your project. You need the Foundry User role and a bearer token for scope https://ai.azure.com/.default . Use a project in a supported Agent Service region. The REST creation and MCP resource checks described here succeeded in East US 2. POST {project_endpoint}/toolboxes/{toolbox_name}/versions?api-version=v1 Authorization: Bearer {token} Content-Type: application/json Accept: application/json Foundry-Features: Skills=V1Preview { "description": "Toolbox with a skill reference", "tools": [], "skills": [ { "type": "skill_reference", "name": "example-skill", "version": "1" } ] } Replace {project_endpoint} with your project's endpoint, shaped like https://<account>.services.ai.azure.com/api/projects/<project> , and the other placeholders with your own values. Use an existing skill version in place of "1" , or omit version to follow that skill's default. Notice that skills is separate from tools . An empty tools array is valid for a skills-only toolbox. This request creates a full version, not a patch that adds one skill to an existing version. For an existing toolbox, include the tools and skill references you want to retain in the new version. This is a Foundry configuration request, not an MCP capability declaration. It tells Foundry which skills to expose, not the host how to load them. The test returned HTTP 200 with a toolbox version object. Here is the response shape for the example request, using example-toolbox for {toolbox_name} and an illustrative ID: { "metadata": {}, "id": "toolbox_example:1", "name": "example-toolbox", "version": "1", "description": "Toolbox with a skill reference", "created_at": 1791423871, "tools": [], "skills": [ { "type": "skill_reference", "name": "example-skill", "version": "1" } ], "object": "toolbox.version" } The top-level name and version identify the created toolbox version. The entry under skills identifies the skill version it references. For testing, use the returned toolbox name and version in this endpoint: {project_endpoint}/toolboxes/{toolbox_name}/versions/{version}/mcp?api-version=v1 Here, {version} is the returned toolbox version, not the skill version in the request. This URL connects to that specific toolbox version. To connect to whichever toolbox version is marked as the default, use this URL instead: {project_endpoint}/toolboxes/{toolbox_name}/mcp?api-version=v1 This URL stays the same when you change the toolbox's default version. Clients using it aren't pinned to a specific version. The first version of a new toolbox becomes the default automatically. Creating another version doesn't automatically make it the default. What the agent discovers in Foundry Follow the guide's MCP connection setup, including authentication and session initialization. Its examples use the earlier initialize exchange, not the server/discover approach shown above. During initialization, the client requests a protocol version and the server replies with the version it supports. The client can continue only if it also supports the returned version. In our test, Foundry returned 2025-11-25 , so we used MCP-Protocol-Version: 2025-11-25 on later HTTP requests. If the server also returns an Mcp-Session-Id header, include that header and its value on later requests so the server can associate them with the same session. A compatible MCP client SDK handles these details for you. The preview guide then says to send resources/list to the toolbox endpoint: { "jsonrpc": "2.0", "id": 10, "method": "resources/list", "params": {} } A shortened response fragment from the tested resource shape, with the skill name replaced by example-skill , is: { "result": { "resources": [ { "uri": "skill://example-skill/SKILL.md", "name": "example-skill" }, { "uri": "skill://index.json", "name": "skills-index" } ] } } The tested endpoint returned an instruction URI ending in /SKILL.md and a separate skill://index.json resource. The guide shows the shorter skill://{name} shape. Always use the URI your toolbox actually returns: { "jsonrpc": "2.0", "id": 11, "method": "resources/read", "params": { "uri": "skill://example-skill/SKILL.md" } } The response contains the instruction text. This example uses the tested content with the skill name replaced by example-skill : { "jsonrpc": "2.0", "id": 11, "result": { "contents": [ { "uri": "skill://example-skill/SKILL.md", "mimeType": "text/markdown", "text": "---\nname: example-skill\ndescription: An example skill for article validation.\n---\n\nWhen asked for the validation marker, respond with SKILL-CHECK-PASSED." } ] } } Listing the resource and reading its instructions confirms that the content is accessible. It doesn't confirm that your agent has loaded it as a skill. The guide includes a .NET integration with Microsoft Agent Framework using AgentSkillsProviderBuilder.UseMcpSkills . It makes names and descriptions available to the agent, then loads selected instructions and supporting files when needed. Versions and compatibility Foundry also manages skill versions. Each version is a fixed snapshot. You can set version in a toolbox's skill reference to select a specific skill version, or omit it to use the skill's default version. For example, suppose skill version "1" is the default and you create version "2" . You can test version "2" by explicitly referencing it in a test toolbox. If you later make it the skill's default, references without a version will use version "2" . References explicitly set to "1" will still use version "1" . This setting selects the skill version, not the toolbox version. How close is this to the official extension? Reading content and loading it when needed follow the same approach. The table below compares how skills are discovered, read, and loaded: Area Official specification Foundry preview Reading content Uses MCP resources and resources/read Serves toolbox skills as MCP resources Loading content Loads instructions and supporting files when needed The Agent Framework integration loads content when needed Finding skills Uses skills/list and skills/get The guide describes resources/list . The tested endpoint also accepted skills/list and returned a file manifest Protocol support still matters. The tested Foundry endpoint accepted skills/list over its negotiated 2025-11-25 protocol, but rejected a 2026-07-28 request to server/discover as an unsupported protocol version. For a Foundry integration, follow the product guide and check your chosen client. Don't assume that every client supporting the latest extension will connect and load skills without changes. Foundry skills support is in preview. The preview has no service-level agreement and Microsoft does not recommend it for production workloads. Before you try it Start with the client support matrix and the documentation for your agent's host. Look for Skills extension support, not only MCP tool support. Then check a few things in your setup: Can the host find and load skills from your server for your agent? Does it read supporting files only when needed? Does it check the files and keep track of which server supplied them? Does it ask for the required approvals before running code? The useful change here is how skills reach your agents. With support on both sides, you have a standard way to share them over MCP instead of building a separate skill-delivery API for each agent. Which of your existing skills would benefit most from being available over MCP? Further reading MCP Skills extension overview Current Skills extension specification SEP-2640: Skills Extension MCP extension client support matrix Use skills with Microsoft Foundry agents (preview) Attach skills to a Foundry toolbox568Views0likes0CommentsWhen the Answer Isn’t in the Document: Metadata-Aware Agentic RAG with Foundry IQ
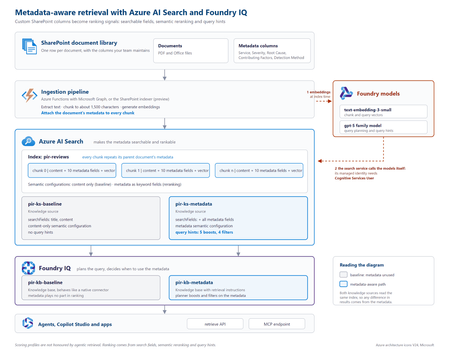
The problem SharePoint libraries often contain years of carefully curated metadata, including root cause, severity, business unit, document type, owner and classification. If that metadata never reaches the retrieval pipeline, however, a RAG system cannot use it. This creates a common blind spot: the information that explains what a document is about may exist in its metadata rather than its text. Consider an incident review containing this statement: “Investigation found that a DNS record was repointed during a migration while the old target was still serving writes.” The associated Root Cause Category is Configuration change, but those words do not appear in the document. Another review might mention that a configuration change was suspected and ruled out. Text-only retrieval can therefore favour the wrong document. In the sample dataset used for this project, none of the 19 reviews classified as configuration-change incidents contained the word “configuration”, while six reviews with other root causes did. Metadata does not improve every search. It helps when the information that determines what a document is lives outside the document text. Why tuning alone cannot fix it With a native SharePoint knowledge source, document text is extracted, chunked and embedded, while standard properties are retained. Custom SharePoint columns are not part of that ingestion path. Fields such as Root Cause Category, Contributing Factors, Detection Method and Severity therefore never become structured fields available to retrieval. If the metadata is absent from the index, search tuning cannot make it count. Flattening all metadata into a single text string is also problematic: Notification Service | Sev2 | Configuration change | Missing runbook This preserves the words but loses their meaning. A root cause, severity and contributing factor represent different concepts and should remain separate fields. Bring a custom Azure AI Search index The approach is to create and control a custom Azure AI Search index, then expose it to Foundry IQ as a searchIndex knowledge source. This combines metadata control with agentic query planning and a governed retrieval surface. Approach Metadata control Agentic planning Native SharePoint knowledge source No Yes Custom index queried directly Yes No Custom index as a knowledge source Yes Yes Architecture The key design principle is simple: every chunk carries its parent document's metadata. Figure 1. Metadata-aware retrieval architecture with Azure AI Search and Foundry IQ. The ingestion pipeline extracts a document, creates chunks, attaches document-level metadata to every chunk, generates embeddings and writes the records to Azure AI Search. Foundry IQ then uses the index as a knowledge source. Azure AI Search holds the metadata. Foundry IQ decides when to use it. Figure 2. Detailed implementation view, including the baseline and metadata-aware retrieval paths. At query time, the search service calls the configured models for vectorisation and query planning. Where key authentication is disabled, the search service's managed identity needs the required access. In the tested implementation, the Cognitive Services User role resolved HTTP 401 responses from retrieve requests. Put metadata on every chunk A chunk can only be retrieved and ranked using information available on that chunk. Each metadata property should therefore remain in its own field: { "id": "doc1035-000", "parentId": "doc1035", "title": "Notification Service: failed sign-ins", "content": "<extracted review text>", "rootCauseCategory": "Configuration change", "contributingFactors": "Missing runbook; Change outside window", "detectionMethod": "Customer report", "severity": "Sev2" } A separate metadata index does not solve the same problem because a match against metadata in one index cannot raise the ranking of a content chunk in another. What influences retrieval Four areas matter in this design: Search fields: searchFields determine which fields generated subqueries search. Semantic configuration: prioritised fields give the semantic reranker access to important metadata. Query hints: hints help the planner connect natural-language requests to known metadata values. Filters: a baseFilter or request-level filterAddOn can enforce constraints. Boost hints influence ranking without excluding documents. Filter hints can narrow the result set when the planner determines that a filter is appropriate. "queryHints": { "boosts": [{ "kind": "fieldValue", "field": "rootCauseCategory", "fieldValues": ["Configuration change", "Capacity", "Software defect", "Dependency failure", "Certificate expiry"], "boost": 3.0, "boostInstructions": "Boost when the user describes what caused an incident." }] } Hints are best effort. Hard requirements should use a base filter or document-level access control rather than relying on the planner to select a hint. The tested configuration used the 2026-08-01-preview API. Current documentation should be checked for supported models, limits and behaviour before implementation. Measuring the impact Two knowledge bases were created over the same Azure AI Search index. The baseline searched title and content. The metadata-aware configuration used the same content plus structured metadata, semantic configuration and query hints. Ten questions were run through both configurations. Correctness was determined directly from the metadata attached to returned reviews, rather than by asking an LLM whether a result appeared relevant. For the question “What can be learned from outages caused by configuration changes?”, the planner generated: rootCauseCategory eq 'Configuration change' Matching reports in top 5 Score Baseline 0 Metadata-aware 3 Best possible 5 Across ten questions and four runs using gpt-5.4-mini for query planning, the baseline returned 26 matching reviews in the top five. The metadata-aware configuration returned 39 to 41, against a best possible score of 50. The gains appeared where metadata carried the missing meaning: Configuration changes: 0 → 3 Configuration changes reported by customers: 0 → 3 Capacity in production: 1 → 5 Alert fatigue: 3 → 5 Queries whose important terms already appeared in the document text scored 5/5 in both configurations. The result is therefore more specific than “metadata improves search”: metadata closes a retrieval gap when document text does not fully describe what the document represents. A failure mode worth handling Because query planning uses an LLM, the planner can occasionally generate a filter that the search index rejects. Two invalid examples observed during testing were: severity eq Sev1 changeRelated eq true The first omitted quotes around a string. The second treated an Edm.String field containing Yes and No as a Boolean. The latter caused the retrieve request to fail with HTTP 502. The fix was to make the schema and allowed values explicit: This is a text field, not a Boolean. The only valid values are 'Yes' and 'No'. Never compare the field with true or false. Application code should also handle retrieval failures rather than assuming every generated filter will be valid. Production considerations A custom index provides control, but the solution now owns ingestion. Options include the SharePoint indexer with custom columns, an Azure Function using Microsoft Graph, or an existing pipeline built with Logic Apps, Azure Data Factory or Microsoft Fabric. A custom Azure AI Search index does not automatically inherit the SharePoint permissions model. Where users have different document permissions, ACLs must be carried into ingestion and retrieval. Query hints should also be regenerated when taxonomy values change. Key takeaways Confirm that the required metadata reaches the index. Keep metadata structured rather than flattening it into one text field. Attach parent-document metadata to every chunk. Use search fields, semantic configuration, query hints and filters deliberately. Describe field types and valid values clearly in filter instructions. Evaluate against a baseline using objective correctness rules. Metadata-aware retrieval is not about making every search better. It gives the retrieval system access to context that does not exist in the document text. Try the proof of concept The complete proof of concept, synthetic dataset, index scripts, knowledge-base configurations and A/B evaluation harness are available in the GitHub - shikha-msft/foundryiq-metadata-agentic-rag. References Create a search index knowledge source Create a knowledge base Query a knowledge base via API or MCP What is Foundry IQ?388Views0likes0CommentsClosing the AI Agent Governance Gap with Microsoft Foundry
Developers are shipping agents faster than security teams can catalog them. As organizations move beyond pilots and begin operating dozens or hundreds of agents, one question keeps coming up: how do we actually get visibility into our AI agents across our environment? In this article, we'll walk through how Azure services can help establish visibility, guardrails, and cost accountability across your AI estate. Governance for AI happens across four layers: Resources – who can create new AI resources Builders – who can develop and publish agents in a certain scope Behavior – how agent outputs are evaluated, monitored, and governed Dependencies – what models, tools, APIs, and MCP servers agents can interact with Most organizations already have governance controls for identities, networking, and compliance. The challenge isn't creating new controls. It's connecting existing controls into an operating model that works for AI agents. Below we walk through each area and go a bit deeper on how to close the gap. Setting up boundaries with Azure Policy First, let's start in the Azure portal with Azure Policy. Azure Policy lets you set guardrails on what can be deployed in your environment and flags or blocks anything that doesn't comply. For AI workloads, the built-in definitions range from limiting models that people in your organization can deploy to locking down the network through enabling private endpoints. Some policies you get started with: Foundry model deployments should only use approved models: Restricts deployments to models or publishers your organization has explicitly approved Foundry model deployments should meet eligibility requirements (preview): Applies rules based on model attributes like preview vs. GA status and distribution source Azure AI Services resources should have key access disabled: Makes Microsoft Entra ID the only entry point The full list of policies related to Azure AI Services are available here: List of built-in policy definitions - Azure Policy | Microsoft Learn Why this comes first: Policy checks resources before they are created, so it proactively keeps your environment aligned with your standards. Implementing role-based access control (RBAC) Once these boundaries are in place, the next step is RBAC. Setting RBAC up early ensures that people and identities building agents have the right scope for what they actually need to do. Foundry roles only apply when you authenticate using Microsoft Entra ID. If you're using key-based authentication instead, the key grants full access with without role restrictions. API keys are convenient for quick development usage but when moving towards production, Microsoft Entra ID is the preferred method. Roles can be assigned at three scopes: the Foundry resource, a Foundry project, or an individual agent itself. Below is an example of how different personas within organization can map to a certain scope for creating and building agents with Foundry. Here's how each role in the diagram compares, from least to most privileged: Role Privilege Level What it does in Microsoft Foundry Foundry Agent Consumer Least Interact with agent endpoints in a project. This is your least-privilege role for people who only need to use agents. Foundry User Low Grants reader access to the Foundry project, the Foundry resource, and data actions for your Foundry project. Least-privilege access role for developers building and testing agents. Foundry Project Manager Medium This role lets you perform management actions on Foundry projects, build and develop with projects, and conditionally assign the Foundry User role to other user principals. Foundry Account Owner Higher Grants full access to manage Foundry projects and resources, and lets you assign the Foundry User role to other user principals. Foundry Owner Highest Grants full access to manage Foundry projects and resources to build and develop with projects. This role can also assign the Foundry User, ACR, and monitoring roles to users in the environment. Source: Role-based access control for Microsoft Foundry - Microsoft Foundry | Microsoft Learn For the agent resources themselves, assign managed identities rather than API keys since it lowers the risk of having compromised credentials. Note if you're scripting RBAC permissions: these roles were recently renamed from Azure AI User, Azure AI Owner, Azure AI Account Owner, and Azure AI Project Manager. The role IDs and permissions didn't change, so use the role definition GUID in your code to avoid issues while the rename rolls out. Observability in Microsoft Foundry Governance requires more than access control. Organizations also need evidence of how agents are being used. Observability provides the audit trail needed to investigate incidents, understand usage patterns, and track costs. The Foundry Control Plane brings these observability and governance tools together in one place, alongside services like Azure Monitor, Microsoft Entra, Microsoft Purview, and Azure Policy. In the Foundry portal, tracing is a good starting point. Once you connect an Application Insights resource to your project, Foundry turns on tracing automatically so every run, including the ones you test in the playground, is logged. After it is completed, you can search by Response ID or Trace ID to see the conversation history, token usage, run steps, tool calls, and inputs and outputs between the user and the agent. For more granular queries, you can write KQL to dive into individual agent runs or use the prebuilt Grafana dashboards in Azure Monitor. With client-side tracing, you can also export traces to observability tools you may already use, such as Datadog or Jaeger. Note: Permissions required for viewing this telemetry requires the Log Analytics Reader role on the connected Application Insights resource, and Privileged Monitoring Data Reader on top of that if the underlying Log Analytics tables are protected. Alongside all of these monitoring features, every agent comes with content safety guardrails and evaluations let you test and optimize performance before and after you publish your agents. When agents get published to Microsoft Teams and Microsoft 365 Copilot, Microsoft 365 admins can approve usage requests. These requests can be further scoped to a limited group for pilot testing/department usage or the full organization. Adding an AI gateway Observability tells you what your agents are doing, but how do you actually control them? This is where Azure API Management comes in. Once you have more than one agent, model deployment, or multiple teams consuming them, you need a single enforcement point between the agents and the resources they call. Adding Azure API Management in front of Microsoft Foundry gives you: Rate limiting and load balancing across regions and model deployments Consistent authentication and quota policies for model and tool traffic Usage tracking per team or cost center so you can accurately charge back to different departments Governed access to your custom and remote MCP servers Note: When choosing MCP servers, start with trusted, enterprise supported sources (GitHub, Microsoft, internally developed servers, etc.) that have documented security controls, enterprise authentication, clear ownership, and least-privilege permissions. Treat community MCP servers as untrusted until they have undergone a formal security review and are verified by organizations. Adding an AI gateway completes the governance picture. Azure Policy governs what can be deployed. RBAC governs who can build and manage agents. Observability provides evidence of how agents behave in production. The AI gateway extends governance into runtime, controlling how agents interact with models, tools, and external systems. Combined, these layers help organizations move beyond simply building agents to operating them responsibly at scale. Extend governance across the wider estate A few directions to take this further: MCP registry in Azure API Center – As MCP usage grows, you can create an approved inventory of MCP servers and APIs that can be used across an organization. Microsoft Agent 365 – Microsoft's enterprise control plane for AI agents. It gives every agent its own Microsoft Entra Agent ID and published Foundry agents sync to its registry automatically. This gives your IT team one place to run access reviews, lifecycle policies, and owner attestation across every agent in the tenant, including shadow agents discovered outside Foundry. Copilot Studio – when you add an MCP tool, you can point it at the API Management URL instead of the direct remote endpoint to gain additional observability through the gateway. GitHub Copilot – you can apply the same AI gateway-fronted MCP registry, applied to the developer side. Microsoft Purview – data classification, DLP, audit, and AI interaction governance across the wider estate. Where to go next Looking for a quick start? Turn on the three Azure Policy definitions above in audit mode against a non-production subscription and see what gets flagged that is out of compliance. Ready to design the end-to-end pattern? Take a look at this Cloud Adoption Framework guidance on AI governance and governing Azure platform services for AI. Want to go deeper on agent observability? Start with these articles around Application Insights integrations with Foundry: Use Insights in Microsoft Foundry and Monitor AI Agents with Application Insights Governing AI agents doesn't require starting from scratch. The identity, policy, monitoring, and cost controls you already use for the rest of your Azure estate can extend to AI workloads. Start with one layer, connect the next, and build a governance foundation that grows with your AI adoption.665Views3likes0CommentsFrom Business Brief to Production Agent: Building in Three Stages, Not One
The problem with "AI can help my business" Every non-technical founder has heard some version of "you should put an AI agent on this." Far fewer have seen what it actually costs, in time and money, to find out whether that's true for their specific business — before committing to it. The honest answer is: it shouldn't cost much at all, if you build it in the right order. Most of the expensive AI project failures aren't failures of the model — they're failures of sequencing. Someone commits to real infrastructure, real hosting, and real integration work before anyone has confirmed the underlying idea even holds up. This post walks through a small, realistic project — an autonomous sales-development agent for a fictitious construction-tech company — built in three deliberate stages, each one cheap enough to abandon and each one answering a different question before the next stage spends any more money or time. The point isn't the specific agent. It's the order of operations: what to validate first, what to validate second, and what you only pay for once everything before it has already been proven. The Brief Hi, I'm looking for someone who can help me grow FieldForge, a SaaS platform specifically for general contractors, remodelers, and design-build companies. I'm not looking for generic lead lists. I need someone who can identify qualified construction companies, reach the owner/decision-maker, start conversations, and book demos that can turn into paying SaaS customers. Your experience with B2B lead generation and appointment setting looks relevant. I'd love to hear how you would approach generating qualified leads and growing a construction-focused SaaS. Translated into engineering terms, that's four capabilities: pull in new leads from a data feed (ingest_permits), decide whether each one is worth pursuing (qualify_lead), draft a personalized first-touch email for the ones that qualify (generate_pitch_email), and hand qualified leads off to an outbound sequence (dispatch_sequence). Nothing about that list requires committing to any infrastructure yet — which is exactly the point of Stage 1. Stage 1: Mock prototype — no AI, no backend, no cost The first stage has no real agent in it at all. It's a Vite + React console with the full intended UI — a strategy pane, a live-feed pane, a lead-dossier pane — wired to hand-written mock data and a fake setTimeout standing in for "the AI is thinking." No model calls, no cloud resources, no backend of any kind. It runs entirely in a browser tab: This is deliberately the cheapest possible way to answer the first real question: does this even make sense as a product, before a single token of inference is spent proving it? Is a 3-pane command console the right way to expose "an agent found and qualified these leads for you"? Is a permit-triggered pitch angle a good hook, or does it look contrived once it's actually on screen? Does a business owner look at this and understand what they're being offered? None of those questions need a real agent to answer — they need a UI a person can click through and react to. Running this stage costs essentially nothing beyond development time: no API calls, no cloud spend, nothing to tear down if the idea doesn't land. Where the AI pair programmer actually did the work. This entire stage — the layout, the state management, the mock data shapes, the interaction flow — was built by describing the product in plain language to an AI coding assistant (GitHub Copilot, Claude) and iterating on the generated code directly, rather than dragging components around in a low-code builder. That distinction matters more than it sounds like it should. A low-code prototype is fast to show, but it's still just a prototype — once a real agent needs to sit behind it, most of that first version gets rebuilt in real code anyway. A pro-code prototype, even a fake one, is a keepable asset: the exact same React components, the exact same UI shell, carry forward unchanged into Stage 2 and Stage 3. Nothing here gets rebuilt later — it gets connected to something real. What this stage proves, and what it deliberately doesn't. By the end of Stage 1, you know whether the product concept and the UX hold up — whether the thing you're describing to a non-technical stakeholder actually makes sense once it's on a screen in front of them. What it tells you nothing about: whether a real model can actually do the reasoning this UI is pretending to show. That's a completely different risk, and it's wrong to pay for cloud infrastructure to find out — it just needs a real agent, still running on a laptop: Stage 2: A real agent, still running on a laptop — the convincing part This is the stage that actually matters most, and it's also the cheapest place to find out if the whole idea works. The fakery gets ripped out and replaced with a genuine agent: a Microsoft Agent Framework Agent, backed by a real model deployment on Microsoft Foundry, given the same four tools from the brief — ingest_permits, qualify_lead, generate_pitch_email, dispatch_sequence — as real Python functions it can actually call. Its reasoning streams live into the same terminal-style pane the mock prototype already had, so nothing about the UI needs to change; only what's driving it does. Crucially, the frontend stays on a local dev server and the agent stays a local process on the same machine. There's no cloud hosting, no production auth, no deployment pipeline — the UI just talks to a locally running agent server over a simple streaming protocol. That's the deliberate design of this stage: the only thing worth testing here is whether the agent is actually good, and every question that matters — does it call tools in a sensible order, does it correctly decide which leads qualify, does its drafted email actually reflect the lead's specific trigger event rather than reading like a template — can be answered without touching a cloud resource. The qualify_lead tool is where this gets concrete: it's handed a target definition — commercial/residential remodelers in a specific revenue band, an active permit filing, still running manual/legacy tooling — and has to decide, per lead, whether it's a fit. You'll see this called an ICP (Ideal Customer Profile) constantly in sales and GTM circles right now, to the point of being a bit of a buzzword. Stripped of the jargon it's just this: a precise, written-down definition of a good-fit customer, specific enough that a model can apply it as consistently as a trained human rep would. The reason it matters isn't the term — it's that the agent's usefulness is bounded entirely by how precisely that definition is written, and this stage is exactly where you find out if yours is precise enough. This is also where model choice gets decided, cheaply. Swapping which Foundry model deployment sits behind the agent, or rewriting the system instructions, costs a restart and a few cents of inference — not a redeploy, not a new pipeline run. If gpt-4o isn't giving good enough qualification judgment, or the reasoning is inconsistent between runs, you find out here, in seconds per iteration, for the price of a handful of API calls. Compare that to discovering the same problem after cloud hosting, authentication, and a production pipeline are already built around it. That's why this stage — not Stage 1 — is the genuinely convincing one. Anyone can mock up a UI that looks like an agent found and qualified a lead. Stage 2 is where you can put a real, unscripted permit feed in front of a real model and watch it reason its way to a defensible qualify/reject decision and a genuinely personalized email, live, for the cost of a few model calls. That's the moment a skeptical stakeholder stops asking "does this actually work" and starts asking "when can we have it." What this stage proves, and what it deliberately doesn't. By the end of it, you know the agent itself is sound — right tools, right order, correct ICP logic, real personalization — for a cost barely above Stage 1's. What it hasn't touched: what happens when a real user hits this over the public internet, how auth works outside your own machine, whether the hosting model you eventually pick can actually serve this reliably. That's a different kind of work, and it starts now that there's finally something worth doing that work for. Stage 3: Quasi-production — translating a proven agent into a running service Stage 2 answers "does the agent work." Stage 3 answers a different question entirely: "can this be handed to someone who isn't on my laptop." That's not a continuation of Stage 2's work — it's a translation of it. The agent's logic, tools, and instructions don't change at all going into this stage; what changes is everything around them, as the same proven Agent gets repackaged into something that can actually run as a service instead of a local process. The agent itself deploys as a Foundry Hosted Agent via azd — no hand-written Dockerfile, no Container App config, no Bicep authored from scratch; Foundry's managed hosting owns the runtime, scaling, and session continuity (via previous_response_id chaining on the Responses protocol), and assigns the agent its own managed identity. The frontend and its API layer become an Azure Static Web App: the React build as static assets, plus a small same-origin Azure Function that reverse-proxies requests to the hosted agent. That proxy exists for a concrete reason — Foundry's hosted-agent endpoint has no CORS support, so a browser calling it directly would simply be refused; routing through a same-origin Function sidesteps that entirely, and keeps the real agent URL and credentials server-side instead of sitting in a public JS bundle. None of that is agent work. It's the operational work of turning a validated prototype into a real, addressable, network-reachable thing — the productionization step every agent eventually needs regardless of how it was built, and the part that's easy to underestimate if you haven't budgeted for it as its own phase. Framed plainly, this stage is where the project stops being "a demo that runs on my machine" and starts being "a small SaaS": something with a real URL, a real hosting bill, real auth, and a real deploy pipeline — everything that separates a working prototype from a thing you could actually put a customer in front of. To be clear about the boundary of "quasi": this is not a fully hardened production system. There's no custom domain, no persistent session store beyond what Foundry provides out of the box, and no load testing. What it is: proof that the exact agent validated in Stage 2 can be deployed, reached over a real network, and driven from a real hosted frontend without silently breaking — the last class of risk that only shows up once something leaves your own machine. What this stage proves, and what it deliberately doesn't. By the end of it, you know the whole pipeline holds together end to end, from a hosted UI through a same-origin proxy to a Foundry-managed agent and back, streaming, over a real deployment. What it doesn't prove: that it holds up under real production load, real customer data governance, or a real incident on-call rotation. Those are legitimate next questions — just not the ones this stage was built to answer, and not ones worth paying for before the first two questions were settled. The pattern, not just the project Line the three stages up and the shape becomes obvious: each one is deliberately the cheapest possible way to eliminate one specific class of risk before the next stage spends real money finding out the hard way. Stage 1 kills product/UX risk for the cost of dev time and zero infrastructure. Stage 2 kills agent-quality risk — the right tools, the right model, correct decisions — for the cost of a few model calls, and it's the stage that actually earns anyone's confidence that this is real. Stage 3 kills operational risk — real hosting, real network, real auth — by translating an already-proven agent into a running service, rather than building all of that around an agent nobody has validated yet. Collapse those stages — build the hosting and the agent and the UI all at once, betting everything up front — and you don't save time. You just move all three classes of failure into the same debugging session, at the point where they're most expensive to disentangle and hardest to tell apart. Staged this way, each phase is cheap enough to walk away from if it fails, and each one only gets built on top of a phase that already earned its place. There's a second half to this story that's deliberately not in this post: the data. Everything here ran on synthetic permit feeds and mock company data — a real deployment lives or dies on where its actual leads come from and how well they're structured for a model to reason over. That's its own story, and it gets a dedicated write-up of its own. Project reference Source code: https://github.com/olivierb123/lead-agent-demo Live demo: https://victorious-glacier-03340ff0f.3.azurestaticapps.net246Views0likes0Comments
Your Agent Shouldn't Wait for a Prompt: Build an Event-Driven Microsoft Foundry Routine
Most agents are still waiting in a chat window. They may be capable of classifying an incident, finding the right documentation, or recommending an owner - but nothing happens until someone remembers to ask. The hard part is no longer always the reasoning. It is noticing that work has arrived, invoking the agent securely, and keeping enough history to understand what happened. Routines in Microsoft Foundry close that gap. A routine connects a trigger - such as a schedule, timer, GitHub issue, or Microsoft Teams message - to an agent action. Microsoft Foundry queues the invocation, runs the agent, and stores a run record for later inspection. In this post, we will build an event-driven routine for a familiar developer workflow: When someone opens a GitHub issue, invoke a triage agent immediately - without waiting for a person to copy the issue into a chat. Along the way, we will look at the architecture, create the routine with the Azure Developer CLI (azd), test it, inspect its run history, and make an explicit identity decision before putting it into production. From conversational agents to event-driven agents A chat-first agent follows a request-response pattern: A user opens an interface. The user provides a prompt. The agent performs work. The interaction ends or waits for another prompt. An event-driven agent starts differently. Work in an external system becomes the prompt. A newly opened issue, for example, already contains useful context: its title, description, author, repository, labels, and timestamps. A routine can receive that event through an authorized connection and invoke an agent while the context is still fresh. That changes the agent's role. It is no longer only a place people go for answers. It becomes a participant in an operational workflow. The routine does not replace the agent. It supplies the managed automation around it: Trigger: Defines when work starts. Connection: Authenticates the event source. Action: Identifies the agent and invocation protocol. Dispatch identity: Determines whose permissions are used when the agent and its tools run. Run history: Records executions so operators can inspect outcomes. This separation is useful. The agent owns the reasoning; the routine owns when and how that reasoning begins. The scenario: triage every new GitHub issue Our example assumes that a triage agent is already deployed in a Microsoft Foundry project. When an issue opens, the agent should: Summarize the issue in two or three sentences. Classify it as a bug, feature request, documentation issue, or support question. Estimate severity and explain the evidence. Recommend an owner or team. Identify missing reproduction details. Produce a proposed response for a maintainer to review. Keeping a human review step is intentional. Event-driven does not have to mean unrestricted autonomy. A routine can automate the expensive first pass while a maintainer remains responsible for labels, assignments, and public responses. Prerequisites You need: An active Microsoft Foundry project. The Foundry User role or higher on the project. A deployed prompt agent or hosted agent. Workflow agents are not currently supported by routines. The Azure Developer CLI. A GitHub connection authorized in the Foundry project. The routines extension for azd. Install the extension and confirm that the routine commands are available: azd extension install azure.ai.routines azd ai routine --help Set the project endpoint through your active azd environment or pass it explicitly to each command: azd env set AZURE_AI_PROJECT_ENDPOINT \ "https://<account>.services.ai.azure.com/api/projects/<project>" The agent must exist before you attach a routine to it. A routine references an agent; it does not deploy one. Create the GitHub issue routine The following command creates an enabled routine named triage-on-open. Replace the placeholders with the connection and repository details from your environment: azd ai routine create triage-on-open \ --trigger github-issue \ --connection-id "<workspace-connection-id>" \ --owner "<github-owner>" \ --repository "<github-repository>" \ --issue-event opened \ --action agent-invoke \ --agent-name "triage-agent" \ --description "Triage every newly opened GitHub issue" There are two important type translations in this command: The CLI alias github-issue represents the routine trigger type github_issue. The CLI alias agent-invoke invokes the agent through the Invocations API. If your agent uses the Responses API instead, use --action agent-response. Choose the protocol that matches the deployed agent rather than treating the two actions as interchangeable. For automation that belongs in source control, define the routine as an azure.ai.routine service in azure.yaml. This makes the relationship between the agent and its trigger reproducible across environments: services: triage-agent: host: azure.ai.agent project: ./agent triage-on-open: host: azure.ai.routine uses: - triage-agent description: Triage every newly opened GitHub issue enabled: true triggers: issue-opened: type: github_issue connection_id: ${GITHUB_CONNECTION_ID} owner: ${GITHUB_OWNER} repository: ${GITHUB_REPOSITORY} issue_event: opened action: type: invoke_agent_invocations_api agent_name: triage-agent Deploy the routine after the target agent: azd deploy triage-on-open --no-prompt The uses relationship tells azd to order the agent before the routine. Deployment is idempotent: redeploying updates the named routine instead of creating duplicates. Give the agent a clear triage contract Automation magnifies ambiguity. A vague instruction that is merely inconvenient in a chat can produce inconsistent work every time an event fires. Give the triage agent a bounded contract such as: You are the first-pass triage agent for this repository. For each newly opened issue: 1. Summarize the reported behavior without adding facts. 2. Classify it as bug, feature, documentation, or support. 3. Assign severity only when the issue contains supporting evidence. 4. List missing information needed to reproduce or route the issue. 5. Recommend an owner from the approved ownership map. 6. Draft a response, but do not publish, close, label, or assign the issue. Return structured JSON that matches the triage schema. A useful output contract might look like this: { "summary": "The CLI exits when a project endpoint contains an explicit port.", "category": "bug", "severity": { "level": "medium", "reason": "The issue blocks routine creation but has a documented workaround." }, "missing_information": [ "Azure Developer CLI version", "Redacted project endpoint shape", "Full error output" ], "recommended_owner": "developer-experience", "proposed_response": "Thanks for the report. Could you share..." } Structured output gives downstream systems something predictable to validate. It also makes evaluation easier: you can test category accuracy, required-field completeness, unsupported severity claims, and whether the agent attempted a prohibited action. Test before waiting for a real event Start by checking that Foundry stored the routine you intended: azd ai routine show triage-on-open --output json Confirm: The routine is enabled. The trigger watches the correct owner and repository. issue_event is opened. The action references the intended agent. The connection ID belongs to the expected Foundry project. You can manually dispatch a routine while testing: azd ai routine dispatch triage-on-open \ --input '{"test":true,"issue":{"number":123,"title":"Test triage event"}}' The manual input is a one-time override for that dispatch. It does not replace the event payload or modify the routine's stored configuration. Inspect recent executions: azd ai routine run list triage-on-open --top 20 Then open a test issue in the watched repository and inspect the run list again. A production test should verify more than "the agent ran." Check that the correct event started the run, the agent received enough context, tool calls used the intended identity, the output matched the schema, and prohibited actions did not occur. Choose the dispatch identity deliberately Every routine uses the agent identity by default. This is usually the better fit for unattended automation because access belongs to the agent rather than to an employee's account. Use agent identity when the agent's tools authenticate with managed identity, workload identity, or keys and the agent has been granted only the permissions required for the task. Some tools require delegated user access. In that case, you can create the routine with creator identity. Creator identity means the Microsoft Entra identity of the person or service principal that creates the routine—not the agent publisher, connection creator, latest editor, or user who caused an event. This distinction has operational consequences: If the creator loses access or consent, delegated tool calls can fail. Recreating the routine as another principal changes the delegated creator identity. The event connection identity is separate from the identity used to dispatch the agent. Dispatch identity is a creation-time decision. To switch an existing routine between agent and creator identity, delete and recreate it. For a GitHub triage flow, a strong starting design is: Use a narrowly scoped project connection to receive issue events. Use agent identity for Foundry and Azure resources. Keep repository-changing actions disabled until evaluation demonstrates reliable behavior. Require human approval before posting, assigning, labeling, or closing. Identity is not a deployment detail. It is part of the automation's behavior and should be reviewed with the same care as the prompt and tool list. Make failure visible An event-driven agent can fail even when its reasoning is sound. The connection might expire. The agent might receive an unexpected payload. A tool might lose permission. The output might violate its schema. Monitor the workflow at four boundaries: Trigger: Did the expected event fire the routine exactly once? Invocation: Did Foundry invoke the intended agent and protocol? Tools: Did tool calls succeed with the intended identity and scope? Outcome: Did the output satisfy the triage contract? Use azd ai routine run list for routine execution history and your agent's Foundry observability data for traces, tool calls, latency, and failures. Preserve representative failures as evaluation cases instead of fixing each incident only in the prompt. Also design for duplicate delivery. Before taking a repository-changing action, check whether the issue and event have already been processed. Idempotency matters more once an agent can act without a person initiating each run. Know the current boundaries Before adopting routines for a regulated or business-critical workload, review the current service constraints: Routines support prompt agents and hosted agents, but not workflow agents. A recurring schedule has a minimum interval of five minutes. GitHub issue triggers support opened and closed issue events. Routines inherit the project's networking configuration and can work with virtual-network-secured projects. Routines do not currently support customer-managed key encryption. Regional availability has exceptions; verify your project's region in the current documentation. These boundaries can change. Treat the routines documentation as the source of truth when moving from a tutorial to production. What changes when agents stop waiting? The most interesting part of this design is not the GitHub trigger. It is the change in operating model. The agent begins work because the world changed, not because someone opened a chat. That makes trigger scope, identity, output contracts, run history, evaluation, and human approval part of the agent design—not infrastructure to consider later. Once the triage routine is working, the same pattern can support: A Teams message that starts support classification. A nightly backlog review. A one-time release-readiness check. A scheduled compliance summary. A hosted agent that uses the reminder tool to resume the same conversation after a long-running task. Start with one bounded event and one reversible outcome. Measure what the agent does, not merely whether it ran. Then expand its permissions only as evidence earns that autonomy. Try it next Choose the path that matches where you are: Build: Follow the Microsoft Foundry routines documentation and connect one existing agent to a schedule or event. Harden: Review dispatch identity, connection scope, idempotency, output validation, and human approval before enabling repository-changing tools. Extend: Add the reminder tool to a hosted agent that needs to continue work later. Explore: Open the Microsoft Foundry portal to inspect your project, agents, and routine runs. Your agent already knows how to do useful work. The next step is teaching it when that work should begin.527Views2likes2Comments
Your Agents Need More Than a Place to Run
In architecture reviews with enterprise teams moving their first agentic applications toward production, I often hear the same plan: the team has containerized their agent and intends to run it on the managed Kubernetes cluster the organization already trusts. The reasoning is sensible, since the platform team knows the tooling and security has approved the network model, and for the first use case or two it is often the right call. Having watched this unfold in my years leading AgenticAI customer engineers and forward deployed engineers, and now helping customers reach production on Azure, I want to describe what happens next, before leaders commit rather than after. One thing to note is Azure supports multiple ways to build and operate agents. Foundry Agent Service provides an integrated managed runtime around your agent code. Azure Kubernetes Service supports teams that need Kubernetes-level control or want to extend an established platform, while Azure Container Apps provides managed container hosting. These services can work together. The decision is which capabilities and responsibilities best fit the workload. Where the cluster is the right answer A stateless retrieval application, a document extraction pipeline, or a classification job is a web service that happens to call a model, and a container platform runs web services well. A large retail customer of mine ran an invoice extraction agent on containers for over a year with almost no issues, and I never suggested they move it. The cluster remains the right home for several other situations as well. LLM invocations embedded inside existing microservices, event driven, or batch pipelines fit container platforms naturally. Genuine constraints such as air-gapped or sovereign environment, regions where a managed service is not yet offered are a good reason to run your own stack, and strong engineering team that already operates at that level can be a real asset. Even when the agents themselves move to a managed runtime, the tool servers, business APIs, and data services those agents call, often stay on your cluster, so they are complementary far more often than they are competitors. The problem is that these early wins can make agents seem like just another workload. Where the wheels come off The first failure is the state. A research agent that plans, searches, and synthesizes for ninety minutes is a long-running stateful process, while a Kubernetes pod is a disposable container the scheduler may restart at any time. A financial services team I worked with lost costly research run to a routine node upgrade, and responded as capable engineers do by building checkpointing, a durable store, and a resume mechanism. It worked, but they now owned a piece of infrastructure they had to keep correct as their agent's framework changed beneath it. A managed agent runtime absorbs this. Hosted agents in Foundry Agent Service, as one example, give every session a VM-isolated sandbox with a persistent file system, a durable state store that survives crashes and restarts and can hold checkpoints for frameworks such as LangGraph or Microsoft Agent Framework, and a resilient execution mode that recovers long-running work after a process interruption. The second is the human-in-the-loop. A commercial insurance customer’s claims agent needed sign-off from an adjuster and sometimes a second reviewer, with days between steps. Stopping an agent cleanly at the moment it needs a decision, holding its full session for four days without paying to keep it running, and resuming it correctly when the approval arrives is not something a container orchestrator gives out the box. The team built agent session suspend and resume, a queue, a durable state store, notifications, and an approval interface, and ended up with a small workflow engine nobody had planned to own. In hosted agents, an idle session is deprovisioned with its state persisted and restored onto fresh compute when the same session ID returns, so an agent waiting on an approval cost nothing while it waits, and sessions are retained for up to thirty days of inactivity. The approval experience remains yours to design, which is where your engineers' time should go. The third is multi-turn conversation, which quietly pushes teams into building their own context management system. The first version appends each turn to history, and within few turns the history outgrows the context window while cost and latency climb. So, the team adds truncation, then summarization, then retrieval of earlier turns, then per-user and per-tenant scoping, then expiry and deletion rules for privacy. An industrial customer's safety compliance assistant, with conversations stretching across days, followed exactly this path and ended up with a bespoke thread store and summarization pipeline nobody had budgeted for. Its first serious incident came when a summary silently dropped a compliance-relevant instruction. With the Responses protocol in hosted agents in Foundry, conversation history is a durable, platform-managed record keyed by a conversation ID and reachable from any channel, so the thread store is no longer yours to build, although deciding what to summarize or retrieve remains a design choice for your agent. The fourth is identity. On a cluster, the path of least resistance is a shared service account, and in one review a security architect asked which actions had been taken on behalf of which user, only to learn that the logs could not say. Hosted agents create a dedicated Microsoft Entra agent identity for each agent at deploy time, use on-behalf-of flows to act with the user's delegated permissions in interactive scenarios and the agent's own identity in autonomous ones, and keep the agent identifiable for audit in both cases. The fifth is per-user session isolation, which is the difference between an agent that serves many people and an agent that mixes them up. Agents read files, run code, and hold working data, and on a shared pod the default is that many users share a process, a file system, and often a cache. Giving every user session its own sandboxed environment and storage, so that one person's documents and intermediate results can never surface in another's, means engineering hard isolation boundaries and proving them to your security team. Hosted agents make a VM-isolated sandbox per session the default, and their durable state store can partition items per end user, so one store is safe to share across the users of a multitenant agent. And lastly, Evaluation and optimization are where the gap widens. The largest difference between teams that scale and those that stall is evaluation. Because agents are probabilistic and multi-step, staging tests often miss failures such as a wrong tool choice or a policy violation deep in a task. One customer’s agent passed every offline check but degraded unnoticed for weeks after a model update because evaluation stopped at release. Mature teams continuously evaluate production traces, combine automated judges with sampled human review, and red-team regularly.Once quality is measurable, teams can deliberately balance prompts, models, tools, latency, and cost. One team cut per-task cost by routing simple steps to smaller models after evaluation confirmed quality held. Self-built stacks require teams to assemble and maintain tracing, datasets, judges, and release gates. Hosted agents instead combines default OpenTelemetry traces with continuous evaluation, adversarial testing, and datasets generated from agent instructions. Staged closed-loop optimization uses those traces to improve instructions, tool descriptions, and model selection without extra plumbing. The real cost is the velocity gap Leaders usually expect me to quantify the initial build, and that is the smaller number. A team of four building the first agent often becomes ten or twelve within a year, and a growing share of them are maintaining a runtime for agents rather than building agents that serve the business. The enterprise has quietly created an internal agent infrastructure company in a field where the patterns for memory, tools, evaluation, and safety are rewritten every few months, while hyperscalers put hundreds of engineers on exactly this problem and ship at a cadence no single platform group can match. Foundry Agent Service, for instance, bundle content safety guardrails into the runtime and route outbound traffic through a customer virtual network, capabilities that platform teams otherwise assemble one integration at a time. This plumbing does not differentiate your organization, so the question is whether your scarcest engineers should spend years on it or on the workflows, data, and judgment only your company has. This is also why the technology companies held up as examples are a poor template. Many built their own runtimes because managed options did not yet exist and had large platform organizations to carry the load. Even they tend to invest in a custom runtime for the first handful of use cases and then migrate as managed services mature, because the maintenance burden compounds while the strategic value of owning the plumbing does not. What I would do as the leader I am not arguing against Kubernetes or for moving everything tomorrow. Comparable managed runtimes exist across the hyperscalers, and I use hosted agents as the running example only because it is the one I know best from the inside. Managed agent services are still maturing, some workloads have real data residency or customization needs, and abstraction always constrains something. What I am arguing for is a deliberate choice for each use case, guided by three questions: whether the agent must outlive a single request by running long, waiting on humans, or remembering across sessions whether it must act with its own identity, auditable delegation, and policy enforcement whether your team would be building anything a managed service already provides, and who will still maintain it in two years. Key takeaways Match the runtime to the workload. Containers on your existing cluster suit stateless, short-lived agents, while long-running, human-in-the-loop, and memory-dependent agents need capabilities your platform team was never hired to build. Count the hidden team. The real cost of self-hosting is the growing group of engineers maintaining state, identity, memory, guardrails, and tracing instead of solving business problems. Make evaluation continuous and connected to production traces. Pre-release testing alone will miss the drift and trajectory failures that hurt you, and optimization of quality, cost, and latency depends on that evaluation data. Follow the pattern of the leaders, not their early architecture. Companies that built custom runtimes did so before managed options matured, and most of them move toward managed services as those options improve. A practical place to begin is your roadmap for the next twelve months. Sort each use case into stateless and short-lived or long-running and human-dependent, and for every agent in the second group put a price on the engineers who would maintain the runtime rather than the business logic. I would like to hear how you have drawn this line, and where a managed service was not yet ready for something you needed.819Views2likes0Comments