microsoft defender for office 365
427 TopicsAuthorization and Governance for AI Agents: Runtime Authorization Beyond Identity at Scale
Designing Authorization‑Aware AI Agents at Scale Enforcing Runtime RBAC + ABAC with Approval Injection (JIT) Microsoft Entra Agent Identity enables organizations to govern and manage AI agent identities in Copilot Studio, improving visibility and identity-level control. However, as enterprises deploy multiple autonomous AI agents, identity and OAuth permissions alone cannot answer a more critical question: “Should this action be executed now, by this agent, for this user, under the current business and regulatory context?” This post introduces a reusable Authorization Fabric—combining a Policy Enforcement Point (PEP) and Policy Decision Point (PDP)—implemented as a Microsoft Entra‑protected endpoint using Azure Functions/App Service authentication. Every AI agent (Copilot Studio or AI Foundry/Semantic Kernel) calls this fabric before tool execution, receiving a deterministic runtime decision: ALLOW / DENY / REQUIRE_APPROVAL / MASK Who this is for Anyone building AI agents (Copilot Studio, AI Foundry/Semantic Kernel) that call tools, workflows, or APIs Organizations scaling to multiple agents and needing consistent runtime controls Teams operating in regulated or security‑sensitive environments, where decisions must be deterministic and auditable Why a V2? Identity is necessary—runtime authorization is missing Entra Agent Identity (preview) integrates Copilot Studio agents with Microsoft Entra so that newly created agents automatically get an Entra agent identity, manageable in the Entra admin center, and identity activity is logged in Entra. That solves who the agent is and improves identity governance visibility. But multi-agent deployments introduce a new risk class: Autonomous execution sprawl — many agents, operating with delegated privileges, invoking the same backends independently. OAuth and API permissions answer “can the agent call this API?” They do not answer “should the agent execute this action under business policy, compliance constraints, data boundaries, and approval thresholds?” This is where a runtime authorization decision plane becomes essential. The pattern: Microsoft Entra‑Protected Authorization Fabric (PEP + PDP) Instead of embedding RBAC logic independently inside every agent, use a shared fabric: PEP (Policy Enforcement Point): Gatekeeper invoked before any tool/action PDP (Policy Decision Point): Evaluates RBAC + ABAC + approval policies Decision output: ALLOW / DENY / REQUIRE_APPROVAL / MASK This Authorization Fabric functions as a shared enterprise control plane, decoupling authorization logic from individual agents and enforcing policies consistently across all autonomous execution paths. Architecture (POC reference architecture) Use a single runtime decision plane that sits between agents and tools. What’s important here Every agent (Copilot Studio or AI Foundry/SK) calls the Authorization Fabric API first The fabric is a protected endpoint (Microsoft Entra‑protected endpoint required) Tools (Graph/ERP/CRM/custom APIs) are invoked only after an ALLOW decision (or approval) Trust boundaries enforced by this architecture Agents never call business tools directly without a prior authorization decision The Authorization Fabric validates caller identity via Microsoft Entra Authorization decisions are centralized, consistent, and auditable Approval workflows act as a runtime “break-glass” control for high-impact actions This ensures identity, intent, and execution are independently enforced, rather than implicitly trusted. Runtime flow (Decision → Approval → Execution) Here is the runtime sequence as a simple flow (you can keep your Mermaid diagram too). ```mermaid flowchart TD START(["START"]) --> S1["[1] User Request"] S1 --> S2["[2] Agent Extracts Intent\n(action, resource, attributes)"] S2 --> S3["[3] Call /authorize\n(Entra protected)"] S3 --> S4 subgraph S4["[4] PDP Evaluation"] ABAC["ABAC: Tenant · Region · Data Sensitivity"] RBAC["RBAC: Entitlement Check"] Threshold["Approval Threshold"] ABAC --> RBAC --> Threshold end S4 --> Decision{"[5] Decision?"} Decision -->|"ALLOW"| Exec["Execute Tool / API"] Decision -->|"MASK"| Masked["Execute with Masked Data"] Decision -->|"DENY"| Block["Block Request"] Decision -->|"REQUIRE_APPROVAL"| Approve{"[6] Approval Flow"} Approve -->|"Approved"| Exec Approve -->|"Rejected"| Block Exec --> Audit["[7] Audit & Telemetry"] Masked --> Audit Block --> Audit Audit --> ENDNODE(["END"]) style START fill:#4A90D9,stroke:#333,color:#fff style ENDNODE fill:#4A90D9,stroke:#333,color:#fff style S1 fill:#5B5FC7,stroke:#333,color:#fff style S2 fill:#5B5FC7,stroke:#333,color:#fff style S3 fill:#E8A838,stroke:#333,color:#fff style S4 fill:#FFF3E0,stroke:#E8A838,stroke-width:2px style ABAC fill:#FCE4B2,stroke:#999 style RBAC fill:#FCE4B2,stroke:#999 style Threshold fill:#FCE4B2,stroke:#999 style Decision fill:#fff,stroke:#333 style Exec fill:#2ECC71,stroke:#333,color:#fff style Masked fill:#27AE60,stroke:#333,color:#fff style Block fill:#C0392B,stroke:#333,color:#fff style Approve fill:#F39C12,stroke:#333,color:#fff style Audit fill:#3498DB,stroke:#333,color:#fff ``` Design principle: No tool execution occurs until the Authorization Fabric returns ALLOW or REQUIRE_APPROVAL is satisfied via an approval workflow. Where Power Automate fits (important for readers) In most Copilot Studio implementations, Agents calls Power Automate (agent flows), is the practical integration layer that calls enterprise services and APIs. Copilot Studio supports “agent flows” as a way to extend agent capabilities with low-code workflows. For this pattern, Power Automate typically: acquires/uses the right identity context for the call (depending on your tenant setup), and calls the /authorize endpoint of the Authorization Fabric, returns the decision payload to the agent for branching. Copilot Studio also supports calling REST endpoints directly using the HTTP Request node, including passing headers such as Authorization: Bearer <token>. Protected endpoint only: Securing the Authorization Fabric with Microsoft Entra For this V2 pattern, the Authorization Fabric must be protected using Microsoft Entra‑protected endpoint on Azure Functions/App Service (built‑in auth). Microsoft Learn provides the configuration guidance for enabling Microsoft Entra as the authentication provider for Azure App Service / Azure Functions. Step 1 — Create the Authorization Fabric API (Azure Function) Expose an authorization endpoint: HTTP Step 2 — Enable Microsoft Entra‑protected endpoint on the Function App In Azure Portal: Function App → Authentication Add identity provider → Microsoft Choose Workforce configuration (enterprise tenant) Set Require authentication for all requests This ensures the Authorization Fabric is not callable without a valid Entra token. Step 3 — Optional hardening (recommended) Depending on enterprise posture, layer: IP restrictions / Private endpoints APIM in front of the Function for rate limiting, request normalization, centralized logging (For a POC, keep it minimal—add hardening incrementally.) Externalizing policy (so governance scales) To make this pattern reusable across multiple agents, policies should not be hardcoded inside each agent. Instead, store policy definitions in a central policy store such as Cosmos DB (or equivalent configuration store), and have the PDP load/evaluate policies at runtime. Why this matters: Policy changes apply across all agents instantly (no agent republish) Central governance + versioning + rollback becomes possible Audit and reporting become consistent across environments (For the POC, a single JSON document per policy pack in Cosmos DB is sufficient. For production, add versioning and staged rollout.) Store one PolicyPack JSON document per environment (dev/test/prod). Include version, effectiveFrom, priority for safe rollout/rollback. Minimal decision contract (standard request / response) To keep the fabric reusable across agents, standardize the request payload. Request payload (example) Decision response (deterministic) Example scenario (1 minute to understand) Scenario: A user asks a Finance agent to create a Purchase Order for 70,000. Even if the user has API permission and the agent can technically call the ERP API, runtime policy should return: REQUIRE_APPROVAL (threshold exceeded) trigger an approval workflow execute only after approval is granted This is the difference between API access and authorized business execution. Sample Policy Model (RBAC + ABAC + Approval) This POC policy model intentionally stays simple while demonstrating both coarse and fine-grained governance. 1) Coarse‑grained RBAC (roles → actions) FinanceAnalyst CreatePO up to 50,000 ViewVendor FinanceManager CreatePO up to 100,000 and/or approve higher spend 2) Fine‑grained ABAC (conditions at runtime) ABAC evaluates context such as region, classification, tenant boundary, and risk: 3) Approval injection (Agent‑level JIT execution) For higher-risk/high-impact actions, the fabric returns REQUIRE_APPROVAL rather than hard deny (when appropriate): How policies should be evaluated (deterministic order) To ensure predictable and auditable behavior, evaluate in a deterministic order: Tenant isolation & residency (ABAC hard deny first) Classification rules (deny or mask) RBAC entitlement validation Threshold/risk evaluation Approval injection (JIT step-up) This prevents approval workflows from bypassing foundational security boundaries such as tenant isolation or data sovereignty. Copilot Studio integration (enforcing runtime authorization) Copilot Studio can call external REST APIs using the HTTP Request node, including passing headers such as Authorization: Bearer <token> and binding response schema for branching logic. Copilot Studio also supports using flows with agents (“agent flows”) to extend capabilities and orchestrate actions. Option A (Recommended): Copilot Studio → Agent Flow (Power Automate) → Authorization Fabric Why: Flows are a practical place to handle token acquisition patterns, approval orchestration, and standardized logging. Topic flow: Extract user intent + parameters Call an agent flow that: calls /authorize returns decision payload Branch in the topic: If ALLOW → proceed to tool call If REQUIRE_APPROVAL → trigger approval flow; proceed only if approved If DENY → stop and explain policy reason Important: Tool execution must never be reachable through an alternate topic path that bypasses the authorization check. Option B: Direct HTTP Request node to Authorization Fabric Use the Send HTTP request node to call the authorization endpoint and branch using the response schema. This approach is clean, but token acquisition and secure secretless authentication are often simpler when handled via a managed integration layer (flow + connector). AI Foundry / Semantic Kernel integration (tool invocation gate) For Foundry/SK agents, the integration point is before tool execution. Semantic Kernel supports Azure AI agent patterns and tool integration, making it a natural place to enforce a pre-tool authorization check. Pseudo-pattern: Agent extracts intent + context Calls Authorization Fabric Enforces decision Executes tool only when allowed (or after approval) Telemetry & audit (what Security Architects will ask for) Even the best policy engine is incomplete without audit trails. At minimum, log: agentId, userUPN, action, resource decision + reason + policyIds approval outcome (if any) correlationId for downstream tool execution Why it matters: you now have a defensible answer to: “Why did an autonomous agent execute this action?” Security signal bonus: Denials, unusual approval rates, and repeated policy mismatches can also indicate prompt injection attempts, mis-scoped agents, or governance drift. What this enables (and why it scales) With a shared Authorization Fabric: Avoid duplicating authorization logic across agents Standardize decisions across Copilot Studio + Foundry agents Update governance once (policy change) and apply everywhere Make autonomy safer without blocking productivity Closing: Identity gets you who. Runtime authorization gets you whether/when/how. Copilot Studio can automatically create Entra agent identities (preview), improving identity governance and visibility for agents. But safe autonomy requires a runtime decision plane. Securing that plane as an Entra-protected endpoint is foundational for enterprise deployments. In enterprise environments, autonomous execution without runtime authorization is equivalent to privileged access without PIM—powerful, fast, and operationally risky.Feature Request: Manual Invocation Mode for Embedded Security Copilot Experiences to reduce cost !
Hello, I see that Copilot for Security in XDR dashboards , if used in embedded mode (I mean whenever you are opening a case to investigate) you get AUTOMATICALLY a summary of the incident , and you are consuming SCU costs. I want a way either globally as a tenant option, or through a pwsh to be able to DISABLE this, or be able to PRESS the AI button AND THEN generate the AI reply (and consume SCU credits ..) Current behavior: Open Incident --> Copilot automatically generates Incident Summary --> SCUs ARE consumed Desired behavior: Open Incident --> No AI execution --> Click "Generate Summary" MANUALLY --> SCUs consumed I am not talking about RBAC controls to assign WHO of my admins can use Security Copilot, I have set that, BUT I want my admin to decide IF they want AI to help them (and consume - pay for that SCU credits-costs) OR NOT !! At the moment I havent found any solution, except to educate my admin to press CANCEL the moment he/she opens such an XDR dashboard ! :) Does anyone knows something ? Regards, Panos201Views0likes2CommentsSentinel - Defender XDR KQL Queries Library
Hello all, I’ve been building something over the past few weeks that I think the security community might find useful. https://goxdr.fyi is a searchable KQL query library for Microsoft Sentinel and Defender XDR. The name comes from a nickname my colleagues gave me (GoX) combined with XDR. I also picked up https://goxdr.fyi as a short and easy to remember domain for it. You can check it out here: https://goxdr.fyi The idea came from my own day to day work as someone working in IAM and SOC operations. I constantly find myself writing and refining KQL queries for threat hunting, detection engineering and incident investigation. Over time I realized I had a growing collection of queries that I kept going back to and I thought why not make these available to others? It currently has 117 queries covering identity security, BEC/AiTM detection, NTLM and LDAP attack hunting, OAuth governance, AI/Copilot security, Sentinel alert trending, SOC performance metrics and more. Some of these queries are ones I wrote from scratch based on real scenarios I encountered in production environments. Others are community queries I tested and validated in my own setup. Only the ones I found genuinely useful and that actually worked against real data made it in. Each query comes with a description explaining what it detects and why it matters, along with severity levels, platform tags (Sentinel, XDR or both) and a copy button so you can paste it directly into Advanced Hunting or use it as the basis for an Analytics Rule. The site is open source, hosted on GitHub Pages and licensed under CC BY 4.0. No sign-up, no paywall, no tracking. The source is available. I’ll keep adding queries as new scenarios come up. If there’s enough interest I’m also considering adding Cortex XQL queries for Palo Alto environments. Suggestions, feedback or ideas for new detections are always welcome. Feel free to reach out. Thanks147Views0likes0Comments
Defender of XDR - Quarantine - Lack of filter/search options
Hi Microsoft, I love what you're doing with the Defender XDR portal, but could you please show some love to the Quarantine section soon? On a daily basis, I have to review emails caught in quarantine for false positives, and the lack of search and filtering options is appalling. As a company based in Denmark, 99% of legitimate emails come from .dk domains. Yet there is no way to search for or filter on something this simple. If I type .dk into the search box, I get 0 results, even though I can clearly see .dk sender addresses on the page. The filter options only allow me to enter full sender or recipient email addresses, which is of course almost useless in a quarantine-review context. Some examples of filters that would be extremely useful: Sender domain ends with .dk Sender domain contains .dk URL domain filtering Attachment name filtering Saved filter views More flexible search across message properties The Quarantine experience could be made dramatically better with relatively little effort. So please, pretty please, give the Quarantine portal some attention. It's often the part of Defender that security teams interact with every single day.274Views0likes4Comments
Microsoft Defender will not let me log in on Windows 11
I have a subscription to the Personal Microsoft 365 plan which includes Microsoft Defender. When I try logging into Microsoft Defender on my Windows PC, I receive an error message stating "Couldn't sign in to Microsoft Defender. Something went wrong-please try again later". I have been having this issue for several months now. I have recently contacted Microsoft Tech support who just directed me to this community. The tech support representative mentioned that others may have experienced similar issues as mine. I would appreciate if anyone could advise. My PC is running Windows 11 and is up to date on updates. All of my 365 applications are also up to date. I have also tried running the repair tool on Microsoft Defender in addition to uninstalling and reinstalling the application. The tech support representative mentioned something to me about the issue could be because I am using a personal email account for my login for Microsoft Defender. I did not fully understand why that would be the issue. I would like to note that I have no issue logging into Microsoft Defender on my Android phone. The problem appears to only occur on my PC and only for the Microsoft Defender app. All other apps that come with my 365 subscription use the same login and appear to be working fine.8.4KViews0likes13CommentsCampaign-Centric Hunting with Microsoft Defender XDR and Microsoft Sentinel
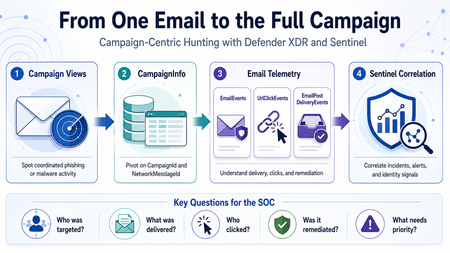
Phishing investigations usually start with one suspicious email. A user reports a message. An alert is generated. An analyst opens the email details, checks the sender, reviews the URL, and tries to understand whether the message is malicious. That is a normal starting point. However, in a real SOC investigation, one email is rarely the full story. Attackers usually operate in campaigns. They reuse sender infrastructure, similar subjects, URLs, payloads, templates, and delivery techniques. A single email may be only one part of a wider phishing or malware campaign targeting multiple users. This is why campaign-centric hunting is important. I wrote this article from the perspective of a SOC analyst who often needs to move quickly from a single suspicious email to the full campaign impact. The goal is simple: use Microsoft Defender XDR and Microsoft Sentinel together to understand who was targeted, what was delivered, who clicked, and what should be prioritized first. Why Campaign-Centric Hunting When investigating a phishing or malware email, analysts usually need to answer practical questions: How many users received messages from the same campaign? Were the messages blocked, junked, delivered, or remediated? Did any user click the URL? Did anyone click through a Safe Links warning? Were any priority or high-risk users affected? Was the email removed after delivery? Are there related Defender XDR or Sentinel incidents? If we only investigate one message, we may miss the bigger picture. Campaign-centric hunting helps the SOC move from this question: Is this email malicious? To this question: What is the full impact of this campaign? That shift is important because the response priority should be based on campaign impact, not only on a single alert. What Campaign Views Provides Campaign Views in Microsoft Defender for Office 365 help analysts investigate coordinated email attacks such as phishing and malware campaigns. From Campaign Views, analysts can review campaign-level information such as: Campaign name Campaign type Campaign subtype Targeted users Inboxed messages Clicked users Visited links Sender domains Sender IPs Payload URLs Delivery actions Campaign timeline Campaign flow This is useful during triage because it quickly shows whether an email is part of a wider attack. For example, one reported phishing message may look small at first. But if Campaign Views shows that the same campaign targeted 50 users, delivered messages to 15 inboxes, and had 2 users click the URL, the investigation becomes much more urgent. Where CampaignInfo Fits The CampaignInfo table gives analysts a KQL-based way to query campaign-related data. Some useful fields are: Field Purpose CampaignId Unique identifier for the campaign CampaignName Name of the campaign CampaignType Campaign category, such as Phish or Malware CampaignSubtype Additional context, such as brand being phished or malware family NetworkMessageId Unique identifier for the email message RecipientEmailAddress Recipient affected by the campaign Timestamp Time when the event was recorded For correlation, the most important field is usually: NetworkMessageId This field can help connect campaign data with other Defender XDR email tables, including: EmailEvents UrlClickEvents EmailPostDeliveryEvents EmailAttachmentInfo EmailUrlInfo This makes CampaignInfo a useful pivot table for campaign-level hunting. Important note: CampaignInfo is currently documented as Preview. Before using these queries in production analytics rules, validate the table availability, schema, and results in your own tenant. Practical Scenario An analyst receives a phishing alert in Microsoft Defender XDR. The alert is related to a user who received a suspicious email with a credential-harvesting URL. The analyst opens Campaign Views and sees that the message belongs to a wider phishing campaign. At that point, the investigation should not stop with the original user. The analyst should now ask: Who else received this campaign? How many messages were delivered? Which users clicked? Did any users click through the Safe Links warning? Were the messages removed after delivery? Are there related incidents in Microsoft Sentinel? The investigation flow could look like this: Start from Campaign Views in Microsoft Defender XDR. Identify the campaign details. Use CampaignInfo to list affected users and messages. Join with EmailEvents to validate delivery status. Join with UrlClickEvents to identify user interaction. Join with EmailPostDeliveryEvents to confirm remediation. Review related Microsoft XDR incidents in Microsoft Sentinel. Prioritize response based on campaign impact. Query 1: List Recent Campaigns The first query gives a simple overview of recent campaigns. CampaignInfo | where Timestamp > ago(14d) | summarize FirstSeen = min(Timestamp), LastSeen = max(Timestamp), AffectedUsers = dcount(RecipientEmailAddress), Messages = dcount(NetworkMessageId) by CampaignId, CampaignName, CampaignType, CampaignSubtype | order by LastSeen desc This helps analysts quickly identify campaigns that affected the organization during the selected period. Useful questions to ask from this output: Which campaigns are most recent? Which campaigns affected the most users? Are the campaigns phishing, malware, or spam? Is there a specific brand or malware family in the subtype? Are similar campaigns appearing repeatedly? Query 2: Understand Delivery Impact After identifying campaigns, the next step is to understand delivery impact. A campaign that was fully blocked is different from a campaign that reached user inboxes. let Campaigns = CampaignInfo | where Timestamp > ago(14d) | project CampaignId, CampaignName, CampaignType, CampaignSubtype, NetworkMessageId, RecipientEmailAddress; Campaigns | join kind=leftouter ( EmailEvents | where Timestamp > ago(14d) | project NetworkMessageId, RecipientEmailAddress, Subject, SenderFromAddress, SenderFromDomain, SenderIPv4, DeliveryAction, DeliveryLocation, ThreatTypes, DetectionMethods, Timestamp ) on NetworkMessageId, RecipientEmailAddress | summarize Messages = dcount(NetworkMessageId), AffectedUsers = dcount(RecipientEmailAddress), Subjects = make_set(Subject, 5), SenderDomains = make_set(SenderFromDomain, 10), SenderIPs = make_set(SenderIPv4, 10) by CampaignId, CampaignName, CampaignType, CampaignSubtype, DeliveryAction, DeliveryLocation | order by AffectedUsers desc, Messages desc This query helps separate campaigns that were blocked from campaigns that actually reached users. From a SOC perspective, delivered messages deserve closer attention, especially if they reached the inbox. Query 3: Identify Users Who Clicked Campaign URLs Delivery is important, but clicks usually increase the priority of the incident. This query joins campaign data with UrlClickEvents. let Campaigns = CampaignInfo | where Timestamp > ago(14d) | project CampaignId, CampaignName, CampaignType, CampaignSubtype, NetworkMessageId, RecipientEmailAddress; Campaigns | join kind=inner ( UrlClickEvents | where Timestamp > ago(14d) | project NetworkMessageId, AccountUpn, Url, ActionType, IsClickedThrough, ThreatTypes, DetectionMethods, IPAddress, Workload, ClickTime = Timestamp ) on NetworkMessageId | summarize FirstClick = min(ClickTime), LastClick = max(ClickTime), ClickEvents = count(), ClickedUsers = dcount(AccountUpn), ClickThroughUsers = dcountif(AccountUpn, IsClickedThrough == true), ClickedUrls = make_set(Url, 10), SourceIPs = make_set(IPAddress, 10) by CampaignId, CampaignName, CampaignType, CampaignSubtype | order by ClickThroughUsers desc, ClickedUsers desc, LastClick desc This query helps identify campaigns where users interacted with the payload. If a user clicked a phishing URL, the next step should usually include identity-focused investigation, such as reviewing sign-in activity, MFA status, session activity, and possible risky sign-ins. Query 4: Focus on Click-Through Events Safe Links may block access to a malicious site. In some cases, however, a user may continue through a warning page. Those cases should be reviewed carefully. let Campaigns = CampaignInfo | where Timestamp > ago(30d) | project CampaignId, CampaignName, CampaignType, CampaignSubtype, NetworkMessageId, RecipientEmailAddress; Campaigns | join kind=inner ( UrlClickEvents | where Timestamp > ago(30d) | where IsClickedThrough == true | project NetworkMessageId, AccountUpn, Url, ActionType, ThreatTypes, IPAddress, ClickTime = Timestamp ) on NetworkMessageId | project ClickTime, CampaignId, CampaignName, CampaignType, CampaignSubtype, AccountUpn, RecipientEmailAddress, Url, ActionType, ThreatTypes, IPAddress | order by ClickTime desc This is one of the most useful views during incident response. A click-through event does not automatically mean compromise, but it is a strong reason to investigate the user account further. Query 5: Confirm Post-Delivery Remediation A malicious message may be delivered first and removed later by ZAP, AIR, or manual remediation. This query joins CampaignInfo with EmailPostDeliveryEvents. let Campaigns = CampaignInfo | where Timestamp > ago(30d) | project CampaignId, CampaignName, CampaignType, CampaignSubtype, NetworkMessageId, RecipientEmailAddress; Campaigns | join kind=leftouter ( EmailPostDeliveryEvents | where Timestamp > ago(30d) | project NetworkMessageId, RecipientEmailAddress, RemediationTime = Timestamp, Action, ActionType, ActionTrigger, ActionResult, DeliveryLocation, SourceLocation ) on NetworkMessageId, RecipientEmailAddress | summarize RemediatedMessages = dcountif(NetworkMessageId, isnotempty(ActionType)), RemediationTypes = make_set(ActionType, 10), RemediationResults = make_set(ActionResult, 10), LastRemediation = max(RemediationTime) by CampaignId, CampaignName, CampaignType, CampaignSubtype | order by LastRemediation desc This helps answer a very important question: Were the delivered malicious messages actually removed? This is useful for both SOC triage and reporting because it shows not only detection, but also response. Query 6: Campaign Blast Radius Summary The following query combines campaign, delivery, click, and remediation data into one campaign-level view. let TimeRange = 30d; let Campaigns = CampaignInfo | where Timestamp > ago(TimeRange) | project CampaignId, CampaignName, CampaignType, CampaignSubtype, NetworkMessageId, RecipientEmailAddress; let Delivery = EmailEvents | where Timestamp > ago(TimeRange) | summarize DeliveryActions = make_set(DeliveryAction, 10), DeliveryLocations = make_set(DeliveryLocation, 10), DeliveredMessages = dcountif(NetworkMessageId, DeliveryAction =~ "Delivered"), JunkedMessages = dcountif(NetworkMessageId, DeliveryAction =~ "Junked"), BlockedMessages = dcountif(NetworkMessageId, DeliveryAction =~ "Blocked"), Subjects = make_set(Subject, 5), SenderDomains = make_set(SenderFromDomain, 10) by NetworkMessageId, RecipientEmailAddress; let Clicks = UrlClickEvents | where Timestamp > ago(TimeRange) | summarize ClickEvents = count(), ClickThroughEvents = countif(IsClickedThrough == true), FirstClick = min(Timestamp), LastClick = max(Timestamp), ClickedUrls = make_set(Url, 10) by NetworkMessageId; let Remediation = EmailPostDeliveryEvents | where Timestamp > ago(TimeRange) | summarize RemediationActions = make_set(ActionType, 10), LastRemediation = max(Timestamp) by NetworkMessageId, RecipientEmailAddress; Campaigns | join kind=leftouter Delivery on NetworkMessageId, RecipientEmailAddress | join kind=leftouter Clicks on NetworkMessageId | join kind=leftouter Remediation on NetworkMessageId, RecipientEmailAddress | summarize AffectedUsers = dcount(RecipientEmailAddress), Messages = dcount(NetworkMessageId), DeliveredMessages = sum(DeliveredMessages), JunkedMessages = sum(JunkedMessages), BlockedMessages = sum(BlockedMessages), TotalClickEvents = sum(ClickEvents), ClickThroughEvents = sum(ClickThroughEvents), Subjects = make_set(Subjects, 10), SenderDomains = make_set(SenderDomains, 10), ClickedUrls = make_set(ClickedUrls, 10), RemediationActions = make_set(RemediationActions, 10), LastClick = max(LastClick), LastRemediation = max(LastRemediation) by CampaignId, CampaignName, CampaignType, CampaignSubtype | extend SuggestedPriority = case( ClickThroughEvents > 0, "High", TotalClickEvents > 0, "Medium", DeliveredMessages > 0, "Medium", "Low" ) | order by SuggestedPriority asc, AffectedUsers desc, Messages desc This type of query can be useful during hunting sessions, incident review, and campaign reporting. The goal is not only to collect more data. The goal is to help the analyst decide what needs attention first. Correlating Campaign Activity with Microsoft Sentinel When Microsoft Defender XDR is connected to Microsoft Sentinel, incidents and alerts can be synchronized into the Sentinel incident queue. This allows the SOC to correlate campaign-related email activity with other security signals, such as: Suspicious sign-ins Identity alerts Endpoint alerts Cloud app activity OAuth consent activity Data exfiltration attempts Related Microsoft XDR incidents For example, if a user clicked a phishing URL, the SOC can then review whether the same user had suspicious sign-in activity shortly after the click. The following query is a simple starting point for reviewing Microsoft XDR incidents in Microsoft Sentinel. SecurityIncident | where TimeGenerated > ago(30d) | where ProviderName == "Microsoft XDR" | where Title has_any ("phish", "phishing", "email", "malware", "campaign") | summarize Incidents = count(), HighSeverity = countif(Severity == "High"), MediumSeverity = countif(Severity == "Medium"), Closed = countif(Status == "Closed"), Active = countif(Status == "Active") by bin(TimeGenerated, 1d) | order by TimeGenerated desc This query does not replace campaign hunting. It simply helps analysts understand how email-related activity is represented in the Sentinel incident queue. Suggested SOC Workflow A practical campaign-centric workflow could look like this: Step 1: Start from Campaign Views Review campaigns with delivered messages, clicked users, visited links, or high user impact. Step 2: Pivot to KQL Use CampaignInfo to list campaign-related messages and affected recipients. Step 3: Validate Delivery Join with EmailEvents to confirm whether messages were blocked, junked, delivered, or replaced. Step 4: Review User Interaction Join with UrlClickEvents to identify users who clicked URLs or clicked through Safe Links warnings. Step 5: Confirm Remediation Join with EmailPostDeliveryEvents to confirm whether delivered messages were removed after delivery. Step 6: Correlate in Sentinel Review related Microsoft XDR incidents and correlate with identity, endpoint, and cloud activity. Step 7: Decide Response Depending on the impact, the SOC may decide to: Escalate the incident Notify affected users Review user sign-ins Revoke user sessions Reset passwords Block sender domains or URLs Submit false negatives Create a watchlist for related indicators Tune analytics rules or response processes Suggested Priority Logic Not every campaign needs the same level of response. A simple triage model could be: Condition Suggested priority Campaign blocked before delivery Low Campaign delivered to junk Low to Medium Campaign delivered to inbox Medium Campaign delivered to multiple inboxes Medium to High User clicked URL High User clicked through warning High Priority account clicked High Click followed by suspicious sign-in Critical This model should be adapted to each organization’s risk profile and response process. Limitations and Things to Validate Before using this approach in production, validate the following: Defender for Office 365 Plan 2 availability Campaign Views permissions CampaignInfo table availability Defender XDR connector configuration Advanced hunting event streaming Field names in your environment Retention period Data latency Join behavior using NetworkMessageId Whether click events can be joined to email metadata in all cases One important limitation is that some URL click events may not join cleanly with email metadata. For example, clicks from Drafts or Sent Items may not have the same message metadata available for correlation. Also, because CampaignInfo is currently documented as Preview, I would avoid depending on it alone for critical production automation without testing and validation.264Views0likes0CommentsOperational Notes on Microsoft Security Copilot Agents in Defender XDR and Microsoft Entra ID
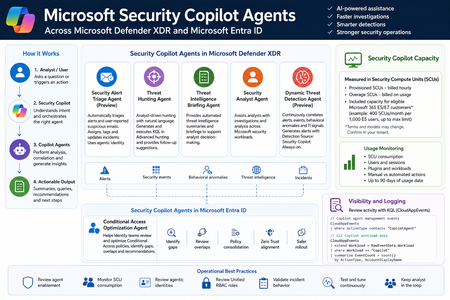
Microsoft Security Copilot is now becoming more visible inside day-to-day security operations, especially through embedded experiences and agent-based workflows across Microsoft Defender XDR, Microsoft Entra ID, Microsoft Intune, and Microsoft Purview. Instead of looking at Security Copilot only as a standalone prompt interface, SOC and identity teams should also understand how Security Copilot agents are deployed, how they consume Security Compute Units, how they appear in operational workflows, and where activity can be monitored. This post summarizes practical observations from a security operations perspective, with a focus on Microsoft Defender XDR, Microsoft Entra ID, usage monitoring, and KQL-based activity review. Licensing & Capacity Units Requirements Requires eligible Microsoft security licensing, typically: Microsoft 365 E5 Microsoft 365 E7 Security Compute Units (SCUs) Security Copilot capacity is measured using Security Compute Units (SCUs). SCUs are billed based on provisioned capacity. Indicative pricing: $4 per Provisionied SCU/hour $6 per Overage SCU/hour Billing is calculated hourly, based on the amount of SCUs provisioned. Included Capacity Organizations with: 1,000 Microsoft 365 E5 licenses Receive: 400 included SCUs Included SCUs are shared across the tenant within a common capacity pool. Scaling SCU capacity can be scaled dynamically based on operational requirements and workload demand. Data Retention Security Copilot session and interaction data without active SCU-backed retention is typically retained for: 90 days Security Copilot Agents - Microsoft Defender This section outlines the Microsoft Security Copilot agents currently available in the Microsoft Defender portal. NameKey characteristics Security Alert Triage Agent (Preview) Manual setup from Defender portal Automatically creates Unified RBAC custom role Runs automatically when a user reports a suspicious email or when a new supported alert is generated, supported alert sources: MDI, MDC, MDO If an alert tuning rule is enabled, it will be automatically disabled when the agent is deployed. Creates and connects with agentic user account: Phishing Triage Agent (Security Copilot) Automatic alert assignment to SecurityCopilotAgentUser-db16fec3-f1fb-4632-843e-46d07408c584@<tenant-domain>Alert was assigned to Phishing Triage Agent (Security Copilot). Adds Tag Agent to the created Incidents Threat Hunting Agent Manual setup from Defender portal Automatically creates Unified RBAC custom role This agent runs manually. There isn't an automatic trigger. Creates and connects with agentic user account: Threat Hunting Agent (Security Copilot) Analyst Questions in natural language Generates and executed KQL queries in Advanced hunting Provides charts, dynamic follow-up questions and remediation actions recommendations No activity is identified from agent's identity during agent execution Threat Intelligence Briefing Agent Manual setup from Defender portal Provides automated TI briefing summary Configured from https://security.microsoft.com/securitysettings/defender/agent_configuration-threatintelligencebriefingagent Security Analyst Agent Manual setup from Defender portal Dynamic Threat Detection Agent (Preview) Automatically enabled always-on, runs continuously in the background Correlates: Alerts, Security events, Behavioral anomalies, TI signals Generates Alerts with Detection Source: Security Copilot The Alerts can be correlated with existing Multi-Stage Incidents No agentic user account identity is used by this agent Available free of charge during public preview, will begin consuming Security Compute Units (SCUs) once generally available (GA) Incidents handled by Security Alert Triage Agent: Alerts created by Dynamic Threat Detection Agent: Execution of Threat Hunting Agent: View agents in use: https://security.microsoft.com/security-copilot/agents View Unified RBAC custom roles: https://security.microsoft.com/mtp_roles View Security Copilot user identities in Microsoft Entra ID: Notes: CloudAppEvents activity logs only from the following agents: Phishing Triage Agent Conditional Access Optimization Agent Security Copilot Agents - Microsoft Entra ID Conditional Access Optimization Agent Usage Monitoring Sign-in to Security Copilot portal using Global Admin account and navigate to the following location: https://securitycopilot.microsoft.com/usage-monitoring Reference: https://learn.microsoft.com/en-us/copilot/security/manage-usage Logging Activity Copilot Agents Management: CloudAppEvents | where ActionType contains "CopilotAgent" | extend AgentName = RawEventData.AgentName | extend Workload = RawEventData.Workload | extend ResultStatus = RawEventData.ResultStatus | project TimeGenerated, ActionType, ResultStatus, AgentName, Application, Workload All Copilot Workload data: CloudAppEvents | extend Workload = RawEventData.Workload | where Workload == "Copilot" | summarize EventCount = count() by ActionType, AccountDisplayName448Views3likes1Comment
Defender XDR - how to grant "undo action" Permissions on File Quarantine?
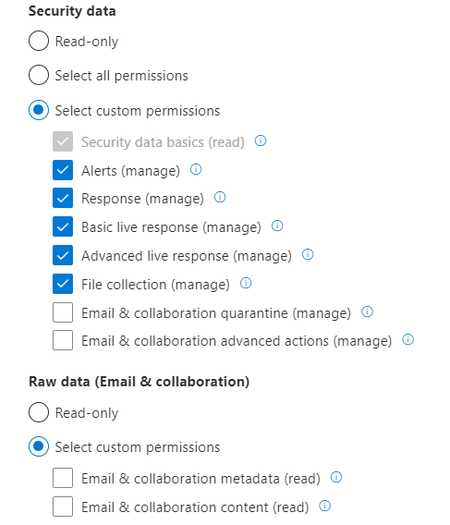
Dear Defender XDR Community I have a question regarding the permissions to "undo action" on a file quarantine action in the action center. We have six locations, each location manages their own devices. We have created six device groups so that Accounts from Location 1 can only manage/see devices from Location 1 as well. Then we created a custom "Microsoft Defender XDR" Role with the following permissions. This way the admins from location 1 can manage all Defender for Endpoint Devices / incidents / recommendations etc. without touching devices they aren't managing.. very cool actually! BUT - if a file gets quarantined, it might want to be released again because of false positive etc. I can do that as a global admin, but not as an admin with granularly assigned rights - the option just isnt there.. I don't want to give them admins a more privileged role because of - you know - least privileges. but i don't have the option to allow "undo action" on file quarantine events, besides that being a critical feature for them to manage their own devices and not me having to de-quarantine files i dont care about.. Any thoughts on how to give users this permission?1KViews0likes1Comment
Understand New Sentinel Pricing Model with Sentinel Data Lake Tier
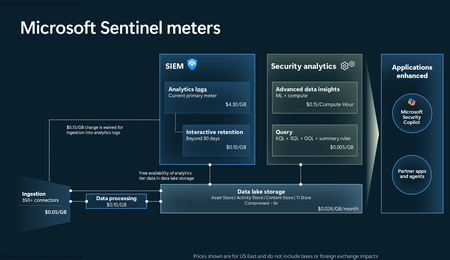
Introduction on Sentinel and its New Pricing Model Microsoft Sentinel is a cloud-native Security Information and Event Management (SIEM) and Security Orchestration, Automation, and Response (SOAR) platform that collects, analyzes, and correlates security data from across your environment to detect threats and automate response. Traditionally, Sentinel stored all ingested data in the Analytics tier (Log Analytics workspace), which is powerful but expensive for high-volume logs. To reduce cost and enable customers to retain all security data without compromise, Microsoft introduced a new dual-tier pricing model consisting of the Analytics tier and the Data Lake tier. The Analytics tier continues to support fast, real-time querying and analytics for core security scenarios, while the new Data Lake tier provides very low-cost storage for long-term retention and high-volume datasets. Customers can now choose where each data type lands—analytics for high-value detections and investigations, and data lake for large or archival types—allowing organizations to significantly lower cost while still retaining all their security data for analytics, compliance, and hunting. Please flow diagram depicts new sentinel pricing model: Now let's understand this new pricing model with below scenarios: Scenario 1A (PAY GO) Scenario 1B (Usage Commitment) Scenario 2 (Data Lake Tier Only) Scenario 1A (PAY GO) Requirement Suppose you need to ingest 10 GB of data per day, and you must retain that data for 2 years. However, you will only frequently use, query, and analyze the data for the first 6 months. Solution To optimize cost, you can ingest the data into the Analytics tier and retain it there for the first 6 months, where active querying and investigation happen. After that period, the remaining 18 months of retention can be shifted to the Data Lake tier, which provides low-cost storage for compliance and auditing needs. But you will be charged separately for data lake tier querying and analytics which depicted as Compute (D) in pricing flow diagram. Pricing Flow / Notes The first 10 GB/day ingested into the Analytics tier is free for 31 days under the Analytics logs plan. All data ingested into the Analytics tier is automatically mirrored to the Data Lake tier at no additional ingestion or retention cost. For the first 6 months, you pay only for Analytics tier ingestion and retention, excluding any free capacity. For the next 18 months, you pay only for Data Lake tier retention, which is significantly cheaper. Azure Pricing Calculator Equivalent Assuming no data is queried or analyzed during the 18-month Data Lake tier retention period: Although the Analytics tier retention is set to 6 months, the first 3 months of retention fall under the free retention limit, so retention charges apply only for the remaining 3 months of the analytics retention window. Azure pricing calculator will adjust accordingly. Scenario 1B (Usage Commitment) Now, suppose you are ingesting 100 GB per day. If you follow the same pay-as-you-go pricing model described above, your estimated cost would be approximately $15,204 per month. However, you can reduce this cost by choosing a Commitment Tier, where Analytics tier ingestion is billed at a discounted rate. Note that the discount applies only to Analytics tier ingestion—it does not apply to Analytics tier retention costs or to any Data Lake tier–related charges. Please refer to the pricing flow and the equivalent pricing calculator results shown below. Monthly cost savings: $15,204 – $11,184 = $4,020 per month Now the question is: What happens if your usage reaches 150 GB per day? Will the additional 50 GB be billed at the Pay-As-You-Go rate? No. The entire 150 GB/day will still be billed at the discounted rate associated with the 100 GB/day commitment tier bucket. Azure Pricing Calculator Equivalent (100 GB/ Day) Azure Pricing Calculator Equivalent (150 GB/ Day) Scenario 2 (Data Lake Tier Only) Requirement Suppose you need to store certain audit or compliance logs amounting to 10 GB per day. These logs are not used for querying, analytics, or investigations on a regular basis, but must be retained for 2 years as per your organization’s compliance or forensic policies. Solution Since these logs are not actively analyzed, you should avoid ingesting them into the Analytics tier, which is more expensive and optimized for active querying. Instead, send them directly to the Data Lake tier, where they can be retained cost-effectively for future audit, compliance, or forensic needs. Pricing Flow Because the data is ingested directly into the Data Lake tier, you pay both ingestion and retention costs there for the entire 2-year period. If, at any point in the future, you need to perform advanced analytics, querying, or search, you will incur additional compute charges, based on actual usage. Even with occasional compute charges, the cost remains significantly lower than storing the same data in the Analytics tier. Realized Savings Scenario Cost per Month Scenario 1: 10 GB/day in Analytics tier $1,520.40 Scenario 2: 10 GB/day directly into Data Lake tier $202.20 (without compute) $257.20 (with sample compute price) Savings with no compute activity: $1,520.40 – $202.20 = $1,318.20 per month Savings with some compute activity (sample value): $1,520.40 – $257.20 = $1,263.20 per month Azure calculator equivalent without compute Azure calculator equivalent with Sample Compute Conclusion The combination of the Analytics tier and the Data Lake tier in Microsoft Sentinel enables organizations to optimize cost based on how their security data is used. High-value logs that require frequent querying, real-time analytics, and investigation can be stored in the Analytics tier, which provides powerful search performance and built-in detection capabilities. At the same time, large-volume or infrequently accessed logs—such as audit, compliance, or long-term retention data—can be directed to the Data Lake tier, which offers dramatically lower storage and ingestion costs. Because all Analytics tier data is automatically mirrored to the Data Lake tier at no extra cost, customers can use the Analytics tier only for the period they actively query data, and rely on the Data Lake tier for the remaining retention. This tiered model allows different scenarios—active investigation, archival storage, compliance retention, or large-scale telemetry ingestion—to be handled at the most cost-effective layer, ultimately delivering substantial savings without sacrificing visibility, retention, or future analytical capabilities.Solved3.5KViews2likes6Comments