mcp
44 Topics
MCP Server Authorization with Azure API Management: From Simple to Advanced
Why put API Management in front of your MCP servers The Model Context Protocol (MCP) has quickly become the standard way for AI agents, such as GitHub Copilot in VS Code, to reach external tools and data. As soon as an MCP server does anything meaningful, the same questions that govern any API resurface: who is allowed to call it, what are they allowed to do, and how do you enforce that consistently across many servers without rewriting each one. Azure API Management (APIM) answers those questions for MCP. It sits between the MCP client and the tool backend and applies the controls you already trust for REST APIs: identity validation, OAuth, rate limiting, IP filtering, and observability. Crucially, APIM speaks the MCP authorization specification, which is built on OAuth 2.1 and Protected Resource Metadata (PRM, RFC 9728). That means APIM can do more than block bad requests. It can actively drive an interactive sign-in from the IDE, so the user logs in with their own identity and the agent acts on their behalf. This article walks through a progression of authorization scenarios, each one building on the last: The simple case: validate a token and block everything else. Triggering an interactive sign-in from VS Code for an MCP server that APIM hosts from your own APIs. Going beyond "is this a tenant user" to "does this user have the right attribute" with Entra app roles. Fronting an existing external MCP server and letting it drive its own OAuth flow (GitHub as the example). Governing which tools of an existing MCP server an agent is actually allowed to invoke. APIM MCP capabilities and the basic authorization options API Management exposes MCP servers in two distinct ways, and the authorization story differs slightly for each. Expose a REST API as an MCP server. APIM takes an API it already manages and projects selected operations as MCP tools. You own the operations, so you choose exactly which ones become tools at configuration time. This is the right mode when the capability you want to expose is an API you control. Expose an existing MCP server (passthrough). APIM fronts a remote MCP-compatible server (LangChain, an Azure Function, GitHub's remote MCP server, your own container) and relays the MCP protocol to it. APIM governs access, but the upstream server still owns its tool catalog. On top of either mode, you have a spectrum of authorization options: Subscription keys for simple, machine-to-machine access where a shared secret in a header is acceptable. Token validation with Microsoft Entra ID, where APIM acts as the protected resource and verifies a bearer token on every call. Interactive OAuth 2.1 sign-in, where APIM advertises Protected Resource Metadata so an MCP client can discover the authorization server, log the user in, and retry with a user token. Authorization passthrough, where an external MCP server presents its own authorization challenge and APIM relays it faithfully so the client authenticates directly against the upstream's identity provider. The rest of the article works through these options in increasing order of capability. The example setup The walkthroughs in the first three scenarios all use the same backend so you can reproduce them without standing up anything of your own: the publicly available Star Wars API at Star Wars API. It is a simple, read-friendly REST API (characters, films, planets, starships, and so on) imported into API Management as a normal API and then projected as an MCP server. The reason this single API is enough to illustrate the whole progression is that, in API Management, one underlying API can back several independent MCP servers, each exposing a different slice of its operations. For example, you can create: A read-only MCP server that exposes only the GET operations, for agents that should be able to query data but never change it. A write-capable MCP server that exposes the POST, PUT, or DELETE operations, for trusted automation that is allowed to mutate state. Same backend API, two MCP servers, two different tool surfaces. Each of these servers is an independent resource in APIM, so each one can carry its own authorization. Both can require an authenticated user (Scenarios 1 and 2), and you can go further by protecting only the sensitive one: gate the write-capable server behind an Entra app role so that, even among authenticated users, only those who carry a specific claim can reach the mutating tools. That app-role mechanism is the subject of Scenario 3, and it composes naturally with the multi-server split described here. Registering the MCP API in Microsoft Entra ID Before any of the policies below can validate a token, you need an application registration in Microsoft Entra ID that represents the MCP API. This registration is what defines the audience and scope that tokens are issued for, and it is the source of the mcp-audience, mcp-scope, and (indirectly) mcp-client-id values that the policies reference. Create it once and reuse it across all the MCP servers in this article. In the Azure portal, open Microsoft Entra ID, then App registrations, then New registration. Name it (for example, star-wars-mcp-api), choose single-tenant, and register. Record the Application (client) ID and the Directory (tenant) ID. Open Expose an API and add an Application ID URI. Accept the default api://<app-id>. This URI is your token audience. Still under Expose an API, add a delegated scope named MCP.Access, set its consent display name and description, set the state to Enabled, and save. Authorize the client that will request the scope. Under Expose an API, select Add a client application and enter the client ID of the MCP client. For VS Code, this is the built-in Microsoft authentication client aebc6443-996d-45c2-90f0-388ff96faa56. Check the MCP.Access scope and save. These steps produce the four constants the validation policy needs: Named value Comes from Example entra-tenant-id The Directory (tenant) ID from step 1 11111111-1111-1111-1111-111111111111 mcp-audience The Application ID URI from step 2 api://22222222-2222-2222-2222-222222222222 mcp-scope The scope name from step 3 MCP.Access mcp-client-id The client ID of the calling app from step 4 aebc6443-996d-45c2-90f0-388ff96faa56 [!NOTE] mcp-client-id is the identity of the application calling the MCP server, not the MCP API itself. For VS Code it is the built-in Microsoft authentication client, and its value lands in the token's appid claim, which is why the validation policy lists it under client-application-ids. If your tenant blocks the first-party VS Code client, register your own public client application and use its client ID instead. [!TIP] For the privileged-access feature in Scenario 3, you will also declare an app role on this same registration. You do not need it yet, but it is convenient to know that all identity configuration for these servers lives on this one app registration. With that backend and structure in mind, the scenarios below build up the authorization model one capability at a time. Scenario 1: The simple case, validate the token and block unauthorized access The most basic protection is to require a valid Entra ID token on every MCP request and reject anything that fails validation. No interactive flow, no roles, just a gate. APIM does this with the validate-azure-ad-token policy. The policy checks the issuing tenant, the audience (your MCP API), the calling client application, and the required scope. Anything that does not satisfy all four is rejected with a 401. <policies> <inbound> <base /> <validate-azure-ad-token tenant-id="{{entra-tenant-id}}" header-name="Authorization" failed-validation-httpcode="401" failed-validation-error-message="Unauthorized. Access token is missing or invalid."> <client-application-ids> <application-id>{{mcp-client-id}}</application-id> </client-application-ids> <audiences> <audience>{{mcp-audience}}</audience> </audiences> <required-claims> <claim name="scp" match="any"> <value>{{mcp-scope}}</value> </claim> </required-claims> </validate-azure-ad-token> </inbound> <backend> <base /> </backend> <outbound> <base /> </outbound> <on-error> <base /> </on-error> </policies> The values in double braces are APIM named values: centralized constants, defined once and shared by every MCP server. They map directly to the four values produced by the Entra app registration in the example setup (entra-tenant-id, mcp-audience, mcp-scope, and mcp-client-id). Storing them as named values keeps the policy free of hardcoded identifiers and lets every server reuse the same configuration. This gets you a server that nobody can call without a properly minted token. What it does not do is help a fresh client obtain that token in the first place. That is the next scenario. Scenario 2: Driving an interactive sign-in from VS Code for an APIM-hosted MCP server When you expose one of your own APIs as an MCP server, you usually want a developer to open VS Code, connect to the server, and be prompted to sign in with their Microsoft account. No pre-shared key, no manual token handling. APIM achieves this by behaving as a well-mannered OAuth 2.1 protected resource. Using the Star Wars MCP server from the example setup, each selected operation becomes a tool the agent can call, so an agent can answer "which films featured the character named Leia" by calling the underlying API through APIM. How the sign-in flow works The protocol choreography is what turns a plain 401 into an interactive login: Two ingredients make this work: a 401 challenge that points to a metadata document, and the metadata document itself. The challenge: a 401 that points the client to its metadata Instead of a bare 401, APIM returns a WWW-Authenticate header carrying the URL of the server's Protected Resource Metadata. This is what tells the client "you need a token, and here is where to learn how to get one." Keeping this logic in a shared policy fragment means every MCP server reuses it. Notice the mcpResourceMetadataUrl reference in the fragment below. It is not hardcoded; it is a context variable that each MCP server sets in its own server-level policy before including this fragment (you will see that wiring in the per-server policy later in this scenario). The fragment simply reads whatever value the calling server provided. This indirection is what keeps the fragment pluggable: the same shared challenge-and-validate logic serves every MCP server, while each server supplies its own PRM URL. In most deployments the PRM endpoint is a single, dynamic one (built in the next section) that derives the resource from the request path, so the variable just carries that server's path. But because the URL is configurable per server rather than baked into the fragment, you retain flexibility for the cases that need it. <fragment> <!-- No token: challenge with the per-server PRM URL set by the caller --> <choose> <when condition="@(!context.Request.Headers.ContainsKey("Authorization"))"> <return-response> <set-status code="401" reason="Unauthorized" /> <set-header name="WWW-Authenticate" exists-action="override"> <value>@("Bearer resource_metadata=\"" + (string)context.Variables.GetValueOrDefault("mcpResourceMetadataUrl", "") + "\"")</value> </set-header> </return-response> </when> </choose> <!-- Token present: validate against shared named values --> <validate-azure-ad-token tenant-id="{{entra-tenant-id}}" header-name="Authorization" failed-validation-httpcode="401" failed-validation-error-message="Unauthorized. Access token is missing or invalid."> <client-application-ids> <application-id>{{mcp-client-id}}</application-id> </client-application-ids> <audiences> <audience>{{mcp-audience}}</audience> </audiences> <required-claims> <claim name="scp" match="any"> <value>{{mcp-scope}}</value> </claim> </required-claims> </validate-azure-ad-token> </fragment> Creating the /.well-known PRM endpoint in APIM with a policy This is the part that often surprises people: APIM itself serves the metadata document. There is no separate identity service to stand up. You publish one small anonymous API at the service root that answers GET /.well-known/oauth-protected-resource/*, derives the resource value from the requested path, and returns a JSON document pointing at Microsoft Entra ID as the authorization server. Create a blank HTTP API named well-known with an empty API URL suffix so it resolves at the service root, add a GET operation with the template /.well-known/oauth-protected-resource/*, clear the subscription requirement so it is reachable anonymously, and apply this policy: <policies> <inbound> <base /> <!-- Build the resource URL from the requested PRM sub-path --> <set-variable name="resourceUrl" value="@{ var prefix = "/.well-known/oauth-protected-resource"; var path = context.Request.OriginalUrl.Path; var resourcePath = path.Length > prefix.Length ? path.Substring(prefix.Length) : ""; return "https://" + context.Request.OriginalUrl.Host + resourcePath; }" /> <return-response> <set-status code="200" reason="OK" /> <set-header name="Content-Type" exists-action="override"> <value>application/json</value> </set-header> <set-body>@{ return new JObject( new JProperty("resource", (string)context.Variables["resourceUrl"]), new JProperty("authorization_servers", new JArray( "https://login.microsoftonline.com/{{entra-tenant-id}}/v2.0")), new JProperty("scopes_supported", new JArray("{{mcp-prm-scope}}")), new JProperty("bearer_methods_supported", new JArray("header")) ).ToString(); }</set-body> </return-response> </inbound> <backend> <base /> </backend> <outbound> <base /> </outbound> <on-error> <base /> </on-error> </policies> The {{mcp-prm-scope}} named value populates the scopes_supported array of the metadata document. It tells the client which delegated scope to request when it goes to the authorization server, so it must be the fully qualified scope value: the token audience (the Application ID URI from the app registration) followed by the scope name. With the example values that is api://22222222-2222-2222-2222-222222222222/MCP.Access. In other words, it is the combination of the mcp-audience and mcp-scope values defined in the example setup. Named value Value to set Example mcp-prm-scope <mcp-audience>/<mcp-scope> api://22222222-2222-2222-2222-222222222222/MCP.Access [!NOTE] Keep mcp-prm-scope in sync with the scope the validation fragment requires. The PRM document advertises this scope so the client requests it, and validate-azure-ad-token then checks for it in the scp claim. A mismatch means the client obtains a token without the scope APIM expects, and validation fails. Because the policy builds the resource value from the request path, this single endpoint serves metadata for every MCP server you ever add. The Star Wars server, a future inventory server, and anything else all share it. Wiring it onto the MCP server Each MCP server only needs to declare its own metadata URL and include the shared fragment: <policies> <inbound> <base /> <set-variable name="mcpResourceMetadataUrl" value="https://apim-contoso-mcp.azure-api.net/.well-known/oauth-protected-resource/star-wars-mcp/mcp" /> <include-fragment fragment-id="mcp-entra-auth" /> </inbound> <backend> <base /> </backend> <outbound> <base /> </outbound> <on-error> <base /> <include-fragment fragment-id="mcp-auth-challenge-onerror" /> </on-error> </policies> On the VS Code side, the configuration is deliberately plain. With no subscription-key header present, the client falls straight into the OAuth flow: { "servers": { "star-wars-mcp": { "url": "https://apim-contoso-mcp.azure-api.net/star-wars-mcp/mcp", "type": "http" } } } Restart the server in VS Code, and it detects the 401, reads the metadata, opens a browser sign-in, requests consent on first use, and then loads the tools using the user's token. [!CAUTION] Do not read the response body with context.Response.Body inside MCP server policies. It forces response buffering and breaks the MCP streaming transport. If global diagnostic logging is enabled, set the Frontend Response payload bytes to log to 0 at the All APIs scope. Scenario 3: Beyond tenant membership, authorize on a user attribute with app roles Validating a token confirms the caller is a signed-in user in your tenant with the right scope. That is often not enough. Some MCP servers expose sensitive tools that only a subset of users should reach. You want to express "this user is not only part of the tenant, but has a specific attribute that permits this server." Microsoft Entra app roles are the optimal mechanism for this. You declare a role on the MCP API app registration, assign it to specific users or to a security group, and Entra ID emits a roles claim in the access token whenever your API is the audience. APIM then authorizes on that claim. App roles beat the groups claim here because they avoid the group overage problem, they are scoped to the application, and they travel with the app. Declaring and assigning the role On the MCP API app registration, under App roles, create a role: Setting Value Display name Privileged Access Allowed member types Users/Groups Value Privileged.Access Description Access to privileged MCP servers Then, on the matching enterprise application, under Users and groups, assign the users (or, better, a security group) to the Privileged Access role. The Value field is the exact string that lands in the token roles claim, so it cannot contain spaces. [!TIP] Keep User assignment required set to No on the enterprise application. Unassigned users still obtain a valid token with the MCP.Access scope and keep access to the non-privileged servers. They simply do not carry the roles claim, so the privileged servers reject them. Enforcing the claim in the per-server policy The shared mcp-entra-auth fragment is used by every server, so the role requirement must not live there. Place the check in the privileged server's own policy, right after the fragment include. The token is already validated at that point, so this step is pure authorization. Because the caller is authenticated but not authorized, return 403, not 401, and do not emit a challenge: re-authenticating will not grant a role the user does not have. <policies> <inbound> <base /> <set-variable name="mcpResourceMetadataUrl" value="https://apim-contoso-mcp.azure-api.net/.well-known/oauth-protected-resource/star-wars-mcp/mcp" /> <include-fragment fragment-id="mcp-entra-auth" /> <!-- Privileged guardrail: require the Privileged.Access app role --> <choose> <when condition="@(!context.Request.Headers.GetValueOrDefault("Authorization","").Replace("Bearer ","").AsJwt().Claims.GetValueOrDefault("roles", new string[0]).Contains("Privileged.Access"))"> <return-response> <set-status code="403" reason="Forbidden" /> <set-header name="Content-Type" exists-action="override"> <value>application/json</value> </set-header> <set-body>{"error":"forbidden","message":"You lack the Privileged.Access role required for this MCP server."}</set-body> </return-response> </when> </choose> </inbound> <backend> <base /> </backend> <outbound> <base /> </outbound> <on-error> <base /> <include-fragment fragment-id="mcp-auth-challenge-onerror" /> </on-error> </policies> One operational detail worth calling out: app-role assignments only appear in newly issued tokens. A user who is granted the role after they signed in must obtain a fresh token. In VS Code, run MCP: Reset Cached Tokens (or sign out of the Microsoft account from the Accounts menu), then restart the server and sign in again. You can confirm the result by pasting the access token into https://jwt.ms and checking for "roles": ["Privileged.Access"]. Scenario 4: Fronting an existing external MCP server that drives its own sign-in So far APIM has been the authorization resource. But many valuable MCP servers already exist and run their own identity. GitHub publishes a remote MCP server with dozens of tools, and it authenticates users against GitHub's own OAuth authorization server. You do not want to re-implement that. You want APIM to govern access (rate limits, IP rules, logging, a single managed endpoint) while letting the upstream own the login. This is the "expose an existing MCP server" passthrough mode. When you register GitHub's remote MCP server behind APIM, the gateway relays the upstream's own authorization challenge. The client never authenticates against Entra here. It authenticates directly against GitHub. The flow, confirmed by probing the gateway: A call to the APIM endpoint with no token returns GitHub's own 401 with a WWW-Authenticate header, relayed through APIM. The Protected Resource Metadata that GitHub serves advertises authorization_servers: ["https://github.com/login/oauth"], so the client knows to log in at GitHub. The PRM resource reflects the APIM host, because GitHub builds it from the forwarded Host header. The client trusts the APIM endpoint while still logging in at GitHub. VS Code completes the GitHub sign-in and the full tool catalog loads. In the proof of concept this surfaced all 47 GitHub tools through the single APIM endpoint. The client configuration is again just a URL pointing at APIM: { "servers": { "github-via-apim": { "url": "https://apim-contoso-mcp.azure-api.net/github-mcp/mcp", "type": "http" } } } The key insight is that APIM transparently relays the backend's authentication challenge. GitHub remains the authorization server, GitHub tolerates being fronted by APIM, and you get a governed, centrally managed entry point without owning the identity flow. [!NOTE] Passthrough only relays what the upstream advertises. If the backend's PRM resource value and the actual MCP transport endpoint differ by a path segment, some clients fall back to deriving the metadata location from the server URL and can miss it. When you onboard a custom self-authenticating server, verify that the resource it advertises matches the exact URL the client connects to. Scenario 5: Restricting which tools of an existing MCP server an agent may call Passthrough raises a governance question that token validation alone cannot answer. A developer may legitimately have permission to merge a pull request through GitHub, but you may not want their AI agent to perform that action autonomously. You want to allow the read and discovery tools while blocking the destructive write tools, at the gateway, regardless of what the client tries. What is and is not possible for an external server It is important to be precise here, because the capability differs from the REST-as-MCP mode: For a REST-API-exposed-as-MCP server, you pick which operations become tools at creation time. That is native tool selection and the cleanest possible filter. For an existing/external MCP server, APIM does not enumerate the upstream's tools. The portal Tools blade explicitly states that tools are not visible for external MCP servers, and there is no allow-list property for them. APIM also cannot safely rewrite the tools/list response, because reading the response body breaks the streaming transport and the list may arrive as text/event-stream. What APIM can do reliably, and server-agnostically, is block the invocation. Every tool call arrives as a JSON-RPC tools/call request in the request body, which APIM can inspect safely. The deny-listed tools remain visible in the catalog, but any attempt to invoke one is intercepted at the gateway and returned a JSON-RPC error before it ever reaches the upstream. The reusable deny-list fragment The block is driven by a per-server named value (a comma-separated list of tool names), so the same fragment governs every external server. Only the named value changes. <!-- Fragment: mcp-tool-filter (include after the auth fragment) --> <fragment> <choose> <when condition="@(context.Request.Body != null)"> <set-variable name="mcpMethod" value="@{ try { var body = context.Request.Body.As<JObject>(preserveContent: true); return (string)body?["method"] ?? string.Empty; } catch { return string.Empty; } }" /> <choose> <when condition="@(((string)context.Variables["mcpMethod"]).Equals("tools/call", StringComparison.OrdinalIgnoreCase))"> <set-variable name="mcpToolName" value="@{ var body = context.Request.Body.As<JObject>(preserveContent: true); return (string)body?["params"]?["name"] ?? string.Empty; }" /> <!-- mcpBlockedTools is a comma-separated deny-list set by the per-server policy before this include --> <set-variable name="mcpBlocked" value="@{ var tool = ((string)context.Variables["mcpToolName"]).Trim().ToLowerInvariant(); var deny = ((string)context.Variables.GetValueOrDefault("mcpBlockedTools", "")).ToLowerInvariant().Split(',').Select(t => t.Trim()); return deny.Contains(tool); }" /> <choose> <when condition="@((bool)context.Variables["mcpBlocked"])"> <return-response> <set-status code="200" reason="OK" /> <set-header name="Content-Type" exists-action="override"> <value>application/json</value> </set-header> <set-body>@{ var id = "null"; try { var body = context.Request.Body.As<JObject>(preserveContent: true); id = body?["id"]?.ToString(Newtonsoft.Json.Formatting.None) ?? "null"; } catch {} return "{\"jsonrpc\":\"2.0\",\"id\":" + id + ",\"error\":{\"code\":-32602,\"message\":\"Unknown tool: " + ((string)context.Variables["mcpToolName"]) + "\"}}"; }</set-body> </return-response> </when> </choose> </when> </choose> </when> </choose> </fragment> The deny-list itself lives in a named value, one per server: APIM named value. Comma-separated, case-insensitive. mcp-blocked-tools-github = merge_pull_request,create_repository,delete_repository,push_files,create_or_update_file,issue_write,label_write # <policies> <inbound> <base /> <set-variable name="mcpResourceMetadataUrl" value="https://apim-contoso-mcp.azure-api.net/.well-known/oauth-protected-resource/github-mcp/mcp" /> <include-fragment fragment-id="mcp-entra-auth" /> <set-variable name="mcpBlockedTools" value="{{mcp-blocked-tools-github}}" /> <include-fragment fragment-id="mcp-tool-filter" /> </inbound> <backend> <base /> </backend> <outbound> <base /> </outbound> <on-error> <base /> <include-fragment fragment-id="mcp-auth-challenge-onerror" /> </on-error> </policies> Generic per-server pattern: mcp-blocked-tools-<server> = <comma,separated,tool,names> Wiring it onto the GitHub passthrough server <policies> <inbound> <base /> <set-variable name="mcpResourceMetadataUrl" value="https://apim-contoso-mcp.azure-api.net/.well-known/oauth-protected-resource/github-mcp/mcp" /> <include-fragment fragment-id="mcp-entra-auth" /> <set-variable name="mcpBlockedTools" value="{{mcp-blocked-tools-github}}" /> <include-fragment fragment-id="mcp-tool-filter" /> </inbound> <backend> <base /> </backend> <outbound> <base /> </outbound> <on-error> <base /> <include-fragment fragment-id="mcp-auth-challenge-onerror" /> </on-error> </policies> Now when the agent tries to merge a pull request, the gateway returns a clean -32602 Unknown tool error and the upstream is never touched. Read and discovery tools continue to work. The tool still appears in the client's catalog. Adding governance for another external server is just one more named value plus the same fragment include. No new policy logic. Key takeaways API Management turns MCP servers into governed resources, applying the same identity, traffic, and observability controls you already use for APIs. Start simple with validate-azure-ad-token to gate access, then graduate to a full interactive sign-in by serving Protected Resource Metadata from a single APIM policy. You can publish multiple MCP servers from one underlying API, for example a read-only server and a read-write server, by selecting different operations. App roles let you authorize on a user attribute, not just tenant membership, and the check belongs in the per-server policy so shared logic stays clean. For existing external servers, APIM relays the upstream's own OAuth flow, so a server like GitHub keeps owning its identity while you keep central governance. When an external server's full tool surface is too broad, APIM can block specific tool invocations at the gateway with a reusable, named-value-driven policy, so a user's agent cannot perform actions the user could perform manually. References About MCP servers in Azure API Management Secure access to MCP servers in API Management Expose REST API in API Management as an MCP server Expose and govern an existing MCP server validate-azure-ad-token policy reference Policy fragments in API Management RFC 9728: OAuth 2.0 Protected Resource Metadata MCP authorization specification Star Wars API (example backend) MCP for Beginners1.6KViews3likes2CommentsAgents League: Meet the Winners
Agents League brought together developers from around the world to build AI agents using Microsoft's developer tools. With 100+ submissions across three tracks, choosing winners was genuinely difficult. Today, we're proud to announce the category champions. 🎨 Creative Apps Winner: CodeSonify View project CodeSonify turns source code into music. As a genuinely thoughtful system, its functions become ascending melodies, loops create rhythmic patterns, conditionals trigger chord changes, and bugs produce dissonant sounds. It supports 7 programming languages and 5 musical styles, with each language mapped to its own key signature and code complexity directly driving the tempo. What makes CodeSonify stand out is the depth of execution. CodeSonify team delivered three integrated experiences: a web app with real-time visualization and one-click MIDI export, an MCP server exposing 5 tools inside GitHub Copilot in VS Code Agent Mode, and a diff sonification engine that lets you hear a code review. A clean refactor sounds harmonious. A messy one sounds chaotic. The team even built the MIDI generator from scratch in pure TypeScript with zero external dependencies. Built entirely with GitHub Copilot assistance, this is one of those projects that makes you think about code differently. 🧠 Reasoning Agents Winner: CertPrep Multi-Agent System View project CertPrep Multi-Agent System team built a production-grade 8-agent system for personalized Microsoft certification exam preparation, supporting 9 exam families including AI-102, AZ-204, AZ-305, and more. Each agent has a distinct responsibility: profiling the learner, generating a week-by-week study schedule, curating learning paths, tracking readiness, running mock assessments, and issuing a GO / CONDITIONAL GO / NOT YET booking recommendation. The engineering behind the scene here is impressive. A 3-tier LLM fallback chain ensures the system runs reliably even without Azure credentials, with the full pipeline completing in under 1 second in mock mode. A 17-rule guardrail pipeline validates every agent boundary. Study time allocation uses the Largest Remainder algorithm to guarantee no domain is silently zeroed out. 342 automated tests back it all up. This is what thoughtful multi-agent architecture looks like in practice. 💼 Enterprise Agents Winner: Whatever AI Assistant (WAIA) View project WAIA is a production-ready multi-agent system for Microsoft 365 Copilot Chat and Microsoft Teams. A workflow agent routes queries to specialized HR, IT, or Fallback agents, transparently to the user, handling both RAG-pattern Q&A and action automation — including IT ticket submission via a SharePoint list. Technically, it's a showcase of what serious enterprise agent development looks like: a custom MCP server secured with OAuth Identity Passthrough, streaming responses via the OpenAI Responses API, Adaptive Cards for human-in-the-loop approval flows, a debug mode accessible directly from Teams or Copilot, and full OpenTelemetry integration visible in the Foundry portal. Franck also shipped end-to-end automated Bicep deployment so the solution can land in any Azure environment. It's polished, thoroughly documented, and built to be replicated. Thank you To every developer who submitted and shipped projects during Agents League: thank you 💜 Your creativity and innovation brought Agents League to life! 👉 Browse all submissions on GitHub1.9KViews3likes2CommentsBuilding a Smart Building HVAC Digital Twin with AI Copilot Using Foundry Local
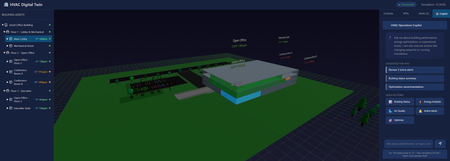
Introduction Building operations teams face a constant challenge: optimizing HVAC systems for energy efficiency while maintaining occupant comfort and air quality. Traditional building management systems display raw sensor data, temperatures, pressures, CO₂ levels—but translating this into actionable insights requires deep HVAC expertise. What if operators could simply ask "Why is the third floor so warm?" and get an intelligent answer grounded in real building state? This article demonstrates building a sample smart building digital twin with an AI-powered operations copilot, implemented using DigitalTwin, React, Three.js, and Microsoft Foundry Local. You'll learn how to architect physics-based simulators that model thermal dynamics, implement 3D visualizations of building systems, integrate natural language AI control, and design fault injection systems for testing and training. Whether you're building IoT platforms for commercial real estate, designing energy management systems, or implementing predictive maintenance for building automation, this sample provides proven patterns for intelligent facility operations. Why Digital Twins Matter for Building Operations Physical buildings generate enormous operational data but lack intelligent interpretation layers. A 50,000 square foot office building might have 500+ sensors streaming metrics every minute, zone temperatures, humidity levels, equipment runtimes, energy consumption. Traditional BMS (Building Management Systems) visualize this data as charts and gauges, but operators must manually correlate patterns, diagnose issues, and predict failures. Digital twins solve this through physics-based simulation coupled with AI interpretation. Instead of just displaying current temperature readings, a digital twin models thermal dynamics, heat transfer rates, HVAC response characteristics, occupancy impacts. When conditions deviate from expectations, the twin compares observed versus predicted states, identifying root causes. Layer AI on top, and operators get natural language explanations: "The conference room is 3 degrees too warm because the VAV damper is stuck at 40% open, reducing airflow by 60%." This application focuses on HVAC, the largest building energy consumer, typically 40-50% of total usage. Optimizing HVAC by just 10% through better controls can save thousands of dollars monthly while improving occupant satisfaction. The digital twin enables "what-if" scenarios before making changes: "What happens to energy consumption and comfort if we raise the cooling setpoint by 2 degrees during peak demand response events?" Architecture: Three-Tier Digital Twin System The application implements a clean three-tier architecture separating visualization, simulation, and state management: The frontend uses React with Three.js for 3D visualization. Users see an interactive 3D model of the three-floor building with color-coded zones indicating temperature and CO₂ levels. Click any equipment, AHUs, VAVs, chillers, to see detailed telemetry. The control panel enables adjusting setpoints, running simulation steps, and activating demand response scenarios. Real-time charts display KPIs: energy consumption, comfort compliance, air quality levels. The backend Node.js/Express server orchestrates simulation and state management. It maintains the digital twin state as JSON, the single source of truth for all equipment, zones, and telemetry. REST API endpoints handle control requests, simulation steps, and AI copilot queries. WebSocket connections push real-time updates to the frontend for live monitoring. The HVAC simulator implements physics-based models: 1R1C thermal models for zones, affinity laws for fan power, chiller COP calculations, CO₂ mass balance equations. Foundry Local provides AI copilot capabilities. The backend uses foundry-local-sdk to query locally running models. Natural language queries ("How's the lobby temperature?") get answered with building state context. The copilot can explain anomalies, suggest optimizations, and even execute commands when explicitly requested. Implementing Physics-Based HVAC Simulation Accurate simulation requires modeling actual HVAC physics. The simulator implements several established building energy models: // backend/src/simulator/thermal-model.js class ZoneThermalModel { // 1R1C (one resistance, one capacitance) thermal model static calculateTemperatureChange(zone, delta_t_seconds) { const C_thermal = zone.volume * 1.2 * 1000; // Heat capacity (J/K) const R_thermal = zone.r_value * zone.envelope_area; // Thermal resistance // Internal heat gains (occupancy, equipment, lighting) const Q_internal = zone.occupancy * 100 + // 100W per person zone.equipment_load + zone.lighting_load; // Cooling/heating from HVAC const airflow_kg_s = zone.vav.airflow_cfm * 0.0004719; // CFM to kg/s const c_p_air = 1006; // Specific heat of air (J/kg·K) const Q_hvac = airflow_kg_s * c_p_air * (zone.vav.supply_temp - zone.temperature); // Envelope losses const Q_envelope = (zone.outdoor_temp - zone.temperature) / R_thermal; // Net energy balance const Q_net = Q_internal + Q_hvac + Q_envelope; // Temperature change: Q = C * dT/dt const dT = (Q_net / C_thermal) * delta_t_seconds; return zone.temperature + dT; } } This model captures essential thermal dynamics while remaining computationally fast enough for real-time simulation. It accounts for internal heat generation from occupants and equipment, HVAC cooling/heating contributions, and heat loss through the building envelope. The CO₂ model uses mass balance equations: class AirQualityModel { static calculateCO2Change(zone, delta_t_seconds) { // CO₂ generation from occupants const G_co2 = zone.occupancy * 0.0052; // L/s per person at rest // Outdoor air ventilation rate const V_oa = zone.vav.outdoor_air_cfm * 0.000471947; // CFM to m³/s // CO₂ concentration difference (indoor - outdoor) const delta_CO2 = zone.co2_ppm - 400; // Outdoor ~400ppm // Mass balance: dC/dt = (G - V*ΔC) / Volume const dCO2_dt = (G_co2 - V_oa * delta_CO2) / zone.volume; return zone.co2_ppm + (dCO2_dt * delta_t_seconds); } } These models execute every simulation step, updating the entire building state: async function simulateStep(twin, timestep_minutes) { const delta_t = timestep_minutes * 60; // Convert to seconds // Update each zone for (const zone of twin.zones) { zone.temperature = ZoneThermalModel.calculateTemperatureChange(zone, delta_t); zone.co2_ppm = AirQualityModel.calculateCO2Change(zone, delta_t); } // Update equipment based on zone demands for (const vav of twin.vavs) { updateVAVOperation(vav, twin.zones); } for (const ahu of twin.ahus) { updateAHUOperation(ahu, twin.vavs); } updateChillerOperation(twin.chiller, twin.ahus); updateBoilerOperation(twin.boiler, twin.ahus); // Calculate system KPIs twin.kpis = calculateSystemKPIs(twin); // Detect alerts twin.alerts = detectAnomalies(twin); // Persist updated state await saveTwinState(twin); return twin; } 3D Visualization with React and Three.js The frontend renders an interactive 3D building view that updates in real-time as conditions change. Using React Three Fiber simplifies Three.js integration with React's component model: // frontend/src/components/BuildingView3D.jsx import { Canvas } from '@react-three/fiber'; import { OrbitControls } from '@react-three/drei'; export function BuildingView3D({ twinState }) { return ( {/* Render building floors */} {twinState.zones.map(zone => ( selectZone(zone.id)} /> ))} {/* Render equipment */} {twinState.ahus.map(ahu => ( ))} ); } function ZoneMesh({ zone, onClick }) { const color = getTemperatureColor(zone.temperature, zone.setpoint); return ( ); } function getTemperatureColor(current, setpoint) { const deviation = current - setpoint; if (Math.abs(deviation) < 1) return '#00ff00'; // Green: comfortable if (Math.abs(deviation) < 3) return '#ffff00'; // Yellow: acceptable return '#ff0000'; // Red: uncomfortable } This visualization immediately shows building state at a glance, operators see "hot spots" in red, comfortable zones in green, and can click any area for detailed metrics. Integrating AI Copilot for Natural Language Control The AI copilot transforms building data into conversational insights. Instead of navigating multiple screens, operators simply ask questions: // backend/src/routes/copilot.js import { FoundryLocalClient } from 'foundry-local-sdk'; const foundry = new FoundryLocalClient({ endpoint: process.env.FOUNDRY_LOCAL_ENDPOINT }); router.post('/api/copilot/chat', async (req, res) => { const { message } = req.body; // Load current building state const twin = await loadTwinState(); // Build context for AI const context = buildBuildingContext(twin); const completion = await foundry.chat.completions.create({ model: 'phi-4', messages: [ { role: 'system', content: `You are an HVAC operations assistant for a 3-floor office building. Current Building State: ${context} Answer questions about equipment status, comfort conditions, and energy usage. Provide specific, actionable information based on the current data. Do not speculate beyond provided information.` }, { role: 'user', content: message } ], temperature: 0.3, max_tokens: 300 }); res.json({ response: completion.choices[0].message.content, model: 'phi-4', timestamp: new Date().toISOString() }); }); function buildBuildingContext(twin) { const alerts = twin.alerts.filter(a => a.active); const zoneStatus = twin.zones.map(z => `${z.name}: ${z.temperature.toFixed(1)}°F (setpoint: ${z.setpoint}°F), CO₂: ${z.co2_ppm}ppm, ${z.occupancy} people` ); return ` Zones: ${zoneStatus.join('\n')} Active Alerts: ${alerts.length} ${alerts.map(a => `- ${a.severity}: ${a.message}`).join('\n')} Energy: ${twin.kpis.total_power_kw.toFixed(1)} kW Chiller: ${twin.chiller.percent_load}% load, ${twin.chiller.cop.toFixed(2)} COP `.trim(); } Example interactions: User: "Why is the third floor conference room warm?" AI: "The Executive Suite on Floor 3 is currently 75.2°F, 3 degrees above the 72°F setpoint. This is due to high occupancy (8 people) and VAV-F3-EXEC operating at reduced airflow (285 CFM vs 450 CFM capacity). AHU-2 is supplying adequate cool air at 55°F. Recommend checking VAV damper position—it may be partially stuck." User: "What's our current energy usage?" AI: "Total building power consumption is 47.3 kW. Breakdown: Chiller (24.1 kW, 51%), AHU fans (12.8 kW, 27%), Pumps (7.2 kW, 15%), Other (3.2 kW, 7%). Chiller is operating at 62% load with a COP of 4.8, which is efficient for current conditions." User: "Activate demand response level 2" AI: "I cannot directly control building systems for safety reasons. To activate DR Level 2, use the Control Panel and click 'Demand Response' → 'Level 2'. This will raise cooling setpoints by 3°F and reduce auxiliary loads, targeting 15% energy reduction." The AI provides grounded, specific answers citing actual equipment IDs and metrics. It refuses to directly execute control commands, instead guiding operators to explicit control interfaces, a critical safety pattern for building systems. Fault Injection for Testing and Training Real building operations experience equipment failures, stuck dampers, sensor drift, communication losses. The digital twin includes comprehensive fault injection capabilities to train operators and test control logic: // backend/src/simulator/fault-injector.js const FAULT_CATALOG = { chillerFailure: { description: 'Chiller compressor failure', apply: (twin) => { twin.chiller.status = 'FAULT'; twin.chiller.cooling_output = 0; twin.alerts.push({ id: 'chiller-fault', severity: 'CRITICAL', message: 'Chiller compressor failure - no cooling available', equipment: 'CHILLER-01' }); } }, stuckVAVDamper: { description: 'VAV damper stuck at current position', apply: (twin, vavId) => { const vav = twin.vavs.find(v => v.id === vavId); vav.damper_stuck = true; vav.damper_position_fixed = vav.damper_position; twin.alerts.push({ id: `vav-stuck-${vavId}`, severity: 'HIGH', message: `VAV ${vavId} damper stuck at ${vav.damper_position}%`, equipment: vavId }); } }, sensorDrift: { description: 'Temperature sensor reading 5°F high', apply: (twin, zoneId) => { const zone = twin.zones.find(z => z.id === zoneId); zone.sensor_drift = 5.0; zone.temperature_measured = zone.temperature_actual + 5.0; } }, communicationLoss: { description: 'Equipment communication timeout', apply: (twin, equipmentId) => { const equipment = findEquipmentById(twin, equipmentId); equipment.comm_status = 'OFFLINE'; equipment.stale_data = true; twin.alerts.push({ id: `comm-loss-${equipmentId}`, severity: 'MEDIUM', message: `Lost communication with ${equipmentId}`, equipment: equipmentId }); } } }; router.post('/api/twin/fault', async (req, res) => { const { faultType, targetEquipment } = req.body; const twin = await loadTwinState(); const fault = FAULT_CATALOG[faultType]; if (!fault) { return res.status(400).json({ error: 'Unknown fault type' }); } fault.apply(twin, targetEquipment); await saveTwinState(twin); res.json({ message: `Applied fault: ${fault.description}`, affectedEquipment: targetEquipment, timestamp: new Date().toISOString() }); }); Operators can inject faults to practice diagnosis and response. Training scenarios might include: "The chiller just failed during a heat wave, how do you maintain comfort?" or "Multiple VAV dampers are stuck, which zones need immediate attention?" Key Takeaways and Production Deployment Building a physics-based digital twin with AI capabilities requires balancing simulation accuracy with computational performance, providing intuitive visualization while maintaining technical depth, and enabling AI assistance without compromising safety. Key architectural lessons: Physics models enable prediction: Comparing predicted vs observed behavior identifies anomalies that simple thresholds miss 3D visualization improves spatial understanding: Operators immediately see which floors or zones need attention AI copilots accelerate diagnosis: Natural language queries get answers in seconds vs. minutes of manual data examination Fault injection validates readiness: Testing failure scenarios prepares operators for real incidents JSON state enables integration: Simple file-based state makes connecting to real BMS systems straightforward For production deployment, connect the twin to actual building systems via BACnet, Modbus, or MQTT integrations. Replace simulated telemetry with real sensor streams. Calibrate model parameters against historical building performance. Implement continuous learning where the twin's predictions improve as it observes actual building behavior. The complete implementation with simulation engine, 3D visualization, AI copilot, and fault injection system is available at github.com/leestott/DigitalTwin. Clone the repository and run the startup scripts to explore the digital twin, no building hardware required. Resources and Further Reading Smart Building HVAC Digital Twin Repository - Complete source code and simulation engine Setup and Quick Start Guide - Installation instructions and usage examples Microsoft Foundry Local Documentation - AI integration reference HVAC Simulation Documentation - Physics model details and calibration Three.js Documentation - 3D visualization framework ASHRAE Standards - Building energy modeling standardsLearn how to build MCP servers with Python and Azure
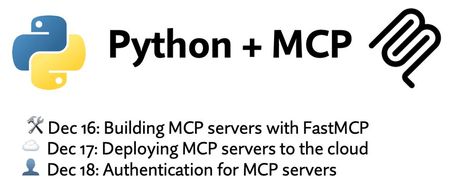
We just concluded Python + MCP, a three-part livestream series where we: Built MCP servers in Python using FastMCP Deployed them into production on Azure (Container Apps and Functions) Added authentication, including Microsoft Entra as the OAuth provider All of the materials from our series are available for you to keep learning from, and linked below: Video recordings of each stream Powerpoint slides Open-source code samples complete with Azure infrastructure and 1-command deployment If you're an instructor, feel free to use the slides and code examples in your own classes. Spanish speaker? We've got you covered- check out the Spanish version of the series. 🙋🏽♂️Have follow up questions? Join our weekly office hours on Foundry Discord: Tuesdays @ 11AM PT → Python + AI Thursdays @ 8:30 AM PT → All things MCP Building MCP servers with FastMCP 📺 Watch YouTube recording In the intro session of our Python + MCP series, we dive into the hottest technology of 2025: MCP (Model Context Protocol). This open protocol makes it easy to extend AI agents and chatbots with custom functionality, making them more powerful and flexible. We demonstrate how to use the Python FastMCP SDK to build an MCP server running locally. Then we consume that server from chatbots like GitHub Copilot in VS Code, using it's tools, resources, and prompts. Finally, we discover how easy it is to connect AI agent frameworks like Langchain and Microsoft agent-framework to the MCP server. Slides for this session Code repository with examples: python-mcp-demos Deploying MCP servers to the cloud 📺 Watch YouTube recording In our second session of the Python + MCP series, we deploy MCP servers to the cloud! We walk through the process of containerizing a FastMCP server with Docker and deploying to Azure Container Apps. Then we instrument the MCP server with OpenTelemetry and observe the tool calls using Azure Application Insights and Logfire. Finally, we explore private networking options for MCP servers, using virtual networks that restrict external access to internal MCP tools and agents. Slides for this session Code repository with examples: python-mcp-demos Authentication for MCP servers 📺 Watch YouTube recording In our third session of the Python + MCP series, we explore the best ways to build authentication layers on top of your MCP servers. We start off simple, with an API key to gate access, and demonstrate a key-restricted FastMCP server deployed to Azure Functions. Then we move on to OAuth-based authentication for MCP servers that provide user-specific data. We dive deep into MCP authentication, which is built on top of OAuth2 but with additional requirements like PRM and DCR/CIMD, which can make it difficult to implement fully. We demonstrate the full MCP auth flow in the open-souce identity provider KeyCloak, and show how to use an OAuth proxy pattern to implement MCP auth on top of Microsoft Entra. Slides for this session Code repository with Container Apps examples: python-mcp-demos Code repository with Functions examples: python-mcp-demosLearn how to use the four IQs: Web IQ, Work IQ, Fabric IQ, Foundry IQ
We just concluded Microsoft IQ Deep Dive with Python, a three-part livestream series all about Microsoft IQ. We showed how to use the four IQs to ground your AI applications and agents: Work IQ: user-specific retrieval of M365 data, like Teams chats, emails, and calendar events. Fabric IQ: retrieval of data stored in OneLake, via Fabric ontologies, graphs, and data agents. Web IQ: real-time web results with super low latency Foundry IQ: multi-source agentic retrieval on search indexes plus remote sources (including Web IQ, Work IQ, and Fabric IQ) The four IQs are all exposed as MCP endpoints, so you can easily integrate into your own agents, or add to your Foundry agents via the Foundry Toolbox. Check out our code samples for Python notebooks and agents that use each of the MCP servers and APIs. All of the materials from our series are available for you to keep learning from, and linked below: Video recordings of each stream PowerPoint slides that you can use for reviewing or even teaching the material to your own community An annotated write-up of each presentation, so you can quickly read through 🙋🏽♂️ Have follow up questions? Join the weekly Python+AI office hours on Foundry Discord. Microsoft IQ Deep Dive with Python: Foundry IQ 📺 Watch YouTube recording In the first session, we dived into Foundry IQ (Azure AI Search), exploring how it helps agents and applications work with curated knowledge and organizational context. We built knowledge bases in Python and connected them to multiple knowledge sources, including file knowledge sources, search indexes built from ingested data, and the Web IQ MCP server. Then we performed multi-source agentic retrieval on those knowledge bases, which executes queries in parallel and merges the results with state-of-the-art ranking models. Finally, we built agents in Python using Microsoft Agent Framework and grounded their responses in Foundry IQ results three different ways: a custom tool calling the knowledge base API, the knowledge base MCP endpoint, and a Foundry Toolbox. We deployed those agents to Foundry Agent Service as hosted agents and published one to Teams. 🖼️ Slides for this session 📝 Write-up for this session 💻 Code repository with examples: iqdeepdive Microsoft IQ Deep Dive with Python: Work IQ 📺 Watch YouTube recording In the second session, we focused on Work IQ and how it brings workplace context into AI-powered experiences. We compared Work IQ to Microsoft Graph, then explored all three protocols it speaks — A2A, MCP, and REST — with runnable Python notebooks for each. We walked through the 10 generic tools that Work IQ exposes over MCP, including ask, which calls Microsoft 365 Copilot directly, and do_action, the only write path. We also connected Work IQ to a Foundry IQ knowledge base as a knowledge source, so a single query returns a blended answer across indexed HR documents and live work context. Then we wired Work IQ into a Microsoft Agent Framework agent as an MCP tool, and finished with Agent 365 autopilots — agents that get their own Microsoft 365 identity, mailbox, and place in the org chart, and act as themselves rather than on behalf of you. A live demo showed the Work Mate autopilot reading its own mailbox in Teams and emailing a customer directly. 🖼️ Slides for this session 📝 Write-up for this session 💻 Code repository with examples: iqdeepdive Microsoft IQ Deep Dive with Python: Fabric IQ 📺 Watch YouTube recording In the final session, we explored Fabric IQ and how it connects AI experiences to structured business data stored in Microsoft Fabric's OneLake. We introduced the key components of Fabric IQ — ontologies, graphs, semantic models, and data agents — and showed how each one helps describe, organize, and reason over operational data. Ontologies provide a shared business vocabulary that maps entity types, properties, and relationships to actual OneLake data. Graphs offer dedicated graph database capabilities for queries requiring extensive relationship traversal. Semantic models expose Power BI analytics through DAX measures on star-schema tables. Data agents combine all of these behind a single conversational interface that selects the right source and query language automatically. For each component, we demonstrated the Ontology MCP server and Data Agent MCP server for agent integration, and showed how to add each as a knowledge source to Foundry IQ knowledge bases for multi-source retrieval. 🖼️ Slides for this session 📝 Write-up for this session 💻 Code repository with examples: iqdeepdive2.1KViews2likes0CommentsCreating Autonomous Teams Agents Using OpenClaw, MCP, and Azure Container Apps
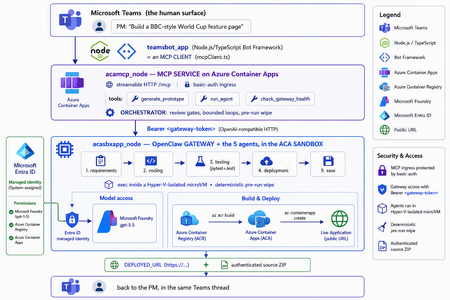
The one shift that changes everything For two years, "AI coding" meant autocomplete. A suggestion appears in your editor, you hit tab, you move on. The agent only existed while you were actively typing. That is no longer the only model. A new category of tools runs asynchronously and autonomously: you message the agent from a chat window — Teams, Slack, Telegram — describe what you want, and walk away. The agent plans, writes code, runs tests, deploys, and hands you back a result. Some of them never sleep: they hold a persistent memory, load their own skills, and act on a schedule without being prompted. This is the world of OpenClaw, Hermes Agent, and the other long-running autonomous agents that exploded across developer culture in 2026. OpenClaw alone crossed 377,000 GitHub stars and millions of active users, becoming — for a while — the most-starred project on GitHub. You install it with one line, connect a channel, and start delegating from your phone. The workflow moves from pair programming to delegation and review. The interactive copilot asks, "What should I write next?" The autonomous agent asks, "What do you need done?" And that reframing is exactly why three questions now keep architects awake: Is it safe? You are handing a self-driving process the ability to run shell commands, touch files, and call APIs. One community report memorably described these agents as a teammate in your group chat who happens to have root access to your codebase. That is not a compliment — it is a threat model. Can it fit into real multi-agent work? A single agent is a demo. Production is a fleet — specialists that hand off to each other with gates in between. Is it flexible and controllable? Autonomy is thrilling right up until the agent packages last week's stale files into this week's deliverable, or loops forever on a failing test. This post answers all three — not with hand-waving, but with a working reference implementation you can clone today: CustomCodingAgentApp in the Multi-AI-Agents-Cloud-Native repo, an "Agentic Prototype Factory" that turns a plain-language idea into a tested, live-on-Azure prototype without leaving the chat window. A product manager types "Build a BBC-style World Cup feature page" in Microsoft Teams. Minutes later they get back a running HTTPS URL and a downloadable source ZIP. Under the hood, five specialized OpenClaw agents powered by Microsoft Foundry gpt-5.5 collaborate in a shared sandbox, run real pytest/Jest suites, and ship the result to Azure Container Apps — all orchestrated behind a Model Context Protocol (MCP) service so any MCP client (GitHub Copilot, Claude, the Teams bot) can drive it. We'll build up to that architecture in the order you should learn it. Part 1 — Long-running autonomous agents, and their two hard problems What actually makes them different A traditional chatbot is text in, text out. It waits for you. An autonomous agent inverts that: Property Traditional chatbot Long-running autonomous agent Execution Responds to a prompt Acts proactively (a "heartbeat" wakes it on a schedule) Scope Words Files, shell, browser, APIs — the real machine Memory This session only Persistent across sessions Interface A web box Any chat channel + the terminal Autonomy None Plans and takes multi-step action on its own Architecturally, OpenClaw is not a library you import — it's a runtime. A single long-running process (the Gateway) bridges your messaging channels to an LLM backend, keeps sessions alive, queues work in ordered lanes, and drives the classic agent loop: call the model → execute the tool calls it asks for → feed results back → repeat until done. There is no rigid step-planner; the model itself steers. That is what makes it feel magical — and what makes it hard to contain. That containment problem has two faces. Hard problem #1 — Security The same properties that make an autonomous agent useful make it dangerous. Full system access + proactive execution + a 32,000-server tool ecosystem is a large, self-driving attack surface. OpenClaw's own short history is the cautionary tale: a critical one-click remote-code-execution CVE early in its life, hundreds of malicious community "skills" discovered on its marketplace, and tens of thousands of gateways found exposed on the open internet. None of this means "don't use autonomous agents." It means: never run one with ambient credentials on a machine you care about. The agent belongs in a box with a hard wall around it. Hard problem #2 — Persistence and continuity Real agent work is long. Refactoring a codebase, researching across dozens of pages, building-testing-deploying an app — these take minutes to hours, far past a single request/response. So the runtime needs durable sessions, a place to keep state, and a workspace that survives across steps. But a persistent workspace that is reused creates its own hazard: state leakage. Files from yesterday's task can contaminate — or get shipped inside — today's result. Continuity and cleanliness pull in opposite directions, and you have to engineer the tension out. One agent is a demo; production is a fleet A single monolithic agent asked to "gather requirements, write the code, test it, deploy it, and package it" will do all four mediocrely and blur the boundaries between them. The production pattern is orchestrator-worker: specialized agents, each with one job, handing off to the next through explicit gates. OpenClaw supports exactly this — it can spawn sub-agents and even dispatch external coding harnesses, acting as a meta-orchestrator rather than a single model. The open question is never whether to go multi-agent; it's where the seams and the guardrails go. The answer to "is it safe?": put the agent in a microVM If the agent needs root to be useful, then give it root — inside a disposable microVM, not on your host. In 2026 there are several credible ways to do this: Kata Containers on AKS — each pod gets its own lightweight VM boundary and guest kernel. Hyperlight Wasm — per-call, snapshot-restored Wasm microVMs for running LLM-generated code. Azure Container Apps dynamic sessions — prewarmed, Hyper-V-isolated sandboxes that start in milliseconds, scale to thousands, and are purpose-built for "secure execution of custom code" and "running LLM-generated scripts." That last one — the ACA sandbox — is the sweet spot for a chat-driven agent factory: strong isolation without you operating a Kubernetes cluster, and an exec API to run commands inside the box. It's what the reference implementation uses. Part 2 — Putting OpenClaw into the ACA sandbox Here is where the repo stops being a diagram and becomes running code. The Agentic Prototype Factory decomposes the "idea → live app" job into five specialized OpenClaw agents that run in sequence, all inside the sandbox: requirements → coding → testing → deployment → save Each is addressable as its own model target on the OpenClaw gateway's OpenAI-compatible API: model value Routes to openclaw / openclaw/default Default agent openclaw/requirements-agent Requirement Agent openclaw/coding-agent Coding Agent openclaw/testing-agent Testing Agent openclaw/deployment-agent Deployment Agent openclaw/save-agent Save & download Agent Control, not vibes: review gates with feedback loops Autonomy without gates is how you get an agent that confidently deploys a broken app. The orchestrator wires the five agents into a graph with hard, bounded gates: Every knob is explicit and lives in server.py: _MAX_TEST_ROUNDS = 3, _MAX_DEPLOY_REVIEW = 2, _DEPLOY_POLL_ATTEMPTS = 12, _DEPLOY_POLL_DELAY_S = 20. The Testing Agent must end each turn with a literal TESTS_PASSED / TESTS_FAILED verdict; the orchestrator won't declare success until it HTTP-checks the deployed URL and inspects the response body — because a ResourceNotFound can happily return an HTTP 200. That is what "flexible and controllable" looks like in practice: the LLM drives creatively inside a deterministic state machine. The deterministic pre-run wipe (solving state leakage) Because the sandbox is reused across runs (fast, cheap), the orchestrator does something disciplined before every run: it wipes all lingering agent workspaces. Stale files from a previous task can never leak into — or be packaged as — the new result. This is the engineered answer to Hard Problem #2. Working with the sandbox's limits, not against them The ACA sandbox exec API is hard-capped at ~120 seconds — shorter than a cold az acr build plus az containerapp create. A naive agent would time out and report failure. The clever bit: those commands finish server-side on Azure even after the client exec disconnects. So deployment is split in two: deploy-build <dir> <app> — installs the deploy helpers, writes a tight .dockerignore, and kicks off the ACR build tagged <app>:latest. If the client drops at ~120s, the image still lands in ACR. deploy-finish <app> — idempotent, polled up to 12×. It reports STILL_BUILDING until the image exists, then fires a --no-wait containerapp create, and finally returns DEPLOYED_URL=https://<fqdn>. This is the single most important lesson of the whole sample: an autonomous agent doesn't need a longer timeout — it needs to understand the durability semantics of the platform it runs on. Part 3 — MCP, and why its security is the whole ballgame The five-agent workflow is powerful, but it would be a silo if the only way to reach it were a bespoke API. Instead, the repo wraps the entire orchestration as a Model Context Protocol (MCP) service (acamcp_node) exposed over streamable HTTP at /mcp, with a tiny, legible tool surface: MCP tool What it does generate_prototype Run the full five-agent workflow end to end run_agent Invoke a single named agent check_gateway_health Liveness / readiness of the OpenClaw gateway The payoff is enormous: any MCP client can now drive the factory — GitHub Copilot, Claude, or the Teams bot we're about to meet. One protocol, many front-ends. But MCP is not just an integration convenience — it's a control plane, and every MCP tool is a privileged capability. In an ecosystem with 32,000+ community servers, "just add an MCP server" is a supply-chain decision. A tool call is code execution by another name. So the security posture has to be deliberate. Here is how the reference implementation hardens it — and the principles are portable to any MCP deployment: Auth in front of the protocol. The MCP ingress sits behind basic auth (MCP_BASIC_AUTH_PASSWORD); the gateway itself requires the gateway token as a bearer credential (Authorization: Bearer <token>). No anonymous tool calls. A tiny, named allowlist — not a blank check. The gateway routes only to six explicit model targets. There is no "run arbitrary agent" escape hatch; the routing table is the allowlist. No secrets in the workload. There are no model API keys anywhere in the running containers — model access is brokered entirely through Entra ID managed identities. The gateway token is stored as a Kubernetes secret and never baked into an image. Private by default. The gateway's OpenAI-compatible endpoint is operator-level access — it stays on private ingress, with TLS and authentication added before anything is ever exposed publicly. Least privilege at the identity layer. The gateway is granted exactly the Foundry roles it needs (Cognitive Services User / Cognitive Services OpenAI User) on the Foundry resource — nothing more. The takeaway for MCP is the same as for the agent itself: treat the protocol as a doorway, and put a guard on the door. Authentication, an explicit allowlist, private ingress, and brokered identity turn MCP from an open blast radius into a governed control plane. Part 4 — The complete solution: Teams + MCP on ACA + OpenClaw on the ACA sandbox Now assemble the three deployable components into one loop: The request lifecycle, end to end A PM sends one sentence in Teams. The teamsbot_app bot — acting as an MCP client via mcpClient.ts — opens an MCP handshake and calls generate_prototype. The MCP service on ACA (acamcp_node) runs the orchestrator: pre-run wipe, then requirements → coding → testing. The OpenClaw gateway in the ACA sandbox (acasbxapp_node) executes each agent, talking to Foundry gpt-5.5 through a managed identity — no keys in the box. Real pytest + Jest suites run inside the sandbox. Fail → loop back (bounded). Pass → deploy. Deployment uses the build + poll split to survive the ~120s exec cap; the app lands in Azure Container Apps and is health-checked body-aware at its live URL. The Save Agent produces an authenticated ZIP download URL. The bot streams each agent's progress back into the Teams thread and returns the running HTTPS URL + source ZIP — optionally auto-opening the project in VS Code Insiders. How the architecture answers the three questions The question How this solution answers it Is it safe? The autonomous agent runs in a Hyper-V-isolated ACA sandbox, not on anyone's laptop. No model keys in the workload — Entra ID managed identity brokers Foundry. MCP behind basic auth; gateway behind a bearer token on private ingress; token as a secret, never in an image. A deterministic pre-run wipe removes cross-run leakage. Does it fit multi-agent work? It is a multi-agent system — five specialist OpenClaw agents with A2A hand-offs and review gates — and because it's exposed via MCP, any client (Copilot, Claude, Teams) can orchestrate it. Is it flexible and controllable? Creativity lives inside a deterministic state machine: explicit TESTS_PASSED/FAILED verdicts, bounded retry loops (_MAX_TEST_ROUNDS, _MAX_DEPLOY_REVIEW), body-aware health checks, and a human approving in the Teams thread. Deploy it yourself The repo ships scripts for all three tiers (the gateway uses the platform's managed identity to reach Foundry — no key handling, no image rebuild): # 1) OpenClaw gateway + the 5 agents (acasbxapp_node) cd acasbxapp_node cp .env.example .env # gateway token, Foundry endpoint, sandbox ids ./scripts/build-openclaw-image.sh # build + push the OpenClaw image to ACR ./scripts/deploy-aks-gateway.sh # grant Foundry roles + deploy # 2) MCP service (acamcp_node) cd ../acamcp_node cp .env.example .env # ACR + cluster; gateway token read from ../acasbxapp_node/.env ./scripts/build-images.sh # build + push the MCP image ./scripts/deploy-aks.sh # secret + manifests to the openclaw namespace ./scripts/smoke-check.sh # verify the MCP handshake # 3) Teams bot (teamsbot_app) — Node.js/TypeScript MCP client cd ../teamsbot_app # configure + run per the folder README, then sideload the Teams app package The reference implementation targets Azure (ACA + AKS) — the OpenClaw gateway and MCP service run as containers, and the code-execution sandbox uses the ACA dynamic-sessions exec API. Keep the gateway on private ingress and add TLS before any public exposure. Final thought Strip away the World Cup demo and a reusable pattern remains — a blueprint for running any long-running autonomous agent in the enterprise: A message-driven agent (OpenClaw / Hermes) + a microVM sandbox (Azure Container Apps dynamic sessions) + an MCP control plane with auth + enterprise identity (Entra ID managed identity) + a human surface (Microsoft Teams). The autonomy that made these agents go viral is the same autonomy that makes security teams nervous. You don't resolve that tension by slowing the agent down — you resolve it by giving it a box with a hard wall, a control plane with a guard on the door, an identity instead of a secret, and a human in the loop. Do that, and "your PM types a sentence, Azure ships an app" stops being a scary demo and becomes something you can actually put in production. Clone it, break it, harden it further: kinfey/Multi-AI-Agents-Cloud-Native → code/CustomCodingAgentApp The chat window is the new terminal. Let's make it a safe one.1.7KViews2likes0CommentsMCP for Beginners: Why Every AI Engineer and Developer Should Learn the Model Context Protocol
If you have spent any time building with large language models in the last year, you have hit the same wall everyone hits: your model is brilliant at reasoning but blind to the real world. It cannot read your database, call your internal API, search your documents, or trigger a deployment unless you hand-write glue code for every single integration. The Model Context Protocol (MCP) exists to tear that wall down, and Microsoft's open-source MCP for Beginners curriculum (reachable via the short link https://aka.ms/mcp-for-beginners) is the most complete, hands-on way to learn it. This post explains what MCP is, walks through the latest updates to the course, shows real code, and makes the case for why MCP belongs on your learning roadmap right now. Whether you are an AI engineer shipping agents to production, a developer wiring tools into Copilot, or a student trying to build a standout portfolio project. What is MCP, and why does it matter? Think of MCP as a universal translator for AI applications. Just as a USB-C port lets you connect any peripheral to any laptop without a custom cable per device, MCP lets an AI model connect to any tool or data source through one standardized protocol. The course uses exactly this analogy, and it holds up well. Before MCP, integrations were an M × N problem: every one of your M AI applications needed bespoke code to talk to each of your N tools. MCP turns that into an M + N problem. Build a tool once as an MCP server, and any MCP-compatible client, Claude Desktop, VS Code, Cursor, GitHub Copilot, and many others — can use it immediately. The protocol is built on a clean client–server model with a small set of primitives: Tools — functions the model can call (query a database, send an email, run code). Resources — data the server exposes for context (files, records, documents). Prompts — reusable, parameterized prompt templates. Sampling — a server asking the client's LLM to generate a completion, enabling collaborative workflows. Elicitation — a server requesting structured input from the user mid-task. Roots — boundaries that tell a server which directories or resources it is allowed to operate on. Communication runs over JSON-RPC, with transports for local processes ( stdio ) and remote servers (streamable HTTP). That standardization is the whole point: write to the spec, and you interoperate with the entire ecosystem. What's new: the latest updates to the course The MCP for Beginners curriculum is actively maintained, and the public changelog reads like a release log for a living product. Here are the most important recent changes, drawn directly from that changelog. 1. Aligned to MCP Specification The biggest update: the entire curriculum has been validated against the current MCP Specification 2025-11-25 and the latest official SDKs. Stale references to older spec revisions (2025-03-26 and 2025-06-18) were corrected across the security, transport, real-time search, sampling, and stdio-server modules, with links repointed to the canonical modelcontextprotocol.io spec paths. A gap analysis confirmed the course already covers every primitive introduced or expanded in the latest spec: Sampling — covered in lesson 3.14 and Advanced Topics. Elicitation (including URL mode) — in Core Concepts and Protocol Features. Roots — in the Introduction, Core Concepts, and Root Contexts. Tasks (experimental, long-running operations) — in Core Concepts and Protocol Features. Tool Annotations ( readOnlyHint / destructiveHint ) — in Core Concepts and Protocol Features. 2. Samples validated against current SDKs Code that does not run is worse than no code at all, so the maintainers re-validated the core samples: TypeScript: @modelcontextprotocol/sdk resolved to 1.29.0 ; a tsc --noEmit type-check passed with no errors — the McpServer and StdioServerTransport APIs remain valid. Python: validated in an isolated virtual environment with mcp[cli] (1.27.2); FastMCP.list_tools() correctly returned the sample add and subtract tools. SDK version pins across labs were bumped (for example mcp>=1.26.0 ) and lockfiles regenerated so every sample tracks the current release. 3. A serious security pass Security is treated as a first-class concern, not an afterthought. A full audit across every dependency manifest and the sample source code was run, and npm audit now reports 0 vulnerabilities in every audited directory. Highlights: Transitive npm advisories (in the MCP Inspector dev tool, the OpenAI client, and the SDK) were remediated by bumping @modelcontextprotocol/inspector to 0.22.0 and pinning a patched shell-quote . A real code-level command-injection fix (OWASP A03): an open_in_vscode tool that used subprocess.run(..., shell=True) was rewritten to launch the resolved executable directly with no shell — closing a metacharacter-injection vector. Python dependencies were audited with pip-audit , and a vulnerable transitive werkzeug was pinned to a patched >=3.1.6 . For anyone learning to ship agents, this is gold: the course demonstrates the whole secure-development loop, not just the happy path. 4. New lessons and a growing curriculum The curriculum keeps expanding with practical, modern lessons: 5.17 Adversarial Multi-Agent Reasoning — two agents argue opposite sides of a question using shared MCP tools ( web_search + run_python ), judged by a third agent. Includes a Mermaid architecture diagram, orchestrators in Python, TypeScript, and C#, and use cases like hallucination detection, threat modeling, and API design review. 3.12 MCP Hosts — configuration for Claude Desktop, VS Code, Cursor, Cline, and Windsurf, with JSON templates and a transport comparison table. 3.13 MCP Inspector — a debugging guide for testing tools, resources, and prompts. 4.1 Pagination — cursor-based pagination patterns in Python, TypeScript, and Java. 5.16 Protocol Features — progress notifications, request cancellation, resource templates, and lifecycle management. 5. Microsoft product rebranding Content was updated to reflect Microsoft's rebranding: Azure AI Foundry → Microsoft Foundry, and the AI Toolkit (AITK) → Microsoft Foundry Toolkit Extension for VS Code. If you have seen older tutorials referencing the previous names, the curriculum is now current. Your first MCP server: see how little code it takes The course's "first server" lesson builds a simple calculator. Here is the shape of a minimal MCP server in Python using FastMCP , which mirrors the validated sample in the repo. Notice how the protocol plumbing disappears — you just decorate functions. # server.py — a minimal MCP server with two tools from mcp.server.fastmcp import FastMCP # Name your server; this identifies it to MCP clients mcp = FastMCP("Calculator") @mcp.tool() def add(a: int, b: int) -> int: """Add two numbers and return the result.""" return a + b @mcp.tool() def subtract(a: int, b: int) -> int: """Subtract b from a and return the result.""" return a - b if __name__ == "__main__": # Run over stdio so local hosts (VS Code, Claude Desktop) can connect mcp.run() The same idea in TypeScript, using the official SDK validated at version 1.29.0 : // server.ts — minimal MCP server in TypeScript import { McpServer } from "@modelcontextprotocol/sdk/server/mcp.js"; import { StdioServerTransport } from "@modelcontextprotocol/sdk/server/stdio.js"; import { z } from "zod"; const server = new McpServer({ name: "Calculator", version: "1.0.0" }); // Register a tool with a typed input schema server.tool( "add", { a: z.number(), b: z.number() }, async ({ a, b }) => ({ content: [{ type: "text", text: String(a + b) }], }) ); // Connect over stdio and start listening const transport = new StdioServerTransport(); await server.connect(transport); That is a complete, runnable server. The docstrings and schemas matter: MCP exposes them to the model so it knows when and how to call each tool. Clear descriptions are effectively prompt engineering for your tools — a common pitfall is leaving them vague, which leads to the model misusing or ignoring the tool. Connecting it in VS Code Once your server runs, an MCP host connects to it. A typical VS Code / host configuration looks like this: { "servers": { "calculator": { "command": "python", "args": ["server.py"] } } } Lesson 3.12 (MCP Hosts) covers the equivalent JSON for Claude Desktop, Cursor, Cline, and Windsurf, and lesson 3.13 shows how to use the MCP Inspector to test your tools before wiring them into a host — the single best debugging habit you can build early. How the course is structured The curriculum is organized as a progressive journey with hands-on code in C#, Java, JavaScript, Python, Rust, and TypeScript. It is grouped into phases: Foundations (Modules 0–2): Introduction, Core Concepts, and Security. Building (Module 3): Getting Started — 15 lessons covering your first server and client, LLM clients, VS Code integration, stdio and HTTP streaming, testing, deployment, auth, hosts, the Inspector, sampling, and MCP Apps. Growing (Modules 4–5): Practical Implementation and Advanced Topics — 17 advanced lessons including Azure integration, OAuth2, Entra ID auth, scaling, multi-modality, context engineering, custom transports, and adversarial multi-agent reasoning. Mastery (Modules 6–11): Community Contributions, Lessons from Early Adoption, Best Practices, Case Studies, a Microsoft Foundry Toolkit workshop, and an end-to-end 13-lab PostgreSQL capstone. That final module is the standout for portfolio building: a complete, production-flavored path that takes you from architecture and row-level security through database design, a FastMCP server, semantic search with pgvector and Azure OpenAI, testing, Docker deployment to Azure Container Apps, and monitoring with Application Insights. Why developers should learn MCP now For AI engineers MCP is becoming the default integration layer for agents. Instead of re-implementing tool calling for every framework, you write to one open protocol and your tools work everywhere. The advanced modules — sampling, roots, elicitation, scaling, routing, and adversarial multi-agent patterns — are exactly the techniques you need to move agents from demo to production. For developers MCP is already wired into tools you use daily: VS Code, GitHub Copilot, Claude Desktop, Cursor, and more. Learning to build an MCP server means you can expose your systems — internal APIs, databases, CI/CD — to AI assistants safely. The security-first approach in the course (OAuth2, Entra ID, RBAC, dependency auditing) teaches you to do this the right way from day one. For students MCP is a rare opportunity to learn a technology while it is still early, with a free, beginner-friendly, Microsoft-maintained curriculum and code in six languages. The 13-lab capstone alone is a genuine portfolio project. And with content translated into 50+ languages, the barrier to entry is low no matter where you are. Responsible and secure by design A recurring theme worth calling out: the course does not treat security and governance as optional extras. It models real practices you should carry into your own work: Least privilege via roots — constrain what a server can touch. Tool annotations — mark tools readOnlyHint or destructiveHint so clients can warn users before destructive actions. No shells for user input — the command-injection fix is a textbook example of why you never pass untrusted input through a shell. Dependency hygiene — audit with npm audit and pip-audit , and pin patched releases. Proper auth — dedicated lessons on OAuth2 and Microsoft Entra ID. Key takeaways MCP standardizes how AI connects to tools and data, turning a combinatorial integration problem into a simple, reusable one. The course is current, validated against MCP Specification 2025-11-25 with SDKs at TypeScript 1.29.0 and Python mcp 1.27.2 . Samples actually run, and the repo demonstrates a full secure-development loop with 0 reported vulnerabilities after auditing. It is broad and deep: from a 10-line calculator server to a 13-lab production capstone, in six languages. It is the fastest credible path to MCP fluency for AI engineers, developers, and students alike. Get started today Open the course: https://aka.ms/mcp-for-beginners (redirects to the GitHub repository). Fork and clone it — use a sparse checkout to skip translations for a faster download: git clone --filter=blob:none --sparse https://github.com/microsoft/mcp-for-beginners.git cd mcp-for-beginners git sparse-checkout set --no-cone "/*" "!translations" "!translated_images" Build your first server with lesson 3.1 in your language of choice. Debug it with the MCP Inspector, then connect it in VS Code. Go deep with the 13-lab database capstone, and read the official spec at modelcontextprotocol.io. Track what's new in the changelog and join the community discussions. MCP is quietly becoming the connective tissue of the AI ecosystem. The earlier you learn it, the more leverage you will have — and Microsoft's MCP for Beginners is the clearest on-ramp available. Star the repo, build a server this week, and start connecting your AI to the world.If You're Building AI on Azure, ECS 2026 is Where You Need to Be
Let me be direct: there's a lot of noise in the conference calendar. Generic cloud events. Vendor showcases dressed up as technical content. Sessions that look great on paper but leave you with nothing you can actually ship on Monday. ECS 2026 isn't that. As someone who will be on stage at Cologne this May, I can tell you the European Collaboration Summit combined with the European AI & Cloud Summit and European Biz Apps Summit is one of the few events I've seen where engineers leave with real, production-applicable knowledge. Three days. Three summits. 3,000+ attendees. One of the largest Microsoft-focused events in Europe, and it keeps getting better. If you're building AI systems on Azure, designing cloud-native architectures, or trying to figure out how to take your AI experiments to production — this is where the conversation is happening. What ECS 2026 Actually Is ECS 2026 runs May 5–7 at Confex in Cologne, Germany. It brings together three co-located summits under one roof: European Collaboration Summit — Microsoft 365, Teams, Copilot, and governance European AI & Cloud Summit — Azure architecture, AI agents, cloud security, responsible AI European BizApps Summit — Power Platform, Microsoft Fabric, Dynamics For Azure engineers and AI developers, the European AI & Cloud Summit is your primary destination. But don't ignore the overlap, some of the most interesting AI conversations happen at the intersection of collaboration tooling and cloud infrastructure. The scale matters here: 3,000+ attendees, 100+ sessions, multiple deep-dive tracks, and a speaker lineup that includes Microsoft executives, Regional Directors, and MVPs who have built, broken, and rebuilt production systems. The Azure + AI Track - What's Actually On the Agenda The AI & Cloud Summit agenda is built around real technical depth. Not "intro to AI" content, actual architecture decisions, patterns that work, and lessons from things that didn't. Here's what you can expect: AI Agents and Agentic Systems This is where the energy is right now, and ECS is leaning in. Expect sessions covering how to design agent workflows, chain reasoning steps, handle memory and state, and integrate with Azure AI services. Marco Casalaina, VP of Products for Azure AI at Microsoft, is speaking if you want to understand the direction of the Azure AI platform from the people building it, this is a direct line. Azure Architecture at Scale Cloud-native patterns, microservices, containers, and the architectural decisions that determine whether your system holds up under real load. These sessions go beyond theory you'll hear from engineers who've shipped these designs at enterprise scale. Observability, DevOps, and Production AI Getting AI to production is harder than the demos suggest. Sessions here cover monitoring AI systems, integrating LLMs into CI/CD pipelines, and building the operational practices that keep AI in production reliable and governable. Cloud Security and Compliance Security isn't optional when you're putting AI in front of users or connecting it to enterprise data. Tracks cover identity, access patterns, responsible AI governance, and how to design systems that satisfy compliance requirements without becoming unmaintainable. Pre-Conference Deep Dives One underrated part of ECS: the pre-conference workshops. These are extended, hands-on sessions typically 3–6 hours that let you go deep on a single topic with an expert. Think of them as intensive short courses where you can actually work through the material, not just watch slides. If you're newer to a particular area of Azure AI, or you want to build fluency in a specific pattern before the main conference sessions, these are worth the early travel. The Speaker Quality Is Different Here The ECS speaker roster includes Microsoft executives, Microsoft MVPs, and Regional Directors, people who have real accountability for the products and patterns they're presenting. You'll hear from over 20 Microsoft speakers: Marco Casalaina — VP of Products, Azure AI at Microsoft Adam Harmetz — VP of Product at Microsoft, Enterprise Agent And dozens of MVPs and Regional Directors who are in the field every day, solving the same problems you are. These aren't keynote-only speakers — they're in the session rooms, at the hallway track, available for real conversations. The Hallway Track Is Not a Cliché I know "networking" sounds like a corporate afterthought. At ECS it genuinely isn't. When you put 3,000 practitioners, engineers, architects, DevOps leads, security specialists in one venue for three days, the conversations between sessions are often more valuable than the sessions themselves. You get candid answers to "how are you actually handling X in production?" that you won't find in documentation. The European Microsoft community is tight-knit and collaborative. ECS is where that community concentrates. Why This Matters Right Now We're in a period where AI development is moving fast but the engineering discipline around it is still maturing. Most teams are figuring out: How to move from AI prototype to production system How to instrument and observe AI behaviour reliably How to design agent systems that don't become unmaintainable How to satisfy security and compliance requirements in AI-integrated architectures ECS 2026 is one of the few places where you can get direct answers to these questions from people who've solved them — not theoretically, but in production, on Azure, in the last 12 months. If you go, you'll come back with practical patterns you can apply immediately. That's the bar I hold events to. ECS consistently clears it. Register and Explore the Agenda Register for ECS 2026: ecs.events Explore the AI & Cloud Summit agenda: cloudsummit.eu/en/agenda Dates: May 5–7, 2026 | Location: Confex, Cologne, Germany Early registration is worth it the pre-conference workshops fill up. And if you're coming, find me, I'll be the one talking too much about AI agents and Azure deployments. See you in Cologne.Giving Your AI Agents Reliable Skills with the Agent Skills SDK
AI agents are becoming increasingly capable, but they often do not have the context they need to do real work reliably. Your agent can reason well, but it does not actually know how to do the specific things your team needs it to do. For example, it cannot follow your company's incident response playbook, it does not know your escalation policy, and it has no idea how to page the on-call engineer at 3 AM. There are many ways to close this gap, from RAG to custom tool implementations. Agent Skills is one approach that stands out because it is designed around portability and progressive disclosure, keeping context window usage minimal while giving agents access to deep expertise on demand. What is Agent Skills? Agent Skills is an open format for giving agents new capabilities and expertise. The format was originally developed by Anthropic and released as an open standard. It is now supported by a growing list of agent products including Claude Code, VS Code, GitHub, OpenAI Codex, Cursor, Gemini CLI, and many others. As defined in the spec, a skill is a folder on disk containing a SKILL.md file with metadata and instructions, plus optional scripts, references, and assets: incident-response/ SKILL.md # Required: instructions + metadata references/ # Optional: additional documentation severity-levels.md escalation-policy.md scripts/ # Optional: executable code page-oncall.sh assets/ # Optional: templates, diagrams, data files The SKILL.md file has YAML frontmatter with a name and description (so agents know when the skill is relevant), followed by markdown instructions that tell the agent how to perform the task. The format is intentionally simple: self-documenting, extensible, and portable. What makes this design practical is progressive disclosure. The spec is built around the idea that agents should not load everything at once. It works in three stages: Discovery: At startup, agents load only the name and description of each available skill, just enough to know when it might be relevant. Activation: When a task matches a skill's description, the agent reads the full SKILL.md instructions into context. Execution: The agent follows the instructions, optionally loading referenced files or executing bundled scripts as needed. This keeps agents fast while giving them access to deep context on demand. The format is well-designed and widely adopted, but if you want to use skills from your own agents, there is a gap between the spec and a working implementation. The Agent Skills SDK Conceptually, a skill is more than a folder. It is a unit of expertise: a name, a description, a body of instructions, and a set of supporting resources. The file layout is one way to represent that, but there is nothing about the concept that requires a filesystem. The Agent Skills SDK is an open-source Python library built around that idea, treating skills as abstract units of expertise that can be stored anywhere and consumed by any agent framework. It does this by addressing two challenges that come up when you try to use the format from your own agents. The first is where skills live. The spec defines skills as folders on disk, and the tools that support the format today all assume skills are local files. Files are inherently portable, and that is one of the format's strengths. But in the real world, not every team can or wants to serve skills from the filesystem. Maybe your team keeps them in an S3 bucket. Maybe they are in Azure Blob Storage behind your CDN. Maybe they live in a database alongside the rest of your application data. At the moment, if your skills are not on the local filesystem, you are on your own. The SDK changes where skills are served from, not how they are authored. The content and format stay the same regardless of the storage backend, so skills remain portable across providers. The second is how agents consume them. The spec defines the progressive disclosure pattern but actually implementing it in your agent requires real work. You need to figure out how to validate skills against the spec, generate a catalog for the system prompt, expose the right tools for on-demand content retrieval, and handle the back-and-forth of the agent requesting metadata, then the body, then individual references or scripts. That is a lot of plumbing regardless of where the skills are stored, and the work multiplies if you want to support more than one agent framework. The SDK solves both by separating where skills come from (providers) from how agents use them (integrations), so you can mix and match freely. Load skills from the filesystem today, move them to an HTTP server tomorrow, swap in a custom database provider next month, and your agent code does not change at all. How the SDK works The SDK is a set of Python packages organized around two ideas: storage-agnostic providers and progressive disclosure. The provider abstraction means your skills can live anywhere. The SDK ships with providers for the local filesystem and static HTTP servers, but the SkillProvider interface is simple enough that you can write your own in a few methods. A Cosmos DB provider, a Git provider, a SharePoint provider, whatever makes sense for your team. The rest of the SDK does not care where the data comes from. On top of that, the SDK implements the progressive disclosure pattern from the spec as a set of tools that any LLM agent can use. At startup, the SDK generates a skills catalog containing each skill's name and description. Your agent injects this catalog into its system prompt so it knows what is available. Then, during a conversation, the agent calls tools to retrieve content on demand, following the same discovery-activation-execution flow the spec describes. Here is the flow in practice: You register skills from any source (local files, an HTTP server, your own database). The SDK generates a catalog and tool usage instructions, which you inject into the system prompt. The agent calls tools to retrieve content on demand. This matters because context windows are finite. An incident response skill might have a main body, three reference documents, two scripts, and a flowchart. The agent should not load all of that upfront. It should read the body first, then pull the escalation policy only when the conversation actually gets to escalation. A quick example Here is what it looks like in practice. Start by loading a skill from the filesystem: from pathlib import Path from agentskills_core import SkillRegistry from agentskills_fs import LocalFileSystemSkillProvider provider = LocalFileSystemSkillProvider(Path("my-skills")) registry = SkillRegistry() await registry.register("incident-response", provider) Now wire it into a LangChain agent: from langchain.agents import create_agent from agentskills_langchain import get_tools, get_tools_usage_instructions tools = get_tools(registry) skills_catalog = await registry.get_skills_catalog(format="xml") tool_usage_instructions = get_tools_usage_instructions() system_prompt = ( "You are an SRE assistant. Use the available skill tools to look up " "incident response procedures, severity definitions, and escalation " "policies. Always cite which reference document you used.\n\n" f"{skills_catalog}\n\n" f"{tool_usage_instructions}" ) agent = create_agent( llm, tools, system_prompt=system_prompt, ) That is it. The agent now knows what skills are available and has tools to fetch their content. When a user asks "How do I handle a SEV1 incident?", the agent will call get_skill_body to read the instructions, then get_skill_reference to pull the severity levels document, all without you writing any of that retrieval logic. The same pattern works with Microsoft Agent Framework: from agentskills_agentframework import get_tools, get_tools_usage_instructions tools = get_tools(registry) skills_catalog = await registry.get_skills_catalog(format="xml") tool_usage_instructions = get_tools_usage_instructions() system_prompt = ( "You are an SRE assistant. Use the available skill tools to look up " "incident response procedures, severity definitions, and escalation " "policies. Always cite which reference document you used.\n\n" f"{skills_catalog}\n\n" f"{tool_usage_instructions}" ) agent = Agent( client=client, instructions=system_prompt, tools=tools, ) What is in the SDK The SDK is split into small, composable packages so you only install what you need: agentskills-core handles registration, validation, the skills catalog, and the progressive disclosure API. It also defines the SkillProvider interface that all providers implement. agentskills-fs and agentskills-http are the two built-in providers. The filesystem provider loads skills from local directories. The HTTP provider loads them from any static file host: S3, Azure Blob Storage, GitHub Pages, a CDN, or anything that serves files over HTTP. agentskills-langchain and agentskills-agentframework generate framework-native tools and tool usage instructions from a skill registry. agentskills-mcp-server spins up an MCP server that exposes skill tool access and usage as tools and resources, so any MCP-compatible client can use them. Because providers and integrations are separate packages, you can combine them however you want. Use the filesystem provider during development, switch to the HTTP provider in production, or write a custom provider that reads skills from your own database. The integration layer does not need to know or care. Where to go from here The full source, working examples, and detailed API docs are on GitHub: github.com/pratikxpanda/agentskills-sdk The repo includes end-to-end examples for both LangChain and Microsoft Agent Framework, covering filesystem providers, HTTP providers, and MCP. There is also a sample incident-response skill you can use to try things out. A proposal to contribute this SDK to the official agentskills repository has been submitted. If you find it useful, feel free to show your support on the GitHub issue. To learn more about the Agent Skills format itself: What are skills? covers the format and why it matters. Specification is the complete format reference for SKILL.md files. Integrate skills explains how to add skills support to your agent. Example skills on GitHub are a good starting point for writing your own. The SDK is MIT licensed and contributions are welcome. If you have questions or ideas, post a question here or open an issue on the repo.Learn MCP from our free livestream series in December
Our Python + MCP series is a three-part, hands-on journey into one of the most important emerging technologies of 2025: MCP (Model Context Protocol) — an open standard for extending AI agents and chat interfaces with real-world tools, data, and execution environments. Whether you're building custom GitHub Copilot tools, powering internal developer agents, or creating AI-augmented applications, MCP provides the missing interoperability layer between LLMs and the systems they need to act on. Across the series, we move from local prototyping, to cloud deployment, to enterprise-grade authentication and security, all powered by Python and the FastMCP SDK. Each session builds on the last, showing how MCP servers can evolve from simple localhost services to fully authenticated, production-ready services running in the cloud — and how agents built with frameworks like Langchain and Microsoft’s agent-framework can consume them at every stage. 🔗 Register for the entire series. You can also scroll down to learn about each live stream and register for individual sessions. In addition to the live streams, you can also join office hours after each session in Foundry Discord to ask any follow-up questions. To get started with your MCP learnings before the series, check out the free MCP-for-beginners course on GitHub. Building MCP servers with FastMCP 16 December, 2025 | 6:00 PM - 7:00 PM (UTC) Coordinated Universal Time Register for the stream on Reactor In the intro session of our Python + MCP series, we dive into the hottest technology of 2025: MCP (Model Context Protocol). This open protocol makes it easy to extend AI agents and chatbots with custom functionality, making them more powerful and flexible. We demonstrate how to use the Python FastMCP SDK to build an MCP server running locally and consume that server from chatbots like GitHub Copilot. Then we build our own MCP client to consume the server. Finally, we discover how easy it is to connect AI agent frameworks like Langchain and Microsoft agent-framework to MCP servers. Deploying MCP servers to the cloud 17 December, 2025 | 6:00 PM - 7:00 PM (UTC) Coordinated Universal Time Register for the stream on Reactor In our second session of the Python + MCP series, we're deploying MCP servers to the cloud! We'll walk through the process of containerizing a FastMCP server with Docker and deploying to Azure Container Apps, and also demonstrate a FastMCP server running directly on Azure Functions. Then we'll explore private networking options for MCP servers, using virtual networks that restrict external access to internal MCP tools and agents. Authentication for MCP servers 18 December, 2025 | 6:00 PM - 7:00 PM (UTC) Coordinated Universal Time Register for the stream on Reactor In our third session of the Python + MCP series, we're exploring the best ways to build authentication layers on top of your MCP servers. That could be as simple as an API key to gate access, but for the servers that provide user-specific data, we need to use an OAuth2-based authentication flow. MCP authentication is built on top of OAuth2 but with additional requirements like PRM and DCR/CIMD, which can make it difficult to implement fully. In this session, we'll demonstrate the full MCP auth flow, and provide examples that implement MCP Auth on top of Microsoft Entra.1.2KViews2likes0Comments